
L234A - Sewing machine NECCHI - Free user manual and instructions
Find the device manual for free L234A NECCHI in PDF.


| Brand | Necchi |
| Model | L234A |
| Product Type | Mechanical Sewing Machine |
| Dimensions (L x W x H) | 40 x 18 x 30 cm |
| Weight | 7.5 kg |
| Power Supply | AC 110-240V, 50/60 Hz |
| Power Consumption | 85 W |
| Maximum Sewing Speed | 800 stitches per minute |
| Stitch Patterns | 15 built-in stitches (straight, zigzag, decorative) |
| Buttonhole Type | 4-step automatic buttonhole |
| Needle System | HAx1 (130/705H) |
| Presser Feet Included | All-purpose, zipper, buttonhole, blind hem, satin stitch |
| Bobbin Type | Front-loading, class 15 (vertical) |
| Maximum Stitch Length | 4 mm |
| Maximum Stitch Width | 5 mm |
| Free Arm Capability | Yes |
| Lighting | Built-in LED lamp |
| Maintenance | Clean bobbin area and oil moving parts periodically |
| Safety Features | Automatic needle stop, protective cover |
| Accessories Included | Set of needles, bobbins, seam ripper, screwdriver, oil |
Frequently Asked Questions - L234A NECCHI
User questions about L234A NECCHI
0 question about this device. Answer the ones you know or ask your own.
Ask a new question about this device
Download the instructions for your Sewing machine in PDF format for free! Find your manual L234A - NECCHI and take your electronic device back in hand. On this page are published all the documents necessary for the use of your device. L234A by NECCHI.
USER MANUAL L234A NECCHI
natural_image
Line drawing of a sewing machine labeled L234A, showing internal components and mounting bracket (no text or symbols on the machine itself)



Important safety instructions
DANGER - To reduce the risk of electric shock:
When using an electrical appliance, basic safety should always be followed, including the following:
Read all instructions before using this sewing machine.
- An appliance should never be left unattended when plugged in.
- Always unplug this appliance from the electric outlet immediately after using and before cleaning.
WARNING - To reduce the risk of burns, fire, electric shock, or injury to persons:
- Read the instruction carefully before you use the machine
- Keep the instructions at a suitable place close to the machine and hand it over if you give the machine to a third party.
- Use the machine only in dry locations.
- Never leave the machine unattended with children or elderly people due to they may not be able to estimate the risk.
-
This appliance can be used by children aged from 8 years and above and persons with reduced physical, sensory or mental capabilities or lack of experience and knowledge if they have been given supervision or instruction concerning use of the appliance in a safe way and understand the hazards involved.
-
Children shall not play with the appliance.
-
Cleaning and user maintenance shall not be made by children without supervision.
-
Always switch off the machine if you carry out preparation for work (change the needle, feed the yarn through the machine, change the footer, etc.).
-
Always unplug the machine if you leave it unattended, to avoid injury by expediently switch on the machine.
-
Always unplug the machine if you changing the lamp or carry out maintenance (oiling, cleaning).
-
Don't use the machine if it's wet or in humid environment.
-
Never pull at the cord, always unplug the machine by gripping the plug.
-
If the LED lamp is damaged or broken, it must be replaced by the manufacturer or its service agent or a similarly qualified person, in order to avoid a hazard.
-
Never place anything on the pedal.
- Never use the machine if the air vents are blocked, keep the air vents of the machine and the foot pedal free from dust, fusel and leftovers.
- The machine must only be used with designated foot controller, in order to avoid a hazard. If the foot controller is damaged or broken, it must be replaced by the manufacturer or its service agent or a similarly qualified person.
- The sound pressure level at normal operation is smaller than 78dB(A).
- Do not dispose of electrical appliances as unsorted municipal waste, use separate collection facilities.
- Contact your local government for information regarding the collection systems available.
- If electrical appliances are disposed of in landfills or dumps, hazardous substances can leak into the groundwater and get into the food chain, damaging your health and well-being.
- When replacing old appliances with new ones, the retailer is legally obligated to take back your old appliance for disposal at least for free of charge.
- The appliance is not to be used by persons (including children) with reduced physical, sensory or mental capabilities, or lack of experience and knowledge, unless they have been given supervision or instruction. (For outside Europe)
- Children being supervised not to play with the appliance. (For outside Europe)
SAVE THESE INSTRUCTIONS
This sewing machine is intended for household use only.
Be sure to use the sewing machine in the temperature range from 5^ C to 40^ C. If the temperature is excessively low, the machine can fail to operate normally.
To carry the sewing machine, hold the carrying handle with your hand, and support the sewing machine with the other hand.
Contents
Machine Introduction VII
Principal parts of the machine....1
Front and side of machine....1
Accessories 2
Inside of machine 2
Connecting machine to power source 3
Polarized plug information....3
Foot control 3
Setting up the telescopic thread stand 4
Open and close the front cover....4
Remove and replace the flat bed extension 5
Presser foot lifter....5
Free arm sewing....5
Remove the flat bed extension....5
Replace the flat bed extension....5
Changing the needles 6
Changing the presser foot....7
How to use the upper cutter....7
Deactivate the upper cutter....7
Reactivate the upper cutter 7
Attach the 2-thread overlock converter 8
Remove the 2-thread overlock converter....8
Machine Settings 9
Getting ready to sew 10
What needle and thread to use with different fabrics.... 10
General threading information 10
Threading the upper looper (red) 11
Threading the lower looper (yellow) 12
Threading the left needle (purple)....14
Threading the right needle (green).... 15
Waste collector....16
Install the waste collector 16
Remove the waste collector 16
Thread tension....17
Differential feed adjustment....19
Presser foot pressure adjustment....20
Stitch width settings 21
Stitch length settings....21
Stitch finger lever setting 22
Stitch Chart 23
Stitch chart....24
Stitch overview 24
Sewing Basics 29
Sewing 30
Changing thread....30
Start sewing 31
Rolled edge sewing....33
Flatlock sewing....34
Maintenance And Trouble Shooting 36
Machine maintenance 37
Replacing the lower cutter....38
Replacing the upper cutter 39
Trouble shooting guide....40
Technical specifications 42

natural_image
Abstract composition of pink geometric shapes and lines on white background (no text or symbols)Machine Introduction

natural_image
Abstract composition of pink geometric shapes including a circle, elongated rectangle, and zigzag lines on white background (no text or symbols)Principal parts of the machine
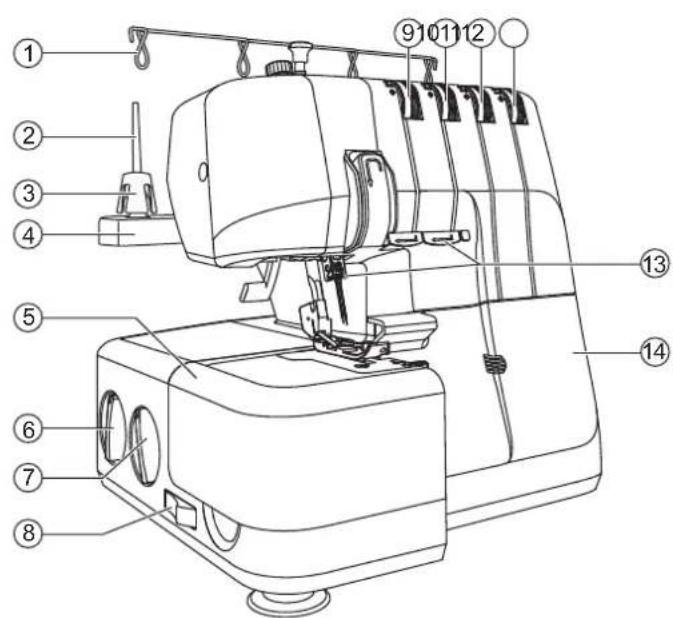
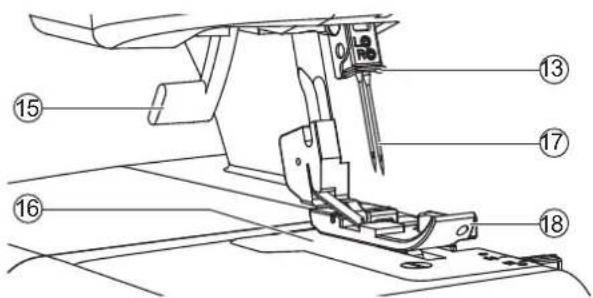
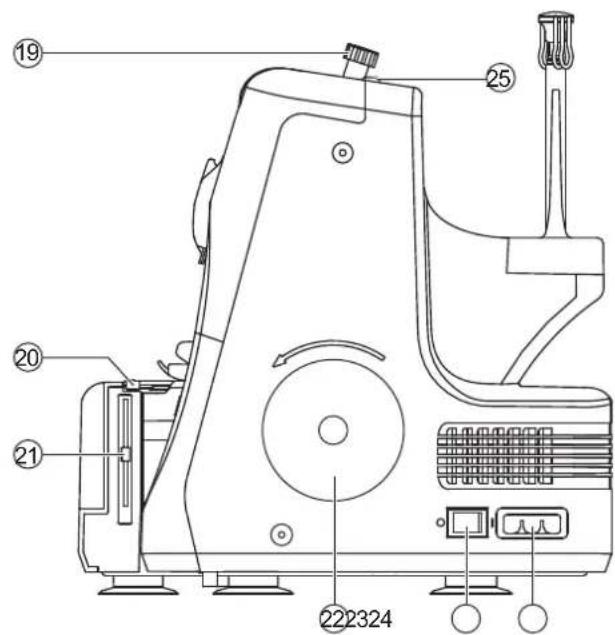
◆ Front and side of machine
- Telescopic thread stand
- Spool pin
- Cone holder
- Spool stand
- Flat bed extension
- Differential feed dial
- Stitch length dial
- Upper cutter on/ off switch
- Left needle thread tension dial (purple)
- Right needle thread tension dial (green)
- Upper looper thread tension dial (red)
- Lower looper thread tension dial (yellow)
- Thread guides
- Front cover
- Presser foot lifter
- Needle plate
- Needles
- Presser foot
- Presser foot pressure adjustment knob
- Stitch finger lever
- Cutting width lever
- Hand wheel
- Power switch
- Main plug socket
- Thread guides
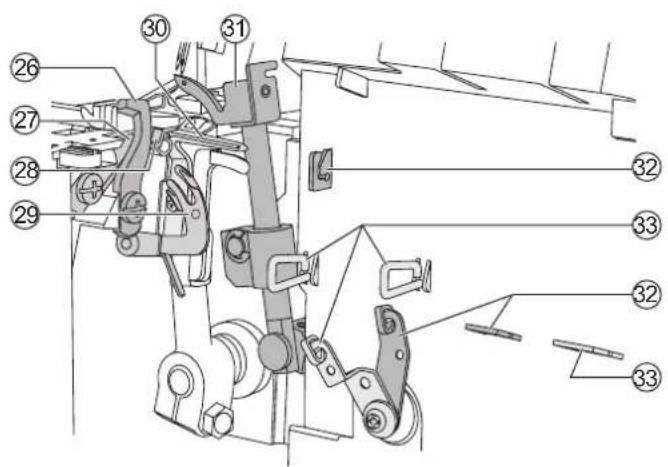
Inside of machine
- Upper cutter
- Lower cutter
- Stitch finger
- Lower looper threader
- Lower looper
- Upper looper
- Upper looper thread guides
- Lower looper thread guides
Accessories
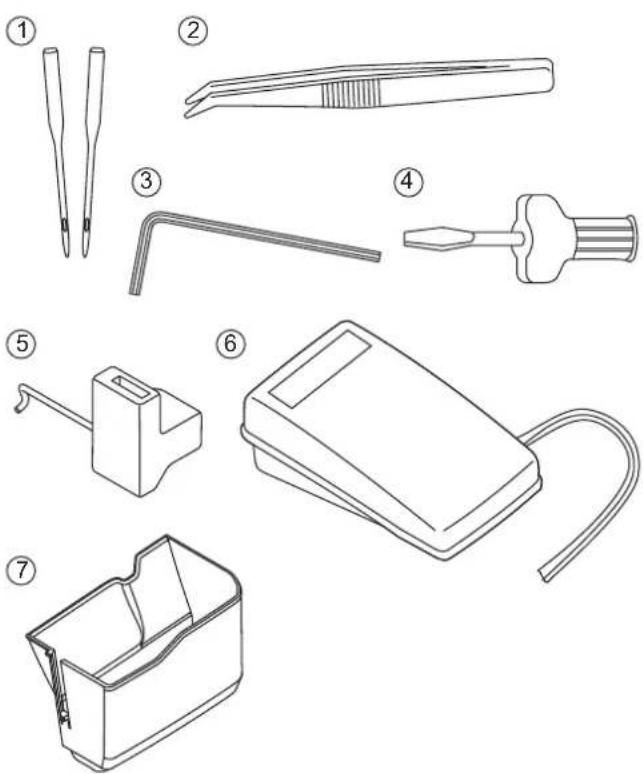
- Needle pack including two needles, size #14/90
- Tweezers
- Allen key to change needles
- Screwdriver
- 2-thread overlock converter
- Foot Control
- Waste collector
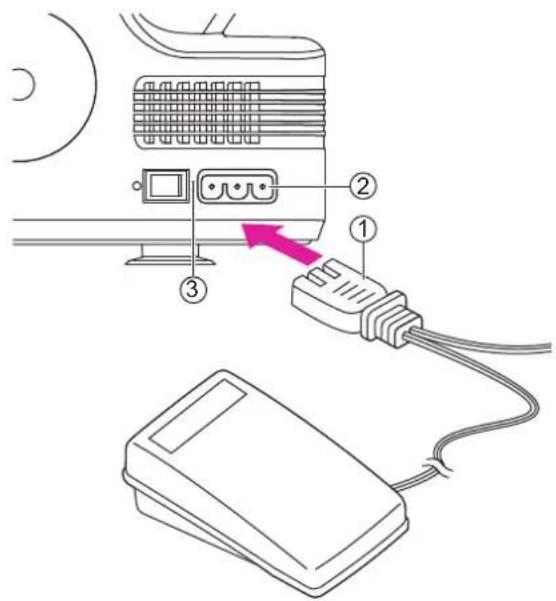
Connecting machine to power source
natural_image
Hand holding a switch with a pink arrow indicating left motion (no text or symbols)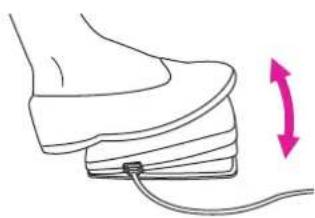
natural_image
Illustration of a foot pressing down on a curved object with a pink arrow indicating rotation (no text or symbols)Note
Among the accessories you will find the power cord and the foot control.

Attention
Unplug the power cord when the machine is not in use.
Before connecting the power supply, make sure that the voltage and frequency shown on the rating plate is conforming with your mains power.
Place the machine on a stable table.
- Connect the power line cord to the machine by inserting the 2-hole plug into the mains plug socket.
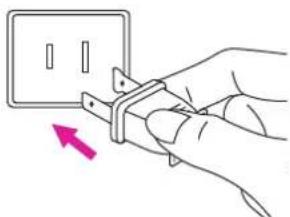
- Connect the power line plug to the wall outlet.
- Turn on the power switch.
- The sewing lamp will light up when the switch is turned on.
① Foot control/ electric power cord
② Main plug socker
③ Power switch "l"
◆ Polarized plug information
This appliance has a polarized plug (one blade wider than the other), to reduce the risk of electrical shock; this plug will fit in a polarized outlet only one way. If the plug does not fit fully in the outlet, reverse the plug. If it still does not fit, contact a qualified electrician to install the proper outlet. Do not modify the plug in any way.
Foot control
Press the foot control to start sewing. Use the foot control to adjust the sewing speed. The harder you press, the faster the machine will sew. To stop the machine from sewing, remove your foot from the control.
Note
When the front cover is open the safety switch is activated and prevents the machine from sewing, even if the foot control is pressed.
Note
Consult a qualified electrician if you are in doubt about how to connect the machine to the power source.
Setting up the telescopic thread stand
natural_image
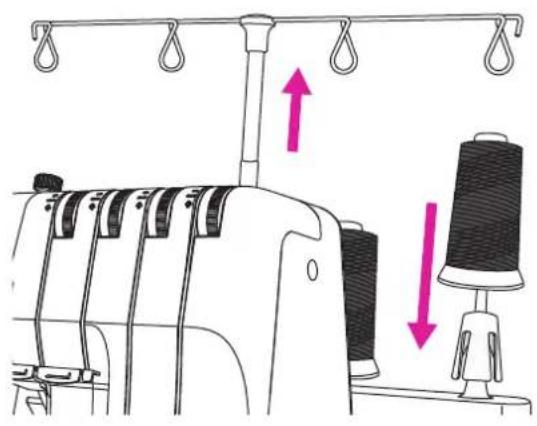
Diagram of a sewing machine with spools and thread, showing mechanical components and directional arrows (no text or symbols)Extend the telescopic thread stand to its full height, then turn until it clicks into place.
Place the thread spools or cones over the cone holders on the spool pin.
If the machine is already threaded, straighten the threads to prevent tangling.
Open and close the front cover
natural_image
Technical line drawing of a sewing machine with directional arrows indicating movement (no text or symbols)Open the front cover
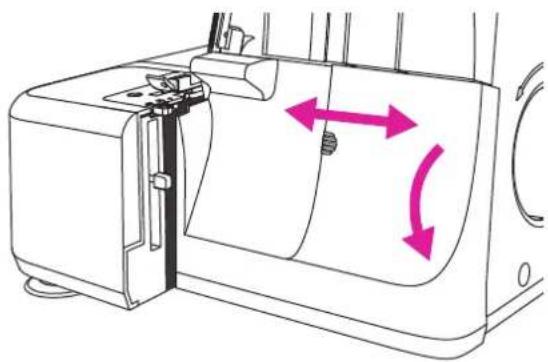
First push the cover to the right as far as it will go and then pull it downward toward you.
Close the front cover
First pull the cover upward and then slide it to the left until it locks.
Note
The front cover has a safety switch and the machine will not sew if the front cover is open.
Remove and replace the flat bed extension
natural_image
Line drawing of a sewing machine with a hand operating it, showing a pink arrow indicating the left side (no text or symbols present)◆ Free arm sewing
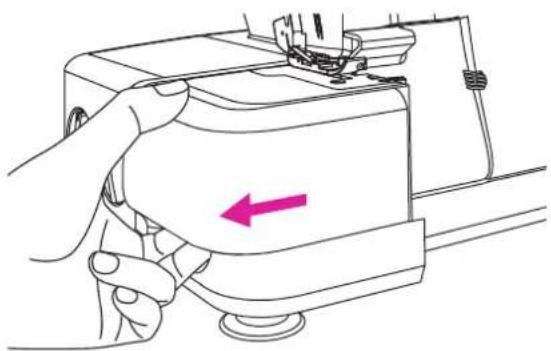
For free arm sewing, slide off the flat bed extension. The free arm makes it easier to sew small items and hard to reach areas such as armholes and overcasting trouser cuffs.
Remove the flat bed extension
Insert a finger in the slot on the left side of the flat bed extension. Slide the flat bed extension to the left and remove it from the machine.
◆ Replace the flat bed extension
Align the projections on the flat bed extension with the grooves on the free arm and slide it to the right until it snaps into place.
Presser foot lifter
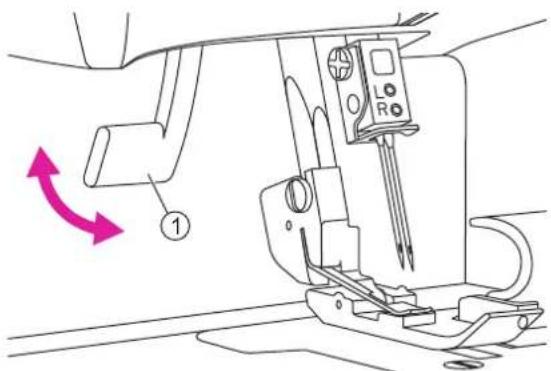
Raise the presser foot with the presser foot lifter at the back of the machine.
① Presser foot lifter
Changing the needles
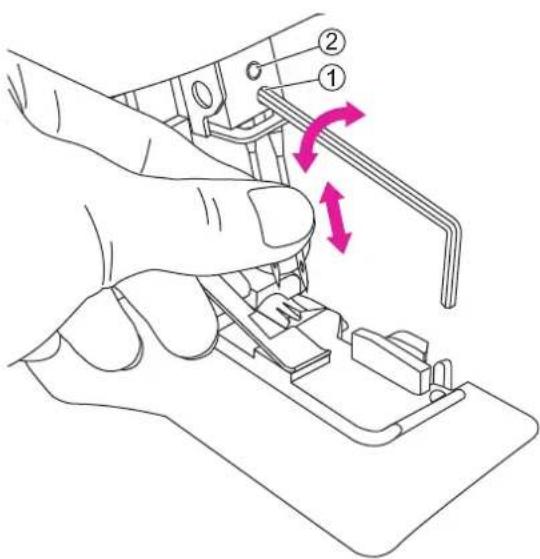
Attention
Turn off the main power switch and unplug the machine.
- Turn the hand wheel toward you until the needles are at the highest position.
- Loosen, but do not remove the left or right needle clamp screw with the allen key while you are holding the needles.
- Remove the left or right needle, depending on the stitch type you want to sew.
- Hold the new needle(s) with the flat surface to the back.
- Insert the needle(s) into the left and/or right needle clamp as far as it/they will go.
- Securely tighten the left or right needle clamp screw.
① Right needle clamp screw
② Left needle clamp screw
Note
When using both needles, the left needle is positioned a little higher up than the right needle (they are not supposed to be 'level', like a twin needle).
Changing the presser foot
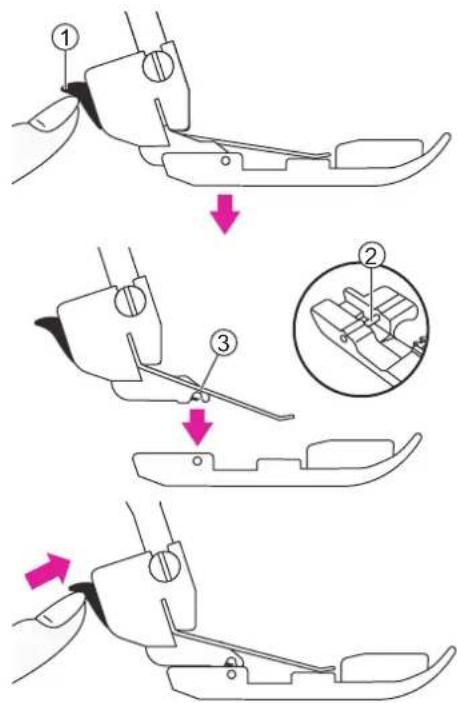
Attention
Turn off the main power switch and unplug the machine.
- Raise the presser foot.
- Turn the hand wheel toward you until the needles are in the highest position.
- Push the black button on the back of the presser foot holder, and the foot will come off.
- Place the new foot with the pin right underneath the groove of the ankle and lower the presser foot. Push the black button on the back of the presser foot holder and the foot will snap into place.
① Presser foot holder
② Pin
③ The groove of the ankle
Note
Optional feet are not included.
How to use the upper cutter
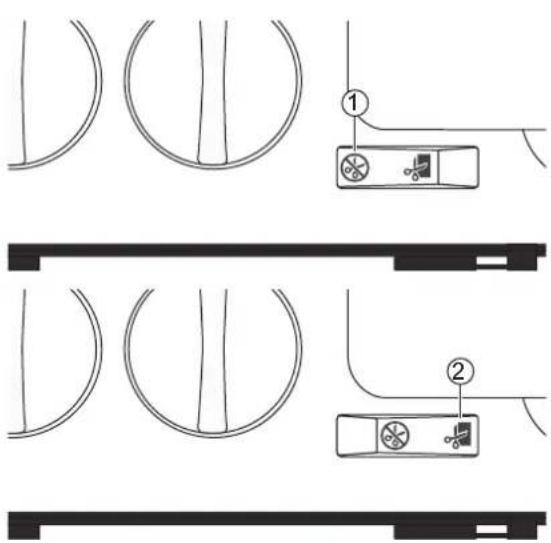
◆ Deactivate the upper cutter
- Turn the hand wheel toward you until the upper cutter is in its lowest position.
- Turn off the upper cutter by switching the upper cutter switch to non-cutting position.
◆ Reactivate the upper cutter
- Turn on the upper cutter by switching the upper cutter switch to cutting position.
① Non-cutting position
② Cutting position
Note
Always have the upper cutter in the cutting position when sewing, because this machine must trim off any excess fabric to form the stitch over the fabric edge. An exception to this is when sewing decorative flatlock seams. Then the upper cutter needs to be turned off.
Attach the 2-thread overlock converter
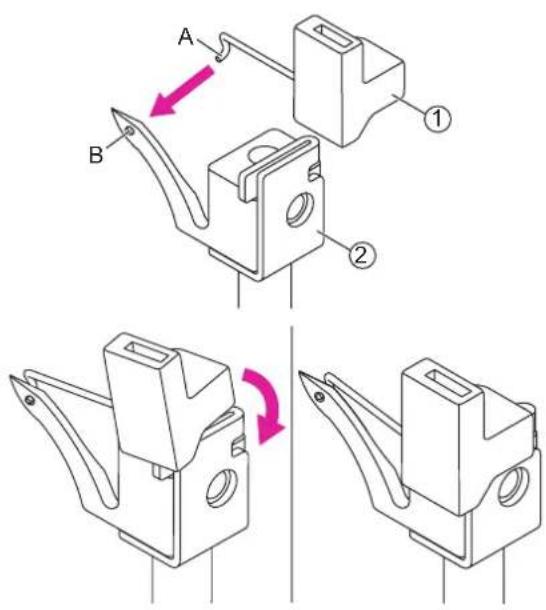
natural_image
Technical line drawing of a mechanical bracket component with a pink rotation arrow (no text or symbols)Note
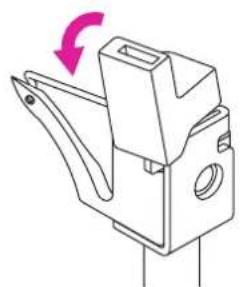
2-thread overlock stitches are sewn using one needle thread and the lower looper thread. Before sewing, the two-thread converter must be attached to the upper looper, so the machine will sew with only two threads.
Open the front cover.
Bring the upper looper to its higher position by turning the hand wheel toward you.
① 2-thread overlock converter
② Upper looper
Insert the tip of the converter (A) into the hole of the upper looper (B)
Push the converter down into the slot of the upper looper.
Remove the 2-thread overlock converter
Remove the converter by tilting it toward you.

natural_image
Abstract composition of pink geometric shapes and lines on white background (no text or symbols)Machine Settings

natural_image
Abstract composition of pink geometric shapes including a circle, elongated rectangle, and zigzag lines on white background (no text or symbols)Getting ready to sew
flowchart
graph TD
    A["Component 1"] --> B["Flow Indicator"]
    C["Component 2"] --> D["Flow Indicator"]
    E["Component 3"] --> F["Flow Indicator"]
    G["Component 4"] --> H["Flow Indicator"]
    I["Component 5"] --> J["Flow Indicator"]
    K["Component 6"] --> L["Flow Indicator"]
    M["Component 7"] --> N["Flow Indicator"]
    O["Component 8"] --> P["Flow Indicator"]
    Q["Component 9"] --> R["Flow Indicator"]
◆ General threading information
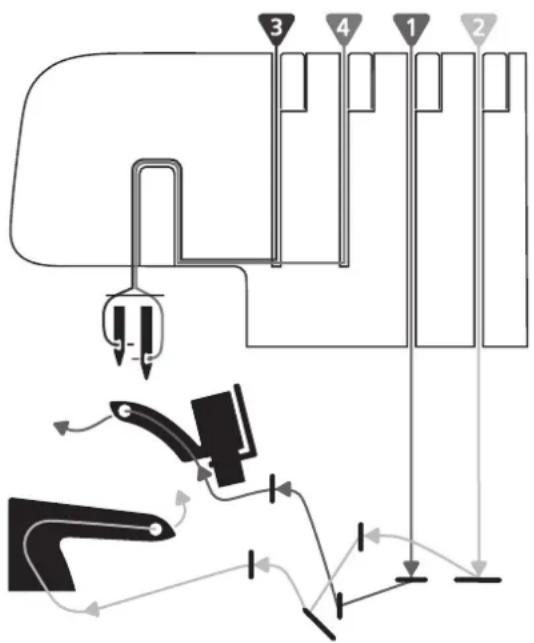
A color coded diagram is located inside the front cover for quick reference (see illustration to the right). Always start threading the loopers and then the needles from left to right (follow the order listed below).
- Upper looper - Red
- Lower looper - Yellow
- Left needle - Purple
- Right needle - Green
Note
Always raise the presser foot before threading.
Important:
If the threads break during sewing, re-thread all thread paths in the order listed below.
- Unthread the needle(s)
- Unthread upper and lower looper
- Thread the upper looper
- Thread the lower looper
- Thread the needle(s) from left to right
See the table below for recommendations on what needles and thread to use for different fabric weights.
Tip:
Your new machine is threaded to sew a 4-thread overlock. Tie your own threads to these threads and carefully pull them through the machine, to easily thread your new overlock machine the first time.
What needle and thread to use with different fabrics
| Light Fabric(voile, crepe, georgette, etc.) | Medium Fabric(cotton, chino, wool, satin, etc.) | Heavy Fabric(denim, jersey, tweed, etc.) |
 |  |  |
| Needles:size #12/80 needles,suitable for overlock machines | Needles:size #14/90 needles, suitable foroverlock machines | Needles:size #14/90 needles, suitablefor overlock machines |
| ThreadThread suitable for overlock machines | ||
◆ Threading the upper looper (red)
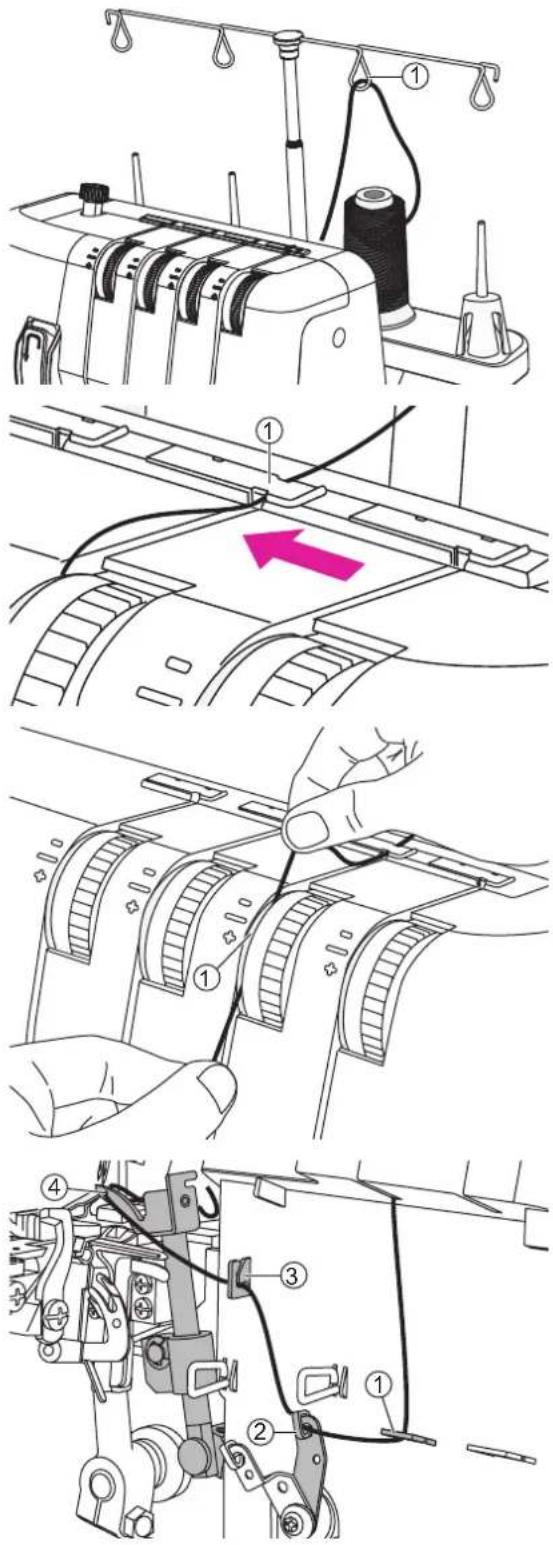
When threading the upper looper, follow the thread path marked with a red dot.
Open the front cover. Raise the needle to highest position by turning the hand wheel toward you. Raise the presser foot. Pass the thread from back to front through the thread guide on the thread stand. Use the tweezers to make the threading easier.
① Telescopic thread stand
Pull the thread from right to left under the upper thread guide.
① Upper thread guide
While holding the thread with both hands, pass it between the tension discs and pull it down to make certain it is properly placed between the tension discs.
① Tension discs
Thread the looper area of the machine following the red color coded thread guides. Use the tweezers to make the threading easier.
Use the tweezers to bring the thread behind the lower looper and thread into the hole in the upper looper from front to back.
Pull about 10cm (4") of thread through the looper and place it to the back of the stitch plate.
①-③ Thread guides
④ Upper looper hole
◆ Threading the lower looper (yellow)
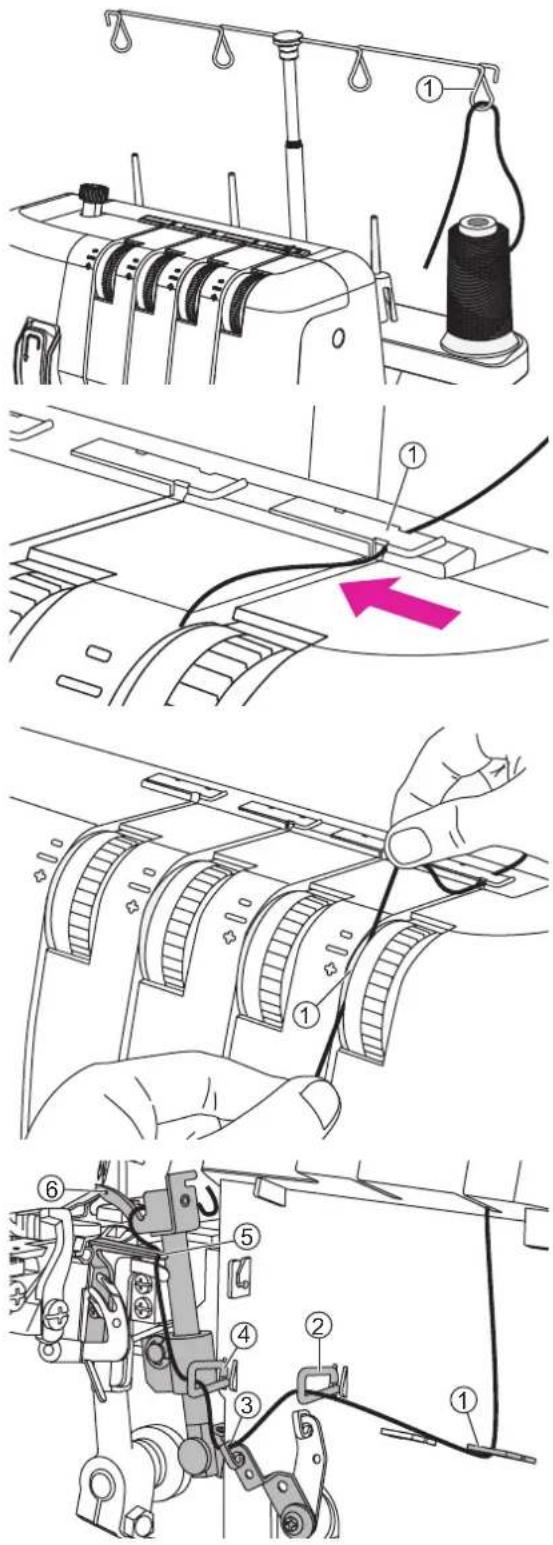
When threading the lower looper, follow the thread path marked with a yellow dot.
Pass the thread from back to front through the thread guide on the thread stand. Use the tweezers to make the threading easier.
① Telescopic thread stand
Pull the thread from right to left under the upper thread guide at the back on the top cover.
① Upper thread guide
While holding the thread with both hands, pass it between the tension discs and pull it down to make certain it is properly placed between the tension discs.
Turn the hand wheel toward you until the lower looper is at the far right.
① Tension discs
Thread the looper area of the machine following the yellow color coded thread guides. Use the tweezers to make the threading easier.
After thread guide, pass the thread from front to back through the hole in the lower looper.
Pull about 10cm (4") of thread through the looper and place it over the upper looper and to the back of the stitch plate.
①-④ Thread guides
⑤ Lower looper hole
⑥ Upper looper
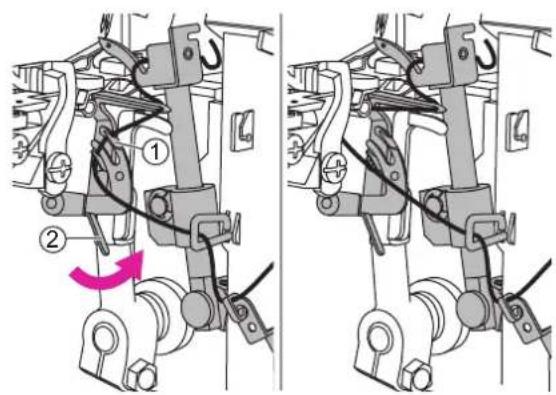
Hold the thread end with your left hand. Use the tweezers to place the thread behind the fingers of the lower looper threader.
Pull the lever on the lower looper threader gently upwards as far as it will go. Release the lever and the lower looper becomes fully threaded.
① Fingers of the lower looper threader
② Lower looper threader lever
natural_image
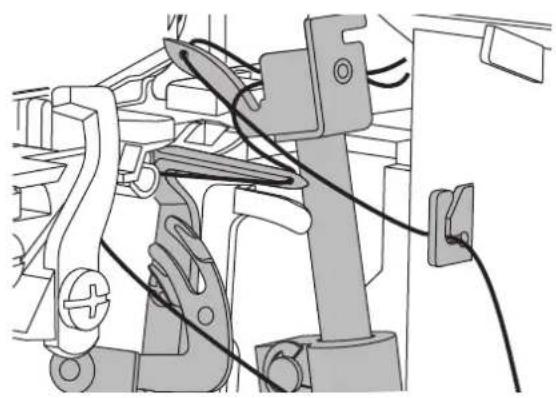
Mechanical assembly diagram showing linkage components and wiring (no text or labels)Note
When both loopers are threaded, the threads should run as illustrated to the right.
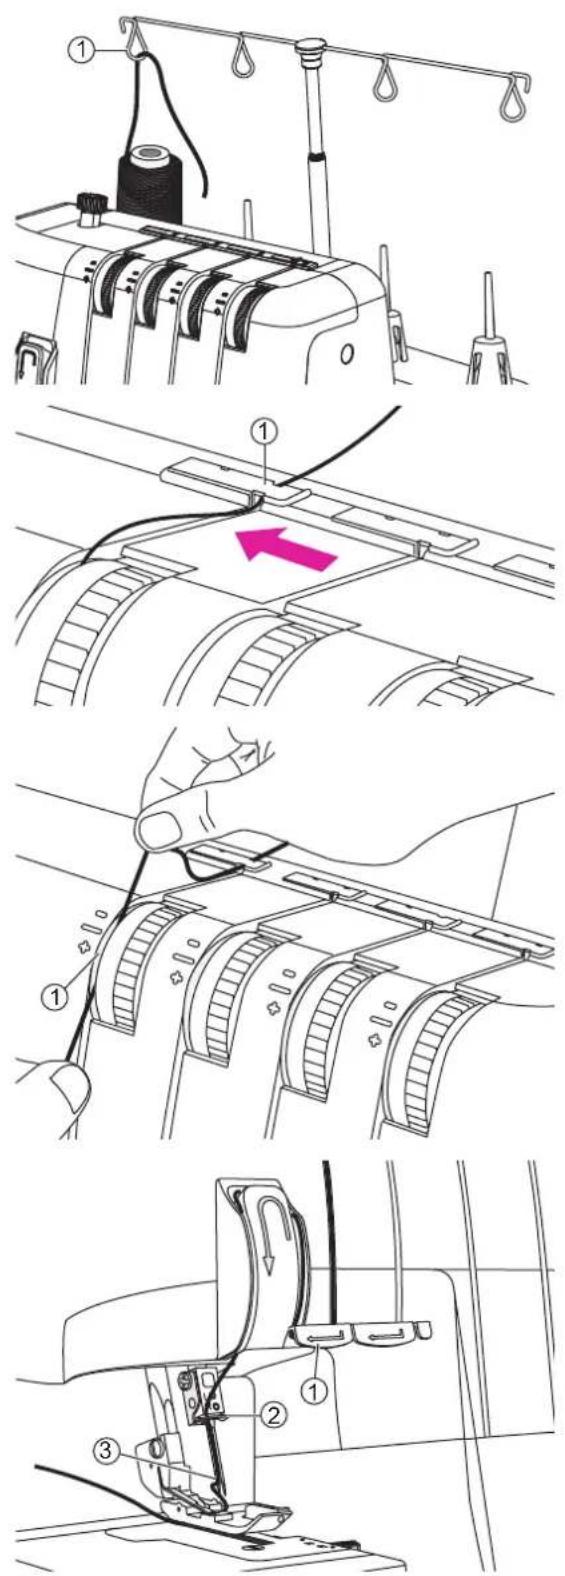
◆ Threading the left needle (purple)
Pass the thread from back to front through the thread guide on the thread stand. Use the tweezers to make the threading easier.
① Telescopic thread stand
Pull the thread from right to left under the upper thread guide at the back on the top cover.
① Upper thread guide
While holding the thread with both hands, pass it between the tension discs and pull it down to make certain it is properly placed between the tension discs.
① Tension discs
Lead the thread down and under thread guide continue up and around thread.
Lead the thread down and place the it behind the thread guide above the needle(s).
Thread the eye of the left needle. Use the tweezers to make needle eye threading easier.
Pull about 10 cm (4") of thread through needle eye to hang free.
Place the thread to the back, under the presser foot.
①-② Thread guide
③ Left needle
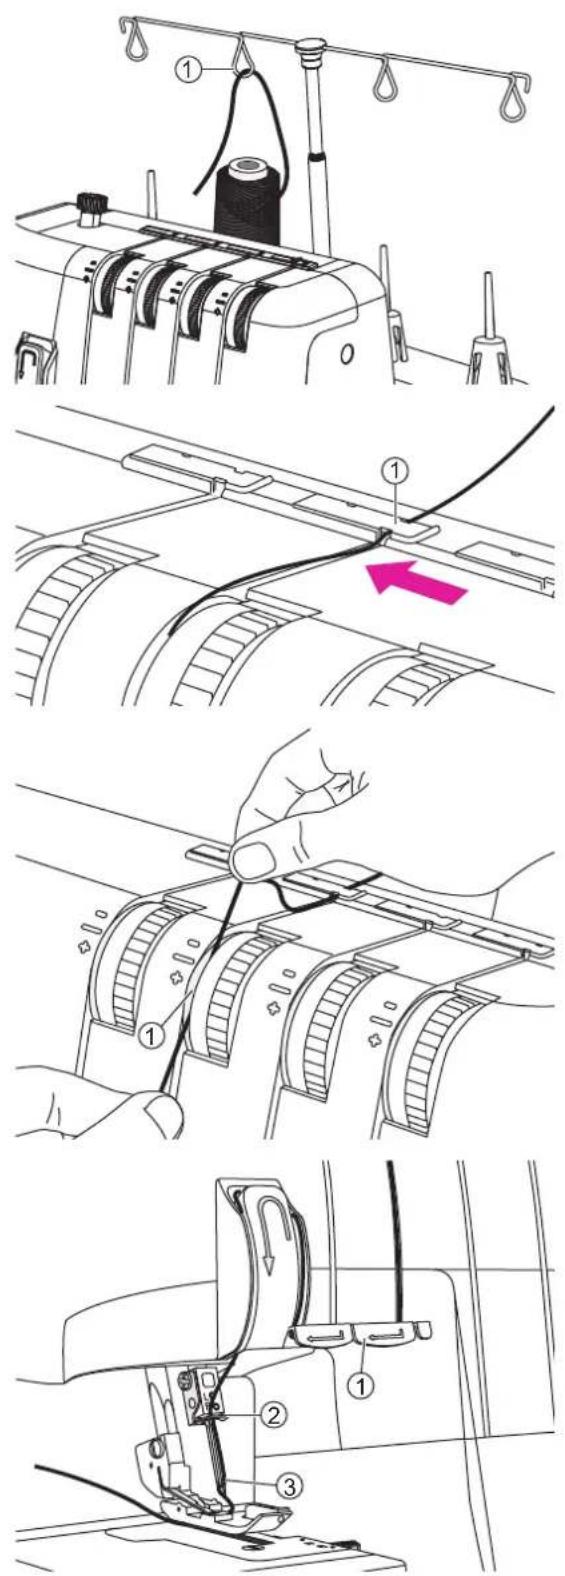
◆ Threading the right needle (green)
Pass the thread from back to front through the thread guide on the thread stand. Use the tweezers to make the threading easier.
① Telescopic thread stand
Pull the thread from right to left under the upper thread guide at the back on the top cover.
① Upper thread guide
While holding the thread with both hands, pass it between the tension discs and pull it down to make certain it is properly placed between the tension discs.
① Tension discs
Lead the thread down and under thread guide, continue up and around thread point. Lead the thread down and place the it behind the thread guide above the needle(s). Thread the eye of the right needle. Use the tweezers to make needle eye threading easier. Pull about 10 cm (4") of thread through needle eye to hang free. Place the thread to the back, under the presser foot.
①-② Thread guide
③ Right needle
Waste collector
natural_image
Technical line drawing of a mechanical assembly with an inset showing a close-up view of a component (no text or symbols present)◆ Install the waste collector
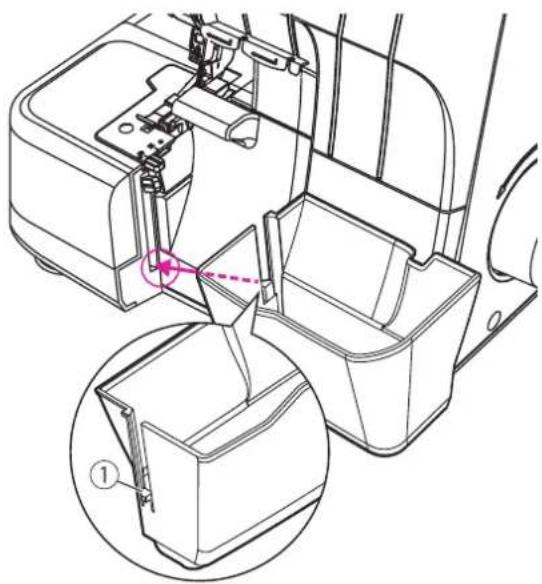
Align the projection on the waste collector with the groove bottom of the cutting width lever and slide it until snaps into place.
① Projection of the waste collector
natural_image
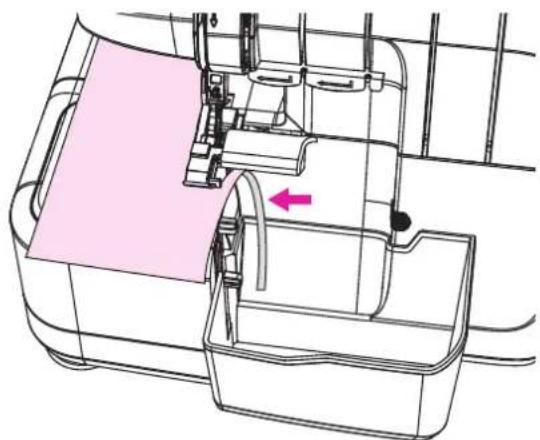
Technical line drawing of a mechanical device with no visible text or symbolsWhen sewing, the fabric scrap will fall along the front cover into the waste collector.
natural_image
Line drawing of a sewing machine with a hand operating the base (no text or symbols present)Remove the waste collector
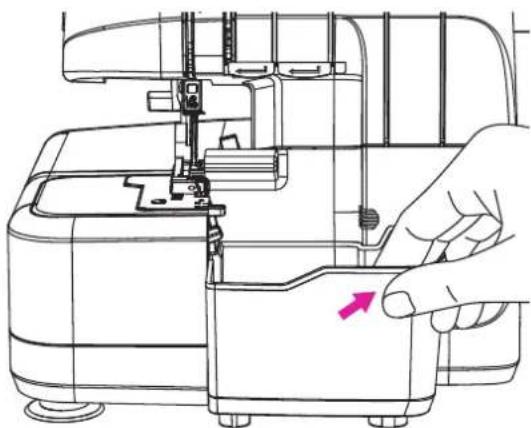
Grab the upper right edge of the waste collector and pull the collector to the right obliquely to remove it.
Thread tension
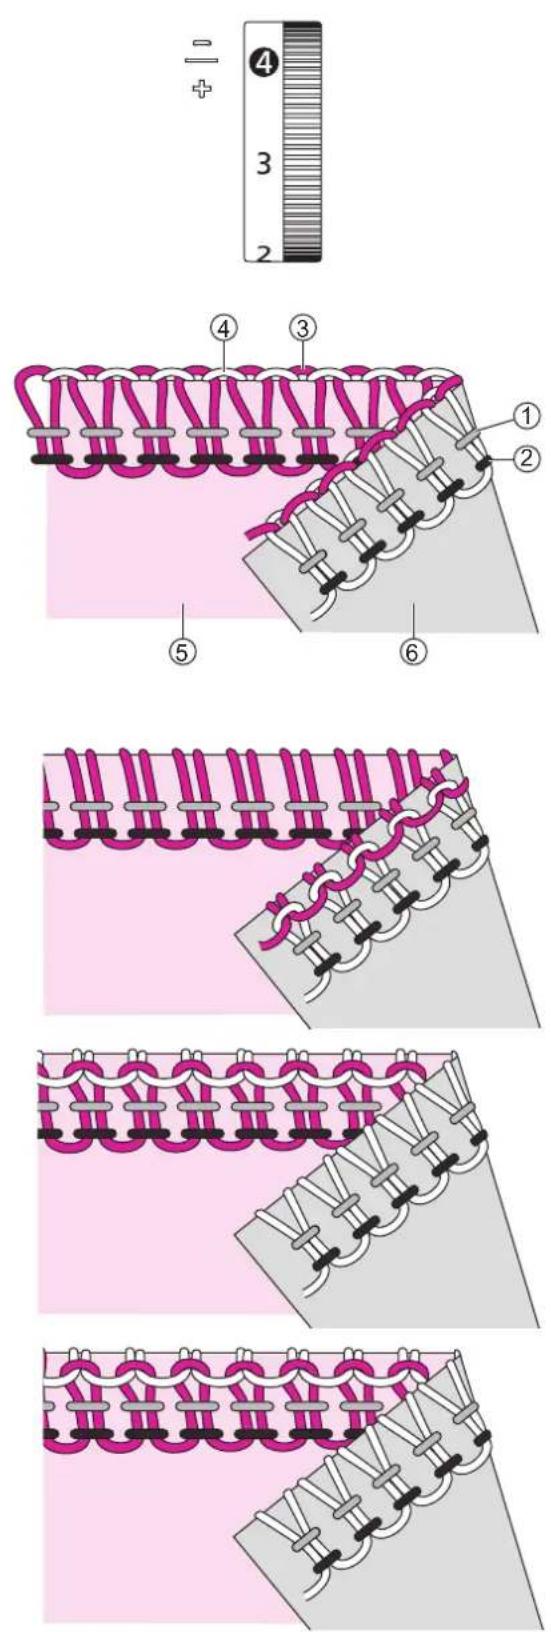
- Basic thread tension setting: "4"
- To increase the tension, turn the dial to the next number up. To reduce the tension, turn the dial to the next number down.
- Proper setting of tension is important to good sewing.
- There is no single tension setting appropriate for all the stitch functions and fabrics.
Correct thread tension
Lower looper thread and upper looper thread should be well balanced with the same tension (both looper threads should cross at the edge of the fabrics). Needle threads should not be too loose or too tight, but equally balanced tension.
① Right needle thread
② Left needle thread
③ Upper looper thread
④ Lower looper thread
⑤ Right side of fabric
⑥ Wrong side of fabric
Upper looper thread is too loose
The upper looper thread is unbalanced when it is pulled to the wrong side of the fabric. Tighten the thread tension of the upper looper or loosen the thread tension of the lower looper.
Upper looper thread is too tight
The upper looper thread is unbalanced when it is pulling on the top side of the fabric. Loosen the thread tension of the upper looper or tighten the thread tension of the lower looper.
Lower looper thread is too loose
The lower looper thread is unbalanced when it is pulled to the right side of the fabric. Tighten the thread tension of the lower looper or loosen the thread tension of the upper looper.
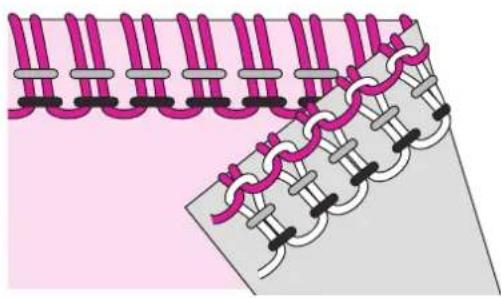
natural_image
Illustration of a knitted fabric with pink and white threads, no text or symbols presentLower looper thread is too tight
The lower looper thread is unbalanced when it is pulling on the wrong side of the fabric. Loosen the thread tension of the lower looper or tighten the thread tension of the upper looper.
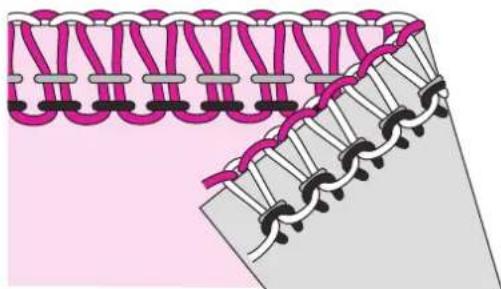
natural_image
Illustration of a knitted fabric with pink and gray threads, no text or symbols presentLeft needle thread is too loose
If the left needle thread is too loose, tighten the thread tension of the left needle or loosen both looper threads.
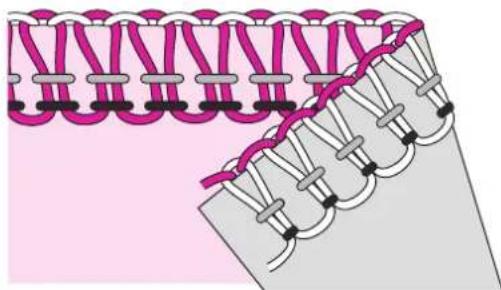
natural_image
Illustration of a knitted fabric with pink and gray threads, no text or symbols presentLeft needle thread is too tight
If the left needle thread is too tight, loosen the thread tension of the left needle.
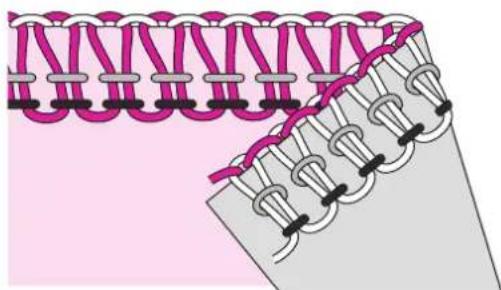
natural_image
Illustration of a knitted fabric with pink and gray threads, no text or symbols presentRight needle thread is too loose
If the right needle thread is too loose, tighten the thread tension of the right needle.
natural_image
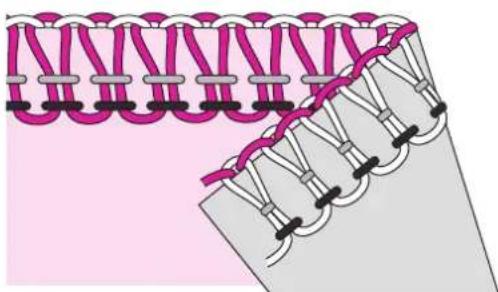
Diagram of a knitted fabric with pink and gray threads, no text or symbols presentRight needle thread is too tight
If the right needle thread is too tight, loosen the thread tension of the right needle.
Differential feed adjustment
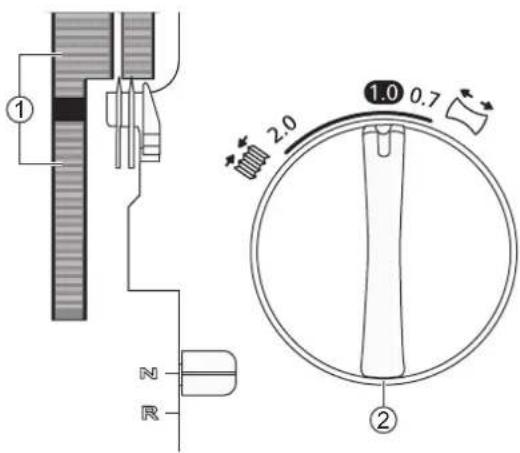
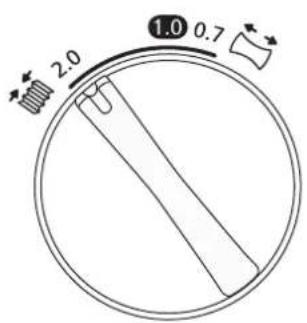
The differential feed system consists of two sets of feed teeth arranged one behind the other. Both feed teeth work independently of each other to provide good results when sewing on speciality fabrics. When the amount of feed by the front feed teeth is changed in relation to the feed by the rear feed teeth it will "stretch" or "gather" the fabric.
Use the differential feed to prevent stretching or distortion of knit fabrics and puckering of lightweight fabrics.
For overlock stitching on normal fabric, set the differential feed to 1.0.
① Differential feed system
② Differential feed dial
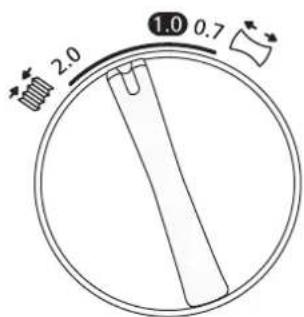
Gathered overlock (stretch, knit fabrics)
When overedging stretch fabric, such as knits and jersey, adjust the differential feed to a number between 1.0 and 2.0.
The setting depends on the fabric being sewn. Test sew with different settings before sewing on your project.
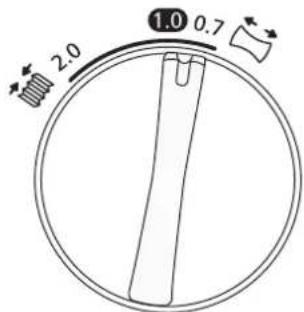
Stretch overlock (light weight fabrics)
When overedging light woven or loosely knit fabrics, such as silk and silky knitwear, adjust the differential feed to a number between 0.7 and 1.0. When sewing, apply gentle tension to the fabric by holding the seam lightly in front and back of the presser foot. The setting depends on the fabric being sewn as well as the desired amount of stretching. Therefore, test sew with different settings before sewing on your project.
| Fabric | Differential Feed | Adjustment | Result |
| Stretch fabric (knit, jersey) | 1.0–2.0 | ||
| Non-stretch fabric (cotton, denim) | 1.0 | ||
| Light-weight fabric (Silk, silky knitwear) | 0.7–1.0 |
Presser foot pressure adjustment
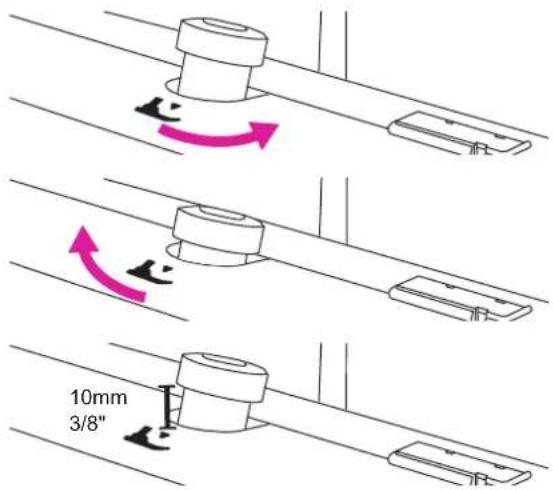
The presser foot pressure is pre-set for sewing on medium weight fabric. When sewing in different fabric weights, adjustment might be needed. Generally, decrease the presser foot pressure when sewing in light weight fabric and increase it when sewing in heavy weight fabrics. Always test sew on a sample of your fabric before sewing on your project. Increase or decrease the pressure in small increments by turning the presser foot pressure screw.
Less pressure: Decrease the pressure by turning the adjustment knob in counterclockwise direction towards the "−".
More pressure: Increase the pressure by turning the adjustment knob in clockwise direction towards the "+".
Back to standard setting: Turn the adjustment knob until the distance from the front cover to the "head" of the screw is 10mm (3/8").
Stitch width settings
natural_image
Diagram showing two stages of a coiled structure with pink and gray bands, labeled ① and ② (no text or symbols on the diagram itself)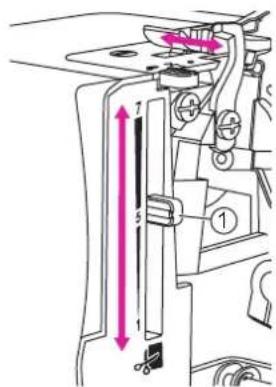
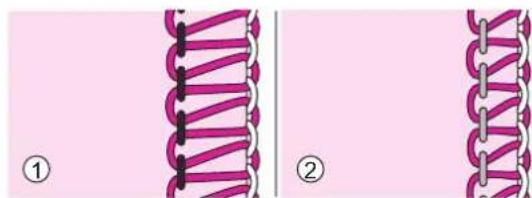
The stitch width can be increased or decreased by changing the needle position or with the cutting width lever.
Width adjustment by changing needle position
① When only the left needle, or when both needles are used the stitch width is approx. 6mm (1/4").
② When only the right needle is used the stitch width is approx. 3mm (1/8").
Width adjustment with the cutting width lever
By fine tuning the cutting width, using the cutting width lever, adjustments are possible within the range shown below:
When only the left needle is used: 5 - 7mm
When only the right needle is used: 3 - 5mm
Move the lever up and down to adjust the stitch width, "7" is the widest and "1" is the most narrow setting.
① Cutting width lever
Stitch length settings
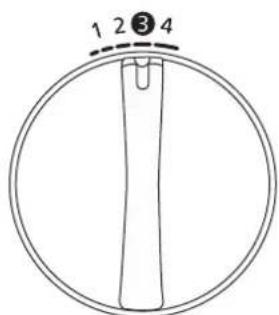
The stitch length dial should be set to "3" for most sewing.
Adjust the stitch length to 4mm when sewing on heavy weight fabrics. Adjust the stitch length to 2mm when sewing on light weight fabrics.
Stitch finger lever setting
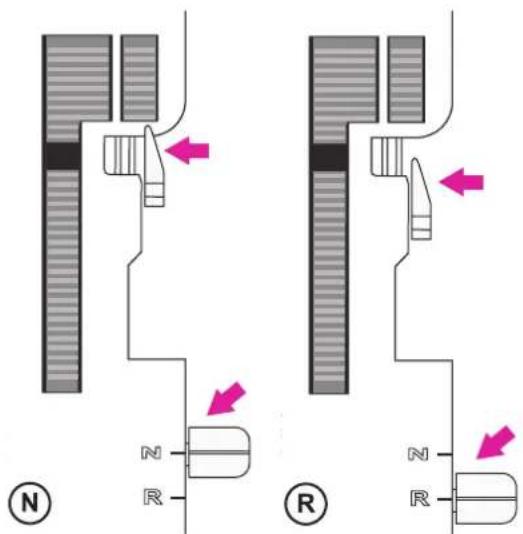
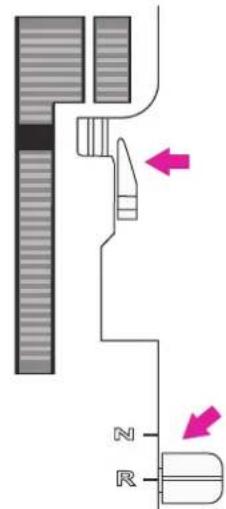
The stitch finger lever should be set to "N" (Normal) for all standard overlock sewing. To sew rolled edge you need to retract the stitch finger by setting the stitch finger lever to "R" (Rolled Edge). When moving the stitch finger, be sure to push the lever as far as it will go in each direction.

natural_image
Abstract composition of pink geometric shapes and lines on white background (no text or symbols)Stitch Chart

natural_image
Abstract composition of pink geometric shapes including a circle, elongated rectangle, and zigzag lines on white background (no text or symbols)Stitch chart
On your overlock machine, different stitches are obtained by combining different needle positions, threading methods, tension settings, and the use of the 2-thread overlock converter.
◆ Stitch overview
The settings shown in the table below are our recommendations based on normal conditions. It may be necessary to adjust the thread tension depending on the stitch, type of fabric and thread you are using. For best results make tension adjustments in small increments of no greater than half a number at a time. Always test sew on a sample of your fabric before sewing on your project.
In the table below, different fabric weights and types are explained. For you to better understand how the stitches are formed, each of the threads are displayed in different shades of grey.
Icon explanation sheet
| Woven lightChiffon, voile, organza, batiste, silk, etc. |  Needle position Needle position |  2-thread overlock converter 2-thread overlock converter | |
 | Woven mediumCotton, chino, wool, satin, etc. |  Differential feed Right n e thread Differential feed Right n e thread | [2012] |
 | Woven heavyDenim, canvas, terrycloth, etc. |  Stitch length Left needle HCWA Stitch length Left needle HCWA |  |
 | Stretch lightCharmeuse, nylon, tricot, single knit jerseys, etc. |  Cutting width Upper loop Cutting width Upper loop  | |
 | Stretch mediumDouble knit, velour, swimwear, etc. | N/R Stitch finger position |  Lower looper thread Lower looper thread |
| [8209] | Stretch heavySweater knits, fleece, etc. |
4-Thread overlock
For all seams where stretch or give is needed, such as neck edges, side seams, sleeves, etc.
| Stitch/Fabric | LR | → | ---- | ← | N/R | ← | Thread Tension | ||||
| LR | LR | ← | ← | ||||||||
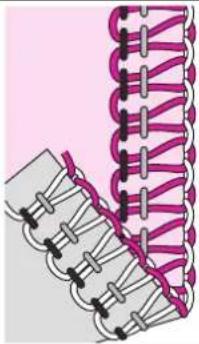 | Both 1.0 3 5-6 | N - 3 3 | 4 4 | ||||||||
| Both 1.0 3 5-6 | N - 4 4 | 4 4 | |||||||||
| Both 1.0 3-4 5 | -6 N - 4 | 4 4 4 | |||||||||
| Both 1.0 3 5-6 | N - 4 4 | 4 4 | |||||||||
| Both 1.0 3 5-6 | N - 4 4 | 4 4 | |||||||||
| Both 1.0 3-4 5 | -6 N - 4 | 4 4 4 | |||||||||
3-Thread overlock, wide (and narrow)
For sewing two layers of stretchy fabric or overcasting a single layer of light to medium fabric. Use heavier threads in the loopers to create decorative edges.
| Note | |||||||||||||||
| Use the right needle instead for a narrow stitch. Recommended thread tension settings within brackets in the chart. | |||||||||||||||
| Stitch/Fabric | L R | ←→←→ | ---- | ←→←→ | N/R | ←→←→ | Thread Tension | ||||||||
| L R | ←→←→ | L R | ←→←→ | ←→←→ | ←→←→ | ||||||||||
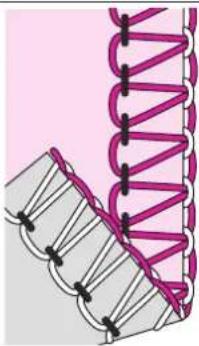 | ←→←→ | Left | 1.0 | 3 | 5-6 | N | - | 4 | (-) | - | (4) | 4 | (5) | 4-5 | (4-5) |
 |
| ←→←→ | Left | 1.0 | 3-4 | 5-6 | N | - | 4 | (-) | - | (4) | 4 | (5) | 4-5 | (4-5) | |
| ←→←→ | Left | 1.0 | 3 | 5-6 | N | - | 4 | (-) | - | (4.5) | 4 | (5) | 4-5 | (4-5) | |
| ←→←→ | Left | 1.0 | 3 | 5-6 | N | - | 4 | (-) | - | (4.5) | 4 | (5) | 4-5 | (4-5) | |
| ←→←→ | Left | 1.0 | 3-4 | 5-6 | N | - | 4 | (-) | - | (4.5) | 4 | (5) | 4-5 | (4-5) | |
3-Thread narrow edge
For sewing stretchy fabric or overcasting a single layer of light fabric. Popular for creating decorative tucks. Use decorative threads, such as 40 weight rayon, in the loopers and regular thread in the needle. Use different colors in the loopers to get an interesting effect.
Note
Not recommended for heavy weight fabrics.
| Stitch/Fabric | LR | ←→ | ---- | ←→ | N/R | ←→ | Thread Tension | ||||
| LR | LR | ←→ | ←→ | ||||||||
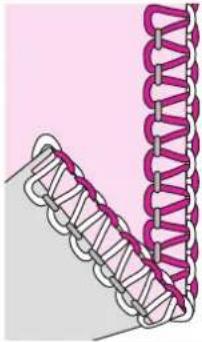 | Right | 1.0 | 1-1.5 | 5-6 | R | - | - | 5-6 | 6 | 3 | |
|
| Right | 1.0 | 1-1.5 | 5 | R | - | - | 5-6 | 6 | 3 | ||
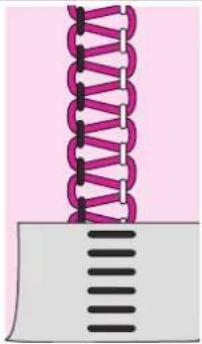
3-Thread flatlock, wide (and narrow)
For sewing fabrics together with a decorative effect either with the flatlock side or the ladder stitch side. Create varying effects by threading the loopers with decorative thread, such as 40 weight rayon.
Note
Use the right needle instead for a narrow stitch. Recommended thread tension settings within brackets in the chart.
| Stitch/Fabric | LR | ←→ | ←→ | ←→ | N/R | ←→ | Thread Tension | ||||||||
| LR | ←→ | LR | ←→ | ←→ | ←→ | ←→ | |||||||||
 | ←→ | Left | 1.0 | 2-3 | 5 | N | - | 0 | (-) | - | (0) | 5 | (5-7) | 9 | (8-9) |
 |
| ←→ | Left | 1.0 | 2-3 | 5 | N | - | 0 | (-) | - | (0) | 5 | (5-7) | 9 | (8-9) | |
| →→ | Left | 1.0 | 2-3 | 5 | N | - | 0 | (-) | - | (0) | 5 | (5-7) | 9 | (8-9) | |
| →→ | Left | 1.0 | 2-3 | 5 | N | - | 0 | (-) | - | (0) | 5 | (5-7) | 9 | (8-9) | |
| ←→ | Left | 1.0 | 2-3 | 5 | N | - | 0 | (-) | - | (0) | 5 | (5-7) | 9 | (8-9) | |
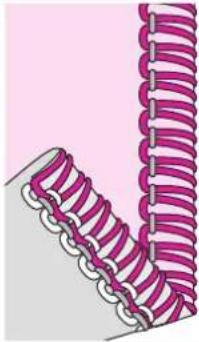
3-Thread rolled edge
For edging lightweight fabrics. It gives a nice finish on silky scarves, pillow ruffles and napkins. For a beautiful rolled edge, thread the loopers with a decorative lightweight thread, such as 40 weight rayon, for a beautiful satin edge and the needle and lower looper with lightweight regular thread.
Note
Not recommended for heavy weight fabrics.
| Stitch/Fabric | LR | ←→ | ---- | ←→ | N/R | ←→ | Thread Tension | ||||
| LR | LR | ←→ | ←→ | ||||||||
 | Right | 1.0 | 1-1.5 | 5 | R | - | - | 5 | 4-6 | 7-9 | |
|
| Right | 1.0 | 1-1.5 | 5 | R | - | - | 5 | 4-6 | 7-9 | ||
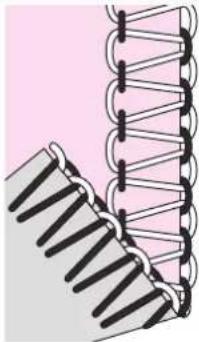
2-Thread overedge, wide (and narrow)
For overcasting a single layer of light to medium weight fabrics (2-thread overlock converter required).
Note
Use the right needle instead for a narrow stitch. Recommended thread tension settings within brackets in the chart.
| Stitch/Fabric | LR | ←→ | ←→ | ←→ | N/R | ←→ | Thread Tension | ||||||||
| LR | ←→ | LR | ←→ | ←→ | |||||||||||
 | ←→ | Left | 1.0 | 2-4 | 5-6 | N | V | 1-2 | (-) | - | (1-3) | - | (-) | 5-8 | (6-9) |
 |
| ←→ | Left | 1.0 | 2-4 | 5-6 | N | V | 1-2 | (-) | - | (1-3) | - | (-) | 5-8 (6-9) | ||
| ←→ | Left | 1.0 | 2-4 | 5-6 | N | V | 1-2 | (-) | - | (1-3) | - | (-) | 5-8 | (6-9) | |
| ←→ | Left | 1.0 | 2-4 | 5-6 | N | V | 1-2 | (-) | - | (1-3) | - | (-) | - | (6-9) | |
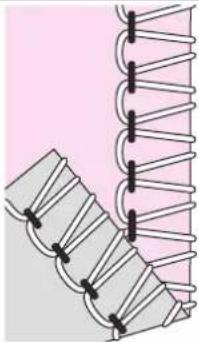
2-Thread wrapped overlock, wide (and narrow)
Gives a beautiful finish to lightweight fabrics (2-thread overlock converter required).
Note
Use the right needle instead for a narrow stitch. Recommended cut width and thread tension settings within brackets in the chart.
| Stitch/Fabric | LR | ←→ | ---- | ←→ | N/R | ←→ | Thread Tension | |||||||||
| LR | ←→ | ←→ | ←→ | |||||||||||||
 | ←→ | Left | 1.0 | 2-3 | 4-5 | (5-6) | N | V | 4-6 | (-) | - | (5-7) | - | (-) | 1-3 | (4-6) |
 |
| ←→ | Left | 1.0 | 3-4 | 4-5 | (5-6) | N | V | 4-6 | (-) | - | (5-7) | - | (-) | 1-3 | (4-6) | |
| ←→ | Left | 1.0 | 2-4 | 4-5 | (5-6) | N | V | 4-6 | (-) | - | (5-7) | - | (-) | 1-3 | (4-6) | |
| ←→ | Left | 1.0 | 3-4 | 4-5 | (5-6) | N | V | 4-6 | (-) | - | (5-7) | - | (-) | 1-3 | 1-3 (4-6) | |
| ←→ | Left | 1.0 | 3-4 | 4-5 | (5-6) | N | V | 4-6 | (-) | - | (5-7) | - | (-) | 1-3 | (4-6) | |
2-Thread rolled edge
For edging lightweight fabrics. It gives a nice finish on silky scarves, pillow ruffles and napkins. Thread the looper with a decorative lightweight thread, such as 40 weight rayon for a beautiful satin edge (2-thread converter required).
Note
Not recommended for heavy weight fabrics.
| Stitch/Fabric | LR | → | ---- | → | N/R | → | Thread Tension | ||||
| LR | LR | → | → | ||||||||
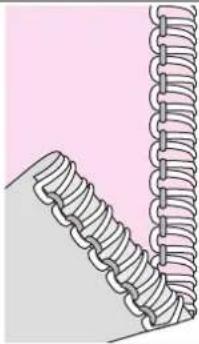 | Right | 1.0 | 1-1.5 | 5-6 | R | V | - | 5 | - | 4-6 | |
|
| Right | 1.0 | 1-1.5 | 5 | R | V | - | 5 | - | 4-6 | ||

natural_image
Abstract composition of pink geometric shapes and lines on white background (no text or symbols)Sewing Basics

natural_image
Abstract composition of pink geometric shapes including a circle, elongated rectangle, and zigzag lines on white background (no text or symbols)Sewing
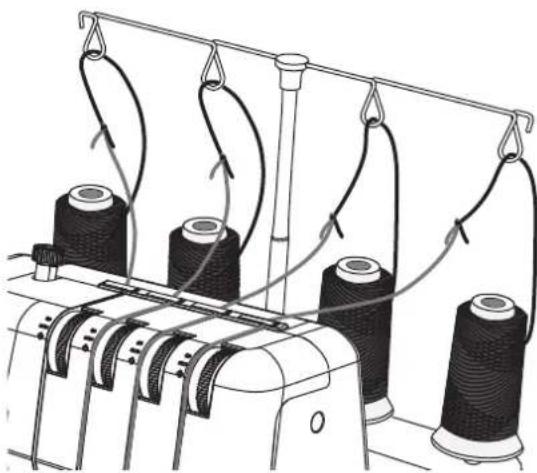
natural_image
Diagram of textile machinery with spools and coiled threads (no text or labels)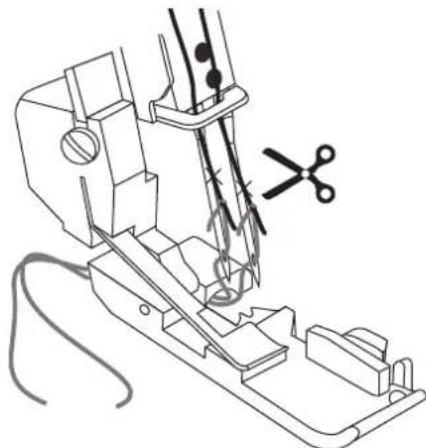
natural_image
Line drawing of a sewing machine with scissors and cable (no text or symbols)Changing thread
The following is an easy way to change threads:
- Cut the thread in near the spool, behind the guides on the telescopic thread stand.
- Remove the thread spool and place the new thread on the spool pin.
- Tie the end of the new thread to the end of the old thread. Cut the thread tails to 2-3cm (approx. 1") in length and firmly pull both threads to test knot security.
- Raise the presser foot.
- First note tension dial settings and then turn the tension dials down to "0".
- Pull the threads through the machine one at a time until the knots are in front of the needle. If the threads do not pull easily, check for tangles on thread guides or looping under thread stand.
- Cut the thread behind the knot and thread the needle.
- Return tension dials to previous settings.
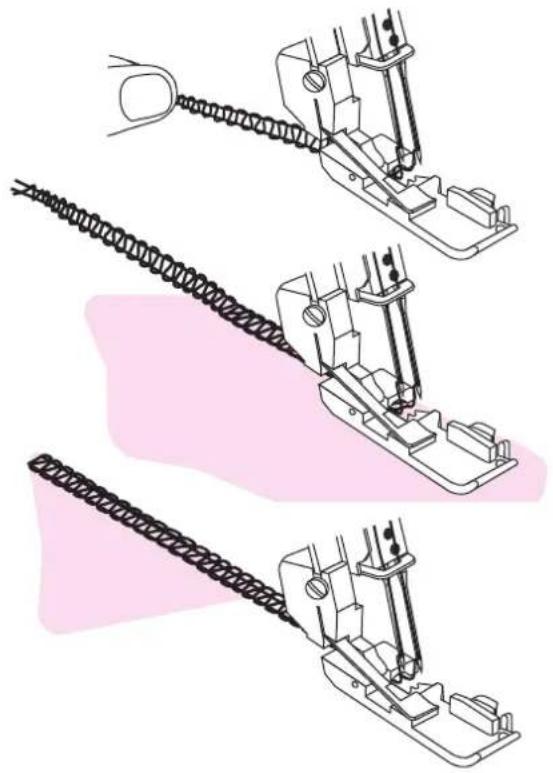
natural_image
Three-step line drawing of a sewing machine with thread and chain, shown in different angles (no text or symbols)◆ Start sewing
-
When the machine is completely threaded, close the front cover and bring all of the threads over the stitch plate and slightly to the left under the presser foot.
-
Hold the threads and apply a slight tension.
-
Ensure that the upper blade moves against the lower blade correctly by turning the hand wheel slowly toward you. If the upper cutter blade does not move correctly, check if there are any fabric or waste thread stuck between the blades.
-
Turn the hand wheel toward you 2 or 3 complete turns to start making a thread chain. Check if all threads wind around the stitch finger of the stitch plate. If the threads do not wind around the finger, make sure each thread is threaded correctly.
-
Continue holding the thread chain while pressing the foot control. Sew until the chain is 5-8cm (2"-3") in length.
-
Place fabric under the front of the presser foot and sew a test sample. Guide the fabric slightly with your left hand while sewing. Do not pull on the fabric as this may deflect the needle, causing it to break.
-
When you reach the end of the fabric, continue sewing while drawing the finished fabric gently backwards and to the left. This is called chaining off. It prevents the threads from coming undone and prepares for next sewing.
-
Cut off the thread chain 2-5cm (1"-2") behind the presser foot.
natural_image
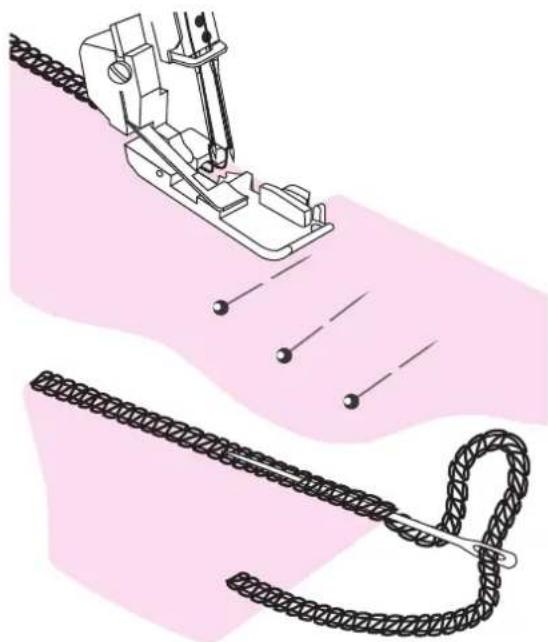
Illustration of a sewing machine and a knotted rope, both without any text or symbolsPin placement
Insert straight pins to the left of the presser foot. The pins will be easy to remove and are away from the cutters.
Warning
Sewing over pins will damage and might destroy the edge of the cutters.
Securing thread chain
- Thread the chain into a large eyed, hand sewing needle.
- Insert the needle into the end of the seam and pull the chain into the seam to secure the threads.
natural_image
Line drawing of a sewing machine needle stitching fabric (no text or symbols)Corded overlock
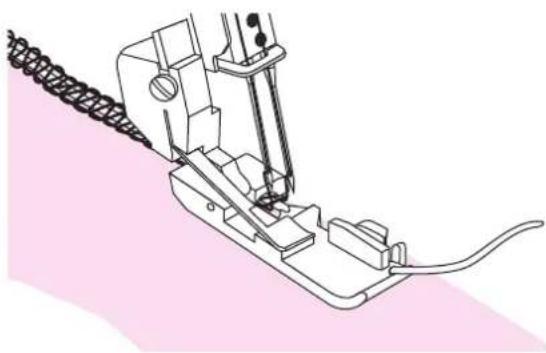
Corded overlock can be used to strengthen stitches when joining elastic fabrics such as knits. Cording prevents knit fabrics from stretching and also stabilizes the seams.
- Insert the cord through the hole in the front of the foot.
- Position the cord under the foot to the back of the machine and sew the garment seam.
- The cord is attached in the stitch as the seam is sewn.
Gathering using the differential feed
The differential feed can be used to gather lightweight fabrics. Use it for sleeves, making ruffles, and more.
Set the differential feed between 1.5 and 2 to obtain the best gathering effect for your project. Always try on a scrap piece of your fabric first. See differential feed adjustment to learn how to adjust the differential feed.
natural_image
Illustration of two coiled spring-like structures with no text or symbols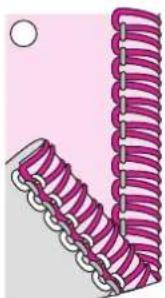
natural_image
Illustration of two coiled spring-like structures with no text or symbols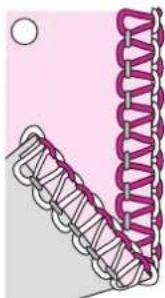
natural_image
Illustration of a coiled spring with a coiled rod, against a pink background (no text or symbols)◆ Rolled edge sewing
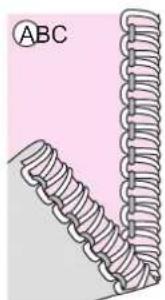
The rolled edge stitch is appropriate for light weight fabrics such as lawn, voile, organdy, crepe, etc. The rolled edge is achieved by adjusting the thread tension to make the fabric edge roll under the fabric while overlocking. Adjust the thread tension to change the degree of rolling. To sew rolled edge you need to set the stitch finger lever to "R".
Tip: For a beautiful rolled edge, thread the upper looper with a decorative thread and the needle and lower looper with lightweight regular thread.
2-Thread rolled edge (A)
- Attach the 2-thread overlock converter.
- Use the right needle thread and lower looper thread.
- Move the stitch finger lever to "R".
- Set the stitch length dial to "1-1.5" for a fine seam.
- Set the thread tension according to the stitch table
- Make a thread chain and test sew on a sample of your fabric before sewing on your project. Hold the thread chain while beginning to sew to keep it from curling into the seam.
3-Thread rolled edge (B) / narrow edge (C)
A variant of the rolled edge stitch (B) is the narrow edge (C). It can be obtained by adjusting the thread tension according to "3-thread rolled edge" or "3-thread narrow edge".
- Use the right needle thread and the upper and lower looper threads.
- Move the stitch finger lever to "R".
- Set the stitch length dial to "1-1.5" for a fine seam.
- Set the thread tension according to "3-thread rolled edge" or "3-thread narrow edge".
- Make a thread chain and test sew on a sample of your fabric before sewing on your project. Hold the thread chain while beginning to sew to keep it from curling into the seam.
A
natural_image
Diagram of a spring attached to a sheet of paper with a vertical seam (no text or symbols)B
flowchart
graph TD
    A["Step 1: Folded object"] --> B["Step 2: Reformational change"]
    B --> C["Step 3: Folded structure with coiled spring"]
    C --> D["Step 4: Reformational change with coiled spring"]
    D --> E["Final state: Folded object with coiled spring"]

Flatlock sewing
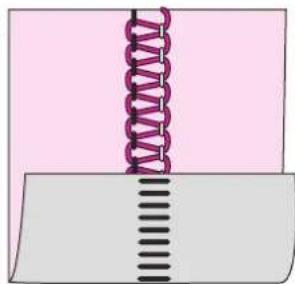
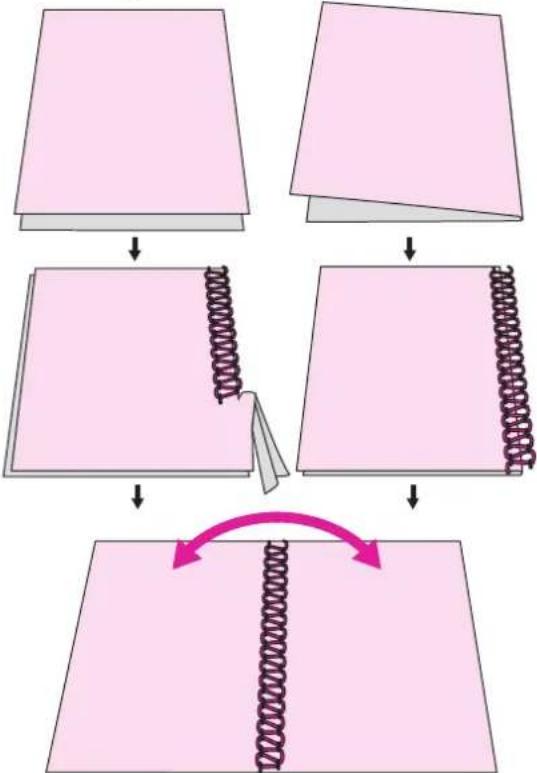
A flatlock (a) is made by adjusting the tension of the 3-thread overlock stitch, sewing the seam and pulling the fabrics apart to flatten the seam. The tensions must be adjusted correctly for the fabric to pull flat properly.
A flatlock can be used both as a decorative construction stitch, sewing two pieces together (standard flatlock), or for decoration only on one piece of fabric (decorative flatlock). There are two ways to sew a flatlock. Either with the wrong sides of the fabric together to create a decorative look, or with the right sides together, to create a ladder stitch.
Standard flatlock, wide (B)
- Use the left needle.
- Thread the lower and upper looper and the left needle.
- Set the thread tension according to "3-thread flatlock, wide (and narrow)".
- Place the wrong sides of the two pieces of fabric together to sew a decorative stitch on the right side of the project.
- Sew the seam, trimming the excess fabric. The needle thread will form a V on the underside of the fabric. The lower looper thread will pull into a straight line at the fabric edge.
- Unfold the fabric and pull on opposite sides of the seam to pull the stitches flat.
Decorative flatlock, wide (C)
- Place the upper cutter in the nonworking position. The fabric should not be trimmed on this stitch.
- Follow steps 1-3 above.
- Fold the fabric piece, wrong sides together, to sew a decorative stitch on the right side of the project.
- Position the fabric so the seam is sewn with part of the stitch extending off the fabric.
- Unfold the fabric and pull on opposite sides of the stitch to flatten.
Tip: The upper looper thread is the prominent thread in the flatlock stitch. Place a decorative thread in the upper looper and regular threads in the lower looper and needle.
D
natural_image
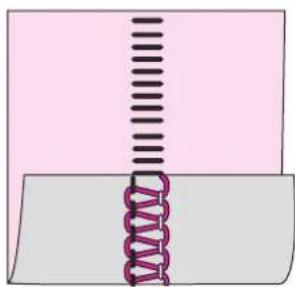
Simple line drawing of a notebook with a spring attached, no text or symbols presentLadder stitch (D)
A ladder stitch is a flatlock stitch but sewn with the right sides of the fabric together. The needle thread will be the prominent thread that creates the ladder.

natural_image
Abstract composition of pink geometric shapes and lines on white background (no text or symbols)Maintenance And Trouble Shooting

natural_image
Abstract composition of pink geometric shapes including a circle, elongated rectangle, and zigzag lines on white background (no text or symbols)Machine maintenance
natural_image
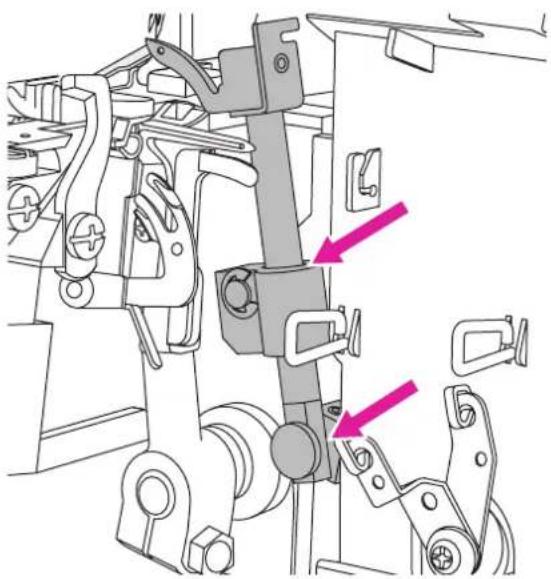
Mechanical assembly diagram showing linkage components with two pink arrows indicating specific parts (no text or labels present)An overlock requires more frequent maintenance than a conventional sewing machine for two reasons:
- A lot of lint is produced when the cutters are cutting the fabric.
- An overlock runs at a very high speed and needs to be oiled frequently to lubricate the internal working parts.
Cleaning
Attention
Turn off the main power switch and unplug the machine.
Open the front cover and remove all the lint using a lint brush.
Oiling
Attention
Turn off the main power switch and unplug the machine.
To keep the machine running smoothly and quietly the moving parts, pointed out in the picture, must be lubricated often. We recommend lubricating after every 24 hours of use. Use sewing machine oil. Do not use any other oil, it could damage the machine. Wipe the machine surface to remove all excess oil before sewing.
◆ Replacing the lower cutter
Attention
Turn off the main power switch and unplug the machine.
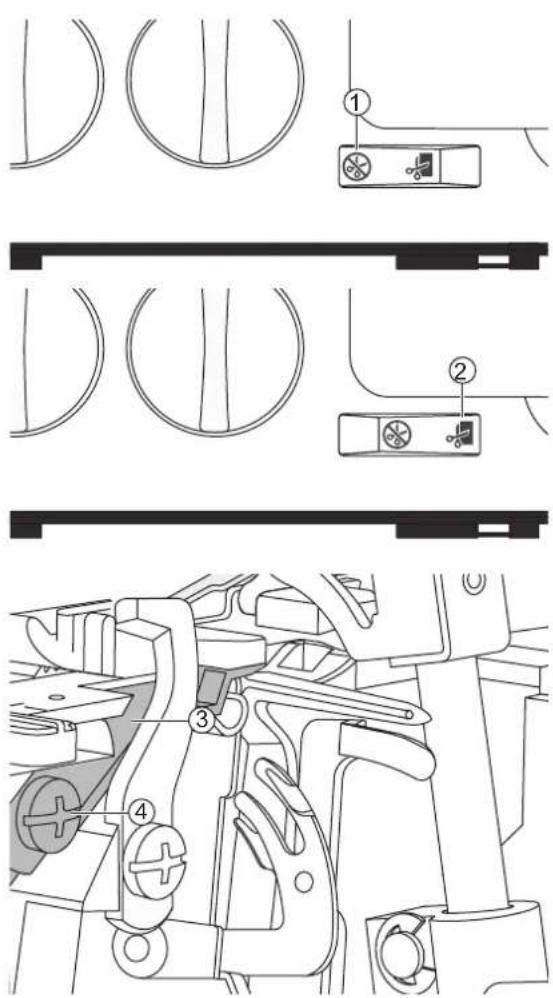
The stationary lower cutter should be changed when it becomes blunt. Change it by following the below instructions. If you are having any difficulties, consult your service agent to make the necessary adjustments.
- Turn off the upper cutter. Open the front cover.
- Loosen the lower cutter set screw and remove the stationary cutter.
- Place a new lower cutter in the groove of the lower cutter holder. The blade of the lower cutter shall be flush with the stitch plate.
- Tighten the lower cutter set screw.
- Turn the upper cutter on again.
- Turn the hand wheel so the needles are in their lowest position.
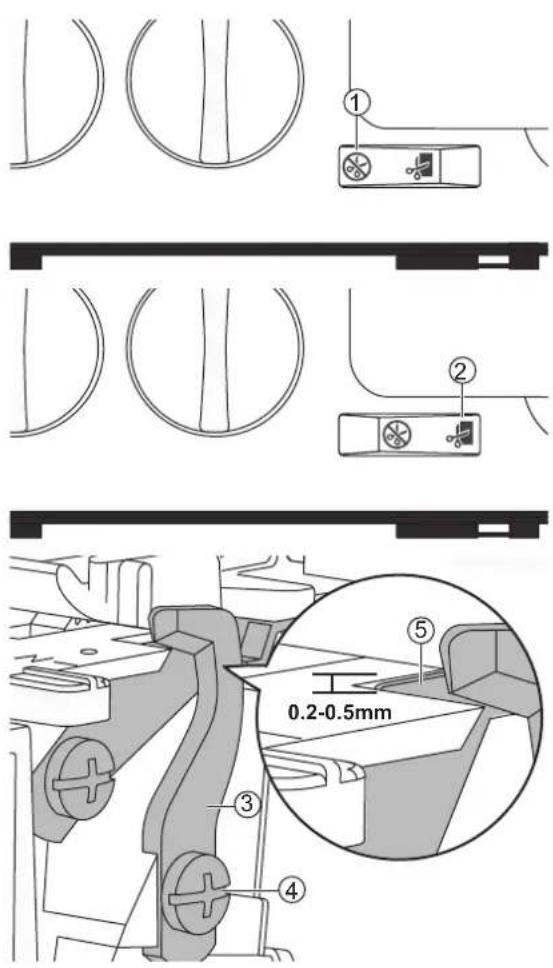
① Non-cutting position
② Cutting position
③ Lower cutter
④ Lower cutter set screw
◆ Replacing the upper cutter
Attention
Turn off the main power switch and unplug the machine.
The upper cutter should be changed when it becomes blunt. Change it by following the below instructions. If you are having any difficulties, consult your service agent to make the necessary adjustments.
- Place the upper cutter in its lowest position.
- Turn off the upper cutter. Open the front cover.
- Loosen the upper cutter set screw and remove the upper cutter.
- Place a new upper cutter in the groove of the upper cutter holder. The front edge of the upper cutter is approx 0.2-0.5mm lower than the cutting edge of the stationary cutter.
- Tighten the upper cutter set screw.
- Turn the upper cutter on again.
① Non-cutting position
② Cutting position
③ Upper cutter
④ Upper cutter set screw
⑤ Lower cutter
Storage
When the machine is not in use, be sure to keep it unplugged. Store the machine, so it is not exposed to direct sunlight or humidity.
Trouble shooting guide
Before calling for service, check the following items. If the problem still persists, contact the place of purchase or your nearest authorized dealer.
| Problem Cause Correction Reference | |||
| Machine does not run | 1. Machine not properly connected to power source. | 1. Check that machine has been properly connected to power source. | 3 |
| Fabric does not feed well | 1. Stitch length is set too short for the fabric being sewn. | 1. Increase the stitch length setting. | 20 |
| 2. Differential feed is not set in the correct position for the fabric being sewn. | 2. Adjust the differential feed. | 18 | |
| 3. Presser foot pressure not correctly set for fabric being sewn. | 3. Adjust presser foot pressure. | 19 | |
| Needle breaks | 1. Needle may not be properly seated in the needle clamp. | 1. Insert needle so that it is all the way up in the needle clamp, then tighten the screw securely. | 6 |
| 2. Manually pulling fabric from behind presser foot while sewing which causes needles to deflect. | 2. Refrain from pulling fabric manually; allow feed teeth to draw fabric under presser foot. | - | |
| 3. Needle may not be the correct size for the fabric being sewn. | 3. Use a needle size that is compatible for the fabric. | 10 | |
| Thread Breaks | 1. Machine may not be threaded correctly; threads threaded in the incorrect sequence. | 1. Check that machine is threaded in correct order. 10 | |
| 2. Thread is not unreeling smoothly off the thread spool. | 2. Check the thread spool to ensure thread is not getting caught. | - | |
| 3. Needle(s) may have a bent, dull or broken point. | 3. Replace needle(s). | 6 | |
| 4. The needle is inserted incorrectly. | 4. Insert the needle correctly. | 6 | |
| 5. Using thread that is poor quality or has uneven filament. | 5. Use good quality thread with a smooth, even filament. | - | |
| 6. Thread tension is set too tight. 6. | Loosen thread tension. | 16 | |
| 7. Thread is caught in one of the thread guides. | 7. Check threading path to ensure all threads are feeding smoothly. | - | |
| Stitches Skipping | 1. Needle(s) may have a bent, dull or broken point. | 1. Replace needle(s). | 6 |
| 2. Needle may not be properly seated in the needle clamp. | 2. Insert needle so that it is all the way up in the needle clamp, then tighten the screw securely | - | |
| Stitches Skipping | 3. Needle may not be the correct size for the fabric being sewn. | 3. Use a needle size that is compatible for the fabric. | 10 |
| 4. Machine may not be threaded correctly or threads were threaded in the incorrect sequence. | 4. Check that machine is threaded in correct order as shown in machine manual. | 10 | |
| 5. Using thread that is poor quality or has uneven filament. | 5. Use good quality thread with a smooth, even filament. | - | |
| Irregular Stitches | 1. Stitches are not balanced. 1. Adjust thread tensions and possibly cutting width. | 16/19 | |
| 2. Thread is not unreeling smoothly off the thread spool. | 2. Check the thread spool to ensure thread is not getting caught. | - | |
| 3. Machine may not be threaded correctly or threads threaded in the incorrect sequence. | 3. Check that machine is threaded in correct order as shown on. | 10 | |
| Fabric Puckers | 1. Thread tensions are set too tightly. | 1. Loosen thread tensions. | 16 |
| 2. Thread is not unreeling smoothly off the thread spool. | 2. Check the thread spool to ensure thread is not getting caught. | - | |
| 3. Using thread that is poor quality or has uneven filament. | 3. Use good quality thread with a smooth, even filament. | - | |
| 4. Stitch length is set too short. 4. Adjust stitch length to a longer setting. | 20 | ||
| 5. Differential Feed is not set in the correct position for the fabric being sewn. | 5. Adjust the differential feed. | 18 | |
| Irregular Trimming | 1. Upper and lower fabric cutters are not in proper position. | 1. Check alignment of cutters. | 37/38 |
| 2. Cutter(s) are damaged or worn out. | 2. Replace one or both cutters. | 37/38 | |
| Fabric Jams | 1. Upper and lower fabric cutters are not in proper position. | 1. Check alignment of cutters. | 37/38 |
| 2. Thread is not unreeling smoothly off the thread spool. | 2. Check the thread spool to ensure thread is not getting caught. | - | |
| 3. Too much fabric thickness. 3. Compress thick layers with conventional sewing machine before sewing on your overlock machine. | - | ||
◆ Technical specifications
| Sewing speedMaximum 1200 ± 100 rpm | Stitch length1–4mm | Needle bar stroke25 ± 3mm |
| Needles#90/14 | Stitch width2.3–7mm | Presser foot rise5–7mm |
| Number of needles1–2 | Differential feed ratio0.7–2.0 | Weight6.3kg |
| Number of threads2–4 | Type of lampLED light | Machine dimensionsWidth: 323mmDepth: 280mmHeight: 295mm |
| Protection classII (Europe) | Power ratingMachine: 100WattLED Light: 100mWatt | Rated voltage120V/60Hz (North America)230V/50Hz (Europe)240V/50Hz (UK, Ireland, North Ireland, Cyprus |




Do not dispose of electrical appliances as unsorted municipal waste, use separate collection facilities.
Contact your local government for information regarding the collection systems available.
If electrical appliances are disposed of in landfills or dumps, hazardous substances can leak into the groundwater and get into the food chain, damaging your health and well-being.
When replacing old appliances with new ones, the retailer is legally obligated to take back your old appliance for disposal at least for free of charge.
- Important safety instructions
- DANGER - To reduce the risk of electric shock:
- WARNING - To reduce the risk of burns, fire, electric shock, or injury to persons:
- SAVE THESE INSTRUCTIONS
- Contents
- Machine Introduction VII
- Machine Settings 9
- Stitch Chart 23
- Sewing Basics 29
- Sewing 30
- Maintenance And Trouble Shooting 36
- Machine maintenance 37
- Trouble shooting guide....40
- Machine Introduction
- Principal parts of the machine
- ◆ Front and side of machine
- Inside of machine
- Accessories
- Connecting machine to power source
- Note
- Attention
- ◆ Polarized plug information
- Foot control
- Setting up the telescopic thread stand
- Open and close the front cover
- Open the front cover
- Close the front cover
- Remove and replace the flat bed extension
- ◆ Free arm sewing
- Remove the flat bed extension
- ◆ Replace the flat bed extension
- Presser foot lifter
- Changing the needles
- Changing the presser foot
- How to use the upper cutter
- ◆ Deactivate the upper cutter
- ◆ Reactivate the upper cutter
- Attach the 2-thread overlock converter
- Remove the 2-thread overlock converter
- Getting ready to sew
- ◆ General threading information
- Important:
- Tip:
- What needle and thread to use with different fabrics
- ◆ Threading the upper looper (red)
- ◆ Threading the lower looper (yellow)
- ◆ Threading the left needle (purple)
- ◆ Threading the right needle (green)
- Waste collector
- ◆ Install the waste collector
- Remove the waste collector
- Thread tension
- Correct thread tension
- Upper looper thread is too loose
- Upper looper thread is too tight
- Lower looper thread is too loose
- Lower looper thread is too tight
- Left needle thread is too loose
- Left needle thread is too tight
- Right needle thread is too loose
- Right needle thread is too tight
- Differential feed adjustment
- Gathered overlock (stretch, knit fabrics)
- Stretch overlock (light weight fabrics)
- Presser foot pressure adjustment
- Stitch width settings
- Width adjustment by changing needle position
- Width adjustment with the cutting width lever
- Stitch length settings
- Stitch finger lever setting
- Stitch chart
- ◆ Stitch overview
- 4-Thread overlock
- 3-Thread overlock, wide (and narrow)
- 3-Thread narrow edge
- 3-Thread flatlock, wide (and narrow)
- 3-Thread rolled edge
- 2-Thread overedge, wide (and narrow)
- 2-Thread wrapped overlock, wide (and narrow)
- 2-Thread rolled edge
- Sewing
- Changing thread
- ◆ Start sewing
- Pin placement
- Warning
- Securing thread chain
- Corded overlock
- Gathering using the differential feed
- ◆ Rolled edge sewing
- 2-Thread rolled edge (A)
- 3-Thread rolled edge (B) / narrow edge (C)
- Flatlock sewing
- Standard flatlock, wide (B)
- Decorative flatlock, wide (C)
- Ladder stitch (D)
- Maintenance And Trouble Shooting
- Machine maintenance
- Cleaning
- Oiling
- ◆ Replacing the lower cutter
- ◆ Replacing the upper cutter
- Storage
- Trouble shooting guide
Brand : NECCHI
Model : L234A
Category : Sewing machine