
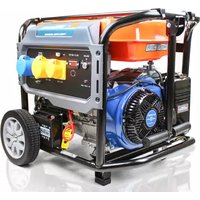
HY2800L-2 - Generator HYUNDAI - Free user manual and instructions
Find the device manual for free HY2800L-2 HYUNDAI in PDF.


| Brand | Hyundai |
| Model | HY2800L-2 |
| Type | Portable Generator |
| Engine Type | 4-Stroke OHV, Single Cylinder |
| Displacement | 196 cc |
| Max. Output Power | 2.8 kVA (2.8 kW) |
| Rated Output Power | 2.5 kVA (2.5 kW) |
| Fuel Type | Unleaded Gasoline |
| Fuel Tank Capacity | 15 L |
| Run Time (50% load) | Approx. 10 hours |
| Output Voltage | 230 V AC / 12 V DC |
| Starting System | Recoil Start |
| Noise Level | Approx. 70 dB(A) @ 7m |
| Dimensions (L x W x H) | Approx. 600 x 430 x 430 mm |
| Weight | Approx. 45 kg |
| Protection Features | Low Oil Shutdown, Overload Protection |
| Outlet(s) | 2 x 230V AC Sockets, 1 x 12V DC Terminal |
| Maintenance | Regular oil change, air filter cleaning, spark plug inspection |
| Frame Material | Steel with Anti-Vibration Mounts |
| Warranty | Refer to manual for details |
Frequently Asked Questions - HY2800L-2 HYUNDAI
User questions about HY2800L-2 HYUNDAI
0 question about this device. Answer the ones you know or ask your own.
Ask a new question about this device
Download the instructions for your Generator in PDF format for free! Find your manual HY2800L-2 - HYUNDAI and take your electronic device back in hand. On this page are published all the documents necessary for the use of your device. HY2800L-2 by HYUNDAI.
USER MANUAL HY2800L-2 HYUNDAI
OPEN FRAME PETROL GENERATORS
HY2800L-2, HY3800L-2, HY3800LEK-2, HY7000LEK-2, HY9000LEK-2 & HY10000LEK-2
User Manual

natural_image
Technical line drawing of a portable gas generator with visible internal components (no text or symbols)CONTENTS
PAGE N ^0/s
- SAFETY 4-8
- UNPACKING & ASSEMBLY 8-9
- PARTS LOCATIONS 10
- PREPARATION FOR USE 11 - 12
- STARTING & STOPPING MACHINE 13 - 16
- MAINTENANCE 17 – 20
- STORAGE & TRANSPORTATION 21
- SPECIFICATION 22
- RECYCLING & PRODUCT DISPOSAL 23
- DECLARATIONS of CONFORMITY 24
- CONTACT DETAILS 25
- MANUAL UPDATES 25
- WARRANTY 25
1. SAFETY
1.1. General safety notes.
1.1.1. The operator of the machine is responsible for, and has a duty of care in making sure that the machine is operated safely and in accordance with the instrucons in this user manual. Keep the manual safe and pass it on if the machine is loaned or sold to another user.
1.1.2. Please note the following safety points.
1.1.2.1. The machine should never be le it in a condion which would allow an untrained or unauthorised person/s to operate this machine.
1.1.2.1.1. All due care and diligence should be taken by the operator for the safety of, and with regard to, those around whilst using the machine.
1.1.2.1.2. Some or all of the following - warning signs, symbols and/or PPE pictograms may appear throughout this manual. You MUST adhere to their warning/s. Failure to do so may result in personal injury to yourself or those around you.
| The FOLLOWING safety notes will help avoid or reduce risk of injury or death. | |||||||
 DANGERIndicates a hazard, which, if not avoided, could result in serious injury or death. DANGERIndicates a hazard, which, if not avoided, could result in serious injury or death. |  WARNINGIndicates a hazard, which, if not avoided, could result in serious injury. WARNINGIndicates a hazard, which, if not avoided, could result in serious injury. |  CAUTIONIndicates a hazard which, if not avoided, might result in minor or moderate injury. CAUTIONIndicates a hazard which, if not avoided, might result in minor or moderate injury. | |||||
 NOTEIndicates a situation that could easily result in equipment damage. NOTEIndicates a situation that could easily result in equipment damage. | [TSDT]READ and keep the manual safe and pass it on if the machine is loaned or sold to another user. |  You MUST fully read instrucons to make sure you use and operate machine safely. You MUST fully read instrucons to make sure you use and operate machine safely. | |||||
| Appropriate Personal Protective Equipment (PPE)MUST be worn at all mes when machine is in use or being repaired. | |||||||
 |  |  |  |  |  |  |  |
| ALWAYS keep the working area clear of non-essenal people to include, but not limited to, children, the elderly and vulnerable persons.NEVER ALLOW an untrained person to use this machine. | |||||||
1.2. Carbon monoxide.
1.2.1. Carbon monoxide is a colourless and odourless gas. Inhaling this gas can cause death as well as serious long term health problems such as brain damage.
1.2.2. The symptoms of carbon monoxide poisoning can include but are not limited to the following;
Headaches, dizziness, nausea, breathlessness, collapsing or loss of consciousness.
1.2.2.1. Carbon monoxide poisoning symptoms are similar to u, food poisoning, viral infecons and simply redness. It is quite common for people to mistake this very dangerous poisoning for something else.
1.2.2.2. To avoid carbon monoxide poisoning DO NOT use Petrol/Diesel-powered equipment inside any of the following;
Home, garage, tent, camper van, mobile home, caravan or boat.
This list is not exhaustive and if you are in any doubt contact your dealer.
1.2.3. If you think you have or someone around you has been aected by carbon monoxide poisoning;
1.2.3.1. Get them fresh air immediately, by leaving the aected area or by opening doors and windows. If safe and praccal to do so make sure that the machine is turned o. DO NOT enter a room you suspect of having carbon monoxide present – instead call the emergency services.
1.2.3.2. Contact a doctor immediately or go to hospital - let them know that you suspect carbon monoxide poisoning.
1.2.4. DO NOT use in an enclosed area or a moving vehicle.

1.3. General fuel safety.

CAUTION
ALL FUELS ARE FLAMMABLE
1.3.1. Fire hazard - keep fuel away from all sources of ignition for example heaters, lamps, sparks from grinding or welding.

Fire Hazard
1.3.2. DO NOT carry out hot work on tanks that have contained fuel it is extremely dangerous.
1.3.3. ALWAYS keep work area clean and dy.
1.3.4. ALWAYS clean up all spills promptly using correct methods i.e. absorbent granules and a lidded bin.
1.3.5. ALWAYS dispose of waste fuels correctly.
1.4. Fueling/De-fueling (where applicable).

CAUTION
ALL FUELS ARE FLAMMABLE
1.4.1. ALWAYS fuel and defuel in a well-venlated area outside of buildings.
1.4.2.ALWAYS wear correct, suitable and t for purpose Personal Protective Equipment (PPE), suggested items are but not limited to safety gloves and overalls.

1.4.3. When fueling/de-fueling ALWAYS avoid inhaling fumes
1.4.4. When de-fueling ALWAYS use a propriety fuel retriever.
1.4.5. ALWAYS carry fuel in the correct and clearly marked container.

Fire Hazard
1.5. Electrical safety.

Risk of
electric shock
1.5.1. Electricity can kill - NEVER work on LIVE/ENERGISED equipment.
1.5.2. Prior to carrying out any maintenance work you MUST Identify electrical isolaon methods and isolate all electrical supplies,
1.5.3. Prior to use and with all electrical supplies isolated You MUST check all electrical cables, plugs and connecons for the following;
1.5.3.1. Are intact and have no signs of damage, to include but not limited to bare wires, chang, cuts and loose wiring.
1.5.3.2. If there are any signs of damage, the damaged item MUST be taken out of service until the damage has been repaired by an electrically competent person.
1.5.3.3. All trailing cables should be routed so as not to cause any kind of trip hazard.
1.5.3.4. NEVER work on or near electricity with wet hands, wet clothing, and wet gloves.
1.6. Baeries (Not ed on HY2800L-2/HY3800L-2 models).

Corrosive
1.6.1. Baeries present a risk if they become damaged by the possible leaking of electrolyte. This electrolyte is an acid and can cause serious burn injuries. Care should be taken when working on or near them. NOTE the electrolyte may be in liquid or gel form.
1.6.2. Should you come into contact with electrolyte you should;
1.6.2.1. Remove all clothing contaminated with electrolyte. If you cannot remove then saturate in water.
1.6.2.2. Get medical assistance as soon as possible. You must advise the medical sta of the type acid.
1.6.2.2.1. Lead/acid baery = dilute sulphuric acid
1.6.2.2.2. Nickel/cadmium = potassium hydroxide alkali electrolyte.
1.6.2.3. Use fresh running water to wash o excess electrolyte, connue this unl medical assistance arrives. Make sure that you do not wash the electrolyte to another part of the face or body.
1.6.2.4. If electrolyte comes into contact with Eyes the electrolyte needs to be immediately washed away with large amounts of water. Make sure that you do not wash the electrolyte to another part of the face or body.
1.6.3. Gasses from charging baeries are highly ammable and great care should be taken to charge in well venlated areas.
1.6.4. There is an explosion risk if the baery terminals are short circuited, when connecng/dis-connecng ALWAYS exercise great care so that the terminals or baery leads are NOT allowed to touch and cause a spark. ALWAYS use suitable insulated tools.

Risk of explosion
1.7. Noise.
1.7.1. The operang noise of the machine can damage your hearing. Wear hearing protecon such as earplugs or ear defenders to protect your hearing. Long-term and regular users are advised to have hearing checked regularly. Be especially vigilant and cauous when wearing hearing protecon because your ability to hear alarm warnings will be reduced.
1.7.2. Noise emissions for this equipment is unavoidable. Carry out noisy work at approved mes and for certain periods. Limit the working me to a minimum. For your personal protecon and protecon of people working nearby it is also advisable for them to wear hearing protecon.
1.7.3. See CERTIFICATE of CONFORMITY secon for Outdoor Noise declaraon of conformity.

2. UNPACKING & ASSEMBLY
2.1. Unpacking.
2.1.1. Place the carton on a rm at surface.
2.1.2. Remove everything from the carton except the generator.
2.1.3. Open the carton by carefully cung the carton down each corner, being careful not to cut the machine.
2.1.4. Leave the generator on the carton while you install the wheel kit.
N.B. The HY2800L-2/HY3800L-2 versions DO NOT come with wheel kits.
2.2. Packing contents.
2.2.1. Owner's manual – quantity 1.
2.2.2. Wheels – quantity 2.
2.2.3. Handle assembly – quantity 1.
2.2.4. Wheel axle – quantity 2.
2.2.5. Hardware bag comprising of;
2.2.5.1. Spark plug socket – quantity 1.
2.2.5.2. Socket bar – quantity 1.
N.B. The above packaging contents in this manual are for reference only and do not represent for any specific model.
2.3. Assembly.
2.3.1. The generator requires some assembly prior to rst use.
2.3.2. The wheels are designed to give improved the portability.
N.B. The wheels are NOT intended for on road use.
2.3.3. To install the wheels.
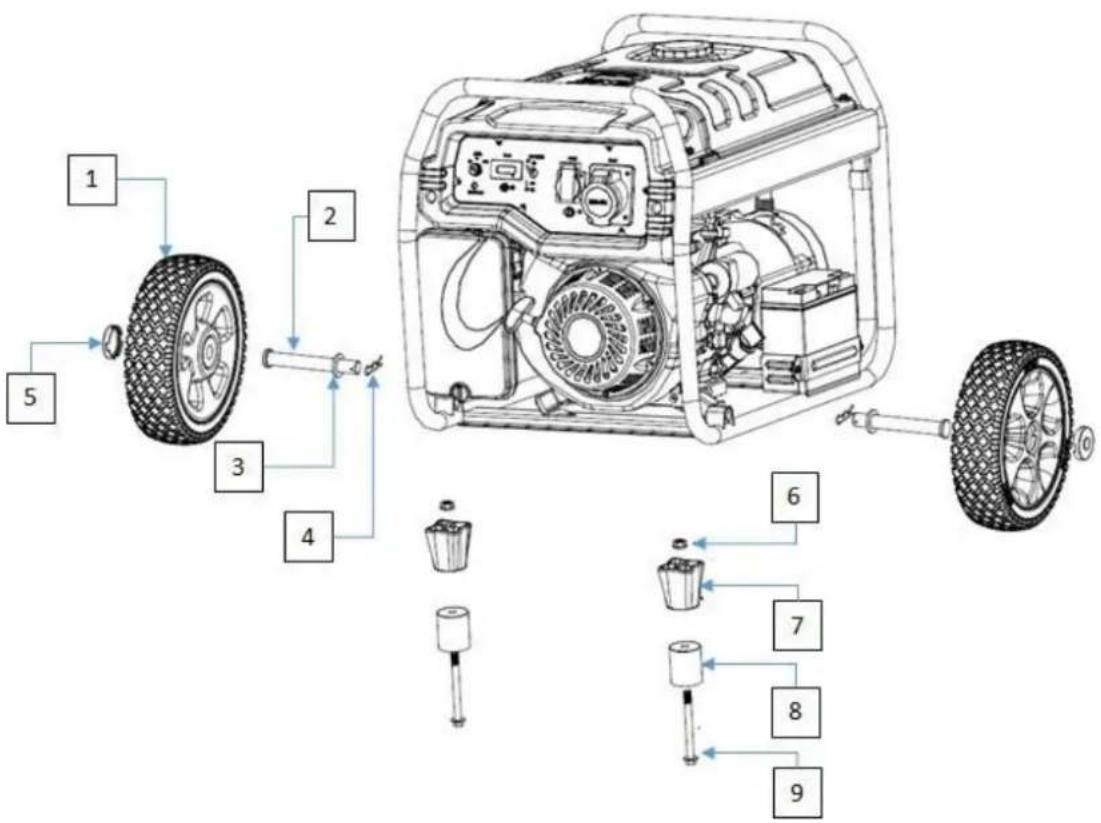
2.3.3.1. Slide the axle (2) through the wheel (1) from the outside then pass the axle through the at washer (3) and through the frame.
2.3.3.2. Once axle is passed through the frame put the 'P' clip (4) through the axle hole.
2.3.4. To t the rubber feet.
2.3.4.1. Pass the bolt (9) through the rubber pad (8) and support (7).
2.3.4.2. Pass the end of the M8 bolt (9) through the frame and secure it in place with the M8 nut (6).
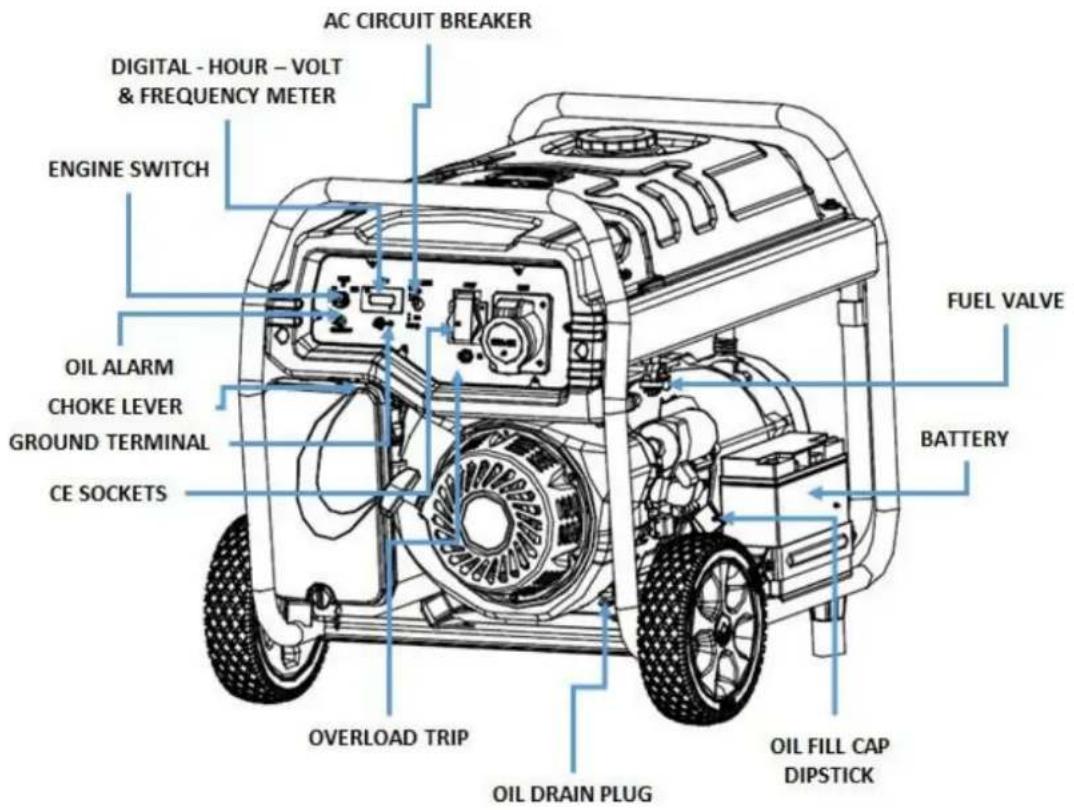
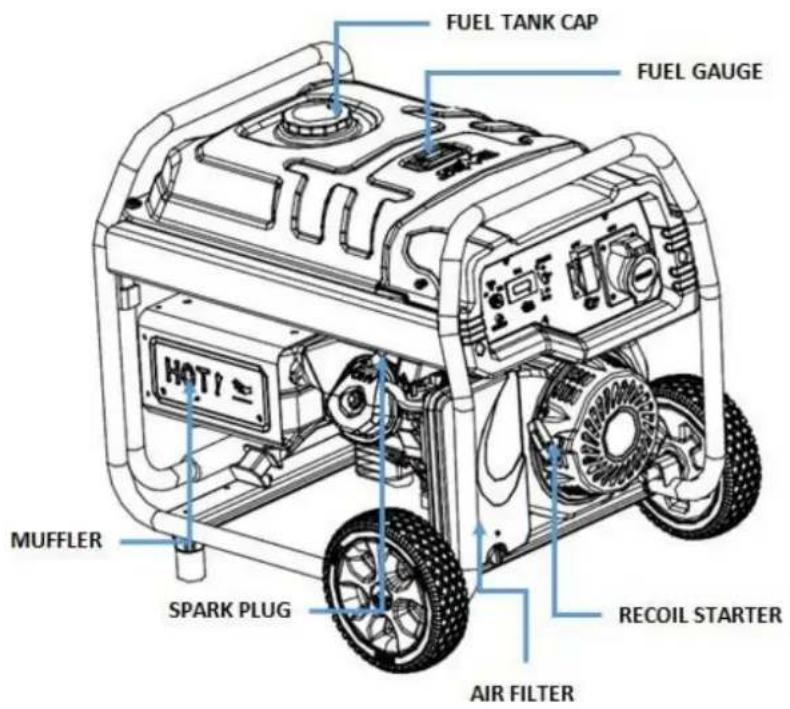
3. PARTS LOCATIONS
3.1.Generic locaons - locaons may vary slightly between models.
4. PREPARATION BEFORE USE

NOTE
The machine is shipped without oil - You MUST add oil before using this machine.
4.1. Oil type - SAE15W40.
4.2. Adding oil.
4.2.1. Place the generator on a at, level surface.
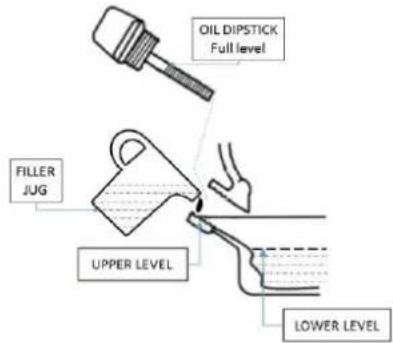
4.2.2. Clean area around oil ller and remove oil cap and dipsck. Wipe the dipsck clean.
4.2.3. Slowly ll the engine with oil through the oil ller unl it reaches the upper thread of the ller hole or to the full mark on the dipsck.
4.2.4. Stop lling occasionally to check oil level. DO NOT over II.
4.2.5. Ret the oil ller cap and make sure the cap is ghtened.
4.2.6. You MUST check engine oil level before starng every session.
4.3. Fuel type Unleaded Petrol.
4.4. Adding fuel.

CAUTION
Do not overll the fuel tank you MUST allow space for fuel expansion. If the fuel tank is overllled, fuel can overow onto a HOT engine and cause FIRE and/or EXPLOSION. If fuel does spill, wait unl it evaporates before starng engine. Check fuel lines, tank, cap and ngs frequently for cracks or leaks. Replace as required.
4.4.1. DO NOT light cigarees or smoke when lling the fuel tank. Fuel is highly FLAMMABLE and it's vapours are EXPLOSIVE.
4.4.2. NEVER II fuel tank when engine is running or hot. Turn generator engine OFF and allow engine to cool enrely before lling fuel tank.
4.4.3. Avoid spilling petrol onto HOT engine.
4.4.4. Keep fuel away from sparks, open ames, pilot lights, heat, and other sources of ignition.
4.4.5. DO NOT mix oil with petrol.
4.4.6. Once fueling has nished ret the fuel cap and fully ghten. Wipe up any spilled fuel before starng machine.


4.4.7. IMPORTANT: To prevent gum deposits from forming in fuel system parts such as the carburetor, fuel hose or tank during storage. Alcohol-blended fuels (called gasohol), ethanol or methanol can aract moisture, which leads to separaon and formaon of acids during storage. Acidic gas can damage the fuel system. Fuel should be emped before storage for 30 days or longer. See the “Storage” secon. NEVER use engine or carburetor cleaner products in the fuel tank as permanent damage may occur.
4.5. Grounding (Earthing) the generator.
4.5.1. The Requirement for Electrical Installaons BS 7971:2008 requires that the frame and external electrically conducive part of this generator be properly connected to an approved earth ground.
4.5.2. Proper grounding of the generator will help prevent electric shock in the event of ground fault condition in the generator or in connected electrical devices.
4.5.3. Proper grounding also helps dissipate stac electricity, which oen builds up in ungrounded devices.
4.6. Floang earth portable generator use.
4.6.1. This range of generators adopt a oang earth conguraon which means that the Neutral of the alternator is not connected to the Earth of the machine.
4.6.2. It is therefore IMPORTANT that you ONLY use the generator to supply equipment in the following combinaons.
4.6.2.1. One or more of CLASS II equipment
4.6.2.2. Only ONE item of Class I equipment
4.6.2.3. One or more of CLASS II equipment and only ONE item of Class I equipment.
4.6.3. CLASS I equipment has a GREEN/YELLOW earth wire connected inside the plug.
4.6.4. CLASS II equipment DOES NOT have GREEN/YELLOW earth wire connected inside the plug.
4.6.5. CLASS II equipment will have the following symbol embossed or printed on the casing.

5. STARTING & STOPPING MACHINE

NOTE
WARNING NEVER start or stop engine with electrical devices plugged into the power outlets and devices turned on. Unplug all electrical loads from the unit's power outlets, or make sure that the main breaker is OFF (down) posion, before starng the engine.
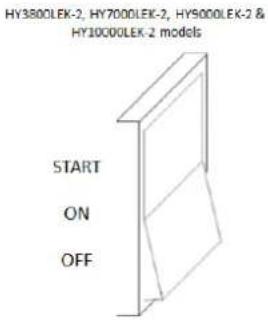
5.1. Starng the engine – Recoil start. 5.1.1. On HY2800L-2/HY3800L-2 models press the engine switch (2 posion switch) to ON posion, on HY3800LEK-2, HY7000LEK-2, HY9000LEK-2 & HY10000LEK-2 models press the engine switch (3 posion switch) to ON then to START posion.

5.1.2. Turn the fuel tap to the ON posion.

5.1.3. Move the engine choke lever to the START posion.

flowchart
graph TD
    A["START"] --> B["CHOKE LEVER"]
    B --> C["RUN"]
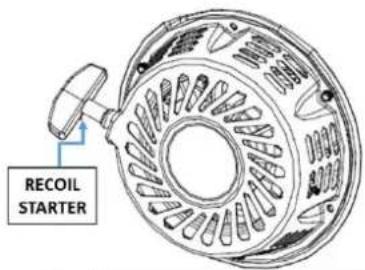
5.1.4. For recoil start, rmly grasp the recoil handle and pull slowly until increased resistance is felt. Then pull rapidly up and away.
5.1.5. When the engine starts, move choke lever to the 12 - choke posion II engine runs smoothly and then to RUN posion. If engine falters, move the choke lever back to 12 - choke posion unl engine runs smoothly and then fully RUN posion again.

WARNING
Starter cord kickback (rapid retracon) will pull hand and arm toward engine faster than you can let go which could cause broken bones, fractures, bruises, or sprains resulting in serious injury. When starng engine, pull cord slowly until resistance is felt and then pull rapidly to avoid kickback. NEVER wrap the starter cord around your hand.

NOTE
If engine fails to start aer 3 pulls, or if unit shuts down during operaon. Make sure the unit is on a at level surface and check for proper oil level in crankcase. This engine is equipped with a low oil level protecon device.
5.2. For electric start.

NOTE
If baery is discharged or unavailable, use manual starng instrucons as above.
5.2.1. Follow steps 5.1.1. To 5.1.3.
5.2.2. Press and hold the switch at the "START" posion unl generator starts.
HY3800LEK-2, HY7000LEK-2, HY9000LEK-2 & HY10000LEK-2 models
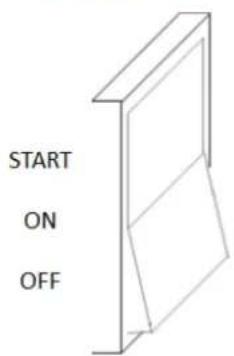
5.2.3. To prolong the life of starter motor and starter components, DO NOT press the start switch in the "START" posion for more than 5 seconds, you MUST then pause for at least 1 minute between starng aempts.
5.2.4. When the engine starts, move the choke lever to 12 - choke posion II engine runs smoothly and then to RUN posion. If the engine falters, move the choke lever back to 12 - choke posion unl engine runs smoothly and then fully RUN posion again.

WARNING
Exhaust system heat and/or gases could ignite combustible, structures or damage the fuel tank causing a re, resulting in death, serious injury and/or property damage. Contact with muer area could cause burn resulting in serious injury.
DO NOT touch hot part and AVOID hot exhaust gases.
You MUST allow the equipment to cool before touching.
Keep at least 5 feet (152 cm) of clearance on all sides of generator including overhead.
IMPORTANT DO NOT overload the generator. DO NOT overload individual output sockets.
These outlet sockets are protected against overload with push-to-reset-type circuit breakers. If current rang of any circuit breaker is exceeded, that breaker will open and the electrical output to that socket will be lost.
5.3. Connecng electrical loads.
5.3.1. Let the engine run unl the rpm is stable and has been allowed to warm up for a few minutes aer starng.
5.3.1.1. Then plug in and turn on the electrical loads.
5.3.1.2. Add up the rated was (or amps) of all loads to be connected
at one me. This total should not be greater than;
5.3.1.2.1. The circuit breaker rang of the output socket supplying the power or,
5.3.1.2.2. The rated waage/current capacity of the generator.

NOTE
Connect all electrical loads in the OFF posion then turn ON for operaon.
Turn all electrical loads OFF and disconnect from generator before stopping generator. # Exceeding generators waage/current capacity could damage generator and/or electrical devices connected to it.
DO NOT exceed the generator's waage/current capacity.
# Failure to disconnect the electrical load before switching the generator OFF may damage the AVR.
5.4. Overloading.
5.4.1. Overloading a generator in excess of its rated waage capacity can result in damage to the generator and to connected electrical devices.
5.4.2. Observe the following to prevent overloading of the unit;
5.4.2.1. Add up the total waage of all electrical devices to be connected at one me. This total should NOT be greater than the generator's waage capacity.
5.4.2.2. The rated waage of lights can be taken from light bulbs. The rated waage of tools, appliances and motors can usually be found on a data label or decal axed to the devices. If the appliance, tool or motor does not give waage, mulply volts mes ampere rang to determine was (volts × amps = was).
5.4.2.3. Some electrical inducon motors, require about three mes more power for starng than for running. This surge of power only lasts a few seconds when starng. You MUST make sure you allow for high starng waage when selecng electrical devices to connect to the generator;
5.4.2.3.1. Calculate the was needed to start the largest motor.
5.4.2.3.2. Add to that gure the running was of all other connected loads. Start the largest motor rst and only one motor at a me.
5.5. Stopping the engine.
5.5.1. Switch o all loads then unplug them from the generator outlet sockets. NEVER start or stop the engine with electrical devices plugged in and turned on. Switch the main breaker down (OFF).
5.5.2. Let the engine run with no-load for several minutes to stabilise the internal temperatures of engine and generator.
5.5.3. Move the engine switch to the OFF posion,
5.5.4. Close the fuel valve.
5.6. Low oil level system shutdown.
5.6.1. The engine is equipped with a low oil level sensor that shuts down the engine automacally when the oil level drops below a specied level.
5.6.2. If the engine shuts down by itself and the fuel tank has enough petrol, check the engine oil level. Engine oil level should be checked daily.
5.7. High altitude.
5.7.1. To remain emissions compliant at high altitude (altudes over 5,000 feet or 1524 meters) adjustment is required. This adjustment will cause decreased performance, increased fuel consumption, and increased emissions. Contact your dealer for high altitude adjustment informaon.
5.7.2. Operaon of the engine at altitudes below 2,500 feet or 762 meters with the high altitude kit is not recommended.
6. MAINTENANCE
6.1. Follow the maintenance intervals shown below. More frequent service is required when operang in adverse conditions.
| MAINTENANCE SCHEDULE | |
| Aer rst 10 hours | Change the engine oil - use SAE15W40 |
| Every 8 hours or Daily | Clean the machine |
| Check the engine oil level | |
| Every 25 hours or Yearly | Clean the engine air Iter |
| Every 100 hours oR Yearly | Change the engine oil - use SAE15W40 |
| Yearly | Replace the engine air Iter |
| Service the fuel valve | |
| Service the spark plug | |
| Check the muer and the spark arrester | |
| Clean the cooling system | |
6.2. General recommendations.
6.2.1. The warranty of the generator does not cover items that have been subjected to operator abuse or negligence. To receive full value from the warranty, the operator must maintain the generator as instructed in this manual. Some adjustments will need to be made periodically to properly maintain the generator.
6.2.2. All adjustments in the Maintenance secon of this manual should be made at least once each season. Follow the requirements in the "Maintenance Schedule".
IMPORTANT Once a year replace the spark plug and the air liter. A new spark plug and a clean air liter helps the engine run beer and last longer.
6.2.3. Generator maintenance.
6.2.3.1. Generator maintenance consists of keeping the unit clean and dry. Operate and store the unit in a clean dry environment where it will not be exposed to excessive dust, dirt, moisture or any corrosive vapors. Cooling air slots in the generator must not become clogged with snow, leaves, or any other foreign material. DO NOT use the machine where it can become exposed to rain, snow, sleet or any other type of moisture.
6.2.3.2. Check the cleanliness of the generator frequently and clean when dust, dirt, oil, moisture or other foreign substances are visible on its exterior surface.
CAUTION
Never insert a nger, object or tool through the air cooling slots, even if the engine is not running.
NOTE
DO NOT use a garden hose or pressure washer to clean the generator. Water can enter the engine fuel system and cause problems. In addition, if water enters the generator though
the cooling air slots, some water will be retained in voids and crevices of the rotor and stator winding insulaon which can cause electrical shorts circuits and damage the alternator. Water and dirt build up on the generator internal windings will eventually decrease the insulaon resistance of these windings.
6.2.4. Cleaning the external of the generator.
6.2.4.1. Use a damp cloth to wipe the exterior surfaces.
6.2.4.2. A so, bristle brush may be used to remove dirt, oil etc.
6.2.4.3. A vacuum cleaner may be used to pick up loose dirt and debris.
6.2.4.4. Low pressure air (not to exceed 25 psi) may be used to blow away dirt.
6.2.4.5. Check cooling air slots and openings on the generator. These openings must be kept clean and unobstructed.
6.3. Engine Maintenance.

WARNING
When working on the generator, you MUST always disconnect the spark plug HT cable from the spark plug and keep the cable away from the spark plug. The fuel tap should also be in the OFF posion.
6.4. Oil change.

CAUTION
Hot oil may cause burns. Allow engine to cool before draining oil. Avoid prolonged or repeated skin exposure to used oil. Thoroughly wash exposed areas with soap.
6.4.1. Before starng you MUST allow the engine to cool down slightly. While the engine is cooling down;
6.4.1.1. Clean area around oil drain plug.
6.4.1.2. Remove oil drain plug and dipsck from the engine to drain oil completely into a suitable container.
6.4.1.3. When oil has completely drained, ret the oil drain plug and fully ghten.
6.4.1.4. Fill the engine with recommended oil. SA15W40
6.4.1.5. Wipe up any spilled oil.
6.4.1.6. Dispose of used oil at a proper collecon center.
6.4.1.7. Ret the dipsck.

6.4.2. Spark plug replacement.
6.4.2.1. Use spark plug F6TC, BPR4ES or Champion RN14YC. Replace the plug once each year. This will help the engine to start easier and run beer.
6.4.2.2. Stop the engine and remove the HT lead from the spark plug.
6.4.2.3. Clean the area around the spark plug and remove it from the cylinder head.
6.4.2.4. Set the spark plug's gap to 0.70-0.80 mm (0.028-0.031 in.). Install the correctly gapped spark plug into the cylinder head and torque to 15 /lbs.

6.4.3. Spark arrestor service. # Spark arrester tment may vary model to model.
6.4.3.1. Shut o generator and allow the engine and muer to cool down completely before servicing spark arrestor (located on the back of the muer).
6.4.3.2. Remove the clamp and spark arrestor screen.
6.4.3.3. Clean the spark arrestor screen with a small wire brush.
6.4.3.4. Replace the spark arrestor if it is damaged.
6.4.3.5. Ret the spark arrestor.
6.4.4. Air Iter service.
6.4.4.1. The engine will not run properly and may be damaged if using a dirty airIter. Replace the airIter once a year. Clean or replace more oen if operang under dusty conditions.
6.4.4.2. Undo air liter cover screw and remove air liter cover.
6.4.4.3. Remove sponge Iter element.
6.4.4.4. Wash Iter element in soapy water. Squeeze Iter dry in clean cloth (DO NOT TWIST).
6.4.4.5. Clean air Iter cover before re-installing it.
6.4.4.6. Put a drop of engine oil onto spongeIter element this will help avoid ice blocking it during winter season.

6.4.5. Valve clearances.
IMPORTANT If you are not competent to carry out this procedure or the proper tools are not available. We advise that you take the generator to your dealer to have the valve clearance adjusted. This is a very important step to ensure longest life for the engine.
6.4.5.1. Aer the rst 50 hours of operaon, check the valve clearance in the engine and adjust if necessary.
6.4.6. General.
6.4.6.1. The generator should be started at least once every seven days and be allowed to run for at least 30 minutes. If this cannot be done and the unit must be stored for more than 30 days, use the following informaon as a guide to prepare it for storage.

WARNING
NEVER store engine with fuel in tank indoors or in enclosed, poorly venlated areas where fumes may reach an open ame, spark or pilot light as on a furnace, water heater, clothes dryer or other gas appliance.

WARNING
Drain the fuel into an approved container outdoors, away from open ame. Make sure that the engine is cool. DO NOT smoke in the vicinity. NEVER cover the generator while the engine and exhaust areas are HOT.
6.4.7. DO NOT store petrol from one season to another.
6.4.8. Replace the petrol container if it starts to rust. Rust and/or dirt in the petrol will cause problems with the carburetor and fuel system.
6.4.9. If possible, store the unit indoors and cover it to give it protecon from dust and dirt.
6.4.10. Make sure that you empty the fuel tank.
6.4.11. If it is not praccal to empty the fuel tank and the unit is to be stored for some me, use a commercially available fuel stabilizer added to the petrol to increase the life of the petrol.
6.4.12. Cover the unit with a suitable protective cover that does not retain moisture.
7. STORAGE & TRANSPORTATION
7.1. Storage.
7.1.1. It is important to avoid gum deposits from forming in essenal fuel system parts such as the carburetor, fuel hose or tank during storage. Also, experience indicates that alcohol-blended fuels (called gasohol, ethanol or methanol) can aract moisture, which leads to separaon and formaon of acids storage. Acidic gas can damage the fuel system of an engine while in storage.
7.1.2. To avoid engine problems, the fuel system should be emped before storage of 30 days or longer, empty fuel system as follows;
7.1.2.1. Remove all petrol from the fuel tank.
7.1.2.2. Start and run engine unl engine stops from lack of fuel.
7.1.2.3. While engine is sll warm, drain oil from crankcase. Rell with recommended grade engine oil - SAE15W40.
7.1.2.4. Remove the spark plug HT lead and spark plug and pour about 1/2 ounce (15 ml) of engine oil into the cylinder. Cover the spark plug hole with rag. Pull the recoil starter a couple mes to lubricate the piston rings and cylinder bore.
7.1.2.5. Install and ghten the spark plug. Do not re-connect spark plug HT lead.
7.1.3. Clean the generator outer surfaces.
7.1.4. Check that cooling air slots and openings on generator are clear of any obstrucons.
7.1.5. Store the unit in a clean dry, dust and dirt free place which is clear of any ammable and combustible materials.
7.2. Transportaon.
7.2.1. To avoid burn injuries you MUST allow the machine to cool fully when moving from one locaon to another. DO NOT move machine whilst it is sll hot.
7.2.2. You MUST drain the fuel tank before moving in a vehicle. Turn the fuel tap to the OFF posion.
7.2.3. To avoid injury or damage to the machine you MUST secure it whilst it is being transported in a vehicle.
7.2.4. DO NOT use in an enclosed area or a moving vehicle.
8. SPECIFICATION
| MODEL | HY2800L-2 | HY3800L-2 | HY3800LEK-2 | |
| ENGINE | Engine - hp | 6.5 | 7 | 7 |
| Displacement - cc | 196 | 210 | 210 | |
| Engine speed - rpm | 3000 | |||
| Fuel tank capacity - l | 15 | 15 | 15 | |
| Fuel type | Straight unleaded petrol | |||
| Oil type | SAE15W40 | |||
| Oil capacity - ml | 600 | 600 | 600 | |
| Start method/s | Recoil | Recoil | Recoil/Electric | |
| Baery size - volts | N/A | 12 | 12 | |
| GENERATOR | Frequency - hz | 50 | 50 | 50 |
| Voltage/s | 230 | 115/230 | 115/230 | |
| Connuous power - kw | 2.0 | 2.8 | 2.8 | |
| Max power - kw | 2.2 | 3.2 | 3.2 | |
| Run me on full load - hours | 9.5 | 9.5 | 9.5 | |
| Run me on 1⁄2 load - hours | 12.5 | 13.5 | 13.5 | |
| Sound level - dB (A) | 96 | 96 | 96 | |
| Outlet sockets - quantity/amp/type | 2 x 13A 230v | 1 x 16A 230v1 x 16A 115v | 1 x 16A 230v1 x 16A 115v | |
| Digital meter | Hours/Volts/Frequency | |||
| MODEL | HY7000LEK-2 | HY9000LEK-2 | HY10000LEK-2 | |
| ENGINE | Engine - hp | 16 | 18 | 18 |
| Displacement - cc | 420 | 460 | 460 | |
| Engine speed - rpm | 3000 | |||
| Fuel tank capacity - l | 25 | 25 | 25 | |
| Fuel type | Straight unleaded petrol | |||
| Oil type | SAE15W40 | |||
| Oil capacity - ml | 1100 | 1100 | 1100 | |
| Start method/s | Recoil/Electric | Recoil/Electric | Recoil/Electric | |
| Baery size - volts | 12 | 12 | 12 | |
| GENERATOR | Frequency - hz | 50 | 50 | 50 |
| Voltage/s | 115/230 | 115/230 | 115/230 | |
| Connuous power - kw | 5.0 | 6.5 | 7.5 | |
| Max power - kw | 5.5 | 7.0 | 8.5 | |
| Run me on full load - hours | 7.8 | 6.2 | 6.4 | |
| Run me on 1⁄2 load - hours | 13.5 | 11.2 | 11.5 | |
| Sound level - dB (A) | 96 | 96 | 96 | |
| Outlet sockets - quantity/amp/type | 2 x 16A 115v1 x 32A 230v | 2 x 16A 115v1 x 32A 230v | 2 x 16A 230v1 x 32A 230v | |
| Digital meter | Hours/Volts/Frequency | |||
9. RECYCLING & PRODUCT DISPOSAL
9.1. We do not oer a takeback scheme for the recovery of Waste Electrical Electronic Equipment (WEEE) & Baeries instead the responsibility to dispose of WEEE and or Baeries is passed onto you by us. So when it becomes necessary to dispose of your machine you must take it to your local Civic Amenity Site. For further informaon please contact your Local Authority for disposal advice.
9.2. You MUST make sure that all unused oil and fuel is disposed of correctly either beforehand or at your local Civic Amenity Site. Under NO circumstance must any oil and fuel be put down any drains.
9.3. Waste Electrical Electronic Equipment (WEEE) recycling.
9.3.1. Certain products contain WEEE waste which should not be disposed of in your domesc waste.
9.3.2. You MUST recycle WEEE in accordance with your local authority or recycling centre.
9.4. Baery recycling, certain products contain baeries which should not be disposed of in your domesc waste.
9.4.1. You MUST recycle baeries in accordance with your local authority or recycling centre.
9.5. Unwanted packaging materials should be sorted and taken to a recycling centre so it can be disposed of in a manner which is compatible with the environment.
9.6. The following symbol means that you should 'Reduce – Reuse – Recycle'.


9.7. We are a Member of the VALPAK Naonal Compliance scheme and our registraon number is RM08660
9.8. For further informaon about disposal please contact your Local Authority.
9.9. You can also get more advice and guidance about recycling at the following website hp://www.recycle-more.co.uk
9.10. Should you pass this product onto another user either sold or loaned you MUST pass on this user manual. This will make sure that all other users can use and maintain the machine safely.


10. DECLARATIONS of CONFORMITY
Genpower conrms that this product complies with the EC Directves listed below;
• 97/68/EC Non Road Mobile Machinery Directive
• 2000/14/EC Outdoor Noise Directive
• 2004/108/EC Electromagnec Compatibility Directive
• 2006/42/EC Machinery Directive
• 2006/95/EC Low Voltage Directive
E C D E CL A R A T I O N of C O N F O R M I T Y
The undersigned, as authorised by: GENPOWER Ltd
Declares that the following equipment manufactured under licence by Hyundai Korea
Conforms to the Directive 2000/14/EC (as amended) of the European Parliament and of the council on the approximation of the laws of the Member States relang to the noise emission in the environment by equipment for use outdoors.
| Equipment category: | Power Equipment |
| Product Name/Model: | HY2800L-2, HY3800L-2, HY3800LEK-2, HY7000LEK-2 HY9000LEK-2 & HY10000LEK -2 |
| Type/Serial No: | Open Frame Generator |
| Net installed power: | 2.0 kW HY2800L-2, 2.8 kW HY3800L-2, HY3800LEK-25.0 kW HY7000LEK-2, 6.5 kW HY9000LEK-2, 7.5 kW HY10000LEK -2 |
| The technical documentaon is kept by: | Kevin Stanley, c/o Genpower Ltd,Isaac Way, Pembroke Dock, Pembrokeshire, SA72 4RW |
The conformity assessment procedure followed was in accordance with annex V or VI of the Direcve.
| Noed Body: | AV Technology Ltd, Unit 12 Easter Court, Europa Boulevard,Warrington, Cheshire, WA5 7ZB |
| Cercate N ^05 /Test report N ^06 : | OND-2016508-04-02 HY2800L-2OND-2016508-04-04 HY3800L-2 – HY3800LEK-2OND-2016508-04-07 HY7000LEK-2OND-2016508-04-08 HY9000LEK-2OND-2016508-04-10 HY10000LEK-2 | |
| Measured Sound Power Level: | HY2800L-2 (92 dB (A)), HY3800L-2, HY3800LEK-2 (93 dB (A)) |
| HY7000LEK-2 (95 dB (A)), HY9000LEK-2 (95 dB (A)) | |
| HY10000LEK -2 (96 dB (A)) |
| Guaranteed Sound Power Level: | HY2800L-2 (93 dB (A)), HY3800L-2, HY3800LEK-2 (94 dB (A)) |
| HY7000LEK-2 (97 dB (A)), HY9000LEK-2 (97 dB (A)) | |
| HY10000LEK -2 (97 dB (A)) |
A copy of this cercate has been submitted to the European Commission and to EU Member State United Kingdom.
Place of Declaraon: Pembroke Dock, SA72 4RW
Date:
Name:
Roland Llewellin
Signature:
RJL###
Posion in Company:
Managing Director
Name & address of manufacturer or Authorised representave
Genpower Ltd, Isaac Way, Pembroke Dock, Pembrokeshire, SA72 4RW
11. CONTACT DETAILS
11.1. POSTAL ADDRESS Genpower Ltd, Isaac Way, London Road, Pembroke Dock, Pembrokeshire, SA72 4RW. UK.
11.2. TELEPHONE +44 (0) 1646 687880
11.3. FAX +44 (0) 1646 686198
11.4. TECHNICAL E-MAIL service@genpower.co.uk
11.5. WEBSITE www.hyundaipowerequipment.co.uk
12. MANUAL UPDATES
12.1. Our manuals are constantly being reviewed and updated. However if should you nd an error, omission or something you nd unclear please contact your dealer for assistance.
12.2. Our latest manuals are also placed online.
12.3. We reserve the right to make any modicaons without prior noce whenever necessary.
13. WARRANTY
13.1 To register your product for the Manufacturer's warranty, please visit:
hps://hyundaipowerequipment.co.uk/warranty
For Inquiries, Please Contact:
GENPOWER LTD
Isaac Way, London Road
Pembroke Dock, UNITED KINGDOM, SA72 4RW
T: +44 (0) 1646 687 880 F: +44 (0) 1646 686 198
E: info@hyundaipowerequipment.co.uk
www.hyundaipowerequipment.co.uk


- OPEN FRAME PETROL GENERATORS
- CONTENTS
- SAFETY
- General safety notes.
- Please note the following safety points.
- Carbon monoxide.
- This list is not exhaustive and if you are in any doubt contact your dealer.
- CAUTION
- ALL FUELS ARE FLAMMABLE
- Noise.
- UNPACKING & ASSEMBLY
- Unpacking.
- N.B. The HY2800L-2/HY3800L-2 versions DO NOT come with wheel kits.
- Packing contents.
- N.B. The above packaging contents in this manual are for reference only and do not represent for any specific model.
- Assembly.
- N.B. The wheels are NOT intended for on road use.
- PARTS LOCATIONS
- PREPARATION BEFORE USE
- NOTE
- STARTING & STOPPING MACHINE
- WARNING
- Stopping the engine.
- Low oil level system shutdown.
- High altitude.
- MAINTENANCE
- Cleaning the external of the generator.
- Engine Maintenance.
- Oil change.
- Spark plug replacement.
- Spark arrestor service. # Spark arrester tment may vary model to model.
- Air Iter service.
- Valve clearances.
- General.
- STORAGE & TRANSPORTATION
- Storage.
- Transportaon.
- SPECIFICATION
- RECYCLING & PRODUCT DISPOSAL
- DECLARATIONS of CONFORMITY
- E C D E CL A R A T I O N of C O N F O R M I T Y
- CONTACT DETAILS
- MANUAL UPDATES
- WARRANTY
Brand : HYUNDAI
Model : HY2800L-2
Category : Generator