
MHT983 - Hi-Fi System MAGNAVOX - Free user manual and instructions
Find the device manual for free MHT983 MAGNAVOX in PDF.


| Product Type | Hi-Fi System |
| Model | MHT983 |
| Brand | Magnavox |
| Dimensions (H x W x D) | 200 x 360 x 280 mm |
| Weight | 4.5 kg |
| Power Supply | AC 120V, 60Hz |
| Power Consumption | 45W |
| Disc Playback | CD, CD-R/RW |
| Radio Tuner | FM/AM digital tuner |
| Preset Stations | 30 (FM) + 15 (AM) |
| Output Power per Channel | 20W RMS |
| Total Power Output | 40W |
| Speaker Impedance | 4 ohms |
| Speaker Type | 2-way bass reflex |
| Audio Input | AUX (3.5mm), USB |
| Remote Control | Included |
| Display | LED clock display |
| Maintenance | Clean cabinet with soft dry cloth |
| Safety | Do not expose to rain or moisture |
| Spare Parts & Repairability | Contact authorized service center |
Frequently Asked Questions - MHT983 MAGNAVOX
User questions about MHT983 MAGNAVOX
0 question about this device. Answer the ones you know or ask your own.
Ask a new question about this device
Download the instructions for your Hi-Fi System in PDF format for free! Find your manual MHT983 - MAGNAVOX and take your electronic device back in hand. On this page are published all the documents necessary for the use of your device. MHT983 by MAGNAVOX.
USER MANUAL MHT983 MAGNAVOX
with Color Changing Lights and Bluetooth® Wireless Technology
Owner's Manual
PLEASE READ BEFORE OPERATING THIS EQUIPMENT.
Model: MHT983
FCCNOTICE:
ThisequipmenthasbeentestedandfoundtocomplywiththelimitsforaClass Bdigitaldevice,pursuanttoPart15oftheFCCRules. Theselimitsare designedtoprovidereasonableprotectionagainstharmfulinterferenceina residentialinstallation. Thisequipmentgenerates,usesandcanradiateradio frequencyenergyand,ifnotinstalledandusedinaccordancewiththe instructions,maycauseharmfulinterferencetoradiocommunications. However,thereisnoguaranteethatinterferencewillnotoccurinaparticular installation.Ifthisequipmentdoescauseharmfulinterferencetoradioor televisionreception,whichcanbedeterminedbyturningtheequipmentoffand on,theuserisencouragedtotrytocorrecttheinterferencebyoneormoreof thefollowingmeasures:
●Reorientorrelocatethereceivingantenna.
- Increase these separation between the equipment and receiver.
- Connecttheequipmentintoanoutletonacircuiddifferentfromthatto whichthereceiverisconnected.
- Consultthedealeroranexperiencedradio/TVtechnicianforhelp.
FCCSTATEMENT:
This device complies with part 15 of the FCC Rules. Operation is subject to the following two conditions:
(1) This device may not cause harmful interference, and
(2) This device must accept any interference received, including interference that may cause undesired operation. The antenna(s) used forth this transmitter must be installed to provide separation distance of least 20cm from all persons and must not become-located or operating in conjunction with any other antenna or transmitter.
FCCWARNING:
Toassurecontinuedoperation,followtheattachedinstallationinstructionsand useonlyshieldcableswhenconnectingtootherdevices.Changesor modificationsnotexpresslyapprovedbythepartyres ponsibleforcompliance couldvoidtheuser'sauthoritytooperatetheequipment.
FRONT VIEW

natural_image
Technical line drawing of a vertical cylindrical device with two circular components and mounting holes (no text or symbols)TOP VIEW

REAR VIEW
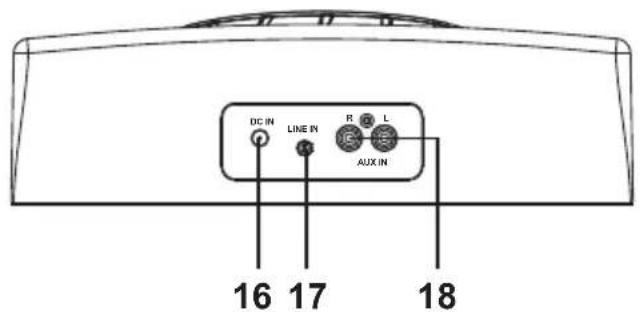
- Loud Speakers with LED Decorative LED Lights
- Subwoofer
- Remote Sensor
- Cradle (To hold Remote Control/External Audio Player/Cell Phone)
- DJ Effect Knob
- SOURCE Button
- LIGHT On/Off Button
- Standby On/Off Button
- (Skip Backward) Button
- ▶(Play/Pause) Button
- ▶(Skip Forward) Button
- (Bluetooth) Indicator
- LINE IN Indicator
- STANDBY/AUX IN Indicator
- VOLUME +/- Buttons
- DC 12V Jack
- LINE IN (3.5mm Stereo) Jack
- AUX IN (RCA) Jacks
LOCATION OF CONTROL (REMOTE CONTROL)

- Standby On/OFF Button
- SOURCE Button
- (Volume Up) Button
- (Skip Backward) Button
- (Play/Pause) Button
- (Skip Forward) Button
- MUTE Button
- (Volume Down) Button
- LIGHT Button
POWER SOURCE
Connect the small plug from the supplied AC/DC Adaptor to the DC 12V Jack on the rear of unit. Connect the AC/DC Adaptor into any convenient household outlet has AC 100-240V, 50/60Hz as the illustrated below. The STANDBY/AUX IN Indicator on the top of unit will illuminate.

Notes:
- The AC Adaptor is intended to be correctly orientated in a vertical or floor mount position.
- For energy saving, if long period of time will not use the unit. Unplug the AC/DC Adaptor from wall outlet.
POWER SOURCE (Remote Control)
In first time use, slide the insulation film from the battery door and discard it as the illustrated follows:
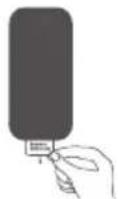
When the button cell is consumed, replace it as follows:
- Push the tab on the battery tray and slide it out as the illustrated below:
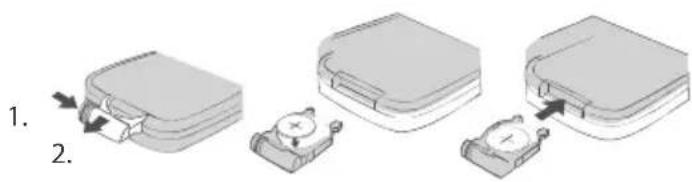
- Install a new CR 2025 button cell to the battery tray as the polarity makings on the rear of remote control cabinet.
- Close the battery tray.
BATTERY PRECAUTIONS:
Follow these Battery Precaution when using a battery in this device:
- Use only the size and type of battery specified.
- Be sure to follow the correct polarity when installing the battery as indicated in the battery compartment. A reversed battery may cause damage to the device.
- Do not mix different types of batteries together (e.g. Alkaline and Carbon-zinc) or old batteries with fresh ones.
- If the batteries in the device are consumed or the device is not to be used for a long period of time, remove the batteries to prevent damage or injury from possible battery leakage.
- Do not try to recharge the battery not intended to be recharged; it can overheat and rupture. (Follow battery manufacturer's instructions.)
- Do not dispose of battery in fire. Battery may explodes or leak.
-
Clean the battery contacts and also those of the device prior to battery installation.
-
This product contains a coin/button cell battery. If the coin/button cell battery is swallowed, it can cause severe internal burn in just 2 hours and can lead to death.
Keep new and used batteries away from children. If the battery compartment does not close securely, stop using the product and keep it away from children.
If you think batteries might have been swallowed or placed inside any part of the body, seek immediate medical attention.
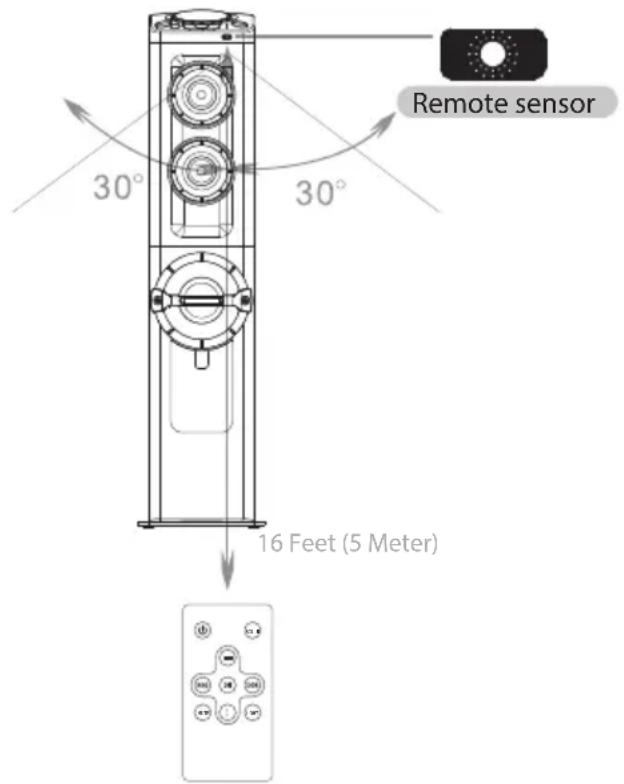
EFFECTIVE RANGE OF REMOTE TRANSMITTER
The effective range of the remote transmitter is 16 Feet (5 Meter); +/- 30° as illustrated follows:
Notes:
- When there is an obstacle between the unit and the transmitter, the transmitter may not operate.
- When direct sunlight, an incandescent lamp, fluorescent lamp or any other strong light shines on the REMOTE SENSOR of the unit, the unit remote operation may be unstable.
OPERATION
General Operation:
- Connect the unit to AC power as previously instructed. The unit will enter to standby mode and the STANDBY/AUX IN Indicator on the top of unit will illuminate.
- Press the Button on the unit or Remote Control to power on the unit from standby mode.
- Press the SOURCE Button on the unit or Remote Control repeatedly to switch to desired playback mode. The corresponding indicator will illuminate (or blinking) with you selection (see list below):
| Playback Modes: Indicator: | |
| BT (Bluetooth) Indicator will illuminate (and blink) | |
| LINE IN LINE IN Indicator will illuminate | |
| AUX IN STANDBY/AUX IN Indicator will illuminate and blink |
-
During playback:
-
Press the Volume +/- buttons on the unit or the +/- buttons on the Remote Control to adjust volume level.
- Press the LIGHT Button on the unit or Remote Control to turn off the Decorative LED Lights on the speakers. Press again to turn it on.
- Turning the DJ Effect Knob to creating DJ effect.
-
Press the MUTE Button on the Remote Control to mute the sound; press again to turn it back.
-
When finished listening, press the Button on the unit or Remote Control to turn the unit to standby mode. The STANDBY/AUX IN Indicator on the top of unit will illuminate.
NOTE:
For energy saving, if long period of time will not use the unit. Unplug the AC/DC Adaptor from wall outlet.
BT Mode:
BT (Bluetooth) pairing:
First time use or re-pairing the unit to a new BT Device, pair as follows:
- Power on the unit and enter to BT mode as previously instructed, the ✿ Indicator on the top of unit will illuminate and blink.
- Power on the external BT Device and enter to BT searching mode. Start pairing following the on screen instructions from the external BT Device. When paired, the ⚙ Indicator will stop blinking.
- If pairing is complete you may now play music with your external BT Device.
-
During playback:
-
Press the Button on the unit or Remote Control to pause; press again to resume to normal playback.
- Press and release the or◀◀ buttons on the unit or Remote Control repeatedly to skip tracks.
- Press the Volume +/- buttons on the unit or the +/- buttons on the Remote Control to adjust volume level.
- Press the LIGHT Button on the unit or Remote Control to turn off the Decorative LED Lights on the speakers. Press again to turn it on.
- Turning the DJ Effect Knob to creating DJ effect.
-
Press the MUTE Button on the Remote Control to mute the sound; press again to turn it back.
-
When finished listening, press the Button on the unit or Remote Control to turn the unit to standby mode. The STANDBY/AUX IN Indicator on the top of unit will illuminate.
Notes:
- When the external BT Device searched the unit, our model number "MHT983" will appear on the display of external BT Device.
- If while pairing you are asked for a code please try "0000" or "1234".
Normal operation after pairing:
- Power on the external BT Device and enter to BT playback mode.
- Power on the unit and enter to BT mode as previously instructed. The ✗ Indicator will illuminate and blink.
- Wait a few seconds until the unit is automatically paired to the external BT Device. The Indicator will stop blinking.
- After pairing is complete you may now play music with your external BT Device.
LINE IN:
Listen from an external Audio Player such as MP3 Player, Discman...etc.
-
In power off mode, connect one end of supplied Audio Connection Cable to the AUX Out/Line Out/Phone Jack on the external Audio Player.
-
Connect the other end of the cable to the AUX IN Jack on the rear of unit as illustrated below:
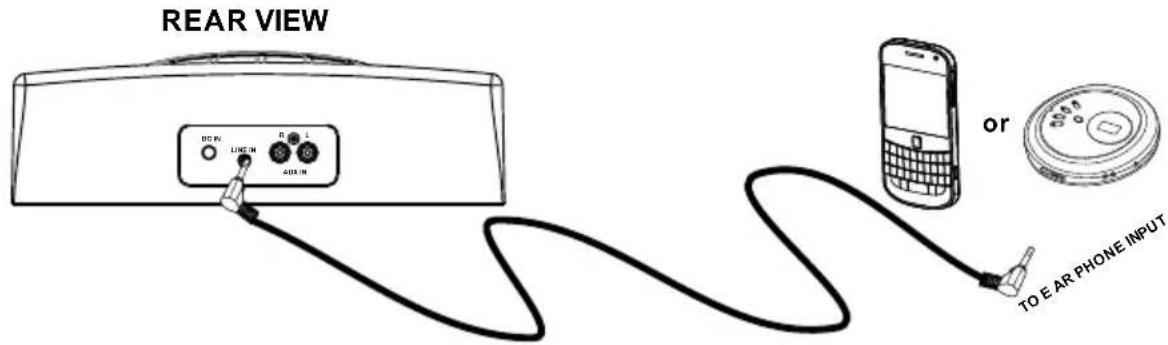
- Power on the unit and enter to AUX IN mode as previously instructed, the LINE IN Indicator on the top of unit will illuminate.
- Play the music on the connected Audio Player as usual.
(Make sure the volume level of the connected Audio Player is turned to high level.)
- When finished listening, press the Button on the unit or Remote Control to turn the unit to standby mode. The STANDBY/AUX IN Indicator on the top of unit will illuminate.
AUX IN:
Listen from an external Audio/Video Player such as Television, DVD Player...etc.
- In power off mode, connect one end of RCAAudio/Video Connection Cable (not included) to the RCAAudio Out Jacks on the external Audio/Video Player.
- Connect the other end of the cable to the AUX IN Jacks on the rear of unit as illustrated below:

- Power on the unit and enter to AUX IN mode as previously instructed, the STAND-BY/AUX IN Indicator on the top of unit will illuminate and blink.
- Play the music on the connected Audio/Video Player as usual. (Make sure the volume level of the connected Audio Player is turned to high level.)
- When finished listening, press the XX Button on the unit or Remote Control to turn the unit to standby mode. The STANDBY/AUX IN Indicator on the top of unit will illuminate.
TROUBLE SHOOTING GUIDE
Check the following before requesting service:
| SYMPTOM | POSSIBLE CAUSE | POSSIBLE SOLUTION |
| Can’t power on | The unit had not connect to AC power | Connect the supplied AC/DC Adaptor to the unit and AC wall outlet |
| No sound or sound weak | Volume of the unit was set to minimum position | Increase the volume level press the Volume + Button on the unit or the + Buttons on the Remote Control |
| Volume level of paired/connected device is in low level | Rise the volume level of the paired/connected device | |
| Sound distortion | Volume level too high | Reduce the volume level by press the Volume - Button on the unit or the - Buttons on the Remote Control |
| Bass level too high | Reduce the bass volume level of the paired/connect-ed device | |
| BT not functioning | The external BT device had NOT paired to the unit | Pair the external BT device to the unit as page 8 |
| The external BT device too far from the unit | Place the external BT device close to the unit |
GENERAL SPECIFICATIONS:
Power Source: DC 12V, 1.5A,
Impedance of Speakers:
Loud Speaker: 10W; 8Ω per chanel
Subwoofer: 20W; 4Ω
Audio Power:
Loud Speakers: ....?W per Channel (Total 10W, RMS)
Subwoofer: ..... ??W (RMS)
BT Version: 4.1
BT Operation Distance: ....≤ 32 Feet in open area
PACKAGE INCLUDES:
1 x Owner's Manual
1 x Remote Control (uses 1 x CR2025 Button Cell, included)
1 x AC/DC Adaptor (Input: AC 100-240V\~, 50/60Hz, 0.75A;
Output: DC 12V, 1.5A, → - +
1 x Audio Connection Cable with 3.5 mm plugs
SPECIFICATIONS AND ACCESSORIES ARE SUBJECT TO CHANGE WITHOUT NOTICE
LIMITED WARRANTY
Craig Electronics warrants this product to be free from manufacturing defects in material and workmanship under normal use for a period of 180 days from date of purchase. If service is required, please return the product to the store where it was purchased for exchange; or, pack the unit in the original packing material with all accessories if applicable, a copy of your sales receipt and a Cashier's check or Money Order for \$7 (to cover shipping and handling costs) payable to Craig Electronics Inc. For consumers in Canada, please make sure that the cashier check or money order is redeemable through a U.S. bank. Ship your product freight pre-paid. Your unit will be repaired, replaced or if the unit cannot be repaired or replaced, a refund will be forwarded to you within four weeks of receipt of your unit. Please ship your unit to:
Craig Electronics Inc.
1160 NW 163 Drive
Miami, Fl 33169
This warranty is void if the product has been: a) Used in a commercial application or rental. b) Damaged through misuse, negligence, or abuse. c) Modified or repaired by anyone other than an authorized Craig service center. d) Damaged because it is improperly connected to any other equipment.
Note: This warranty does not cover: a) Ordinary adjustments as outlined in the Owner's Manual which can be performed by the customer. b) Damage to equipment not properly connected to the product. c) Any cost incurred in shipping the product for repair. d) Damage to the product not used in the USA.
This warranty is not transferable and only applies to the original purchase. Any implied warranties, including the warranty of merchantability, are limited in duration to the period of this expressed warranty and no warranty whether expressed or implied shall apply to the product thereafter.
Under no circumstance shall Craig be liable for any loss or consequential damage arising out of the use of this product. This warranty gives specific legal rights. However, you may have other rights which may vary from state to state. Some states do not allow limitations on implied warranties or exclusion of consequential damage. Therefore, these restrictions may not apply to you.
This product has been manufactured by and is sold under the responsibility of Craig Electronics Inc, and Craig Electronics Inc is the warrantor in relation to this product. MAGNAVOX and SMART. VERY SMART are registered trademarks of Koninklijke Philips N.V. and are used under license from Koninklijke Philips N.V.
To Obtain Service on your Product
email:service@craigelectronics.com
- FCCNOTICE:
- FCCSTATEMENT:
- FCCWARNING:
- LOCATION OF CONTROL (REMOTE CONTROL)
- POWER SOURCE
- Notes:
- POWER SOURCE (Remote Control)
- BATTERY PRECAUTIONS:
- EFFECTIVE RANGE OF REMOTE TRANSMITTER
- OPERATION
- General Operation:
- NOTE:
- BT Mode:
- BT (Bluetooth) pairing:
- Normal operation after pairing:
- LINE IN:
- AUX IN:
- TROUBLE SHOOTING GUIDE
- GENERAL SPECIFICATIONS:
- Impedance of Speakers:
- Audio Power:
- PACKAGE INCLUDES:
- LIMITED WARRANTY
Brand : MAGNAVOX
Model : MHT983
Category : Hi-Fi System