
Burton CR7011A - Turntable Crosley - Free user manual and instructions
Find the device manual for free Burton CR7011A Crosley in PDF.


| Product Type | Vinyl Turntable |
| Brand | Crosley |
| Model | Burton CR7011A |
| Speed Settings | 33 1/3, 45, 78 RPM |
| Platter Material | Aluminum |
| Drive Mechanism | Belt Drive |
| Built-in Speakers | Yes, Stereo |
| Bluetooth Output | Yes, for wireless speakers |
| USB Recording | Yes, to PC via USB |
| Headphone Jack | 3.5mm |
| Dimensions | 14.5 x 11.0 x 5.0 inches |
| Weight | 4.5 lbs |
| Power Supply | 120V AC, 60Hz |
| Power Consumption | 10W |
| Stylus Replacement | Compatible with Crosley NP6 or equivalent |
| Maintenance | Clean stylus with brush; wipe body with dry cloth |
| Safety | Indoor use only; keep away from moisture |
| Warranty | 1 year limited |
| Repair Service | Contact Crosley customer support |
Frequently Asked Questions - Burton CR7011A Crosley
User questions about Burton CR7011A Crosley
0 question about this device. Answer the ones you know or ask your own.
Ask a new question about this device
Download the instructions for your Turntable in PDF format for free! Find your manual Burton CR7011A - Crosley and take your electronic device back in hand. On this page are published all the documents necessary for the use of your device. Burton CR7011A by Crosley.
USER MANUAL Burton CR7011A Crosley
natural_image
Line drawing of a vintage CROSLEY portable cassette machine with open lid and control panel (no text or symbols on device)Questions, problems, missing parts?
Before returning to the store, call Customer Service
8 a.m. – 6 p.m., EST, Monday – Friday
1-888-CROSLEY
www.crosleyradio.com
Safety Instructions
Read and understand this entire manual before using this product. Keep these instructions for future reference.
- Do not use this product near water.
- This product should be operated only by the type of power source indicated on the marking label or in this instruction manual.
- Do not defeat the safety purpose of the polarized plug. A polarized plug has two blades with one blade wider than the other. This plug will fit into the power outlet only one way. If you are unable to insert the plug fully into the outlet try reversing the plug. If the plug should still fail to fit, contact your electrician.
- Protect the power cord from being walked on or pinched particularly at plugs, convenience receptacles, and the point where they exit from the product.
- Do not overload wall outlets, extension cords, or integral convenience receptacles as this can result in a risk of fire or electric shock.
- Never push objects of any kind into this product through openings as they may touch dangerous voltage points or short-out parts that could result in a fire or electric shock. Never spill liquid of any kind on the product.
- Do not attempt to service this product yourself as opening or removing covers may expose you to dangerous voltage or other hazards. Refer all servicing to qualified service personnel.
- Changes or modifications to this unit not expressly approved by the party responsible for compliance could void the user's authority to operate the equipment.
- Do not use attachments not recommended by the product manufacturer as they may cause hazards.
- A product and cart combination should be moved with care. Quick stops, excessive force, and uneven surfaces may cause the product and cart combination to overturn.
- Slots and openings in the cabinet are provided for ventilation and to ensure reliable operation of the product and to protect it from overheating. Do not block or cover these openings.
- Unplug the product during lightning storms or when unused for long periods of time.
Items in this package
Before throwing away any packaging materials, please check thoroughly and make sure you find the following items that come along with this package:
- Turntable
- 45 RPM adapter
- 3.5mm aux in cable
Please contact Crosley customer service if there is any accessory missing from the package. Retain the original packaging materials for exchange or return purposes.
Specifications
Power 120V, 60Hz
Power consumption 18W
Speaker 3.5", 8Ω, 5W x 2
Turntable speed 33 13 , 45, 78 RPM
Replacement needle Crosley NP6
Note:
- Design and specifications are subject to change without notice.
- To help save power consumption, some models will comply with ERP energy saving standard. When there is no audio input for 20 minutes, their powers will automatically cut-off. To turn power back on and resume playing, you will need to turn off the power and turn it on again.
Product Description
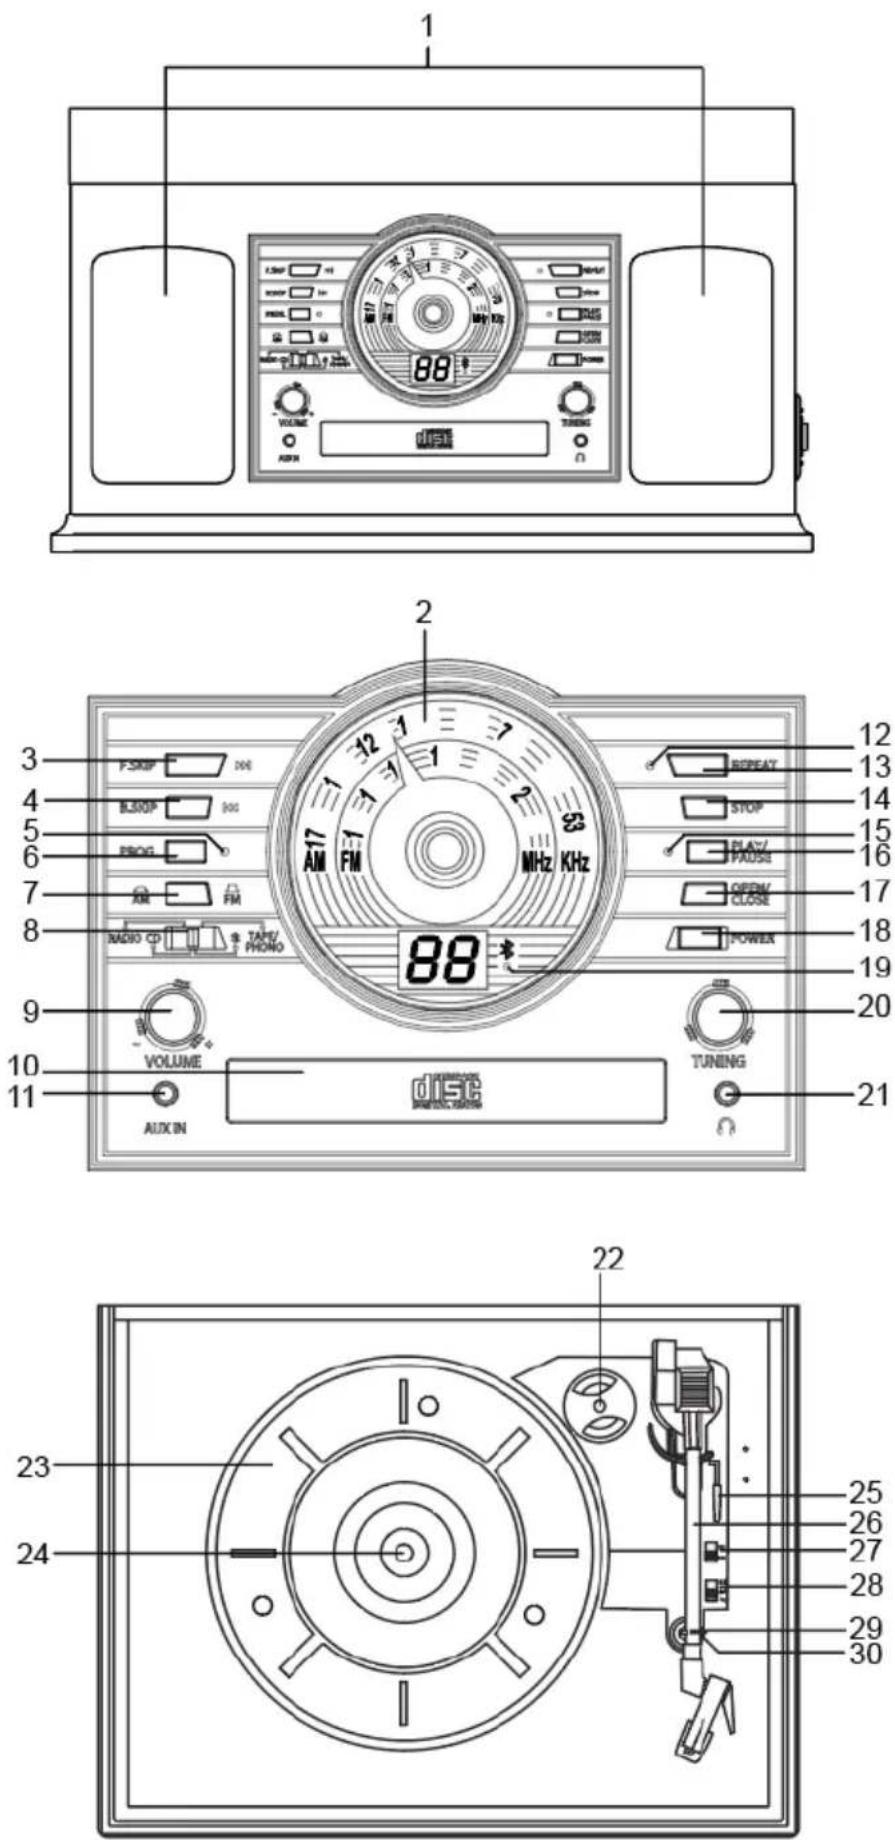
- Speakers
- Dial Scale
- Forward Skip Button
- Backward Skip Button
- Program Indicator
- Program Button
- AM/FM Button
- Function Switch
- Volume Knob
- CD Tray
- Aux In Jack
- Repeat Indicator
- Repeat Button
- Stop Button
- Play Indicator
- Play/Pause Button
- CD Door Open/Close Button
- Power Button
- Bluetooth Indicator
- Tuning Knob
- Headphone Jack
- 45 RPM Adapter
- Turntable Platter
- Turntable Spindle
- Tonearm Lever
- Tonearm
- Auto-stop Switch
- Speed Switch
- Hold Down Clip
- Tonearm Rest
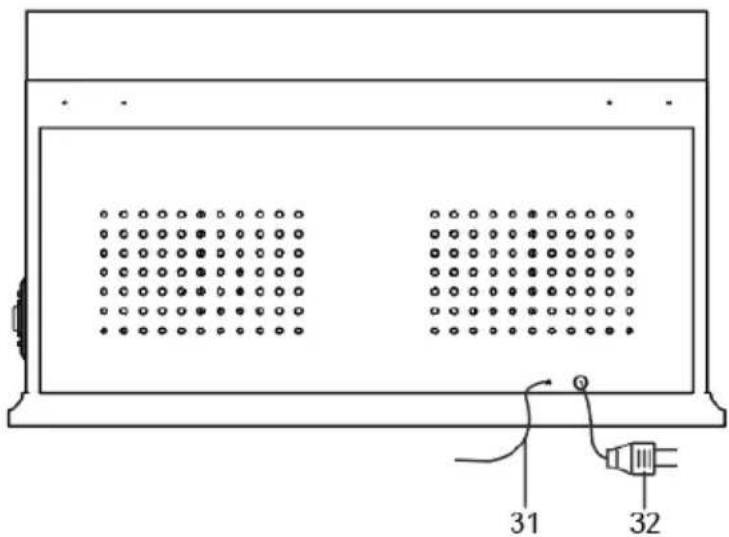
- External Antenna
- Power Cord Plug
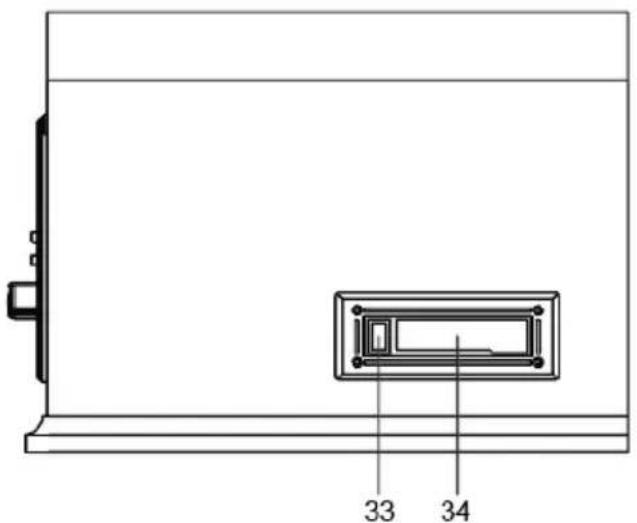
- Cassette Eject/Fast Forward Button
- Cassette Door
Initial Setup
Essential Setup
- Place the unit on a flat and level surface. The selected location should be stable and free from vibration.
- Remove the tie-wrap that is holding the tonearm.
- Plug the power cord to the power outlet.
Aux Input Connection
You can connect an audio device to this unit and play your music through its speakers. To do this, connect the 3.5mm auxiliary cable between your audio device and the Aux In Jack of this unit and start playing the music.
Note: The aux in connection has the highest priority of all the functions. When there is an auxiliary cable plugged in, the aux in connection will automatically override the Bluetooth, turntable, CD, radio or cassette mode. To resume using the other features of the unit, unplug the auxiliary cable from the aux in jack.
Bluetooth Operation
- Press the Power Button to turn on the power.
- Set the Function Switch to the Bluetooth position, you will hear an activation sound from the unit.
- Turn on the Bluetooth feature of your audio device, search for "CROSLEY CR7011A" and pair.
- Once your device is successfully paired with the unit, you will hear a short confirmation sound from the unit.
- Play and stream music from your device to the unit.
Note:
- Bluetooth version – 5.0
Turntable Operation
- Press the Power Button to turn on the power.
- Set the Function Switch to the TAPE/PHONO position.
Note: If a tape is inserted the tape will play instead of the turntable. - Set the Speed Switch accordingly.
- Place the record on the turntable. Use the 45 RPM Adapter if necessary.
- Remove the stylus protector from the stylus assembly.
Note: To avoid stylus damage, make certain the included stylus guard is in place whenever the turntable is being moved or cleaned. - Release the tonearm Hold Down Clip.
Note: When the turntable is not in use, remember to lock back the hold down clip. - Use the Tonearm Lever to lift up the tonearm.
- Gently move the tonearm over the record where play is desired to begin. Set the Tonearm Lever back to the down position, the tonearm will descend slowly onto the record and begin to playback.
- When the record is finished playing, use the Tonearm Lever again to raise the tonearm and then return it to the Tonearm Rest. Release the lever to let the tonearm sit back at its rest. To suspend the playback, repeat the same steps.
- Lock the Hold Down Clip to secure the tonearm.
Platter Auto-stop
If the Auto-stop Switch is set to ON position, the platter will stop spinning automatically when the record plays to the end. In some rare occasion, if the turntable stops playing before the end of the record, set the switch to OFF position the turntable should overcome this issue.
Needle Replacement
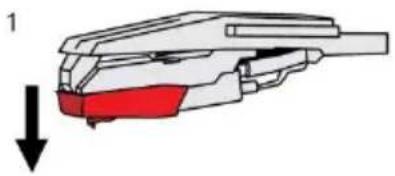
Removing Needle
- Gently pull down the front edge of the needle.
- Pull needle forward.
- Pull out and remove.
natural_image
Diagram of a mechanical component with a red highlighted section and a downward arrow, no text or symbols present.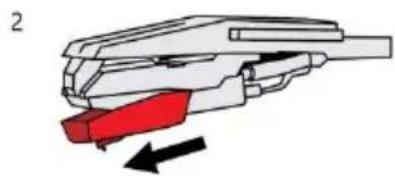
natural_image
Diagram of a mechanical component with red and black parts, showing directional arrows (no text or symbols)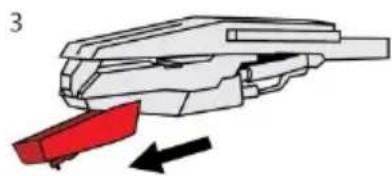
natural_image
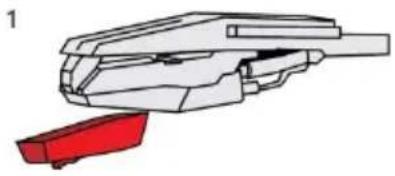
Diagram of a mechanical component with a red highlighted section and black directional arrow (no text or symbols)Installing Needle
- Position the needle with its tip facing down.
- Line up the back of the needle with the cartridge.
- Insert the needle with its front end at a downward angle and gently lift the front of the needle upward until it snaps into place.
natural_image
Technical illustration of a mechanical component with a red base and gray housing (no text or symbols)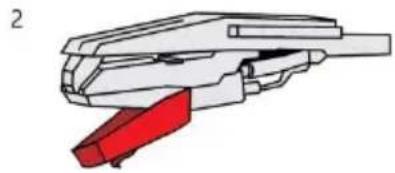
natural_image
Technical illustration of a mechanical component with red clamping element (no text or symbols)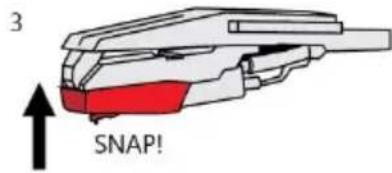
Radio Operation
- Press the Power Button to turn on the power.
- Set the Function Switch to the RADIO position, press the AM/FM Button to set the desired radio band.
- Rotate the Tuning Knob for the desired radio station.
Note:
- The unit is equipped with a FM wire antenna. To FM improve reception, move the wire around until the reception is clear without interferences. Do not connect the wire to any additional antenna.
- The AM antenna is built inside the unit. If AM reception is poor, try to rotate the unit for better reception.
CD Playback Operation
- Press the Power Button to turn on the power.
- Set the Function Switch to the CD position.
- Press the Open/Close button to open the CD tray and put the CD in the tray with the labeled side facing up.
- Press the Open/Close button again to close the tray. The LED display will show “--” for a few seconds, then the total number of tracks on the CD. If it is a blank CD or an unrecognizable CD, it will show “00”.
Note: MP3 or similar types of digital audio files cannot be read by the CD player. - Press the Play/Pause button to start the playback. The Play Indicator will light up.
- During the playback, press the Play/Pause button to pause and the Play Indicator will starting flashing. Press it again to resume playback.
- To skip to the next or previous track, press the Forward Skip or Backward Skip button correspondingly.
- To search fast forward or backward, press and hold the Forward Skip or Backward Skip button correspondingly until you reach the desired time. Release the button and the playback will resume.
- To repeat a specific track, press Repeat button once while that track is playing and the Repeat Indicator will start flashing. To repeat all the tracks, press the Repeat button twice and the Repeat Indicator will remain on. To cancel repeat function, press the Repeat button until the Repeat Indicator is off.
- Press the Stop button if you want to completely stop playback.
Programmed Playback
- Before starting the playback, press the Program button once to enter program mode. The Program Indicator will start flashing. The LED display will flash "01" as the track sequence which is to be edited.
- Press the Forward Skip or Backward Skip buttons to select the desired track that you would like to play. The LED's number will turn steady instead of flashing, showing the sound track number at selection.
- Press the Program button to confirm the selected track. The LED's number will start flashing again showing the next track sequence which is to be edited.
- Repeat steps 2 & 3 for additional sound tracks that you would like to play. The tracks can be in any number and repeated. A maximum of 20 tracks can be programmed at one time.
- Press the Play/Pause button to start the programmed playback. The tracks will play in the same sequence that you programmed earlier.
- To exit the program mode, press the Stop button twice and the Program Indicator will be off.
Cassette Operation
- Press the Power Button to turn on the power.
- Set the Function Switch to TAPE/PHONO position.
- Insert the prerecorded cassette through the cassette door and it will start playing automatically.
- To fast forward, press the cassette Eject/F.F button half way in. To stop fast forwarding and return to the playback mode, press the button again.
Note: To rewind the cassette, you would need to reject the tape and flip it over for the other side and fast forward. - To stop the playback and eject the cassette, press the Eject/F.F. button all the way in.
- When one side of the cassette finishes playing, it will stop automatically.
Note: Remove the cassette from the cassette holder when it is not in use.
Turntable Maintenance
- Do not touch the stylus tip with your fingers. Avoid bumping the stylus on the turntable mat or a record's edge.
- Clean the stylus frequently with a soft brush with a back-to-front motion only.
- Clean the records to get rid of dust or grease with a record cleaning brush and record cleaning solution.
- Clean the turntable lid and turntable cabinet with a slightly damped microfiber cloth.
Note: Do not use a cleanser that contains alcohol, benzene, or any other harsh chemicals, which might damage the paint and finish of the turntable.
** Crosley offers a product line of different cleaning accessories. Please ask your retailer or check out our website www.crosleyradio.com for more cleaning product information.
Troubleshooting
There is no power
- No power at the power outlet.
- To help save power consumption, some models will comply with ERP energy saving standard. When there is no audio input for 20 minutes, their powers will automatically cut-off. To turn power back on and resume playing, turn off the power and turn it on again.
Power is on, but the platter does not turn
- Turntable mode is not selected.
- Turntable's drive belt has slipped off.
- An aux in cable is plugged into the aux in jack, unplug it.
Turntable is spinning, but there is no sound, or sound not loud enough
- Stylus protector is still on.
- Tone arm is lifted up by the lever.
CD does not play
• Function mode is not set to CD.
- The CD is blank.
- The CD is placed on the tray incorrectly with the label side facing down.
- The CD has unsupported digital audio files like MP3 and similar types of format.
- The CD has too many scratches or is dirty.
Cannot pause the cassette
- The feature is not available and you have to stop the cassette completely.
FCC Statements
NOTE: This equipment has been tested and found to comply with the limits for a Class B digital device, pursuant to part 15 of the FCC Rules. These limits are designed to provide reasonable protection against harmful interference in a residential installation. This equipment generates uses and can radiate radio frequency energy and, if not installed and used in accordance with the instructions, may cause harmful interference to radio communications. However, there is no guarantee that interference will not occur in a particular installation. If this equipment does cause harmful interference to radio or television reception, which can be determined by turning the equipment off and on, the user is encouraged to try to correct the interference by one or more of the following measures:
- Reorient or relocate the receiving antenna.
- Increase the separation between the equipment and receiver.
- Connect the equipment into an outlet on a circuit different from that to which the receiver is connected.
- Consult the dealer or an experienced radio/TV technician for help
- Changes or modifications not expressly approved by the party responsible for compliance could void the user's authority to operate the equipment.
This device complies with Part 15 of the FCC Rules. Operation is subject to the following two conditions:
- this device may not cause harmful interference, and
- this device must accept any interference received, including interference that may cause undesired operation.
- Safety Instructions
- Items in this package
- Specifications
- Note:
- Product Description
- Initial Setup
- Essential Setup
- Aux Input Connection
- Bluetooth Operation
- Turntable Operation
- Platter Auto-stop
- Needle Replacement
- Removing Needle
- Installing Needle
- Radio Operation
- CD Playback Operation
- Programmed Playback
- Cassette Operation
- Turntable Maintenance
- Troubleshooting
- There is no power
- Power is on, but the platter does not turn
- Turntable is spinning, but there is no sound, or sound not loud enough
- CD does not play
- Cannot pause the cassette
- FCC Statements
Brand : Crosley
Model : Burton CR7011A
Category : Turntable