
NXW Air Conditioner - Air conditioner Godrej - Free user manual and instructions
Find the device manual for free NXW Air Conditioner Godrej in PDF.


| Brand | Godrej |
| Model | NXW Air Conditioner |
| Product Type | Split Air Conditioner |
| Cooling Capacity | 1.5 Ton (5.0 kW) |
| Power Supply | 220-240 V, 50 Hz, Single Phase |
| Power Consumption (Cooling) | Approx. 1500 W |
| Refrigerant Type | R32 |
| Dimensions (Indoor Unit) | Approx. 99 x 32 x 23 cm |
| Dimensions (Outdoor Unit) | Approx. 90 x 65 x 33 cm |
| Weight (Indoor Unit) | Approx. 12 kg |
| Weight (Outdoor Unit) | Approx. 35 kg |
| Airflow Volume | Up to 650 m³/h |
| Noise Level (Indoor) | ≤ 45 dB(A) |
| Noise Level (Outdoor) | ≤ 55 dB(A) |
| Energy Efficiency Rating | 5 Star (BEE) |
| Main Functions | Cooling, Heating, Dehumidification, Fan, Auto Mode, Sleep Mode, Turbo Mode |
| Control Type | Remote Control with LCD Display |
| Filter Type | Antimicrobial + Catechin Filter |
| Maintenance | Clean filters every 2 weeks; annual professional service recommended |
| Safety Features | Auto Restart, Overload Protection, Child Lock, Self-Diagnosis |
| Installation | Requires professional installation; includes mounting plate, pipes, drainage |
| Warranty | 1 year on product, 5 years on compressor |
Frequently Asked Questions - NXW Air Conditioner Godrej
User questions about NXW Air Conditioner Godrej
0 question about this device. Answer the ones you know or ask your own.
Ask a new question about this device
Download the instructions for your Air conditioner in PDF format for free! Find your manual NXW Air Conditioner - Godrej and take your electronic device back in hand. On this page are published all the documents necessary for the use of your device. NXW Air Conditioner by Godrej.
USER MANUAL NXW Air Conditioner Godrej
NXW - Next World Air Conditioner

XX
NXW - Next World Air Conditioner
INVERTER AC WITH GREEN BALANCE TECHNOLOGY

natural_image
Close-up of a metallic electronic device with grid pattern and 'ferry' logo (no readable text or symbols beyond branding)INDIA'S MOST POWER SAVING INVERTER AC
Split Air Conditioner
Wall - mounted
For Free Installation Contact:
1800-209-5511
Protection of Environment:
"Protection of environment" is one of the core values of Godrej and we seek your co-operation to make sure that this product is not disposed as unsorted municipal waste.

This symbol is known as the "Crossed-out Wheelie Bin Symbol". It means that the product should not be disposed of with your general house-hold waste.
It should be disposed of only through the company's collection centers with special treatment so as to prevent any damage to the environment. Please call: 1800 209 5511 or visit www.godrejappliances.com/green-think for details about Godrej Appliances authorized collection centers.
Godrej & Boyce Mfg. Co. Ltd. - Appliance Division, Plant 11, Pirojshanagar, Vikroli (W), Mumbai 400 079.
Disclaimer - Images shown in manual are representative actual product may vary.
OWNER'S MANUAL

Notes:
Notes:
Dear Customer,
On behalf of Godrej Appliances, we welcome you to the Godrej family, and thank you for giving us an opportunity to serve you.
Godrej Appliances is a leading brand not just in technology and performance but also for its excellent customer service, we have more than 550 service centers across India, so that we can be close to our customers and serve them better.
In order to get the maximum out of your superior Air Conditioner, we urge you to go through this detailed user manual, if you need any assistance at any time, do not hesitate to call us on 1800 209 5511 or write to us at smartcare@godrej.com
We again thank you for giving us the privilege to serve you, and look forward to a long and delightful association.
Warm Regards, Team Godrej
Performance Parameters
| MODEL NAME | GSC 11 GIG 5 DGNG | GSC 11 GIG 5 DGNG COLECTRUM/REFRUCT | L PHELT T GNG | GIC MEAT 5 DGNG | GIC 11 LAT 5 DGNG | |||
| OPERATING MODE | Cooling Cooling/Cooling Cooling/Cooling | Cooling | Cooling | |||||
| RATED VOLTAGE | 230 V / 230 V/230 V / 230 V/230 V | 230 V | 230 V | |||||
| RATED FREQUENCY/PHASE | 50 hr / 1 Phase 5 hr / 1 Phase/50 hr / 1 Phase 50 hr / 1 Phase/50 hr / 1 Phase | 50 hr / 1 Phase | 50 hr / 1 Phase | |||||
| COOLING CAPACITY | 3540 W / 500 W/500 W / 300 W | 600 W | 500 W | |||||
| RATED POWER INPUT | 820 W | 795 W / 1250 W / 250 W / 2800 W | 1250 W | 1250 W | ||||
| RATED INPUT CURRENT | 5.9 A | 5.6 A | 5.6 A | 5.7 A | 2.7 A | 5.6 A | 6.7 A | |
| REFRIGERANT | K290 | K290 | K290 | K290KΩ | K290 | K290 | ||
| REFRIGERANT CHARGE | 0.350 kg | 0.350 kg | 0.310 kg | 0.365 kg | 0.365 kg | 0.380 kg | 0.350 kg | |
| AIR FLOW VOLUME | 530 CMH | 550 CMH | 550 CMH | 850 CMH | 850 CMH | 1600 CMH | 1600 CMH | |
| WEIGHT | HDY | 10 kg | 13 kg | 13 kg | 13 kg | 13 kg | 16 kg | 16 kg |
| OHY | 28 kg | 31 kg | 27.5 kg | 30 kg | 30 kg | 30 kg | 30 kg | |
FULL LOAD & HALF LOAD SETTING FOR INVERTER MODELS
| MODEL NOMENCLATURE | CAPACITY RATING | SELECT SET TEMP | SELECT MODE | TEST MODE ACTIVITY BY | TEST MODEL - IDC DISPLAY |
| GSC 12 GIG 5 DGOG | 100% | 16 | Fan Speed - High | Press "DISPLAY" key 6 times | Display ex IDU display panel will flash continuously |
| 50% | 17 | ||||
| GSC 18 GIG 5 DGOG | 100% | 16 | |||
| 50% | 17 | ||||
| GSC 18 FIXH 5 GGPG | 100% | 16 | |||
| 50% Goal Mode | 17 | ||||
| GSC 12 FIXH 7 GGPG | 100% | 16 | |||
| 50% | 17 | ||||
| GIC 12 BAH 8 GGQG | 100% | 16 | |||
| 50% | 17 | ||||
| GIC 24 BAH 5 GWQG | 100% | 16 | |||
| 50% | 17 | ||||
| GIC 18 LAH 5 GWQG | 100% | 16 | |||
| 50% | 17 |
Notes:
Notes:
Contents
Operation And Maintenance
Operation Guidelines 1
Usage Guidelines 3
Name And Function Of Each Part 4
Operation Of Wireless Remote Control 5
Know Your Air Conditioner 10
Indication Lamp 12
Emergency Switch Operation 12
If it happens, It is not a problem 13
Fault Indication 14
Clean And Care 15
Troubleshooting 17
Installation & Service
Installation Guidelines 20
Dimension Diagram For Installation 22
Installation of Indoor Unit 23
Installation of Outdoor Unit 25
Installation And Maintenance of Health Filters

This symbol stands for the things that should be strictly avoided.

This symbol stands for the things that should be followed
Thank you for choosing Godrej air conditioner. Please read this owner's manual carefully before operating the unit and keep it carefully for consultation.
The products shown in this manual may be different from the one bought by you.
Please refer to the model bought by you for its looks and the position, shape and size of the displayer.
This appliance is not intended for use by individuals (including children) with reduced physical, sensory or mental capabilities or lack of experience and knowledge, unless they have been given supervision or instruction concerning use of the appliance by a person responsible for their safety.
Children should be supervised to ensure that they do not play with the appliance.

Do not dispose this product as unsorted municipal waste.
Collection of such waste separately for special treatment is necessary.
WARRANTY AIR CONDITIONER
-
Company will not be liable for any consequential loss or compensation nor refund of purchase price nor replacement of the Air Conditioner.
-
Customer must ensure the routine maintenance including cleaning of filter etc. for proper operation.
-
Any change in location/damages on handling will be serviced at extra material and labor cost.
-
While Company would take all necessary steps to repair the Air Conditioner supplied under the warranty and keep sufficient stock of the spare parts of the Air Conditioner with them, however, in certain cases, at the sole discretion of the Company, the Company may due to non-availability of spare parts of the Air Conditioner, resulting into the Air Conditioner not being repaired by the Company, offer a replacement scheme to the purchasers of such Air Conditioner which cannot be repaired due to non-availability of spare parts of the Air Conditioner, purchased under the warranty, the Company would offer a replacement of the Air Conditioner. The details of the replacement offer is subject to change from year to year and shall also be applicable on the MRP of the product to be purchased as a replacement.
-
Two (2) free preventive maintenance service (labour only) will be provided to the customer during first year warranty period. To avail these free services customer has to register the call at the call center number 1800 209 5511. After expiry of 12 (twelve) months from date of purchase company is not liable for any free service.
Godrej & Boyce Mfg. Co. Ltd.- Appliance Division CUSTOMER COPY
MODEL NO.
AIR CONDITIONER SERIAL No.:
| CUSTOMER'S NAME & ADDRESS |
| TEL. |
DATE OF PURCHASE:
| DEALER'S NAME & ADDRESS |
| TEL. |
Customer's Signature:
This warranty is valid only if it is filled in and stamped by our authorized dealer on the date of purchase.
Warranty Voice II
- The warranty card is not completed properly at the time of purchase. 2. The completed warranty card is not presented to the authorized personnel at the time of service of the product. 3. The Air Conditioner is not operated and maintained according to instructions given in the "User Guide". 4. Defects are caused by improper use, which shall be determined by the company personnel. 5. Unauthorized persons carry out any repair work. 6. Defects are caused by reasons beyond control, limit abnormal voltage (exceed 250 V or below 20 V), acts of God, or while in transit or other transportation services, may be affected by the Company's responsibility for damage to the Air Conditioner or any parts due to transportation or shifting is not covered by the warranty. 7. The warranty automatically expires after the stipulated period from the original date of purchase, even if the Air Conditioner may not be in use for any time for whatever reason.
Warranty Air Conditioner
The Godrej Air Conditioner comes with a FIVE year warranty on compressor and a ONE year warranty on all other parts (except grill & plastic parts) from the date of purchase, against defective material or workmanship. In case of any such defect found during the first year from date of purchase, Godrej & Boyce Mfg. Co. Ltd. - Appliance Division will undertake repairs to the warranted part free of charge, subject to terms and conditions below. In the warranty period beyond the first year from date of purchase, only the compressor will be provided free of cost, when necessary. However, the Air Conditioner will repaired on payment of necessary charges. The warranty does not cover the demonstration/installation of the Air Conditioner.
INSTRUCTIONS FOR THE CUSTOMER
- Kindly ensure that the dealer fills the warranty card correctly and completely.
- You should retain the warranty card for record and produce the same in the event of any warranty repairs.
- In the event of a defect developing in the product, contact the nearest authorized Godrej & Boyce Service Center for obtaining warranty service and inform the defect, Model details & Serial No.
- Product will function between +/-10% of rated volts at 50Hz. For any fluctuation beyond specified limit, company shall not be responsible and warranty stands terminated.
- In areas where voltage fluctuates below 10% of rated voltage, customer is advised to use a voltage stabilizer which steps up voltage to a minimum of 190V.
- Earthing provision is necessary for safety. Improper domestic wiring leading to hazards such as shock or fire is not covered under this warranty.
- The product must be maintained to ensure hygiene. If there are any insects or rodents in it causing obstruction to the functioning of the product, the company shall not be responsible and in-turn warranty stands terminated.
TERMS AND CONDITIONS
- Repairs and replacement will be carried out by the companies authorized service centers or through authorized dealer's service center.
- All transportation and handling expenses incurred while repairing will be payable by the customer in advance.
- For any Air Conditioner installed beyond the municipal limits of the jurisdiction of the authorized customer service center, charges towards technician's visit will be borne by the customer
- While the company will make every effort to carry out the repairs at the earliest, it however is made expressly clear that the company is under no obligation to do so in a specified period of time.
- The company will retain any part(s), compressor and/or other components when replaced at its discretion.
- Warranty does not cover accessories to the Air Conditioner.
- Refrigeration system, gas charging and consumables will be charged for any such repairs after one year from the date of purchase.
Operation and maintenance-Operational Guidelines
The air conditioner must be grounded, improper grounding may result in electric shock


Please consult our company's authorised service provider for the same
Don't leave windows and doors open for a long time while operating the air conditioner.

It can decrease the air conditioning capacity.
Please note whether the installed stand is firm enough or not.

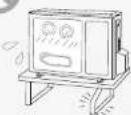
If it is damaged, it may lead to the fall of the unit and may cause injury.
Be sure to pull out the power plug when not using the air conditioner for a long time.


Otherwise, the accumulated dust may cause fire or electric shock.
Don't block the air intake or outlet vents of both the outdoor and indoor units.

It can decrease the air conditioning capacity or cause a malfunction.
Don't step on the top of the outdoor unit or place something on it.


As falling off the outdoor unit can be dangerous.
Select the most appropriate temperature.
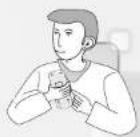
Do not store combustible substances in the room where the air conditioner is installed and at least at a distance of 15m. from the outdoor unit.

It can cause a fire or explosion.
Don't attempt to repair the air conditioner by yourself.

The wrong repair will lead to an electric shock or fire. You should contact our authorised center for repair.

Operational Guidelines
If the supply cord is damaged, it must be replaced.
Please contact our company's authorised service provider/dealer

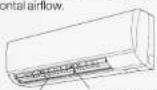
Louver of left/right direction
Louver of upward/ downward direction.
Don't insert your hands or stick into the air intake or outlet vents.


Otherwise it will cause accident.
Don't apply the cold wind to the body for a long time directly.


Don't use the air conditioner for other purposes, such as drying clothes, preserving foods, etc.


It can cause health problems.
Splashing water on the air conditioner can cause an electric shock and malfunction.


Don't place a heat source near the air conditioner.


It can decrease the air conditioning capacity
GODREJ & BOYCE MFG. CO. LTD.- Appliance Division
For any further assistance, please contact our nearest branch office or service centre:
| Branch | Address | Telephone No. |
| Ahmedabad | 4thFloor, APM Shopping Mall Near IOCL Petrol Pump, Shyamal-Karnavati 100 Ft. Road, Satellite, Ahmedabad-380 015. |  Call•1800-209-5511(Toll-Free) Call•1800-209-5511(Toll-Free) |
| Bangalore | 3thFloor, The Karnataka Film Chamber of Commerce Bldg. 28, 1st Main, Crescent Road. High Grounds Nr. Shivanand Circle, Bangalore-560 001. | |
| Bhopal | 217, Zone I, M.P. Nagar, Ben. Jyoti Talkies, Bhopal-462 011. | |
| Bhubaneshwar | Highway Complex NH-5, Rudrapur, Bhubaneshwar-752 101. | |
| Chandigarh / Mohali | Plot No.A-40, Phase-VIII-A, Industrial Area, Mohali-160059. | |
| Chennai | No.1, Sidoo industrial Estate. Ambattur, Chennai-600 098. | |
| Colmbatore | 585-590, Sathya Towers 3rd floor, D.B. Road R.S. Puram, Coimbatore-641 002. | |
| Delhi | Godraj Bhavan, 2ndFloor, Shershah Suri Marg, Okhia, New Delhi-110 065. | |
| Faridabad | Godraj Bhavan, 2ndFloor, Shershah Suri Marg, Okhia, New Delhi-110 065. | |
| Ghaziabad | Godraj Bhavan, 2ndFloor, Shershah Suri Marg, Okhia, New Delhi-110 065. | |
| Guwahati | Godraj Building, G-S.Road. Ulubari, Flyover, Guwahati-781 007. | |
| Hyderabad | 201 & 202, Laia-1 Land Mark, 5-4-94 to 97, 2nd Floor, Above Digital Shoppy, Raniguni, M.G. Road, Secunderabad-500 003. | |
| Jaipur | 502-506, 5thFloor, Gaurav Towers, Malviya Nagar, Jaipur-302 017. | |
| Kochi | 2ndFloor, Angels' Arcade South Kalamassery, Near CUSAT Signal Emakulam-682022. | |
| Kolkata | Block GN, Sector V, Salt lake, Kolkata-700 091. | |
| Lucknow | C 3/3 & C3/4, Sanjay Complex Behind Akashwani Bhawan, Vidhan Sabha Marg Luoknow-226001. | |
| Mumbai | Appliance Divn., Plant 4, Proshanagar, Vikholi, Mumbai-400079. | |
| Nagpur | Dr. Bhlwapurkar Chamber 2ndFloor, Opp: Yashwent Stadium Dhantoi, Nagpur-440012. | |
| Patna | Jeevan Deep Bldg. Exhibition Road Patna-800 001. | |
| Pune | Apollo Building Square, Plot No.60, Survey No.599 Sahaney Sujan Park, Lukanagar. Bibewadi Road, Pune-411 040. | |
| Rajpur | 9/1, Besides Bharat Petrol Pump Opp: Hotel Picadelly, Mahoiba Bazaar, GE Road, Rajpur-492001. | |
| Ranchi | C/o, Surya Motors, Near Krishi Bazaar Samiti Panda, Ranchi (Jharkhand)-835 222. |
Website: www.godrejappliances.com & www.godrejsmartcare.com E-mail: smartcare@godrej.com
Installation and Maintenance of Health Filter
Installation Instructions
- Pull the front panel to a specific angle from its two ends according to the arrow direction. Then pull the air filter downwards to remove it. (See Fig.a)
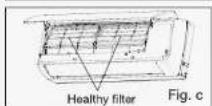
- Mount the health filter onto the air filter,(as shown in Fig.b). If the air filter cannot be installed, please mount the health filter on the front case. (as shown in Fig.c)
- Mount the air filter properly along the arrow direction in Fig.d, and then close the panel cover.

natural_image
Illustration of two hand-drawn panels showing airflow or ventilation process, with arrows indicating direction (no text or symbols)

Usage Guidelines
Working principle and special functions for cooling
Principle:
The air conditioner absorbs heat in the room, transmits and discharges it outside resulting in the decrease in ambient temperature. Its cooling capacity will increase or decrease depending on the outdoor ambient temperature.
Anti-freezing function:
If the unit is running in COOL mode and in low outdoor ambient temperature, there will be frost formation on the heat exchanger. When indoor heat exchanger temperature decreases below 0irc C, the indoor unit microcomputer will stop the compressor running and protect the unit.
Cleaning and Maintenance
- Take out the health filter before cleaning and reinstall it after cleaning according to the installation instruction. Pay special attention that silver ion filter can't be cleaned with water, while active carbon, photocatalyst, low temperature conversion (LTC) catalyst, formaldehyde eliminator, catechin or mite killing filter can, but can't with brush or hard things. Dry it in the shade or sun after cleaning, but not by wiping.
Service Life
The healthy filter commonly has its usage lifetime for one year under normal condition. As for silver ion filter, it is invalid when its surface becomes black (green).
- This supplementary instruction is provided for reference to the unit with health filter. If the graphics provided herein is different from the physical goods, the latter one shall prevail. The quantity of health filters shall be based on the actual delivery.
Name and function of each part
Indoor unit
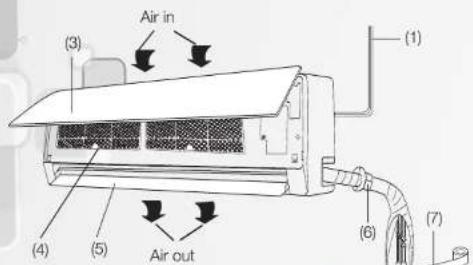
The Icon displayed
: Cool
Dry
: Run
88: Set temp.
Outdoor unit
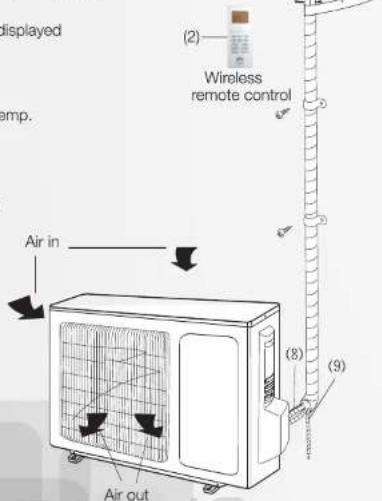
| (1) Power cable |
| (2) Remote control |
| (3) Front panel |
| (4) Filter |
| (5) Guide louver |
| (6) Wall pipe |
| (7) Bind tape |
| (8) Connection wire |
| (9) Drainage pipe |
Installation of outdoor unit
Electric wiring
- Disassemble the handle on the outdoor unit right side plate.
• Take off cord anchorage. Connect and fix power connect cord to the terminal block.
• Fix the power connection cable with cord anchorage. - Ensure wire has been fixed well.
• Install the handle.

NOTE:
- Wrong wiring may cause spare parts malfunction.
- After the cable fixed, make sure there should be a free space between the connection and fixing place on the lead wire.
Air purging and leakage test
- Connect charging hose of manifold valve to charge end of low pressure valve (both high/low pressure valves must be tightly shut).
- Connect joint of charging hose to vacuum pump.
• Fully open handle of Lo manifold valve - Open the vacuum pump to evacuate. At the beginning, slightly loosen joint nut of low pressure valve to check if there is air coming inside. (If noise of vacuum pump has been changed, the reading of millimeter is 0) Then tighten the nut.
- Keep evacuating for more than 15 mins and make sure the reading of pressure gauge is 1.0 × 10³ pa (-76cmHg).
• Fully open high/low pressure valves. - Remove charging hose from charging end of low pressure valve.
- Tighten the nut of low-pressure valve. (As shown in Fig.10)

Fig.10
Installation of indoor unit
NOTE:
When connecting the electric wire if the wire length is not enough, please contact the authorized service shop and buy an exclusive electric wire that is long enough and has no joints.
- The electric wiring must be correctly connected, wrong connection may cause machine malfunction.
- Tighten the terminal screw in order to prevent loose connection. After tightening the screw, slightly pull the wire and confirm whether it is firm or not.
• If the earthing wire is not connected properly, it may cause electric shock. - The cover plate must be fixed. Tighten the connection wire, if it is poorly installed, then the dust, moisture may enter in or the connection terminal may get affected by the outside force, and may cause fire or electric shock.
Install the indoor unit
The piping can be lead out from right, right rear, left left rear. When routing the piping and wiring from the left or right side of indoor unit, it is necessary to cut off the tailings from the chassis (Shown in Fig.7)
- Cut off the tailings 1 when routing the wiring only;
- Cut off the tailings 1 and tailings 2 when routing both the wiring and piping.
• Take out the piping from body case, wrap the piping electric wire, water pipe with tape and pull them through the piping hole (As show in Fig.8)
- Hang the mounting slots of the indoor unit on the upper tabs of the rear panel and check if it is firm enough.(As show in Fig.9)
- The height of the installed location should be 2. m or more from the floor.
Install the connection pipe
- Align the center of the piping flare with the relevant valve.
- Screw in the flare nut by hand and then tighten the nut with spanner and torque wrench refer to the following:
| Hex nut diameter | Tightening torque (N.m) |
| 6 | 15-20 |
| 9.52 | 31-35 |
| 12 | 50-55 |
| 16 | 60-65 |
| 19 | 70-75 |


NOTE: Firstly connect the connection pipe to indoor unit, then to outdoor unit; pay attention to the piping bending, do not damage the connection pipe; the joint nut couldn't tighten too much, otherwise it may cause leakage.
Operation of wireless remote control
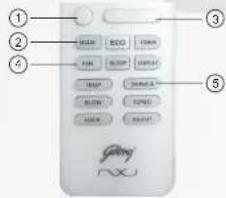
Names and functions of wireless remote control
Note: Be sure that there are no obstructions between receiver and remote hand set; Don't drop or throw the remote hand set; Don't let any liquid in the remote control and don't put the remote control directly under the sunlight or any place which is very hot.
If any of the key is pressed for more than 2 secs, then the display light will turn ON for 8 secs and post that will turn OFF.
Remote Hand Set

ON/OFF button
Press this button, the unit will be turned on, press it once more, the unit will be turned off. When turning on or turning off the unit, the Timer, Sleep function will be cancelled, but the preset time will remain
MODE button
Press this button, Auto,Cool, Dry,Fan mode can be selected circularly. Under auto mode, the unit will automatically set 'SET TEMP' at 25°C.

NOTE: Please do not select HEAT mode if the machine you purchased is cooling only type. Heat mode is not supported by the cooling only appliance.
Be sure that there are no obstructions between receiver and remote hand set. Don't drop or throw the remote hand set. Don't let any liquid in the remote control and don't put the remote control directly under the sunlight or any place which is very hot.
If any of the key is pressed for more than 2 secs, then the display light will turn ON for 8 secs and post that it will turn OFF.
SLEEP button
By pressing this button, Sleep On and Sleep off can be selected. By default, the function will be cancelled automatically in Eight hours. After sleep function is set up, the icon of 'Sleep' will be displayed. This function is only available during COOL mode.
When air conditioner is in sleep operation the indoor temp. will increase 1°C in one hour and 1°C more in next three hours.
FAN button
By pressing this button, Low, Middle, High Auto, speed can be circularly selected.

Low fan Middle fan
High fan
NOTE: Under the Dry mode, the fan speed isn't adjustable, low fan speed is imperative.
LOCK button
When you press the LOCK button (3-5 sec.), all current settings are locked and the icon will be displayed on it. Remote controller does not accept any operation except that of the LOCK. Press again to cancel the LOCK mode. If the keypad is unlocked, the mark will disappear.
DISPLAY button
Press this button to clear the digit display in the air conditioner, press it again to activate it (Not available for the units without LED display window).
When indoor display is ON 📋 will appear on the remote control.
Operation of wireless remote control
Names and functions of wireless remote control
Notice: This is a general use remote hand set, It could be used for the air conditioners with multifunction For some function, which the model doesn't have, pressing the corresponding button on the remote hand set will have no effect on its running status.
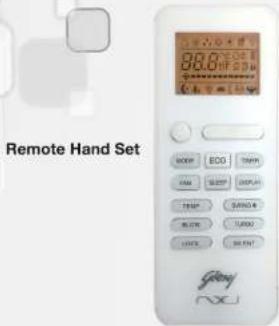
BLOW button
Press this button, to turn on or turn off the drying. If bad odour is coming from air conditioner, press BLOW button on the remote handset. This function will keep indoor fan at super high fan speed for 5 minutes, after air conditioner is turn OFF. The indication of minutes will display on displayer.
It works in two ways:
1) If air conditioner is in operation, and you press BLOW button in COOL and DRY mode, the blower will run at high speed for 5 min. after air conditioner is turned OFF. The decremented time will indicate on display.
2) Press BLOW button when air conditioner is OFF, indoor fan will run at high speed for 5 min. and decremented time will indicate on display.
Note: It is recommended to use BLOW function when AC is OFF.
This function helps to keep the indoor coil dry and prevent dust and mold accumulation. Also the growth of bacteria in indoor coil due to moisture is reduced.
TURBO button
Push this button to activate/cancel the Turbo function which enables the unit to reach the preset temperature in the shortest time. On cooling mode, the unit will blow strong cooling air with super high fan speed. By default, this function will cancel in one hour.
+ button
For presenting temperature increase: Press this button, to increase the temperature, when unit is on. In AUTO, DRY and FAN mode temperature cannot be set up. Centigrade scale range is from 16°C - 31°C. This button is also use for setting time during TIMER operation.
button
For presenting temperature decrease; Press this button, to decrease the temperature, when unit is on. The temperature adjustment is unavailable in the AUTO, DRY and FAN mode.
This button is also use for setting time during TIMER operation.
ECO button
Press this button to go into the Energy-Saving operation mode. Press the button again to cancel. By default, the function will be cancelled automatically in eight hours. This function will help to maintain your power consumption.
Installation of indoor unit
Install the rear panel
- Always mount the rear panel horizontally. Due to the water tray of indoor unit has been adopted the both-way drainage design, the outlet of water tray should be adjusted slightly down when installing, that is taking the outlet of the water tray as the center of a circle, the included angle between the evaporator and level should be 0 or more, that is good for condensing water drainage.
- Fix the rear panel on the wall with screws. (Where is pre-covered with plastic granula)
- Be sure that the rear panel has been fixed firmly enough to withstand the weight of an adult of 60kg, further more, the weight should be evenly shared by each screw.
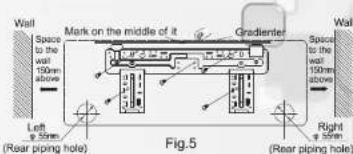
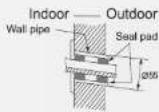
Install the piping hole
- Make the piping hole (Φ55) in the wall at a slight downward slant to the outdoor side.
- Insert the piping-hole sleeve into the hole to prevent the connection piping and wiring from being damaged when passing through the hole.
Install the water drainage pipe
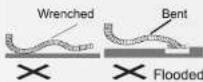
- For well draining, the drain hose should be placed at a downward slant.
- Do not wrench or bend the drain hose or flood its end by water.
- When the long drainage hose passing through indoor, should wrap the insulation materials.
Connect indoor and outdoor electric wires
- Open the surface panel.
- Remove the wiring cover Fig.6.
- Connect the inter connection cord to the terminal block, and then fix the cord with cord anchorge.
- Reassemble the clamp and wiring cover.
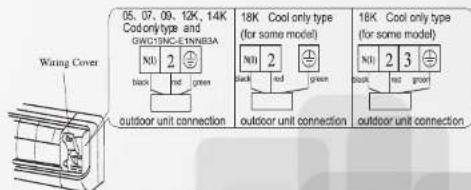
Fig.6
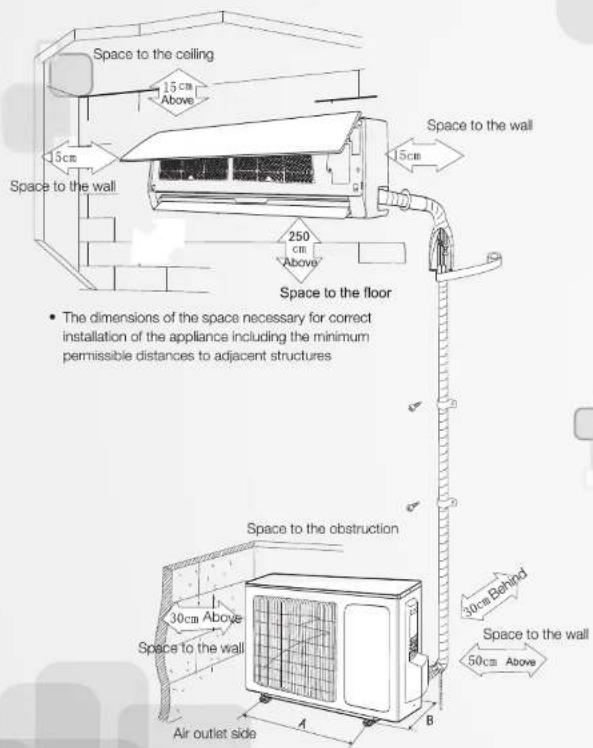
Dimension diagram for Installation
Installation diagram
Operation of wireless remote control
Names and functions of wireless remote control
Notice: This is a general use remote hand set, It could be used for the air conditioners with multifunction For some function, which the model doesn't have, pressing the corresponding button on the remote hand set will have no effect on its running status.
Remote Hand Set

TIMER button
Press this button to initiate auto ON and auto OFF time sequence. Each press will increase the auto timed setting in 30 minutes increments. To set the time use + and - keys.
- If you pressed TIMER button when AC is ON and set time using remote handset, the AC will turned OFF after set time duration is completed
- And if you pressed TIMER button when AC is OFF and set time using remote handset, the AC will turn ON after set time duration is completed.
SILENT button
Press this button to avoid the acoustic noise of air conditioner. The indoor fan will rotate at very low frequency and make you comfortable. When you press SILENT button in cool mode the fan speed will reduce one gear i.e. if fan speed is high, after pressing SILENT button it will reduce to medium. Repressing the SILENT button will regain the previous status.
If you press SILENT button in fan mode, indoor fan speed will directly reduced to low fan speed.
SWING UP AND DOWN BUTTON
Press this button, to make IDU swing louver ON and OFF
When IDU swing louver is ON, will appear on remote control and When Indoor swing is OFF, will not appear on the remote.
Operation of wireless remote control
Guide for operation - General operation
- After Switching ON the power supply, press ON/OFF button, and the unit will start to run.(Note: When power is off, the guide louver of the Indoor unit will close automatically)
- Press MODE button to select the desired running mode, or press COOL mode to enter into the corresponding operation directly.
- Press + and - button, to set the desired temperature. (Setting temp. function is cancelled in AUTO, DRY and Fan Mode)
- Press FAN button to set fan speed and can select among low, medium, high and auto.
- Press Swing (up-down)button, to select the swing.
Guide for operation – Optional operation
- Press SLEEP button, to set sleep.
- Press TIMER button, to set the scheduled timer on or timer off.
- Press DISPLAY button, to switch the display on the indoor unit on or off .(This function may be not available for some units)
- Press TURBO button, to set the TURBO function ON and OFF.

Introduction for special function
About AUTO CLEAN
This function ensures that moisture on evaporator of indoor unit will be blown off after the unit is stopped to avoid mould. This function can be activated using BLOW button on remote control.
About AUTO RUN
When AUTO mode is selected, the setting temperature will not be displayed on the remote hand set, the unit will monitor the room temp, automatically to select the suitable running method and to make the ambient comfortable.
About TURBO function
When this function is on, the unit will run at super-high fan speed to cool quickly so that the ambient temp. approaches the present temp. as soon as possible.
Installation Guideline
Safety Requirements For Electric Appliances
- The power supply should be used as per the rated voltage and AC exclusive circuit, the power cable diameter should be satisfied.
- Don't drag the power cable emphatically.
- It should be reliably earthed, and it should be connected to the special earth device, the installation work should be operated by a company authorised service center. The air switch must have the functions of magnetic tripping and heat tripping, in order to protect the short circuit and overloading.
• The min. distance from the unit and combustive surface is 2 m.
• The appliance shall be installed in accordance with national wiring regulations. - An all-pole disconnection switch having a contact separation of at least 3mm in all poles should be connected in fixed wiring.
Note
- Make sure that the Live wire (RHS) or neutral wire (LHS) as well as the earth wire (top) in the power socket is connected correctly. Power point should be strong enough to withstand the power fed to the air conditioner.
- Wrong connection may cause fire.
Earthing requirements
• Air conditioner is an electric appliance, which needs reliable earthing measure.
- The yellow-green or green alone in air conditioner is earthing wire and cannot be used for other purpose. It cannot be cut off and be fixed by screw, otherwise it would cause electric shock.
• The earth resistance should be according to the National Criterion.
- Please don't connect the earthing wire to any of the following:
- Tap water pipe.
• Gas pipe.
- Drain pipe.
Installation Guideline
Important Notices
• The unit installation work must be done by company authorised service provider
- When removing the unit to the other place, please firstly contact the authorized service center
Basic Requirements For Installation Position
Installation in the following places may cause malfunction. If it is unavoidable contact
the authorised service center:
- Place where strong heat sources, vapors, flammable gas or volatile object are emitted.
- Place where high-frequency waves are generated by radio equipment, welders and medical equipment.
• Place where a lot of salinities such as coast exists.
- Place where the oil (machine oil) is contained in the air.
- Place where a sulfured gas is generated such as the hot spring zones.
• Other place with special circumstance.
Indoor Unit Installation Position Selection
- The air inlet and outlet vent should be far from the obstruction, make sure that the air can be blown through the whole room.
- Select a position where the condensing water can be easily drained out, and the place is easily connected for outdoor unit.
• Select a location where the children can not reach - Select a place which is strong enough to withstand the full weight and vibration of the unit and will not increase the noise.
- Be sure to leave enough space to allow access for routine maintenance. The height of the installed location should be 250cm or more from the floor
- Select a place about 1 m or more away from TV set or any other electric appliances.
- Select a place where the filter can be easily taken out.
- Make sure that the indoor unit installation should accord with installation dimension diagram requirements.
- Do not use the unit in the immediate surroundings of a laundry, a bath, a shower or a swimming pool.
Outdoor Unit Installation Position Selection
- Select a location from which noise and outflow air emitted by unit will not cause inconvenience to neighbors, animals, plants.
- Select a location where there is sufficient ventilation.
- Select a location where there should be no obstructions cover the inlet and outlet vent.
- The location should be able to withstand the full weight and vibration of the outdoor unit and permit safe installation.
- Select a dry place, but do not expose under the direct sunlight or strong wind.
- Make sure that the outdoor unit installation dimension should accord with installation dimension diagram, convenient for maintenance, repair.?
- The height difference of connecting the tubing be within 5m, the length of connecting the tubing be within 10m.
- Select a place where it is out of reach for the children.
- Select a place which will not block the passage and do not influence the city appearance.
Operation of wireless remote control
Guidelines for Changing batteries
Lightly press the location marked , along the arrowhead direction to push the back cover of wireless remote hand set. (As show in figure)
Take out the old batteries. (As show in figure)
Insert two new AAA1.5V dry batteries, and pay attention to the polarity. (As show in figure)
Replace the back cover of wireless remote hand set.
(As show in figure)
NOTE:
When changing the batteries, do not use the old or different batteries, otherwise, it can cause the malfunction of the wireless remote control.
If the wireless remote control will not be used for a long time, please take them out, and don't let the leakage liquid damage the wireless remote control.
It should be placed at least 1m away from the TV set or stereo sound sets. If the wireless remote hand set is not functioning normally, take out the batteries, and after 30s reinsert them. If they are still not running normally replace them.

Sketch map for changing batteries
Know Your Air Conditioner
AUTO Mode:
- Press 'MODE' button to cyclically step through the AUTO→COOL→DRY→FAN modes and stop when AUTO mode is selected.
- △This symbol will appear on the remote display when you select the AUTO mode.
- The air conditioner will automatically select cooling, or fan only operation depending on set temperature and the room temperature.
- Setting temperature cannot be changed. By default it will set to 25°C and display on indoor panel. In this mode the fan speed is changeable (Low, Medium, High, and AUTO)
COOL Mode:
- In the cool mode, the compressor is in operation and your AC functions in the standard operating mode, cooling your room to desired set temperature.
- Press 'MODE' button to cyclically step through the AUTO→COOL→DRY→FAN modes and stop when COOL mode is selected.
- Symbol can be seen on the remote panel when you select the COOL mode.
- The cooling function allows air conditioner to cool the room and at the same time reduces the humidity in the air. In this mode the compressor will run at different frequencies depending on difference between set temp. and room temp, which gives you faster cooling as compared to fixed speed AC.
- Setting temperature range is 16°C to 31°C. The ideal temperature that can be set for comfort and energy savings is between 21°C to 25°C depending whether it is day or night.
- You can change the fan speed setting by pressing FAN button .(Low , Medium, High, and AUTO)
- TURBO, SLEEP, and ECO functions are only available during cooling mode.
Dry Mode:
- In the DRY mode, air conditioner reduces the humidity of the air to make the room more comfortable.
- Press 'MODE' button to cyclically step through the AUTO → COOL → DRY → FAN modes and stop when DRY mode is selected.
Symbol can be seen on the remote panel when you select the DRY mode. - The indoor fan runs at low speed and compressor frequency will vary according to the difference between set and room temperature just to remove extra humidity. In this mode the air conditioner does not blow a lot of cool air, as the intent is just to dry the air and not to cool the room.
- Set temperature and fan speed cannot be changed as indoor fan speed is restricted to Low. Indoor display will show the set temp.
Troubleshooting
| Phenomenon | Troubleshooting |
| Noise is heard from the indoor unit | The sound is that of the fan or is caused when the compressor relay switches on or off.When the Defrost Function starts and stops functioning sound will be heard. This is due to the refrigerant flowing in reverse direction. |
| Indoor unit is not blowing air. | In dehumidifying mode, sometimes indoor fan will stop, in order to avoid condensing water to vaporize again and to restrain temperature rise. |
| Moisture on air outlet vent. | If unit is running under high humidity for a long time, moisture will condense on the air outlet grill and drip off. |

Immediately stop all operations and plug out & contact Company Authorised service center/dealer if -
• There is a harsh sound during operation.
- Terrible odors are emitted during operation.
• Water is leaking in the room.
• Air switch or protection switch often breaks.
• Water or something is splashed into the unit.
- The power supply cord and the power plug is abnormally heated up.
Stop running and pull out of the plug.
10 15
19
Troubleshooting
| Phenomenon | Troubleshooting |
The unit is not running 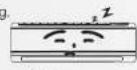  [570] [Breaking off] [570] [Breaking off] | Has the power been shut down?Is power plug loose?Has the circuit protection device tripped?Is voltage high or low? (Tested by professionals)Is the TIMER correctly used? |
Cooling efficiency is not good   | Is temp setting suitable?Are inlet and outlet vents obstructed?Is filter dirty?Are the windows and doors clothed?Did Fan speed set at low speed?Is there any heat sources in the room? |
Wireless remote control is not functioning.  | The unit is disturbed occasionally by abnormal or frequent function switchovers, without the controller's interference. At this time, you need to switch off the power, pull off the plug and reinsert it.Is it in its receiving range? Or is the signal obstructed? Check the batteries of the remote hand set and if required replace them.Check whether the wireless remote control is damaged. |
| If there is water leakage in the room. | The humidity in the room is on the high side.Condensing water over flowed.The connection point of indoor unit drainage pipe is loose. |
| If there is water leakage in the outdoor unit. | When the unit is running in COOL mode, the pipe and connection of pipe would be wet due to condensation of moisture in the air.When the unit is running in Auto Defrosting mode the ice thaws and flows out. |
Know Your Air Conditioner
Fan Mode:
- Press 'MODE' button to cyclically step through the AUTO→COOL→DRY→FAN modes and stop when FAN mode is selected.
- *This symbol can be seen on the remote panel when you select the FAN mode.
- In this mode compressor and outdoor fan are OFF and indoor fan speed can be varied between Low, Medium, High and AUTO speed using remote control.
- Indoor unit displays the indoor room temperature.
Indication Lamp


Lights up when HEAT mode is selected

Lights up when COOL mode is selected

Lights up when DRY mode is selected

This LED illuminate's when the air conditioner is in operation.

Displays the temperature setting when the air conditioner is in operation. Displays the malfunction code (Error Code) when fault occurs.
Emergency switch operation
If the wireless remote control is lost or broken, please use the manual switch button. Press the manual switch button until buzzer sounds once to turn off or turn on the air conditioner. When manual switch is on the unit will run on Auto mode, and the temp can not be changed. The operation is as mentioned below:
Open the panel; the manual switch is on the control box.
- Turn on the unit: When the unit is off, press this button and the unit will run in Auto mode. The microcomputer will measure the indoor temp. and will decide to operate in either cool or fan mode.
- Turn off the unit: When the unit is on, press the button and the unit will stop working.

natural_image
Diagram of a mechanical component with a circular inset showing a ring and a small square (no text or symbols)Manual switch
Fig. 3
Troubleshooting

Caution
Don't attempt to repair the air conditioner by yourself, it can cause an electric shock or fire. Please check the following items before asking for repair, it can save your time and money.
| Phenomenon | Troubleshooting |
Not functioning immediately when the air conditioner is restarted. 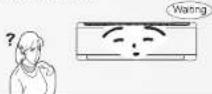 | Once the air conditioner is stopped, it will not operate in approximately 3 minutes to protect itself. |
There's unusual smell blowing from the outlet after operation is started.  | The unit has no peculiar smell by itself. It can be due to the smell accumulated in the ambient.Solution method: Clean the filter. If problem still exists please contact company authorised service center/dealer |
Sound of water flow can be heard during the operation.  | When the air conditioner is switched on or switched off or when the compressor is starts and stops sometimes there is a swoosh or gurgle. This sound is due to the flow of the refrigerant. This is not a malfunction. |
In COOL mode, sometimes mist is emitted from the air outlet vent.  | When the indoor temperature and humidity are very high, this phenomenon would happen. This is caused by the room air swiftly cooling down. After running for a while, indoor temperature and humidity will decrease and no mist will be emitted. |
Creaking noise can be heard from the unit when switching it on or off.  | This is caused by the deformation of plastic due to the changes in temperature. |
Clean and Care
Check before use
- Be sure that nothing obstructs the air outlet and intake vents.
- Check whether ground wire is properly connected or not.
- Check whether the batteries of the air conditioner are functional or not.
- Check whether the installation stand of the outdoor unit is damaged or not. If damaged, please contact the company authorised service center/ dealer.

Maintenance during use
- Turn main power off.
- Clean the filter and indoor and outdoor units' bodies.
- Clear dust and obstructions from the outdoor unit.
- Repaint the rubiginous place on the outdoor unit to prevent it from spreading.
- Adopt the special shield to cover the outdoor unit to avoid the rain water and dust from entering the unit and which may cause rust.
If it happens, it is not a problem
| If it happens It is not a problem | |
| The unit does not operate Due to high (>280) or low (<140) voltage, it has gone into protection mode and thus slapped. | |
| Less cooling Check whether unit is working in dry mode? | |
| The unit does not respond to commands Check whether LOCK key is activate or not? | |
| The indoor display is off Activate DISPLAY key on remote control | |
| If you select 0.5(half hour)timer but Dual digit display limitation, It can't display 0.5, IDU display shows 1 (one hour) it will display 1 for both Half and one hour. | |
| After AC is switched off, if indoor It may happen that you have selected the BLOW display shows '05' function when AC was ON, and therefore AC is performing BLOW operation after it turned OFF. | |
| If you set indoor fan speed at low speed, 3 min. delay when fan speed changed from high but sill it is working at high speed to low. |

16
13
Fault Indication
If any error occurs in your air conditioner, indoor display shows error codes. Following are the error code for respective error: Though your AC shows fault code on the display, it will remain ON for particular faults to make your comfortable. But your have to call service person for repair.
| Trouble Indication Kind of Trouble | |
| EE IDU Machine EE Fault | |
| E1 Indoor fan fault | |
| E2 Indoor fan zero crossing detection abnormal | |
| E3 Indoor evaporator sensor fault | |
| E4 Indoor room temperature sensor fault | |
| E0 Outdoor EE fault | |
| E6 Indoor & Outdoor communication fault | |
| F1 Compressor starting abnormal | |
| F2 Compressor out-of-step fault | |
| F3 IPM module fault | |
| F4 Compressor shell roof fault | |
| F5 Exhaust (Discharge) temperature sensor fault | |
| F6 Suction temperature sensor fault | |
| F7 Outdoor coil (condenser) temperature sensor fault | |
| F8 Outdoor ambient temperature sensor fault | |
| F9 Outdoor DC fan fault | |

Clean and Care

Caution
- Turn power off and pull out the power plug before cleaning air conditioner, or it may cause electric shock.
- Never sprinkle water on the indoor unit or the outdoor unit for cleaning because it can cause an electric shock.
- Volatile liquid (e.g. thinner or gasoline) will damage the air conditioner. (So wipe the units with a dry soft cloth, or a cloth slightly moistened with water or cleanser.)
• Air conditioner contains flammable gas.
Cleaning the front panel
When cleaning the front panel, please dip the cloth into water (temperature of below 45°C) squeeze the water out and wipe the dirty part.
Note: Please do not immerse the front panel in water, as there are microcomputer components and circuit boards on the front panel which may get damaged.
Cleaning the air filter (Recommended once every three months)
NOTE: If dust around the air conditioner is more, the air filters should be cleaned regularly. After taking off the filter, don't touch the fin of indoor unit, in order to avoid hurting your fingers.
Take down the air filter
Open the front panel and pull the air filter downwards to take it out. please see the Fig. 4 (a, b).

Clean the air filter
To clean the dust on the filters, you can either use a vacuum cleaner, or wash them with warm water and dry it in the shade.
NOTE: Never use water above 45 to clean, or it can cause deformation or discoloration. Never parch it by fire, or it can cause a fire or deformation.
Insert the air filter
Reinsert the filters along the direction of arrowhead, and then cover it with the front panel and clasp it.


14
15
- INVERTER AC WITH GREEN BALANCE TECHNOLOGY
- INDIA'S MOST POWER SAVING INVERTER AC
- Notes:
- Contents
- Operation And Maintenance
- Installation & Service
- WARRANTY AIR CONDITIONER
- Godrej & Boyce Mfg. Co. Ltd.- Appliance Division CUSTOMER COPY
- INSTRUCTIONS FOR THE CUSTOMER
- TERMS AND CONDITIONS
- Operation and maintenance-Operational Guidelines
- Operational Guidelines
- GODREJ & BOYCE MFG. CO. LTD.- Appliance Division
- Installation and Maintenance of Health Filter
- Installation Instructions
- Usage Guidelines
- Working principle and special functions for cooling
- Principle:
- Anti-freezing function:
- Cleaning and Maintenance
- Service Life
- Name and function of each part
- Installation of outdoor unit
- Electric wiring
- NOTE:
- Air purging and leakage test
- Installation of indoor unit
- Install the indoor unit
- Install the connection pipe
- Operation of wireless remote control
- Names and functions of wireless remote control
- Remote Hand Set
- ON/OFF button
- MODE button
- SLEEP button
- FAN button
- LOCK button
- DISPLAY button
- BLOW button
- TURBO button
- + button
- button
- ECO button
- Install the rear panel
- Install the piping hole
- Install the water drainage pipe
- Connect indoor and outdoor electric wires
- Dimension diagram for Installation
- TIMER button
- SILENT button
- SWING UP AND DOWN BUTTON
- Guide for operation - General operation
- Guide for operation – Optional operation
- Introduction for special function
- About AUTO CLEAN
- About AUTO RUN
- About TURBO function
- Installation Guideline
- Safety Requirements For Electric Appliances
- Note
- Earthing requirements
- Important Notices
- Basic Requirements For Installation Position
- Indoor Unit Installation Position Selection
- Outdoor Unit Installation Position Selection
- Guidelines for Changing batteries
- Know Your Air Conditioner
- AUTO Mode:
- COOL Mode:
- Dry Mode:
- Immediately stop all operations and plug out & contact Company Authorised service center/dealer if -
- Fan Mode:
- Indication Lamp
- Emergency switch operation
- Troubleshooting
- Caution
- Clean and Care
- Check before use
- Maintenance during use
- If it happens, it is not a problem
- Fault Indication
- Cleaning the front panel
- Cleaning the air filter (Recommended once every three months)
- Take down the air filter
- Clean the air filter
- Insert the air filter
Brand : Godrej
Model : NXW Air Conditioner
Category : Air conditioner