WDI3301 - Washing machine Caple - Free user manual and instructions
Find the device manual for free WDI3301 Caple in PDF.


| Product Type | Integrated Washer Dryer |
| Brand | Caple |
| Model | WDI3301 |
| Washing Capacity | 8.0 kg |
| Drying Capacity | 6.0 kg |
| Maximum Spin Speed | 1400 rpm |
| Power Supply | 220-240V~, 50Hz |
| Rated Power (Wash) | 1900 W |
| Drying Power | 1300 W |
| Maximum Current | 10 A |
| Water Pressure Range | 0.05 MPa - 1 MPa |
| Number of Programs | 16 |
| Control Type | Electronic with digital display |
| Door Type | Porthole with magnetic closure |
| Child Lock | Yes |
| Delay Start | Up to 24 hours |
| Dry Level Options | Extra Dry, Normal Dry, Gentle Dry |
| Temperature Options | Cold, 20°C, 30°C, 40°C, 60°C, 90°C |
| Installation Type | Built-in (integrated) |
| Spare Parts Availability | Minimum 7-10 years (depending on component) |
Frequently Asked Questions - WDI3301 Caple
User questions about WDI3301 Caple
0 question about this device. Answer the ones you know or ask your own.
Ask a new question about this device
Download the instructions for your Washing machine in PDF format for free! Find your manual WDI3301 - Caple and take your electronic device back in hand. On this page are published all the documents necessary for the use of your device. WDI3301 by Caple.
USER MANUAL WDI3301 Caple
Integrated Washer Dryer Instruction Manual
WDI3301
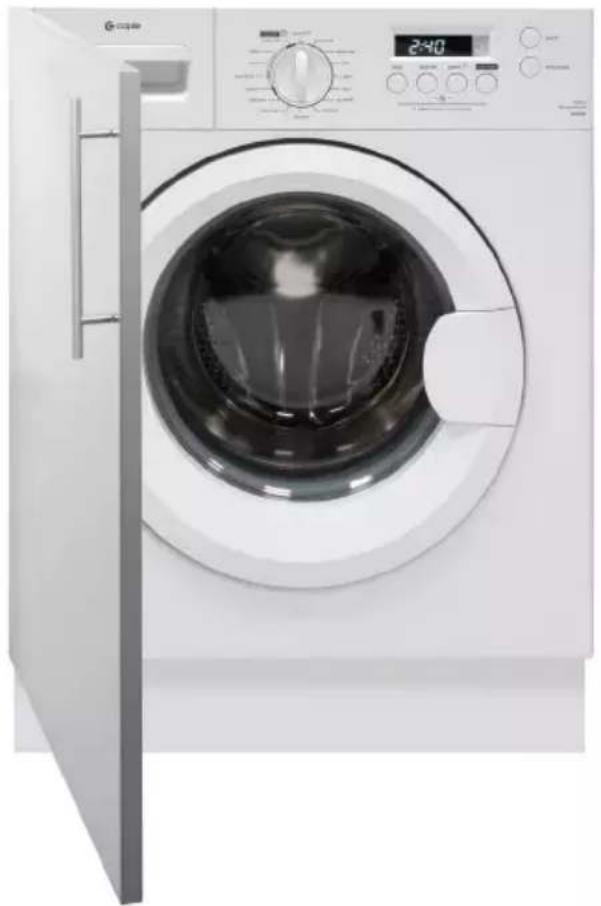
natural_image
Front view of a white washing machine with open door and digital display (no visible text or symbols)CONTENTS
Warnings 3
Environmental Protection 13
Warranty 13
Overview of Washer Dryer 14
Installation 15
Built In Installation 19
Operation 24
Detergent Drawer 28
Quick User Guide 29
Control Panel 30
Programmes 36
Table Of Programmes 38
Cleaning And Maintenance 39
Troubleshooting 43
Product Specifications 45
Caple Contact Details 48
Keep these instructions for use with the appliance. If the appliance should be sold or passed on to others, make sure that the instructions are passed on with it. We thank you for taking note of these suggestions before installing and using the appliance. They have been written for your personal safety and the safety of others.

CAUTION: HOT SURFACE

CAUTION: RISK OF FIRE
WARNINGS
- This appliance is intended to be used in household and similar applications such as:
- Staff kitchen areas in shops, offices and other working environments.
- Farm Houses.
- By clients in hotels, motels and other residential type environments.
- Bed and breakfast type environments.
- Your machine is designed for use in a domestic environment. The warranty will be invalid if you use it for commercial purposes.
- This appliance is not intended for use by persons (including children) with reduced physical, sensory or mental capabilities, or lack of experience and knowledge, unless they have been given supervision or instruction concerning use of the appliance by a person responsible for their safety.
- This appliance can be used by children aged from 8 years and above and persons with reduced physical, sensory or mental capabilities or lack of experience and knowledge if they have been given supervision or instruction concerning use of the appliance in a safe way and understand the hazards involved.
- Children shall not play with the appliance.
- Cleaning and user maintenance shall not be made by children without supervision. Children of less than 3 years should be kept away unless continuously supervised.
- Keep the packing materials from your machine away from children to avoid hazards.
- Keep pets away from your machine.
- It could be possible for a child or pet to gain access to the washer dryer through the porthole door. Therefore, please check the drum before using the appliance.
- Glass door may be very hot during the operation. Keep kids and pets far away from the machine during the operation.
- DO NOT use the washer dryer if you suspect that it is damaged in any way. Under no circumstances should you attempt to repair the appliance yourself. Repairs carried out by inexperienced persons may cause serious injury.
- Consult your local appointed service engineer and insist on genuine spare parts.
- The washer dryer should be serviced by an appointed service organisation and only genuine parts used.
- It is recommended that the washer dryer be serviced annually by a person competent to service tumble dryers.
- It is dangerous to alter or modify the product in any way other than fitting authorised accessories.
- The new hose-sets supplied with the appliance are to be used and that old hose-sets should not be reused.
- DO NOT allow fluff to accumulate around the washer dryer. Risk of fire.
- DO NOT use the product if the fluff filter is not in position or is damaged; fluff could be ignited.
- Lint and fluff must not be allowed to collect on the floor around the outside of the machine.
- It is important to clean the lint filter after each drying cycle or the restrictions to airflow will extend drying times and could cause the safety cut-out to trip.
- It is important to clean fluff from the window of the dryer and around the door seal after each drying cycle. Failure to do so could result in water leaking.
INSTALLATION WARNINGS
- The washer dryer must be installed by a Registered Installer.
- Do not install the product in a low temperature room or in a room where there is a risk of frost occurring. At temperatures around freezing point the product may not be able to operate properly: there is a risk of damage if the water is allowed to freeze in the hydraulic circuit (valves, hoses, pumps).
- The appliance shall not be installed in bath room or very wet rooms as well as in the rooms with explosive or caustic gases.
- The appliance shall not be installed at a humid place.
- Never install the washer dryer near curtains.
- The appliance must not be installed behind a lockable door, a sliding door or a door with a hinge on the opposite side to that of the tumble dryer.
- Please note it is not recommended that the washer dryer is placed directly next to ovens or cookers as the performance of the dryer may be affected.
- Do not stack the washer dryer on top of other appliances.
- Remove all packages and transport bolts before using the appliance. Otherwise, serious damage may result.
VENTILATION WARNINGS
- Install the rear of the appliance close to a wall or vertical surface.
- There should be a gap of at least 12mm between the machine and any obstructions. The inlet and outlet air should be kept clear of obstruction.
- DO NOT block the air inlets at the front and back of your washer dryer.
- DO NOT block the air inlets at the base and side of your washer dryer.
- Make sure carpets or rugs do not obstruct the base or any ventilation openings.
- Prevent items from falling or collecting behind the washer dryer as they may obstruct the air inlet and outlet.
- Adequate ventilation must be provided to avoid back flow of gases into the room from appliances burning other fuels, including open fires.
- Exhaust air must not be discharged into a flue which is used for exhausting fumes from appliances burning gas or other fuel.
- The rear of the washer dryer gets quite hot during use.
- Position the appliance so that the back is not accessible while in operation, but ensure that the sides have a space available to allow airflow.
LAUNDRY WARNINGS
- Before using for the first, the product shall be calibrated.
- Before washing the clothes at first time, the product shall be operated in one round of the whole procedures without the clothes inside.
- Always refer to the laundry care labels for directions on suitability for washing and drying.
- Fabric softeners, or similar products should be used as specified by the fabric softener instructions.
- Make sure that all pockets are emptied. Sharp and rigid items such as coin, brooch, nail, screw or stone etc. may cause serious damages to this machine.
- Remove all objects from pockets such as lighters and matches.
- DO NOT exceed the recommended maximum load.
- DO NOT dry articles in the appliance if anything other than a water solution has been used in the cleaning process.
- DO NOT dry unwashed items in the washer dryer.
- DO NOT attempt to dry dripping wet articles.
- Clothes should be spin dried or thoroughly wrung before they are dried.
- Under no circumstances should anything other than the recommended articles be placed in the washer dryer.
- It is forbidden to wash carpets.
- Glass fibre curtains should NEVER be put in this machine.
- Skin irritation may occur if other garments are contaminated with glass fibres.
- Foam rubber materials can, under certain circumstances, when heated become ignited by spontaneous combustion.
- Items such as foam rubber (latex foam), shower caps, waterproof textiles, rubber backed articles and clothes or pillows fitted with foam rubber pads MUST NOT be dried in the washer dryer.
- Items that have been soiled with substances such as cooking oil, acetone, alcohol, petrol, kerosene, spot removers, turpentine, waxes and wax removers should be washed in hot water with an extra amount of detergent before being dried. This will reduce, but not eliminate, the hazard.
- The washer dryer is not to be used if industrial chemicals have been used for cleaning.
- The drum inside may be very hot. Always allow the washer dryer to complete the cool down period before removing the laundry.
-
The final part of the drying cycle occurs without heat (cool down cycle) to ensure that the items are left at a temperature that ensures that the items will not be damaged.
-
WARNING: Never stop the machine before the end of the drying cycle unless all items are quickly removed and spread out so that the heat is dissipated.
- Do not lean on the door when loading the machine or use the door to lift or move the machine.
- Do not climb up and sit on top cover of the machine.
- Please do not close the door with excessive forces. If it is found difficult to close the door, please check if the clothes are put in or distributed well.
- Please check whether the water inside the drum has been drained before opening its door. Please do not open the door if there is any water visible.
- Be careful of burning when the product drains hot washing water.
- After the programme is completed, please wait for two minutes to open the door (Some models).
- Never refill the water by hand during washing.
- The machine whose lid can be opened during water extraction, that it takes 15s or more for complete stop of water extracting chamber tub.
ELECTRICAL WARNINGS
- Do not plug the machine in and switch it on at the mains until the installation is completed.
- The technical details (supply voltage and power input) are indicated on the product rating plate.
- Any electrical work required to install the appliance should be carried out by a qualified person.
- The appliance must not be supplied through an external switching device, such as a timer, or connected to a circuit that is regularly switched on and off by a utility.
- DO NOT use a two-way adaptor, or extension lead. The dryer must be connected to its own socket.
- This appliance must be Earthed.
- The socket outlet and the plug on the appliance must be of the same type.
- Do not touch the appliance when hands or feet are damp or wet.
- We recommend that the appliance is unplugged each time after use. It should always be disconnected from the electricity supply for long periods (i.e. weekends, if it is to be left unattended for holidays etc.).
- The special mains cable and plug assembly must only be replaced with a genuine part available from the manufacturer or service agent in order to avoid a hazard.
- Make sure that the electrical system is earthed, complies with all applicable law and that the (electricity) socket is compatible with the plug of the appliance. Otherwise, seek qualified professional assistance.
- The plug should be accessible for disconnection after the appliance has been installed.
- Always remove the plug before cleaning the appliance.
Explanation of the symbols:
△ WARNING: This combination of symbol and signal word indicates a potentially dangerous situation which may result in death or serious injuries unless it's avoided.
CAUTION: This combination of symbol and signal word indicates a potentially dangerous situation which may result in slight or minor injuries or damage to property and the environment.
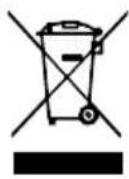
ENVIRONMENTAL PROTECTION
Waste electrical products should not be disposed of with household waste. Please recycle where facilities exist. Check with your Local Authority or retailer for recycling advice. This appliance is marked according to the European Directive on Waste Electrical and Electronic Equipment (WEEE).
By ensuring this product is disposed of correctly, you will help prevent potential negative consequences for the environment and human health, which could otherwise be caused by inappropriate waste handling of this product. The symbol on the product indicates that this product may not be treated as household waste. Instead it shall be handed over to the applicable collection point for the recycling of electrical and electronic equipment. Disposal must be carried out in accordance with local environmental regulations for waste disposal.
For more detailed information about treatment, recovery and recycling of this product, please contact your local council, your household waste disposal service or the retailer where you purchased the product.
CE DECLARATIONS OF CONFORMITY CE
This appliance has been manufactured to the strictest standards and complies with all applicable legislation, Low Voltage Directive (LVD) and Electromagnetic Compatibility (EMC).
UKCA DECLARATIONS OF CONFORMITY UK CA
This appliance has been manufactured to the strictest standards and complies with all applicable legislation.
TECHNICAL FICHE
This appliance conforms to all current and applicable energy regulations. To view the Technical Fiche that supports the energy labelling data, please visit the product page on our website www.caple.co.uk
WARRANTY
Your new appliance is covered by warranty. The warranty card is enclosed - if it is missing, you must provide the following information to your retailer in order to receive a replacement: date of purchase, model and serial number (placed on the inside of the appliance storage drawer).
Registration can also be completed online by visiting www.caple.co.uk.
Ensure you keep your warranty card safe, you may need to show it to Caple Service together with proof of purchase.
If you fail to show your warranty card you will incur all repair charges.
Spare parts are only available from Caple Service and spare parts authorised centres.
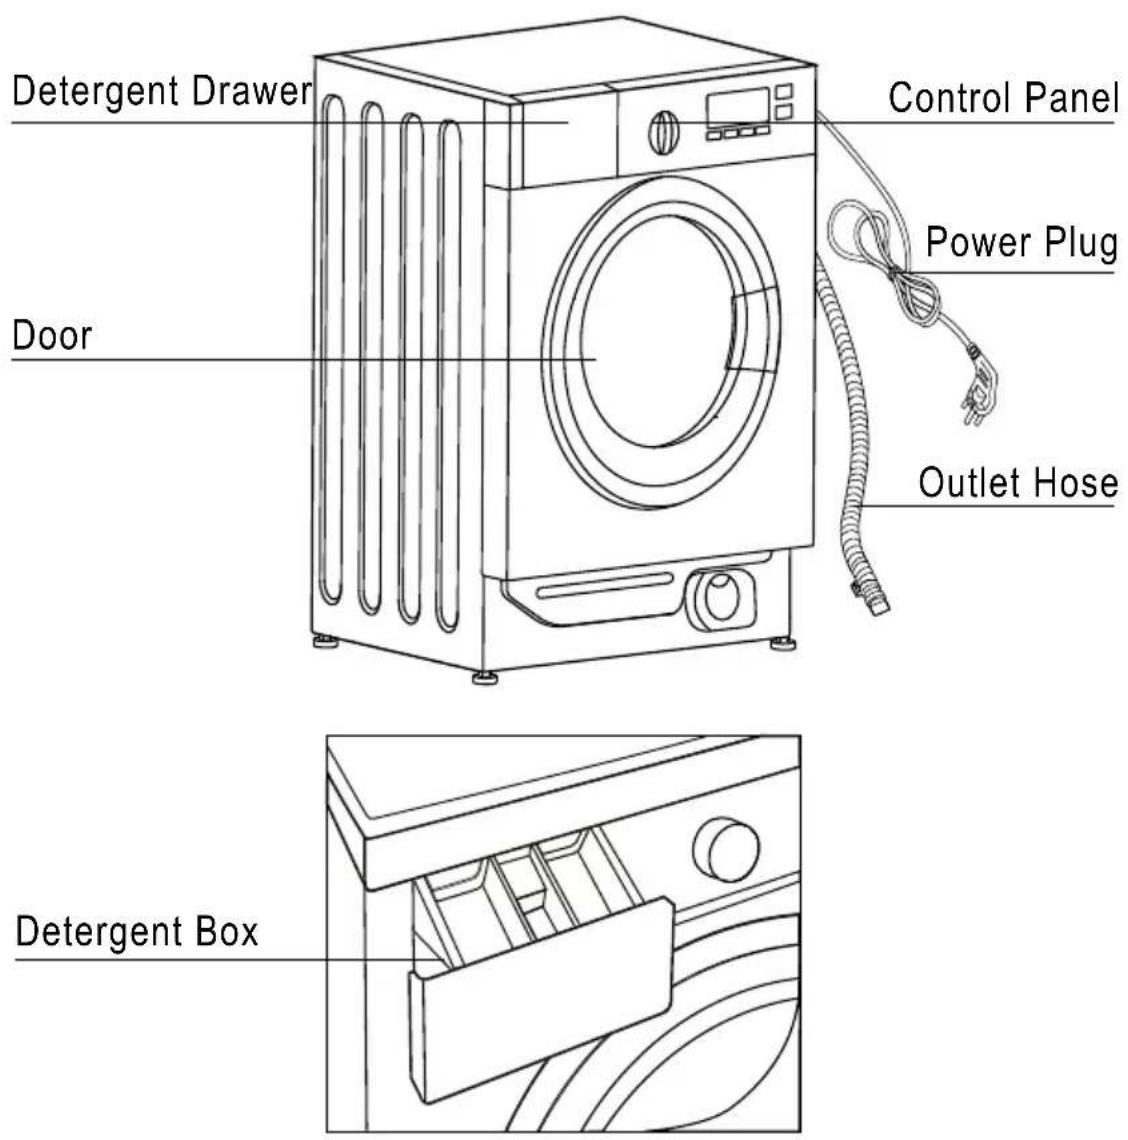
OVERVIEW OF WASHER DRYER
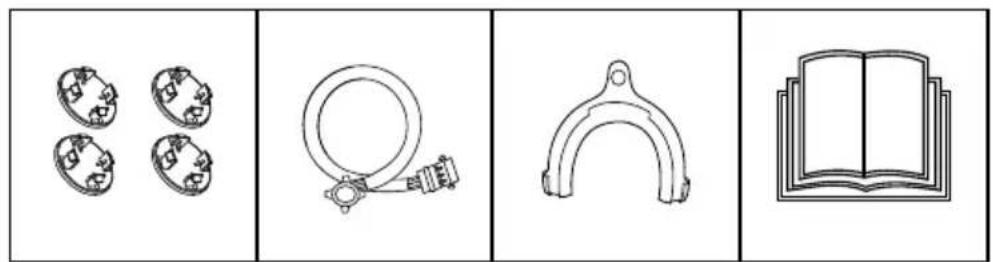
ACCESSORIES
natural_image
Four-panel diagram showing mechanical parts and an open book, no text or symbols presentTransport hole plug Supply hose cold water
Drain hose support Owner's manual
UNPACKING THE WASHER DRYER
Unpack your washer dryer and check if there is any damage during the transportation. Also make sure that all the items (as shown on page 14) in the attached bag are received. If there is any damage to the washer dryer during the transportation, or any item is missing, please contact your retailer immediately.
DISPOSE OF THE PACKING MATERIALS

WARNING:
Keep packaging materials away from children.
The packing materials of this machine may be dangerous to children. Please dispose of them properly. Please dispose of the related packing materials according to the relevant local regulations. Please do no throw the packing materials away together with the other daily living disposals.
REMOVE TRANSPORT BOLTS

WARNING:
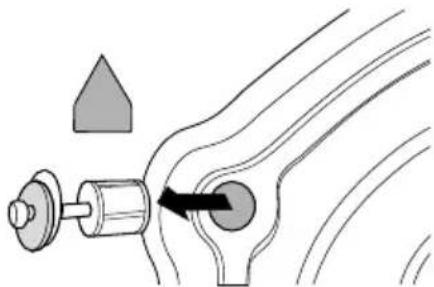
- You must remove the transport bolts from the backside before using the product.
You'll need the transport bolts again if you move the product, so make sure you keep them in a safe place.
natural_image
Diagram of a mechanical joint or connector with directional arrows indicating movement (no text or symbols present)Please take the following steps to remove the bolts:
- Loosen all bolts with spanner and then remove along with the flat washers, rubber bungs and plastic spacer tubes.
- Cover the open transportation bolt holes with the plastic cap included in the instruction bag.
- Keep the transport bolts, flat washers, rubber bungs and plastic spacer tubes stored away safely for future use.
NOTE:
During the removal of the bolts, spacer tubes fall inside the product. These can be removed by tilting the product forward and recovering them from the floor or inside the base of the machine.
SELECT THE LOCATION

WARNING:
Stability is important to prevent the product from moving.
Make sure that the product does not stand on the power cord.
The washer dryer must be placed in a location according to the below:
Rigid, dry, and level surface (if not level, please make it level with reference to the following figure "Adjust Legs")
Avoid direct sunlight
Sufficient ventilation
Room temperature is above 0°C
Keep far away from heat resources.
Do not install the washer dryer on carpeted floor.
ADJUST LEGS

WARNING:
The lock nuts on all four feet must be screwed tightly against the housing.
Level the appliance using the feet:
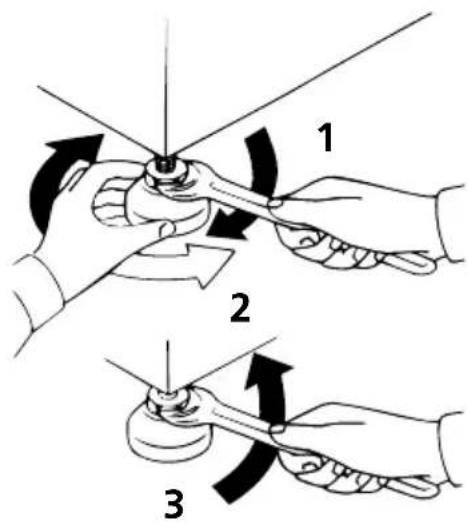
- Turn the nut clockwise to release the screw.
- Rotate the foot to raise or lower it until it touches to the floor.
- Lock the foot, screwing in the nut, until it tightens against to the bottom of the washer dryer.
Check the washer dryer is steady using a spirit level or by pressing the four corners on top of the appliance in sequence.
NOTE:
The 4 legs allow the height of the washer dryer to be adjusted from 825mm to a maximum of 835mm.
CONNECT INLET PIPE

WARNING:
To prevent leakage or water damage, follow the instructions in this chapter.
Do not kink, crush, modify or sever water inlet hose. The washer dryer should be installed in its final position such that the inlet pipe is not trapped.
-
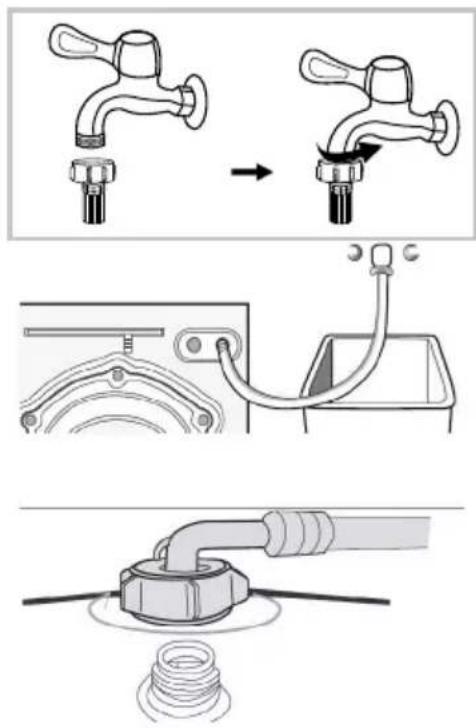
Connect the inlet pipe to the water supply tap. Only use the pipe supplied with the appliance (do not reuse old pipe-sets).
-
Connect the other end of the inlet pipe to the inlet valve at the back of the washer dryer and fasten the pipe tightly clockwise.
NOTE:
If there is any leakage with the hose, repeat these steps to connect the inlet hose.
CONNECT OUTLET HOSE

WARNING:
Do not kink or trap the drain hose.
Position drain hose properly, otherwise damage might result of water leakage.
When installing drain hose, fix it properly.
If drain hose is too long, do not force it into the washer dryer as it will cause abnormal noises.
The drain hose should be inserted into suitable drain pipe of between 60cm and 100cm height above the floor using the curved drain hose support.
The drain hose can be connected in three different ways:
- Connect it to a drain pipe
- Attach it to a sink
- Connect it to the sink drain pipe
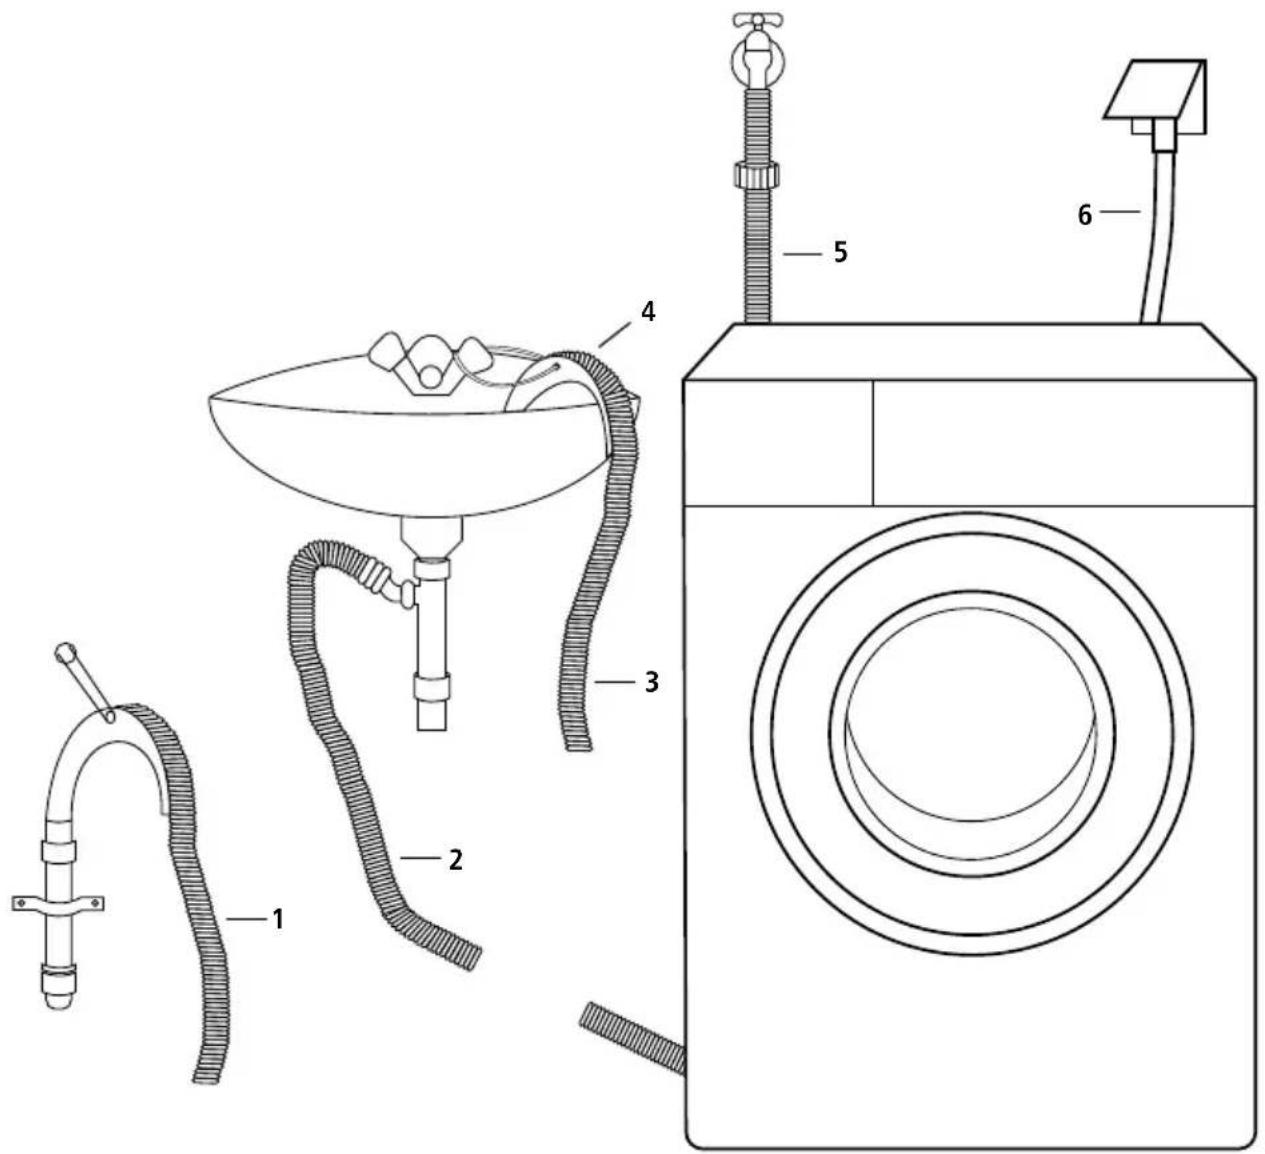
- Drain Hose connection to Drain Pipe
- Drain Hose connection to Sink Drain Pipe
-
Drain Hose attached to Sink
-
Drain Hose Support
- Water Inlet Pipe
- Electrical Connection
NOTE:
When using the outlet hose support, please install it like the above image. If the outlet hose is too long, do not force it into the washer dryer as it will cause abnormal noises.
When installing outlet hose, fit it properly with rope.
WARNING:
Contact Caple Service should the power cord need replacement. Installation faults are not covered by the manufacturers warranty.
Before installing the washer dryer, please read these built-in instructions carefully and keep for future reference. This appliance has been designed to be built into the kitchen furniture. The recess should have the dimensions as shown in the figure below:
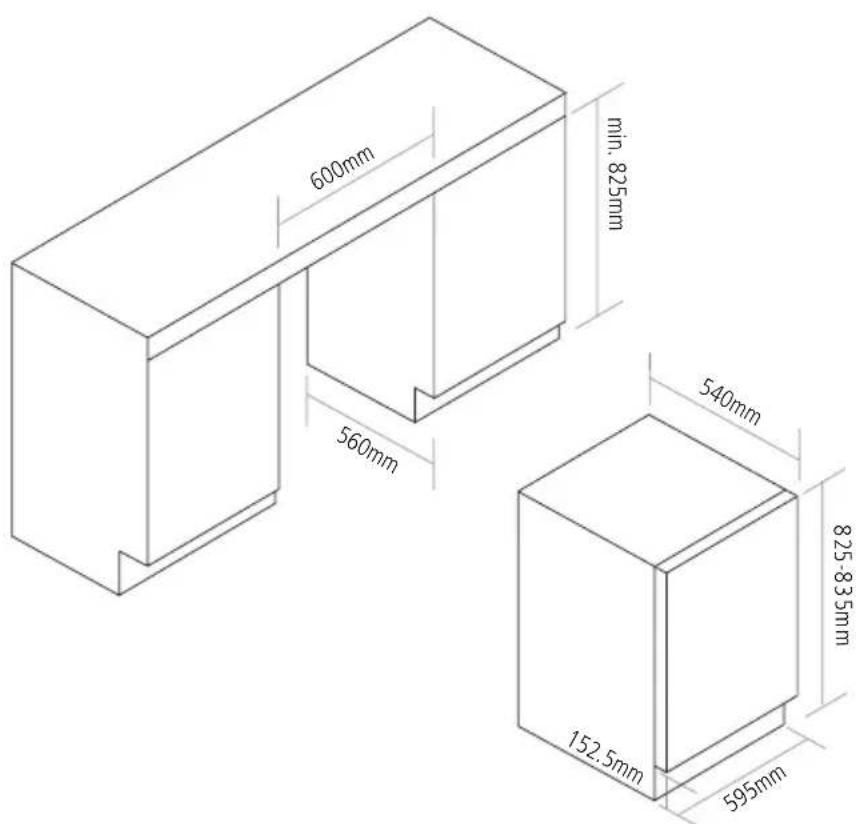
WARNING:
When installing the appliance into the kitchen, if possible, ensure the hoses are placed in either of the two recesses on the back of the appliance. This will help to prevent the hoses from being kinked or trapped.
PREPARATION AND ASSEMBLY OF THE DOOR
The appliance is prearranged for the assembly of a door opening from right to left or from left to right.
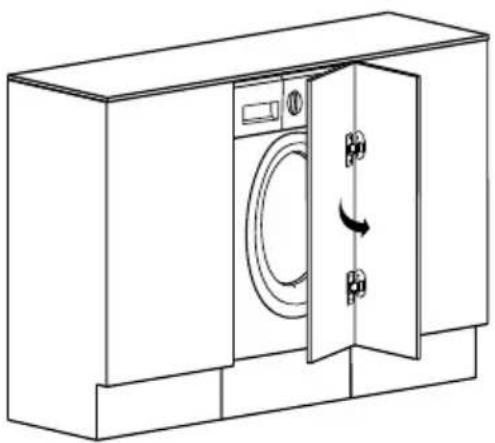
natural_image
Line drawing of a front-loading washing machine with door open and side buttons, showing internal mechanism (no text or symbols)Door opening from left to right
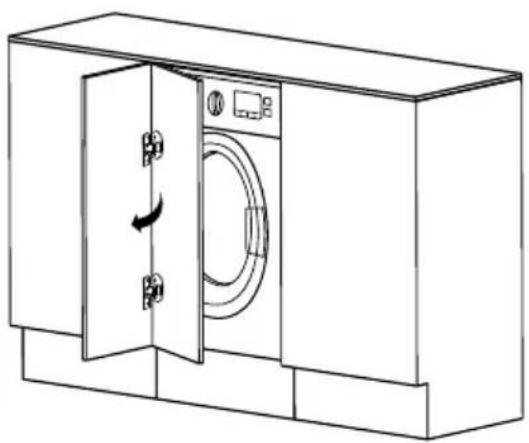
natural_image
Line drawing of a washing machine cabinet with door and side panels, showing internal components and directional arrow (no text or symbols)Door opening from right to left
APPENDIX
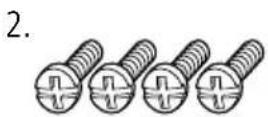
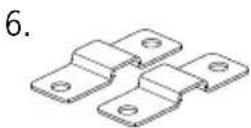
- Self-tapping screws (ST4*12)
- Self-tapping screws (M5*12)
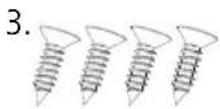
- Self-tapping screws (ST4.8*15)
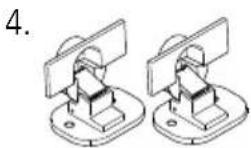
- Hinges
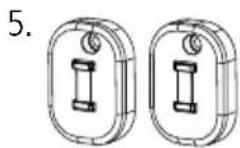
- Counter magnet
- Spacer
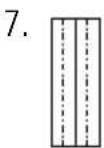
- Door template
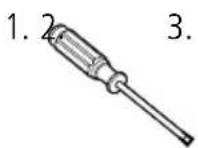
TOOLS
- Screw Driver
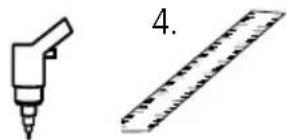
- Automatic Driver
- Ruler
- Pencil
natural_image
Two technical diagrams: a pencil and a ruler, both without any text or symbols.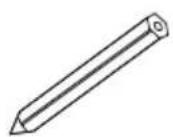
DOOR TEMPLATE PREPARATION
- Make the mark on the door according to the cupboard and washer dryer height.
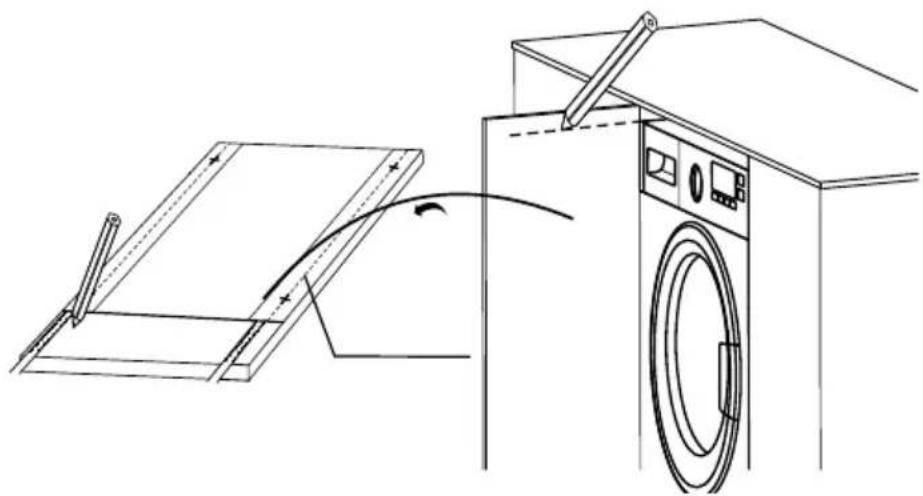
natural_image
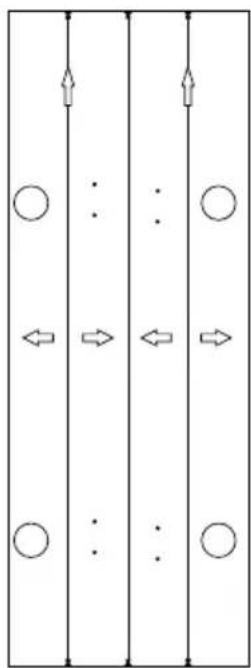
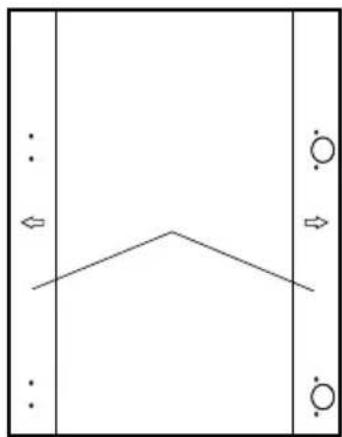
Line drawing of a washing machine with a panel being installed, showing the door and fan (no text or symbols)- Fix door template onto the door.
flowchart
graph TD
    A["Step 1"] --> B["Step 2"]
    B --> C["Step 3"]
    C --> D["Step 4"]
    D --> E["Step 5"]
    E --> F["Step 6"]
    F --> G["Step 7"]
    G --> H["Step 8"]
    H --> I["Step 9"]
    I --> J["Step 10"]
    J --> K["Step 11"]
    K --> L["Step 12"]
    L --> M["Step 13"]
    M --> N["Step 14"]
    N --> O["Step 15"]
    O --> P["Step 16"]
    P --> Q["Step 17"]
    Q --> R["Step 18"]
    R --> S["Step 19"]
    S --> T["Step 20"]
natural_image
Simple line drawing of a symmetrical shape with arrows indicating direction (no text or symbols)(the door on the right)
natural_image
Simple line drawing of a symmetrical shape with vertical and horizontal lines, no text or symbols present.Paste on the door
(the door on the left)
DRILL HOLES ON THE DOOR
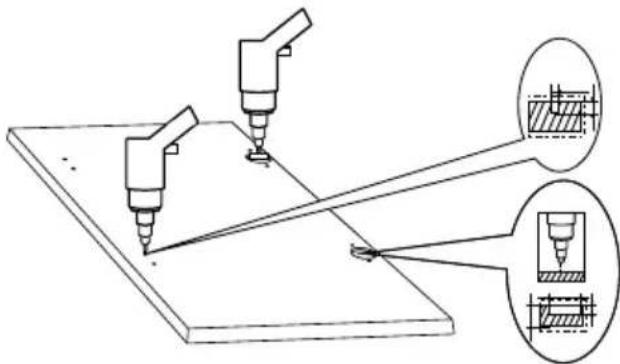
- Drill the holes on the door according to the door template.
- Installing the hinges and spacer. Fix the hinges to the furniture door with the ST4*12 screws. The hinges can be adjusted to compensate for possible uneven thickness of the door.
natural_image
Technical line drawing of a precision cutting tool on a workbench, with two tool tips and two cross-sectional views (no text or symbols)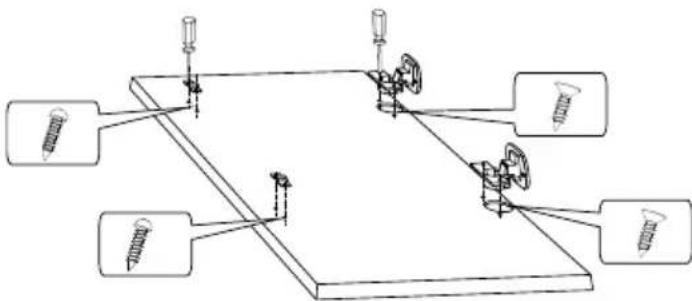
INSTALLING THE DOOR MAGNET
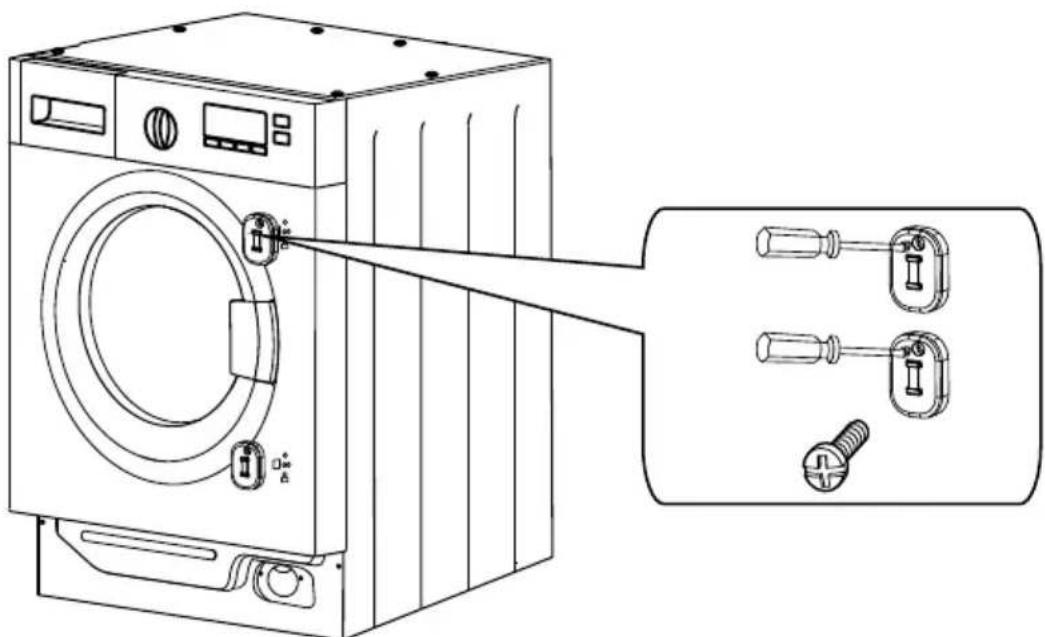
The appliance is designed with magnetic closure of the door. To enable a correct operation of this device, it is necessary to screw the counter-magnet into the inner side of the door.
natural_image
Line drawing of a washing machine with attached lock and screwdriver components, shown in two views (no text or symbols)INSTALLING THE DOOR
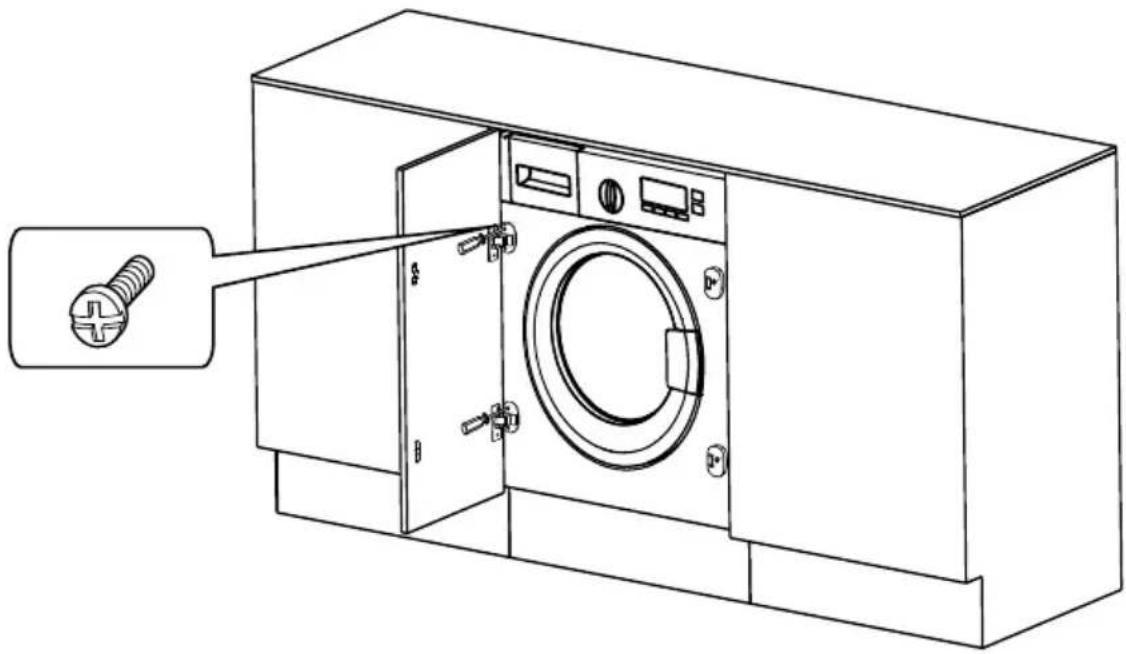
NOTE:
The furniture door should not exceed 9kg.
natural_image
Line drawing of a washing machine with screw and door, showing internal components and a close-up of the door (no text or symbols)BEFORE WASHING
EMPTY ALL POCKETS
Foreign objects (e.g. nails, coins, paper, clips, etc.) can cause damage to garments and to the components in the machine.
Check the laundry before washing and remove foreign objects.
SORT THE LAUNDRY
Sort the laundry by colour and care label. Most garments have a textile care label in the collar or side seam.
TIP: Dark textiles often contain excess dye and should be washed separately several times before being included in a mixed load. Always wash whites and colours separately.
PRE-TREAT STAINS
Badly soiled areas, stains etc. should be cleaned as soon as possible, preferably whilst still fresh. Spillages should be carefully dabbed off using a soft, colour fast cloth. Do not rub.
TIP: Badly soiled areas can be pretreated with a liquid detergent, stain removers etc. first, following the manufacturer's instructions. With particularly stubborn stains ask your dry cleaner for advice. Solvent-based cleaners (e.g. benzine) can damage plastic parts. When pre-treating garments, make sure that any plastic parts (e.g. buttons) are protected from cleaning agent. Chemical (solvent-based) cleaning agents can cause severe damage to the washer dryer. Do not use solvent-based cleaning agents in the machine.
GENERAL TIPS:
Curtains: Remove lead weights first or place in a laundry bag
Underwiring and collar stiffeners: Any loose wiring in bras, shirt collar stiffeners, etc. should be removed or sewn in.
Close any zips, attach Velcro fasteners, fasten hooks and eyes etc. before washing.
Fasten duvet covers, pillow cases etc. to prevent small items from being rolled up inside them.
When washing rugs, bed covers or other heavy clothing, it is recommended to avoid the spinning cycle.
Do not wash any items in this washing dryer which are specified by the manufacture as not washable on the care label ( Symbol).
HELPFUL SUGGESTIONS:
MAXIMISE THE LOAD SIZE
Achieve the best use of energy, water, detergent and time by using the recommended maximum load size. Save up to 50% energy by washing a full load instead of 2 half loads.
DO YOU NEED TO PRE-WASH?
For heavily soiled laundry only. Save detergent, time, water and between 5 to 15% energy consumption by not selecting Pre-wash for slight to normally soiled laundry.
IS A HOT WASH REQUIRED?
Pre-treat stains with stain remover or soak dried in stains in water before washing to reduce the necessity of a hot wash programme. Save energy by using a low temperature wash programme.
When washing heavily soiled whites, we recommend using cotton programs of 60^ C or above and a normal washing powder (heavy duty) that contains bleaching agents that at medium/high temperatures provide excellent results.
For washes between 40^ C and 60^ C the type of detergent used needs to be appropriate for the type of fabric and level of soiling.
Normal powders are suitable for “white” or colour fast fabrics with high soiling, while liquid detergents or “colour protecting” powders are suitable for coloured fabrics with light levels of soiling.
BEFORE DRYING
CLOTHES PREPARATION
Make sure that the laundry you are going to dry is suitable for drying in a tumble dryer, as shown by the care symbols on each item.
Check that all fastenings are closed and that pockets are empty. Turn the articles inside out. Place cloths loosely in the drum to make sure that they don't get tangled.
DO NOT TUMBLE DRY
Silk, Nylon stockings, delicate embroidery, fabrics with metallic decorations, garments with PVC or leather trimmings.
IMPORTANT:
Do not dry articles which have been treated with a dry cleaning fluid or made from rubber (danger of fire or explosion).
During the last 15 minutes, the load is always tumbled in cool air.
ENERGY SAVING
Only dry laundry which has been thoroughly wrung or spin-dried. The drier the laundry, the shorter the drying time thus saving electricity.
ALWAYS: Check that the filter is clean before every drying cycle.
NEVER: Put dripping wet items into the tumble dryer, this may damage the appliance.
SORTING THE LOAD
Sort the load by cares symbols. These can be found on the collar or inside the seam:

Suitable for tumble drying

Tumble drying at high temperature

Tumble drying at low temperature only

Do not tumble dry
If the item does not have a care label, it must be assumed that it is not suitable for tumble drying.
BY AMOUNT AND THICKNESS: Whenever the load is bigger than the dryer capacity, separate clothes according to thickness (e.g. towels from sheets).
BY TYPE OF FABRIC COTTONS / LINEN: Towels, cotton jersey, bed and table linen.
SYNTHETICS: Blouses, shirts, overalls etc. made of polyester or polyamid, as well as cotton/synthetic mixes.
DETERGENT DRAWER
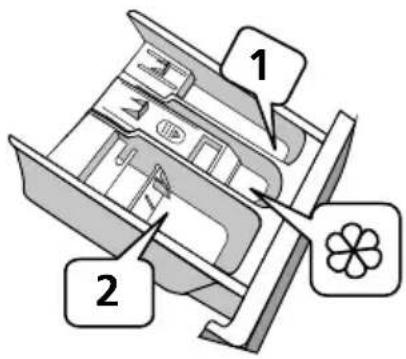
The detergent draw is split into 3 compartments as illustrated in figure:
Compartment "1": for prewash detergent.
CAUTION:
Detergent only needs to be added in "case I" after selecting pre-washing.
Compartment "✿": for special additives, softeners, starch fragrances, etc.
WARNING:
Only use liquid products; the washer dryer is set to automatically dose additives at each cycle during the last rinse.
Compartment "2": for washing detergent.
WARNING:
Some detergents are not designed for use in the dispenser drawer but are supplied with their own dispenser that is placed in the drum directly.
| PROGRAMME ||| | (WHM) | ||
| Cotton • | ○ | ||
| 1 Hour W/D • | ○ | ||
| Jeans • | ○ | ||
| Mix • | ○ | ||
| Wool • | ○ | ||
| Rinse & Spin | ○ | ||
| Eco 40 - 60 | ● | ○ | |
| 20°C | ● | ○ |
| PROGRAMME || | |||
| Dry Only | |||
| Spin Only | |||
| Quick | • | ○ | |
| Sports Wear | • | ○ | |
| Baby Care | • | ○ | |
| Wash & Dry • | ○ | ||
| Intensive | • | ○ |
- Means Must - Means Optional
CAUTION:
Before washing, please make sure the machine is installed properly.
CALIBRATION
It is recommended to calibrate the washer dryer before its first use.
Complete the calibration by following the below steps:
Power on the washer dryer.
Press SPEED and DELAY buttons at the same time. "T19" will show on the display.
Press START/PAUSE, to start the washer dryer and wait until "*****" appears.
The washer dryer is now ready to use.
CAUTION:
Before using for the first time, the washer dryer should be operated once without clothes, as detailed below:
Install the washer dryer
Open the door and load the laundry
Measure out the detergent
Close the door
Put down (hang up) the drain hose (if not connected to sink plumbing)Turn on the water tap (if not connected to mains water supply)
Plug in the power supply
Turn the washer dryer on
Select the desired programme and function
Press the START/PAUSE button to start washing/drying
NOTE:
Should power go out when the washer dryer is running, a special memory saves the settings and, when power returns, the machine resumes the cycle from where it left off.
At the end of the programme, the washer dryer will make a sound to signify the end of the cycle. END will show on the display
Close the water tap
Turn off the washer dryer
CONTROL PANEL
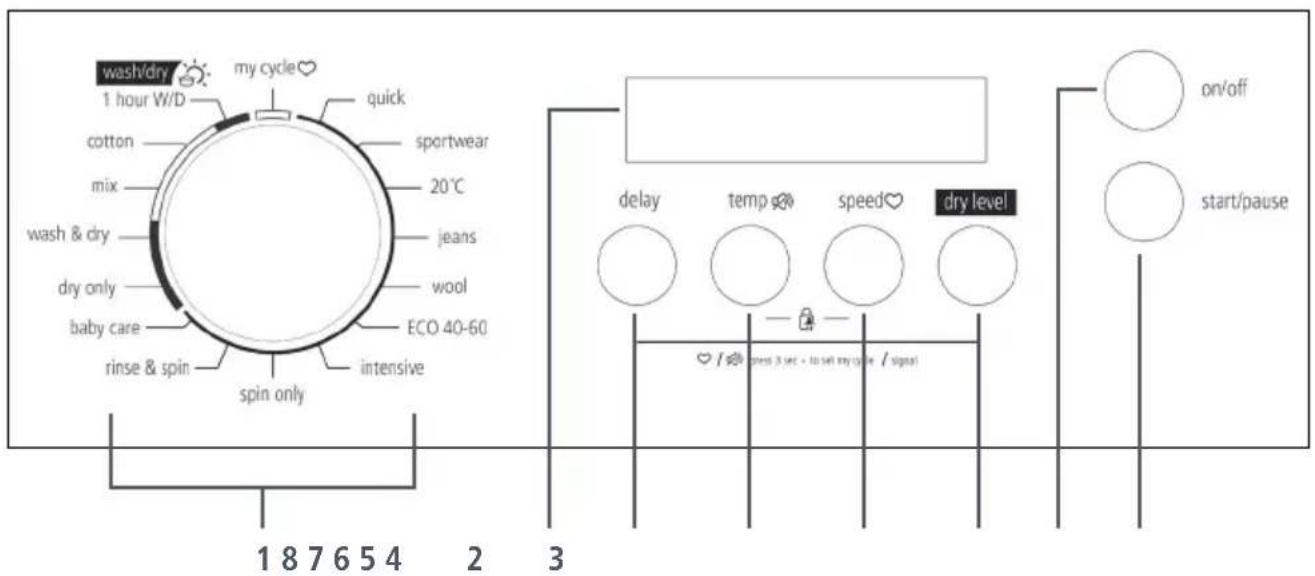
NOTE: Diagram is for reference only. Please refer to real product as standard.
| BUTTON | OPERATION |
| 1 | Programme Selector |
| 2 On/Off Button | |
| 3 Start/Pause Button | |
| 4 Dry Level Button | |
| 5 Spin Speed Button | |
| 6 Temperature Selection Button | |
| 7 Delay Start Button | |
| 8 Digital Display |
OPENING THE DOOR
A special safety device prevents the door from being opened during a wash cycle. After the wash cycle has finished the “Door Lock” light will turn off and the door can be opened.
START/PAUSE BUTTON
Close the door BEFORE selecting the button START/PAUSE.
Press to start the selected cycle.
When the START/PAUSE button has been pressed, the appliance can take few seconds before it starts working.
PAUSING THE MACHINE
Press the START/PAUSE button to pause washing/drying.
Press the START/PAUSE button again to re-start the programme from the point it had been paused at.
CANCELLING THE PROGRAMME
To cancel the programme, set the selector to the ON/OFF position.
DELAY BUTTON
This button allows you to pre-programme the wash cycle to delay the start of the cycle for up to 24 hours.
To delay the start use the following procedure:
Select the required programme.
Press the delay start button once to activate it. The pre-set delay increases by 1 hour each time the button is pressed, until h24 appears on the display, at which point pressing the button again will reset the delay start to zero.
Confirm by pressing the START/PAUSE button.
It is possible to cancel the delay start by pressing the Delay button until 0H appears on the display. If the programme has already started, press the ON/OFF button.

CAUTION:
If there is any break in the power supply while the machine is operating, a special memory stores the selected programme and, when the power is restored, it continues where it left off.
DRY LEVEL BUTTON
This button allows you to choose between three dry levels:

Extra Dry

Normal Dry

Gentle Dry
NOTE: Each press of the DRY LEVEL button allows you select either of the three settings.
TEMPERATURE SELECTION BUTTON
This button allows you to change the temperature of the wash/dry cycle.
It is not possible to raise the temperature over the maximum allowed for the programme, in order to protect the fabrics.
Press the TEMP button repeatedly to change the temperature (Cold, 20°C, 30°C, 40°C, 60°C, 90°C).
SPIN SPEED BUTTON
This button allows you to change the spin speed of the cycle.
If the label does not indicate specific information, it is possible to use the maximum spin expected in the programme.
To prevent damage to the fabrics, it is not possible to increase the speed over the maximum allowed for the programme.
Press the SPEED button repeatedly to change the spin speed.
| PROGRAMME | DEFAULT SPEED [RPM] |
| 1400 | |
| Quick 800 | |
| Sport Wear 800 | |
| 20°C 1000 | |
| Jeans 1000 | |
| Wool 600 | |
| Eco 40-60 1400 | |
| Intensive 800 | |
| Spin Only 1000 |
| PROGRAMME | DEFAULT SPEED [RPM] |
| 1400 | |
| Rinse & Spin 1000 | |
| Baby Care 800 | |
| Dry Only | 1400 |
| Wash & Dry | 1400 |
| Mix | 800 |
| Cotton | 1400 |
| 1 Hour W/D | 1400 |
NOTE:
The higher the spinning speed in the spinning phase, the higher the noise and the lower the remaining moisture content.
CHILD LOCK

Simultaneously pressing the TEMP and SPEED buttons for 3 SECONDS, allows you to lock the keys. This way, you can avoid making unwanted changes if a button on the display is pressed accidentally during a cycle.
In this case, all buttons except for the ON/OFF button will not work. The machine will turn off when the ON/OFF button is pressed. When the ON/OFF button is pressed again, the machine resumes the washing/drying programme and the Key Lock remains active.
CAUTION:
If there is a power cut the child lock will deactivate.
The child lock will remain effective when the power is resumed.
The child lock can be simply cancelled by simultaneously pressing the TEMP and SPEED buttons again.
The child lock will not automatically cancel after the programme has completed.
TURNING AUDIBLE ALARMS ON/OFF

It is possible to deactivate the buzzer on your appliance. After deactivating the buzzer function, the buzzer will no longer sound until re-activated.
After starting the machine, press and hold the TEMP button for 3 seconds and you will hear a beep. The buzzer will be deactivated.
To reactivate the buzzer, press and hold the TEMP button again for 3 seconds.
CAUTION:
After muting the buzzer function, the sounds will no longer be heard.
MY CYCLE ♥
My Cycle memorises a certain programme and its customised settings.
To save a programme and its settings to My Cycle, Hold the SPEED button for 3 SECONDS.
DIGITAL DISPLAY
The displays indicator system allows you to be constantly informed about the status of the machine. The display will remain on throughout the cycle.
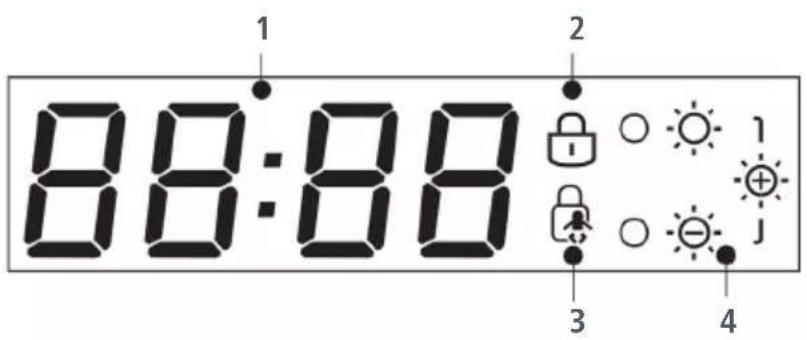
1 ) CYCLE DURATION
When a programme is selected, the display automatically shows the cycle duration, which can vary depending on the function selected. The display also shows set Delay Times e.g. '2h' and status messages such as Error Codes e.g. 'E20' and the End of the cycle 'End'.
2 ) DOOR LOCKED INDICATOR LIGHT
The indicator light is illuminated during the wash cycle.
A special safety device prevents the door from being opened during the programme. After the programme has finished the "Door Security" light will turn off and the door can be opened.
3 ) KEY LOCK INDICATOR LIGHT
The indicator light show that the keys are locked.
4 ) DRYING LEVEL LIGHTS
The relevant indicator light is illuminated when the drying level is selected.
PROGRAMMES
The machine has specific programmes to meet every need of washing and/or drying (see table of programmes).
MY CYCLE
Memory programme that saves your customised programme settings. The default 'My Cycle' programme is Cotton.
QUICK
An extra short programme, suitable for refreshing small loads of laundry at a low temperature.
SPORTWEAR
Sports clothing made from synthetic, microfibre and fleece materials. Avoid using fabric conditioner when washing these items.
20°C
Ideal for lightly soiled clothes as well as washing and protecting brightly coloured textiles.
JEANS
For denim clothing. Darker garments should be washed separately several times before including in a mixed load. Wash denim textiles inside out.
WOOL
This programme performs a wash cycle dedicated to woollen fabrics that can be machine or hand washable. Especially gentle to prevent shrinkage, with longer programme pauses.
ECO 40 - 60
This programme is able to clean normally soiled cotton laundry declared to be washable at 40^ C or 60^ C, together in the same cycle. This programme is used to assess the compliance with the EU Eco-design legislation.
INTENSIVE
A prolonged and intense cycle for increased washing performance. For hard-wearing laundry that is heavily soiled.
SPIN ONLY
Spin only programme, with selectable spin speed.
RINSE AND SPIN
Separate rinse and spin programme.
BABY CARE
Ideal for washing baby clothes. Enhanced washing and rinse performance to better protect delicate skin.
DRY ONLY
Dry only programme, with selectable temperature. Temperature is dependent on the load.
WASH AND DRY
A prolonged cycle for washing and drying normally soiled laundry. This programme is used to assess the compliance with the EU Eco-design legislation.
MIX
For washing items made of cotton, linen and synthetics or blended fabrics. Suitable for lightly soiled laundry.
COTTON
This programme is suitable to wash and/or dry normally soiled hard-wearing cotton laundry.
1 HOUR W/D
Wash and dry cycle suggested for small loads (max 1Kg). Overloading will prolong the programme duration and affect the remaining moisture content.
TABLE OF PROGRAMMES
| PROGRAMME | WASHING/ DRYING LOAD [KG] | TEMP [°C] | DEFAULT TIME [H] |
| 8.0 Default | 8.0 | ||
| 1400 | |||
| Quick 2.0 Cold 0:15 | |||
| Sport Wear 4.0 40 1:11 | |||
| 20°C 4.0 20 1:01 | |||
| Jeans | 8.0 60 1:45 | ||
| Wool 2.0 40 1:07 | |||
| Eco 40-60 | 8.0 | - | 3:35 |
| Intensive | 8.0 40 3:48 | ||
| Spin Only | 8.0 | - | 0:12 |
| Rinse & Spin | 8.0 | - | 0:20 |
| Baby Care | 8.0 60 1:43 | ||
| *Dry Only | 6.0 | - | 4:14 |
| * Wash & Dry | 8.0 / 6.0 | - | 5:00 |
| * Mix 8.0 / 6.0 | 40 1:20 | ||
| * Cotton | 8.0 / 6.0 | 40 3:49 | |
| * 1 Hour W/D | 1.0 / 1.0 Cold 0:58 |
* Indicates programme with a dry function.
NOTE:
The real duration of drying cycle depends by the starting humidity level of the laundry due to spin speed, type and amount of load, cleanliness of filters and ambient temperature.

WARNING:
Before maintenance, unplug the machine and close the tap.
Proper maintenance of the washer dryer can extend its working life.
To clean the washer dryer exterior, use a damp cloth, avoiding abrasives, alcohol and/or solvents.
To maintain a good wash and dry performance we recommend that the soap drawer and pump filters are regularly cleaned.
A monthly service wash, using a suitable cleaner is also recommended.
CLEANING THE DRUM
Any rust left inside the drum by metal articles must be removed immediately with chlorine free detergents.
Never use steel wool.
NOTE:
Do not put laundry in the washer dryer during cleaning.
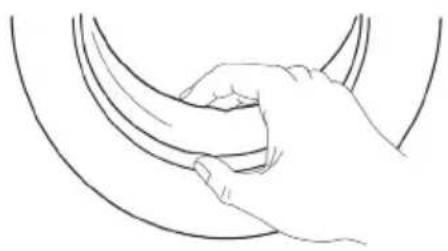
CLEANING THE DOOR SEAL AND GLASS
Wipe the glass and seal after each cycle to remove lint and stains. If lint builds up it can cause leaks.
Remove any coins, buttons and other objects from the seal after each wash.
natural_image
Line drawing of a hand gripping a curved object (no text or symbols)CLEANING THE INLET FILTER
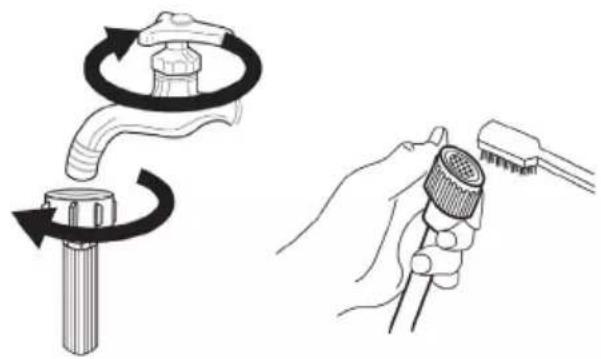
If there is insufficient or no water when the tap is opened, the inlet filter must be cleaned as follows:
1) Clean the filter in the tap:
Close the tap
Remove the water supply hose from the tap
Clean the filter
Reconnect the water supply hose
natural_image
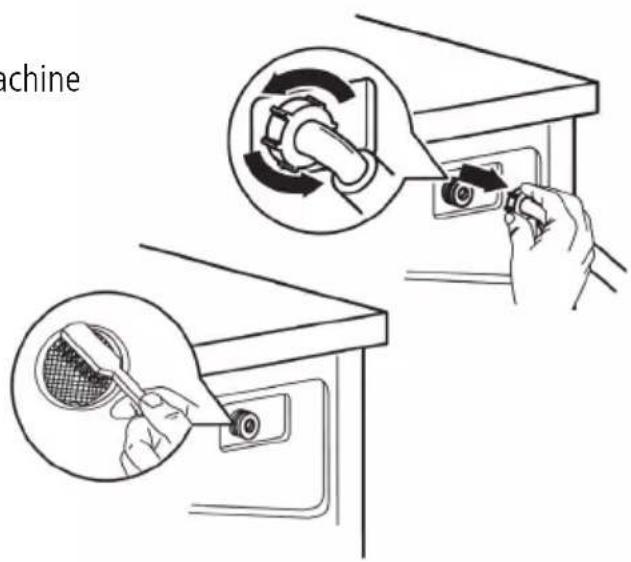
Illustration showing a hand holding a microphone and a valve with rotating arrows (no text or symbols)2) Clean the filter in the washer dryer:
Unscrew the inlet pipe from the back of the machine
Pull out the filter
Use a brush to clean the filter
Reinstall the filter
Reconnect the inlet pipe
DRAWER CLEANING
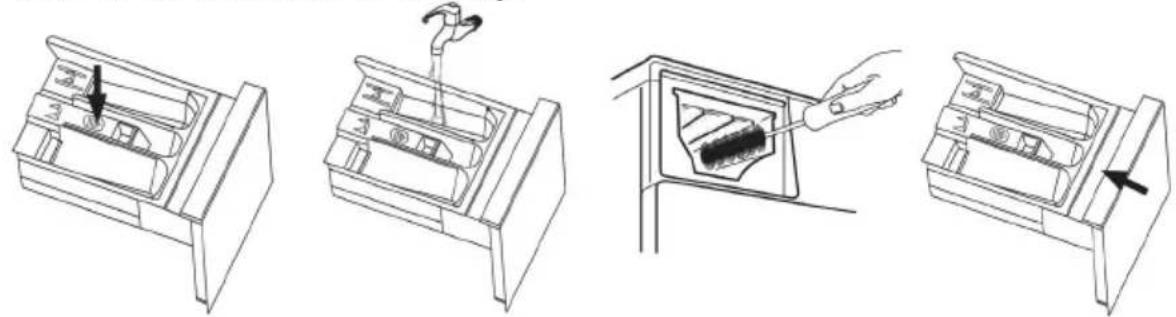
We recommend to clean the drawer to avoid accumulating detergent and additive residue.
Extract the drawer by pressing down on the softener cover inside the drawer.
Clean the drawer and inside the recess with running water and a brush.
Reinsert the drawer into its housing.
natural_image
Four-step line drawings showing a device being inserted into a box, with no visible text or symbols.FILTER CLEANING

WARNING:
Be careful of hot water.
Allow detergent solution to cool down.
Unplug the machine to avoid electrical shock.
The filter must be cleaned periodically to ensure the normal operation of the washer dryer
The washer dryer comes with a special filter able to trap large residue, such as buttons or coins which could clog the drain.
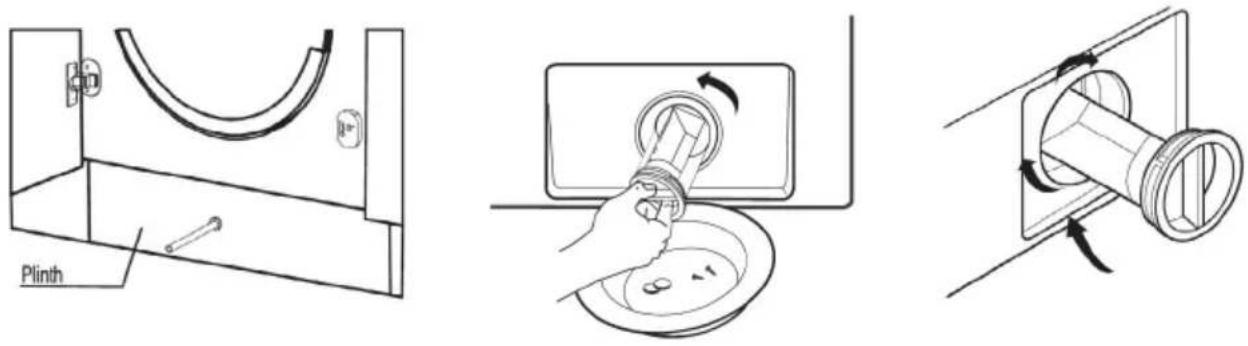
To clean the filter, proceed as follows:
Ensure all the water has been emptied from the drum.
Remove the plinth.
Before unscrewing the filter, we recommend you place an absorbent cloth under it to keep the floor dry. A small amount of water will come out of the filter as you remove it - this is normal.
Turn the filter counter-clockwise to the stop limit.
Remove and clean the filter; when finished, replace it turning it clockwise. The filter handle will be locked when it is not possible to turn any further and the handle is horizontal. Applying a small amount of liquid soap on the filter seal will help refitting.
Repeat the previous steps in reverse order to reassemble all parts.
CAUTION:
When the appliance is in use and depending on the programme selected, there could be hot water in the filter. Never remove the filter during a wash cycle. Always wait until the appliance has finished the cycle and is empty. When replacing the cover ensure it is securely tightened.
SUGGESTIONS FOR MOVING OR PROLONGED DISUSE
Should the washer dryer be stored in an unheated room for a long period of time, drain all water from tubes.
Unplug the washer dryer.
Detach the tube from the drainage system and clip on the rear of the machine and lower it, fully draining water into a bowl.
Secure the drain tube with the drainage system and clip on the rear of the machine when finished.
Keep the door glass and gasket clean.
The manufacturers warranty only covers faults within the product of a mechanical or electrical nature. Faults caused by handling, installation or misuse are not covered and may incur a charge for any repair visit to resolve.
BEFORE CALLING FOR SERVICE
Reviewing the charts on the following pages may save you from calling for service.
DRYING TIME IS TOO LONG/CLOTHES ARE NOT DRY ENOUGH ON:
Have you selected the correct drying time/programme?
Were the clothes too wet? Were the clothes thoroughly wrung or spin-dried?
Does the filter need cleaning?
Is the machine overloaded?
THE MACHINE DOES NOT OPERATE:
Is there a working electricity supply to the dryer? Check using another appliance such as a table lamp.
Is the plug properly connected to the mains supply?
Is there a power failure?
Has the fuse blown?
Is the door fully closed?
Is the dryer switched on, both at the mains supply and at the machine?
Has the drying time or the programme been selected?
Has the machine been switched on again after opening the door?
| PROBLEM POSSIBLE CAUSES SOLUTION | ||
| Washer dryer cannot start up | Door is not closed properly | Restart after the door is closedCheck if the clothes are stuck |
| Door can't be opened | Washer dryer's safety protection design is working | Disconnect the power, restart the product |
| Water leakage | The connection between inlet pipe or outlet hose is not tight | Check and fasten water pipesClean up outlet hose |
| Detergent residues in the box | Detergent is dampened or agglomerated Clean and wipe the detergent box | |
| Indicator or display does not light | Disconnect the powerPC board or harness has connection problem | Check if the power is shut down and the power plug is connected correctly |
| Abnormal noise | Check if the fixing (bolts) have been removed. Check it's installed on a solid and level floor | |
| E30 Door is not closed properly | Restart after the door is closedCheck if the clothes is stuck | |
| E10 Water injecting problem while washing | Check if the water pressure is too lowStraighten the water pipe.Check if the inlet valve filter is blocked | |
| E21 Overtime water draining Check if the drain hose is blocked | ||
| E12 Water overflow Restart the washer dryer | ||
| EXX Others | Please try again first, call up service line if there are still troubles | |
If the problem persists or more help is required, please contact our Caple service team on 0117 938 7420 or via email service@caple.co.uk.
SPARE PARTS AVAILABILITY
The original spare parts for some specific components are available for a minimum of 7 or 10 years, based on the type of component, from the placing on the market of the last unit of the model.
For more info and to order spares, please contact Caple service or visit our website www.caple.co.uk.
| MODEL WDI3301 | |
| Power supply 220-240V~,50Hz | |
| Washing Capacity 8.0kg | |
| Drying Capacity 6.0kg | |
| Rated Power 1900W | |
| Drying Power 1300W | |
| Standard Water Pressure 0.05MPa~1MPa | |
| MAX. Current 10A | |
NOTES
NOTES

caple
Caple Service
Fourth Way
Avonmouth
Bristol
BS11 8DW
T: 0117 938 1900
E: service@caple.co.uk
www.caple.co.uk
- Integrated Washer Dryer Instruction Manual
- WDI3301
- CONTENTS
- WARNINGS
- INSTALLATION WARNINGS
- VENTILATION WARNINGS
- LAUNDRY WARNINGS
- ELECTRICAL WARNINGS
- ENVIRONMENTAL PROTECTION
- CE DECLARATIONS OF CONFORMITY CE
- UKCA DECLARATIONS OF CONFORMITY UK CA
- TECHNICAL FICHE
- WARRANTY
- OVERVIEW OF WASHER DRYER
- ACCESSORIES
- UNPACKING THE WASHER DRYER
- DISPOSE OF THE PACKING MATERIALS
- WARNING:
- REMOVE TRANSPORT BOLTS
- NOTE:
- SELECT THE LOCATION
- ADJUST LEGS
- CONNECT INLET PIPE
- CONNECT OUTLET HOSE
- PREPARATION AND ASSEMBLY OF THE DOOR
- APPENDIX
- TOOLS
- DOOR TEMPLATE PREPARATION
- DRILL HOLES ON THE DOOR
- INSTALLING THE DOOR MAGNET
- INSTALLING THE DOOR
- BEFORE WASHING
- EMPTY ALL POCKETS
- SORT THE LAUNDRY
- PRE-TREAT STAINS
- GENERAL TIPS:
- HELPFUL SUGGESTIONS:
- MAXIMISE THE LOAD SIZE
- DO YOU NEED TO PRE-WASH?
- IS A HOT WASH REQUIRED?
- BEFORE DRYING
- CLOTHES PREPARATION
- DO NOT TUMBLE DRY
- IMPORTANT:
- ENERGY SAVING
- SORTING THE LOAD
- DETERGENT DRAWER
- CAUTION:
- CALIBRATION
- CONTROL PANEL
- OPENING THE DOOR
- START/PAUSE BUTTON
- PAUSING THE MACHINE
- CANCELLING THE PROGRAMME
- DELAY BUTTON
- DRY LEVEL BUTTON
- TEMPERATURE SELECTION BUTTON
- SPIN SPEED BUTTON
- CHILD LOCK
- TURNING AUDIBLE ALARMS ON/OFF
- MY CYCLE ♥
- DIGITAL DISPLAY
- ) CYCLE DURATION
- ) DOOR LOCKED INDICATOR LIGHT
- ) KEY LOCK INDICATOR LIGHT
- ) DRYING LEVEL LIGHTS
- PROGRAMMES
- MY CYCLE
- QUICK
- SPORTWEAR
- 20°C
- JEANS
- WOOL
- ECO 40 - 60
- INTENSIVE
- SPIN ONLY
- RINSE AND SPIN
- BABY CARE
- DRY ONLY
- WASH AND DRY
- MIX
- COTTON
- HOUR W/D
- CLEANING THE DRUM
- CLEANING THE DOOR SEAL AND GLASS
- CLEANING THE INLET FILTER
- DRAWER CLEANING
- FILTER CLEANING
- SUGGESTIONS FOR MOVING OR PROLONGED DISUSE
- BEFORE CALLING FOR SERVICE
- DRYING TIME IS TOO LONG/CLOTHES ARE NOT DRY ENOUGH ON:
- THE MACHINE DOES NOT OPERATE:
- SPARE PARTS AVAILABILITY
- caple
Brand : Caple
Model : WDI3301
Category : Washing machine