
AMD-006 - Hi-Fi System AIWA - Free user manual and instructions
Find the device manual for free AMD-006 AIWA in PDF.


| Brand | Aiwa |
| Model | AMD-006 |
| Product Type | DVD Player with Speakers and FM Radio |
| Power Consumption | 43 W |
| Input Voltage | 110-240 V ~ 50/60 Hz |
| Speaker Output Power | 2 x 15 W |
| FM Tuning Range | 87.5 - 108 MHz |
| USB Playback | FAT32, max 32 GB |
| Supported Disc Types | DVD, DVD±R, DVD±RW, CD, CD-R, CD-RW, VCD, MP3, MPEG4 |
| Video Output | Composite, Component (Y/Cb/Cr) |
| Audio Output | Stereo RCA (L/R) |
| Bluetooth | Yes (device name: AMD-006) |
| Region Code | 4 |
| Laser Type | Semiconductor, 650 nm |
| Audio Frequency Response | 20 Hz - 22 kHz (48/96 kHz sampling) |
| Video Signal System | PAL, NTSC, AUTO |
| Video Aspect Ratio | 16:9, 4:3 Pan & Scan, 4:3 Letterbox |
| Functions | DVD/CD playback, FM radio, Bluetooth streaming, USB playback, CD ripping, program play |
| Remote Control Batteries | 2x AAA (supplied) |
| Cleaning | Wipe disc from center outward with soft cloth; do not use solvents |
| Safety | Do not expose to rain/moisture; do not open cabinet; only qualified service personnel |
Frequently Asked Questions - AMD-006 AIWA
User questions about AMD-006 AIWA
0 question about this device. Answer the ones you know or ask your own.
Ask a new question about this device
Download the instructions for your Hi-Fi System in PDF format for free! Find your manual AMD-006 - AIWA and take your electronic device back in hand. On this page are published all the documents necessary for the use of your device. AMD-006 by AIWA.
USER MANUAL AMD-006 AIWA
natural_image
White audio recording device with two gray sound speakers, one displaying a digital display (no visible text or symbols)aiwa
Instruction Manual
Table Of Contents
Warning and Precautions....1-3
General Information: 4-5
Function Overview:
Front Panel 6
Back Panel 6
Remote Control....7 Blues Functions.
Connections:
Connection to Speakers....9
Connecting to FM Aerial....9
Connecting to TV and Additional Components ....10
System Setup 11-13
CD Ripping....13
MP3/MPEG4/JPEG Operation Method....14
Playing Discs:
Selecting the Starting Time....15
Selecting the Audio Channel 15
Special Functions:
Angle Selection 16
Picture Zooming 16
Selecting Subtitle Language .... 16 Selecting Audio Language ....
Selecting Audio Language
Other Functions:
FM Radio Operating Instruction 17
Bluetooth Connection Operation 17
Troubleshooting....18
Specifications 19
Warning and Precautions


WARNING: DUE TO THE HIGH RISK OF FIRE OR ELECTRIC SHOCK, DO NOT EXPOSE THIS APPLIANCE TO RAIN OR MOISTURE. DO NOT OPEN THE CABINET AS DANGEROUS HIGH VOLTAGES ARE PRESENT INSIDE THE ENCLOSURE. ONLY QUALIFIED SERVICE PERSONNEL SHOULD ATTEMPT TO OPEN THE CABINET.
To ensure proper use of this product, please read this owners manual carefully.
Basic Safety Requirements


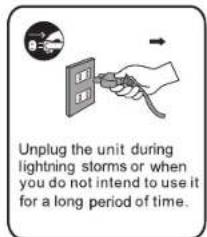
Warning and Precautions Warning and


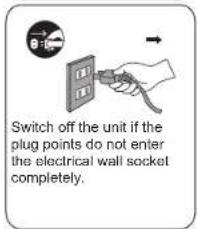

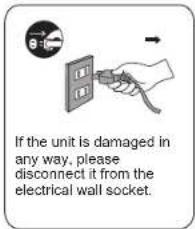
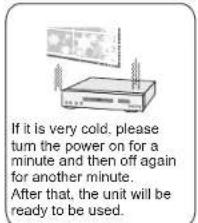

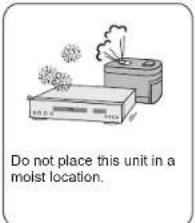

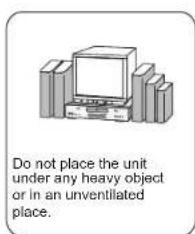

Warnings:
- This appliance is not intended for use by persons (including children) with reduced physical, sensory or mental capabilities, or lack of experience and knowledge, unless they have been given supervision or instruction concerning use of the appliance by a person responsible for their safety.
- This product is not a toy! Children should be supervised to ensure that they do not play with the appliance.
- Do not operate with a damaged cord or plug, or if the product malfunctions, or is dropped or damaged in any manner.
- Do not cover the unit during use.
- Do not insert foreign objects into the DVD compartment.
- If the supply cord is damaged, it must be replaced by the manufacturer, its service agent or similarly qualified persons in order to avoid a hazard.
CAUTION: This Digital Versatile Disc Player employs a laser system. To prevent direct exposure to the laser beam, do not open the enclosure. Visible laser radiation is present when the enclosure is open. DO NOT STARE INTO THE BEAM. Additionally, the use of controls or adjustments or performance or procedures other than those specified herein may result in hazardous radiation exposure. To ensure proper use of this product, please read this owner's manual carefully and retain for future reference. Should the unit require maintenance, contact an authorized service center.
This equipment generates, uses and can radiate radio frequency energy and, if not installed and used in accordance with the instructions, may cause interference to radio communication. However, this is no guarantee that interference will not occur in a particular installation. If this equipment does cause interference to radio or television reception, which can be determined by turning the equipment off and on, the user is encouraged to try to correct the interference with one of the following methods:
♦ Reorient or relocate the receiving antenna
◆ Increase the distance between the equipment and receiver.
- Connect the equipment into an outlet on a circuit different from that to which the receiver is connected.
◆ Consult the dealer or an experienced radio/TV technician for assistance.
Record the model and serial numbers of this unit before placing in the final position. These numbers are located on the back of the unit's cabinet. Retain this information for future reference.
General Information
DVD Region Code:
DVD Player and discs are designed with region numbers which dictate the region (printed on the rear panel of the DVD case). If the region number does not match the region number your DVD player is set to, you will not be able to play the disc. If you try to play the DVD, the message "WRONG REGION" will appear on OSD. The region number of this player is 4.
Types of Discs:
The following discs may be used with this player: DVD/DVD±R/DVD±RW/CD/CD-R/CD-RW/VCD/MP3/MPEG4
• DVDs:
Discs usually recorded with multi -titles. Titles may be divided in to chapters.
• Video CDs:
Discs are generally divided into tracks.
• Audio CDs and MP3: Disc divided into tracks.
Please note:
• Do not play CD-G,CD-EXTRA,CD-ROM and DVD-ROM discs.
- Do not play illegally produced discs.
• Do not play scratched discs.
- Do not play discs that are dusty, soiled or marked with fingerprints.
Glossary of Disc Terms:
- Title(DVD): The longest sections of a picture or a music piece on a DVD: a movie, etc., for a picture piece on a video software; or an album, etc., for a music piece and audio software. Each title is assigned a title number enabling you to locate the title you want.
- Chapter(DVD): Sections of a picture or a music piece that is smaller than titles. A title is composed of several chapters. Each chapter is assigned a chapter number enabling you to locate the chapter you want. Depending on the disc, no chapters may be recorded.
- Track(Video or Audio CD): Sections of a picture or a music piece on a VIDEO or an audio CD. Each track is assigned a track number enabling you to locate the track you want.
Conventions used in this Manual:
- Instructions in this manual describe the controls on the system. You can also use the controls on the remote control if they have the same or similar names as those on the system.
- The types of functions and operations that can be used for a particular disc vary depending on the features of that disc. In some cases, these functions and operations may differ from the descriptions given in this manual. In this event, follow the instructions given on the season. This manual only covers basic disc operations.
- For some functions, the icon may appear on the screen. This indicates that the functions described in this manual are not allowed for that specific disc.
- The drawings of the front panel display used in this manual are purely for explanation purposes. The actual display may differ slightly from what is shown here.
General Information
Notes about Discs:
Disc Handling Precautions:
• To keep the disc clean, handle the disc by its edge.
Do not touch the surface.
• Do not stick paper or tape on the disc.
- If there is glue (or a similar substance) on the disc, remove the glue completely before using the disc.

- Do not expose the disc to direct sunlight or heat sources such as hot air ducts or leave it in a car parked in direct sunlight as there may be a considerable rise in temperature inside the car.
- After playing, store the disc in its case.
- Do not write on the label side with a ball-point pen or other writing utensils.
- Be careful not to drop or bend the disc.
Disc Cleaning Precautions:
- Before playing, clean the disc with a soft clean cloth. Wipe the disc from the centre out
- Do not use solvents such as benzene, thinner, commercially available cleaners or anti-static sprays intended for vinyl LPs.

Disc Installing Precautions:
• Do not install more than 1 disc on the disc tray
- Do not place the disc on the tray upside down.
- Do not try to close the disc tray when the disc is not installed properly.
Accessories:
Check that you have the following items:
* Main unit +2 speakers
* 2X'AAA' batteries
* FM antenna(attached to the unit)
Remote control
*AV cable
User manual
Inserting Batteries into the Remote Control:
The system can be controlled using the supplied remote Insert 2 X'AAA' batteries by matching the +and- in the battery compartment. When using the remote, point it at the remote sensor on the front panel of the system

Please note:
- Do not leave the remote in an extremely hot or humid place.
• Do not use a new battery with an old one - Do not drop any foreign objects into the remote casing.
- Do not expose the unit to direct sunlight.
- If you do not intend to use the remote for an extended period of time, remove the batteries to avoid possible damage from battery leakage and corrosion.
Function Overview
Front Panel:
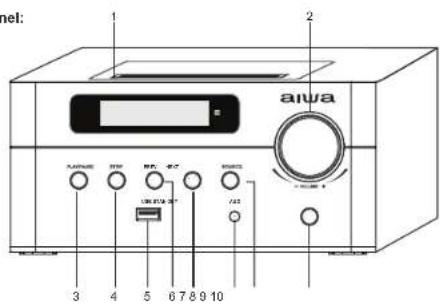
- OPEN/CLOSE
- PREV
- VOLUME +/-
- NEXT
- PLAY/PAUSE
- AUX
- STOP
- SOURCE
- USB(32 GB Max)
- STANDBY
Back Panel:
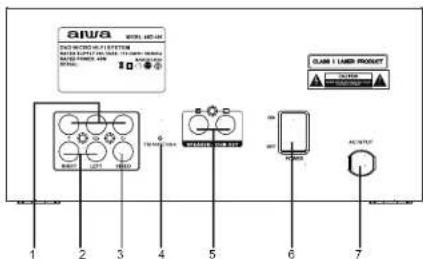
- Y/Cb/Cr SIGNAL OF COMPONENT OUTPUT
- SPEAKER OUTPUT
- R/L OUTPUT
- POWER ON/OFF
- VIDEO OUTPUT
- POWER INPUT
- FM ANTENNA
Function Overview
Remote Control:
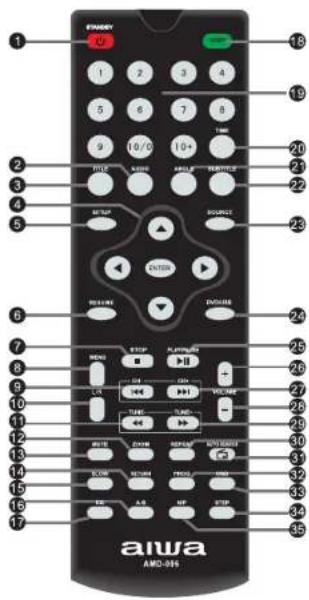
- STANDBY: Press this button to switch the player to ON or to set to Standby mode.
- AUDIO
- TITLE: During DVD playback, press this button to return to the title menu.
- NAVIGATION BUTTONS (▲▼▶◀)
- SETUP
- RESUM
- STOP
- STOP
- MENU
- MENU
- PREV/CH-
- L/R
- REV/TUNE-
12 ZOOM - ZOOM
- MUTE
- MOTE 14. RETU
- RETURN
- SLOW
16.A-B
17.EQ
18 COPY - COFT
- NUMBER BUTTONS
- NUMBER BUTTONS
- TIME
- TIME
- ANGLE
22.SUBTITLE - SOURCE(FM/AUX/BT/DVD)
- DVD/USB(switch between DVD and
USB inputs)
25 PLAY/RAUSE - FLAT/FAUSE
- VOLUME+
- NEXT/CH
- VOLUME-
- FWD/TUNE+
30 REPEAT - AUTO SEARCH
- AUTO SEARCH
- PROGRAM
- OSD
- STEP
- N/P
Player Functions
Menu/Title
Press the MENU key during DVD playback to return to the disc's Main menu.
Press the TITLE key during DVD playback to return to the disc's Title menu.
Press the TITLE key during VCD playback to the disc's PBC menu.
Mute
Press MUTE to mute/ restore sound.
Setup
Press the SETUP key to enter the player's setup menu. Enter the Setup menu to adjust the player's internal settings; please see the SETUP section for more details.
On-Screen Display/OSD
The On-Screen Display (OSD) indicator is a user-friendly interface designed to display playback type status. The OSD indicator will display information based on the type of disc that has been loaded (i.e., DVD or CD).
Time
To select the desired section to play(search).
Press the TIME button to display the search bar.
Press the DIRECTION button to select the desired item.
Press the NUMERIC button to input data.
Press the OK button to start playback.
N/P
Set the format of this player to select the color format of TV: "NTSC/PAL/AUTO".
L/R
Press this button repeatedly to select between left, right or both audio channels in CD/VCD/SVCD discs.
RETURN
Press this button to go back(menus).
Play/Pause/Stop
Press 📄 to play the disc for the first time.
Press during playback to pause. Press again to resume playback
Press during playback to stop the disc (Pre-Stop). Press to resume playback at the time-point at which the disc was ignored.
Press ☐ when the disc is Pre-Stopped to stop playback completely. (When ⓝ pressed, the disc will start playing from the beginning.)
Previous/Next (Skip)
Press 📄 to skip to the next track (DVD, CD, etc).
Press 🧑 to return to the previous track (DVD. CD, etc).
Forward/Reverse (Search)
Repeatedly press ☐ no search forward through a disc.
Repeatedly press to reverse.
Press 📄 for normal playback.
Slow
Press SLOW for slow-motion playback. Each successive press of SLOW will change the rate of slow-motion
playback
Press 📄 to resume normal playback.
Step
Press STEP for frame-by-frame playback. Each successive press of STEP will advance the video one frame.
Press 📄 to resume normal playback.
Connections
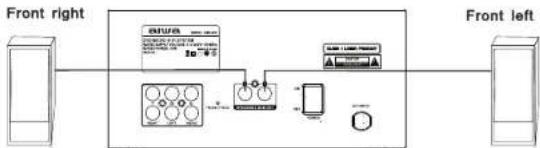
Connection to Speakers:
flowchart
graph LR
    A["Front right"] --> B["Device 1"]
    B --> C["Device 2"]
    C --> D["Control Unit"]
    D --> E["Display"]
    F["Front left"] --> G["Device 3"]
    G --> H["Device 4"]
    H --> I["Control Unit"]
    I --> J["Display"]
Connect the supplied speakers using the supplied speaker wires matching the colors of the jacks and
speake
- Connect the supplied speaker wire to the R, L terminal jacks.
To avoid short-circuiting the speakers:
Short-circuiting of the speakers may damage the system. To prevent this, make sure to take the following precautions when connecting the speakers:
• Make sure the stripped end of each speaker cord does not touch another speaker terminal or the stripped end of another speaker cord.
Incorrect installations of speaker cord:
- Stripped speaker cord is touching another speaker terminal.

• Stripped cords are touching each other due to excessive
removal of insulation.
Please note:
- Be sure to match the speaker cord correctly.
• For optimal sound performance, use the supplied speakers
- Do not use speakers with an impedance lower than the supplied speakers.
Extension of the FM Aerial:
- Extend and move the aerial in various directions until the clearest signal is received.
Please note:
- Keep the aerial as far away as possible from the TV.
VCR or any radiation source to prevent interference.

If you have poor FM reception:
For better FM reception, use a 75 ohm coaxial cable (not supplied) to connect the system to an outdoor FM aerial.
Connections
Connecting to TV and Additional Components:
- Video Connection: Connect either the 'VIDEO' output, or the 'YCbCr' outputs to the corresponding Inputs on a TV or other device. DO NOT connect both the video outputs to the TV.
- Audio Connection (optional): Use the 'Right' and 'Left' outputs if you want to connect the audio output to an amplifier or similar device.

flowchart
graph TD
    A["Video Input"] --> B["Display Device"]
    B --> C["Monitor Interface"]
    D["Video Output"] --> E["Display Device"]
    E --> F["Monitor Interface"]
    G["Video Display"] --> H["Monitor Interface"]
    I["Connect ONE of the video output ONLY to avoid picture interference."] --> J["Connect ONE of the video output ONLY to avoid picture interference."]
System Setup
General Setup Operation:
Press SETUP button to enter the Setup menu. Then press ▶ button to highlight General, Audio, Dolby, Video or Preference submenu and press ENTER/ button to enter the highlighted menu. Use the direction arrows to navigate the menu, and press Enter button to confirm. After the setting is confirmed, press SETUP button to exit the setting.
General Setup Page :

TV Display:
4:3/PS: Select this if you have a normal TV and want both sides of the picture to be trimmed or formatted to fit your TV screen. 4:3/LB: In this case, a wide picture with black bands on the upper and lower portions of the TV screen will be displayed. 16:9: Wide Screen display. Angle Mark: Displays current angle setting information on the right hand corner of the screen if available on the disc. OSD Language: You can select your own preferred language. Captions: Closed captions are data that are hidden in the video signal of some discs. Before you select this function, please ensure that the disc contains closed captions information and your TV set also has this function. Screen Saver: This function is used to turn the screen saver on or off.
HDCD: This function is used to change the HDCD playback settings. Last Memory: This function is used to turn the Resume Playback function On/Off. When it is on, the same disc can be played starting from where the previous playback was stopped.
Audio Setup Page:
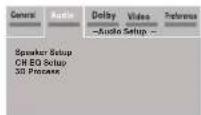
Speaker Setup:
On Audio Setup Page, press ▲▼ highlight Speaker Setup, then press OK button to enter Speaker Setup submenu. CH EQ Setup: On Audio Setup Page, press to highlight CH EQ Setup, then press OK button to enter the submenu and change the settings. 3D Process: This function is used to change the 3D surround settings.
System Setup
Dolby Setup Page:

Dual Mono Setup:
This function is to set the ML/MR audio output in different modes.
Stereo: Select this mode when your DVD player is connected to one stereo speaker or TV with stereo audio inputs.
L-Mono:Select this mode when your DVD player is connected to a single channel speaker or TV with mono audio input. The player shall output L-channel audio only. R-Mono:Select this mode when your DVD player is connected to a single channel speaker or TV with mono audio input. The player shall output R-channel audio only.
Mix-Mono: Select this mode when your DVD player is connected to a single channel speaker or TV with mono audio input. The player shall mix R/L-Channel audio into 1 channel to output.
Dynamic Setup: This function is used to set dynamic output level from OFF to FULL.
Video Setup Page:

Component Setup:
This function is used to set the component video output or YUV mode.
Quality Setup:
Sharpness: This function is used to set the sharpness of picture high, medium or low.
Brightness: This function is used to set brightness of the picture. Highlight Brightness, then press ENTER or ▶ button to enter Brightness submenu, then press ▶ to set brightness from -20 to +20. Press ENTER or OK button to save and exit.
Contrast: This function is used to set contrast of picture. Highlight Contrast then press ENTER or ▶ button to enter Contrast submenu, then press ◀ No set contrast from -16 to +16. Press ENTER or OK button to save and exit.
Gamma: Press /▲/▼ to choose Gamma level: None, Low, Medium, or High. Press ENTER to exit.
Hue: Press / to adjust the Hue data. Press the ENTER to exit.
Saturation: Press / to adjust the saturation data and press ENTER to exit.
Preference Page:

TV Type:
Used to select the color system that corresponds with both NTSC and PAL TV system.
PAL: Select this if the connected TV is PAL system. It will change the video signal of a NTSC disc and output to PAL format.
NTSC: Select this if the connected TV is NTSC system. It will change the video signal of a PAL disc and output to NTSC format.
Auto: Change the video signal output automatically according to the playing disc format.
Audio: Selects an audio language (if available).
Subtitle: Selects a subtitle language(if available).
Disc Menu: Selects a disc menu language (if available).
System Setup
CD Ripping
Parental:
Some DVDs may have a parental level assigned to the complete disc or to certain scenes on the disc. This feature lets you set a playback limitation level. The rating levels are from 1 to 8 and are country dependent. You can prohibit the playing of certain discs that are not suitable for your children or have certain discs played with alternative scenes. Password:
This function is used to set Password Mode On or Off and to change the password. Highlight Password, then press ENTER or button to enter Password Setup Page and set Password Mode On or Off.

Highlight Password, then press 1▶select Change, then press ENTER or OK to enter the following submenu:

Old Password: Enter the OLD password, (factory setting is "0000") and the cursor will jump automatically to New Password. New Password: Enter the NEW password. Enter 4 digits from the remote control's numeric buttons, and the cursor will automatically jump to Confirm PWD. Default: Press no choose RESET, and press ENTER to confirm. It will reset the player to factory default setting. Note: The set password will not be changed by this reset.
When an audio CD is in the disc tray, you can copy the audio from the CD as audio files onto the inserted USB memory stick. Press the "COPY" button to commence.

MP3 / MPEG4 / JPEG Operation Method
When a MPEG and a MP3 disc is loaded, the screen will display as follows:
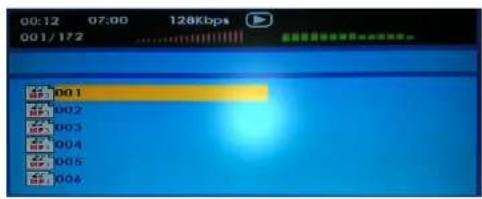
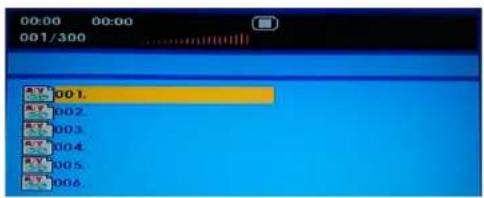
Press ▲ / ▼ to select the file when the cursor appears in the file window. Press Select to play the current file selected by the cursor.
Press PROG key to switch between the directory window and the file window.
Please note:
- The player will not identify or play a MP3 disc under the following conditions: the recording format is not supported (make sure the files are in MP3 format), the disc is badly scratched, damaged or dirty or the disc is not finalized.
Playing Discs
Please note:
- For CD, the information about track and time appears on the front panel display, as shown below.

- Depending on the VCD, the time information may not appear on the TV screen or you may not be able to change the display.
Selecting the Starting Time:
This function allows you to start playing at any chosen time on the disc. When playing a DVD disc: 1. Press the Title button repeatedly, and the following menu will appear on the TV screen:

- Use the number buttons (0-9/>10) to input the title or character number you want
of chapter number you want
- Use the ◀ or ▶ to select title or chapter
When playing a Video CD disc:
- Press the Title button and the following menu will appear on the TV screen:

- Use the number buttons (0-9/>10) to input the time
you want. 3. Press Title button again to exit.
Program Play:
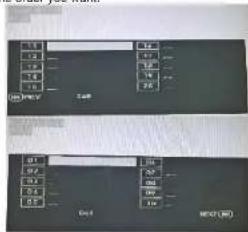
In audio CD mode you can play the contents of the disc in the order you want by programming the order of the tracks to be played. Up to 99 tracks can be stored.
-
Press PROG to enter program mode
-
Use the number buttons (0-9, >10) to input the track number in the order you want.
-
Repeat step 2 to store other tracks.
-
To start program play, press Start.
-
To stop play back, press ■ once.
- To cancel the program, press ■ again.
Selecting the Audio Channel:
Depending on the discs, you can select different audio channels.
• For Video CD discs
Press AUDIO repeatedly to select the following: Mono Left, Mono Right, Mix-mono Stereo.
Please note:
• In Mp3 mode, this button does not function.
Special Functions
Angle Selection:
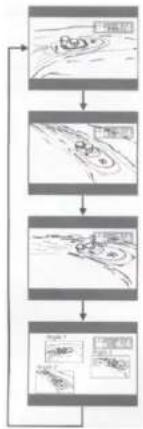
Some DVD discs contain scenes which have been shot simultaneously from a number of different angles. For these discs, the same scenes can be viewed from each of the different angles (the recorded angles differ from disc to disc).
- While playing a title shot from different angles, the angle marks are on the TV screen.
the angle mark appears on the TV screen. 2. Press the ANGLE button in change the scenes
from one angle to other angle(s). For example
flowchart
graph TD
    A["Start"] --> B{Condition 1}
    B -->|Yes| C["Process Step 1"]
    B -->|No| D["Process Step 2"]
    C --> E["End"]
    D --> E
    E --> F["Feedback Loop"]
Picture Zooming:
Press ZOOM to change the magnification level of the picture.
During DVD playback, each successive press of ZOOM will change the level of magnification. During JPEG CD playback, each successive press of
ZOOM will change the level of magnification. When the magnification level is greater than Normal/100%use the NAVIGATION keys to pan around the magnified picture.
When the magnification level is equal to 100%, use the NAVIGATION keys to rotate the picture.
Please note:
This function cannot be used during MP3 or CD Audio playback.
Selecting Subtitle Language:
This function can only be used for a DVD disc recorded with multi-subtitle languages. You can set a preferred language for subtitle in the SETUP menu.
- Press SUBTITLE repeatedly to select a desired language
Please note:
- The first press will show the current selection.
- Subsequent logges to the next subtitle setting.
- Some DVDs display subtitles automatically and cannot be turned off even if you set the subtitle function to off.
- During some scenes, the subtitles may not appear immediately after you turn them on.
- Some DVDs allow you to make subtitle selections and turn subtitles on or off only via the Disc menu.
- Use ◀/▶/▲/▼ and ENTER buttons.
Selecting Audio Language:
Depending on some VCD and DVD discs, you may be able to change the audio format (including audio coding type, number of channels recorded and audio language) using the Audio button. The relevant message appears on the TV display as shown below:
AUDIO 2/8 : AC-3 5.1CH ENGLISH
Other Functions
FM Radio Operating Instruction:
1. Default Radio
You can add up to 30 stations to the preset station memory. This will allow you to select the assigned number of a station to immediately switch to any of the preset stations.
97:50 FM
2. Switch to Radio Status
When is in DVD status, press "SOURCE" key to switch to Radio status.the unit
3. Automatic Channel Search
When the unit is in radio status(FM), press "AUTO SEARCH" key on the remote control or the "PLAY/PAUSE" key on the panel to start the automatic search of the stations. After it has searched through all the stations, it will stop and store them automatically. You may press "CH+" or "CH-" to choose the different stations. If you find some stations are unclear, press "TUNE+" or "TUNE-" to adjust the frequency until the station is clear, and then press "PROG" key on the remote to store this station.
4. Manual Channel Search
To manually search the stations, press "TUNE+" and "TUNE-" to search the stations, and then press "PROG" key to store them.
Note: Only the last 4 digits of the channel frequency are displayed.
BT Connection Operation:
- Press 'SOURCE' key repeatedly to switch to Bluetooth mode.
- Turn on the Bluetooth function on your Bluetooth device; search for the Bluetooth ID 'AMD-006' and connect.
- Now you can play music from your Bluetooth device on the unit speakers.
Note: The volume control on the unit is independent of the volume control on your Bluetooth device. If you can't hear the song being played even after increasing the volume on the unit, try increasing the volume on your Bluetooth device.
USB operation:
- Insert the USB memory device into the USB port.
- Press 'SOURCE' key repeatedly until 'DVD' is chosen.
- Press the 'DVD/USB' key to select between DVD and USB inputs.
- Now you can play compatible files from your USB memory device (see Specifications section for details).
Troubleshooting
This troubleshooting guide may help you find a possible cause and solution to a problem.
If the problem still exists, please contact your local customer service centre.
| Common symptom | Possible cause | Remedy |
| Unit does not work. | Mains power is not connected.Power is OFF. | Connect to mains power outlet.Turn the power ON. |
| CD does not play. | No disc is inserted("no disc" will be shown on screen). | Insert a disc. |
| Disc is upside down("no disc" will be shown on screen). | Reload disc.The label side should face upwards. | |
| Dirty disc. | Clean disc surface. | |
| Deformed/scratched disc. | Replace disc. | |
| Condensation in unit . | Turn power on for 1-2 hours before using the unit. | |
| No sound/sound in one or more speakers does not work. | Wrong audio output setting. | Check audio output setting. |
| Poor or missing cable connection. | Check connections. | |
| No picture. | Video equipment not connected.Wrong output setting of video output. | Check video connections.Check video output setting in General setup. |
There are some general things, which we recommend you to check before you call Customer Support for assistance.
- Use only discs of high quality. Low quality discs can cause faults when burning a CD or DVD-disc, which will affect the replay of the disc.
- Make sure the disc is clean and in no way damaged.
- Check if the burning was done correctly – perhaps burn a new disc at low burning speed (x.1).
Specifications
DVD Section:
| Laser type. | Semiconductor laser, Wavelength 650nm |
| Signal system. | PAL, NTSC/AUTO |
| Video format. | 16:9, 4:3 panscan, 4:3 letter box |
| Video output level. | 1 Vp-p (75 ohm) |
| Video Y output level. | 1 Vp-p (75 ohm) |
| Video C output level. | 286 mV P-P (75 ohm) |
| Audio frequency response. | 20Hz - 22 KHz (48 Khz) |
| 20Hz - 22 KHz (96 Khz) |
Tuner Section:
| Tuning Range | FM87.5 - 108 MHz |
| Usable Sensor | FM20dB (S/N=30dB) |
| Auto Stop Sensor | FM23dB |
| Signal to Noise Ratio | FM 50 dB |
| Stereo Separation | FM 25 dB (1KHz) |
| Input Voltage | 110-240V ~ 50/60Hz |
| Power Consumption | 43W |
| Speaker output | 2 x 15W |
USB Section:
| USB format....FAT32 |
| USB capacity....32 GB Max |
| USB playback file formats..VOB/DVD/DAT(VCD)/MP3/MP4(AVI)/DIVX/WMA/JPEG/KODAK |
- Table Of Contents
- Function Overview:
- Connections:
- Playing Discs:
- Special Functions:
- Other Functions:
- Warning and Precautions
- Basic Safety Requirements
- Warning and Precautions Warning and
- Warnings:
- General Information
- DVD Region Code:
- Types of Discs:
- Glossary of Disc Terms:
- Conventions used in this Manual:
- Notes about Discs:
- Accessories:
- Inserting Batteries into the Remote Control:
- Please note:
- Function Overview
- Player Functions
- Menu/Title
- Mute
- Setup
- On-Screen Display/OSD
- Time
- N/P
- L/R
- RETURN
- Play/Pause/Stop
- Previous/Next (Skip)
- Forward/Reverse (Search)
- Slow
- Step
- Connections
- Incorrect installations of speaker cord:
- Extension of the FM Aerial:
- Connecting to TV and Additional Components:
- System Setup
- General Setup Operation:
- TV Display:
- Speaker Setup:
- Dolby Setup Page:
- Dual Mono Setup:
- Video Setup Page:
- Component Setup:
- Quality Setup:
- Preference Page:
- TV Type:
- CD Ripping
- Parental:
- MP3 / MPEG4 / JPEG Operation Method
- Playing Discs
- Selecting the Starting Time:
- Program Play:
- Selecting the Audio Channel:
- Special Functions
- Angle Selection:
- Picture Zooming:
- Selecting Subtitle Language:
- Selecting Audio Language:
- Other Functions
- FM Radio Operating Instruction:
- Default Radio
- Switch to Radio Status
- Automatic Channel Search
- Manual Channel Search
- BT Connection Operation:
- Troubleshooting
- Specifications
Brand : AIWA
Model : AMD-006
Category : Hi-Fi System