SVL1034MI - Washing machine SVAN - Free user manual and instructions
Find the device manual for free SVL1034MI SVAN in PDF.


| Product type | Washing machine |
| Brand | SVAN |
| Model | SVL1034MI |
| Rated capacity (kg) | 10 kg |
| Spin speed (rpm) | 1400 rpm |
| Energy efficiency class | A+++ |
| Noise level (wash/spin) (dB) | 52 / 74 dB |
| Dimensions (H x W x D) (cm) | 85 x 60 x 60 |
| Weight (kg) | 72 kg |
| Power supply | 220-240 V, 50 Hz, 10 A |
| Motor type | Inverter motor |
| Display type | LED digital display |
| Number of programs | 16 |
| Key functions | Delay start, Quick wash, Eco wash, Steam function, Child lock |
| Door type | Front load, 180° opening |
| Drum material | Stainless steel |
| Cleaning and maintenance | Clean the detergent drawer, door seal, and drain filter regularly; run a drum clean cycle monthly |
| Safety features | Child lock, anti-flood system, unbalanced load detection |
| Spare parts availability | Available online from SVAN and third-party retailers; comprehensive repair manual included |
| Reparability index | 8.0/10 (as rated by users) |
Frequently Asked Questions - SVL1034MI SVAN
User questions about SVL1034MI SVAN
0 question about this device. Answer the ones you know or ask your own.
Ask a new question about this device
Download the instructions for your Washing machine in PDF format for free! Find your manual SVL1034MI - SVAN and take your electronic device back in hand. On this page are published all the documents necessary for the use of your device. SVL1034MI by SVAN.
USER MANUAL SVL1034MI SVAN
natural_image
Line drawing of a single washing machine with front panel and side panels (no text or symbols)SVL 1034MI
SVAN TRADING S.L.
Read this manual carefully and keep it for future reference.
natural_image
Simple line drawing of a box with a cross mark on the front panel (no text or symbols)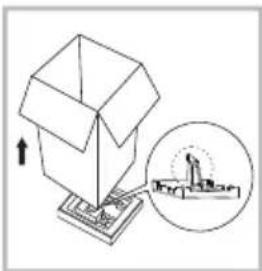
natural_image
Diagram of a box with an upward arrow and a magnified inset showing a person standing on a platform (no text or symbols)natural_image
Illustration of a hand using a wrench to adjust or install a washing machine (no text or symbols present)V.1
Nivelar la lavadora

Advertencia
Note
natural_image
Line drawing of a kitchen sink with faucet and chain handle (no text or symbols)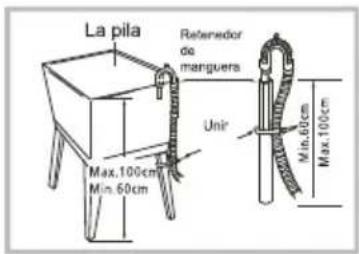
Advertencia!
natural_image
Hand pointing at a button labeled 'I' on a square button (no text or symbols beyond the number 1)Enchufe
natural_image
Simple diagram showing a circular flow with two curved arrows indicating clockwise motion (no text or symbols)Seleccione programa
natural_image
Simple line drawing of a sweater with a tag and patterned tie (no text or symbols)Revise la etiqueta
natural_image
Line drawing of two backpacks with circular designs and straps (no text or symbols)natural_image
Simple line drawing of a bag with internal objects, no text or symbols presentnatural_image
Line drawing of a knitted sweater with three arms (no text or symbols)natural_image
Simple line drawing of two stacked containers with arrows indicating motion (no text or symbols)
Pantalla
natural_image
Line drawing of a hand washing a washing machine with a circular vent (no text or symbols)Note
natural_image
Line drawing of a hand gripping a curved object (no text or symbols)natural_image
Diagram of a mechanical valve or drain with rotating flow arrows indicating motion (no text or symbols)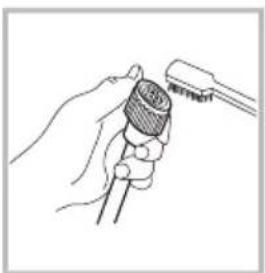
natural_image
Line drawing of a hand holding a connector with a cable (no text or symbols)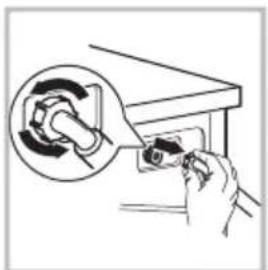
natural_image
Illustration of a hand using a tool to adjust or install a component, with no visible text or symbols.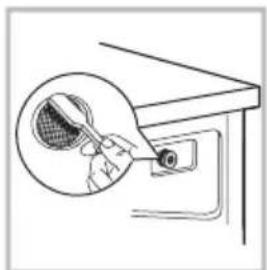
natural_image
Line drawing of a hand holding a magnifying glass over a screen, with no text or symbols present.
Nota
natural_image
Technical line drawing of a mechanical component with labeled section A (no text or symbols beyond label)natural_image
Line drawing of a mechanical device with a lever and handle (no text or symbols)natural_image
Line drawing of a hand inserting a small object into a container (no text or symbols)natural_image
Technical line drawing of a mechanical component with internal compartments and a lever (no text or symbols)natural_image
Simple line drawing of a mechanical component with a circular feature and an arrow indicating rotation (no text or symbols)natural_image
Simple line drawing of a kitchen appliance with a plate, sink, and spoon (no text or symbols)natural_image
Hand operating a rotary switch with a dial and scroll (no text or symbols visible)natural_image
Technical line drawing of a mechanical component with rotational arrows indicating motion (no text or symbols)■ Cleaning and Care 27
■ Trouble Shooting 30
■ Technical Specifications .... 31
■ Product Fiche 32
■ Safety Instructions
Please read the following safety information thoroughly and follow it strictly to minimize the risk of fire or explosion, electric shock and to prevent property damage, personal injury or loss of life. Failing to follow these instructions shall void any warranty.
Warning!
This combination of symbol and signal word indicates a potentially dangerous situation which may result in death or serious injuries unless it's avoided.
! Caution!
This combination of symbol and signal word indicates a potentially dangerous situation which may result in slight or minor injuries or damage to property and the environment.
Note!
This combination of symbol and signal word indicates a potentially dangerous situation which may result in slight or minor injuries.
Warning!
ELECTRIC SHOCK HAZARD
- If the supply cord is damaged, it must be replaced by the manufacturer, its service agent or similarly qualified persons in order to avoid a hazard.
- If the machine is damaged, it must not be operated unless repaired by the manufacturer, its service agent or similarly qualified persons.
Risk of electric shock!
• The appliance can be used by children aged from 8 years and above and persons with reduced physical, sensory or mental capabilities or lack of experience and knowledge if they have been given supervision or instruction concerning use of the appliance in a safe way and understand the hazards involved. Children shall not play with the appliance. Cleaning and user maintenance shall not be made by children without supervision.
- Children should be supervised that they do not play with the appliance.
- Children 3 years and under shall be kept away from the appliance or continuously supervised.
- Animals and children may climb into the machine. Check the machine before every operation.
- Do not climb or sit on the appliance.
- All washing and additional substances are to be kept in a safe place out of the reach of children.
- Do not install the machine on a carpet floor. The obstruction of the openings by a carpet can damage the machine.
- Keep the appliance clear from heating sources and direct sunlight to avoid plastic and rubber parts to corrode.
- Do not use the appliance in humid environments or rooms containing explosive or caustic gas. In case of water leakage or water splashes let the appliance dry in the open air.
-
The appliance must not be installed behind a lockable door, a sliding door or a door with a hinge on the opposite side to that of the washing machine.
-
Do not operate the machine in rooms with a temperature of below 5^ . This can cause damages to parts of it. If it is unavoidable, make sure to drain the water completely from the appliance after every use (see "Maintenance - Cleaning of drain pump filter") to avoid damages caused by frost.
- Never use flammable sprays or substances in the immediate proximity of the appliance.
INSTALLATION
- Remove all packaging material and transport bolts before using the appliance. Otherwise, serious damage may result.
- This appliance is equipped with a single inlet valve and can be connected to the cold water supply only.
- Mains plug must be accessible after installation.
- Before washing clothes for the first time, the product shall be operated once throughout all the procedures without any clothes inside.
- Before using the washing machine, the product shall be calibrated.
- Do not put any excessively heavy objects on the appliance, like water containers or heating devices.
- The new hose-sets supplied with the appliance are to be used and that old hose-sets should not be reused.
- Max. Inlet water pressure 1 MPa. Min. inlet water pressure 0.05 MPa.
ELECTRICAL CONNECTION
- Make sure the supply cable is not trapped by the machine, it can get damaged.
- Connect the product to a grounded outlet protected by a fuse complying with the values in the “Technical specifications” table. The grounding installation has to be made by a qualified electrician. Ensure that the machine is installed in accordance with the local regulations.
- Water and electrical connections must be carried out by a qualified technician in accordance with the manufacturer's instructions and local safety regulations.
⚠ Warning!
- Don't use multiple plugs or extension cords.
- The appliance must not have an external switching device such as a timer or connected to a circuit that is regularly switched on and off.
- Do not pull the plug out of the mains outlet if there is flammable gas around.
- Never pull out power plug with wet hands.
- Always pull at the plug, not at the cable.
•Always unplug the appliance if it is not being used.
WATER CONNECTIONS
- Check the connections of the water inlet tubes, the water tap and the outlet hose for possible problems due to changes of water pressure. If the connections loosen or leak close the water tap and get it repaired. Do not use the appliance before the pipes and hoses are installed properly by qualified persons.
- Glass door may become very hot during the operation. Keep children and pets far away from the machine while it is operating.
- The water inlet and outlet hoses have to be safely installed and remain undamaged. Otherwise, water leakage can occur.
- Do not remove the drain pump filter while there is still water in the appliance. Big quantities of water can leak out, and there is a risk of scalding due to hot water.
- Never use any flammable, explosive or toxic solvents. Do not use gasoline and alcohol etc. as detergents. Only select detergents that are suitable for machine washing.
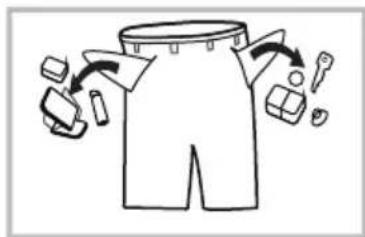
- Make sure that all pockets are emptied. Sharp and rigid items such as coins, brooches, nails, screws, stones etc. may cause serious damages to this machine.
- Remove all objects from pockets such as lighters and matches before use the appliance.
• Thoroughly rinse items that have been washed by hand. - Items that have been soiled with substances such as cooking oil, acetone, alcohol, petrol, kerosene, spot removers, turpentine, wax and wax removers should be washed in hot with an extra amount of detergent before being dried in the appliance.
- Items containing foam rubber (latex foam), shower caps, water proof textiles, rubber backed articles and clothes or pillows fitted with foam rubber pads should not be dried in the machine
- Fabric softeners or similar products should be used as recommended in their instructions.
- Never try to open the door forcefully. The door will unlock shortly after the end of a cycle.
- Please do not close the door with excessive force. If it is found difficult to close the door, please check if the clothes are properly inserted and distributed.
• Always unplug the appliance and close the water tap before cleaning and maintenance and after each use.
- Never pour water over the appliance for cleaning purpose. Risk of electric shock!
• Repairs shall only be carried out by the manufacturer, its service agent or similarly qualified persons in order to avoid a hazard. The producer will not be responsible for damages caused by the intervention of not authorized persons.
TRANSPORT
- Before Transport:
-Bolts shall be reinstalled to the machine by a specialized person
-Accumulated water shall be drained out of the machine - This appliance is heavy. Transport with care. Never hold any protruding part of the machine when lifting. The machine door cannot be used as a handle.
INTENDED USE
The product is intended only for home use and for textiles in household amounts suitable for machine washing and drying. This appliance is for indoor use only and not intended for built in use. Only use according to these instructions. The appliance is not intended for commercial use.
Any other use is considered as improper use. The producer is not responsible for any damage or injuries that may result of it.
- This appliance is intended to be used only in household applications.
Packaging/Old appliance
This marking indicates that this product should not be disposed with other household wastes throughout the EU. To prevent possible harm to the environment or human health from uncontrolled waste disposal, recycle it responsibly to promote the sustainable reuse of material resources. To return your used device, please use the collection systems or contact the retailer where the product was purchased. They return and can take this product for environmental safe recycling.
■ Product Description
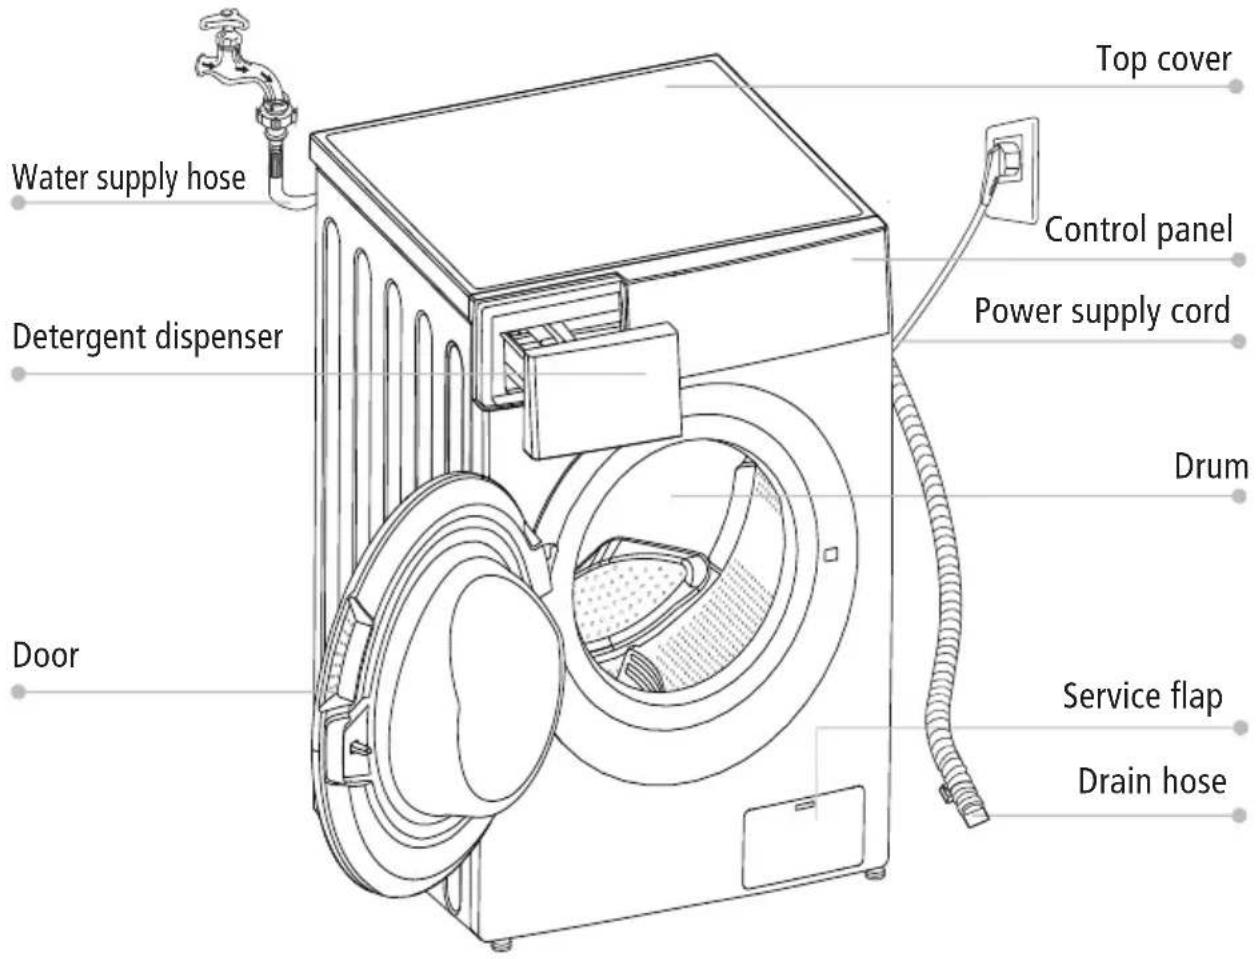

Note!
- The product picture is for illustration only, please refer to real product as reference.
Accessories
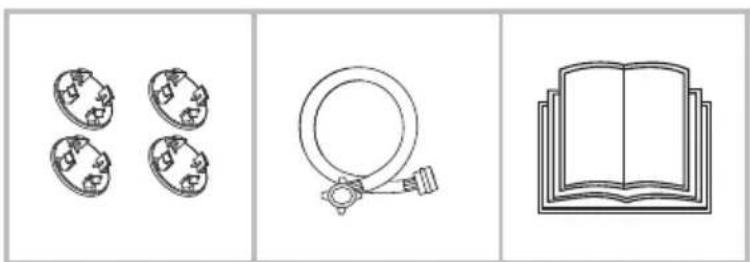
natural_image
Three-panel image showing four circular objects and a magnifying glass, alongside an open book (no text or symbols)4 x Cover caps
1 x Supply hose cold water
1 x Owner's manual
■ Installation
Installation area

Warning!
- Stability is important to prevent the product from wandering! Make sure the machine is standing leveled and stable.
- Make sure that the product does not stand onto the power cord.
- Make sure to maintain the minimum distances from the walls as shown in the picture
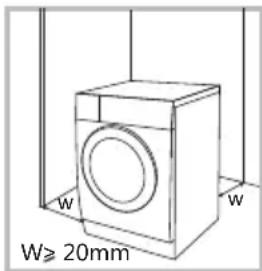
Before installing the machine, the location characterized as follows shall be selected:
- Rigid, dry, and level surface
- Avoid direct sunlight
- Sufficient ventilation
-
Room temperature is above 0^ C
-
Keep far away from the heat sources such as coal or gas burning appliances.
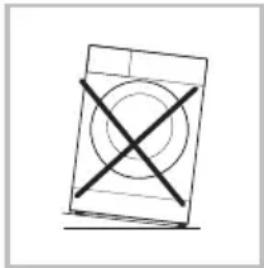
natural_image
Simple line drawing of a rectangular box with a central circle and two X-shaped cross marks (no text or symbols)Unpacking the washing machine

Warning!
- Packaging material (e.g. Films, Styrofoam) can be dangerous for children.
- There is a risk of suffocation! Keep all packaging well away from children.
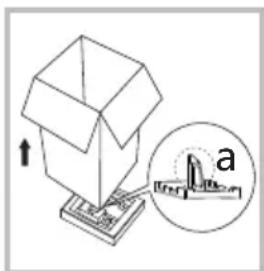
natural_image
Isometric line drawing of a box with an arrow pointing upward, and a magnified inset showing a small 3D structure labeled 'a' (no text or symbols on the diagram itself)- Remove the cardboard box and styrofoam packing.
- Lift the washing machine and remove the base packaging. Make sure the small triangle foam (a) is removed with the bottom packaging together. If not, lay the unit down on the side surface and remove it manually.
- Remove the tape securing the power supply cord and drain hose.
- Remove the inlet hose from the drum.
Remove transport bolts
⚠ Warning!
- You must remove the transport bolts from the backside before using the product.
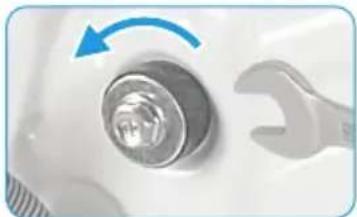
natural_image
Close-up of a mechanical component with a wrench and circular knob, no visible text or symbolsLoosen the 4 transport bolts with a spanner.
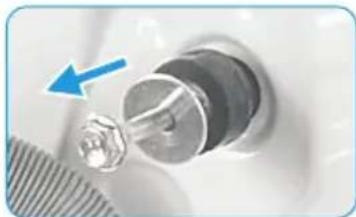
natural_image
Close-up of a mechanical component with a blue arrow pointing to a metallic part (no visible text or symbols)Remove the bolts including the rubber parts and keep them for future use.
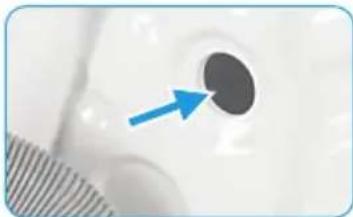
natural_image
Close-up of a white object with a dark circular hole and a blue arrow pointing to it, partially overlaid by a striped pattern (no text or symbols)Close the holes using the cover caps.
Levelling the washing machine
Warning!
- The lock nuts on all four feet must be screwed tightly against the housing.
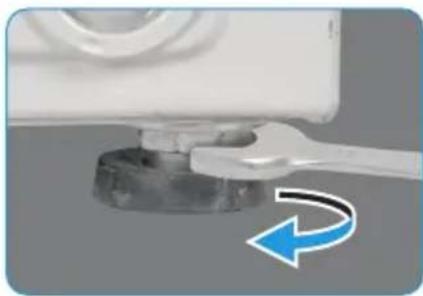
natural_image
Close-up of a white mechanical component with a blue circular arrow indicating rotation (no text or symbols)- Loosen the lock nut.
- Turn the foot until it reaches the floor.
- Adjust the legs and lock the nuts with a spanner. Make sure the machine is level and steady.
Connect the water supply hose
Warning!
To prevent leakage or water damage, follow the instructions in this chapter
- Do not kink, crush or modify water inlet hose.
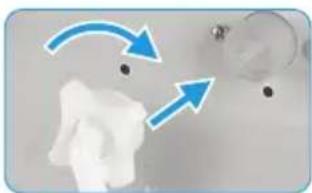
natural_image
Close-up of a white object with blue arrows indicating motion or direction, no visible text or symbolsConnect the water supply hose to the water inlet valve and a water tap with cold water as indicated.
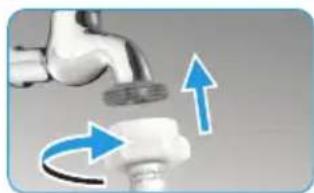
natural_image
Close-up of a faucet with blue arrows indicating rotation or movement (no text or symbols)Note!
- Connect manually, do not use tools. Check if the connections are tight.
Drain Hose

Warning!
- Do not kink or protract the drain hose.
- Position drain hose properly, otherwise damage might result of water leakage.
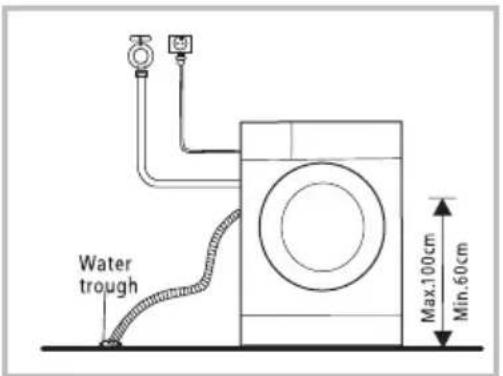
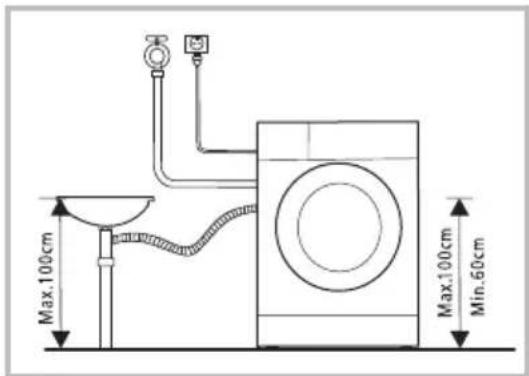
There are two ways to place the end of drain hose:
- Put it into the water trough. 2. Connect it to the branch drain pipe of the trough.
Quick Start
! Caution!
- Before washing, please make sure the washing machine is installed properly.
- Your appliance was thoroughly checked before it left the factory. To remove any residual water and to neutralize potential odors, it's recommended to clean your appliance before first use. For this reason, start the Cotton program at 90°C without laundry and detergent.

Calibration
It's recommended to calibrate the washing machine, so that provide the best performance.
The appliance is able to detect the amount of laundry loaded. This function is optimizing the product performance by minimizing energy and water consumption, saving you money and time. For this reason it's recommended to calibrate the appliance for best use.
1- Remove all accessories from the drum and close the door;
2- Insert the mains plug to the socket;
3- Switch on the washing machine and press "Temp." and "Function" simultaneously for 10 seconds until "t19" is displayed;
4- Press [ ▷II] to start the appliance and wait till “*****” is displayed.
1. Before Washing
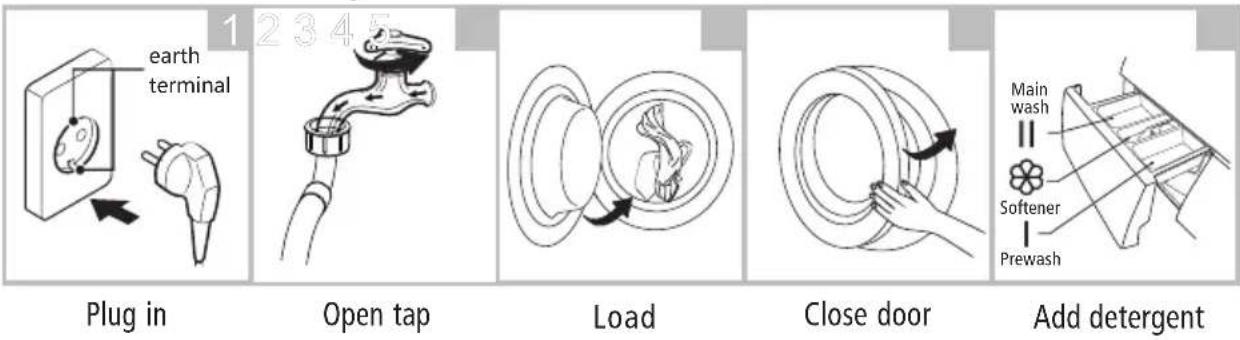

Note!
- Detergent need to be added in compartment I if the pre-wash function is selected.
2. Washing
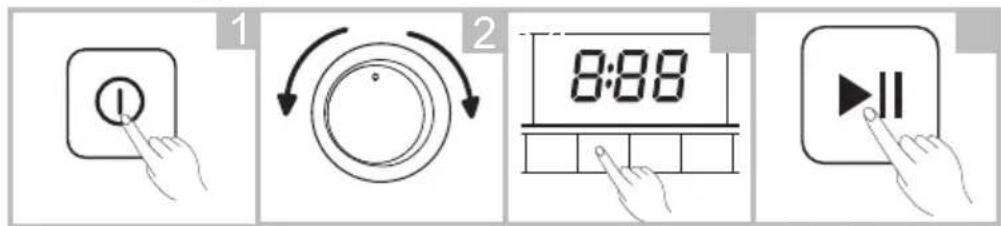
Power On
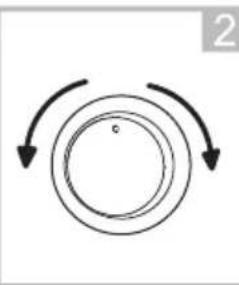
Select programme
Select function or remain default settings
Press
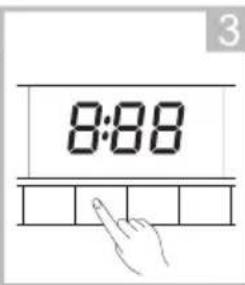
Start/Pause to start the program
3. After Washing
Buzzer beep and "End" on display.
■ Before Each Washing
- The ambient temperature of the washing machine should be 5-40°C. If used under 0°C, the inlet valve and draining system may be damaged. If the machine is installed under freezing conditions, it should be transferred to normal ambient temperature to ensure the water supply hose and drain hose can unfreeze before use.
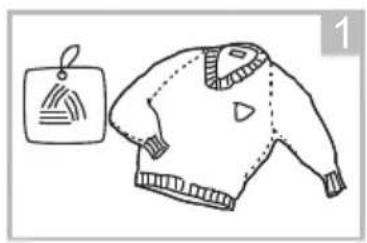
- Please check your laundry care labels and the detergent use instructions before wash. Use non-foaming or less-foaming detergent suitable for machine washing properly.
natural_image
Simple line drawing of a sweater with a tag and patterned jacket (no text or symbols)Check the care label
natural_image
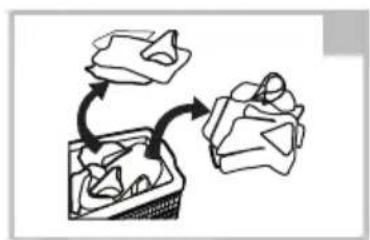
Simple line drawing of a bag being folded into a basket (no text or symbols)Sort laundry according to color and textile type
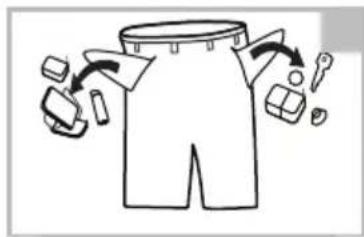
Take all items out of the pockets
natural_image
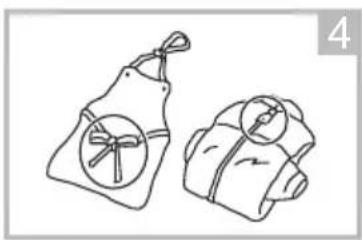
Two handbags with circular designs, one wrapped in a strap and the other in a blanket (no text or symbols)Tie together long textile strips and belts, close zips and button
natural_image
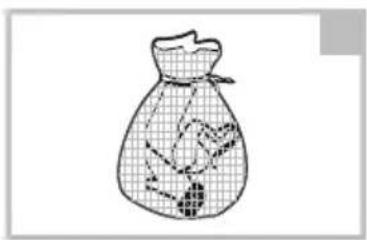
Simple line drawing of a money bag with a grid pattern and printed labels (no readable text or symbols)Put small items into a laundry bag
natural_image
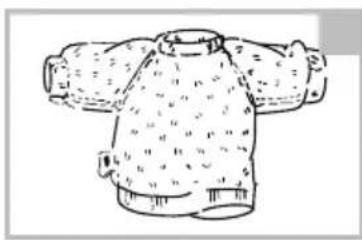
Line drawing of a traditional-style jacket with three arms and textured body (no text or symbols)Turn easy-pilling and long-pile fabric inside out
Warning!
- Do not wash or dry articles that have been cleaned in, washed in, soaked in, or dabbed with combustible or explosive substances like wax, oil, paint, gasoline, alcohol, kerosene, and other flammable materials.
- Washing single clothes items may easily create big eccentricity and cause alarm due to unbalance. Therefore it is suggested to add one or two more laundry items to the wash so that spin can be done smoothly.
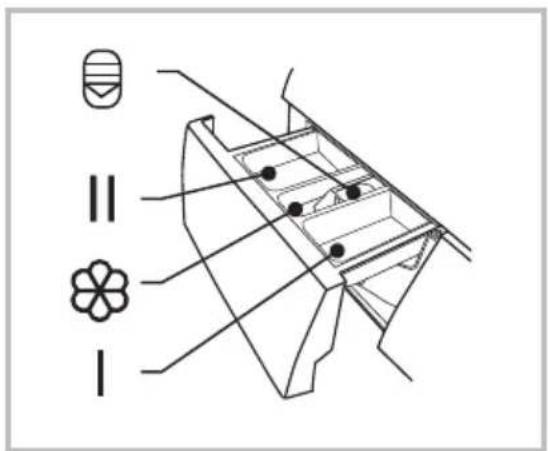
■ Detergent Dispenser
I Pre wash
II Main wash
Softener
Release button to pull out the dispenser
! Caution!
- Detergent only need to be added in "compartment I" after selecting pre-wash function.
| Programme | I | II | |
| Sterilization | ● | ○ | |
| Cotton | ○ | ● | ○ |
| 20°C | ● | ○ | |
| Mix | ○ | ● | ○ |
| Wool | ● | ○ | |
| Synthetic | ○ | ● | ○ |
| ECO 40-60 | ● | ○ | |
| Intensive | ● | ○ |
● Means must ○ Means optional
| Programme | I | II | |
| Self-Clean | |||
| Spin Only | |||
| Rinse & Spin | ○ | ||
| Baby Care | ○ | ● | ○ |
| Sport | ○ | ● | ○ |
| Duvet | ○ | ● | ○ |
| Rapid 45' | ○ | ● | ○ |
| Quick 15' | ● | ○ |
Detergent Recommendation
| Recommended washing detergent | Wash cycles | Washing temp. | Type of laundry and textile |
| Heavy-duty detergent with bleaching agents and optical brighteners | Cotton,ECO 40-60,Mix,Duvet | 20/30 / 40/60 | White laundry made from boil-proof cotton or linen |
| Colour detergent without bleaching agent and optical brighteners | Cotton,ECO40-60,Mix, Duvet,20°C | Cold/20/ 30/40 | Coloured laundry made from cotton or linen |
| Color or mild detergent without optical brighteners | 20°C,Synthetic | Cold/20/ 30/40 | Coloured laundry made from easy care fibres or synthetic materials |
| Mild washing detergent | Synthetic | 20 30/ | Delicate textiles, silk, viscose |
| Special wool detergent | Wool | 20 30/ | Wool |

Note!
- Agglomerating or ropy detergent or additive can be diluted in some water before pouring it into the detergent dispenser, to avoid its inlet to get blocked and thus cause a water overflow.
- Please choose the suitable type of detergent to get a maximum of washing performance and a minimum of water and energy consumption
- To achieve the best cleaning result a proper detergent dosing is important.
- Use a reduced detergent amount if the drum is not filled completely.
- Always adjust the amount of detergent to the water hardness, if your tap water is soft, use less detergent.
- Dose according to how dirty your laundry is, less dirty clothes require less detergent.
- Highly concentrated (compact detergent) requires particularly accurate dosing.
Following symptoms are a sign of detergent overdosing:
- heavy foam formation
- poor washing and rinsing result
Following symptoms are a sign of detergent underdosing:
- laundry turns grey
- built-up of limescale deposits on the drum, the heating element and/or the laundry
■ Control Panel
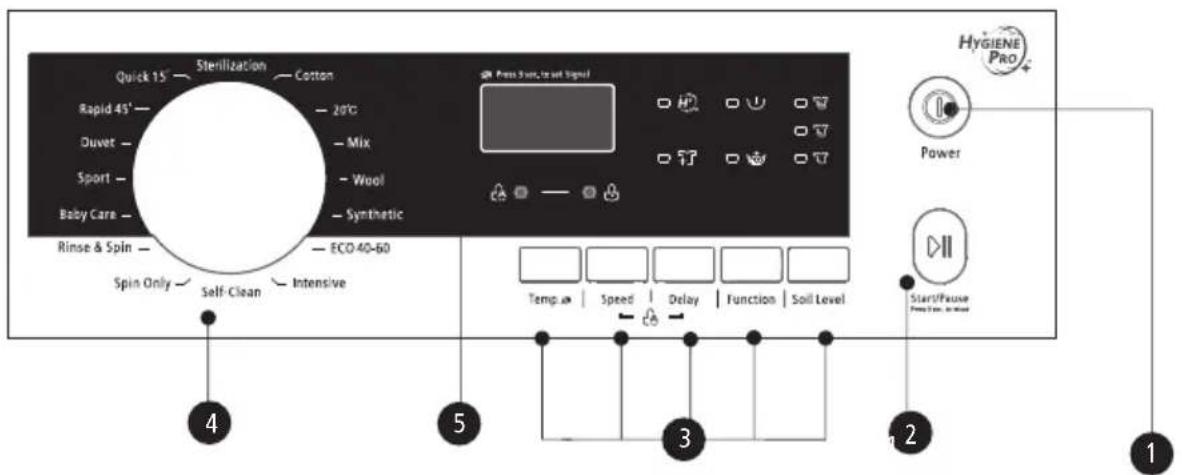

Note!
The chart is for reference only, Please refer to real product as standard.
1 Power
Product is on/off.
3 Option
This allows you to select an additional function and will light when selected.
5 Display
The display shows the settings, estimated time remaining, options, and status messages for your washer. The display will remain on through the cycle.
2 Start/Pause
Press the button to start or pause the washing cycle.
4 Programmes
Available according to the laundry type.
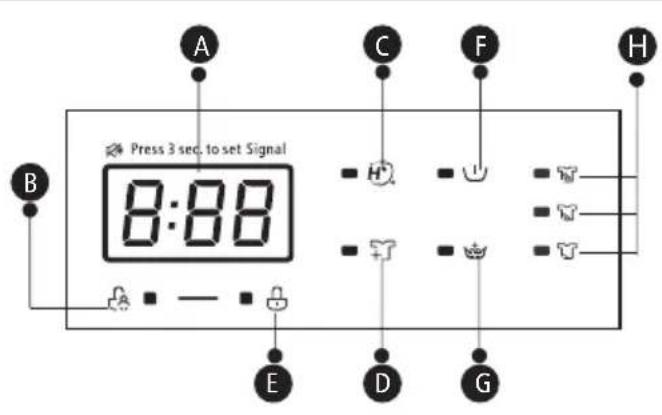
A Display
| Wash Time | Delay Time |
| 125 | 2h |
| Speed | Error |
| 100 | E30 |
| End | Temp. |
| End | 30 |
B Child Lock C HYGIENE PRO
D Reload E Door Lock
F Pre Wash G Extra Rinse
H Soil Level
Programmes
Model:SVL1034MI
| Programme | Load(kg) Display Time | |
| 10.0 | 10.0 | |
| 1500 | ||
| Sterilization | 5.0 | 2:27 |
| Cotton | 10.0 | 3:39 |
| 20°C | 5.0 | 1:11 |
| Mix | 10.0 | 1:30 |
| Wool | 2.0 | 1:07 |
| Synthetic | 5.0 | 3:28 |
| ECO 40-60 | 10.0 | 3:59 |
| Intensive | 10.0 | 3:48 |
| Self-Clean | - | 1:18 |
| Spin Only | 10.0 | 0:12 |
| Rinse & Spin | 10.0 | 0:30 |
| Baby Care | 10.0 | 1:53 |
| Sport | 5.0 | 1:16 |
| Duvet | 2.0 | 1:48 |
| Rapid 45' | 2.0 | 0:45 |
| Quick 15' | 2.0 | 0:15 |

Note!
- The parameters in this table are only for user's reference. The actual parameters maybe different with the parameters in above mentioned table.
Programmes
| SVL1034MI | |||||||
| Cycle | Nominal capacity in kg | Temperature setting | Cycle duration in h:min | Energy consumption in KWh/cycle | Water consumption in L/cycle | Highest washing temperature ^^1) | Residual moisture in % / Spin speed in rpm ^2) |
| 20°C | 5.0 | 20 | 1:11 | 0.212 | 51 | 20 | 65% / 1000 |
| Cotton (60°C) | 10.0 | 60 | 3:44 | 1.708 | 85 | 60 | 53% / 1500 |
| Intensive | 10.0 | 40 | 3:48 | 1.277 | 85 | 40 | 70% / 800 |
| Mix | 10.0 | 40 | 1:30 | 0.889 | 85 | 40 | 65% / 1000 |
| Quick 15' | 2.0 | Cold | 0:15 | 0.030 | 31 | Cold | 75% / 800 |
| EC0 40-60 ^3) | 10.0 | - | 3:59 | 1.015 | 70.6 | 38 | 53% / 1450 |
| 5.0 | - | 3:00 | 0.635 | 55.3 | 33 | 53% / 1450 | |
| 2.5 | - | 3:00 | 0.286 | 38.8 | 22 | 53% / 1450 | |
- The above data is for reference only, and the data may change due to different actual use conditions.
- The valves given for programmes other than the ECO 40-60 programme are indicative only.
- Concerning to EN 60456:2016/prA2019 With (EU)2019/2014, (EU)2019/2023, The EU energy efficiency class is: B
Energy test program: ECO 40-60. Other as the default.
Half load for 10.0Kg machine: 5.0Kg.
Quarter load for 10.0Kg machine:2.5Kg.
1) The highest temperature reached by the laundry in the wash cycle for at least 5 minutes.
2) Residual moisture after the wash cycle in water content percent and the spin speed at which this was achieved.
3) The ECO 40-60 programme is able to clean normally soiled cotton laundry declared to be washable at 40^ C or 60^ C, together in the same cycle. This programme is used to assess the compliance with the regulation (EU) 2019/2023.
The most efficient programmes in terms of energy consumption are generally those that perform at lower temperatures and longer duration.
Loading the household washing machine up to the capacity indicated for the respective programmes will contribute to energy and water savings.
Noise and remaining moisture content are influenced by the spinning speed: the higher the spinning speed in the spinning phase, the higher the noise and the lower the remaining moisture content.
Caution!
- If there is any break in the power supply while the machine is operating, a special memory stores the selected programme. The machine will continue the programme when the power supply is re-established.
Programmes
Programmes are available according to the laundry type.
| Programmes | |
| Cotton | Hard-wearing textiles, heat-resistant textiles made of cotton or linen. |
| Synthetic | Wash synthetic articles, for example: shirts, coats, blending.While washing the knitting textiles, detergent quantity shall be reduced due to its loose string construction and easily forming bubbles. |
| Baby Care | Washing the baby's clothes, it can make the baby's wear cleaner and make the rinse performance better to protect the baby skin. |
| Rapid 45' | Washing few and not very dirty clothes quickly. |
| Mix | Mixed load consisting of textiles made of cotton and synthetics. |
| 20°C | 20°C default, can choose cold water. |
| Sterilization | Consistent 70°C washing ensures sterilization effects.Loading weight lower than 5kg is suggested. |
| Quick 15' | Extra short programme approx, suitable for lightly soiled washing as a small amounts of laundry. |
| ECO 40-60 | Default 40°C,not selectable,suitabale for laundry washing at about 40°C-60°C. |
| Wool | Hand or machine-washable wool or richwool textiles.Especially gentle wash programme to prevent shrinkage, longer programme pauses (textiles rest in wash liquor). |
| Spin Only | Extra spin with selectable spin speed. |
| Rinse & Spin | Extra rinse with spin. |
| Intensive | To increase the washing effects, washing time is increased. |
| Self-Clean | Specially set in this machine to clean the drum and tube. It applies 90 °C high temperature sterilization to make the clothes washing more green. When this programme is performed, the clothes or other washing cannot be added.When proper amount of chlorine bleaching agent is put in, the barrel cleaning effect will be better. The customer can use this programme regularly according to the need. |
| Sport | Washing the activewear. |
| Duvet | This program is specially designed for washing duvet coats. |
Option
| Cycle | Default Temp.(°C) | Default spin speed in rpm | Additional functions | |
| Wash cycles | 1500 1400 | |||
| Sterilization | 70 | 800 | 800 | Delay, ☐, |
| Cotton | 40 | 1500 | 1400 | Delay, ☐, ☐, |
| 20°C | 20 | 1000 | 1000 | Delay, ☐, ☐, |
| Mix | 40 | 1000 | 800 | Delay, ☐, ☐, ☐, ☐, |
| Wool | 40 | 600 | 600 | Delay, ☐, |
| Synthetic | 40 | 1200 | 1200 | Delay, ☐, ☐, ☐, ☐, |
| ECO 40-60 | -- | 1500 | 1400 | Delay, |
| Intensive | 40 | 800 | 800 | Delay, |
| Self-Clean | 90 | -- | -- | Delay, |
| Spin Only | -- | 1000 | 1000 | Delay, |
| Rinse & Spin | -- | 1000 | 1000 | Delay, ☐, ☐, |
| Baby Care | 60 | 800 | 800 | Delay, ☐, ☐, ☐, ☐, |
| Sport | 40 | 800 | 800 | Delay, ☐, ☐, ☐, ☐, |
| Duvet | 40 | 1000 | 1000 | Delay, ☐, ☐, |
| Rapid 45' | 40 | 800 | 800 | Delay, ☐, ☐, |
| Quick 15' | Cold | 800 | 800 | Delay, |

Note!
- For the maximum spin speed, program time, and other details of the ECO 40-60 program, please refer to the content on the Product Fiche page.
- The table shows which cycle offers which options for adjustment. If an adjustment is not possible for a cycle.
Temp.
Temp.
When needed, the washing temperature can be adjusted by pressing the temperature button in the following steps: Cold - 20°C - 30°C - 40°C - 60°C - 90°C.

Spin Speed
When needed, the spinning speed can be adjusted pressing the Speed button in the following steps: 1400 : 0-400-600-800-1000-1200-1400 1500: 0-400-600-800-1000-1200-1400-1500

Delay
- Select a programme
- Press the Delay button to choose the delaying time 0-24h
- Press [Start/Pause] to start the delay operation

Choose programme


StartSetting time
To cancel the Delay function, press the "Delay" button before starting the program until the display shows 0 h. If the program has already started, switch the appliance off and afterwards on and select a new programme.

Pre Wash
Extra washing function before the main washing cycle starts to increase the washing performance. Note: Detergent needs to be added to the compartment I.

Extra Rinse
When extra rinse function is selected, the rinse cycle is added one more time for deeper cleaning and rinsing.

Soil Level
The user can select according to the pollution degree for laundry and program will automatically control the washing time.

HYGIENE PRO
The self-clean function will be automatically activated during every washing cycle. HYGIENE PRO system will keep your laundry always clean. Environmentally save time and ease your laundry.

Caution!
Some programs have automatically added HYGIENE PRO function, this function can't be manually selected or canceled.

Child Lock
This function is meant to keep children from misusing the controls.
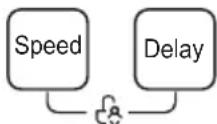
Press [Speed] and [ ] Behaltaneously for 3 sec until the buzzer beep. The child lock indicator switches on.
Caution!
When the Child Lock is activated, the display will alternately show "CL" and the remaining time.
Pressing any other button will cause the Child Lock indicator to flash for 3 sec. When the program ends, "CL" and "END" will alternate on the display for 10 sec, then the indicator will flash for 3 sec.
The Child Lock deactivates the function of all buttons except the On/Off button and the Child lock button!
Only the simultaneous pressing of the two buttons [Speed] and [Delay] can deactivate the Child Lock!
Please deactivate the Child Lock before selecting a new program!

Mute the buzzer


Temp.
Choose the Programme

Press the [Temp.]button for 3sec., the buzzer is mute.
To act the buzzer function, press the button again for 3 seconds. The setting will be kept until the next reset.
Caution!
- MuAfter ting the buzzer function, the sounds will not be activated any more.

Reload
This operation can be executed during the washing progress. When the drum is still rolling and there is large amount of water with high temperature in the drum. The state is unsafe and the door cannot be opened forcefully. To press
[Start/Pause] for 3 sec. to reload, and start the clothes adding in the midway function. Please follow the steps as bellow:
- Wait until the drum stops rotation.
- The door lock is unlocked.
- Close the door when the clothes are reloaded and press the [ ] ▷ II button.

P 3sress[11

] ec.

Reload the clothes


Start
! Caution!
- Don't use the Reload function when the water level over the edge of the inner tub or the temperature is higher.
■ Cleaning and Care
⚠ Warning!
- Always unplug the appliance and close the water tap before cleaning and maintenance.
Cleaning the Cabinet
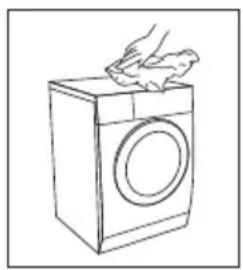
Proper maintenance on the washing machine can extend its working life. The surface can be cleaned with diluted non-abrasive neutral detergents when necessary. If there is any water overflow, use a cloth to wipe it off immediately. Never use sharp items to clean the appliance.
natural_image
Line drawing of a hand washing a washing machine (no text or symbols)Caution!
- Never use abrasive or caustic agents. formic acids or its diluted solvents or similar substances, like alcohol or chemical products.
Cleaning the Drum
Any rust stains left inside the drum by metal articles must be removed immediately using chlorine-free detergents. Never use steel wool for cleaning the drum!
Note!
- Keep any laundry away from the machine while cleaning the drum.
Cleaning the Door Seal and Glass
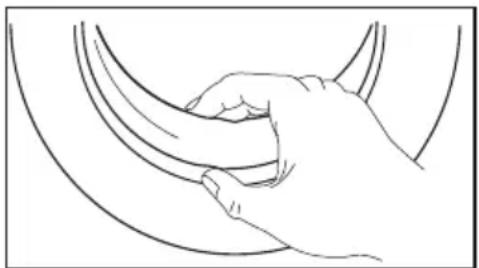
Wipe the glass and seal after each wash to remove lint and stains. If lint builds up it can cause leakages.
Remove any coins, buttons and other objects from the seal after each wash.
Clean the Door Seal and Glass every month to ensure the normal operation of the appliance.
natural_image
Line drawing of a hand gripping a curved object (no text or symbols)Cleaning the Inlet Filter

Note!
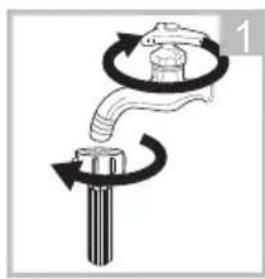
- Diminishing water flow is a sign that the filter need to be cleaned.
- Close the tap and remove the water supply hose from it.
- Clean the filter with a brush.
- Unscrew the water supply hose from the backside of the machine. Pull out the filter with long nose pliers.
- Use a brush to clean the filter.
- Reinstall the filter to the water inlet and reconnect the water supply hose.
- Clean the Inlet filter every 3 months to ensure the normal operation of the appliance.
natural_image
Diagram showing a valve mechanism with rotating arrows and a base component (no text or symbols)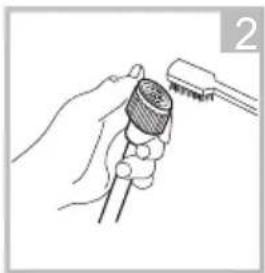
natural_image
Line drawing of a hand holding a connector with a tool, no text or symbols present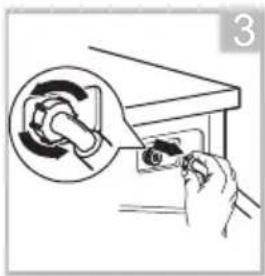
natural_image
Hand holding a small electronic device with a magnified inset showing the internal mechanism (no text or symbols visible)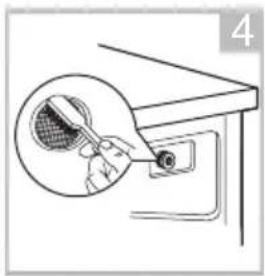
natural_image
Line drawing of a hand holding a tennis racket inside a mirror (no text or symbols)Clean The Detergent Dispenser
- Press down the release [ ] on the softener cover and pull the dispenser drawer out of the recess. Clean the inside of the recess with a brush.
- Lift the softener cover off the dispenser drawer and wash both items with water.
- Restore the softener cover and push the drawer back into the recess.
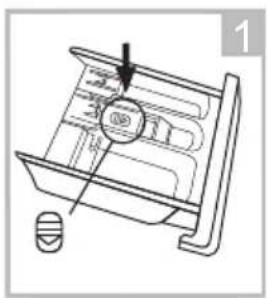
natural_image
Technical line drawing of a mechanical component with an arrow indicating direction (no text or symbols)Press the release and remove the dispenser drawer
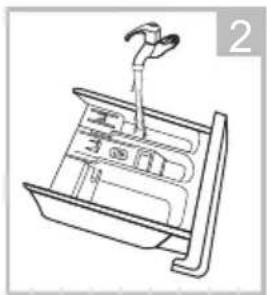
natural_image
Line drawing of a mechanical device with a lever and internal components (no text or symbols)Clean the dispenser drawer and the softener cover under water
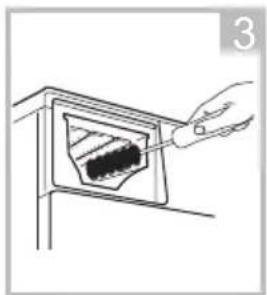
natural_image
Line drawing of a hand inserting a small object into a container (no text or symbols)Clean the recess with an soft brush
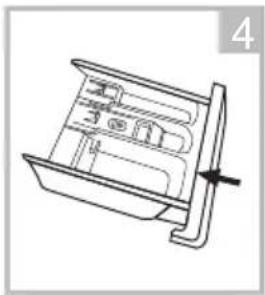
natural_image
Technical line drawing of a mechanical component with internal compartments and a handle (no text or symbols)Insert the dispenser drawer

Note!
- Do not use abrasive or caustic agents to clean plastic parts.
- Clean the detergent dispenser every 3 months to ensure the normal operation of the appliance.
Cleaning the Drain Pump Filter
Warning!
- Make sure that the machine has finished the washing cycle and is empty. Switch it off and unplug it before cleaning the drain pump filter.
- Be careful of hot water. Allow the water to cool down. Risk of scalding!
- Clean the filter periodically every 3 months to ensure the normal operation of the appliance.
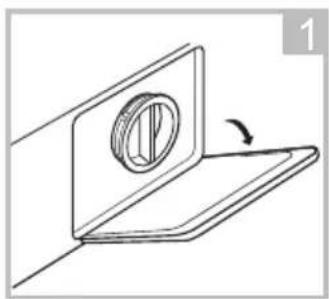
natural_image
Technical line drawing of a mechanical component with a circular feature and rotation arrow (no text or symbols)Open the lower cover cap
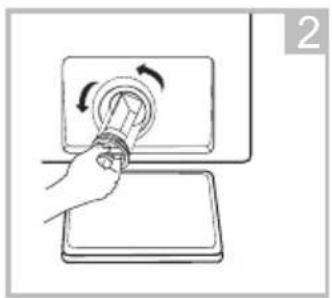
natural_image
Hand holding a tool interacting with a circular button on a tray (no text or symbols visible)Open the filter by turning to the counter clockwise
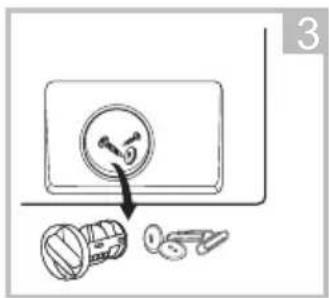
Remove extraneous matter
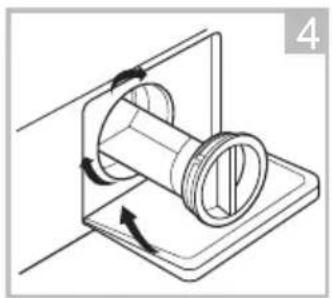
natural_image
Technical line drawing of a mechanical component with rotational arrows indicating motion (no text or symbols)Close the lower cover cap
Caution!
- When the appliance is in use and depending on the programme selected there can be hot water in the pump. Never remove the pump cover during a wash cycle, always wait until the appliance has finished the cycle, and is empty. When replacing the cover, ensure it is securely re-tightened.
■ Trouble Shooting
Whenever there is a problem with the appliance, check if you can solve it following the tables below. If the problem persists, please contact the customer service.
| Description | Possible cause | Solution |
| Appliance does not start | Door is not closed properly. Clothes are stuck. | Close the door properly and restart.Check the laundry. |
| Door can’t be opened | Safety protection is activated. | Disconnect the power and restart. |
| Water leakage | Connections are not tight enough. | Check and fasten the water inlet pipe.Check and clean the outlet hose. |
| Detergent residues in the detergent dispenser | Detergent is damp and/or clotted. | Clean and wipe the detergent dispenser dry. |
| Indicator or display does not work | PC board or harness have connection problems. | Switch off the power and check if the mains plug is connected properly. |
| Abnormal noise | Fixing bolts still in place. Floor is not solid or level. | Check if the fixing bolts have been removedMake sure the appliance is installed on a solid and level floor. |
Error Codes
| Description | Possible cause | Solution |
| E30 | Door is not closed properly | Close the door properly and restart. |
| E10 | Water injecting problem during wash cycle. | Check if the water pressure is high enough.Straighten the water pipe.Clean the inlet valve filter. |
| E21 | Overtime water draining | Check the drain hose for blockage. |
| E12 | Water overflow | Restart the appliance. |
| EXX | Others | Restart the appliance. If problem persists, please contact the customer service. |
■ Customer service
Spare part for your appliance are available for a minimum of 10 years.
In case of questions please contact our customer service at:

Warning!
Risk of electric shock
- Never try repair an appliance which is defective of presumed to be defective.
You may put your own and future users' lives in danger. Only authorised specialists are allowed to carry out this repair work. - Improper repair will void the warranty and subsequent damages can't be recognized!
Transport
IMPORTANT STEPS WHEN MOVING THE APPLIANCE
- Unplug the appliance and close the water inlet tap.
- Check, if the door and the detergent dispenser are closed properly.
- Remove the water inlet pipe and the outlet hose from the house installations.
- Let the water drain completely from the appliance (see "Maintenance Cleaning the drain pump filter")
- Important: Re-install the 4 transport bolts in the back of the appliance.
- This appliance is heavy. Transport with care. Never hold any protruding part of the machine when lifting. The machine door cannot be used as a handle.
■ Technical Specifications
| Power Supply | 220-240V~,50Hz |
| MAX.Current | 10A |
| Standard Water Pressure | 0.05MPa~1MPa |
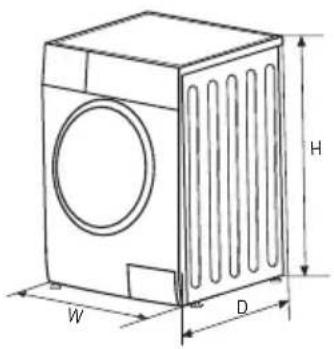
| Model | Washing Capacity | Dimension (W*D*Hmm) | Net Weight | Rated Power |
| SVL1034MI | 10.0kg | 595*565*850 | 72kg 1900W |
■ Product Fiche
Product Information Sheet acc. regulation (EU) 2019/2023
Supplier's name or trade mark:
Supplier's address (b):
Model identifier: SVL1034MI
General product parameters:
| Parameter | Value | Parameter | Value | ||
| Rated capacity (°) (kg) | 10.0 | Dimensions in cm | Height | 85 | |
| Width | 60 | ||||
| Depth | 57 | ||||
| EEI_W (°) | 60.0 | Energy efficiency class (°) | B | ||
| Washing efficiency index (°) | 1.04 | Rinsing effectiveness (g/kg) (°) | 5.0 | ||
| Energy consumption in kWh per cycle, based on the eco 40-60 programme. Actual energy consumption will depend on how the appliance is used. | 0.593 52 | Water consumption in litre per cycle, based on the eco 40-60 programme. Actual water con-sumption will depend on how the appliance is used and on the hardness of the water. | |||
| Maximum temperature inside the treated textile (°) (°C) | Rated capacity | 38 | Remaining moisture content (°) (%) | Rated capacity | 53 |
| Half | 33 | Half | 53 | ||
| Quarter | 22 | Quarter | 53 | ||
| Spin speed (°) (rpm) | Rated capacity | 1450 | Spin-drying efficiency class (°) | B | |
| Half | 1450 | ||||
| Quarter | 1450 | ||||
| Programme duration (°) (h:min) | Rated capacity | 3 59 : | Type | free-standing | |
| Half | 3 00 : | ||||
| Quarter | 3 : 00 | ||||
| Airborne acoustical noise emissions in the spinning phase (°) (dB(A) re 1 pW) | 80 | Airborne acoustical noise emission class (°) (spinning phase) | C | ||
| Off-mode (W) | 0.50 | Standby mode (W) | N/A | ||
| Delay start (W) (if applicable) | 4.00 | Networked standby (W) (ifapplicable) | N/A | ||
Minimum duration of the guarantee offered by the supplier (b):
| This product has been designed to release silver ions during the washing cycle | NO |
Additional information:
Weblink to the supplier's website, where the information in point 9 of Annex II to Commission Regulation (EU) 2019/2023 (1) (b) is found:
(*) for the eco 40-60 programme.
(*) changes to these items shall not be considered relevant for the purposes of paragraph 4 of Article 4 of Regulation (EU) 2017/1369.
(°) if the product database automatically generates the definitive content of this cell the supplier shall not enter these data.
1) The actual energy consumption will depend on how the appliance is used.
2) The actual water consumption will depend on how the appliance is used and on the hardness of the water.
3) Delivery of the spare parts within 15 working days after having received the order.
Product Data Sheet concerning (EU) 2019/2014
The product data sheet for your appliance can be found online.
Go to https://eprel.ec.europe.eu and enter the model identifier for your appliance to download the data sheet.
The model identifier for your appliance can be found in the technical specifications section.
- Nivelar la lavadora
- Advertencia
- Note
- Advertencia!
- Nota
- ■ Safety Instructions
- Warning!
- ! Caution!
- Note!
- ELECTRIC SHOCK HAZARD
- INSTALLATION
- ELECTRICAL CONNECTION
- ⚠ Warning!
- WATER CONNECTIONS
- TRANSPORT
- INTENDED USE
- Packaging/Old appliance
- ■ Product Description
- Accessories
- ■ Installation
- Installation area
- Unpacking the washing machine
- Remove transport bolts
- Levelling the washing machine
- Connect the water supply hose
- Drain Hose
- Quick Start
- Calibration
- Before Washing
- Washing
- After Washing
- ■ Before Each Washing
- ■ Detergent Dispenser
- ■ Control Panel
- A Display
- Programmes
- Caution!
- Option
- Temp.
- Spin Speed
- Delay
- Pre Wash
- Extra Rinse
- Soil Level
- HYGIENE PRO
- Child Lock
- Mute the buzzer
- Reload
- ■ Cleaning and Care
- Cleaning the Cabinet
- Cleaning the Drum
- Cleaning the Door Seal and Glass
- Cleaning the Inlet Filter
- Clean The Detergent Dispenser
- Cleaning the Drain Pump Filter
- ■ Trouble Shooting
- ■ Customer service
- IMPORTANT STEPS WHEN MOVING THE APPLIANCE
- ■ Technical Specifications
- ■ Product Fiche
Brand : SVAN
Model : SVL1034MI
Category : Washing machine