
MIN600SI - Range hood MATRIX - Free user manual and instructions
Find the device manual for free MIN600SI MATRIX in PDF.


| Product Type | Integrated Extractor (Range Hood) |
| Model | MIN600SI |
| Width | 600 mm |
| Mains Voltage | 230-240 VAC |
| Total Power Consumption | 49 W |
| Motor Speeds | 3 speeds (low, medium, high) |
| Lighting | 4W max LED SES bulb |
| Grease Filter Type | Acrylic or aluminium (depending on model) |
| Charcoal Filter | Replaceable for recirculating mode; replace every 4-6 months |
| Minimum Distance Above Electric Hob | 600 mm (650 mm recommended) |
| Minimum Distance Above Gas Hob | 700 mm (or 760 mm without hob instructions) |
| Annual Energy Consumption | 26.6 kWh |
| Sound Power Level | 62 dBA |
| Maximum Airflow | 193.2 m³/h |
| Fluid Dynamic Efficiency | 8.6 |
| Energy Efficiency Index | 69.1 |
| Grease Filter Efficiency | 70% |
| Lamp Efficiency | 14% |
| Electrical Protection | 3A fuse |
| Safety Class | Class II (double insulated) |
| Steam Cleaner Use | Not permitted |
Frequently Asked Questions - MIN600SI MATRIX
User questions about MIN600SI MATRIX
0 question about this device. Answer the ones you know or ask your own.
Ask a new question about this device
Download the instructions for your Range hood in PDF format for free! Find your manual MIN600SI - MATRIX and take your electronic device back in hand. On this page are published all the documents necessary for the use of your device. MIN600SI by MATRIX.
USER MANUAL MIN600SI MATRIX
Manual for installation, use and maintenance
MIN600SI
60cm Integrated Extractor

Important
The CDA Group Ltd cannot be held responsible for injuries or losses caused by incorrect use or installation of this product. Please note that CDA reserve the right to invalidate the guarantee supplied with this product following incorrect installation or misuse of the appliance or use in a commercial environment.
This appliance is not designed to be used by people (including children) with reduced physical, sensorial or mental capacity, or who lack experience or knowledge about it, unless they have had supervision or instructions on how to use the appliance by someone who is responsible for their safety.
Under no circumstances should any external covers be removed for servicing or maintenance except by suitably qualified personnel.
Appliance information:
Please enter the details on the appliance rating plate below for reference, to assist CDA Customer Care in the event of a fault with your appliance and to register your appliance for guarantee purposes.
| Appliance Model | |
| Serial Number |
EU Declarations of Conformity
This appliance has been manufactured to the strictest standards and complies with all applicable legislation, including Electrical safety (LVD) 2014/35/EU and Electromagnetic interference (EMC) 2014/30/EU.
Parts intended to come into contact with food conform to 1935/2004/EC.
IMPORTANT INFORMATION FOR CORRECT DISPOSAL OF THE PRODUCT IN ACCORDANCE WITH EU DIRECTIVE 2012/19/EU.
At the end of its working life, the product must be taken to a special local authority waste collection centre or to a dealer providing appliance recycling services.
Disposing of a household appliance separately avoids possible negative consequences for the environment and health. It also enables the constituent materials to be recovered, saving both energy and resources. As a reminder of the need to dispose of household appliances separately, the product is marked with a crossed-out wheeled dustbin.
Please note:
- Under no circumstances should the extractor be connected to any gas ventilation system, flue system or hot air ducting system.
- Do not vent the extractor into an attic or loft space.
- Only house the extractor in rooms with adequate ventilation. Remember that the extractor is powerful and whatever air is extracted needs to be replaced.
- Do not tile the extractor in. It should be removable for service or maintenance.
- Do not use silicone sealant to secure the hood to the wall.
- You must be able to isolate the extractor from the mains electrical supply after installation.
- This extractor has been designed to be used in a room with a volume of less than 36 m³.
- Steam cleaners must not be used when cleaning this appliance.
- The performance of your extractor will vary depending on a number of factors. These include: type of extraction, length of ducting, room volume, ventilation available and cleanliness of the filters.
Using your Extractor
For best performance, you should switch on the extractor 15 minutes before starting to cook and leave it to run for approximately 15 minutes after the end of cooking.
Control Panel
A - Light switch B - Power indicator light C - Power switch
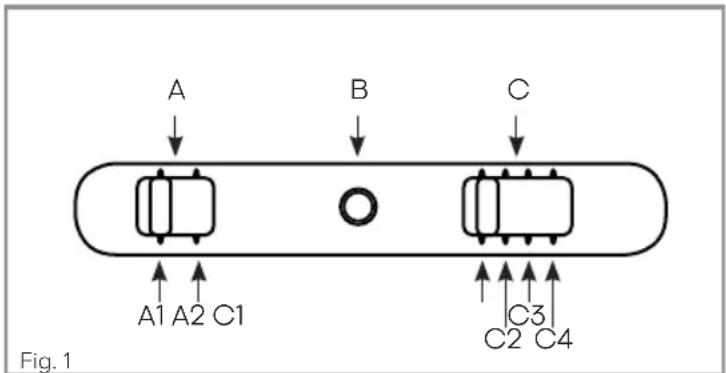
To switch the extractor light on or off
- Slide the light switch to position A1 for off, or A2 for on.
To switch on the extractor, or change the motor speed
- Slide the power switch to the required position. C2 is the lowest speed and C4 is the highest.
To switch the extractor off
- Slide the power switch to position C1 for off.
Care and Maintenance
IMPORTANT : DO NOT PERFORM MAINTENANCE OR CLEANING OF THE EXTRACTOR WITHOUT FIRST SWITCHING OFF THE ELECTRICITY SUPPLY.
Cleaning
You should use a nonabrasive cleaner. Any abrasive cleaner (including Cif) will scratch the surface and could erase the control panel markings.
You can clean your extractor effectively by simply using a dilute solution of water and mild detergent and drying to a shine with a clean cloth, for example a clean microfibre cloth.
Cleaning the (rectangular) grease filter
The grease filter captures grease particles in the air, so is therefore subject to clogging depending on the frequency of use of the appliance.
In order to prevent fire hazard it is recommended to clean the grease filter at a maximum of 2 month intervals by carrying out these instructions:
Depending on model, you may have either acrylic or aluminium grease filter(s).
Acrylic grease filter:
- Remove the cover panel by pushing the fixing clips up and then lifting the panel forwards.
- Remove the filter retaining wires from the cover panel.
- Remove the grease filter and wash by hand in a lukewarm solution of water and mild detergent. Once clean squeeze the grease filter but DO NOT wring it out. Clean the filter holder using a dilute solution of water and mild detergent or with a damp cloth. Allow the grease filter to dry completely before reassembling the extractor.
- Replace the grease filter in the cover panel and reattach the filter retaining wires.
- Replace the cover panel by inserting the lugs on the upper side in the extractor, and then refasten the fixing clips on the lower side.
Aluminium grease filters:
- Remove the filters from the cooker hood and wash in a solution of warm water and neutral liquid detergent, leaving to soak.
- Rinse thoroughly with warm water and leave to dry.
- The filters may alternatively be washed in the dishwasher. The aluminium panels may alter in colour after several washes in a dishwasher. This is not a fault and is not cause for replacing the panels.
Changing the (circular) charcoal filter (re-circulating only):
To ensure best performance of your extractor, you should replace the charcoal filters every four to six months,
depending on use.
Please note the charcoal filter cannot be washed.
To attach a new charcoal filter, follow the steps below:
- Remove the cover panel (acrylic filter model) or grease filter (aluminium filter model) as described above.
- Place the charcoal filter on the centre of the motor support, and once firmly located turn the charcoal filter clockwise 90° until the charcoal filter locks into position.
- Replace the cover panel or grease filter that has been removed.
Changing the Light
DO NOT CHANGE THE LIGHT BULB IMMEDIATELY AFTER USE AS THE BULB WILL BE HOT. ALLOW IT TO COOL BEFORE REMOVING IT.
Remove the cover panel as described above, unscrew the light bulb and replace the light with the correct type of light bulb (4W max LED SES). Finally, replace the cover panel.
Do not touch bulbs or adjacent areas during or straight after prolonged use of the lights.
The light is designed for use during cooking and not for general room illumination. Extended use of the light can reduce the life span of the bulb.
Bulb replacement is not covered by the guarantee.
Only use bulbs recommended for your extractor. Do not fit bulbs of a higher power rating. Bulbs of a lower power rating may be adequate for use, generally last longer and use less energy.
Spare bulbs are available from CDA Customer Care.
Installation requirements
When the extractor is to be installed above an electric hob, the minimum distance between the hob and extractor must exceed 600mm (650mm is recommended).
When the extractor is to be installed above a gas hob, the minimum distance between the hob and extractor must exceed 700mm (750mm is recommended).
If the instructions provided with your gas hob state that the required distance between the hob and extractor must be greater than 700mm, then that is the distance that should be observed; this is a legal requirement and may lead to your hob being disconnected from the gas supply and the installation being reported to RIDDOR (The height should be measured from the top of the burners).
NOTE: IN THE ABSENCE OF ANY INSTRUCTIONS SUPPLIED WITH THE GAS HOB, THE MINIMUM DISTANCE BETWEEN THE HOB AND EXTRACTOR MUST BE AT LEAST 760mm.
The width of any hob must not be greater than the width of the extractor installed above it.

Installation procedure
- Mark the positions of the fixing holes on the wall using the dimensions shown in Fig. 3.
- Drill and plug the wall with appropriate fixings, suitable for the wall type you are fixing the extractor on.
- Mount the brackets and securely tighten.
- Hang the hood on the brackets and adjust the brackets and height to suit. The adjustment mechanism is shown in Fig. 4.
- Once the hood is levelled and square against the wall, adjust the bottom panel as required (Fig. 5).
- Secure the extractor to the adjacent units through the holes in the side of the product, to ensure that it cannot be accidentally knocked off the hanging brackets.


Mains Electricity Connection
THIS APPLIANCE MUST BE CONNECTED TO THE MAINS SUPPLY BY A COMPETENT PERSON, USING FIXED WIRING VIA A DOUBLE POLE SWITCHED FUSED SPUR OUTLET AND PROTECTED BY A 3A FUSE.
We recommend that the appliance is connected by a qualified electrician, who is a member of the N.I.C.E.I.C. and who will comply with the I.E.T. and local regulations.
The wires in the mains lead of this appliance are coloured in accordance with the following code:
BLUE = NEUTRAL, BROWN = LIVE.
As the colours of the wires in the mains lead for the appliance may not correspond with the coloured markings identifying the terminals connecting to the fused spur, proceed as follows:
- The wire which is coloured blue must be connected to the terminal marked N (Neutral), or coloured black.
- The wire which is coloured brown must be connected to the terminal marked L (Live), or coloured red.
NOTE: USE A 3A FUSE
Assembly and electrical connection should be carried out by competent personnel.
When installing this product we recommend you seek the help of another individual.
IMPORTANT: THIS APPLIANCE IS A CLASS II APPLIANCE (DOUBLE INSULATED) AND IS NOT INTENDED TO BE EARTHED. DO NOT FIT AN EARTH LEAD TO THIS EXTRACTOR.
Do not mount the isolation switch behind the chimney section. It is a requirement that you must be able to isolate the extractor from the mains electrical supply after installation.
This appliance is intended to be connected to the mains electrical supply by means of an isolation switch and fused spur and is intended to be protected by a 3A fuse. The use of a 13A fuse can cause damage to the internal wiring in the event of a fault, and may also invalidate the warranty.

Electrical Information
Mains electrical voltage: 230 - 240Vac.
Total rated power consumption: 49W.
Troubleshooting
If your extractor is not working:
- Check that the mains supply has not been switched off.
- Check that the fuse in the spur has not blown.
Contact CDA Customer Care
A : Customer Care Department, The CDA Group Ltd, Harby Road, Langar, Nottinghamshire, NG13 9HY
T:01949 862 012 F:01949 862 003
E: customer.care@cda.eu W: www.cda.eu
| Energy Efficiency Information | |||
| Attribute Symbol Units | Symbol | Value | Units |
| I/1S06NiMnoitacifitredl ledoM I 0 | |||
| Annual Energy Consumption | AECHood | 26.6 | kWh |
| Time increase factor | f | 1.7 | |
| Fluid Dynamic Efficiency | FDEHood | 8.6 | |
| Energy Efficiency Index | EEIHood | 69.1 | |
| Measured airflow at Best Efficiency Point | QBEP | 99.2 | m3/h |
| Measured Pressure at Best Efficiency Point | PBEP | 120.0 | Pa |
| Maximum airflow | QMAX | 193.2 | m3/h |
| Measured electric power at Best Efficiency Point | WBEP | 38.2 | W |
| Nominal lighting power | WL | 4 | W |
| Average illumination of the lighting system on the cooking surface | EMiddle | 55.0 | Lux |
| Measured power consumption in standby | PS | -- | W |
| Measured power consumption off mode | PO | 0.0 | W |
| Sound power level | LWA | 62.0 | dBA |
| Grease Filter Efficiency | GFEHood | 70 | % |
| Lamp efficiency | LEHood | 14 | % |
MATRIX
Serviced by
C|D|A
Built for your life
For our Customer Care Department, or for Service,
Please contact us at:


- MIN600SI
- IMPORTANT
- APPLIANCE INFORMATION
- EU DECLARATIONS OF CONFORMITY
- IMPORTANT INFORMATION FOR CORRECT DISPOSAL OF THE PRODUCT IN ACCORDANCE WITH EU DIRECTIVE 2012/19/EU
- PLEASE NOTE
- USING YOUR EXTRACTOR
- CONTROL PANEL
- TO SWITCH THE EXTRACTOR LIGHT ON OR OFF
- TO SWITCH ON THE EXTRACTOR, OR CHANGE THE MOTOR SPEED
- TO SWITCH THE EXTRACTOR OFF
- CARE AND MAINTENANCE
- CLEANING
- CLEANING THE (RECTANGULAR) GREASE FILTER
- ACRYLIC GREASE FILTER
- ALUMINIUM GREASE FILTERS
- CHANGING THE (CIRCULAR) CHARCOAL FILTER (RE-CIRCULATING ONLY)
- PLEASE NOTE THE CHARCOAL FILTER CANNOT BE WASHED
- CHANGING THE LIGHT
- DO NOT CHANGE THE LIGHT BULB IMMEDIATELY AFTER USE AS THE BULB WILL BE HOT. ALLOW IT TO COOL BEFORE REMOVING IT
- INSTALLATION REQUIREMENTS
- INSTALLATION PROCEDURE
- MAINS ELECTRICITY CONNECTION
- NOTE: USE A 3A FUSE
- ASSEMBLY AND ELECTRICAL CONNECTION SHOULD BE CARRIED OUT BY COMPETENT PERSONNEL
- IMPORTANT: THIS APPLIANCE IS A CLASS II APPLIANCE (DOUBLE INSULATED) AND IS NOT INTENDED TO BE EARTHED. DO NOT FIT AN EARTH LEAD TO THIS EXTRACTOR
- ELECTRICAL INFORMATION
- TROUBLESHOOTING
- IF YOUR EXTRACTOR IS NOT WORKING
- CONTACT CDA CUSTOMER CARE
- MATRIX
Brand : MATRIX
Model : MIN600SI
Category : Range hood