
PA301 - Telephone NETGEAR - Free user manual and instructions
Find the device manual for free PA301 NETGEAR in PDF.


| Type de produit | VoIP Phone |
| Marque | Netgear |
| Modèle | PA301 |
| Dimensions (L x l x H) | 200 x 180 x 90 mm |
| Poids | 800 g |
| Alimentation | PoE (802.3af) ou adaptateur secteur 5V DC |
| Consommation électrique | 5W max |
| Écran | LCD 2.4 pouces, 320x240 pixels |
| Ports réseau | 2 ports Ethernet 10/100 Mbps (RJ45) |
| Audio | Haut-parleur mains-libres, micro, prise casque 3.5mm |
| Codecs supportés | G.711, G.722, G.729 |
| Fonctions principales | Appels vocaux, conférence à 3, transfert d'appel, mise en attente, répertoire 500 contacts, journal d'appels |
| Protocoles VoIP | SIP (RFC 3261) |
| Sécurité | Chiffrement TLS, SRTP, authentification SIP |
| Montage | Sur bureau (support inclinable) ou mural |
| Température de fonctionnement | 0°C à 40°C |
| Humidité de fonctionnement | 10% à 90% sans condensation |
| Certifications | CE, FCC, RoHS |
| Contenu de l'emballage | Téléphone PA301, câble Ethernet, support, guide de démarrage rapide |
| Garantie | 2 ans |
Frequently Asked Questions - PA301 NETGEAR
User questions about PA301 NETGEAR
0 question about this device. Answer the ones you know or ask your own.
Ask a new question about this device
Download the instructions for your Telephone in PDF format for free! Find your manual PA301 - NETGEAR and take your electronic device back in hand. On this page are published all the documents necessary for the use of your device. PA301 by NETGEAR.
USER MANUAL PA301 NETGEAR
Instructions in this guide are for users of Windows ^® 95 and Windows 98 who are installing the Model PA301 Network Card. For instructions on installing and verifying the Windows network driver, refer to “Install the Network Card” on this page.
The following seven easy steps are provided in this guide for installing your Model PA301 Network Card:
- Verify Package Contents
- Install the Network Card
- Connect the Telephone Cables
- Install the Network Driver
- Install the Model PA301 Software
- Access the Internet
- Access the Network Printers
As a final step, be sure to register your NETGEAR ^™ product at www.NETGEAR.com.

Verify Package Contents
Unpack the package contents and verify that you have the following:
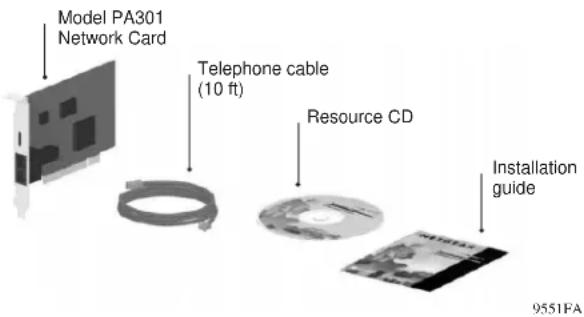
Verify PC Requirements
The instructions given in this guide are for using the NETGEAR ModelPA301 Network Card in a PC that has a Microsoft ^® Windows 95 operating system.

Install the Network Card
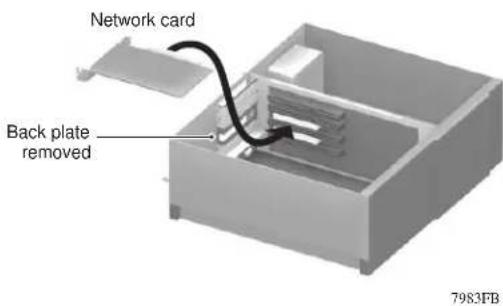

Note: Touch a grounded metal object to free yourself of static electricity before you handle the network card.
- Turn the power off and unplug the power cord from your computer.
- Remove the PC cover.
- Choose an available PCI slot (PCI slots are the shorter slots) and remove the corresponding back plate from the PC chassis.
- Insert the network card into the PCI slot and fasten the card to the computer chassis by tightening the screw that is on the PC.

Note: To avoid damaging any components on the network card, handle it by the edges, using your thumbs to push it securely into the PCI slot. Make sure the network card is fully inserted into the slot to prevent the PC operating system from experiencing problems.
- Replace the PC cover and reconnect the power cord to the PC.

Connect the Telephone Cables
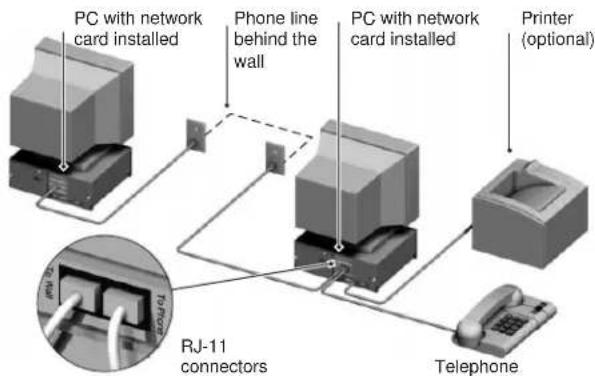
9552FA
Using the telephone cable provided in the NETGEAR package, connect one end of the telephone cable to the port labeled "TO WALL" on the network card and the other end of the cable to an available wall jack, as illustrated above.
Using the cable shipped with your telephone or modem, connect that cable to the port labeled "TO PHONE" on the network card.
If you are using an external analog modem to connect to the Internet, refer to the following illustration that shows the connections for the wall jack, Model PA301 Network card, external modem, and phone. Note that the captions on the modem Card, network card, and modem direct you to the outlets where you connect the cables.
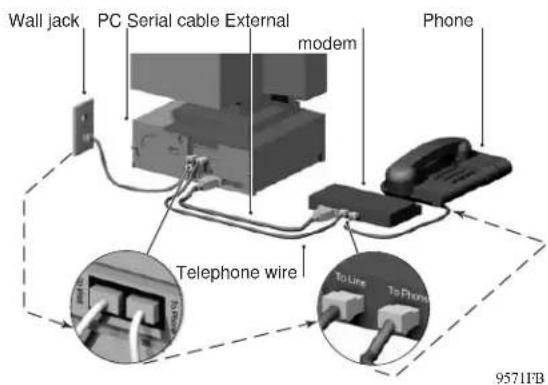
The illustration below depicts the configuration with an internal modem and shows a closeup of the connections for the wall jack, modem card, Model PA301 Network Card, and phone. Note that the caption on the modem card and network card direct you to the outlets where you connect the cable from the wall jack and the cable that connects to the phone.
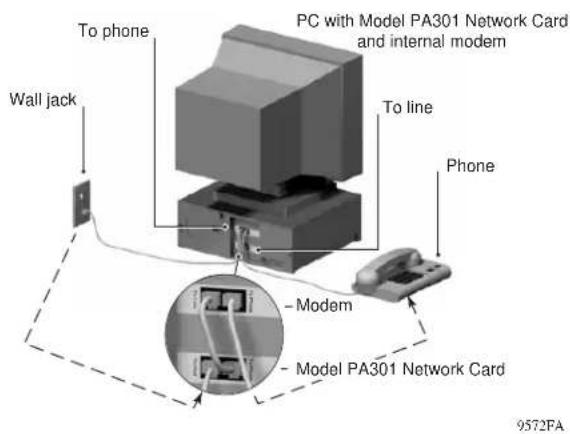

Note: For optimal performance, the Model PA301 Network Card should be plugged directly into a wall jack, and the modem should be plugged directly into the network card.

Install the Network Driver
This guide provides instructions for installing the Windows Network Driver. The steps given are for users of Windows 95. However, because all versions of Windows 95 might not respond the same, windows that are different from those shown in these instructions might open but prompt you for the same information, or windows might open in a different order than shown in these instructions.
If you are using Windows 98, read these instructions thoroughly for an overview of the steps that are necessary for the installation of the software driver. Follow the instructions given by the Windows 98 Installation Wizard to install the driver.

Note: You must install the network card before installing the network driver. You need to have the Windows 95 or Windows 98 CD and the NETGEAR Phoneline10X Resource CD ready to use in the installation process.
If you have not yet named your PC and your network, before you proceed with the installation steps, decide on a name for your network and for each PC. You will be using these names in section 5, “Install the PA301 Software.”

Note: If the “Insert CD” window opens and the “Please insert the CD labeled Windows”...message appears at any time during the installation process, insert the Windows CD and click on OK. Then proceed with the following steps.
1. Turn on the power to the computer and start Windows.
The new hardware is found and the driver is automatically loaded.
2.
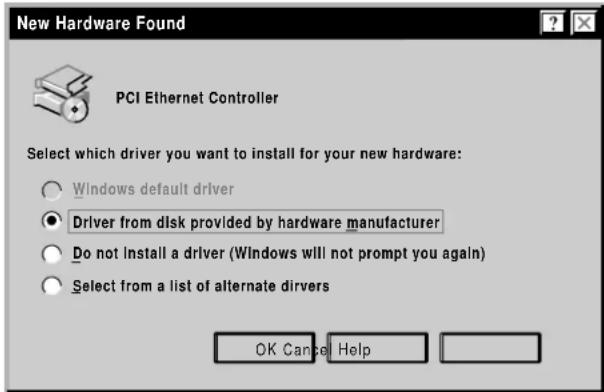
Select “Driver from disk provided by hardware manufacturer,” and click on OK to open the Update Driver Wizard window.
(A New Hardware Found window might open that is different from the one above and prompt you to click on Next to open the Update Driver Wizard window.)
3.
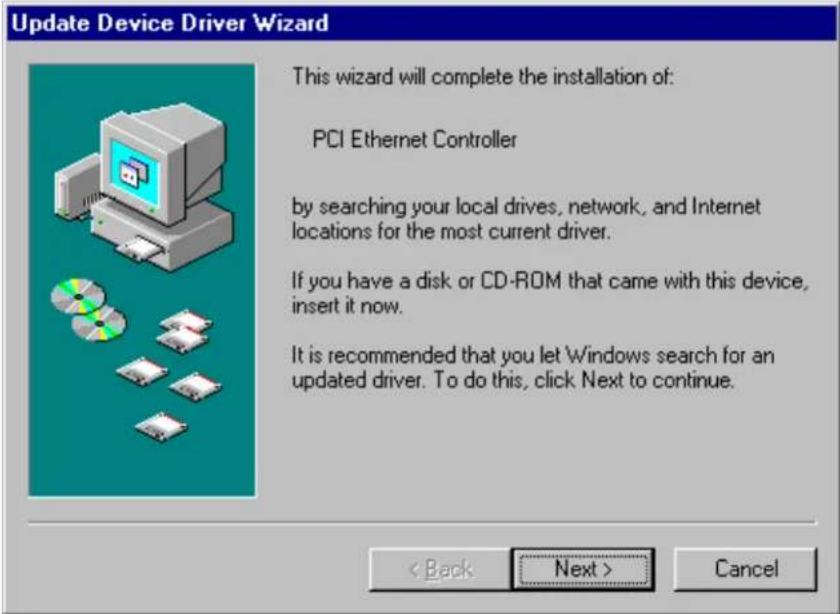
Insert the NETGEAR Phoneline10X Resource CD and click on Next.
4.
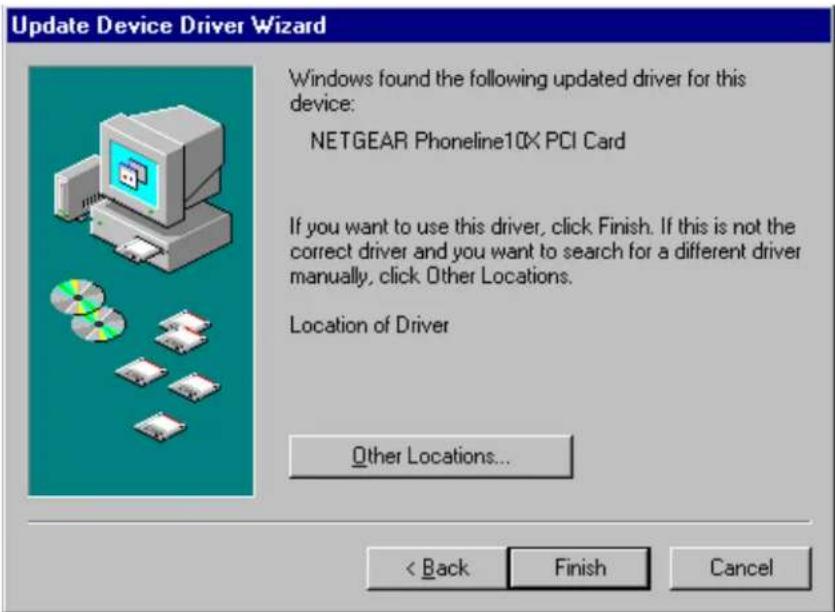
Click on Finish to start copying the drivers.
It may take several minutes for the operating system to complete the driver installation.
- If the following window opens:
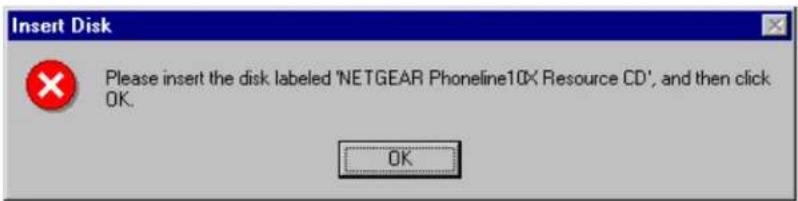
Make sure the NETGEAR Phoneline10X Resource CD is inserted in the CD drive and click on OK to open the following Copying Files window:
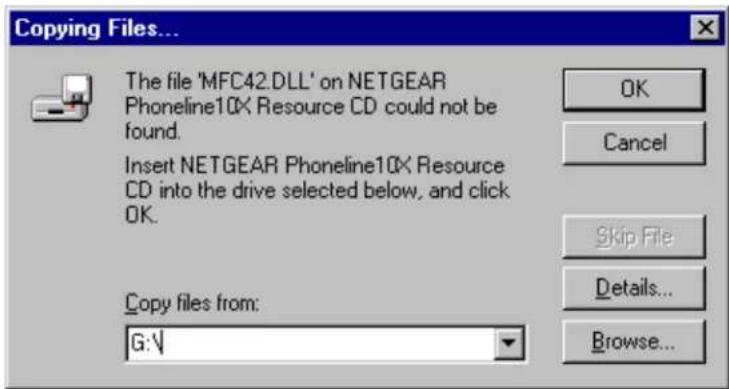
Be sure the destination is typed correctly in the Copy files from entry field to point to the root directory of your CD drive (for example, in the entry field, "G:" represents the CD drive and the backslash () represents the root directory).
Click on OK.
- If the following window opens:
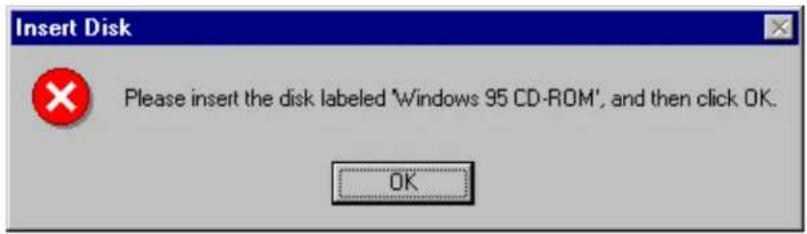
Insert your Windows 95 CD and click on OK.
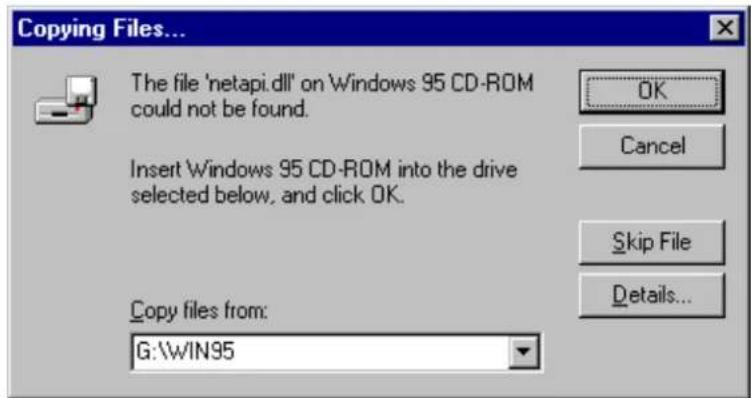
Be sure the destination is typed correctly in the Copy files from entry field to point to the WIN directory of your CD drive (for example, in the entry, field "G:" represents the CD drive and the backslash WIN95 (\WIN95) represents the subdirectory). If you are using Windows 95, type \WIN95 for the subdirectory; if you are using Windows 98, type \WIN98 for the subdirectory.
Click on OK.
5.
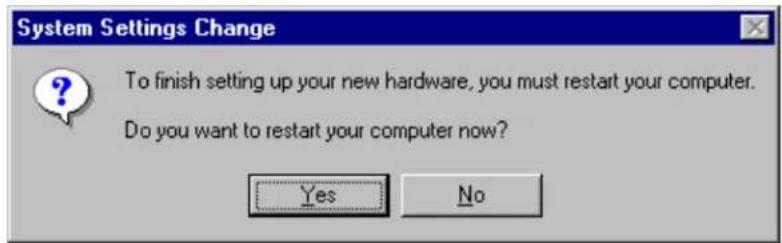
Click on Yes to Restart your PC.
If the System Settings Change window does not open, restart your PC by using the Start menu; select Shut Down, click on Restart your computer, and then click on Yes.

Install the PA301 Software

Note: If you have an Ethernet adapter installed in the same PC, you can use your Ethernet adapter to share your Internet connection. The Ethernet adapter must be connected to a cable modem, ADSL modem, or router. However, if your Ethernet adapter is connected to an Ethernet network instead of a modem or router, you will not be able to share files and printers between the Phoneline network and the Ethernet network.
After the system restarts, be sure that the NETGEAR Phoneline10X Resource CD is inserted in your CD drive.
- From the Start menu, select Run and at the prompt, type the following: G:\setup.exe ("G:" represents the CD drive letter), and click on OK to open the Welcome window.
FirstGear software automatically detects if all the necessary Windows network services are installed. If any of the services are missing, FirstGear installs them automatically. After the services have been installed, the following FirstGear Network Services Installed window opens:
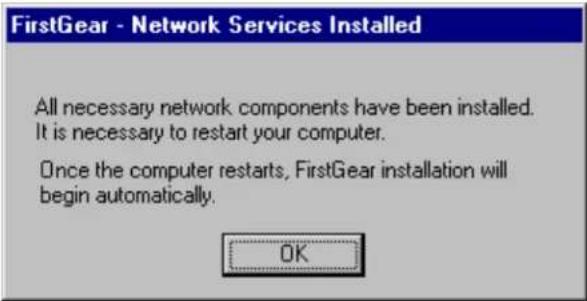
Click on OK to restart your PC.
When the PC restarts, the Welcome page opens.
2.
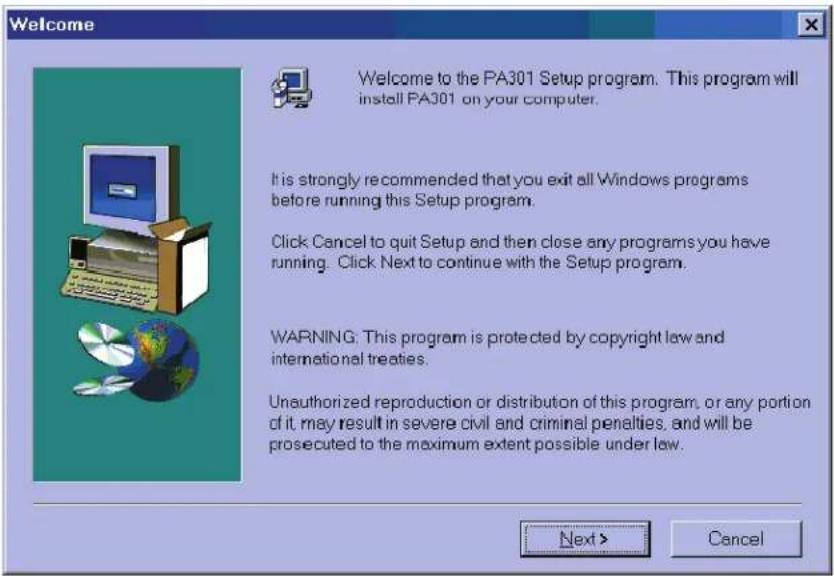
Click on Next to open the Choose Destination Location window.
3.
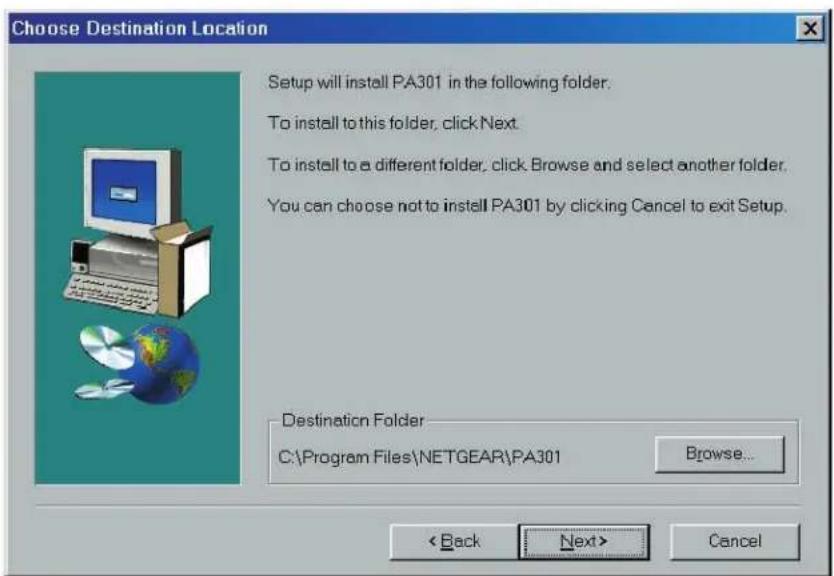
Click on Browse and, if needed, change the destination folder; then click on Next to open the FirstGear - Installation Wizard window.
4.
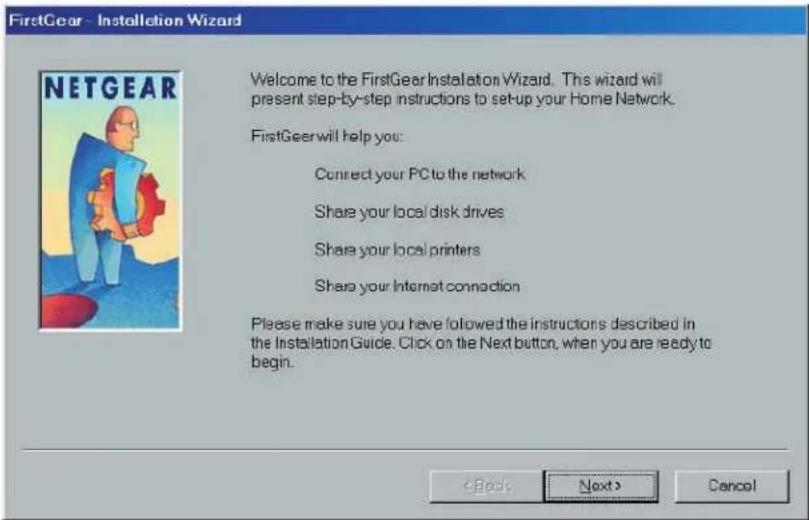
This window introduces the steps you will go through to set up your home network.
Click on Next to open the FirstGear - Computer Name Entry Page window.
5.
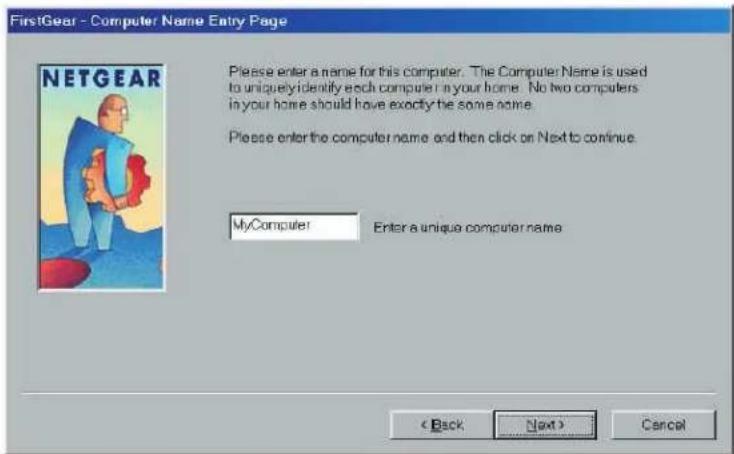

Note: No two PCs in your home should have the same name.
Enter a unique name for your PC, and click on Next to open the FirstGear - Workgroup Entry Page window.
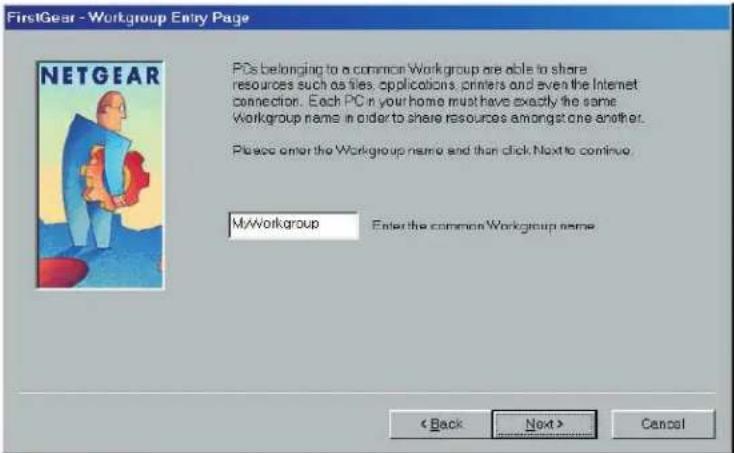

Note: Each PC in your home must have the exact same Workgroup name in order to share resources among the PCs. Write the workgroup name on a sheet of paper to have available when you install FirstGear on all the other PCs in your home to be certain that you input the exact same Workgroup name for each PC.
Enter the workgroup name and click on Next to open the FirstGear - Shared Drives Selection Page window.
6.
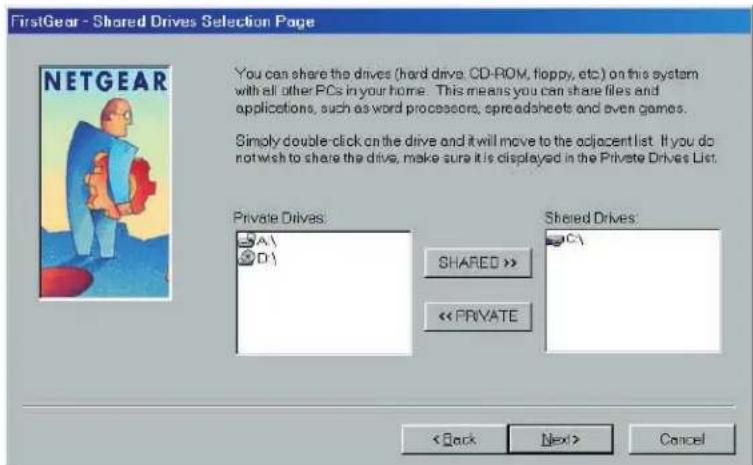
Double-click on the drives you want to share (shown in the field to the left in the window) to move the drives to the Shared Drives field (shown to the right of the window).
- If you do not have any printers installed:
Click on Finish and proceed to section 6, "Access the Internet."
• If you have printers installed:
Click on Next to open the following FirstGear - Shared Printers Selection Page window. Select the printers attached to this PC that you want to share with other PCs in your home.
The PC you are currently configuring must be powered on in order to share the printer with other PCs in your home.
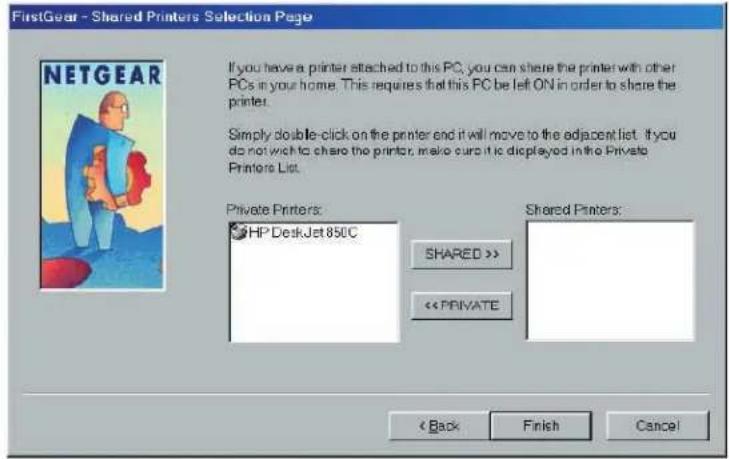
Double-click on the printer you want to share (shown in the field to the left of the window) to move it to the Shared Printers field (shown to the right of the window).
Click on Finish to open the FirstGear - Internet Sharing Page window and proceed to section 6, "Access the Internet."

Access the Internet
If you do not have a modem or Ethernet card installed, proceed to section 7, "Access the Network Printer."

Note: Only one PC in your home can be designated to share the Internet service with all other PCs in your home.
1.
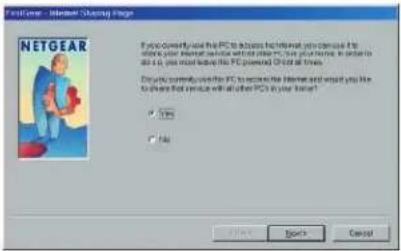
Answer Yes for the one PC connected to a modem or router that can be used for Internet access. For all other PCs in your home, answer No. The default setting is No.

Note: You will need to have the PC that has a router or an analog, cable, or ADSL modem attached to it powered on in order for the other PCs to use the Internet.
If you select No and click on Next, you will be asked to reboot the system. If this is the case, you are finished with the FirstGear Internet-sharing installation. Complete sections 1 through 6 for all other PCs in your home, and then proceed to section 7 to enable the other PCs in your home to access the shared printers.
If you select yes and click on Next, the FirstGear - Share The Internet window opens.
2.
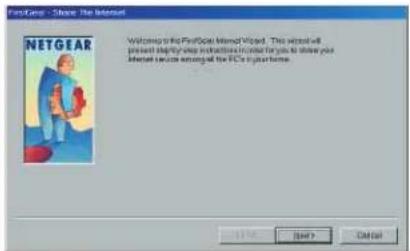
Click on Next to open the FirstGear - Ethernet Card Detected window.

Note: If you do not have an Ethernet card installed in your PC, the FirstGear - Ethernet Card Detected window does not appear. Proceed to step 5, in this section.
3.
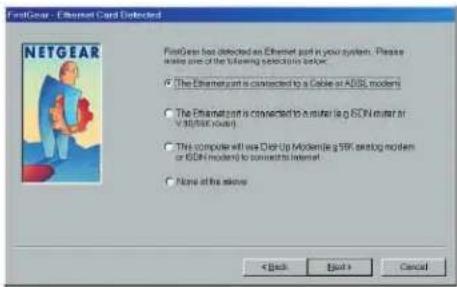
Select the connection you have and click on Next to open the FirstGear - Warning window.
4.
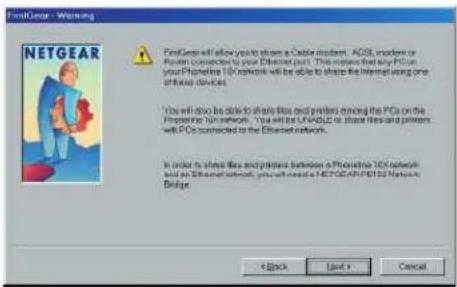
If you selected Dial-Up Modem, click on Next to open the FirstGear - Share the Internet window.
If you don't have the Internet Dial-up Connection, FirstGear completed the installation and you are prompted to restart your computer. Proceed to section 7.
5.
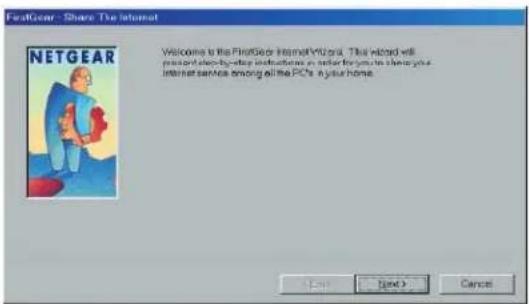
Click on Next to open the FirstGear - Choose Default Phone Entry window.
6.
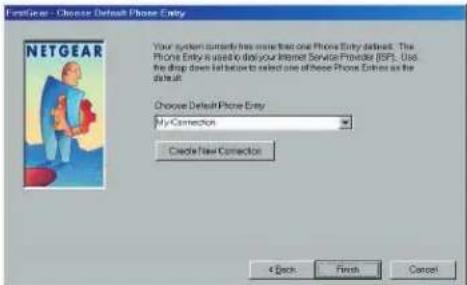
The Choose Default Phone Entry field has a drop-down menu. From this menu, choose the ISP connection you want to share with the other PCs in your home. Click on Finish.

Note: If you have only one connection set up, the Choose Default Phone Entry window will not appear.
The Restarting Windows window opens.
Select Yes to restart your PC, and click on OK.

Access the Network Printers
Follow the instructions in this section after your network is installed. Be sure the PC attached to your shared printer is powered on.
- For each PC that is to make use of the shared printer, double-click on the Add Network Printer icon on your desktop to open the Install Network Printer window.
2.
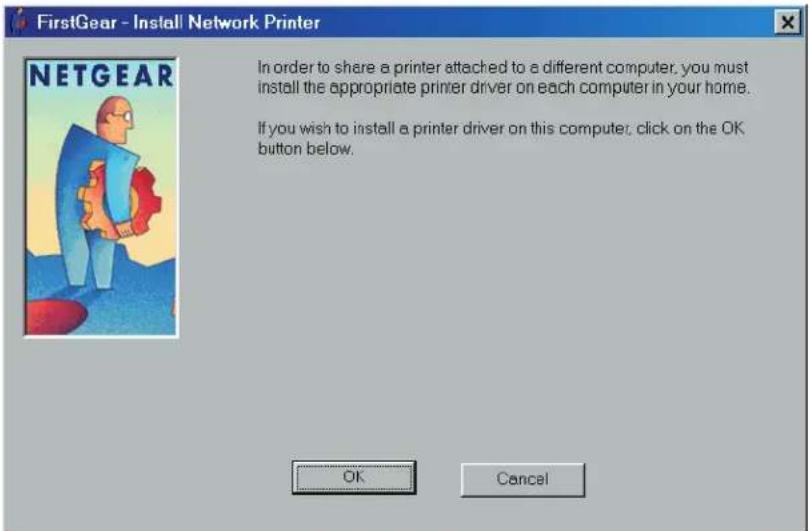
Click on OK to open the Browse for Printer window.
3.
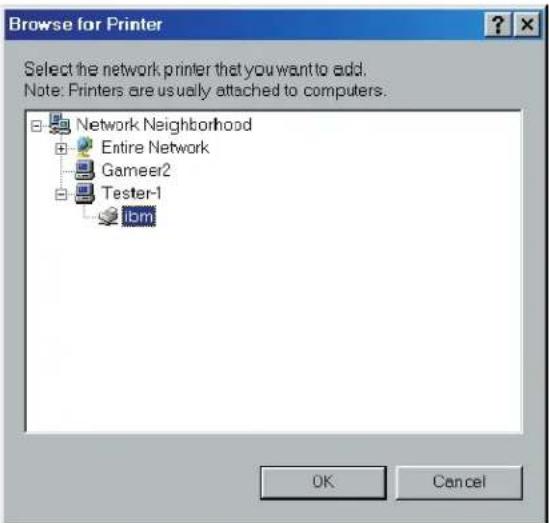
Choose the PC that you set up earlier to share printers.
-
Select a network printer.
-
Follow the instructions in the subsequent Window screens.

Technical Specifications
| Model PA301 Network Card | |
| Standards Compatibility | Compatible with HPNA 1.0 and HPNA 2.0Supports Microsoft Windows 95 and Windows 98PCI 2.2 Plug-and-Play compatible |
| DC operating voltage | +5V + / - 5% @ 400 mA maximum |
| Physical Specifications | |
| Dimensions 4.75 x 2.875 in. (12 x 7.1 cm.) | |
| Weight 0.22 lb (100g) | |
| Environmental Specifications | |
| Operating temperature 0 | ° to 55°C |
| Operating humidity 10% to 90% noncondensing | |
| Agency Compliance | FCC, Part 15, Class B, Part 68 |
| Interface Options | Dual RJ-11 connector for connecting telephones and PCs |
| LEDs | 1 green (ACT) Activity LED1 green LINK LED |
© 2000 by NETGEAR, Inc. All rights reserved.
Trademarks
NETGEAR ^™ is a trademark of NETGEAR, Inc. Windows ^® is a registered trademark of Microsoft Corporation. Other brand and product names are trademarks or registered trademarks of their respective holders. Information is subject to change without notice.
Statement of Conditions
In the interest of improving internal design, operational function, and/or reliability, NETGEAR reserves the right to make changes to the products described in this document without notice. NETGEAR does not assume any liability that may occur due to the use or application of the product(s) or circuit layout(s) described herein.
Federal Communications Commission (FCC) Compliance Notice: Radio Frequency Notice
Note: Modifications to this device change it from the original state it was in when tested and may alter the device so that it no longer complies with FCC testing limitations for Class B digital devices. According to FCC regulations, the user could be prohibited from operating this equipment if it is modified.
This device complies with Part 15 of the FCC Rules. Operation is subject to the following two conditions:
- This device may not cause harmful interference.
- This device must accept any interference received, including interference that may cause undesired operation.
Declaration of Conformity
NETGEAR Model PA301 Network Card

Tested to comply with FCC Standards
FOR HOME OR OFFICE USE
Note: This equipment has been tested and found to comply with the limits for a Class B digital device, pursuant to Part 15 of the FCC Rules.
These limits are designed to provide reasonable protection against harmful interference in a residential installation. This equipment generates, uses, and can radiate radio frequency energy and, if not installed and used in accordance with the instructions, may cause harmful interference to radio communications. However, there is no guarantee that interference will not occur in a particular installation. If this equipment does cause harmful interference to radio or television reception, which can be determined by turning the equipment off and on, the user is encouraged to try to correct the interference by one or more of the following measures:
- Reorient or relocate the receiving antenna.
- Increase the separation between the equipment and receiver.
- Connect the equipment into an outlet on a circuit different from that to which the receiver is connected.
- Consult the dealer or an experienced radio/TV technician for help.
This device complies with Part 68 of the FCC Rules. All direct connections to telephone network lines must be made using standard plugs and jacks compliant with FCC Part 68.

Support Information
Defective or Damaged Merchandise
Defective or damaged merchandise can be returned to your point-of-purchase representative.
Internet/World Wide Web
To get product support, to register your product online, or to obtain product information and NETGEAR product documentation, direct your Web browser to:
http://www.NETGEAR.com
Customer Support
You can contact Customer Support at the following toll free numbers:
Australia 1800-787-638 Korea 00308-11-0319
Austria 00800-06384327 Netherlands 0800-023-0981
(00800-0-NETGEAR) New Zealand 00800-1233-4566
Denmark 808-82179 Norway 800-12041
Canada 1-888-NETGEAR Singapore 001-800-1233-4566
Finland 0800-111-036 Sweden 0200-298-298
France 0800-77-17-53 Switzerland 00800-0638-4327
Germany 00800-06384327 (00800-0-NETGEAR) United Kingdom 020-7216-0014
Hong Kong 001-800-1233-4566 United States 1-888-NETGEAR
Japan 0120-66-5402 All Other Countries +1 801-236-8499
(00800-0-NETGEAR)
NETGEAR
NETGEAR, Inc.
4500 Great America Parkway
Santa Clara, CA 95054
USA
Phone: 1-888-NETGEAR
E-mail: support@NETGEAR.com
http://www.NETGEAR.com


- Verify Package Contents
- Verify PC Requirements
- Install the Network Card
- Connect the Telephone Cables
- Install the Network Driver
- Turn on the power to the computer and start Windows.
- Install the PA301 Software
- Access the Internet
- Access the Network Printers
- Technical Specifications
- Trademarks
- Statement of Conditions
- Federal Communications Commission (FCC) Compliance Notice: Radio Frequency Notice
- Declaration of Conformity
- Support Information
- Defective or Damaged Merchandise
- Internet/World Wide Web
- Customer Support
- NETGEAR
Brand : NETGEAR
Model : PA301
Category : Telephone