CD9959 - CD Player ROBERTS - Free user manual and instructions
Find the device manual for free CD9959 ROBERTS in PDF.


| Product Type | CD Player |
| Brand | Roberts |
| Model | CD9959 |
| Dimensions (W x H x D) | Approx. 430 x 100 x 300 mm |
| Weight | Approx. 3.6 kg |
| Power Supply | AC 230V, 50Hz |
| Power Consumption | 15 W |
| Supported Disc Types | CD, CD-R, CD-RW |
| Playback Functions | Program, Repeat, Random, Intro Scan |
| Outputs | Headphone (3.5mm), RCA (L/R) |
| Audio Output Level | 2V RMS (RCA) |
| Frequency Response | 20 Hz – 20 kHz |
| Signal-to-Noise Ratio | >90 dB |
| Harmonic Distortion | <0.05% |
| Cleaning Instructions | Clean lens with soft cloth; avoid solvents |
| Safety Precautions | Do not expose to moisture; use only supplied AC cord |
| Spare Parts Availability | Contact Roberts service center |
| Reparability | Refer to authorized repair centers |
Frequently Asked Questions - CD9959 ROBERTS
User questions about CD9959 ROBERTS
0 question about this device. Answer the ones you know or ask your own.
Ask a new question about this device
Download the instructions for your CD Player in PDF format for free! Find your manual CD9959 - ROBERTS and take your electronic device back in hand. On this page are published all the documents necessary for the use of your device. CD9959 by ROBERTS.
USER MANUAL CD9959 ROBERTS
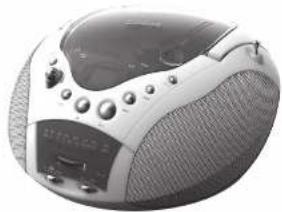
CD radio, mains lead, quick start guide and safety/warranty leaflet.
Features
- MW / FM stereo wavebands - 20 track programmable CD
• CD repeat play
- Deep bass boost
- Dial tuning system - Headphone socket
+ AC mains socket
- Batteries E x LR14 / C size (not included)
Controls
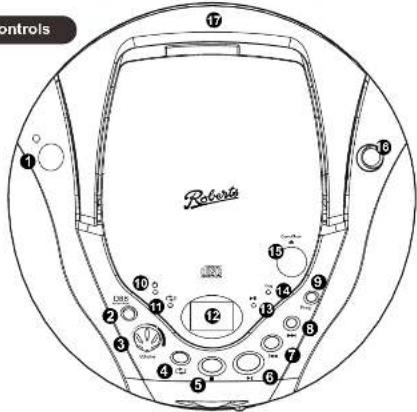
1 Headphone socket
2 Deep base boost button
3 Volume control
4 Repeat butto
5 Stop button
6 Play / Pause button
7 Previous track button
8 Next track button
9 Program bull
10 On indicator
- Repeat indicator
12 LED display
- Play / Pause indicator
14 Program indicator
15 Open / close button
16 Talascopic aerial
17 Handle
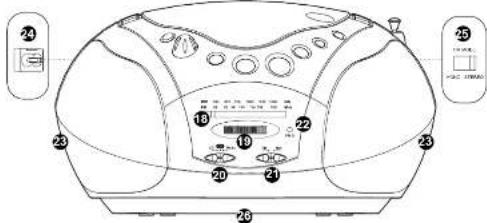
18 Dial scale
19 Tuning control
20 Function switch
21 Waveband switch
-
EM Storage indicator
-
Loudspeakers x 2
-
Meigs power socket
-
EM more switch
-
Battery compartment (uniscount)
STEP 1 - Plug in & play FM radio
A - Connect to the mains
Please read the safety leaflet provided before connecting your CD radio to the mains.
1 Place your CD radio on a flat surface
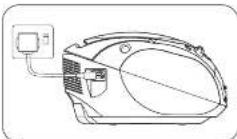
2 Plug the mains lead into the mains power socket (located towards the rear of the unit) ensuring that the plug is pushed fully into the socket.
3 Plug the other end of the main lead into a well socket and switch on the socket.
B - Switch on your CD radio
1 Carefully, fully extend the telescopic aerial
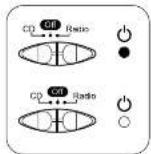
2. Switch on your CD radio by sliding the Function switch to the 'Radio' position. The On indicator will light.
- If you wish to switch off your CD radio, slide the Function switch to the Off position. The On indicator will go out.
C - Play FM radio
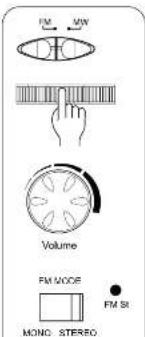
1 Side the Waveband switch to the FM position.
2 Rotate the Tuning control to tune to the desired station. The station frequency is indicated in the dial scale.
3 Rotate the Volume control to select the required level
4 To receive stereo broadcasts set the FM Mode switch (located on the right hand side of your CD radio) to the 'STEREO' position. The FM stereo indicator will light.
5 If the station being received is weak some hiss may be audible, to reduce the hiss set the FM Mode switch to the 'MONO' position to return to mono operation.
6. Press the Deep bass boost button to activate the bass boost. Press the button again to deactivate base boost.
- It is recommended that the FM band be used wherever possible as better results in terms of quality and freedom from interference will usually be obtained than on the MW band.
STEP 2 - Play MW radio
Play MW radio
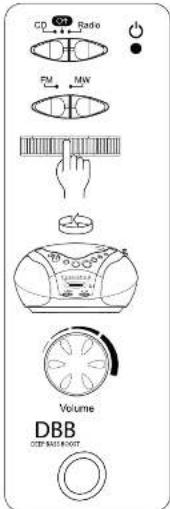
- Switch on your CD radio by siding the Function switch to the 'Radio' position. The On Indicator will light.
2 Slide the Waveband switch to the MW position.
3 Rotate the Tuning control to tune to the desired station. The station frequency is indicated in the dial scale.
For MW reception there is a built-in ferrite aerial. Rotate the GD radio to the position giving best reception - Rotate the Volume control to select the required level.
5 Press the Deep bass boost button to activate the bass boost. Press the button again to deactivate bass boost
6 To switch off your CD radio, side the Function switch to the Off position. The On Indicator will go out. - It is recommended that the FM band be used wherever possible as better results in terms of quality and freedom from interference will usually be obtained than on the MW band.
STEP 3 - Play CD-R / CD-RW discs
Use only Digital Audio CDs which have the symbol.

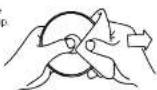
Never write on a CD or attach any sticker to the CD. Always hold the CD at the edge and store it in its box after use with the label facing up.
To remove dust and dirt, breathe on the CD and wipe it with a soft, lint-free cloth in a straight line from the centre towards the edge.
Cleaning agents may damage the CD.
Do not expose the CD to rain, moisture, sand, or to excessive heat, (e.g. from heating equipment or in motor cars parked in the sun).
CD-R / CD-RW discs
Your CD radio can playback CD-DA format audio CD-RGD-RW discs that have been finalised* upon completion of recording.
Your CD radio may fail to playback some CD-R/CD-RW discs due to poor recording of the CD-R/CD-RW disc.
*Financing enables a CD-R/CD-R/W disc to playback on audio CD players such as your CD radio.
Note: If the unit is in the CD stop mode position for more than 15 minutes it will automatically switch to the standby mode. The operation indicator and the display will go off in such a case. To use the unit again slide the function switch to "Off" for a few seconds and then back to the CD setting.
For operation of your GD radio please sea overleaf.
continued overical...
Step 3 cont. - Play CD / CD-RW discs
Other information
A - Inserting a CD
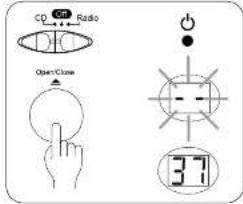
- Set the Function switch to 'CD'. The On Indicator will light up and '-' will flash on the display.
2 To open the CD compartment, push the Open / Close button on the CD door.
3 Press the CD onto the spindle until it clicks into place. Close the CD door. The CD player will scan the contents of the CD and the total number of tracks will appear on the display.
4 If the Function switch is set to CD and a CD is not inserted the display will show no
CLASS 1 LASER PRODUCT means that the laser's construction makes it inherently safe so that: the legally prescribed maximum permissible radiation values can never be exceeded. Caution: Using any equipment or devices other than those described and specified in these operating instructions, or tampering with the unit in any way can result in dangerous exposure to radiation.
B - Playing a CD

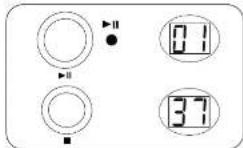
1 Press the Play / Pause button to start playback. The Play / Pause Indicator will light up and the display will show the track number.
2 Set the Volume control to the required setting. Press the Deep bass boost button to activate the Bass boost system if desired.
3. To pause playback press the Play / Pause button. The track number and the Play / Pause indicator will flash. To resume playback press the Play / Pause button again.
4 To stop playback, press the Stop button. The total number of tracks will appear on the display.
6. To take out the CD, press the Open / Close button on the CD door to open the door. Note: The CD door should only be opened when the CD is in Stop mode.
C - Selecting a track
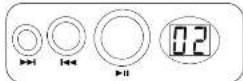
1 What the CO is playing, press either the Next or Previous track buttons to change to the desired track.
2 You can also skip tracks when the player is in stop mode. Skip to the desired track using the Next or Previous track buttons. Press and hold the button to make the track numbers cycle, release the button when the desired track number is displayed.
2 Press the Play / Pause button to play the selected track.
4 Whist the CD is playing press and hold down either the Next or Previous track buttons.
5 Release the button when the desired part of the track is reached.
CD Repeat mode
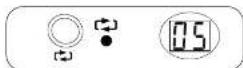
1 Whilst the CD is playing press the Repeat button once to reveal the current track. The Repeat Indicator will flash
2 Press the Repeat button again to repeat all tracks on the CD. The Repeat Indicator will light up.
3 Press the Repeat button again to return to normal play. The Repeat indicator will switch off.
Programmed play
By programming the player you can play up to 20 tracks in any desired order.
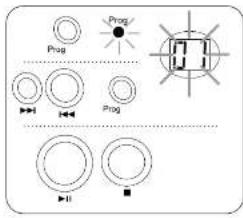
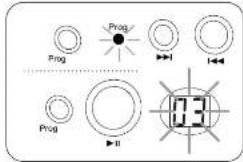
1 Whist the CD is in Stop mode, press the Program button. The display will flash '01' once before flashing '38'. The Program Indicator will 1ash
2 Select the first track using the Next or Previous track buttons. The track number will flash on the display. Store this track by pressing the Program button. The display will flash the next counter number (CZ) once before flashing 30'.
3 Repeat the above steps until you have completed your program (maximum 20 tracks). Press the Play/Pause button to commence play of the selected tracks.
4 To stop the program press the Stop button. The display will show the total number of tracks. To assume program play press the Program button, the display will flash the program counter number ('03') once before flashing the programmed track number.
Editing a programme
1 Whist the CD is in Stop mode, repeatedly press the Program button to step through the tracks programmed until you find the desired counter number. The display will flash the counter number ('03') once before flashing '00'. The Program indicator will flash
2 Select a new track using the Next or Previous track buttons. The track number will flash on the display. Store this track by pressing the Program button. The display will flash the selected track number. The new track has been stored in the program. Press Play/Pause to play the revised program tracks.
Check a programme
1 Whilst the CD is in Stop mode, repeatedly press the Program button to stop through the tracks programmed. The display will fetch each programmed track number sequence.
Erase a programme
1 Whilst the CD is in Stop mode, open the CD door to erase the programme. Programmes are also erased by changing position of the Function switch to the 'Off' or 'Radio' position.
Battery operation
Please read the safety leaflet provided before using batteries.
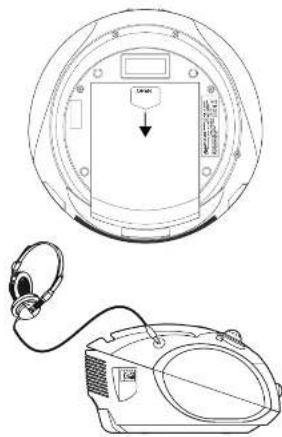
1 Slide the battery cover catch in the direction of the arrow. Open the battery cover.
2 Fit six LR14 (C size) batteries into the spaces in the compartment. Take care to ensure all batteries are inserted with the correct polarity as shown on the outside of the battery compartment. Replace the battery cover.
3. Reduced power distortion and a stuttering sound are all signs that the batteries may need replacing. If the unit is not to be used for any extended period of time, it is recommended that the batteries are removed.
We would recommend for economy that the CD9598 is used on the mains whenever possible with battery operation for occasional or stand-by use only.
IMPORTANT: Danger of explosion if batteries are incorrectly replaced. Replace batteries only with the same or equivalent type.
Headphone socket
A 3.5mm Headphone socket is provided for use with headphones. Inserting a plug automatically mutes the internal loudspeakers.
Please be aware that the sensitivity of headphones can vary widely. We therefore recommend setting the volume to a low level before connecting headphones.
natural_image
Technical line drawing of a circular device with a labeled component and a separate photo of a handheld device (no text or symbols present)
Stereo CD radio
natural_image
Close-up of a portable electronic device with sound waves and control knobs (no visible text or symbols)Please read this guide and the safety/warranty booklet before use
Specifications
Power requirements
Mains 230V \~ 50Hz only
Batteries 6 x LR14 / C size (not included)
Battery life Up to 16 hours depending on operating mode.
Circuit features
Headphone socket 3.5mm dia.
Aerial system FM Telescopic aerial
MW Built-in Ferrite serial
Frequency coverage FM 67-108.5MHz, MW 513-1629kHz
Product markings
\~ This symbol indicates AC voltage.
This symbol indicates DC voltage.
The name plate is located on the underside of the unit.
The company reserves the right to amend the specification without notice.
ROBERTS RADIO LIMITED
Issue 1a
2020-12-11
www.mhartaradio.com
© 2020 Roberts Radio Limited

- Features
- STEP 1 - Plug in & play FM radio
- A - Connect to the mains
- B - Switch on your CD radio
- C - Play FM radio
- STEP 2 - Play MW radio
- Play MW radio
- STEP 3 - Play CD-R / CD-RW discs
- CD-R / CD-RW discs
- Step 3 cont. - Play CD / CD-RW discs
- Other information
- A - Inserting a CD
- B - Playing a CD
- C - Selecting a track
- CD Repeat mode
- Programmed play
- Editing a programme
- Check a programme
- Erase a programme
- Battery operation
- Headphone socket
- Specifications
- Circuit features
- Product markings
- ROBERTS RADIO LIMITED
Brand : ROBERTS
Model : CD9959
Category : CD Player