
PTO169 - Oven Premium - Free user manual and instructions
Find the device manual for free PTO169 Premium in PDF.


| Product Type | Built-in Electric Oven |
| Brand | Premium |
| Model | PTO169 |
| Dimensions (H x W x D) | 59.5 cm x 59.5 cm x 54.5 cm |
| Weight | Approx. 30 kg |
| Power Supply | 220-240 V, 50/60 Hz, 16 A |
| Oven Capacity | 70 Liters |
| Energy Efficiency Class | A+ |
| Main Functions | Bake, Grill, Convection, Defrost, Pizza Mode |
| Temperature Range | 50°C - 250°C |
| Control Type | Rotary knobs with digital display |
| Interior Material | Easy-clean enamel |
| Number of Oven Shelves | 2 |
| Grill Type | Infrared grill with variable temperature control |
| Cooling System | CoolTouch door with forced air cooling |
| Child Lock | Yes, electronic lock |
| Pyrolytic Self-Cleaning | No, manual cleaning recommended |
| Spare Parts Availability | Heating elements, thermostat, door gasket, shelves |
| Repair Index (France) | 8.5 / 10 |
| Warranty | 2 years |
| Included Accessories | 2 wire shelves, 1 baking tray, instruction manual |
Frequently Asked Questions - PTO169 Premium
User questions about PTO169 Premium
0 question about this device. Answer the ones you know or ask your own.
Ask a new question about this device
Download the instructions for your Oven in PDF format for free! Find your manual PTO169 - Premium and take your electronic device back in hand. On this page are published all the documents necessary for the use of your device. PTO169 by Premium.
USER MANUAL PTO169 Premium
natural_image
Exterior view of a modern electric toaster with a baked die on the front (no visible text or symbols)This product is for domestic use only
Use & Care Manual
Important Safeguards
IMPORTANT SAFEGUARDS
When using electrical appliances, basic safety precautions should always be followed, including the following:
- Read all instructions.
2.Do not touch hot surfaces. Use handles or knobs.
-
To protect against risk of electrical shock, do not immerse cord, plug, or any non-removable parts of this oven in water or other liquid.
-
Close supervision is necessary when any appliance is used by or near children.
-
Unplug from outlet when not in use and before cleaning. Allow to cool before putting on or taking off parts.
-
Do not use outdoors.
-
Do not let cord hang over edge of table or counter, or touch hot surfaces.
-
Extreme caution must be used when moving an appliance containing hot oil or other hot liquid.
-
Do not place on or near a hot gas or electrical burner, or in a heated oven.
-
Turn all controls to "OFF" before inserting or removing plug from wall outlet.
-
Do not place any of the following materials in the oven: paper, cardboard, plastic wrap, and the like.
-
To disconnect, grasp plug and remove from outlet. Do not pull by the cord.
-
Do not use oven for other than intended use.
-
Oversize foods or metal utensils must not be inserted in this appliance, as they may create a fire or risk of electric shock.
-
A fire may occur if the toaster oven is covered or touching flammable material including curtains, draperies, walls and the like, when in operation. Do not store any item on top of unit when in operation.
-
Do not store any material, other than manufacturer's recommended accessories, in this oven when not in use.
-
Do not clean with metal scouring pads. Pieces can break off the pad and touch electrical parts resulting in a risk of electric shock.
-
Extreme caution should be used when using containers constructed of other than metal or glass.
-
Do not cover crumb tray or any parts of the oven with metal foil. This will cause overheating of the oven.
If this product is mounted under a cabinet:
- To reduce the risk of fire, do not place any heating or cooking appliance beneath the appliance.
- To reduce the risk of fire, do not mount unit over or near any portion of a heating or cooking appliance.
- To reduce the risk of electric shock, do not mount over a sink.
-To reduce the risk of fire, do not store anything directly on top of the appliance surface when the appliance is in operation.
- If the supply cord is damaged, it must be replaced by the manufacturer or its service agent or a similarly qualified person in order to avoid a hazard.
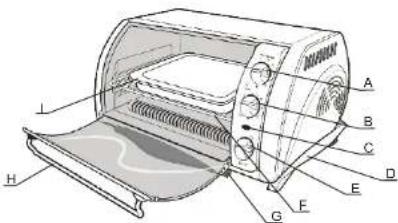
A. Toast/Bake/Broil temperature control
B. 30-minute bake timer
C. On indicator light
D. Side handle
E. 6-minute timer
F. Slide rack
G. Slide - out crumb tray
H. Door handle
I. Bake pan
GETTING TO KNOW YOUR
TOASTER OVEN/BROILER(Continued) CONTROL PANEL

Please familiarize yourself with the toaster oven control panel, oven functions and accessories prior to the first use:
Bake/Broil Temperature Control Dial: Choose the desired or recommended FUNCTION from Broil, Bake, Toast.
Toast Color Dial:
For Toasting: Set the Toast Color Dial as desired. For best results, select the medium setting for your first cycle, then adjust lighter or darker to suit your taste.
For Baking: Turn the Bake/Broil
Temperature Control Dial and Bake timer to the desired setting.
For Broiling: Turn the Temperature Control Knob Dial to Broil. And turn the Bake timer to desired setting.
When the time has elapsed or the knob is manually turned to the "0" position, a bell will sound and the Oven will automatically shut off.
"On" Indicator Light : Illuminate when the oven is on.
Slide Rack: Used for toasting, broiling, and Baking.
Bake Pan: When using, place it on the Slide Rack.
Slide Out Crumb Tray: Slide it out for cleaning.
Broil Rack: Used for broiling.
How to Use
This product is for household use only.
Getting Started:
- Wash all parts as instructed in the Care and Cleaning section.
- Insert the crumb tray underneath the bottom heating elements.
- Plug the unit into a standard outlet.
For Toasting:
- Insert the slide rack in the rackslot.
It is not necessary to preheat the oven for toasting.


natural_image
Line drawing of a toaster oven with lid removed, showing open lid and tray (no text or symbols)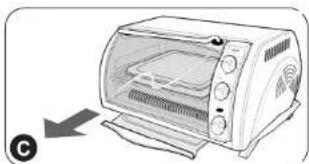
natural_image
Illustration of a toaster oven with a right-hand rule arrow (no text or symbols on the device itself)Cable Eléctrico
- Set the toast browning control as desired(A). For best results, select the medium setting for your first cycle, then adjust lighter or darker to suit your taste.
- Turn temperature control to TOAST setting. The "On" Indicator Light will come on and stay on during the toasting cycle. When toasting is done, you hear a bell sound. The on indicator light goes out.
- To stop toasting at any time, open the Oven door. The heating element and the on indicator light go out.
- Turn the toast browning control to OFF.
- Using an oven mitt or pot holder, open the door and slide out the slide rack to remove food.
Caution: The Oven is hot. Do not let your skin touch any surface.
TOASTER GUIDE
BREAD (4 SLICES)
| Position | Bread Shade grade | Toast Time |
| DARK | 7 G ra de | 6 m in |
| MIDDLE | 5 G ra de | 4 m in~5 min |
| Light | 3 Grade | 2 min~3 min |
Baking:
- Place bake pan, containing food to be cooked, on the slide rack.
- Consult the Baking/Broiling Chart below for the type of food you want to cook.
- Turn the temperature control to the desired temperature setting.
- Turn the bake timer control to the desired number of minutes.
Note: For best results, always preheat the Oven for 5 minutes. - The upper and lower heating elements will cycle on and off to maintain the temperature. To stop cooking, open the oven door. To continue operating, close the door. Check food for doneness at minimum time.
- When finished baking, turn the temperature control to the Off.
- Using an oven mitt or pot holder, open the door and slide out the slide rack to remove the bake pen.
Caution: The oven is hot. Do no let you skin touch any surface.
BAKING GUIDE
Note: When BAKING foods, place Bake Pan on the Slide Rack. Preheat oven for 5 minutes before placing food in Oven. Use recommended times as a guide.
| FOOD | AMOUNT | TEMP/TIME PROCEDURE | |
| Chicken | to fit Bake Pan | 200°C 40-50 min | Arrange in Bake Pan and place on top of Slide Rack. Bake until chicken registers 50C on meat thermometer. |
| to fit Bake Pan | Ate and Arrange in Bake Pan and place on top of Slide Rack. Bake until done as desired. | ||
| Cookies | 6-8 cookies | follow package | Arrange in Bake Pan and place on top Slide Rack. Bake until done and browned as desired. |
| Biscuits | to fit Bake Pan | follow package | Arrange in Bake Pan and place on top Slide Rack. Bake until done and browned as desired. |
| Potatoes | 1-6 mediumm potatoes | 200°C 1-1 hr | Wash and pierce potatoes. Place directly on Slide Rack. |
| Onion rings | single layer to fit Bake Pan | t200°C follow package | Turn once during baking. Check frequently to prevent over browning |
| Pizza | 200C follow package | Place pizza directly on Slide Rack Check frequently to prevent over browning. | |
NOTE: If the power supply cord is damaged, it must be replaced by service agent or a similarly qualified person in order to avoid a hazard.
natural_image
Exterior view of a modern sit-up electric toaster oven (no text or symbols visible)Partes internas
- Place the bake pan both on the slide rack.
- Use the chart below as a guide to cooking times.
Check food for doneness at minimum cooking time. - When finished broiling, Using an oven mitt or pot holder, slide out slide rack to remove bake pan.
- Turn the temperature control to broil and the 30-minute bake timer control to on. The oven does not need to be preheated for broiling.
- To stop cooking, open the door. Check food for doneness at minimum cooking time.
Note: The oven is hot. Do no let you skin touch any surface. - Turn temperature control to OFF and 30-minute bake timer to 0(off).
BROILING/BAKING GUIDE
BROILING GUIDE
NOTE: When BROILING foods, Always preheat for 5 minutes before cooking/baking, and slide Bake Pan under Slide Rack and use uppermost rack position. Turn Bake/Broil Temperate; Dial to BROIL. Do not preheat. Broiling times are approximate. Do not under cook ground beef, fish or poultry. Check for desired doneness on steaks.
| FOOD | AMOUNT | TIME | PROCEDURE |
| Chicken | 35-45 min | Agrape pieces skin-side down;turn after 20-25 min. Continuebroiling until 70C on meatthermometer, or juices run clear. | |
| 1-8 frankfurters | Frankfurters | For uniform browning, turnfrequently. | |
| Hamburgers | 1-6 (1/4 lb.each) | 25-35 min | Turn after 15 minutes; continuebroiling until 60C on meatthermometer, or done asdesired. |
| 1-2 (3/4-inch thick) | Breadsteaks | Turn after 15 minutes; continuebroiling until 70C on meatthermometer. | |
| Pork chops | 1-6 (3/4-inch thick) | 30-40 min | Turn after 20 minutes; continuebroiling until 70C on meatthermometer. |
| Fish steaks | 1-6 (1 inch thick) | 25 min | Turn after 10 minutes;continue broiling until fishflakes easily with a fork. |
| Open-facedcheese sandwich | 7-10 min | Fracierspier sandwich,toast bread first. Top breadwith sliced cheese. Broiluntil cheese is melted. |
Care and Cleaning
IMPORTANT: Before cleaning any part, be sure the Oven is off, unplugged, and cool. Always dry parts thoroughly before using oven after cleaning.
- Clean the Glass Door with a nylon pad and sudsy water. Do not use a spray glass cleaner.
- To remove the Slide Rack, open the door, pull the rack forward and out. Wash the Slide Rack in hot, sudsy water or in a dishwasher. To remove stubborn spots, use a polyester or nylon pad. To replace the Slide Rack,
open the door completely and slide the Rack into the rack support grooves. Be sure the slide Rack is seated properly. Wash the Bake Pan in hot, sudsy water. To minimize scratching, use a polyester or nylon pad.
Crumb Tray
To remove the Crumb Tray, unplug the oven. Tilt back the Oven and use the knob located on the bottom of the Oven to pull down the Crumb Tray; discard crumbs. Wipe Tray with a dampened cloth or paper towelling and dry. Close and secure Tray.
Exterior Surfaces
Be sure the oven has cooled completely before wiping the top and exterior walls with a damp cloth or sponge. Dry afterward.
Cooking Containers
- The inside dimensions of this Oven are 11"x7"x23" (28 cm x 19 cm x 7.6 cm). This size allows for many different types of baking containers. Keep the inside dimensions of the oven in mind when purchasing baking containers.
- Metal, ovenproof glass without lids, or ceramic bake ware may be used in your Oven. Follow manufacturer's instructions. Be sure the top edge of the container is at least 1" (2.54 cm) away from the upper heating elements.
-
Some frozen foods are packaged in containers suitable for microwave or regular ovens. Check package instructions. If there are any questions regarding the use of a specific container, contact the food manufacturer.
-
Some items which should never be used in your Toaster Oven:
-
Glass lids on glass or metal bake ware. (If a cover is needed, use aluminum foil and be careful that it does not touch the heating elements.)
• Air-tight packages such as sealed pouches or cans. - Plastic wrapping or paperboard covers.
- Containers larger than those recommended.
- Containers with warnings against use in range-type or toaster ovens.

- IMPORTANT SAFEGUARDS
- GETTING TO KNOW YOUR
- TOASTER OVEN/BROILER(Continued) CONTROL PANEL
- Toast Color Dial:
- How to Use
- Getting Started:
- For Toasting:
- Cable Eléctrico
- TOASTER GUIDE
- BREAD (4 SLICES)
- Baking:
- BAKING GUIDE
- Partes internas
- BROILING/BAKING GUIDE
- BROILING GUIDE
- Care and Cleaning
- Crumb Tray
- Exterior Surfaces
- Cooking Containers
Brand : Premium
Model : PTO169
Category : Oven