ATW-RM1 - Uncategorized Audio-Technica - Free user manual and instructions
Find the device manual for free ATW-RM1 Audio-Technica in PDF.


| Product Type | Wireless Microphone Receiver |
| Brand | Audio-Technica |
| Model | ATW-RM1 |
| Form Factor | Half-rack, 1U |
| Dimensions (W x H x D) | 210 x 44 x 180 mm |
| Weight | 1.1 kg |
| Power Supply | 12-18 V DC, 500 mA (AC adapter included) |
| Frequency Range | UHF 600-690 MHz |
| Number of Channels | 1 (single channel) |
| Audio Output | Balanced XLR, unbalanced 1/4" jack |
| Antenna Type | 2 x BNC, 50 ohms |
| Frequency Response | 20 Hz - 20 kHz |
| Dynamic Range | >110 dB |
| RF Output Power | 10 mW (transmitter) |
| Modulation | FM |
| Display | LCD with frequency and AF/RF levels |
| Controls | Power, Volume, Frequency select, Scan |
| Included Accessories | AC adapter, antennas, rack ears |
| Operating Temperature | 0°C to 40°C |
| Cleaning | Wipe with dry cloth; avoid solvents |
| Safety Certifications | CE, FCC |
Frequently Asked Questions - ATW-RM1 Audio-Technica
User questions about ATW-RM1 Audio-Technica
0 question about this device. Answer the ones you know or ask your own.
Ask a new question about this device
Download the instructions for your Uncategorized in PDF format for free! Find your manual ATW-RM1 - Audio-Technica and take your electronic device back in hand. On this page are published all the documents necessary for the use of your device. ATW-RM1 by Audio-Technica.
USER MANUAL ATW-RM1 Audio-Technica
ProfessionalUHF Wireless Systems
ATW-RM1RackMountHardwareKit
InstallationandOperation
audio-technica.
Assembly Instructions/ATW-RM1 Rack-mount Hardware Kit
For use with Audio-Technica 2000 and 3000 Series wireless systems and for the ATW-DA49 antenna distribution system.
This kit contains the hardware necessary for mounting a half-rack receiver or distribution system in a 19" audio equipment rack; also brings antennas to the front for improved reception.
The following parts are included:
- Long rack ear
- Short rack ear
- Two BNC bulkhead connectors with mounting hardware
- Two 34" BNC-to-BNC cables
- Six rack ear screws
How to assemble the ATW-RM1 Rack Mount Hardware Kit (see Fig. 1)
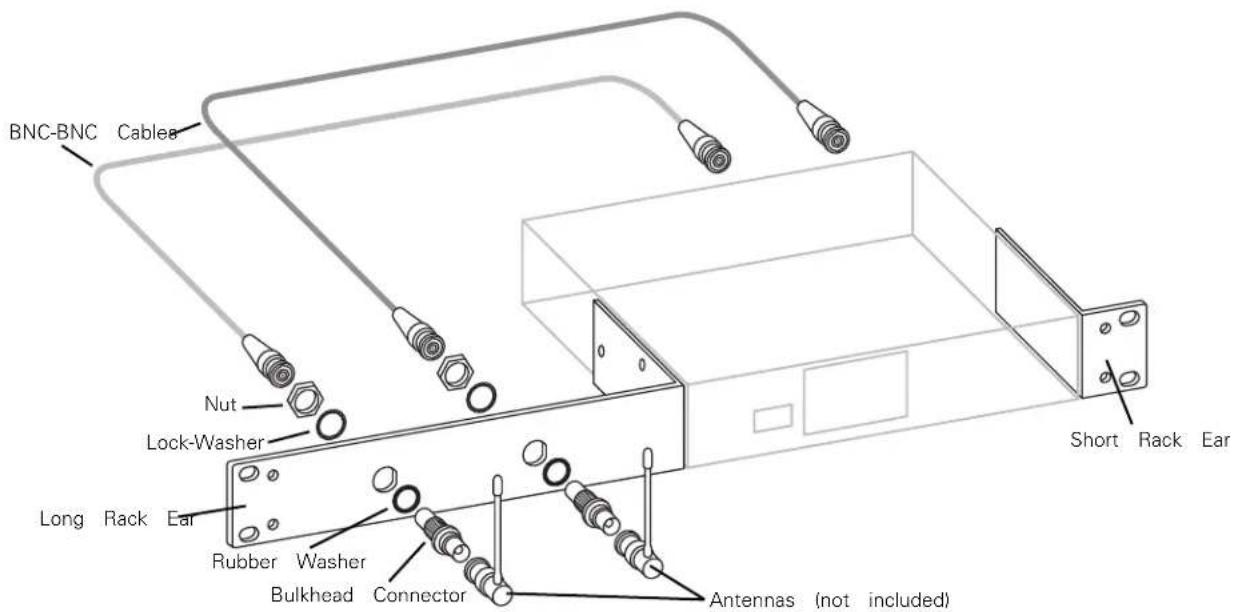
- Remove the nut and lock-washer from each bulkhead connector. Install the connectors from the front into the two holes in the long rack ear (see Fig. 1). Note that the flat on the threaded section must be aligned with the flat in each panel hole.
- Install the lock-washer and nuts (included) over the back of each bulkhead connector. Secure each connector from the back with its lock-washer and nut, tightening the nut firmly.
- Connect one end of each provided BNC-BNC cable to the rear antenna input jacks on the back of the receiver (or antenna distr system amplifier). Attach the other end of each cable to the back the BNC bulkhead connectors. Make certain the bayonet twist-rings are fully latched on the connectors at both ends.
- Finally, mount the receiver's antennas to each of the BNC bulk connectors.
Figure1
To reduce the environmental impact of a multi-language printed document, product information is available online at www.audio-technica.com in a selection of languages.
Brand : Audio-Technica
Model : ATW-RM1
Category : Uncategorized