eiQCANOPY70TM - Range hood ElectriQ - Free user manual and instructions
Find the device manual for free eiQCANOPY70TM ElectriQ in PDF.


| Product Type | Canopy Range Hood |
| Brand | ElectriQ |
| Model | eiQCANOPY70TM |
| Width | 70 cm (27.6 inches) |
| Depth | 50 cm (19.7 inches) |
| Height | 15 cm (5.9 inches) |
| Net Weight | 10 kg |
| Power Supply | 220-240 V, 50 Hz |
| Motor Power | 200 W |
| Number of Speeds | 3 |
| Max Suction Capacity | 600 m³/h |
| Lighting | 2 x 40 W halogen bulbs (not included) |
| Filter Type | Aluminum grease filters (dishwasher safe) |
| Charcoal Filter | Optional (for recirculation mode) |
| Installation Type | Wall-mounted or ducted/recirculating |
| Control Type | Touch controls |
| Noise Level | 45-60 dB (depending on speed) |
| Energy Class | A+ |
| Grease Filter Cleaning | Monthly in dishwasher or by hand |
| Charcoal Filter Replacement | Every 3-6 months |
| Bulb Replacement | G4 halogen 40W, available as spare part |
| Safety Features | Auto-off timer (optional), overheat protection |
| Spare Parts Available | Grease filters, charcoal filters, bulbs |
| Warranty | 2 years (manufacturer standard) |
Frequently Asked Questions - eiQCANOPY70TM ElectriQ
User questions about eiQCANOPY70TM ElectriQ
0 question about this device. Answer the ones you know or ask your own.
Ask a new question about this device
Download the instructions for your Range hood in PDF format for free! Find your manual eiQCANOPY70TM - ElectriQ and take your electronic device back in hand. On this page are published all the documents necessary for the use of your device. eiQCANOPY70TM by ElectriQ.
USER MANUAL eiQCANOPY70TM ElectriQ
natural_image
Illustration of a kitchen air conditioner unit with two ventilation grilles and control knobs (no text or symbols)CANOPY COOKER HOOD
eiQCANOPY70TM
Thank you for choosing your electriQ cooker hood.
This instruction manual is designed to provide you with all required instructions related to the installation, use and maintenance of the appliance. In order to operate the unit correctly and safely, please read this instruction manual carefully before installation and usage.
CONTENTS
SAFETY 3
INSTALLATION 7
OPERATION 8
CLEANING AND MAINTENANCE 8
FILTER INFORMATION 10
BULB REPLACEMENT 11
TROUBSLEHSOOTING 12
SUPPORT 12
PRODUCT FICHE 13
SAFETY PRECAUTIONS
Whilst this product is compliant with all safety requirements, incorrect or inappropriate use can lead to both personal injury and potential damage to property. Please read the contents of this instruction booklet thoroughly before fitting or using this appliance.
- The cooker hood must be installed in accordance with the installation instructions and all measurements followed.
- All installation work must be carried out by a competent person or qualified electrician.
- The unit must be connected to an earthed power supply.
- If venting externally, make sure the ducting has no bends sharper than 90 degrees as this will reduce the efficiency of the cooker hood.
- The cooker hood is for domestic use only and is not designed for commercial use. It should only be used for the purpose it was intended – to extract vapours and cooking odours.
- Do not flambé or use an open flame under the cooker hood.
- Do not try to use the cooker hood without the grease filters or if the filters are excessively greasy! They should be cleaned regularly (see “Maintenance”) or replaced as necessary.
- The extraction fan must be level to avoid grease collection at one end, as this could cause a potential fire risk.
- Do not leave frying pans unattended during use because overheated fat or oils might catch fire.
- If the cooker hood is damaged, do not attempt to use it.
- If the supply cord is damaged, it must be replaced by the manufacturer, its service agent or a similarly qualified person in order to avoid a hazard.
- This appliance can be used by children aged from 8 years and above and persons with reduced physical, sensory or mental capabilities or lack of experience and knowledge if they have been given supervision or instruction concerning use of the appliance in a safe way and understand the hazards involved.
- Children must not play with the appliance. Cleaning and user maintenance shall not be made by children without supervision.
-
Children should be supervised to ensure that they do not play with the appliance. It is not a toy.
-
The plug must be accessible after installation for isolation in case of an emergency – or an appropriate fused switch if the unit is hard-wired to the mains via a spur.
- The minimum distance between the surface of the hob and the lowest part of the hood should be at least 65cm. A distance of between 65cm and 75cm gives peak efficiency.
- The air must not be discharged into a flue that is used for exhausting fumes from appliances burning gas or other fuels.
- When the hood is vented externally and used with appliances which burn fuel (e.g. gas, oil, wood) the area must be sufficiently ventilated to ensure safe operation. Fresh air must be allowed to freely enter the room to prevent a partial vacuum.
- A partial vacuum can starve the heating appliance of oxygen, impairing combustion. It can also prevent toxic fumes from leaving the room, or can cause fumes to be sucked into the room from outside.
- Safe operation is only possible when the partial vacuum within the working area does not exceed 4 Pa (0.04 mbar). This can be achieved by ensuring air is able to enter the room from outside through a suitable sized opening which cannot be sealed during operation. A number of alternative solutions are available to ensure this. If in any doubt, professional advice should be sought.
• Regulations concerning the discharge of air have to be fulfilled. - There is a potential fire risk if cleaning is not carried out in accordance with the instructions.
- Clean your appliance periodically by following the method given in the chapter MAINTENANCE
- If used in recirculation mode, charcoal filters (available separately) can be used to trap odours and must be replaced at least once a year depending on how frequently the cooker hood has been used.
- For safety reason, please use only the same size of fixing or mounting screw, which are recommended in this instruction manual.
- Warning: Failure to install the screws or fixing device in accordance with these instructions may result in electrical hazards
CAUTION: Accessible parts of the hood can become very hot during use with cooking appliances, whether in use or not, due to heat rising from the hob. Sufficient time should be allowed for the unit to cool before touching either the housing or the grease filters.
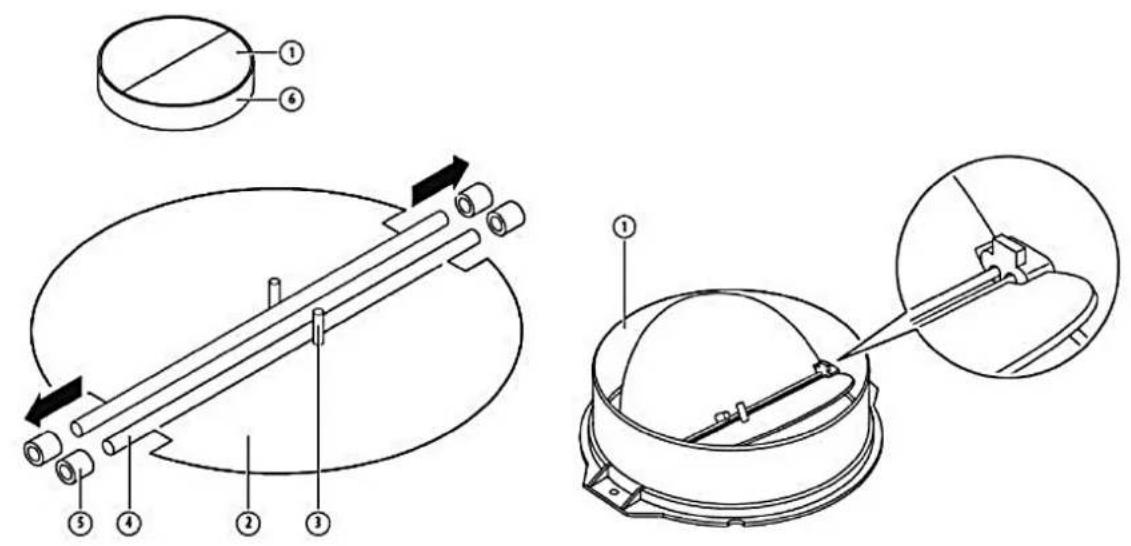
V-FLAP INSTALLATION
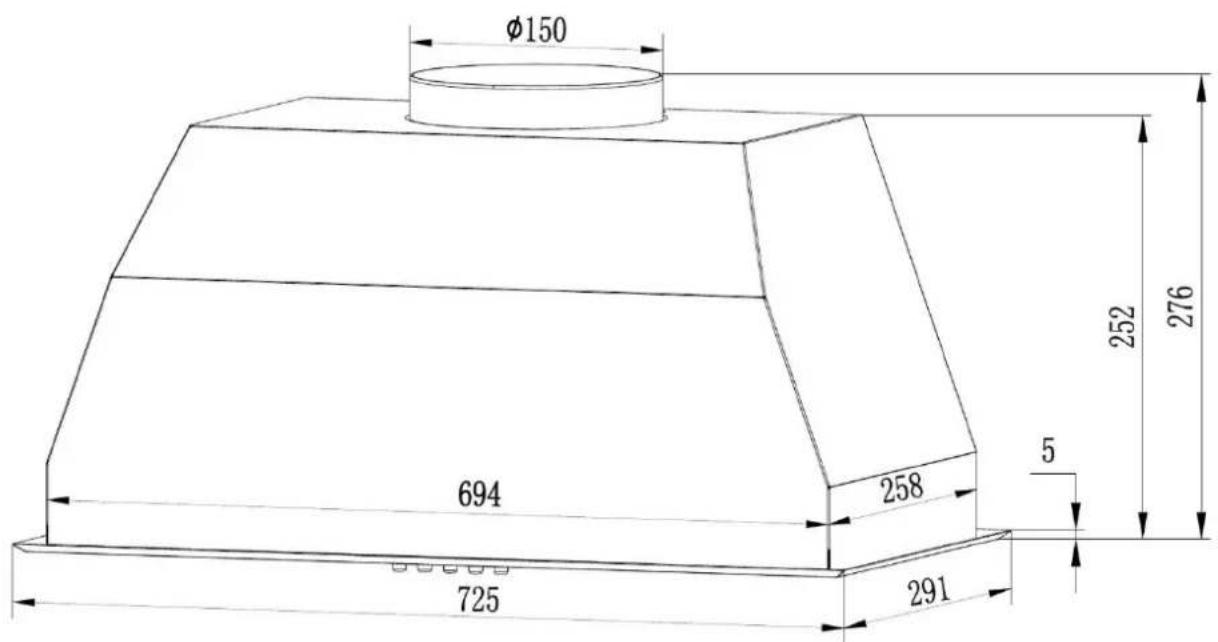
DIMENSIONS
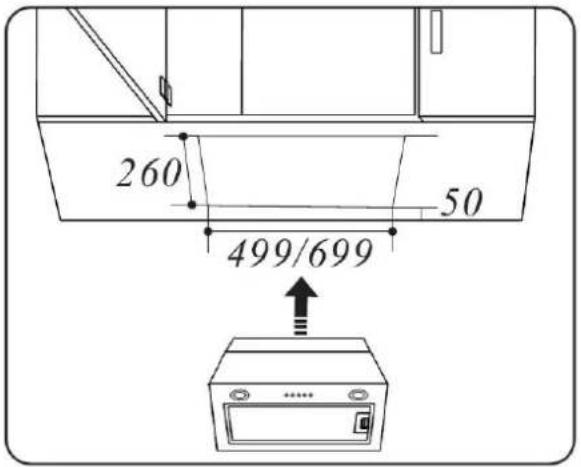
INSTALLATION
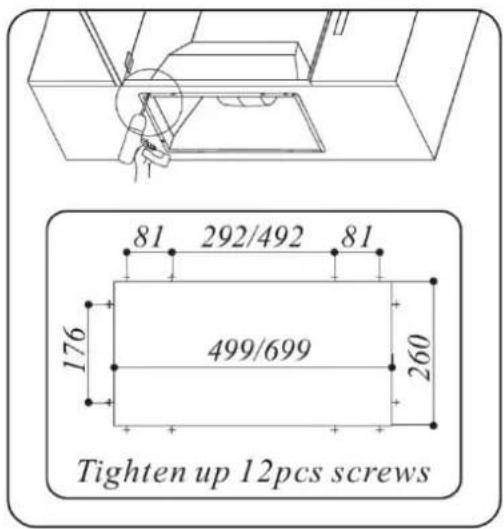
Before installation, measure and cut a hole measuring 52cm x 72cm in your kitchen cabinet of appropriate size to fit the hood.
The depth of the cabinet must be no less than 260mm and 50mm of space must be left at the two ends of the opening.
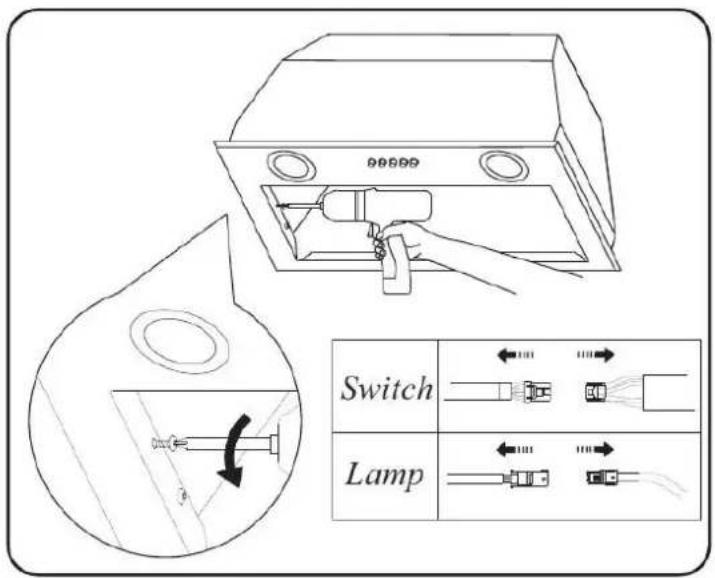
Remove the filter by pulling the latch and then remove the 2 screws from the left and right panel. Disconnect the lamp and switch connectors and remove the panel. Keep the screws safe for reinstallation.
Fix the hood body into the cabinet with the 12 screws provided. Ensure the hood is secure and stable. Reconnect the lamp and switch wire and secure the panel onto the hood using the two screws. Finally, install the filter.
OPERATION

| Button | Function | Remarks |
| 0 | Fan Off | Turns off the fan |
| 1 | Low Speed | Starts the fan at low speed. Suitable for simmering and cooking which do not produce much steam |
| 2 | Medium Speed | Starts the fan at medium speed. Provides ideal ventilation for standard cooking |
| 3 | High Speed | Starts the fan at high speed. Ideal for when high density smoke or steam has been produced |
| Lights On/Off | Turns the lights on and off |
CLEANING AND MAINTENANCE
Before cleaning, switch the unit off and disconnect the power.
Use a soft cloth moistened with mild soapy water or household cleaning detergent.
Never use metal pads, chemicals, abrasive material or stiff brushes to clean the unit.
NOTE: Do not use a steam cleaner to clean the hood as electrical components could be damaged or short-circuit as a result.
MONTHLY CLEANING FOR METALLIC ANTI-GREASE FILTER
IMPORTANT NOTE: Clean the filter every month; an excessive build-up of grease can become a fire hazard. The filter collects grease, smoke and dust, so the filter directly affects the efficiency of the cooker hood. If it's not cleaned, the grease residue (potentially flammable) will saturate on the filter.
Clean it with a soft nylon brush in a mild solution of warm water and a small amount of washing up liquid. Washing up liquid alone should not be used. After cleaning, allow the filter to drain and then dry thoroughly.
The grease filter may also be cleaned in a dishwasher; using a 60^ C program, with the filter upright (short sides upright) in the lower basket. Please be aware some dishwasher cleaning agents can permanently discolour the filter, though this will not affect its performance.
Replacement grease filters are of the universal type available from many household and DIY stores.
STAINLESS STEEL
The stainless steel must be cleaned regularly (e.g. weekly) to ensure long life expectancy.
Dry with a clean soft cloth. A specialised stainless-steel cleaning fluid may be used. Ensure that wiping is done along with the grain of the stainless steel to prevent any unsightly crisscross scratching patterns from appearing.
CONTROL PANEL SURFACE
The control panel inlay can be cleaned using warm soapy water. Ensure the cloth is clean and well wrung before cleaning. Use a dry soft cloth to remove any excess moisture left after cleaning.
Using neutral detergents and avoid using harsh cleaning chemicals, strong household detergents or products containing abrasives, as this will affect the appliance appearance and potentially remove any printing of artwork on the control panel and will void manufactures warranty.
GREASE MESH FILTERS
The mesh filters can be cleaned by hand or in a dishwasher. By hand, soak them for an hour in water with a mild detergent then brush it gently with a soft brush. Do not apply too much pressure, or this may damage them. Leave to dry naturally out of direct sun light.
In a dishwasher, stack them vertically, where possible. Filters should be washed separately to crockery and kitchen utensils. It is advisable not to use rinse aid.
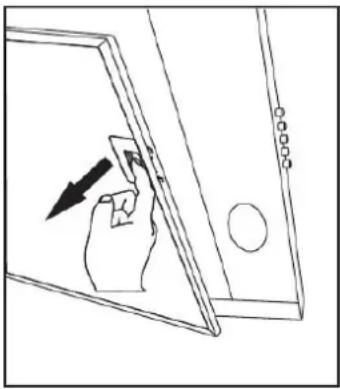
INSTALLING GREASE MESH FILTERS
To install filters:
- Angle the filter into the slots at the back of the hood.
- Push the button on handle of the filter.
- Release the handle once the filter fits into position.
- Repeat to install both filters.
natural_image
Line drawing of a hand inserting a device into a tablet device (no text or symbols)CARBON FILTER (not supplied)
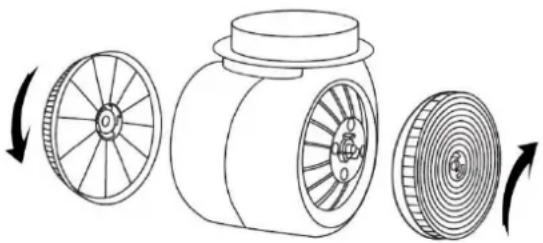
Activated carbon filters can be used to trap odours. The activated carbon filter should be changed between three and six months according to use. The installation procedure of activated carbon filters is as below.
- Fit the carbon filter into the unit and turn it clockwise to lock.
- Repeat on the other side.
NOTE:
- Make sure filters are securely locked in position, otherwise, they may become loose and be dangerous.
- With activated carbon filters fitted you may notice suction is slightly reduced.
natural_image
Diagram showing three stages of a mechanical device with rotating wheels and a housing, illustrating the process (no text or symbols)Filters for eiQCANOPY70TM
| Grease Filter | eiQTMCAN70 |
| Carbon filter | eiQTMCARBONCHIM |
BULB REPLACEMENT
The bulb must be replaced by either the manufacturer, a service agent or similarly qualified persons.
Always switch off the electricity supply before carrying out any operations on the appliance. When handling the bulb, make sure it has completely cooled down before making contact with the hands.
When handling bulbs hold with a cloth or gloves to ensure perspiration does not come in contact with the bulb as this can reduce the life of the bulb.
- Remove the grease filters.
- Put one hand into one of the cavities to gently push out the LED light, and use the other hand to support the light and pull it out, then pull out the light cable.
- After changing the lamp, plug in the lamp cable, and return the lamp into the lamp holder.
Contact the supplier for replacement bulb information.
| LED Modules | Round lamp |
| Max wattage | 3W |
| Bulb product code | L11 |
TROUBLESHOOTING
| FAULT | CAUSE | SOLUTION |
| Light on, but fan does not work | The fan blade is jammed. | Switch off the unit. Repair to be carried out by qualified service personnel only. |
| The motor is damaged. | ||
| Both light and fan do not work | Light bulb blown | Replace the bulb with correct rating. |
| Power cord loose | Plug in to the power supply again. | |
| Excessive Vibration | The fan blade is damaged. | Switch off the unit. Repair to be carried out by qualified service personnel only. |
| The fan motor is not fixed tightly. | Switch off the unit. Repair to be carried out by qualified service personnel only. | |
| Suction performance reduced | Grease filters clogged | Clean or replace grease filters. |
| Distance between the unit and the cooking plane too great. | Readjust the distance to between 65cm and 75cm. |
INFORMATION FOR DISMANTLING
Do not dismantle the appliance other than shown in the user manual. The appliance cannot be dismantled by user. At the end of life, the appliance should not be disposed of with household waste. Check with you Local Authority for recycling advice.
electriQ UK SUPPORT
www.electriQ.co.uk
Call: 0330 390 3061
Office hours: 9AM - 5PM Monday to Friday
Unit J6, Lowfields Business Park Lowfields Way, Elland
West Yorkshire, HX5 9DA
natural_image
Pure electrical circuit lines without any symbolsRecycling facilities are now available for all customers at which you can deposit your old electrical products. Customers will be able to take any old electrical equipment to participating sites run by their local councils. Please remember that this equipment will be further handled during the recycling process, so please be considerate when depositing your equipment. Please contact the local council for details of your local household waste recycling centres.
PRODUCT FICHE
| Symbol | Value | Unit | |
| Annual Energy Consumption | AEC_hood | 34 | kWh/a |
| Time increase factor | f | 1.6 | |
| Fluid Dynamic Efficiency | FDE_hood | 11.7 | |
| Energy Efficiency Index | EEI_hood | 72.5 | |
| Measured airflow rate at the best efficiency | Q_BEP | 193.4 | m3/h |
| Measured air pressure at best efficiency point | P_BEP | 118 | Pa |
| Maximum airflow | Q_max | 303.4 | m3/h |
| Measured electric power input at best efficiency point | W_BEP | 54.4 | W |
| Nominal power of the lighting system | W_L | 3 | W |
| Average illumination of the lighting system on the cooking surface | E_middle | 89 | lux |
| Measured power consumption on standby mode | P_S | / | W |
| Measured power consumption on off mode | P_O | 0 | W |
| Sound power level | L_WA | 62 | dB |
- CANOPY COOKER HOOD
- eiQCANOPY70TM
- CONTENTS
- SAFETY PRECAUTIONS
- V-FLAP INSTALLATION
- DIMENSIONS
- INSTALLATION
- OPERATION
- CLEANING AND MAINTENANCE
- MONTHLY CLEANING FOR METALLIC ANTI-GREASE FILTER
- STAINLESS STEEL
- CONTROL PANEL SURFACE
- GREASE MESH FILTERS
- INSTALLING GREASE MESH FILTERS
- CARBON FILTER (not supplied)
- NOTE:
- Filters for eiQCANOPY70TM
- BULB REPLACEMENT
- TROUBLESHOOTING
- INFORMATION FOR DISMANTLING
- electriQ UK SUPPORT
Brand : ElectriQ
Model : eiQCANOPY70TM
Category : Range hood