
D35B1A - Dehumidifier Friedrich - Free user manual and instructions
Find the device manual for free D35B1A Friedrich in PDF.


| Product Type | Portable Dehumidifier |
| Model | D35B1A |
| Brand | Friedrich |
| Moisture Removal Capacity | 35 pints per day (at 80°F, 60% RH) |
| Coverage Area | Up to 1,500 sq ft |
| Energy Star Certified | Yes |
| Power Supply | 115V, 60Hz, 5.6 Amps |
| Dimensions (H x W x D) | 24.0 x 15.2 x 11.0 inches |
| Weight | 40.0 lbs |
| Water Bucket Capacity | 8.8 pints |
| Continuous Drain Option | Yes, with included hose adapter |
| Fan Speeds | 2 (High and Low) |
| Humidistat | Adjustable (auto shut-off at desired humidity level) |
| Filter Type | Washable, reusable dust filter |
| Filter Indicator | Yes |
| Defrost Function | Automatic low-temperature defrost |
| Noise Level | Approximately 48 dB (on low speed) |
| Refrigerant Type | R-410A |
| Operating Temperature Range | 41°F to 95°F |
| Warranty | 1 year limited warranty |
Frequently Asked Questions - D35B1A Friedrich
User questions about D35B1A Friedrich
0 question about this device. Answer the ones you know or ask your own.
Ask a new question about this device
Download the instructions for your Dehumidifier in PDF format for free! Find your manual D35B1A - Friedrich and take your electronic device back in hand. On this page are published all the documents necessary for the use of your device. D35B1A by Friedrich.
USER MANUAL D35B1A Friedrich
natural_image
Line drawing of a Friedrich air purifier unit with control panel and wheels (no text or symbols on the device itself)Models
D35B1A Volts: 115/60Hz Capacity: 35 Pints Moisture Removal: 35 Pint/Day
D50B1A Volts: 115/60Hz Capacity: 50 Pints Moisture Removal: 50 Pint/Day
Congratulations!
Thank you for your decision to purchase the Friedrich Dehumidifier. Please read thoroughly of this Installation and Operation Manual.
THANK YOU, on behalf of our entire company, for making such a wise purchase.
Table of Contents
DESCRIPTION OF COMPONENTS 3
FUNCTION EXPLANATION....3
INSTALLATION INSTRUCTIONS....4
OPERATION INSTRUCTIONS....4
OPERATING DO'S AND DON'TS 6
CONTINUOUS DRAINAGE 8
MAINTENANCE....10
IN CASE OF EMERGENCY....11
TECHNICAL SPECIFICATIONS....11
| WARNING | AVERTISSEMENT | ADVERTENCIA | |
| THINK SAFETY FIRST | Do not remove, disable or bypass this unit's safety devices. Doing so may cause, fire, injuries or death. | Ne pas supprimer, désactiver ou contourner cette l'unité des dispositifs de sécurité. faire vous risqueriez de provoquer, le feu, les blessures ou la mort. | No eliminar, desactivar o pasar por alto los dispositivos de seguridad de la unidad. Si lo hace podría producirse fuego, lesiones o muerte. |
61952220
DESCRIPTION OF COMPONENTS
Figure 1

DEHUMIDIFIED
DRY AIR VENT

FUNCTION EXPLANATION
Figure 2

flowchart
graph TD
    A["Bucket Full Lamp"] --> B["ON/OFF"]
    C["DEFROST LAMP"] --> D["Low"]
    C --> E["High"]
    F["CURRENT TEMP / TIMER SET DISPLAY"] --> G["RH"]
    H["FAN SPEED HIGH/LOW"] --> I["TIMER"]
    J["POWER ON/OFF"] --> K["TIMERS WHEN THE UNIT IS ON PRESS THE TIMER BUTTON TO DISPLAY THE POWER OFF TIMER. SELECT FROM 1-24 HOURS OF RUNNING TIME UNTIL THE UNIT SHUTS OFF AUTOMATICALLY. WHEN THE UNIT IS OFF PRESS THE TIMER BUTTON TO DISPLAY THE POWER ON TIMER. SELECT FROM 1-24 HOURS UNTIL THE UNIT WILL TURN ON AUTOMATICALLY."]
    L["CURRENT HUMIDITY DISPLAY"] --> M["DISPLAYS THE CURRENT RELATIVE HUMIDITY (RH) IN THE ROOM. WHEN THE OR IS PRESSED THE HUMIDITY SETTING IS DISPLAYED."]
    N["°C/°F SELECTOR PRESS THE °C/°F SWITCH BUTTONS IT WILL SWITCH BETWEEN °C AND °C"] --> O["SET HUMIDITY ADJUST THE HUMIDITY % FROM 30% TO 90% RH BY PRESSING THE OR BUTTONS. HUMIDITY IS ADJUSTED IN 5% INCREMENTS."]
Note: When operating the dehumidifier for extended periods (greater than 23 hours continuously) the dehumidifier will operate for 23 hours on then 1 hour off in order to reset the system. During the off period "SA" will show in the display window. The unit will restart automatically after the hour is complete. FRD002
INSTALLATION INSTRUCTIONS
Follow the steps below for unpacking and set up your unit.
STEP 1. Remove unit from carton and inspect.
STEP 2. Remove accessories from drain bucket.
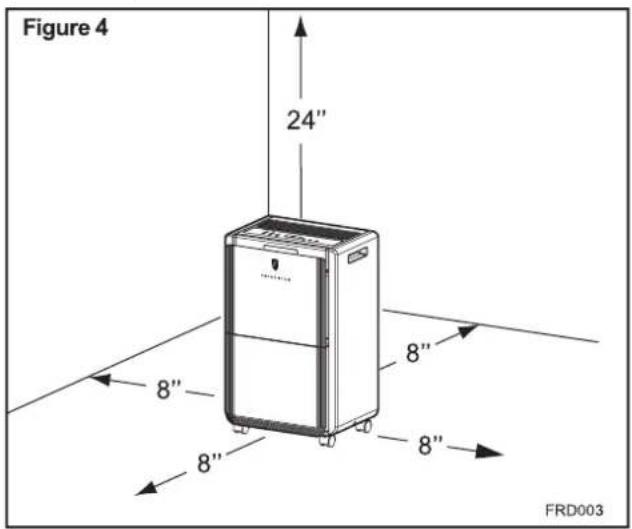
STEP 3. Set up unit in position with adequate clearance. Installation of unit is complete.
Allow at least 8 inches of space all around the unit and at least 24 inches of space above the unit.
OPERATION INSTRUCTIONS
| WARNING | |
 | Electrical HazardsDo not fold power cord as shown at left. |
 | Make sure the plug is placed fully and firmly into the receptacle. |
 | Do not use multiple sockets as shown at left. |
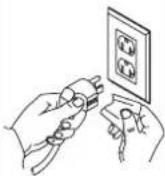 | Make sure the plug is clean. |
 | After turning the unit off please take plug out of the receptacle. |
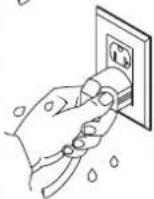 | Do not have wet hands when connecting the power plug. |
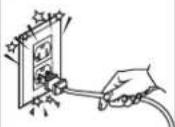 | Do not pull the power cord to avoid a broken cord, which can lead to danger. |
Start Operation
STEP 1. Place the unit in an upright position on a flat, steady, stable and heat resistant surface. Make sure there is nothing flammable or heat sensitive within 39 inches. Operating the product in any other position could cause a hazard.
WARNING

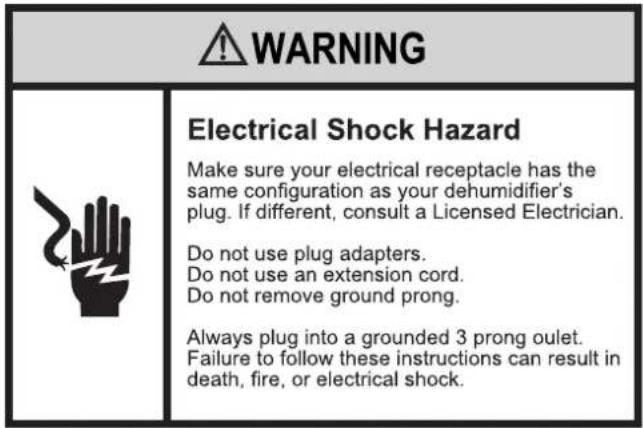
Electrical Shock Hazard
Make sure your electrical receptacle has the same configuration as your dehumidifier's plug. If different, consult a Licensed Electrician.
Do not use plug adapters. Do not use an extension cord. Do not remove ground prong.
Always plug into a grounded 3 prong oulet. Failure to follow these instructions can result in death, fire, or electrical shock.
STEP 2. Insert the plug into a suitable wall socket. The dehumidifier is suitable for operation on an electricity supply having the same voltage as that shown on its rating label.

STEP 3. Make sure the Drain Bucket is correctly placed in the proper position (See Figure 5). (After switching the unit 'ON" for the first time, if the Bucket Full lamp illuminates, just pull out the drain bucket; check to ensure that the float lever is able to move freely, then return the drain bucket to the correct position).
Figure 5

FRD004
When Bucket Full Lamp Is On
When the drain bucket is full, the Bucket Full lamp will illuminate and the unit will stop operating. The drain bucket should be carefully removed from the unit by sliding it outwards (See Figure 6) and should be emptied. Then place the empty drain bucket back to its proper position, (See Figure 7) the unit will start operating and run normally.
Figure 6
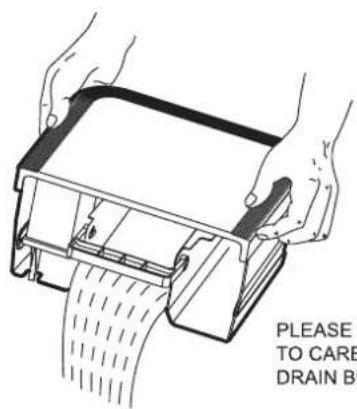
PLEASE USE BOTH HANDS TO CAREFULLY EMPTY THE DRAIN BUCKET.
FRD005
Defrost
When the unit is operated in low temperatures (less than 54 °F the surface of the evaporator will accumulate a layer of frost which will reduce the efficiency of the dehumidifier. When this happens the unit will go into periodic defrost mode automatically. The Defrost Lamp will illuminate on control panel, this is quite normal (See Figure 7).
The dehumidifier will operate in temperatures down to 41 °F. The time it takes to defrost may vary. If the unit freezes up it should be turned off at the power supply for a few hours and then re-started. If the room temperature remains below 41 °F the unit should be switched off. It is not recommended to use the dehumidifier in temperatures below 41 °F.
Figure 7

DRAIN BUCKET
FRD006
OPERATING DO'S AND DON'TS
Do not place anything on top of the unit or control panel (See Figure 8).
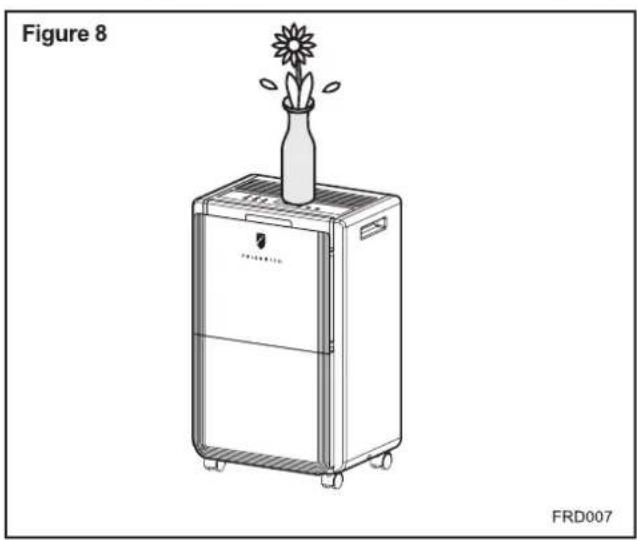
natural_image
Line drawing of a refrigerant appliance with a flower on top, labeled Figure 8 (no text or symbols on the device itself)Do not place anything over the inlet or outlet points (See Figure 9).

natural_image
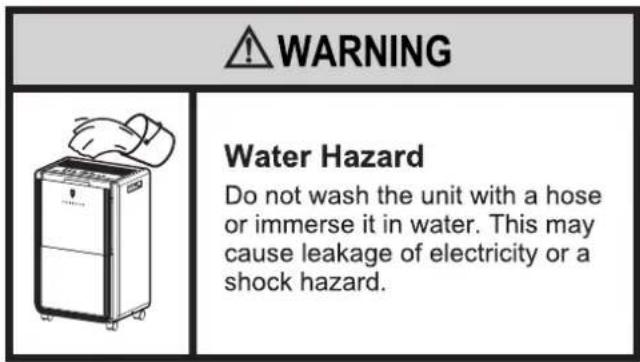
Line drawing of a refrigerant machine with a cloth emitting vapor, labeled Figure 9 and FRD008 (no text on the diagram itself)Do not wet the unit or the control panel (See Figure 10).

natural_image
Line drawing of a refrigerant air conditioner unit with a hand placed on top, labeled Figure 10 (no text or symbols on the device itself)Do not use insect, oil or paint spray around the unit (See Figure 11), it might cause damage to the plastic parts or start a fire.

Do not place the unit on an uneven surface (See Figure 12), to avoid shaking, noise and leakage of water.

Do always keep the unit 8 in. away from the wall (See Figure 13) to dissipate the heat properly.

Do not put any foreign objects into the unit, it is dangerous and will result in damage to the unit (See Figure 14).
Figure 14

natural_image
Line drawing of a portable industrial machine with a prohibition symbol overlay (no text or symbols present)FRD017
Do close all open windows to reach the maximum possible efficiency of dehumidifier removing moisture (See Figure 15).
Figure 15

natural_image
Diagram showing a refrigerator, door lock, and air conditioner unit with directional arrows (no text or symbols)FRD018
When moving or putting unit in storage, do not place the unit on its side or upside down and avoid violent shaking (See Figure 16).
Figure 16

natural_image
Simple line drawing of a device with a prohibition symbol (no text or labels)FRD020
Do ask professional service technicians to service the unit as required (See Figure 17).
Figure 17

natural_image
Line drawing of a person kneeling beside a portable air conditioner unit (no text or symbols visible)FRD012
CONTINUOUS DRAINAGE
To save having to periodically empty the drain bucket, this unit can be configured for continuous drainage. You can use the supplied drain hose to connect to the continuous drainage connector (See Figure 18).

Unscrew and remove the drain cover at the rear of the unit (See Figure 19). Remove the soft rubber stopper. Put it into the drain bucket for safe keeping (See Figure 19).

Insert the drain hose through the hole of the drain cover. Then connect the drain hose to the drain port (See Figure 20).

Tighten the drain cover in clockwise direction onto the rear of the unit (See Figure 21).

Place the bucket in its original location (See Figure 22).
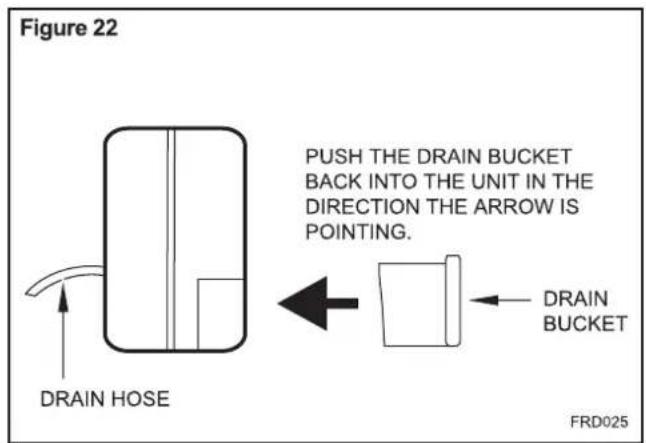
Continuous Drain Hose Routing
When using the function of continuous drainage, the drain hose must be placed horizontally below the drainage hole (See Figure 23).
You must avoid uneven ground and folding the hose (See Figure 23).
Figure 23

Continuous Drainage using Built-In Pump
Installation:
STEP 1. Connect the supplied water hose to the drainage key.
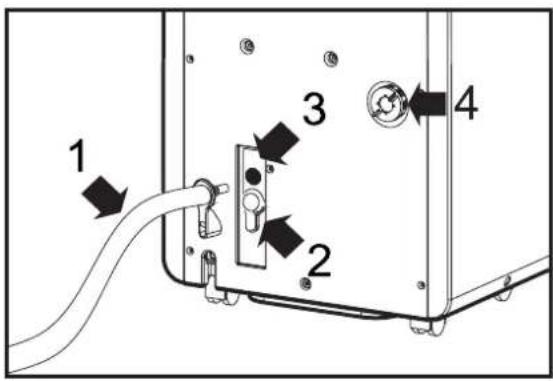
STEP 2. Connect the drainage key and water hose (1) to the drain pump outlet (2) on the rear panel.
STEP 3. Lead the other end to a suitable location for drainage, like a drain or sink and insert the plug into the water drain.
The maximum distance and the rise may be 15 ft from the unit. Exceeding this distance may damage the unit or cause leaks. When the unit's drain bucket capacity reaches a certain water level, it will drain automatically (See Figure 24).
Dismantle:
Press the drain release button (3) on the unit rear panel. The automatic drainage key will pull out (See Figure 24).
Figure 24
FRD027
NOTICE
The rubber drain plug must be inserted in the continuous drainage outlet (4) for built-in pump feature to work.
Removing the rubber drain plug will cause the condensation to exit through the continuous drainage outlet instead of the drain pump outlet.
MAINTENANCE
For safety reasons, make sure the unit is unplugged before servicing or cleaning.

natural_image
Illustration of a hand using a power plug to install three electrical outlets (no text or symbols present)Cleaning the shell
STEP 1. Wipe the shell with a clean, soft cloth.
STEP 2. If the unit is very dirty, use mild detergent then wipe off the detergent with half dried cloth.
Cleaning the air filter
The purpose of the air filter is to filter dust and other materials from the air. If the filter is blocked by dust the electricity usage will be greater than normal. For optimal moisture removal and efficiency, clean the filter every two weeks.
Cleaning Steps
STEP 1. Pull the air filter out gently (See Figure 25).

STEP 2. Clean the air filter with a vacuum cleaner or wash it with clean water and dry with a dry cloth (See Figure 26).

natural_image
Illustration of a hand using a vacuum cleaner to clean or operate on a grid-patterned device (no text or symbols)STEP 3. Put the clean air filter back in place and continue to operate the dehumidifier.
IN CASE OF EMERGENCY
If a problem occurs, unplug the unit and contact a qualified servicing center immediately. Do not disassemble the unit yourself.
NOTICE
If the power cord on this unit is damaged it must be replaced by the manufacturer, its service agent or qualified service technician in order to avoid a hazard.
NOTICE
This appliance is not intended for use by children or other persons without assistance or supervision if their physical, sensory or mental capabilities prevent them from using it safely. Children should be supervised to ensure that they do not play with the appliance.
NOTICE
The appliance shall be installed in accordance with national wiring regulations.
NOTICE
Wiring diagram affixed inside the rear panel.
TECHNICAL SPECIFICATIONS
Operating temperature / Relative humidity: 41°F - 89.6°F (5-32°C) / 30%-90%RH

FRIEDRICH
Friedrich Air Conditioning Company
10001 Reunion Place, Suite 500
San Antonio, TX 78216
800.541.6645
www.friedrich.com
DEHUMIDIFIERS LIMITED WARRANTY
FIRST YEAR
ANY PART: If any part supplied by FRIEDRICH fails because of a defect in workmanship or material within twelve months from date of original purchase, FRIEDRICH will repair the product at no charge, provided the product is transported to a Friedrich Authorized Service Center for repair. ALL transportation charges are the sole responsibility of the owner. This remedy is expressly agreed to be the exclusive remedy within twelve months from the date of the original purchase.
SECOND THROUGH FIFTH YEAR
SEALED REFRIGERANT SYSTEM: If the Sealed Refrigeration System (defined for this purpose as the compressor, condenser coil, dehumidifying coil, capillary, filter drier, and all interconnecting tubing) supplied by FRIEDRICH in your dehumidifier fails because of a defect in workmanship or material within sixty months from date of purchase, FRIEDRICH will pay a labor allowance and parts necessary to repair the Sealed Refrigeration System; PROVIDED FRIEDRICH will not pay the cost of diagnosis of the problem, removal, freight charges, and transportation of the dehumidifier to and from the Service Agency, and the reinstallation charges associated with repair of the Sealed Refrigeration System. All such cost will be the sole responsibility of the owner. This remedy is expressly agreed to be the exclusive remedy within sixty months from the date of the original purchase.
APPLICABILITY AND LIMITATIONS: This warranty is applicable only to units retained within the Fifty States of the U.S.A., District of Columbia, and Canada. This warranty is not applicable to:
- Air filters or fuses.
- Products on which the model and serial numbers have been removed.
- Products which have defects or damage which results from improper installation, wiring, electrical current characteristics, or maintenance; or caused by accident, misuse or abuse, fire, flood, alterations and/or misapplication of the product and/or units installed in a corrosive atmosphere, default or delay in performance caused by war, government restrictions or restraints, strikes, material shortages beyond the control of FRIEDRICH, or acts of God.
OBTAINING WARRANTY PERFORMANCE: Service will be provided by the FRIEDRICH Authorized Dealer or Service Organization in your area. They are listed in the Yellow Pages. If assistance is required in obtaining warranty performance, write to Room Air Conditioner Service Manager (the Friedrich address is at the top of this warranty) or email tac@friedrich.com.
LIMITATIONS: THIS WARRANTY IS GIVEN IN LIEU OF ALL OTHER WARRANTIES. Anything in the warranty notwithstanding, ANY IMPLIED WARRANTIES OF FITNESS FOR PARTICULAR PURPOSE AND/OR MERCHANTABILITY SHALL BE LIMITED TO THE DURATION OF THIS EXPRESS WARRANTY. MANUFACTURER EXPRESSLY DISCLAIMS AND EXCLUDES ANY LIABILITY FOR CONSEQUENTIAL OR INCIDENTAL DAMAGE FOR BREACH OF ANY EXPRESSED OR IMPLIED WARRANTY.
NOTE: Some states do not allow limitations on how long an implied warranty lasts, or do not allow the limitation or exclusion of consequential or incidental damages, so the foregoing exclusions and limitations may not apply to you.
OTHER: This warranty gives you specific legal rights, and you may also have other rights which vary from state to state.
PROOF OF PURCHASE: Owner must provide proof of purchase in order to receive any warranty related services.
All service calls for explaining the operation of this product will be the sole responsibility of the consumer.
All warranty service must be provided by an Authorized FRIEDRICH Service Agency, unless authorized by FRIEDRICH prior to repairs being made.
(9-12)

FRIEDRICH
Friedrich Air Conditioning Co.
10001 Reunion Place • Suite 500 • San Antonio, TX • 78216
(800) 541-6645
www.friedrich.com
Printed in the U.S.A.
- Models
- Congratulations!
- THANK YOU, on behalf of our entire company, for making such a wise purchase.
- Table of Contents
- DESCRIPTION OF COMPONENTS
- FUNCTION EXPLANATION
- INSTALLATION INSTRUCTIONS
- OPERATION INSTRUCTIONS
- Start Operation
- WARNING
- Electrical Shock Hazard
- When Bucket Full Lamp Is On
- Defrost
- OPERATING DO'S AND DON'TS
- CONTINUOUS DRAINAGE
- Continuous Drain Hose Routing
- Continuous Drainage using Built-In Pump
- Installation:
- Dismantle:
- NOTICE
- MAINTENANCE
- Cleaning the shell
- Cleaning the air filter
- Cleaning Steps
- IN CASE OF EMERGENCY
- TECHNICAL SPECIFICATIONS
- FRIEDRICH
- DEHUMIDIFIERS LIMITED WARRANTY
- SECOND THROUGH FIFTH YEAR
Brand : Friedrich
Model : D35B1A
Category : Dehumidifier