
ThinkPad 1839 - Graphic tablet LENOVO - Free user manual and instructions
Find the device manual for free ThinkPad 1839 LENOVO in PDF.


| Product Type | Graphics Tablet (Tablet Computer with Stylus Input) |
| Model | ThinkPad 1839 |
| Operating System | Android 3.1 |
| Processor | NVIDIA Tegra 2 Dual-Core ARM |
| Memory | 1 GB RAM |
| Internal Storage | 16 GB / 32 GB / 64 GB (depending on model) |
| Display | 10.1-inch TFT LCD, 1280x800 pixels, Multi-touch |
| Stylus | Battery-powered ThinkPad Tablet Pen (AAAA alkaline battery) |
| Cameras | Front: 2 MP, Rear: 5 MP |
| Wireless Connectivity | Wi-Fi 802.11 b/g/n, Bluetooth 2.1 + EDR, optional 3G (SIM card slot) |
| Battery | 24.1 Wh Li-Polymer (3250 mAh), non-removable |
| Charging | ThinkPad Tablet AC Charger (100-240V) via micro-USB, also supports Dock and USB |
| Dimensions (W x D x H) | 260.4 mm x 181.7 mm x 14 mm |
| Weight | Approx. 650 g (estimated) |
| Ports | 1x micro-USB, 1x USB 2.0 (full-size), 1x mini-HDMI, 1x headphone/mic combo, 1x ThinkPad Tablet Dock connector, 3-in-1 card reader (SD/SDHC/MMC) |
| Safety Precautions | Avoid water, drops, and disassembly; use approved chargers only; keep away from small children |
| Maintenance & Cleaning | Clean with soft dry cloth; replaceable screen protector film; store in dry area |
| Spare Parts & Repairability | Internal battery replacement only by authorized Lenovo service; stylus battery user-replaceable (AAAA); emergency reset hole |
Frequently Asked Questions - ThinkPad 1839 LENOVO
User questions about ThinkPad 1839 LENOVO
0 question about this device. Answer the ones you know or ask your own.
Ask a new question about this device
Download the instructions for your Graphic tablet in PDF format for free! Find your manual ThinkPad 1839 - LENOVO and take your electronic device back in hand. On this page are published all the documents necessary for the use of your device. ThinkPad 1839 by LENOVO.
USER MANUAL ThinkPad 1839 LENOVO
Notes: Before using this information and the product its supports, besuretoread the following:
•SafetyandWarrantyGuide
•RegulatoryNotice
- "Importantsafetyandhandlinginformation" on page iii
- AppendixC"Notices"onpage99
The Safety and Warranty Guide and the Regulatory Notice have been uploaded the Website To refer to them, goto http://support.lenovo.com, and then touch Guides & Manuals.
FirstEdition(August2011)
©CopyrightLenovo2011.
LIMITEDANDRESTRICTEDRIGHTSNOTICE: If dataorsoftware is delivered pursuant to General Services Administration "GSA" contract, use, reproduction, or disclosure is subject to restrictions set forth in Contract No. GS-35F-05925.
Contents
Readthisfirst......iii
Important safety and handling information.....iii
Chapter1.Productoverview.....1
Tabletlayout......1
Accessories......4
Features......4
Specifications......5
Operatingenvironment......5
Preinstalled widgets and applications.....6
Chapter2.Gettingstarted......9
InstallingtheSIMcard......9
Settingupyourtablet......10
YourGoogleAccount......11
Homescreens......12
Usingthemultitouchscreen...14..
Usingtheonscreenkeyboard......15
UsingtheThinkPadTabletPen...17...
Screenlockmode......18
Downloadinggamesandapplications.19
CustomizingyourHomescreens.19..
Chapter3. Connectingwireless networksanddevices....23
Determining which mobilenetwork you are using
Disablingdataroamingonmobilenetworks.23
Limitingmobiledataconnectionto2Gnetworks.
EditingorcreatingaGSMaccesspointname..24
Connectingtoa2Gor3Gmobiledatanetwo24..
ConnectingtoaWi-Finetwork.....25
UsingBluetoothdevices.....26..
Chapter4.Batteryandacpowe29
Chargingthebattery......29
Extendingthebatterylifebetweencharges
Checkingthebatterystatus...3.1...
Chapter5.Usingyourtable\$3
Frequentlyaskedquestions......33
BrowsingtheInternet....33..
ConnectingtotheInternet..33..
Usingthebrowser..34..
SearchingtheInternet......36
Usingenhancedwirelessfeatures.....37
ImportingWi-FiprofilesfromThinkPad
notebookcomputeryourtableB7...
Configuringhewirelessnetworkdisconnect policy....38
Usingyourtabletforentertainment.....39
Usingheadphonesorearphones39..
Usingcameras.....39..
Viewingpictures......41
Watchingvideos....41...
Listeningtomusic.....42..
Readingbooks.....42...
Obtainingmultimediafiles..42..
WorkingwithEmail.....43..
Managingyourcontacts......44
Workingwithyoufavoriteapplications
Managing recently launched applications.
Sharingyourmobiledataconnection.....45
WorkingwithUSBdevices......46
UsingthemicroUSBconnecto46..
Using the full-size USB connector 47...
UsingHDMIdevices.....48..
Usingthe3-in-1mediacardeader...48
Workingwiththeclock..50..
WorkingwithGoogleMapsandGPS.....51
GoogleTalk....52
YouTube......53
Chapter6. ThinkPadTableoption55
ThinkPadTabletKeyboardFolioCase.
ThinkPadTabletDock......56
UsingtheThinkPadTabletKeyboardFolioCase.56
UsingtheThinkPadTabletDock..59..
Chapter7. Using your tablet within an enterprise......61
SettingupMicrosoftExchangeaccounts....61
Accessingyourcompany'sVPN......61
Chapter8.Security....63
Protectingdataagainstviruses63..
Lockingthetabletscreen.....63
Encryptingthetabletinternalstorage64..
Encryptingtheflashmediacard.65..
Chapter9.Youandyourtable6.7
Comfortandaccessibility....67.
Usingyourtabletmorecomfortably7...
Accessibilityinformation......67
Gettingupdates......68..
Travelingwithyourtablet......69
Traveltips......69
Travelaccessories......70
Careandmaintenance......70
Cleaningyourtablet......70
Protectingthescreenwithareplaceablefilm.70
Storingthetabletforextendedperiods...70
Chapter10.Settings......71
Wireless&networks......71
Sound......74
Screen....74
Location&security......75
Applications......76
Accounts&sync......77
Privacy....78
USBsettings......78
Storage....79
Language&input......80
Accessibility......81
Date&time......82
OpticalTrackPoint......82
Abouttablet......83
Chapter11.Troubleshooting problems......85
Recoveringfromaseveresoftwareproblem.86
Chapter12.Gettingsupport..87
Lenovotechnicalsupport......87
Lenovouserforums......88
AppendixA.Regulatory information....89
Wirelessrelatedinformation......89
Location the UltraConnectwireless antennas....90
Exportclassificationnotice......91
Electronicemissionnotices......91
FederalCommunicationsCommission(FCC)
DeclarationofConformity......91
IndustryCanadaClassBemissioncompliance statement....91
European Union Compliance the
ElectromagneticCompatibilityDirective..92
GermanClassBcompliancestatement.92
KoreaClassBcompliancestatement...92
JapaneseVCCIClassBstatement...93
Japancompliancestatementfoproducts
whichconnecttothepowermainswithrated
currentlessthanorequalto20Aperphas93
Lenovproductserviceinformationfor
Taiwan....93
Additionalregulatoryinformation......93
AppendixB.Environmental, recycling,and disposal information....95
Lenovorecyclingstatement......95
Japanrecyclingstatements.....95
RecyclinginformationforBrazil.....96
EUWEEEstatements......96
BatteryrecyclinginformationforTaiwan.....97
BatteryrecyclinginformationfortheUnitedStates andCanada....97
Battery recycling information to the European
Union....97
China recycling information for Waste Electrical and Electronic Equipment (WEEE).....98
Chinasubstancedisclosuretable.....98
TurkishRoHS......98
UkraineRoHS......98
AppendixC.Notices......99
Trademarks.....100
Readthisfirst
Besuretofollowtheimportanttipsgivenheretogetthemostuseandenjoymentoutofyourtablet.Failure todosomightleadtodiscomfortorinjury,orcauseyourtablettofail.
Importantsafetyandhandlinginformation

Toavoidpersonalinjury,propertydamage,oraccidentaldamagetoyourThinkPad referredtoasthetablet),readalloftheinformationinthissectionbeforeusingit.
For detailed operating instructions refer the ThinkPadTabletUserGuide(this publication). You can access the ThinkPadTabletUserGuide by using one of the following methods:
- Gotohttp://www.lenovo.com/ThinkPadUserGuidesandfollowtheinstructionsonthescreen.
- Startyourtablet.Touchtheapplicationsicon page.Then,touchtheUserGuideicon.
Foradditionaltipstohelpyouoperateyourtabletsafely, goto: http://www.lenovo.com/safety
Handleyourtabletwithcare:
Donotdrop, bend, puncture, insertforeignobjects, or placeheavyobjectsonyourtablet. Sensitive componentsinsidemightbecomedamaged.
Yourtabletscreenismadeofglass. The glass might break if the tablet is dropped on a hardsurface, is the subject of a high impact, or crushed by a heavy object. If the glass chips or cracks, donottouch the brokenglassor attempt to remove it from the tablet. Stop using the tablet immediately and contact Lenovo® technical support for repair, replacement, or disposal information.
Donotdisassembleormodifyyourtablet:
Yourtabletisasealedunit.Therearenoend-userserviceablepartsinside.Allinternalrepairsmustbedone byaLenovo-authorizedrepairfacilityoraLenovo-authorizedtechnician.Attemptingtoopenormodifyyour tabletwillvoidthewarranty.
Replacement of the internal rechargeable battery must be done by a Lenovo-authorized repair facility or a Lenovo-authorized technician. Lenovo-authorized repair facilities or technicians recycle Lenovobatteries according to call laws and regulations.
Preventyourtabletandchargerfromgettingwet:
- Donotimmerseyourtabletinwaterorleaveitinalocationwhereitcangetsaturatedwithwater orotherliquids.
- DonotusetheThinkPadTabletACChargeroutdoors.
Useapprovedchargingmethodsonly:
You can use any of the following charging method to sit safely by charge the internal battery of your tablet:
| Chargingmethod | Tableton(Displayison) | Tabletofforinscreenlockmode(Displayisoff) |
| ThinkPadTabletDock(fastest chargingmethod) | ApprovedApproved | |
| ThinkPadTabletACCharger | Approved,butthebatterywillcharge slowly | Approved |
| ThinkPadTabletDCCharger | Approved,butthebatterywillcharge slowly | Approved |
| AUSBconnectionbetween the micro-USBconnectoronthetablet andaUSBconnectorofapersonal computerorotherdevicethat complieswiththeUSB2.0standards (slowestchargingmethod) | MightnotchargeduetoUSB2.0 powerlimits.Ifthepowerconsumptionofthetablet exceedsUSB2.0powerlimits,the batterywilldischargetocompensate fortheadditionalpowerrequiredby thetablet. | Approved |
Chargingdevicesmightbecomewarmduringnormaluse.Ensurethatyouhaveadequateventilationaround thechargingdevice.Unplugthechargingdeviceifanyofthefollowingoccurs:
- Thechargingdevicehasbeenexposedtorain,liquid,orexcessivemoisture.
•Thechargingdeviceshowssignsofphysicaldamage. - Youwanttocleanthechargingdevice.
Lenovoisnotresponsiblefortheperformanceorsafetyofproductsnotmanufacturedorapprovedby Lenovo.
Preventhearingdamage:
Yourtablethasaheadphoneconnector.Alwaysusetheheadphoneconnectorforheadphones(also-calleda headset)orearphones.
CAUTION: Excessivesoundpressurefromearphonesandheadphonescancausehearingloss.Adjustmentof theequalizertomaximumincreasestheearphoneandheadphoneoutputvoltageandthesound pressurelevel.Therefore,topprotectyourhearing,adjusttheequalizertoanappropriatelevel.
Excessiveuseofheadphonesorearphonesforalongperiodoftimeathighvolumecanbedangerousif theoutputoftheheadphoneorearphoneconnectorsdonotcomplywithspecificationsofEN50332-2. TheheadphoneoutputconnectorofyourtabletcomplieswithEN50332-2Subclause7.Thisspecification limitsthetablet'smaximumwidebandtrueRMSoutputvoltageto150mV.Tohelpprotectagainsthearing loss,ensurethattheheadphonesorearphonesyouusealsocomplywithEN50332-2(Clause7limits)fora widebandcharacteristicvoltageof75mV.UsingheadphonesthatdonotcomplywithEN50332-2canbe dangerousduetoexcessivesoundpressurelevels.
If your tablet camewith headphones or earphones in the package, as a set, the combination of the headphones or earphones and the tablet already complies with these specifications of EN50332-1. If different headphones or earphones are used, ensure that they comply with EN50332-1 (Clause 6.5 Limitation Values). Using headphonesthat donot comply with EN50332-1 can be dangerous due to excessive sound pressure levels.
Take care when using your tablet in an motor vehicle or on a bicycle:
Alwaysprioritizeyoursafetyandthesafetyofothers.Followthelaw.Localawsandregulationsmight governhowyoucanusemobileeelectronicdevices,suchasyourtablet,whileyoudriveamotorvehicle orrideabicycle.
Disposeaccordingtolocallawsandregulations:
When your tabletreachesthe endofitsusefullife, donotcrush, incinerate, immerseinwater, or dispose of your tabletinanymannercontrarytolocallawsandregulations. Some internal parts contains substances that can explode, leak, or have an adverse environmental affect if disposed of incorrectly.
SeeAppendixB"Environmental,recycling,anddisposalinformation"onpage95foradditionalinformation.
Keepyourtabletandaccessoriesawayfromsmallchildren:
Yourtabletcontainssmallpartsthatcanbeachokinghazardtosmallchildren.Additionally,theglassscreen canbreakorcrackifdroppedonorthrownagainstahardsurface.
Protectyourdataandsoftware:
Donotdeleteunknownfilesorchangethenameoffilesordirectoriesthatwerenotcreatedbyyou; otherwise,yourtabletsoftwaremightfailtowork.
Beawarethataccessingnetworkresourcescanleaveyourtabletvulnerabletocomputerviruses,hackers, spyware,andothermaliciousactivitiesthatmightdamageyourtablet,software,ordata.Itisyour responsibilitytoensurethatyouhaveadequateprotectionintheformoffirewalls,antivirussoftware,and anti-spywaresoftwareandkeepthissoftwareuptodate.
Keepelectricalappliancesuchasanelectricfan,radio,high-poweredspeakers,airconditioner,and microwaveovenawayfromyourtabletbecausethestrongmagneticfieldsgeneratedbytheseappliances candamagethescreenandthedataonthetablet.
Takeprecautionswithplasticbags:

DANGER
Plasticbagscanbedangerous.Keepplasticbagsawayfrombabiesandchildrentoavoiddanger ofsuffocation.
Beawareofheatgeneratedbyyourtablet:
When your tabletisturnedonorthebatteryischarging, some partsmightbecomehot. The temperature that they reach depends on the amount of system activity and the level of charge in the battery. Extended contact with your body, event throughout clothing, could cause discomfort over evening burn. Avoid keeping your hands, your lap, or any other part of your body in contact with a hot section of the tablet for any extended time.
PolyvinylChloride(PVC)cableandcordnotice
WARNING: Handling the cordon this product or cords associated with accessories sold with this product will expose you to lead, a chemical known to the State of Californiatocause cancer, and birth defect or other reproductive harm. Wash hands after handling.
Chapter1.Productoverview
Thischapterprovidesanoverviewofthetablet,includingthelocationsoftheconnectorsandcontrols,tablet features,accessories,specifications,operatingenvironment,andpreinstalledwidgetsandapplications.
Tabletlayout

Figure1. ThinkPadTabletfrontandsideview
| ePerstorage | 1 Powerbutton | 12 Speaker |
| 2 microphone | ■ | |
| 3 Rear-facingcamera | 14 ThinkPadTabletPenstringholes | |
| 4 eadphononMorpheneoobetton | ■ | |
| Ambientightsens | 5 inHDMconnector | ■ |
| 6 Micro-USBconnector | 17 Front-facingcamera | |
| 7 hinkMadrableDorseconnector | ■ | |
| Backbutton | 8 SIMcardslot | 19 Homebutton |
| 9 mergencyesehole | ■ | |
| Browser | 10 im-media-cardeader | ■ |
| rotationlockbutton | 11 SBconnector | ■ |
1 Powerbutton
Pressandholdthepowerbuttonforafewsecondstoturnonthetablet.Toturnoffthetablet,pressand holdthepowerbuttonforfewsecondsandhertouchOKfromthePoweroffmenu.
Whenthetabletison, pressthepowerbuttononcetolockorunlockthescreen.
2 Microphone
The built-in microphone capture sound and voice when it is used with an application capable of handling audio.
Todisable the microphone and the Android Settings screen and touch Sound-Microphone.
3 Rear-facingcamera
Yourtablethasa5-megapixelrear-facingcamera, which you can uset to take pictures and create videos. For more information, see "Using cameras" on page 39.
4 Headphoneormicrophoneconnector
Connectheadphonestotheconnectortolistentostereosoundfromthetabletorconnectamicrophone torecordaudioormakecalls.Youalsocanconnectaheadsetwithanintegratedmicrophonethatusesa combinedaudio/microphoneconnector.
5MiniHDMIconnector
Yourtablethasaminihigh-definitionmultimediainterface(HDMI)connector,adigitalaudioandvideo interfacethatcanconnectacompatibledigitalaudiodeviceorvideodisplaysuchasahighdefinition television(HDTV).Formoreinformation,see"UsingHDMIdevices"onpage48
6 MicroUSBconnector
UsethesuppliedUSBcabletoconnectapersonalcomputertothemicroUSBconnectorfordatatransfer. See "UsingthemicroUSBconnector" on page 46
YoualsocanusethesuppliedUSBcableandtheacchargertochargethetabletwhenthebatterypoweris low.See"Chargingthebattery"onpage29.
7 ThinkPadTabletDockconnector
UsethisconnectortoconnectaThinkPadTabletDock.TheThinkPadTabletDockisavailableasanoption fromLenovoathttp://www.lenovo.com/accessories/services/index.html.Formoreinformation,see"Using theThinkPadTabletDock"onpage59.
8 SIMcardslot
OpenthecardslotcovertoaccesstheSubscriberIdentificationModule(SIM)cardslot.InsertaSIMcardto establishawirelessWideAreaNetwork(WAN)connection.
Note: The SIM cardslot is not functional on Wi-Fi-only models.
9 Emergencyresethole
If your tablet stops responding and you cannot turn it off by pressing and holding the power button, reset the tablet by inserting a straightened paper clip into the emergency resetholet to turn off the tablet.
103-in-1mediacardreader
Openthecovertoaccessthe3-in-1mediacardreader.Installasecuredigital(SD)card,asecuredigital highcapacity(SDHC)card,oraMultiMediaCard(MMC)intothe3-in-1mediacardreaderfordatastorage. See "Usingthe3-in-1mediacardreader" onpage48formoreinformation.
11USBconnector
OpentheUSBconnectorcovertoaccessthefull-sizeUSBconnector.Usethefull-sizeUSBconnector toconnectacompatibleUSBdevice,suchasaUSBstoragedeviceoraUSBkeyboard.See"Usingthe full-sizeUSBconnector"onpage47.
If your tablet comes with a ThinkPad Tablet Keyboard Folio Case you have purchased one, us this connector to connect the keyboard. See "Using the ThinkPad Tablet Keyboard Folio Case" on page 56.
12 Speaker
Theintegratedspeakerprovidesaudiooutputforvideoandmusicplayback.
13 ThinkPadTabletPenstorage
If your tablet is shipped with a ThinkPad Tablet Penory you have purchased one, use the storages lott to store it.
14 ThinkPadTabletPenstringholes
UsetheholestotethertheThinkPadTabletPentoyourtablettoavoidlosingit.
15 Volumecontrolbutton
Pressthisbuttontoadjustthetabletvolume.
16 Ambientlightsensor
The ambient lights sensor detects the brightness of the environment. Thescreen brightness automatically adjusts depending on the ambient light conditions detected by the built-in ambient lights sensor.
17 Front-facingcamera
Yourtablethasa2-megapixelfront-facingcamera,whichyoucanusetotakepictures,createvideos,ormake videocallsincollaborationwithWebapplications.Formoreinformation,see"Usingcameras"onpage39.
18 Multitouchscreen
Touchthescreentousethecontrolsonthescreenincludingbuttons,menuitems,andtheonscreen keyboard. Formoreinformation,see"Usingthemultitouchscreen"onpage14.
19 Homebutton
PresstheHomebuttontogotothemainHomescreenatanytime.
20 Backbutton
PresstheBackbuttontoreturntothepreviousscreen,ortocloseadialogboxortheonscreenkeyboard.
21 Browserbutton
Pressthebuttontoopenthebrowser.
22 Screenrotationlockbutton
Pressthebuttontodisablethescreenrotationfunction.Pressagaintoenableit.
Accessories

Figure2.Accessories
ThinkPadTableACChargerThechargeconsistsofwpartssnap-inprongsandchargehead.
Inserttheprongsintothechargerheadtosetuptheaccharger.UsetheacchargertogetherwiththesuppliedUSBcabletoprovideacpowertoyourtabletandchargethebattery.
USB cable Use the USB cable to connect your table top personal compute for data transfer or set together with the acchargertocharge your tablet.
ThinkPadTablePen(fosomenodels)IfoutabletequippedwithThinkPadTablePenuset
toinputtextordrawgraphicsinanaturalmannerandperformotheroperationswithouttouchingthe screenwithyourfinger.Ifyourtabletissoldwithoutthepen,itisavailableleasanoptionfromLenovoat http://www.lenovo.com/accessories/services/index.html.Formoreinformation,see"UsingtheThinkPad TabletPen"onpage17 .
Features
Processor
•NVIDIA ® Tegra™2dual-coreARMprocessor
Operatingsystem
-Android3.1
Memory
1GB
Internalstorage
•16GB,32GB,or64GB(dependingonthemodel)
Display
•Size:257mm(10.1inches)
•Screenresolution:1280x800pixels
•Automaticbrightnesscontrol
•Multitouchtechnology
•ThinFilmTransistorLiquidCrystalDisplay(TFTLCD)technology
•Supportforbattery-poweredThinkPadTabletPeninput
4UserGuide
Integratedcameras
- Front-facingcamera,2megapixel
•Rear-facingcamera,5megapixel
Connectors
•OneminiHDMIconnector
•OneUSB2.0connector
•OnemicroUSBconnector
•OneThinkPadTabletDockconnector
Cardslotorcardreader
•SIMcardslot
•3-in-1 mediacardreader
Wirelessfeatures
- WirelessLAN
- Bluetooth2.1
•WirelessWAN(onsomemodels)
Specifications
Size
•Width:260.4mm(10.3inches)
•Depth:181.7mm(7.2inches)
•Height:14mm(0.55inches)
Battery
•24.1Wh3250mAhLi-Polymerbattery
Powersource(accharger)
•Sine-waveinputat50to60Hz
- Inputratingoftheaccharger:100Vacto240Vac
Operatingenvironment
•Maximum altitude without pressurization:3048m(10000ft)
- Temperature:
-Ataltitudesupto2438m(8000ft) Operating:5.0°Cto35.0°C(41°Fto95°F) Storage:5.0°Cto43.0°C(41°Fto109°F)
-Ataltitudesabove2438m(8000ft) Maximumtemperaturewhenoperatingunderunpressurizedconditions:31.3°C(88°F)
- Relativehumidity:
-Operating:8%to80%
If possible, place your tabletinadry, well-ventilated area without direct exposure to sunshine. Donot use or store your tablet industry, dirty areas, are extreme hot or cold areas.
Preinstalled widgets and applications
Thistopicprovidesanoverallintroductiontothewidgetsandapplicationspreinstalledonyourtablet.
Widgets
AwidgetisasmallapplicationthatyoucanplaceonaHomescreentoprovidequickandeasyaccessto information,anapplication,orafunction.ForadditionalinformationaboutplacingwidgetsonaHome screen,see"CustomizingyourHomescreens"onpage19
The following table provides a list of some helpful widget that might be preinstalled on your tablet.
| WidgetDescription | |
| AccuWeather.com | ViewtheweatherinformationforyourlocationfromtheWeb. |
| AnalogclockViewthecurrenttime. | |
| AppShopAccessLenovoApp | Shoptodownloadapplicationsandgames. |
| Bookmarks | ViewURLsyouhavebookmarkedasfavorites.TouchabookmarktogotothedesiredWebsite. |
| CalendarCheckforthedateand | dscheduledeventsforthatdate.TouchtoopentheCalendarapplication. |
| ConnectifyHotspotConnections | ViewConnectifypeerswhoaresharingyourmobileconnectiondata. |
| ConnectifyHotspotStat | checkforthehotspotsharingstatus. |
| Contact | Viewselectedcontacts.Touchtoeasilygetintouchwiththecontact. |
| Viewalistofrecentlyreceivede-mails.TouchtolaunchtheEmailapplication. | |
| FeaturesandMessages | GetnotificationsaboutthelatestsoftwareupdatesfromLenovoandthird-partyserviceproviders. |
| GoogleInformationonthe | internet. |
| Emailede-mailsfromyourGmailaccount. | |
| Homescreentips | Readtipsonhowtoperformbasicoperationswithyourtablet. |
| LenovoLaunAbZesscommonlyusedapplicationsandAndroidsettings. | |
| LockControl | Lockthescreen. |
| dMarkettodownloadapplications. | |
| MicMuteControl | Enableordisablethemicrophone. |
| Music | Playmusicorotheraudiofiles. |
| Pictureframe | Viewpicturesinthepicturegallery. |
| SocialTouch | Vieweventsconductedthroughvariouswidgetsandapplicationsonyourtablet,suchasPOPMail,GoogleMaps,andGoogleCalendar. |
| SpeakerMuteControl | Enableordisabletheaudiooutput. |
Applications
Anapplicationisasoftwareprogramthatenablesyoutoperformaspecifictask.
Note: Preinstalled applications vary by geographic locations and a subject to change.
The following table lists some application that might be preinstalled on your tablet.
| ApplicationDescription | |
| AccuWeather.com | GettheweatherinformationfordifferentlocationsfromtheWeb. |
| AmazonKindle | Find,shopfor,download,andreadKindleeBooksfromthemassiveselection. |
| AmazonMP3 | DownloadorpurchasmusicfromtheAmazonMP3store. |
| AppShopBrowse,download,andinstallgamesandapplicationsfromLenovoAppShop. | |
| BBCnewsViewinternationalnewsandlistentothelatestnewsheadlinesandBBCWorldServiceradio. | |
| BooksReadbooksthatyouhavedownloadedorcopiedtoyourtablet. | |
| BrowserAccesstheInternet. | |
| Calculator | Performbasicarithmeticoperations. |
| Camera | Takepicturesandrecordvideos. |
| ClockSetupalarmsanddisplaythecurrenttime. | |
| ContactsSaveandmanagetheinformationofyourcontacts. | |
| DocumentsToGo | View,edit,andcreateMicrosoft®Word,Excel®,andPowerPoint®files,orviewPDFfiles. |
| Downloads | Manageddownloadedfiles. |
| eBuddy | ChatonlinewithfriendsthroughWeb-basedinstantmessagingservicessuchasMSN,Yahoo,GoogleTalk,andsoon. |
| EmailManageallyoure-mailaccountsinthissingleapplication. | |
| Gallery | Viewallpicturesorvideosthatyouhavetakenwiththecameras. |
| GoogleSearchSearchforinformationonthelInternet. | |
| GmailSendorreceivee-mailsusingyourGmaile-mailbox. | |
| Latitude | ViewthelocationsofyourfriendsonGoogleMapandshareorhideyourlocation. |
| Maps | FindlocationsandgetdirectionswithGoogleMaps. |
| Market | Browse,download,andinstallapplicationsfromAndroidMarket. |
| Messaging | Sendtextmessagestoyourfriends,colleagues,andfamily. |
| enPlaymusicstoredonyourtablet. | |
| mSpotMovies | Rentyourfavoritemovietowatchit. |
| Music | Playmusicstoredonyourtabletormusicstoredonanoptionallyinstalledflashmediacard. |
| PrinterShare | PrintpicturesanddocumentstoWi-FiprinterssharedonyourLocalAreaNetwork(LAN)orremoteprintersovertheInternet. |
| Settings. | |
| Slacker | Listentoover100freeexpert-programmedradiostationsfromeverygenreorcreateyourowncustomstations. |
| SocialTouch | Vieweventsconductedthroughvariouswidgetsandapplicationsonyourtablet,suchasPOPMail,GoogleMaps,andGoogleCalendar. |
| Talk | ChatwithotherGoogleTalkusers. |
| USBMediaIdentitytransferdatabtweenaUSBstoragedeviceandyourtablet. | |
| ApplicationDescription | |
| VoiceSearch | Performasearchbyspeakingyoursearchterms. |
| YouTube | ViewanduploadYouTubevideosfromyourtablet. |
| ZinioReader | PurchaseandviewdigitalmagazinesfromZinio. |
Chapter2.Gettingstarted
Thischapterhelpsyouquicklystartusingyourtablet.
InstallingtheSIMcard
IfyourtablethasawirelessWANfeature,itmightrequireaSIMcardtoestablishwirelessWANconnections. Dependingonthecountryofdelivery,theSIMcardmightalreadybeinstalledinyourtabletormightbepart oftheshippingcontentsthatcamewithyourtablet.
Attention: When installing or removing the SIM card, don't touch the SIM card metal connectors. As precaution, always hold your tablet in your hand before you install or remove the SIM card to avoid electrostatic discharges.
ToinstallaSIMcard,dothefollowing:
TurnofftablebypressinghpowebuttonforfewsecondsandhertouchOKfromthePoweroffmenu.
2.OpentheSIMcardslotcoverandlocatetheSIMcardslot.TolocatetheSIMcardslot,see"Tablet layout"onpage1.
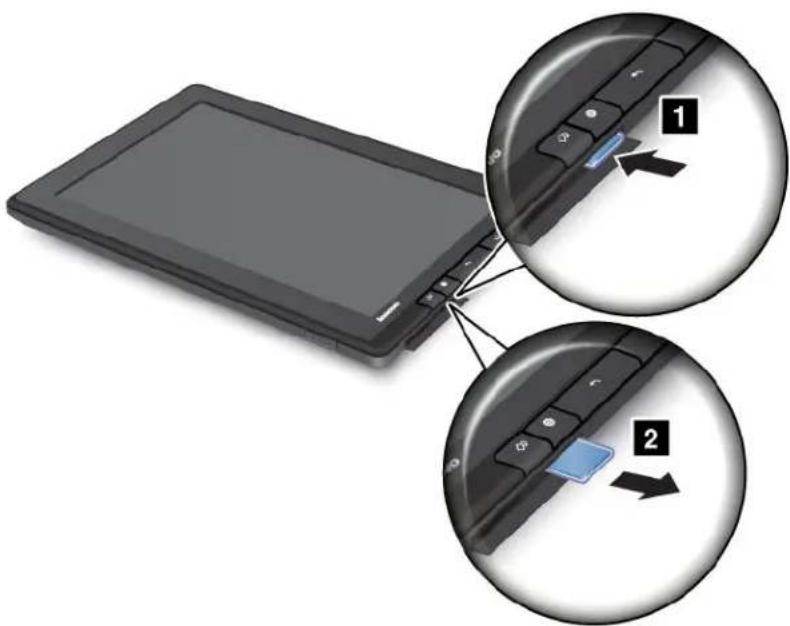
3.HoldtheSIMcardwiththemetalcontactsfacingdownandpointingtowardthetablet,andtheninsertit firmlyintotheSIMcardslotuntilyouhearaclick.

natural_image
Illustration of a digital tablet device with a close-up inset showing a blue key inserted into the screen (no text or symbols visible)4.ClosetheSIMcardslotcoverandrestartyourtablet.
ToremoveaSIMcard,dothefollowing:
TurnofftablebypressingpowerbuttonforfewsecondsandhertouchOKromthePoweroffmenu.
-
LocatetheSIMcardslotandopentheSIMcardslotcover.TolocatetheSIMcardslot,see"Tablet layout"onpage1.
-
PushtheSIMcardinwardandthenreleaseit.TheSIMcardejects.GentlyslidetheSIMcardout oftheslot.
Settingupyourtablet
Thefirsttimeyouturnonyourtablet,theSetupWizardisdisplayedtohelpyousetupyourtabletstepby step.Touchtherightarrowtogotothenextstepafteryoufinishasetting.
1. LanguageandTimeZone
Selectthelanguageyouwanttouseonyourtabletandsetthedateandtime.
2. Licenseagreement
TouchAccepttoacceptthelicenseagreement.
Note: You cannot go forward until you accept the agreement.
3. Using theonscreenkeyboard
This step provides your opportunity to practice using the screen keyboard Touch Skip/You do not want to practice.
4. Wirelessconnection
The table scans available Wi-FinetworksTouchWifnetworkwithinrangesetupWi-Fi connection.
If your tablets support wireless WAN connection, touch Setup your Mobile Broadband (3G) connection to activate your mobilenetwork account.
Note: ASIMcardisrequiredtoactivateyourmobilenetworkaccount.See"InstallingtheSIMcard" onpage9.
If you choosen ootto connect to a wireless network now, touch the right arrow to goto then next step. You can connect to a wireless network later.
5. GoogleAccountandLocationServices
Ifawirelessconnectionhasbeenestablished,createaGoogleAccountorsignintoyourGoogle Accountifyoualreadyhaveone. Otherwise,touchtherightarrowtofinishthesetup.
YourGoogleAccount
Tooptimizeyourtabletcapabilities,registerandsignintoaGoogleAccounttouseGoogleapplications, downloadapplicationsfromAndroidMarket,backupyoursettingsandotherdatatoGoogleservers,and takeadvantageofotherGoogleservicesonyourtablet.
Note: An Internet connection is required to create or sign into a Google Account. Ensure that your tablet has an active Wi-Fi mobile data connection (2Gor3G) before you register or sign in.
CreatingaGoogleAccount
TocreateaGoogleAccount, dothefollowing:
- From the main Home screen touch the Android Settings down the launch zone, to touch the application for the clicba and her touch Settings The Android Settings screeropens.
2TouchAccounts&syne-Addaccount.
3. TouchGoogleAccountsfromtheaccounttypelist.
4 Touch Create account and her follow the instructions on the screert to create your account.
AddingandremovingaGoogleAccount
ToaddaGoogleAccount, dothefollowing:
- From themairHome screentouch the Android Settings download LaunchZoceptouch the applicationsicon from the actionbarandthentouch Settings. The Android Settingsscreenopens.
2TouchAccounts&syne-Addaccount.
- Touch the account typethat you want to add.
- TypeyouraccountinformationandtouchSignin.
- Follow the instructions on the screent of finishing the account. All the added accounts are listed under Manage accounts on the Accounts & syncscreen.
ToremoveaGoogleaccount,touchtheaccountfromtheaccountslistontheAccounts&syncscreen,andthentouchRemoveaccountfromthetoprightcorner.
SynchronizingyourGoogleAccountwithyourtablet
The changes you maketo any added account on the tablet or the Web can be automatically synchronized with each other. By default, the Auto-sync function is enabled.
If you want to synchronize your accounts with your tablet manually, do the following:
- GototheAccounts&syncsettingsscreen.
- Touch the account that you want to synchronize with your tablet.
3Configure the temshayouwantsynchronizeandhertouchtheSyncNowcorthe toprightcornerofthescreen.
If you have forgotten your Google Account password, you can reset it by doing the following:
- Gotohttp://www.google.comandtouchSignin.
2TouchCan'taccessyouraccount?theSigninwithyouGoogleAccountboxandherfollowtheinstructionsonthescreentoresetyourpassword.

ChangingthesynchronizationsettingsforaGoogleAccount
ToconfigurethesynchronizationsettingsforaGoogleAccount,dothefollowing:
- OpentheAccounts&syncsettingsscreen.
- Touch the account that you want to synchronize with your tablet. A list of items that this account cans synchronize is displayed.
- Selector clear the checkbox for an item to change the synchronization settings.
Homescreens
Asthestartingpointstouseyourtablet, Homescreensdisplaythestatusofyourtabletandprovideyou withaccesstoapplications.
TherearefiveHomescreens.Bydefault,themainHomescreenisdisplayedwheneveryouturnonyour tabletorpresstheHomebutton.Touchablankareaonthescreenandslideyourfingerleftorright horizontallytoviewtheotherHomescreens.
Note: The available widgets and applications shortcut on Homescreens might vary by geographic location.
YoucancustomizethefiveHomescreenstomeetyourpersonalpreferences.Forexample,youcanchange themainHomescreen,addorremovewidgetsorapplications,changethewallpaper,andsoon.Formore information,see"CustomizingyourHomescreens"onpage19

Figure3.Homescreen
| 1 actionbar | 3 systembar |
| 2 desktop |
Actionbar
TheactionbarislocatedatthetopofaHomescreen:
- GoogleSearch: Search of information on the Internet. See "Searching the Internet" on page 36 formoreinformation.
- GoogleVoiceSearch: Search for information on the Internet by speaking. See "Searching the Internet" on page 36 form more information.
- Applications: Open the application library to view wall installed applications.
- Customize : OpentheHomescreenscustomizationviewtocustomizetheHomescreens.
Desktop
Desktopistheareawherewidgetsorapplicationsshortcutsaredisplayed.
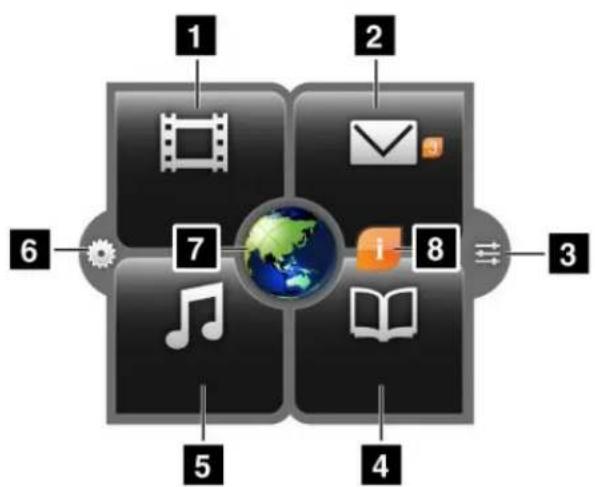
Bydefault,aLenovo-uniquewidgetnamedLenovoLaunchZoneisdisplayedatthecenterofthemainHome screen.LenovoLaunchZoneprovidesyouwitheasyaccesstoAndroidsettings,notificationsforthelatest updatesfromLenovo,andcustomizablelaunchpointstoyourfavoriteapplications.
flowchart
graph TD
    A["1 Filmstrip"] --> B["2 Email"]
    B --> C["3 i"]
    C --> D["4 Open Book"]
    D --> E["5 Note"]
    E --> F["6 Gear Icon"]
    style A fill:#f9f,stroke:#333
    style B fill:#ccf,stroke:#333
    style C fill:#cfc,stroke:#333
    style D fill:#fcc,stroke:#333
    style E fill:#ffc,stroke:#333
    style F fill:#fcc,stroke:#333
Figure4. LenovoLaunchZone
Note: Default applications in Lenovo Launch Zone vary by geographic locations.
| 1 Watch | Launchyourfavoritevideoplayer,suchasmSpotMovies,towatchmoviesorvideos. |
| 2 Email | Launchyourfavoritee-mailapplicationtoreadandsende-mails.ThenumbernexttotheEmailiconindicatesthenumberofunreade-mails.Youcan disablethisfeaturethroughtheLenovoLaunchZonesettings.See“CustomizingLenovo LaunchZone”onpage21 . |
| 3 Androidsettings | OpentheAndroidSettingsscreentoconfigureyourtabletsettings. |
| 4 Read | Launchyourfavoritee-bookreader,suchasAmazonKindle,toreadbooks,magazines, orotherwrittencontents. |
| 5 Listen | Launchyourfavoritemusicplayer,radioplayer,ormusicdownloadsitetolistentomusic, radiobroadcasts,oraudiobooks. |
| 6 LenovoLaunchZone settings | OpentheLaunchZonesettingsscreentochangethecolorofLenovoLaunchZoneor changetheconfigurationofeachlaunchpoint.Formoreinformation,see“Customizing LenovoLaunchZone”onpage21 . |
| 7 BrowserLaunchtheBrowserapplication. | |
| 8 Featuresand messages | Receiveinformationandtipsaboutyourtablet,aswellasspecialoffersinconfigured categories.ThisiconisdisplayedonlywhenthereareunreadsystemnotificationsfromLenovo.Touchthisicontoviewdetailsofthenotifications. |
LenovoLaunchZoneisfullycustomizablethroughtheLenovoLaunchZonesettings.Youcanchange the centerare of LenovoLaunchZonewhich is predefined Browser today viewer You also can change any of four quadrants predefined Watch video, mail, Readbooks, listerto music, to launch any installed application. In this way, you can load your most commonly used applications on LenovoLaunchZone and access those applications with asimpletouch. For instructions on how to changethesesettings, refer to "Customizing LenovoLaunchZone" on page 21
Systembar
ThesystembaratthebottomofaHomescreendisplaysstatusicons,notificationicons,thecurrenttime,andseveraldevicecontrols:
- Back: Gobacktothepreviousscreen.
•Home: Return to themain Homescreen at any time in any application. - RecentApps: Openaviewoffivemostrecentlylaunchedapplications. Formoreinformation, see "Managingrecentlylaunchedapplications" onpage45.
- FavoriteApps:La: theFavoriteAppsutility.See"Workingwithyourfavoriteapplications" on page44 formoreinformation.
•Time,status,andnotificationarea:
Therightsideofthesystembardisplaystime,systemstatusicons,andnotificationicons.
Whenyoutouchthetimearea,theStatusDetailspanelopensdisplayingthecurrenttime,date,wireless connectionstatus,andbatterystatus.
When any notifications are present, the summary is listed below the status details. Touch an notification to view the detailed information.
WhenyoutouchanywhereintheStatusDetailspanel,theQuickSettingspanelisdisplayedbelowthe statusdetails.ThroughQuickSettings,youcanadjustthedisplaybrightnessandenableordisablea feature,suchasmobilenetworkconnection,GPS,Bluetooth,Airplanemode,Wi-Fi,Emailsync,screen orientation,andnotifications.
ToclosetheQuickSettingspanel,touchanywhereelseonthescreen.
Usingthemultitouchscreen
Thistopicprovidesinstructionsonhowtousethemultitouchscreen.
Touch
Tapgentlyonthescreenwithyourfingertiptolaunchanapplication,selectanitem,openamenu,ortypetextusingtheonscreenkeyboard.
Touchandhold
Touchandholdanobjectorablankareaonthescreenuntilanactionoccurs.
Drag
Tomoveanitemsuchasanimageandanicononthescreen,touchandholdyourfingerontheitem,move yourfingertothedesiredlocation,andthentakeyourfingeroffthescreen.
Swipeorslide
MoveyourfingerinaverticalorhorizontaldirectiononthescreentoscrollthroughHomescreens,Web pages,lists,picturethumbnails,andsoon.
Zoom
ZoomoutMovewdingersclose together the screens if you are picking something up to reduce the viewofanimageoraWebpage.
ZoominMovewdingersaparbrthescreertoenlargetheviewofImageonWebpage.
Double-tap
Forsomeapplications, quickly tapt twice on the screentozoomin. Double-tapagaintozoomout.
Editing
•Tocutorcopytext,dothefollowing:
- Touchandholdthewordyouwanttouseuntilthepop-upmenuisdisplayed.
2TouchSelectextThedimenusdisplayedathetopthescreenTheselectedwords highlightedandtwoselectiontabsaredisplayedundertheword.
- Drageitherselectiontabtoexpandorreducetherangeoftheselectedtext.Ifyouwanttoselectall text,touchSelectall.
4TouchCubCopyfromtheeditmenuTheextsave theclipboard.
- Topastetext,dothefollowing:
-
Touchandholdtheareawhereyouwanttopastethetextthatyoucutorcopied.Apop-upoptionis displayed.
-
TouchPastetopastethetext.
Rotatethescreen
Your tablethasabuilt-in motionsensorthatsupportsthescreenauto-rotationfeature.Bydefault,this featureisenabled.Whenyourotatethetablet,thescreenautomaticallyrotatestolandscapeorportraitview.
Todisablethescreenauto-rotationfeature,dooneofthefollowing:
- Pressthescreenrotationlockbuttonfromtherightsideofyourtablet.
- TouchthetimeareafromthesystembarandtouchanywhereintheStatusDetailspaneltoopentheQuickSettingspanel.ThentouchLockscreenorientation.
- FromthemainHomescreen,touchtheAndroidSettingsicon

onLenovoLaunchZone,ortouch
the application for the action baand thenouch SettingsThe Android Settings screen opens Thenouch Screen-Auto-rotatescreen.
Note: Some applications do not support the screen auto-rotation feature.
Usingtheonscreenkeyboard
Theonscreenkeyboarddisdisplayedautomaticallyanytimeyouneedtotype.Itautomaticallyrotatestoeither theportraitorlandscapeviewbasedonthetabletorientation.Usetheonscreenkeyboardtotypetext, numbers,symbols,andothercharacters.
YourtabletispreinstalledwiththeAndroidkeyboardandtheFlexT9keyboard.Youcandownloadmore inputmethodsfromAndroidMarket.
Typingtext, numbers, symbols, and other characters
Whenyouneedtotypetext,touchthetextfieldtobringuptheonscreenkeyboard,thentouchkeysonthe
keyboardtotype.Toclosetheonscreenkeyboard,touchthedownarrowbutton

fromthesystembar.
•FortheAndroidkeyboard:
Touchtheshiftkeytocitalizethecharacter.Double-taptheshiftkeytomakeallcharacters capitalized.Bydefault,theauto-capitalizationfunctionisenabledwhenyouaretypingEnglish.
Totypenumbersandsymbols,touchthe123key

toswitchtothenumbersandsymbolskeyboard.
Toinputtextbyspeaking,touchthemicrophonekeytostan speaking.
•FortheFlexT9keyboard:
Touchtheshiftkeytocapitalizethecharacter.Double-taptheshiftkeytomakeallcharacters capitalized.Bydefault,theauto-capitalizationfunctionisenabledwhenyouaretypingEnglish.
Totypenumbersandsymbols,touchthe123key

toswitchtothenumbersandsymbolskeyboard.
FlexT9alsosupportsspeakmode,whichmeansyoucaninputtextbyspeaking.Tousethespeakmode,touchthedragonflamekeyandspeakthetextthatyouwanttoinput.Whenyouaredone,simplystoptalking.FlexT9convertsourspeechtovisualtext.Innoisyenvironments,itmightbenecessarytomanuallystopthespeakmodebytouchinganywhereonthekeyboard.
If you prefer to input text by writing, touch the pen key

toenablethehandwritingmode.
TolearnmoreaboutFlexT9, gotohttp://www.dragonmobileapps.com/android/flex_overview.html.
Changingtheinputmethodwhentyping
Tochangetheinputmethodwhentyping,dothefollowing:
•FortheAndroidkeyboard:
- Touchandholdthesettingskeytobring theinputmethodselectiondialogbox.
- Touchthedesiredinputmethodfromthelist.
- FortheFlexT9keyboard:
- Touchandholdthe123keytobringuptheFlexT9inputmethodselectiondialogbox.
- TouchSelectInputMethod.
- Touchthedesiredinputmethodfromthelist.
Usingtheonscreenkeyboardinotherlanguages
Tochangetheinputlanguage,dothefollowing:
1 From the main Home screen touch the Android Settings screen open a launch zone, touch the application from the other and her touch Settings The Android Settings screen opens.
2Touch Language Input-Configure input method. All input methods are listed with their submenus.
-
FothAndroidkeyboardtouchActiveInputmethodsandDisablehSelectionUsesystem languageFothFlexT9keyboardtouchSettings-Languageandsettings.
-
Touchthedesiredinputlanguagefromthelanguagelist.
-
Touch the Back button when you are done.
If you have configured multiple languages and want to switch to another language when you are typing text, do the following:
- FortheAndroidkeyboard:
- Touchandholdthesettingskeytobri gtptheinputmethodselectiondialogbox.
- Touchthedesiredlanguagefromthelist. Theselectedlanguageisdisplayedonthespacekey.
- FortheFlexT9keyboard:
- Touchandholdthespacekey.Apop-upmenuisdisplayedlistingallofthelanguageesthatyou haveconfigured.
- Touch the desired language from the pop-up menu. These selected language is displayed on the space key.
Dictionary
Your tablethasdictionariesinmanylanguageesthatcanbehelpfulwhencomposingmessagesand documents.Theappropriatedictionaryisactivatedautomaticallywhenyoutouchasupportedkeyboard.
Theactive dictionary suggests corrections or completes the word while you type. You donot need to interrupt your typing to accept the suggested word.
- Accepting or rejecting dictionaries suggestions
Toacceptadictionarysuggestion,touchthespacekeyonthekeyboardwhenthedictionarysuggestion isdisplayed. Torejectadictionarysuggestion,finishtypingthewordthatyouwant,andthentouchthe suggestiontodmissitbeforetypinganythingelse.
- Correctingawordusingthedictionarysuggestedcorrections
If you misspellaword, the word is underlined with a dotted line. Touch them misspelled word and alist of suggested corrections is displayed. Touch the on that best matches your word. Them misspelled word is replaced.
YoualsocancreateyourowndictionarybyusingtheUserdictionaryfunction.
Toaddawordtoyourdictionary,dothefollowing:
- From the main home screen touch the Android Settings download, to touch the application from the order bar and then touch Settings The Android Settings screen opens.
2TouchLanguage&Input-Usedictionary-Addaddyourword.
Disablingtheonscreenkeyboard
If you prefer to use a physical keyboard, just connect an external USB keyboard or wireless Bluetooth keyboard to your tablet. The own screen keyboard is disabled automatically.
UsingtheThinkPadTabletPen
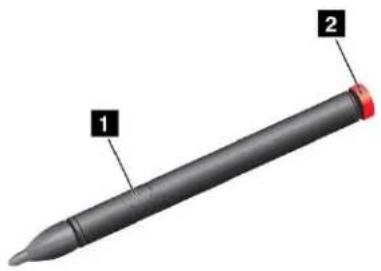
Thebattery-poweredThinkPadTabletPenenablesyoutoinputtextordrawgraphicsinanatural manneSometabletsarequippedwithThinkPadTablePerasstandardeatureFor tabletsthatareshippedwithouttheThinkPadTabletPen,youcanorderapenfromLenovoat http://www.lenovo.com/accessories/services/index.html.
natural_image
3D rendering of a pen-like object with labeled parts (1 and 2), no text or symbols present.Figure5. ThinkPadTabletPenoverview
TousetheThinkPadTabletPen, hold the pen and gently touch the screen with the tip to accomplish actions such as touch, touch and hold, drag, and slide. You also can touch an item or blank area with the pentip and press the active button to imitate such and hold operation.
If the battery power runs out the active but stops functioning Unscrew the battery can remove it to replace the battery.
Whendrawingorwritingwiththepen,holdthepenverticallytoachievethebestlinequality.
Note: The ThinkPad Tablet Penusesone AAAAalkaline battery.
Usethepeninsteadofyourfingerinthefollowingconditions:
- Whenyouneedpreciseanddetailedinput,suchasdrawingapictureorusinghandwritingmode
- Whentoomanyelementsarecrowdedonthescreen,forexample,whenyouareplayinggames
- If you want to keep your screen free from smudges
- If you have long fingernails and it is difficult for out type
YourtabletprovidesastorageslotandstringholesfortheThinkPadTabletPen.WhenyouarenotusingtheThinkPadTabletPen,storeitinthetablet.Ifyouneedtousethepenfrequently,stringthepentothestringholestoavoidlosingit.Tolocatethestorageslotandstringholes,see"Tabletlayout"onpage1
Screenlockmode
Topreventunauthorizeduseandaccesstoyourdata,lockyourtabletwhenyouarenotusingit.Afteryou lockyourtablet,nothinghappenswhenyoutouchthescreen,butyoustillcanlistentomusicandusethe volumebuttons.
Tolockyourtablet, pressthepowerbuttononce. Thetabletscreenisturnedoff.
Tounlockthescreen, pressthepowerbuttonagainanddragtheunlockiconacrossthescreen inanydirection.
If you have setup up a screen unlock password or personal identification Number (PIN), or an unlock pattern, you have to perform correct password or PIN, or draw the correct pattern to unlock your screen. For more information, see "Locking the tablets screen" on page 63.
Downloadinggamesandapplications
Toextend the functionality of your tablet, download and install additional applications from Android Market and Lenovo App Shop. Both Android Market and Lenovo App Shop provide an easy and quick way for youtoshop for games and mobile applications.
DownloadinggamesandapplicationsfromAndroidMarket
TodownloadorbuyanapplicationoragamefromAndroidMarket,dothefollowing:
- From the action bar, touch the applications in to open the application library.
- Touch the Android Marketicontolaunchtheapplication.
- Signinto Android Market with your Google Account. If you don't have a Google Account, follow the instructions on the screent to create an account.
4) you are launching this application for the first time, read her terms and conditions and touch. Accept. The Android Marketscreen is displayed. - Scrollandbrowselistedapplicationsorgamestolocatethedesiredapplicationorgame. Touch the applicationorgametoviewdetailedinformation.
6On the application details screen touch DOWNLOADs, BUY and follow instructions on the screen to start the download and installation. The downloading icon is displayed on the system bar. - Whentedownloadfinishes, touchthe timeareafromthesystembartobringupthenotification messages.
- Touchtheinstalledapplicationonthelistandfollowtheinstructionsonthescreentouseit.
DownloadinggamesandapplicationsfromLenovoAppShop
TodownloadorbuyanapplicationoragamefromLenovoAppShop,dothefollowing:
- From the main home screen touch the Android Settings do not open a launch zone to touch the applications icon from the action bar and the touch Settings. The Android Settings screen opens.
2TouchApplications-Unknownsources allow the installation of applications from LenovoApp Shop.
Note You only need to enable Unknown sources the first time you download applications from Lenovo AppShop, or after you perform a factory data reset operation.
- From the action bar, touch the applications is to open the application library.
- Touch the Lenovo App Shopicontolaunchthe application.
- Scrollandbrowselistedapplicationsorgamestolocatethedesiredapplicationorgame.
- Touch the application or game, and then follow the instructions on the screent download and install it.
CustomizingyourHomescreens
Because the Homescreens are the starting points for outouse your tablet, you might want to customize the Homescreen home your personal preferences. Read this topic to learn how to customize your home screens by adding an item to a Homescreen, rearranging the Homescreens, resetting them in Home screen, changing the wallpaper, and customizing Lenovo Launch Zone.
AddinganitemtoaHomescreen
Toaddanapplicationsshortcut, widget, orotheritemtoaHomescreen, dothefollowing:
Touch the Customization Action to operate the Home screen customization view.
2TouchtheAppshortcutsabtheWidgetsabothemoreadoselecthedesiredentthatyou wanttoadd.
- DragtheitemtotheHomescreenwhereyouwanttoaddit.IfyoudragittoaHomescreenand pausebeforeliftingyourfinger,theHomescreenenlargessoyoucanplacetheitemwhereyouwant ittobelocated.Otherwise,theitemisplacedonthefirstavailablespot.Ifyousimplytouchthe iteminsteadofdraggingit,theitemisaddedtotheHomescreenfromwhichyouenteredtheHome screencustomizationview.
Note: When addingsome items, you might be prompted to make additional selections before the item is added to a Homescreen.
MovingaHomescreenitem
TomoveanitemonaHomescreen,dothefollowing:
- Touchandholdtheitemyouwanttorepositionuntiltmagnifiesandbecomesmovable.Donotlift yourfinger.
- DragtheitemtoanewlocationonthesameHomescreenandreleaseyourfinger. If you want to move the item to another Homescreen, hold and drag the item to the left or right outline of another Home screen until the desired Homescreen opens, and then release your finger.
RemovinganitemfromaHomescreen
- Touchandholdtheitemyouwanttoremoveuntilitmagnifiesandbecomesmovable.Donotliftyour finger.TheapplicationsiconinthetoprightcornerchangestotheTrashicon.
- DragtheitemtotheTrashicon.
- Release your finger when the Trashiconglows red.
ChangingtheHomescreenwallpaper
Touch the Customize action to open the home screen customization view.
2TouchtheWallpapersandouchsourceGalleryLiveWallpapers@Wallpaperfromwhichto selectthewallpaper.
- Touch the image of the wall papery you want to use.
ChangingthemainHomescreen
Touch the Customize for the action to open the Home screen customization view.
- TouchtheOptionstab.
3 Touch and hold the Home and her drag to the location above the home screen that you want to set asthemain Homescreen. Theselected Homescreen is highlighted in green.
- Release your finger. Theselected Homescreen becomes the main Homescreen.
ReorderingtheHomescreens
If you want to order the Homescreens, do the following:
Touch the Customize for the action to open the Home screen customization view.
-
TouchtheOptionstab.
-
Touchandholda Homescreenanddragittoanewlocation. Thetargetlocationishhighlightedwitha greenline.
-
Release your finger. The Homescreen is moved to thenew location.
CustomizingLenovoLaunchZone
CustomizeLenovoLaunchZonebychangingthebackgroundcolor, the transparencylevel, and other settingstomeetyourpersonalpreferences.
TochangethebackgroundcolorandthetransparencylevelofLenovoLaunchZone,dothefollowing:
1 Touch the Lenovo Launch Zone Settings from Lenovo Launch Zone The settings stems are displayed.
- TouchChangeLaunchZoneColor.
- Touch your favorite color and slid the transparency bar to your preference.
Toreplaceoneofthepredefinedfourquadrantswithanotherapplication,dothefollowing:
Touch the Lenovo Launch Zone Settings from Lenovo Launch Zone The settings are displayed.
- Touchthenameofthequadrantthatyouwanttoreplace.
- TouchSelectanapplication.
- TouchBrowse.
- Scrollthroughtheapplicationlistandtouchthedesiredapplication.Youcannowlaunchtheselected applicationfromthequadrant.
Tochangethecenterarea(browser)intoapictureviewer,dothefollowing:
1 Touch the Lenovo Launch Zone Settings from Lenovo Launch Zone The settings stems are displayed.
- TouchZone5: Customize.
- Touchoneofthefollowing:
- Showonepicture:Selectapicturefromyourpicturegallery.
DisplayslideshowChooseImagesourceandconfigurehowoftenyouwouldkdechange apicture.
Tochangeothersettings, opentheLenovoLaunchZonesettingsviewandtouchanitemforfurther configuration.
Note: Default application on Lenovo Launch Zone vary by geographic locations. Therefore, the Launch Zones settings on your tablet might be different from those described in the following table.
Table1. LenovoLaunchZonesettings
| Menu | Options | Description |
| Preinstalledvideoplayers Zone1:Waterchavideoplayerfromthelist,ortouchSelectanapplicationtoselectanotherapplicationolaunchfromZone1. | ||
| Selectanapplication | ||
| Zone2:Email | GmailApp | IfouselecEmailanadditionasettingoptionShowunreadeMailCounteronmainwindowisdisplayed.Whenthisoptionisenabled,thenumberofunreade-mailsisdisplayedinZone2.IfyouwanttoreplaceEmailwithanotherapplication,touchSelectanapplication. |
| Selectanapplication | ||
| Preinstallede-bookreaders Zone3: | Selectane-bookreader,ortouchSelectanapplication toselectanotherapplicationolaunchfromZone3. | |
| Selectanapplication | ||
| Preinstalledmusicplayers Zone4: | Selectamusicplayer,ortouchSelectanapplicationto selectanotherapplicationolaunchfromZone4. | |
| Selectanapplication | ||
| Zone5:Customize | Launchbrowser | ConfigureZone5tobethelaunchpointforBrowseror tobeapictureviewer. |
| Showonepicture | ||
| Displayslideshow | ||
| ChangeLaunchZone Color | Changethebackgroundcolorandtransparencytoyour preference. | |
| Messagesfrom Lenovo | Selectcategoriesforwhichyouwanttoreceive notifications,suchasgames,movies,deviceaccessories, andbooks. | |
Chapter3. Connecting to wireless networks and devices
Yourtabletcanconnecttovarietyofnetworksanddevices,includingmobilenetworks(2Gor3G),Wi-Fi datanetworks,andBluetoothdevices.
Note: Sometablet models can connect to both mobilenetworks (2Gor3G) and Wi-Finetworks, while others can connect to Wi-Finetworks only. If your tablets supports Wi-Ficonnection only, the information related to mobilenetworks does not apply to your tablet.
Determining which mobilenetwork you are using
Forsomenetworks, you can check then network namet to see which mobilenetwork you are using.
Tocheckthenetworkname,dothefollowing:
- From the main Home screen touch the Android Settings download, to touch the applications icon from the action bar and the touch Settings. The Android Settings screen opens.
2TouchWireless networks-Mobilenetworks view the name of the network which you are connected.
Disablingdataroamingonmobilenetworks
Disablethedataroamingfunctiontoavoidunwantedchargeswhenyouaretravelingwithyourtablettoareascoveredbyothercarriers'mobilenetworks.
Todisablethedataroamingfunction,dothefollowing:
- From the main Home screen touch the Android Settings, do not open a launch zone to touch the application from the other area and her touch Settings. The Android Settings screen opens.
2TouchWireless networks-MobilNetworks and cleath Dataoaming checkbox.
Limitingmobiledataconnectionto2Gnetworks
If your battery power is slow and you are unable to charge the battery, limit them mobile data connection to a 2G network to extend your battery life. As lowernetwork connection consumes less power.
Note: When you are connected to a 2G network, you might want to postpone activities that transmit a lot of data, such as sending, uploading, downloading pictures or videos, until you can charge your battery and connect your tablet to a fastermobilenetwork or other wireless network.
Tolimitdataconnectiontoa2Gnetwork,dothefollowing:
- From the main Home screen touch the Android Settings down the launch Z can touch the application for the other hand touch Settings The Android Settings screen opens.
2TouchWirelessnetworks-Mobilenetworks.
- TouchUseonly2Gnetworks.
EditingorcreatingaGSMaccesspointname
If your tabletconnectstoaGlobalSystemforMobileCommunications(GSM)mobilenetwork(2Gor3G), and you need to edit the settings for an existing access point name (APN) or create an new APN, you must obtain the APN and detailed settings from your service carrier.
ToeditorcreateanewAPN, dothefollowing:
1 From themair HomescreentouchtheAndroid SettingsdoenovoLaunchZooptouchthe applicationisoptheetierbaandhertouchSettingsTheAndroid Settingscreeropens.
2TouchWirelessnetworks-Mobilnetworks-AccessPointNames.
3TouchareexistingAPNeditbtouchNewAPNcreateanewoneEntetheAPNsettingsthatyouobtainedfromyourcarrierbytouchingeachsettingthatyouneedtoedit.
- When you are finished, touch Save.
Connectingtoa2Gor3Gmobiledatanetwork
ASIMcardisrequiredtoconnecttoamobilenetwork. Referto "InstallingtheSIMcard" on page 9 for instructionsonhowtoinstallaSIMcard.
Note: SometabletssupportaccesstoWi-Finetworksonly.See "ConnectingtoaWi-Finetwork" on page 25 forinstructionsonconnectingtoaWi-Finetwork.
Depending on your tablet model and place of purchase, you might be guided to connect your mobile network as soon as your turn on the table for the first time and configure the initial setup. During the initial setup, if a SIM card is detected, you are given the option to activate your mobilenetwork account.
If you chosen not to activate your account at that time, you can activate your mobile network account after you install a SIM card by doing the following:
- From the main Home screen touch the Android Settings download Launch Zone, touch the applications icon from the action bar and the touch Settings. The Android Setting screen opens.
2TouchWirelessnetworks-Mobilenetworks.
- Touch Data enabled if it is disabled.
4 Touch Activated device and follow the instructions on the screen activate you mobile network account and connect to them mobile network.
Tomanuallyselectanetwork, dothefollowing:
- From the main Home screen touch the Android Settings download Launch Zone, to touch the application from the other baandhertouch Settings The Android Settings screeropens.
2TouchWirelessNetworks→MobileNetworks→NetworkOperators→SearchnetworksTheist ofmobiledatanetworkscurrentlyavailableisdisplayed.
- Touchanetworkfromthenetworklist, and then follow the instructions on the screento establish the connection.
ConnectingtoaWi-Finetwork
Wi-Fiisawirelessnetworkingtechnologythatprovidesnetworkaccessatdistancesofupto100meters (328feet)dependingontheWi-Firouterandyoursurroundings.YoucanconnectanyThinkPadTabletto aWi-Finetwork.
AWi-FiconnectionrequiresaccesstoafunctioningWirelessAccessPoint(WAP),alsocalledahotspot. Somehotspotsareopentothepublic,butsomeothersimplementsecurityfeaturestolimitaccessto specificgroupsorindividuals.
Note: TherangeandqualityoftheWi-Fisignalisaffectedbythenumberofconnecteddevices,the infrastructure,andtheobjectsthroughwhichthesignalistransmitted.
ConnectingtoaWi-Finetwork
ToestablishaWi-Finetworkconnection,dothefollowing:
- From the main Home screen touch the Android Settings, do not open a launch zone, to touch the application from the other and her touch Settings. The Android Settings screer opens.
2TouchWirelessnetworks-Wi-FsettingsTouchWi-Fidurnbn.
3AisbavailablenetworksdisplayedundeWi-FnetworksTouchWi-Fnetworkconnectot.
- If thenetworkisopen, you are prompted to confirm that you want to connect to that network by touching Connect thenetwork is secured. You are prompted type password other credentials.
When you are connected to a Wi-Fi network, touch its name on the Wi-Fi setting screen for details about the speed, security, address, and related information.
AddingaWi-Finetwork
If you want to access a Wi-Fi network that does not broadcast its network name (also called as serviceset identifier or SSID), you must address that Wi-Fi network before you can connect to it.
ToaddaWi-Finetwork, dothefollowing:
- From the main Home screen touch the Android Settings, do not open a launch zone, to touch the application from the other hand to touch Settings. The Android Settings screer opens.
2TouchWirelessnetworks-Wi-Fsettings-Wi-Fidurnbn.
-
ScrolltothebottomoftheWi-FisettingsscreenandtouchAddWi-Finetwork.
-
Typetherequiredinformationforthenetwork.
5TouchSaveTheinformationaboutthenetworksavedTheWi-Functionwillbeestablished automaticallythenexttimeyoucomewithintherangeofthisnetwork.
DisablinganautomaticWi-Ficonnection
If you donotwant the tablet to automatically connect to as specific Wi-Finetwork that you had previously configured, do the following:
-
From the main Home screen touch the Android Settings, do not open a launch zone, to touch the application from the keyboard and a touch Settings. The Android Settings screen opens.
-
Touch Wireless & networks.
-
If the Wi-Fifunction is off, touch Wi-Fitoturniton.
-
TouchthenameoftheWi-Finetwork.
UsingBluetoothdevices
Bluetoothisashort-rangewirelesscommunicationstechnology.UseBluetoothtoestablishawireless connectionwithanotherBluetooth-enableddeviceoveradistanceofabout10m(32.8ft),suchasa Bluetoothkeyboardorheadset.
EnablinganddisablingtheBluetoothfunction
ToenableordisabletheBluetoothfunction,dothefollowing:
- From the main Home screen touch the Android Settings screen open a launch zone to touch the application from the action bar and her touch Settings The Android Settings screen opens.
2TouchWirelessnetworks-BluetoothenableDisabletheBluetoothfunctionWherenableda greencheckisdisplayedinthecheckboxandtheBluetoothiconisdisplayedonthesystembar.
WhenyouarenotusingBluetooth,turnitofftoextendthebatterylife.
ChangingtheBluetoothnameofyourtablet
Your tablethasageneric Bluetooth name by default, which is visible to other devices when you are trying to connect to them. You can change this nametoy our preference to make it more recognizable to you.
Tochangethename, dothefollowing:
-
From the main Home screen touch the Android Settings download, a local ZoL to touch the applications icon from the action bar and the touch Settings. The Android Settings screen opens.
-
Touch Wireless&networks.
- If the Bluetooth function is off, touch Bluetooth to turn on Bluetooth.
- TouchBluetoothsettings.
- TouchDevicename.
- Typeanewname, andthentouch OK.
PairingwithaBluetoothdevice
The first time you connect your tablet to a Bluetooth device, you need top airt the device with your tablet, so that the two devices can be exchanged at securely.
TopairyourtabletwithaBluetoothdevice,dothefollowing:
1 Fronthemair HomescreentouchtheAndroid SettingsdenovLaunchZo-entouchthe applicationispotheetorbaandhertouchSettingsTheAndroid Settingscreenopens.
- Touch Wireless&networks.
- If the Bluetooth function is off, touch Bluetooth to turn on Bluetooth.
- TouchDiscoverabletomakeyourtabletdiscoverabletootherdevices.
5TouchFindhearbydevicesAisbdeviceDisdisplayedundeFounddevices.
NoteTouchScarfordevicesrefreshthesearchresults.
-
Touch the ID of the Bluetooth device to which you want to connect.
7.TouchPair. -
If you are prompted typeepasswordora PIN to authenticate, typesamepasswordor PIN on both devices. Otherwise, consult the documentation that camewith the target device to learn its default password or PIN for connection, or what other procedures it requires for pairing.
-
WherthepairingsuccessfulPairedbuho connecteds displayed under thepaired device.
ConnectingtoaBluetoothdevice
ToconnecttoaBluetoothdevice,dothefollowing:
- PairwiththetargetBluetoothdevicefirst.See"PairingwithaBluetoothdevice"onpage26.
- In the Bluetooth Settings view, touch the repaired device from the device lists to start the connection.
-
If the target device requires additional action, consult the documentation that camewith the device to learn how to connect to a Bluetooth device, or follow the instructions on the screen of the target device.
-
Whertheableandthevice are connected Connected displayed under the device D.
TransferringdatabetweenyourtabletandaBluetoothdevice
AfteryouconnectyourtablettoaBluetoothdevice,youcantransferdatabetweenyourtabletandthedevice.
TosendafiletotheconnectedBluetoothdevice,dothefollowing:
- Touchandholdthedesireditemtobringuptheoptionsmenu.
2Touchthe ShareSendtheroutBluetooth.
- ReceivethefileattheconnectedBluetoothdevice.Consultthedocumentationthatcamewiththe connectedBluetoothdeviceforinformationonhowtoreceiveafile.
ToreceiveafilefromaconconnectedBluetoothdevice,dothefollowing:
-
Send the file to your table through Bluetooth from the connected Bluetooth device. Ford detailed instructions on how to send a file, consult the documentation that came with the connected Bluetooth device.
-
AmessageisdisplayedtoinformyouthatthereisanincomingfilethroughBluetooth,andtheicon * isdisplayedonthesystembarofyourtablet.
-
Touch the icon from the systembart to bring up then notification message.
-
Touchthenotificationmessage.AFiletransferdialogboxisdisplayed.
-
Touch Accepttoreceivethefile.
-
Whenthefileiscompletelyreceived, theiconisdisplayedonthesystembarandanotificationis displayed, informingyouthatthefilehasbeenreceived.
-
Touch the icon and touch the notification message to open a list of files received through Bluetooth.
-
Touch the desired file and follow the instructions on the screento open it.
TocheckallthefilesthatyoureceivedthroughBluetooth,dothefollowing:
From the main home screen touch the Android Settings done on the launch zone to touch the application from the other hand touch Settings. The Android Settings screen opens.
-
Touch Wireless&networks.
-
If the Bluetooth function is off, touch Bluetooth to turn on Bluetooth.
4TouchBluetoothsettings-ShowreceivedfilesAisbfeceivedfilessdisplayed.
ConfiguringBluetoothoptions
BluetoothdevicesaredesignedtobeinteroperablewithanyBluetoothproductthatiscompliantwith BluetoothSpecification2.1+EDRasdefinedbytheBluetoothSpecialInterestGroup(SIG).DifferentBluetooth deviceshavedifferentprofilessuchasFileTransfer,GenericAccess,AudioGateway,andBasicImage.
AfteryouconnectyourtablettoaBluetoothdevice,selecttheprofileoftheBluetoothdeviceyouwanttousebydoingthefollowing:
From the main Home screen touch the Android Settings down the launch zone to touch the application from the set border and her touch Settings The Android Settings screen opens.
- Touch Wireless & networks.
- If the Bluetooth function is off, touch Bluetooth to turn on Bluetooth.
- TouchBluetoothSettings.
- Locate the Bluetooth device that you want to configure and touch the Configure window displayed with the device information, including its profiles.
- Touchaprofiletoopentheoptionsforthatprofile.
- Touchafeaturetoenableordisableit.
DisconnectingaBluetoothdevice
TodisconnectaBluetoothdevice,dothefollowing:
- From them in Home screen touch the Android Settings, do not open a launch zone, to touch the application from the action bar and a touch Settings The Android Settings screen opens.
2TouchWireless networks-Bluetoothsettings.
- Touchthenameoftheconnecteddevice.
- Touch OK from the pop-up dialog box to disconnect the device.
UnpairingaBluetoothdevice
TounpairaBluetoothdevice,dothefollowing:
- From the main Home screen touch the Android Settings, do not open a launch zone, to touch the application from the action bar and a touch Settings The Android Settings screen opens.
2TouchWireless networks-Bluetoothsettings.
- Locate the Bluetooth device that you want to configure and touch the Configure con
- Touch Unpair to erase all pairing information forth that device.
ViewingBluetoothstatus
ChecktheBluetoothstatusthroughtheBluetoothstatusicononthesystembar:
• ✱ ingray:Bluetoothison.
•inblue:ThetabletisconnectedtoaBluetoothdevice.
•:AmeiscomingfromaBluetoothdevice.
Chapter4.Batteryandacpower
Thischapterprovidesinstructionsonhowtochargethebattery,howtoextendthebatterylifebetween charges,andhowtoviewthebatterystatus.
Chargingthebattery
YourtabletisshippedwithaThinkPadTabletACChargertochargeyourtabletfromanystandardac poweroutlet.
Note: The battery is not fully charged when shipped.
Tochargethebattery,dothefollowing:
1.Insertthesnap-inprongsintothechargerhead.Makesurethattheconnectionissecure.

natural_image
3D rendered mechanical component with mounting holes and a directional arrow (no text or symbols)Figure6. Installing the accharger
- ConnectoneendoftheUSBcabletotheacchargerandtheotherendtothemicroUSBconnectoron thetablet.

natural_image
Illustration of a digital tablet connected to a power adapter cable (no text or symbols visible)Figure7. Connecting the accharger with the tablet
3. Plug the accharger into a standard ac power outlet.
4. Disconnect the accharger from your tablet when the battery power is full, or leave the accharger connected to operate from ac power.
Alternatively, you can use any of the following charging method to sit safely by charge the internal battery of your tablet:
| Chargingmethod | Tableton(Displayison) | Tabletofforinscreenlockmode(Displayisoff) |
| ThinkPadTabletDock(fastest chargingmethod) | ApprovedApproved | |
| ThinkPadTabletACCharger | Approved,butthebatterywillcharge slowly | Approved |
| ThinkPadTabletDCCharger | Approved,butthebatterywillcharge slowly | Approved |
| AUSBconnectionbetween the micro-USBconnectoronthetablet andaUSBconnectorofapersonal computerorotherdevicethat complieswiththeUSB2.0standards (slowestchargingmethod) | MightnotchargeduetoUSB2.0 powerlimits.Ifthepowerconsumptionofthetablet exceedsUSB2.0powerlimits,the batterywilldischargetocompensate fortheadditionalpowerrequiredby thetablet. | Approved |
Attention: Use only Lenovo approved chargers. Unauthorized chargers could cause severe damage to your tablet.
Extendingthebatterylifebetweencharges
When you are traveling outdoors with your table and the ac power is not available, you can extend the battery life by doing the following:
•TurnoffBluetoothandWi-Fiwhennotinuse.
ToturnoffBluetoothandWi-Fi, dothefollowing:
-
Touch the time area from the system barto open the Status Details panel.
-
Touchanywhereinthepanel.TheQuickSettingspanelisdisplayed.
Either touch Airplan mode disable wireless connections to touch Bluetooth and Wi-Fi to disable the two features.
- Manageyourwirelessnetworkdisconnectpolicytosavemorebatterypower.
Formoreinformationonhowtoconfigurethewirelessnetworkdisconnectpolicy,see“Configuringthe wirelessnetworkdisconnectpolicy”onpage38.
- TurnoffautomaticsynchronizationforGmail, Calendar, Contacts, and other applicationsify you do not need them.
Toturnofftheautomaticsynchronizationfunction,dothefollowing:
From the main Home screen touch the Android Settings download Launch Zone.
touch the application for the action and her touch Settings The Android Settings screenopens.
2TouchAccounts&sync→Auto-synd●disable this function.
- Lowerthebrightnessofyourscreen.
Followeitherofthefollowingprocedurestolowerthebrightnesslevelofyourscreen:
-
Touch the time area from the system barto open the Status Details panel.
-
Touchanywhereinthepanel.TheQuickSettingspanelisdisplayed.
-
Locatethescreenbrightnessiconandthendragtheslidertothelefttolowerthescreenbrightness.
-OR-
From the main Home screen touch the Android Settings demo v launch Zone
touch the application for contact or and her touch Settings The Android Settings screenopens.
2TouchScreen-Brightness.
- Dragtheslidertothelefttolowerthescreenbrightness.
- Turnoffthescreenwhenthetabletistemporarilynotinuse.
Pressthepowerbuttontotturnoffthescreen.
- Poweroffyourtabletifthetabletwillnotbeusedforawhile.
Toturnoffyourtablet,dothefollowing:
- PressandholdthepowerbuttonuntilthePoweroffmenuisdisplayed.
2.TouchOK.
Checkingthebatterystatus
Gettheapproximatestatusofyourbatteryatanytimebycheckingthebatterystatusicononthesystembar.
Tocheckfortheaccuratestatus,touchthebatterystatusiconfromthesystembartoopentheStatusDetails panel. Theremainingbatterypowerpercentageisdisplayedinthepanel.
Youalsocangetmuchmoredetailedbatterystatusbydoingthefollowing:
-
From the main home screen touch the Android Settings down the launch zone to touch the application from the other hand to touch Settings The Android Settings screeropens.
-
Touch Abouttablet.
- TouchBatteryusetocheckwhichapplicationsareconsumingbatterypower.
If you have used your tablet for along time, check the battery condition and determine if the battery should bere placed with anewone by doing the following:
- From the main Home screen touch the Android Settings download, a local ZoL touch the applications icon from the action bar and the touch Settings. The Android Settings screen opens.
2TouchAboutablet-Status.
3 TouchBatteryconditionIfthebatteryconditions shows Poorcontact Lenovdofurtheinstructions. Thebatterymightneedtobereplacedwithanewone.
Chapter5. Usingyourtablet
Thischapterprovidesinstructionsonhowtousemanyofyourtablet'sfeaturesandsomepreinstalled applications.
Frequentlyaskedquestions
Use the Homescreentipstolookforsomebasicoperatinginstructions. ToviewtheHomescreentips, dothefollowing:
Touch the Customize action to open the Home screen customization view.
- TouchWidgets.
- ScrolltolocatetheHomescreentipswidgetandtouchit.TheHomescreentipswidgetisadded toyourHomescreen.
- GototheHomescreenwhereyouaddedtheHomescreentipswidget,andthentouchthewidgetto viewtipsonebyone.
The following area efew tipsthat mighthelpyou optimizetheuse of your tablet.
CanlgettheUserGuideinanotherlanguage?
To download the UseGuided another language code http://www.lenovo.com/ThinkPadUserGuides Then follow the instructions on the screen.
Howcanlusethebatterypowermoreeffectivelywhenlamoutoftheoffice?
See "Extendingthebatterylifebetweencharges" on page 31 fortips about saving battery power.
Concernedaboutinformationsecurity?
SeeChapter8"Security"onpage63tolearnhowtoprotectyourpersonalinformation.
Isgettingconnectedindifferentlocationsachallenge?
See "Usingenhancedwirelessfeatures" on page 37 to easily connect to the Internet from different locations.
Needtogivepresentationsorattachanexternalmonitor?
See "UsingHDMIdevices" on page 48 form more information.
BrowsingtheInternet
ReadthistopictolearnmoreaboutbrowsingtheInternet.
ConnectingtotheInternet
TobrowsetheWebandaccessWeb-basedutiliessuchasinstantmessagingapplications,makesurethat youhaveoneofthefollowingnetworkconnectionsavailable:
•Mobilenetwork(2Gor3G)
•Wi-Fi
•GeneralPacketRadioService(GPRS)
If you choosetouseamobiledatanetwork, you might havetosignupforadataplan with your service carrier in your area. With some carriers, you can choose adataplan, track your data usage, and change or cancel your plan. With some plans you pay based on the amount of data used, while with other plans you pay a fixed fee for unlimited data use.
FordetailedinformationabouthowtoconnecttotheInternet,seeChapter3"Connectingtowireless networksanddevices"onpage23.
Usingthebrowser
Toopenthebrowser,dooneofthefollowing:
- TouchtheBrowsericonfromthepredefinedLenovoLaunchZone.
- PresstheBrowserbuttonontherightsideofyourtablet.
- Touchtheapplicationsicon
fromtheactionbarandthentouchBrowser.
NavigatingtheWeb
•Usingthebrowsercontrolbar

Figure8.Browsercontrolbar
| 1 Back | GobacktothepreviousWebpage. |
| 2 Forward | GoforwardtoarecentlyvisitedWebpage. |
| 3 RefreshRefreshthecurrentWebpage. | |
| 4 WebaddressfieldTouchandtypetheaddressoftheWebpagetowhichyouwanttogo. | |
| 5 BookmarkBookmarkthecurrentWebpage. | |
| 6 SearchUseGoogleSearchtosearchforinformation. | |
| 7 Bookmarksandthebrowsinghistory. |
•Usingthebrowsermenu
While you are browsing Webpage, touch the Menific the top right corner access the following options:
- Newtab: OpenanewtabforanewWebpage.
Newincognitdablytouch this option to open new Web page, the Web pages not recorded into the browsing history.
FindbrpageSearchHotexbcontenbrthecurrentWebpage.
Sharepage SharetheWebpagewithfriendbcolleaguethroughBluetoothe-mailmessageor otherways.
-Savepage: Savethecurrentpage.
-Pageinfo:ViewthedetailsofthecurrentWebpage.
-Downloads:Viewandmanagedownloadedfiles.
Settings Configure you browsesettingssuchasettinghomepageclearingcachesettingtextsize,andsoon.
- ViewingWebpages
ToviewaspecificWebpage,dothefollowing:

- Touch the applications icon from the action bar and the touch Browser.
- Touch the Webpage address field and the Bedress of the Webpagetow which you want to go. As you the address, matching Webpage addresses are displayed on a list.
3.Dooneofthefollowing:
- TouchanaddressdisplayedonthescreentogodirectlytothatWebpage.
-CompletotypingtheWebpageaddress.ThentouchtheenterkeyontheAndroidkeyboard(or touchGoifyouareusingtheFlexT9keyboard).
- Scroll your finger horizontally or vertically on the screentoscroll and view desired areas of a Web page. To zoom out a Web page, pinch-in adesired area by bringing two fingers clos to together on the screen. To zoom in a Web page, pinch-out adesired area of a Web page by moving two fingers apart on the screen.
ToselectanitemonaWebpage,dothefollowing:
-Fortext,touchandholdawordtobringupthetextselectortabsandtheeditmenu. Thetextselector isapairofselectiontabs.Drageitheroftheselectiontabstohighlighththetextyouwanttoselect. Thenusetheeditmenuthatisdisplayedatthetopofthescreentocopythetext.
-ForhyperlinksorWebpageaddresses,touchthedesiredhyperlinkorWebpageaddressstogo tothedirectedpage.
Settingupyourhomepage
TosetthecurrentWebpageasthehomepage,dothefollowing:

- Touch the Menu icon from the top right corner.
2TouchSettings-General-Sehompage.
3TouchCurrenpageandouchOK.
TomanuallytypeahomepageWebaddress,dothefollowing:

- Touch the Menu icon from the top right corner.
2TouchSettings-General-Sehomepage. - TypetheaddressoftheWebsiteyouwanttosetasyourhomepageandthentouchOK.
TosetabookmarkedWebpageasthehomepage,dothefollowing:
- TouchtheBookmarksiconfromthebrowsercontrolbar.
2Touchandholddesiredbookmarkdoringthe commandsmenuandouchSetshomepage.
Downloading applications from the Web
Note: Applicationsdownloaded from the Web can be from unknown sources. Top protect your tablet and personal data, download applications only from trusted source such as Android Market and Lenovo App Shop.
TodownloadaWebapplication,dothefollowing:
- From the main Home screen touch the Android Settings, do not open a launch zone to touch the application from the other and her touch Settings. The Android Settings screeropens.
2 Touch Applications-Unknown sources enable the feature permit installation of applications from Websites.
- WhentheAttentiondialogboxisdisplayed, touchOK.
- Gobacktothebrowserscreen, and touch the application you want to download.
- Follow the instructions on the screent download the application.
Managebookmarksandhistory
TobookmarkaWebpage,dothefollowing:
1StaytheWebpageandouchtheBookmarkconTheBookmarkthispagelialogopens.
2TypebookmarknamerthLabefieldandouchOKsavethe setting.
Tomanageyourbookmarks, dothefollowing:
- StayonaWebpageandtouchtheBookmarksicon.
- TouchtheBookmarkstabtoviewallbookmarks.
- TouchabookmarktoopentheWebsite, ortouchandholdabookmarktbringupmoreoptions.
AllthebookmarkedWebpagesalsoareaccessiblefromtheLenovobookmarkwidget.AddtheLenovo bookmarkwidgettoaHomescreensoyoucaneasilyscrollthroughhallbookmarksandgodirectlytoa bookmarkedWebpagefromtheHomescreen.Forinformationabouthowtoaddawidget,see“Customizing yourHomescreens”onpage19.
Tomanageyourbrowsinghistory,dothefollowing:
- StayonaWebpageandtouchtheBookmarksicon.
- Touch the History tabtoviewthelistofvisited Websites.
- On the History tab, you can perform the following actions:
- TouchaWebsiteaddressstoopenit.
- TouchadateforlistsoftheWebpagesvisitedonthatday.
- TouchthestariconnexttoaWebpagetobookmarktheWebpage.
Touch the Men and her touch Clean history to cleath browsing history. - Touch and hold on a Website address to bring up more options.
Configurebrowsersettings
Toconfigurethebrowsersettings,dothefollowing:
- Onthebrowserscreen, touch the Menuicon.
- TouchSettings.
- Touchanitemtoconfigurethesettings.
Searchinghɛnternet
Bytypingorspeaking,youcanuseGoogleSearchorGoogleVoiceSearchtosearchforinformationonthe Web.
GoogleSearch
Tosearchbytyping, dothefollowing:
- FromaHomescreen, touchtheGoogleSearchiconontheactionbar.
- Typeakeywordorothertextusingtheonscreenkeyboard.Asyoutype,thesearchresultsthatfullyor partiallymatchthetextbeingtypedaredisplayedonamenubelowthesearchbox.
3.Dooneofthefollowing:
- Touchoneofthesearchresultsdisplayonthemenu.
Finish typing and hertouch the ante key on the Android keyboard (touch Go you are using the FlexT9 keyboard).
GoogleVoiceSearch
YoualsocansearchforinformationontheWebwithGoogleVoiceSearch.
Tosearchbyspeaking, dothefollowing:
- FromaHomescreen, touch the GoogleVoice Search icon on the action bar.
Note: The first few times you open Google Voice Search, it offers hints about how to use it and an introductory video. - TouchSpeaknowandspeakthenameorkeywordoftheitemyouwanttosearch.
- When you finish speaking, GoogleVoice Search analyzes your speech and the browser opens, displaying these search results.
Note: If GoogleVoiceSearch cannot understand what you say, it presents a list of similar-sounding search terms, which you cantouch to continue to search.
Usingenhancedwirelessfeatures
Foryoureasymanagementofwirelessnetworkconnectionsatdifferentlocations,Lenovohasenhanced thewirelessfeatureswiththefollowingfunctions:
- Thewirelessnetworkprofilesimportandexportfunction.See"ImportingWi-FiprofilesfromaThinkPad notebookcomputertoyourtablet"onpage37
- Advancedwirelesspowermanagement.See“Configuringthewirelessnetworkdisconnectpolicy” onpage38.
ImportingWi-FiprofilesfromaThinkPadnotebookcomputertoyour tablet
If you have several Wi-Fisettings profile that have been configured and saved on a ThinkPad notebook computer, you can capture and import those profile to your tablet. By capturing and importing existing profiles, you can avoid having to manually configure wireless settings on your tablet. After the process is complete, the tablet automatically connect to the same Wi-Finetworks as the ThinkPad notebook host computer does.
ToimportWi-FiprofilesfromaThinkPadnotebookcomputertoyourtablet,youcaneithercapturethe Wi-FiprofilesfromyourThinkPadnotebookcomputerbyyourself,oraskyourITadministratortomanually generateddeployableWi-Fiprofilesandimportthemintoyourtablet.Forthelattermethod,consultyourIT administratorforfurtherhelp.
CapturingWi-FiprofilesfromyourThinkPadnotebookcomputer
Notes: TocaptureWi-Fiprofiles, thehostThinkPadnotebookcomputermusthavethefollowinginstalled:
- Windows7operatingsystem
- LatestAccessConnections™ program
If the host ThinkPad notebook computer does not have the latest Access Connections program installed, goto http://support.lenovo.com to download it.
TocapturetheWi-FiprofilesfromyourThinkPadnotebookcomputer,dothefollowing:
- Installaflashmediacardintoyourtablet.TheflashmediacardisusedtostorethecapturedWi-Fi profiles.See"Usingthe3-in-1mediacardreader"onpage48forinstructionsonhowtoinstalla flashmediacard.
- Connect the tablet to your computer with the supplied USB cable and select Transfer files (Media Transfer Protocol).
- LaunchAccessConnections from your computer and switch to the Advanced view.
4ClicktheToolsabandclicExportoAndroidAisbfWi-Fprofilessdisplayed.
5. SelecttheWi-FiprofilesfromthelistandclickOK.
6. Select the Capture WiFi connection profiler radiobutton.
7.BrowsetheinstalledflashmediacardinyourtabletasthetargetlocationtosavetheWi-Fiprofiles.
8ClickOK.TheWi-Fprofilesare saved and stored ortheflashmediacard hats installed by our tablet.
9.ClickOKagainwhenpromptedforconfirmation.
ImportingWi-Fiprofilestoyourtablet
ToimporttheWi-Fiprofilestoyourtablet,dothefollowing:
- From the main Home screen touch the Android Settings down the launch zone, touch the application from the action bar and her touch Settings The Android Settings screen opens.
2TouchWirelessnetwork-Wi-Fsettings-ImportTheWi-FlmporSettingsscreenisdisplayed.
- TouchtheWi-Fiprofilesyouwanttoimport, andthentouchOK.
- TheselectedWi-FiprofileisimportedtoyourtabletandtheWi-FinameislistedunderWi-Finetworks ontheWi-Fisettingsscreen.WhenyouarewithinrangeofthisWi-Finetwork,yourtabletwillconnectto itautomatically.
Configuringthewirelessnetworkdisconnectpolicy
Togetlongerbatterylife, manageyourwirelessconnectionsmorereasonably by configuring the wireless network disconnect policy.
Toconfigurethewirelessnetworkdisconnectpolicy,dothefollowing:
1 From the main Home screen touch the Android Settings down the launch zone, touch the application from the set to a hand touch Settings The Android Settings screen opens.
2TouchWirelessnetwork-Wi-Fsettings.
3Touch the Menu or and her touch Advanced.
- Touch Wireless Enhanced Settings
- The following options are displayed. Touch to enable the function or further configure these setting.
•TurnoffWi-Fiwhendisplayisoff
Whenenabled,theWi-Ficonctionwillbedisabledafterthescreenislocked.Youcansetwhen Wi-FiwillbeturnedoffafterthescreenislockedbytouchingSetminutes.
- NeverturnoffWi-Fiwhenconnecttothespecified[SSID]
Where enabled every first option TurroWi-Fiher display so enabled the connection to the specified SSID will not be turned off after the screen is locked.
•TurnoffWi-Fionschedule
Choosethisoptiontosetupascheduletoturnoffthewirelessconnection.Forexample,youcanset thescheduletoturnoffWi-Fifrom11:30amto2:00pmeveryworkday.
Note: You cannot turn on Wi-Fi during the scheduled Wi-Fi off time.
Usingyourtabletforentertainment
Readthistopictolearnmoreaboutusingheadphonesorearphones,usingcameras,viewingpictures, playingvideos,playingmusic,andtransferringmediafilesbetweenexternaldevicesandyourtablet.
Usingheadphonesorearphones
Your table has a headphone connector that you can use for a variety of listening devices such as headphones, earphones, and earbuds. Listening with the volume turned up to high fortool long can lead to hearing loss. The symptom of hearing damage might be progressive and not noticed at first.
Takethefollowingprecautions:
- Limit the amount to time you use headphones, earphones, earbuds, or other devices that provide sound directly into your ears.
- Avoid using high volume to block surrounding noise.
3.Decreasethevolumeifyouareunabletohearpeoplespeakingaroundyou. - To ensure that sound pressure levels do not exceed as safe level, use headphones, earphones, or are budsthat comply with EN50332-2 (Clause7 Limits).
Usingcameras
Your tablethastwocameras, a front-facing camera and arear-facing camera, each with an auto-focus feature that enables your capture high-quality pictures and videos.
To use camera touch the application for the action ball and touch Camera duration the camera.
Cameracontrols

Figure9. Cameracontrols
| 1 Zoominorout | Zoominorouttoadjustthefocus. |
| 2 Camerasettingscontrols | Toucheachcontroltovieworchangetheassociatedcamerasettings. |
| 3 Shutterorrecordbutton | Takeapictureorstartrecordingavideo. |
| 4 Cameramodeswitch | Dragtoswitchbetweenthecameramodeforcapturingpicturesandthe camcordermodeforcapturingvideos. |
| 5 Ineeraswitchfront-facingcameraandherear-facingcamera. | |
| 6 Lasttakenpictureorvideo | Touchthethumbnailofthelasttakenpictureorvideotogotothepicture galleryorvideogallerytoviewandmanagethepicturesorvideostakenwith thecameras. |
Takingapicture
Totakeapicture, dothefollowing:
Touch application is the action and touch Camera durr the camera.
- Makesurethatthecameramodeissetforcapturingpictures.
- Selecttousethefront-facingcameraortherear-facingcamera.
4UsecamersettingscontrolstadjustthesettingsandhentouchtheShutterbuttonThepictures savedtothepicturegalleryautomaticallyanddisplayedatthebottomleftcornerofthescreen.
Recordingavideo
Torecordavideo, dothefollowing:
Touch the application is the action and the touch Camera durr the camera.
2.Slidethecameramodeswitchtothecamcordermode.
3. Selecttousethefront-facingcameraortherear-facingcamera.
4Use camera settings controls adjustment settings and her touch the Record button While recording the Record button changes to Stop.
5TouchtheStopbuttonstoprecordingThevideosavedntthevidegalleryautomatically.
Disablingcameras
If you want to disable the cameras, do the following:
From themairHome screentouchtheAndroid SettingsdoenovLaunchZcceptouchthe applicationfortheclerbaandhertouchSettingsTheAndroid Settingscreepopens.
2TouchPrivacy-Cameras cleath checkbox.
Viewingpictures
Youcanviewandmanagepicturesstoredonyourtablet,performbasiceditingtasksonpictures,andseta pictureasyourwallpaperorasacontactpicture.Youalsocanshareyourpictureswithfriendsthrough e-mailoramessagingapplication,orbyuploadingthemtotheYouTubeWebsite.
Toviewpicturesstoredonyourtablet,dothefollowing:
- Touchtheapplicationsicon fromtheactionbar,andthentouchGallery.
TouchImagesandvideos-ImagesonlydisplayPictures.
- Touchanalbumandthentouchapicturetoviewit.
While you are viewing a picture, touch the screen to bring up the following options:
• Viewpicturesinaslide-showmode.
•:ShaetheselectedpicturethroughBluetooth, e-mail, oramessagingapplication.
•:D:etheselectedpicture.
- Touchthemenuicontoviewthepicturedetails, rotatethepicture, cropthepicture, orsetthepicture as thewallpaperorasacontactphoto.
Watchingvideos
Youcanwatchmoviesonlinedirectlyfromyourtabletusingoneofthepreinstalledvideoapplications,playvideosthatyouhavetakenwithcameras.Youalsocanshareyourvideoswithfriendsthroughue-mail,ora messagingapplication,orbyuploadingthemtotheYouTubeWebsite.
T dauncthedefaultvideplayertouchWatchfromthepredefinedLenovdLaunchZonedaunchthe application.Thenscrollandselectyourfavoritemovietowatchit.
Toplayavideofromyourvideogallery,dothefollowing:
- Touch the applications icon from the action bar.
- TouchGallery.
3 Touch Images and videos - Videos only to display the videos you have taken with cameras. - Touchavideotoplayit.
- Usethecontrolsonthescreentocontrol playback.
To share video with you friends touch and hold the video from the video gallery Touch the Sharecon
,andthentouchadatatransfermethod.
Listeningtomusic
YourtabletispreinstalledwiththeAmazonMP3applicationandthemSpotMusicapplication.Both applicationsenableyoutolistento,download,orpurchasemusicfromtheWebsites.
TouchListerfromLenovLaunchZone launchthe defaultmusic play application.
Tolistentomusicstoredonyourtablet,dothefollowing:

- Touch the applications icon from the action bartoopenthe application library.
- TouchMusic. The Android music player is launched.
- Touchanalbumandtouchasongtoplayit.
-OR-
Whileviewingalistofalbums, artists, playlists, or songs, touch the triangular menubuttonnexttoan item and touch Play The playback screen opens and tracks the current play order until you reach the end of the playlist (unless you choose a repeat option). If you choose there repeat option, playback stop only if you stop it, even when you switch applications.
- Use controlsonthescreentocontrol playback.
Note: The Android Music application finds your music files any where you put the monony our tablet.
You can return to the playback screen from any other application by opening then notifications panel and touching the ongoing music notification. To open then notification panel, touch the time area from the system bar; then notifications are listed under Details Status.
If you want to create a playlist of your favorites songs or sorts songs by type, do the following:
- Touch the triangular menubuttontotheright of an album, an artist, asong, oragenre, and touch Addtopaylist.
- OntheAddtoplaylistscreen, touchNew.
- TypethenameforyournewplaylistinthetextfieldandthentouchSave.
To remove song from playlist, touch and hold the song and hertouch Delete from the pop-up menu.
Readingbooks
YourtabletispreinstalledwiththeAmazonKindlee-bookreaderandZiniomagazinereader.
YoucartouchReadromLenovLaunchZone launchthedefault-bookreadapplicationogddhe applicationslibraryolaunchtheAmazonKindleapplication,theZiniomagazinereader,orothere-book readersthatyouhavedownloadedfromAndroidMarket.
Obtainingmultimediafiles
Useanyofthefollowingmethodstogetpictures,music,books,andmovies:
CopyfilefromyoucomputeusingtheTransferfiles(MediaTransfeProtocol)ptionwhenyouconnectthetablettoyourcomputerusingtheprovidedUSBcable.See"UsingthemicroUSBconnector" onpage46.
- DownloadmultimediafilesfromtheInternet.See"DownloadingapplicationsfromtheWeb"onpage35.
- CopyfilesfromotherUSBstoragedevices.See"WorkingwithUSBstoragedevices"onpage47.
- ReceivefromotherBluetoothdevices.See"TransferringdatabetweenyourtabletandaBluetooth device"onpage27.
Note: Use Bluetooth to transfers small-size files only such as a picture or a song. It takes a long time to transfer a large file using Bluetooth.
WorkingwithEmail
UsetheEmailapplicationtoreadandsende-mailsandmanageallyoure-mailaccounts.
YoualsocansetupaMicrosoftExchangeaccounttoreadandwriteyourworke-mailsasyoudoona computer.Formoreinformation,seeChapter7"Usingyourtabletwithinanenterprise"onpage61.
SettingupyourEmailaccount
The first time you launch the Email application, you are directed to setup an Email account by doing the following:
1 From the main home screen touch Email Lenovo launch Zone to touch the applications icon

fromtheactionbarandthentouchEmail).
2Type the-mail address and password of the-mail account you want to add and hertouch Signin.
3. Follow the instructions on the screent setup your Email account.
Readingane-mail
- LaunchtheEmailapplication.
- If you have multiplee-mail accounts, touch the e-mail address from the to p left corner to bring up a list of accounts you have added. Then, touch an e-mail box.
- Touchane-mailtoreadit.
Sendingane-mail
If you want to reply to are receivede-mail, touch or from the top of the receivede-mail.
If you want to compose an ewe-mail, do the following:
- Touchthe Composenewe-mailicon.

- Typetherecipient'se-mailaddressandthesubject,thencomposeyourmessage.IfyouwanttoaddCCorBCCaddresses,touch+Cc/Bcc.
- Touch Send to send thee-mail.
Managingaccounts
Toaddanadditionale-mailaccounttoyourEmailapplication,dothefollowing:
- Touch the Menu icon from anye-mail account view.
- TouchSettings. The Settingsscreenisdisplayed.
- Touch Add account.
- Follow the instructions on the screento add the account.
To delete account touch the account from the account screen, then touch Remove account to delete the account.
Tochangethesettingsofanaccount,dothefollowing:
- Touchanaccountfromtheaccountslistscreen.
2Touch the Menurothertouch Settings.
- Touchanitemorane-mailboxtoconfigurethesettings.
Managingyourcontacts
The Contacts application enables you to create, store, and manage information about your friends, family, and colleagues.
Addingacontact
- From the action bar, touch the applications in to open the application library.
- TouchContactstolaunchtheapplication.
3.TouchNew. - Touch the account to which you want to add thenew contact.
5.EnterthecontactinformationandtouchDone.
Editingcontacts
ToeditcontacttouchthecontactfromthecontactstandhertouchtheEditcon
To delete contact touch the contact from the contactist touch the Menu rather touch Delete contact.
• ToimportcontactsfromaflashmediacardoraUSBstoragedevice,dothefollowing:
- Touch the Menu icon from the contact screen.
2 TouchImport/Export and hertouch the location from which you want import the contact information.
- Touch the option for importing a single contact file, multiple contact files, or all contact files. The contacts are imported.
- ToexportcontactstoaflashmediacardoraUSBstoragedevice,dothefollowing:
- Touch the Menu icon from the contact screen.
2TouchImport/Exportandhertouchthedocatiortowhichyouwant exporthecontactinformation. - Touch OK to confirm. Allof your contacts are exported.
Usingcontacts
UseContactstoquicklyreachpeopleorshareacontactwithyourfriends:
- Tosendane-mailtoacontact,touchthecontactfromthecontactslistandtouchthee-mailaddress.
To share contact touch the contact from the contacts, touch the Menu icon and her touch Share contact to share the contact information with your friend through the-mailor Bluetooth.
Workingwithyourfavoriteapplications
TheFavoriteAppsutilityenablesyoutoquicklyaccessyourfavoriteapplicationsfromaHomescreen.By
default,theFavoriteAppsicon isdisplayedasaprimaryshortcutonthesystembar.TouchtheFavorite
Appsicon, and the Favorite Appsutility is launched and displayed at the bottom right area of the screen.
Note: If you don't take further action within two seconds after you launch the Favorite Apps utility, the utility fades away. Touch the Favorite Apps icon again to bring the utility back.
TheFavoriteAppsutilitydisplayslaunchpointsforsixapplications.Eachlaunchpointisascreen representationofthatapplicationwiththelaunchericoninthebottomleftcorner.Touchalaunchpointto launchtheapplication.
ToaddanapplicationtotheFavoriteAppsutility,dothefollowing:
TouchandholdtheFavoriteAppscorfromthesystembatoopertheAdobRemoveapplications screen.TheFavoriteAppsutilitypanelisdisplayedatthebottomofthescreenandthepreinstalled applicationslibraryisdisplayedatthetop.
2. ScrollthroughtheapplicationsanddragthedesiredapplicationicontoanopenslotintheFavoriteApps utilitypanel.Theapplicationisadded.
ToremoveanapplicationfromtheFavoriteAppsutility,dothefollowing:
TouchandholdtheFavoriteAppsconfromthesystembatopertheAddRemoveapplications screen.
- DragthedesiredapplicationlaunchpointfromtheFavoriteAppsutilitypaneltotheapplicationslibrary. Theapplicationslotontheutilityisnowempty.
Managing recently launched applications
If you have launched several applications and want to switch between them, use the Recent Apps application.
T launch Recent Appstouch the Recent App for the systembase pane opens displaying recentlylaunched applications.Scrollthroughtheapplicationsandtouchanapplicationtoswitchtoit.
YoualsocanuseRecentAppstocloseanapplicationbytouchingtheredXinthetoprightcornerofthelistedapplication.
Toviewallapplicationsthatarerunning,dothefollowing:
- From themairHome screentouch the Android Settings doenovdLaunchZ oesptouch the applicationsicon fromtheactionbarandthentouchSettings.TheAndroidSettingsscreenopens.
2TouchApplications→RunningServicesAisbfunningapplicationisdisplayed.
Tocloseanapplicationfromtherunningservicesview,dothefollowing:
- Touch the application you want to close and then touch Stop.
- TouchOKtoconfirmtheaction.
Sharingyourmobiledataconnection
Youcanshareyourtablet'smobiledataconnectionwithasinglecomputerthroughUSBtetheringorthroughBluetoothtethering.Youalsocanshareyourtablet'sdataconnectionwithmultipledevicesatthesametimebysettingyourtabletasaportableWi-Fihotspot.
Note: Thetethering and hotspot functions might not be supported by all carriers.
Toshareyourtablet'smobiledataconnectionthroughUSB:
-
Use the supplied USB cable to connect your tablet to your computer.
-
From the main home screen touch the Android Settings button launch zone, touch the application from the action bar and help touch Settings The Android Settings screen opens.
3TouchWireless networks→Tethering portable hotspot→USBethering.
- Thetabletstartssharingitsmobilenetworkdataconnectionwithyourcomputer.
5Stop sharing you data connection cleath USBethering:checkbox Ojust disconnect the USBcable.
Toshareyourtablet'smobiledataconnectionthroughBluetooth:
-
Pairyourtabletwithyourcomputer.See"UsingBluetoothdevices"onpage26.
-
From themairHome screentouchtheAndroid SettingsdoenovLaunchZocetouchthe applicationfortheclorbaandhertouchSettingsTheAndroid Settingscreeropens.
3Touch Wireless networks→Tethering portable hotspot→Bluetooth tethering.
-
Thetabletstartssharingitsmobilenetworkdataconnectionwithyourcomputer.
-
Tostopsharingyourdataconnection, cleartheBluetoothetheringcheckbox.
Toshareyourtablet'smobiledataconnectionbyturningyourtabletintoaportableWi-Fihotspot:
- From the main home screen touch the Android Settings do not open a launch zone to touch the application from the other bar and touch Settings The Android Settings screer opens.
2Touch Wireless networks→Tethering portable hotspot→Portable Wi-Flotspot.
- Afteramoment, the tablet starts broadcasting its Wi-Finetworkname (SSID). Now other computers or devices can share the tablet's mobile data connection.
4T stopsharing/oudataconnectionthroughWi-FicleathePortableWi-Fhotspotcheckbox.
TosecureyourportableWi-Fihotspot:
- From the main Home screen touch the Android Settings, do not open a launch zone to touch the application from the other board to touch Settings. The Android Settings screen opens.
2Touch Wireless networks→Tethering portable hotspot→Configure Wi-Flotspot.
3 Touch the Security menu configuration network with Wi-Fi Protected Access Security with presharedkey(WPA2PSK).
IyoutouchWPA2PSKapasswordfieldsdisplayedtheConfigureWi-FlotspotialogboxAfteryoutypeapassword,youneedtotypethatpasswordthenexttimeyouconnecttothetablet'shotspotwithcomputepothedeviceRemovethepasswordtouchOpentheSecuritymenu.
- TouchSave.
WorkingwithUSBdevices
YoutablethasamicroUSBconnectorandafull-sizeUSBconnectortoconnectUSBcompatibledevices. Readthistopictolearnhowtouseeachconnectortoconnectdifferentdevices.
UsingthemicroUSBconnector
UsethemicroUSBconnectortogetherwiththesuppliedUSBcabletoconnectyourtablettoyourpersonal computertochargethetabletbattery,transferfiles,orshareyourmobiledataconnection.
Whenthetabletisconnectedtoyourcomputerthroughthemicro-USBconnector,amenuisdisplayedon yourtabletwiththefollowingoptions:
- Low-powerchargeonly.(Pleaseturnoffyourtablet'sscreen) If you choose this option, turn off the tablets screen by pressing the power button.
•ViewcontentsofSDcard(Mount)
If you have installed a flashmediacardiny our tablet and you want to view the information stored on the card from your computer, touch this option.
•Transferfiles(MediaTransferProtocol)
TheMediaTransferProtocol(MTP)supportsthetransferofmultimediadatawithoutadditionaldevice drivers.MTPispartoftheWindowsMedia® frameworkandthusyoucanuseWindowsMediaPlayero synchronizefilesbetweenthecomputerandthetablet.
Touchthisoptionifyuwanttocopyormovepictures,documents,andotherdatafilesfromorto yourcomputer.
Note: If you ever setup up a screen unlock password, PIN, or pattern, after your touch any of the options, you are prompted to type the password or PIN, or draw the pattern to continue with the operation.
If you donotwant this pop-up menutobedisplaye deach time you connect the tablet to a computer, disable it by doing the following:
-
From the main Home screen touch the Android Settings, do not open a launch zone to touch the application for the Web page and a hand touch Settings The Android Settings screeropens.
-
TouchUSBsettings.
-
TouchanyoptionexceptAskonconnection.
Usingthefull-sizeUSBconnector
Use the full-size USB connector to connect a compatible USB device to your tablet, such as a USB storage device or a USB keyboard. To locate the full-size USB connector on your tablet, see "Tablet layout" on page 1.
Note: The full-size USB connector is compatible with the USB2.0 standard.
WorkingwithUSBstoragedevices
If you connect a USB storage device to your tablet, use the USB File Copy Utility application to copy files from one device to another, delete files, view file details, and view available space on the storage device.
WhenaUSBstoragedeviceisconnectedtoyourtablet,apop-upmessageisdisplayedaskingyouif youwantstartheUSBFileCopyUtilityapplicationTouchStarUtilitydaunchtheUSBFileCopy Utilityapplication.Otherwise,touchDon'tstart.
After youtouch Star Utility from the pop-up menu the USB File Copy Utility screen opens displaying the contents store don both the tablet internal storage and the connected USB storage device.
TocopyanitembetweenyourtabletandtheUSBdevice,dothefollowing:
- Touchthenameofthedesiredstoragedevicefromthelocationbartoopenthefilelistforthatdevice.
- Touchthenamesofthedesiredfiles.Whenselected,agreencheckisdisplayedinthebottomleft cornerofthefile.
3TouchCopyfromtheactionbarAmessageboxopensdisplayinglisbavailablestoragelocations. - Touchalocation. The files are copied to the desired location.
Note: Evenify you donot connect a USB storage device to your tablet, you can use the USB File Copy Utility application to manage files on your tablet and installed flashmediacard.
TodisconnecttheUSBstoragedevice,dooneofthefollowing:
- UnplugtheUSBdeviceorcabledirectly.
- Disconnectthedeviceprogrammaticallyandthenphysicallyasfollows:
- From the main Home screen touch the Android Settings (down launch zone), to touch the application for the action and then touch Settings The Android Settings screen opens.
2TouchStorage-UnmountUSBstorage.
- UnplugtheUSBdevicesafely.
WorkingwithotherUSBdevices
If you are accustomed tousing at traditional physical keyboard, you can connect a USB keyboard to your tablet. When connected, the own screen keyboard is disabled automatically and you can start using the USB keyboard immediately.
KeyboardscanalsobesetupthroughtheThinkPadTableDock'sUSBconnectorandLenovo offersbothaThinkPadUSBKeyboardwithTrackpoint ® andaThinkPadEdgewirelesskeyboard andmousecombothatcanconnectthroughthisport.Topurchasetheseoptions,goto http://www.lenovo.com/accessories/services/index.html.
ForinformationaboutusingaThinkPadTabletKeyboardFolioCaseoption,see"UsingtheThinkPadTablet KeyboardFolioCase"onpage56.
YoualsocanconnectaUSBmousetothetablet.AssoonasyouconnectaUSBmousetothetablet,a pointerisdisplayonthetabletscreenindicatingthatthemouseisactivatedandreadyforuse.
UsingHDMIdevices
YourtablethasaminiHDMIconnectorthatyoucanusetoconnectanexternaldisplayforvideooutput.To locatetheminiHDMIconnector,see"Tabletlayout"onpage1.
To use external display for video output you have to enable the Attached display function first by doing the following:
- From the main home screen touch the Android Settings, do not open a launch zone to touch the application from the action and help touch Settings. The Android Settings screen opens.
2TouchScreen-AttacheddisplayEnable!Whenenabledagreenchecksdisplayedthe checkbox.
WhenyouconnectanexternaldisplaytoyourtabletthroughtheHDMIconnector,yourtabletscreenimage isautomaticallymirroredontheexternaldisplayatthehighestresolutionthatthedevicesupports.
If you attach an external display while you are playing a video, the video output is displayed on the external display in a full-screen landscape mode, but the video playback controls are displayed on your tablet.
Todisabletheimageoutputontheattacheddisplay, disconnecttheexternaldisplayfromyourtablet.
Usingthe3-in-1mediacardreader
Yourtablethasa3-in-1mediacardreaderthatsupportsthefollowingcards.
- SecureDigital(SD)card
- SecureDigitalHigh-Capacity(SDHC)card
•MultiMediaCard(MMC)
Useanyoneofthesecardstoextendthestoragecapabilityofyourtablet.Youalsocanusethesecardsto sharedatawithacomputerorotherdevicethatsupportsthesecardformats.
Tolocatethe3-in-1mediacardreader,see"Tabletlayout"onpage1.
Insertingaflashmediacard
Attention: Before handling a flashmediacard, touchametal table or agrounded metal object. This action reduces anystatic electricity from your body. Static electricity can damage the card.
Toinsertaflashmediacardintothe3-in-1mediacardreader,dothefollowing:
- Openthecardreadercoverandlocatethe3-in-1mediacardreader.
- Makesure that the metal contact of the card are facing down and pointing toward the tablet.
- Insertthecardfirmlyintothe3-in-1 mediacardreaderuntilyouhearaclick. The cardmightstop beforeitiscompletelyinstalledintothecardreader.

natural_image
Illustration of a Lenovo tablet device with an inset close-up showing the blue key (no text or symbols on the device itself)Whenaflashmediacardisinsertedintothe3-in-1mediacardreader,apop-upmessageisdisplayedasking ifyouwantdisplaythecontentsthecardT displaythecontentstouchStarUtilityOtherwise, touchDon'tstart.
Removingaflashmediacard
Toremoveaflashmediacard,dothefollowing:
- Opentheslotcover.
- Pushtheflashmediacardinwardalittleuntilyouhearaclick; then, releaseit. Theflashmediacard popsout.
- Gentlyslidethecardoutofthecardreader.

Securingyourflashmediacard
Toprotecttheinformationfromunauthorizedaccess,youcanencryptyourflashmediacard.Referto "Encryptingtheflashmediacard"onpage65formoreinformation.
Workingwiththeclock
Use the Clock application to display the date and time in large characters, your screen and to set alarms to sound once or on are repeatings schedule.
Settingdateandtime
Bydefault,yourtabletautomaticallysynchronizesthdateandtimewiththeInternet.Ifyouwanttosetthe dateandtimemanually,dothefollowing:
- From the main Home screen touch the Android Settings do not open a launch zone to touch the application from the other area and her touch Settings The Android Settings screen opens.
2 TouchDateTime-AutomaticDisabletheauto-synchronizationfunction.
3 TouchSetlateSetimeSelectimazoneandtheitemsetupdateandime.
Settinganalarm
Tosetanalarm, dothefollowing:
- Launch the Clock application.
2TouchSetalarmandouchAddalarmsethealarmtime. - TouchSet.Adialogboxwithdetailsaboutthealarmopens.
4TouchRepeatoperdialogpoxselectdelaysonwhichyouwanthealarmtsound.
5TouchRingtondoselectringtonfothealarmTheingtonplaysbrieflywheryouselectt. - Touch Labeltotypealabelforthealarm.
- Touch Donetosaveyoursetting.
WorkingwithGoogleMapsandGPS
Use the Google Maps application to find your current location, get direction to your destination, and find other location-based information.
TosearchforplacesorfindyourcurrentlocationusingGoogleMaps,youmustenabletheresources requiredforplottingpositionsbydoingthefollowing:
-
From the main home screen touch the Android Settings, you can view a new launch zone to touch the application from the other hand to touch Settings. The Android Settings screen opens.
-
Touch Location&security.
Enable Use wireless networks Use GPS satellites both.
NoteSelectingUseGPSatellitesenablesyoutopinpointocationsdowrdthestreetLevelHoweverthis moderequiresaclearviewoftheskyandconsumesmorebatterypower.
FindingyourlocationonGoogleMaps
Tolocateyourselfonamap, dothefollowing:
- From the action bar, touch the applications icon. The application library opens.
- TouchMapstolaunchGoogleMaps.
- Touch. A hinkingbluedotismarkedonthemaptoindicateyourcurrentapproximatelocation.
Note: This function is supported, we verify you don to have GPS.
FindingaspecificlocationonGoogleMaps
- From the action bar, touch the applications icon. The application library opens.
- TouchMapstolaunchGoogleMaps.
- TypetheplaceyouwanttofindinthesearchboxorspeaktheplaceusingtheGoogleVoiceSearch function.
- Touch the triangle marktostartsearching. These arch results are marked on themap by lettered balloons.
Gettingdirections
- From the action bar, touch the applications icon. The application library opens.
- TouchMapstolaunchGoogleMaps.
- Touchal Hypeteaddresses of the starting location and the destination location.
4 Touchravemethod(carbusorwalk)andouchGoThe detailed directions are displayed on thescreen.
UsingotherfunctionsofGoogleMap
Tendhouse view them through the Traffic layer, Satellite layer, Terrain layer, Latitude layer.
Touch 📷 tofindlandmarks, placesofbusiness, restaurants, and otherplacesnearyourcurrentlocation.
GoogleTalk
GoogleTalkisaninstantmessagingprogram.UseittocommunicatewithotherGoogleTalkusersbytext, audio,orvideo.
TolaunchtheGoogleTalkapplication,touchtheapplicationsiconfromtheetitionbar,andthentouch GoogleTalk.SigninwithyourGoogleAccount.
Note: you don have Google Account touch Add account create one.
AfteryousignintoGoogleTalk, yourfriendslistisdisplayedontheleftandyourcurrentstatusandother informationisdisplayedonthemainpartofthescreen.
Addinganewfriendtoyourfriendslist
Toaddafriend, dothefollowing:
While viewing your friends, touch the Add friend can the top right of the screen.
- Typeyourfriend'se-mailaddress.Thee-mailaddressscanbeaGmailaddressorothere-mailaddress thatisconfiguredtoconnecttoGoogleTalk.
- Touch Send invitation.
Friendswhoacceptyourinvitationareaddedtoyourfriendslist.Youcanchatwithanyoneonyourfriendslist.
Startingaconversation
Tochatwithafriendbytext,dothefollowing:
- Touchafriendonyourfriendslist.Thechatscreenopens.
- TypeyourmessageandtouchSendtosendthemessage.
Tostartavoicechat,dothefollowing:
- Touchyourfriend'snameonthefriendslisttoopenachatscreen.
- Touch the Microphone icon on the right of the chatscreen.
- Yourfriendreceivesavoicechatinvitation. If your friend accepts your invitation, you can speak to each other using your tablet's built-in microphone and speaker, or a headset.
Toinviteafriendtoavideochat,dothefollowing:
- Touchyourfriend'snameonthefriendslisttoopenachatscreen.
- TouchtheVideoiconontherightofthechatscreen.
- Your friend receives a videochat invitation. If your friend accepts your invitation, the videochatscreen opens.
- Youcannowseeeachotherusingyourtablet'sbuilt-incameraandtalktoeachotherusingthebuilt-in microphoneandspeaker,oraheadset.
FormoreinformationaboutusingGoogleTalk,gototheGoogleWebsiteathttp://www.google.com/mobile/.
YouTube
YouTubeisGoogle'sonlinevideostreamingservicethatenablesyoutoviewvideosanduploadyourownvideostosharewithothers.
WachingvideosonYouTube
ToviewYouTubevideos,dothefollowing:
- From the action bar, touch the applications in to open the application library.
- Touch YouTube launch the application.
- TouchavideoontheYouTubehomescreentowatchit.
- Touch Browse to look for videos by category.
5TouchYouChannelopenscreenwithyoufavoritesuploadsandtheYouTubeinformation. - TouchSearchYouTubetosearchforvideosbytypingorspeaking.
UploadingvideostoYouTube
UploadingvideostoYouTuberequiresaYouTubeaccount.TosignintoyourYouTubeaccount,touchthe
MenficotheoprightbfscreenandouclSigninloneofheGoogleAccountsyour tabletisalreadyaYouTubeaccount,youarepromptedtouseittosignin.Otherwise,addaYouTube accountbytouchingAddaccount.
TouploadyourownvideostoYouTube,dothefollowing:
- Launch the YouTube application and touch YourChannel.
- TouchUpload. The videogalleryopens, displayingalbumsofyourvideos.
- Openanalbumandtouchthevideoyouwanttoupload.
- Typeatitleforthevideoandmoredetailsifyouwant.Forexample,youcanspecifywhetheryouwant tomakethevideopublicorprivate.
- TouchUpload. The video is added to your channel.
FormoreinformationaboutusingYouTube,gotohttp://www.google.com/mobile.
Chapter6.ThinkPadTableoptions
YourtabletmightcomewithaThinkPadTabletKeyboardFolioCaseoraThinkPadTablet Dock.Ifyourtabletdoesnotcomewithone,youcanpurchaseonefromLenovoat http://www.lenovo.com/accessories/services/index.html.
TheThinkPadTabletKeyboardFolioCaseandtheThinkPadTabletDockareoptiondevicesthatLenovo designedspecificallyfortheThinkPadTablet.Theseoptionsprovideconvenienceandmakeyourtableteasiertouseforwork,study,andentertainment.
ThinkPadTabletKeyboardFolioCase
Thekeyboardfoliocaseisnotonlyabook-likecoverwithaThinkPadkeyboard.Italsoisafoldablestand thatholdsyourtabletinanuprightpositionandprovidesatypingexperiencesimilartoanotebookcomputer.

Figure10. ThinkPadTabletKeyboardFolioCaseoverview
1 Keyboard
WorksasaUSBkeyboardwithOpticalTrackPointandhotkeys.
24 OpticalTrackPoint
TheOpticalTrackPointisacursor-positioningdevicethatenablestoyoutopoint,select,anddragwithout movingyourfingersfromatypingposition.
Formoreinformation,see"UsingtheThinkPadTabletKeyboardFolioCase"onpage56
3 Hotkeys
Thehotkeysonthekeyboardfoliocaseenableyoutocontrolmanyfeaturesofyourtabletbypassinga singlekey. Referto "UsingtheThinkPadTabletKeyboardFolioCase" onpage56formoreinformation.
ThinkPadTabletDock
TheThinkPadTabletDockholdsyourtabletinanuprightpositionandfreesyourhandstodoothertasks.It alsoprovidesyoueasyaccesstoconnectorsforUSBdevices,filetransfers,charging,audioinput,audio output,andvideooutput.

natural_image
Two 3D mechanical parts shown from different angles, labeled 1 and 2 (no text or symbols on the parts themselves)Figure11. ThinkPadTabletDockfrontviewandrightsideview
1 Dockconnector
Thisconnectorestablishestheconnectionbetweenthedockandtabletwhenyourtabletisseatedinthe dock.
2USBconnector
UsetoconnectUSBdevices,suchasaUSBkeyboardorUSBstoragedevice.
Note: This connector is compatible with the USB2.0 standard.

Figure12. ThinkPadTabletDockrearview
1 MicroUSBconnector
ConnectapersonalcomputerwiththesuppliedUSBcablefordatatransfer.
2 Headphoneconnector
Connectaheadphoneorpoweredspeakerstolistentotheaudiooutput.
3 Microphoneconnector
Connectamicrophonetocapturesound.
4 Powerconnector
Usethe65Wacpoweradaptershippedwiththedocktoprovidepowertothetabletandchargethebattery.
UsingtheThinkPadTabletKeyboardFolioCase
Toconnectthekeyboardfoliocasetoyourtablet, dothefollowing:
- OpentheUSBcoveronthetabletbyslidingittotheleft.

Figure13. OpeningtheUSBcover
- AligntheUSBconnectoronthetabletwiththeUSBconnectoronthekeyboardfoliocaseandslide thetabletdownwarduntilthetwoUSBconnectorsareconnected.

natural_image
Laptop keyboard with a white downward arrow pointing to the screen (no text or symbols visible)Figure 14. Installing the tablet into the keyboard foli case
- Whentheconnectionisestablished, theonscreenkeyboardisautomaticallydisabledandthekeyboard foliocaseisactivated.
Usingthehotkeys
Thekeyboardfoliocasehasseveralhotkeys.Pressahotkeytoquicklycontrolthecorrespondingfunction.Tolocatethehotkeys,referto"ThinkPadTabletKeyboardFolioCase"onpage55
Volumeandmutecontrol
- Speakermute
- Speakervolumedown
•Speakervolumeup - Microphonemute
Applicationcontrol
- OpenthemainHomescreen
•ViewnotificationsfromLenovo
- OpentheAndroidSettingsscreen
- Openthemenufothecurrentapplication
- LaunchGoogleSearch
Screencontrol
•Gobacktothepreviousscreen
- Lockthescreen
•Zoomin
•Zoomout
Audioandvideocontrol
•Gototheprevioustrackorscene
•Playorpause
• Gotothenexttrackorscene
UsingtheOpticalTrackPoint

Figure15. UsingtheOpticalTrackPoint
The Optical TrackPoint consists of pointing sensor the keyboard and w o clic button at the bottom of the keyboard. To move the point to the screens, you fingering up across the top of the point sensor the ection in which you want the point to move to select an item open an application put the point to the direttem and press the def button Pressleigh button to openthemenu for the current application

Formoreinformationaboutthekeyboardfoliocase,refertothedocumentationshippedwiththekeyboard.
UsingtheThinkPadTabletDock
Toconnectyourtablettothedock,dothefollowing:
-
Position your tablet with the dock connectors sided downward.
-
Alignthedockconnectoronthetabletwiththeconnectoronthedock.
3.Gentlyslideyourtabletintothedockuntilitisfullyseatedasshowninthefollowingillustration.
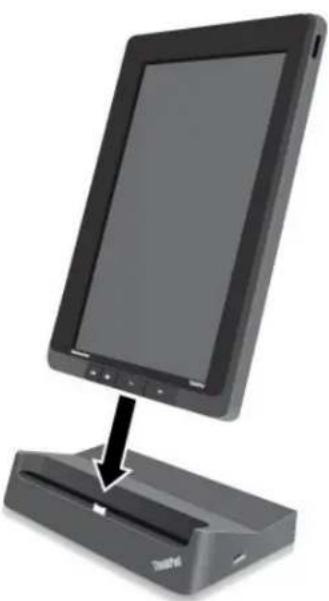
natural_image
Illustration of a black tablet device with a power connector and base, showing no text or symbols.Figure16. Sittingyourtabletonthedock
Afterthetabletisinthedock,youcan:
- Useyourtabletinanuprightpositionwithouthavingtoholdthetablet.
- UsethedocktoholdyourtabletuprightwhenusinganexternalBluetoothkeyboardorUSBkeyboard.
- ConnectthedocktoyourpersonalcomputerwiththesuppliedUSBcabletotransferfiles.
- Connectthedocktoastereosystemorspeakersusingastereoaudiocabletoplaymusic.
- Connectthedocktoanelectricaloutletusingthe65Wacpoweradaptershippedwiththedocktochargethetabletbattery.
Chapter7. Using your tablet within an enterprise
YourtabletprovidessupportforsecureaccesstocorporatenetworksandMicrosoftExchange.Additionally, anumberofbusiness-relatedapplicationsarepreinstalledtohelpyouworkwithandmanageyour work-relateddocuments.
Note: Using your tablet in your company might require additional settings or configurations from your administrator. Contact your administrator form more information.
SettingupMicrosoftExchangeaccounts
MicrosoftExchangeisane-mail-basedcollaborativecommunicationserviceprovidedbyMicrosoft.SetupaMicrosoftExchangeaccounttoconnectwithyourcompany'se-mailaccountsoyoucanuseyourtabletforwork.
TosetupaMicrosoftExchangeaccount,dothefollowing:
- From the main Home screen touch the Android Settings download launch zone, touch the applications icon from the action bar and the touch Settings. The Android Settings screen opens.
2TouchAccounts&syne-Addaccount-Corporate.
3.Entertherequiredinformationandfollowtheinstructionsonthescreentosetupyouraccount.
Note: TousetheMicrosoftExchangeaccount, your company's IT administrator might need to set additional security policies for the account. Contact your IT administrator form more information.
Accessingyourcompany'sVPN
Avirtualprivatenetwork(VPN)providesaccesstotheresourcesinsideasecuredlocalnetwork,suchas thenetworkofyourcompany.
ConfiguringtheVPNsettings
Toaccessyourcompany'sVPN,youmustobtainthedetailedVPNsettingsfromyourcompany'snetwork administrator,andthensetuptheVPNonyourtabletbydoingthefollowing:
- From the main Home screen touch the Android Settings screen open a launch zone, touch the application from the order to another touch Settings The Android Settings screen opens.
2TouchWirelessnetworks-VPNsettings-Add/PN.
-
TouchthetypeofVPNtoadd.ForinformationontheVPNtype,see"Wireless&networks"onpage71.
-
On the screen that opens, follow the instructions from your network administrator to configure the VPN settings.
5TouchtheMenindouchSaveThe/PNsaddedthe/PNist.
Connectingtoyourcompany'sVPN
AfteryoufinishconfiguringtheVPNsettings,connecttoitbydoingthefollowing:
1 From the main Home screen touch the Android Settings screen open a launch zone, touch the application from the other hand to touch Settings The Android Settings screen opens.
2TouchWirelessnetworks-VPNsettingsAllthe/PNshayouhaveaddedaristedthe VPNsettingsscreen.
- Touch your company's VPN.
- Inthedialogboxthatopens, typetherequestedcredentialsandtouchConnect.
When you are connected to a VPN, an otification icon is displayed on the system bar, to the left of the time. Todis connect the VPN, touch then otification icon from the system bar.
EditingordeletingaVPN
ToeditaVPN, dothefollowing:
- From the VPN settingsscreen, touch and hold the VPN to bring up as a submenu.
- TouchEditnetwork.Editthesettings.
3 Touch the Menu or and touch Save save the changes.
TodeleteaVPN, dothefollowing:
Touchandholdhe/PNronthe/PNsettingscreenandhertouchDeletnetwork.
- TouchOKtoconfirmtheoperation.
When connected to your company's network, you can use some of the applications preinstalled on your tablet, such as Documents To Go and Citrix Receiver, to use your tablet as a productivity tool.
DocumentsToGoenablesyoutoview,edit,andcreateMicrosoftWord,Excel,andPowerPointfiles,andto viewPDFfiles.CitrixReceiverenablesyoutoaccessvirtualdesktopsandapplicationsfromyourtablet.It alsoallowsyoutoaccesssecure,centralizedservicesprovidedbyyourITdepartment.
Consult your company's IT administrator form more information about using Citrix Receiver in your work environment.
Chapter8.Security
Thischapterprovidesinformationabouthowtoprotecttheinformationstoredonyourtablet.
Protectingdataagainstviruses
YourtabletispreinstalledwithMcAfeeantivirusprogramstohelpyoutodetectandeliminateviruses.
McAfeeWaveSecureisamobilesecurityservicethatenablesyoutoprotectdata,safelyconnecttothe Internet,andsecurelybrowseandshoptheWeb.Italsoensuresprivacyintheeventoftheftandenhances thepossibilityofrecoveringyourtablet.
TouseMcAfeeWaveSecure,youhavetoregisterwithMcAfeefirstbydoingthefollowing:
- Touch the applications icon from the action bar.
- Touch the McAfee Wave Secure icon.
- Follow the instructions on the screentoregister with McAfee.
If you are using your tablet in an enterprise environment, McAfee Enterprise Mobility Management enables your company's IT personnel to control and configure your tablet to provide secure and easy access to corporatemobile applications.
TodownloadMcAfeeEnterpriseMobilityManagement,touchtheapplicationsicon

fromtheaction
batopentheapplicationslibraryTouchtheMcAfeeBusinessconThertouchDownloadhereForinstructionsonhowtouseit,consultyourITadministrator.
Lockingthetabletscreen
Toprotectyourtabletdataagainstunauthorizedaccess,lockthescreenandsetanunlockmodefor unlockingthescreen.Thescreenunlockmodecanbeapersonalorcorporatepassword,aPIN,orapattern. Afterascreenunlockmodeissetandthescreenislocked,thenexttimeyouturnonyourtabletorwakeup thescreen,youmusttypethepasswordorthePIN,ordrawtheunlockpatterntounlockit.
Settingupthescreenunlockfunction
Toenablethescreenunlockfunctionandsetupapassword, PIN, orapatterntounlockthescreen, do the following:
From the main home screen touch the Android Settings download launch zone touch the
applicationsicon fromtheactionbarandthentouchSettings.TheAndroidSettingsscreenopens.
2TouchLocation&Security-ConfigurdockscreenopenisOptions.
- Touchoneofthefollowingoptionstosetupthescreenunlockmode:
- Notsecured: Nopassword, PIN, or pattern is required to unlock the screen.
Pattern patternisuniquewayousetunlockscreenbyusingoufingetdrawa pattern. The first time you try to set a pattern, as short tutorial about creating an unlock pattern is displayed to guide youth through the process of setting one.
•PIN:Typeaseriesofnumbers.
- Password: Typeaseriesofcharacters, numbers, oracombinationofboth.
CorporateLogonTouchthisoptionusethesameuselDanpasswordyousedogortyour company'sActiveDirectorydomaintounlockyourtabletscreen.
Note: Make anote of your password, PIN, or pattern in case you forget it.
4 Touch OK save you setting The next time you currently you able to wake the screen type the password or PIN, or draw the pattern to unlock the screen.
Attention:
FotheCorporateLogonmodeafterIncorrectattemptsounlockyoutabletyoutabletwilreset itselftothefactorydefaultstate.Thisprocesserasesalluser-createddatafromthetablet,including Googleorothere-mailaccountsettings,systemandapplicationdataandsettings,anddownloaded applications.
- Forotherunlockmodes, if you forget the password, PIN, or pattern, contact Lenovosupport for system reset.
Changingthescreenunlockpassword, PIN, or pattern
Tochangethescreenunlockpassword, PIN, or pattern, dothefollowing:
- From the main home screen touch the Android Settings screen open a launch zone to touch the applications icon from the action bar and the touch Settings. The Android Settings screen opens.
2TouchLocation&Security-Configurdockscreen.
- Touch the screen unlock modethatis currently set and typethe password or PIN, or draw the pattern. Thentouch OK.
- TypeyournewpasswordorPIN, ordrawanewpattern. Confirm it by typing order drawing it for the second time.
- Touch OK to save your change.
Disablingthescreenunlockfunction
Todisablethescreenunlockfunction,dothefollowing:
- From the main home screen touch the Android Settings screen open a launch zone, touch the applications icon from the action bar and the touch Settings. The Android Setting screen opens.
2TouchLocation&Security-Configurdockscreen.
- Touch Notsecured. Thescreen unlock function is disabled.
Encryptingthetabletinternalstorage
Toprotectthedatathatisstoredonyourtabletinternalstoragefromunauthorizedaccess,youcanencrypt theinternalstoragebydoingthefollowing:
Important: Before you start the encryption process, connect your tablet to a standard ac power outlet to ensure steady and sustained supply of electrical power.
- From the main home screen touch the Android Settings (denovo Launch Zone), touch the application from the keyboard and here touch Settings The Android Settings screen opens.
2TouchLocation&Security-Encryptablet.
- Follow the instructions on the screento encrypt your accounts, settings, downloaded applications, and soon.
Encryptingtheflashmediacard
If you use a flashmediacardtostore confidential data or personal information on your tablet, encrypt the cardtoprevent the data from being accessed if the card is ever lost or stolen.
Encryptingaflashmediacard
Toencryptaflashmediacard, dothefollowing:
Important: Before you start the encryption process, connect your tablet to a standard ac power outlet to ensure an steady and sustained supply of electrical power.
- SetupascreenunlockpasswordorPINifyoudidnotsetonebefore.See"Lockingthetabletscreen" onpage63.
- From the main home screen touch the Android Settings screen open a launch zone, touch the application from the order to another touch Settings The Android Settings screen opens.
3 Touch Location Security-EncrypSD Card Messages displayed on form you that data on the flashmediacard will be encrypted. - TypethepasswordorPINthatissetforunlockingthescreen.
5TouchOK confirm the encryption status box is displayed showing the progress of encryption. - Whentheencryptionprocessfinishes, thestatusboxcloses. You can resumenormaloperation of your tablet.
Notes:
- Whileencrypting,youcandonnothingwithyourtabletuntiltheprocessfinishes.Thetimeittakesto encryptdependsontheflashmediacardspacevolume,filesize,filetype,numberoffiles,andsoon.
- The encryption process copiesth data on the flash mediacard to the tablet internal storage first. Therefore, if the amount of space on the tablet internal storage is less than the amount of data on the installed card, you will be prompted to move some data from the card to another storage medium.
Readingdatafromanencryptedflashmediacard
If you try to read the data on the encrypted card on your tablet, the operation is the same as usual. For example, if you want to view the audio files or pictures stored on the encrypted card, just insert the card and use the Android music player to play audio files or got the gallery to view pictures, or use another program such as Document to Goto open a file. However, if you use another tablet to read the encrypted card, you are prompted to express screen unlock password or PIN of the tablet with which the card was encrypted. After you input a correct password or PIN, you will be able to access data on the encrypted card.
Note: If you attempt to read an encrypted flashmediacardonacomputer, you will not be able to access the content of the card under any circumstances.
Chapter9.Youandyourtablet
Thischapterprovidestheaccessibilityinformationaboutyourtablet,andinstructionsontravelingwiththetabletandmaintainingthetablet.
Comfortandaccessibility
Readthistopictolearnhowtouseyourtabletmorecomfortablyandhowtousetheaccessibilityfeatures.
Usingyourtabletmorecomfortably
With the help of all the conveniences and powerful features of your tablet, you can carry your tablet all day long for work or entertainment at many places. Therefore it is important that you remain an attentive good posture, good lighting, and proper seating to achieve greater comfort with your tablet.
Activesittingandrestbreaks: Thelongeryousitandworkwithyourtabletthemoreimportantitisto observeyourworkingposture.Makeminorvoluntaryposturalchangesandtakefrequent,shortbreakswhen youusethetabletforalongtime.Yourtabletisalightandmobilesystem;rememberthatitcaneasilybe repositionedtoaccommodatemanyposturemodificationsyoumightwishtomake.
Workareasetupoptions:Familiarizeyourselfwithallofyourofficefurnituresothatyouknowhowtoadjust yourworksurface,seat,andotherworktoolstoaccommodateyourpreferencesforcomfort.Ifyourwork areaisnotinanofficesetting,besuretotakespecialnoteofemployingactivesittingandutilizingwork breaks.NotethattherearemanyThinkPadproductsolutionsavailabletohelpyoumodifyandexpandyour tablettobestsuityourneeds.AccesstheWebsitehttp://www.lenovo.com/accessories/services/index.html toviewsomeoftheseoptions.Exploreyouroptionsfordockingsolutionsandexternalproductsthatcan providetheadjustabilityandfeaturesthatyouwant.
Accessibilityinformation
Accessibilitytechnologiesenableusersthathavehearing,vision,andmobilitylimitationstoaccess informationinthemostappropriatewayandgetthemostoutoftheirtabletexperience.
Zoom
Zoomintoenlargethetextsize.Tozoomin,touchthescreenwithtwofingersandthenslidethemapart.
Toreducethetextsize, zoomoutbydraggingyourfingerstogether.
Screenbrightness
Tosetascreenbrightnesslevelthatworksforyou,dothefollowing:
- Touch the time area from the system barto open the Status Details panel.
- Touchanywhereofthepanel.TheQuickSettingspanelisdisplayed.
- Locatethescreenbrightnessiconandthendragtheslidertotheleftorrighttoadjustthescreen brightness.
VoiceActions
TheVoiceActionsapplicationenablesyoutocontrolyourtabletusingyourvoice,suchassending messages,browsingtheWeb,listeningtomusic,andactivatinganapplication.
Note: The VoiceActionsfeature is only supported in limited set of languages.
TouseVoiceActions, dothefollowing:
- Touch the Google Voice Search icon from the action bar, or touch the applications icon from the action bar and then touch Voice Search.

-
Say what you want your tablettodo. The following are examples:
-
"MapofGoldenGatePark, San Francisco"
- "Directionsto1299ColusaAvenue, Berkeley, California"
- "GotoGoogle.com"
- “Sende-mailtoHughBriss,subject,newshoes,message,Ican'twaittoshowyoumynewshoes,period”
- "Notetoself:remembertogetthemilk"
- "Setalarmfor7:45pm,label,switchthelaundry"
- "ListentoForever"
Screenreader
Screenreadertechnologiesareprimarilyfocusedonsoftwareapplicationinterfaces,helpsystems,anda varietyofonlinedocuments.However,inthecasewhereascreenreadercannotreaddocuments,the documentmustfirstgothroughaconversionprocess.OnesolutionconvertsAdobePDFfilesintoaformat thatisreadbythescreenreaderapplications.ThissolutionisaWeb-basedserviceprovidedbyAdobe SystemsIncorporated.Throughhttp://www.adobe.com,AdobePDFdocumentscanbeconvertedtoHTML orplaintextinmanylanguages.OneconversionoptionconvertsPDFdocumentsontheInternet.Asecond optionenablesuserstosubmittheURLofanAdobePDFfilethroughge-mailtoconvertittoHTMLorASCII text.AdobePDFfilesonalocalstoragedeviceorlocalareanetwork(LAN)alsocanbeconvertedby attachingtheAdobePDFfiletoane-mailmessage.
Todownloadascreenreaderapplication,dothefollowing:
-
From the main Home screen touch the Android Settings down the launch zone to touch the application from the other bar and her touch Settings The Android Settings screer opens.
-
TouchAccessibility.Amessageboxpopsuptoaskyoutodownloadascreenreader. TouchOKandherfollowthenstructionsrthescreertodownloadhapplication.
Moreaccessibilitytechnologies
The following accessibility applications also are supported but not installed on your tablet. They are available as free applications on Android Market.
KickBackTheTableVibratesbrieflyaseefedbackasyounavigatetheuseinterfacetouchbuttons, andsoon.
TalkBackTheablespeaktheabelsonamesoftemsayounavigatehuseinterfacesuchasmenuoptions,applicationtitles,andcontacts.
- SoundBack: Thetabletplaysasoundasyoutouchthescreen.
After you download these applications, the corresponding items are displayed under Settings > Accessibility. Touch the desired item to enable the function.
Gettingupdates
YourtabletprovidesautomaticnotificationforupdatesavailablefortheAndroidoperatingsystemand updatesavailablefromLenovo.
GettingupdatesfromLenovo
Yourtabletispreinstalledwithanotificationapplicationthatinformsyouaboutthelatestsoftwareupdates fromLenovo.
TheapplicationiconisdisplayedinLenovoLaunchZoneonlywhenthereareunreadsystemnotifications fromLenovo.See"LenovoLaunchZone"onpage12.Touchtheicontopenamessageboxtocheckfor detailedinformationabouttheupdates,andthenfollowtheinstructionstoupdateyourtabletifyouwant.
GettingupdatesfromAndroid
YourtabletreceivesautomaticnotificationswhenupdatesareavailablefortheAndroidoperatingsystem. WhenyoureceiveAndroidupdatenotificationtouchInstallhowInstallateroMoreinfofromthe pop-upoptionsmenuwhentheauto-notificationisdisplayed.
Youalsocancheckforupdatesmanually.Tocheckforthelatestupdates,dothefollowing:
- From the main Home screen touch the Android Settings down a launch zone to touch the application for the other hand touch Settings The Android Settings screen opens.
2TouchAboutablet-Systemupdates.
- AscreenopensanddisplaysalltheavailableupdatesfromAndroid.
Note: If there is noupdate available, you will see a message stating that your system isuptodate.
4you want to apply the update touch Restar Install and her follow the instructions finish the installation. Otherwise, touch the Back button.
Travelingwithyourtablet
Thistopicprovidesinformationtohelpyouworkwithandtransportyourtabletwhileyoutraveling.
Traveltips
Usethefollowingtraveltipstotravelmoreconfidentlyandefficientlywithyourtablet:
- While it is safe to allow your tablettog through the tray machines at airport security stations, it is important to keep you're on the table at all timester prevent theft.
- Put your tablet in a protective case when not in usetoprevent damage or scratching.
- If you are traveling abroad, disable the dataroaming function to prevent unwanted charges. See "Disabling dataroaming on mobilenetworks" on page 23.
Traveltipsonairplanes
If you carry your tablet into an airplane, check the following travel tips:
- If you are going to us the wireless service, check with the airline for any restrictions before boarding the airplane.
- If therearerestrictions on the use of tablets with the wireless feature on an airplane, enable the Airplane mode. To enable it, do the following:
a.TouchthetimeareafromthesystembartoopentheStatusDetailspanel.
b. TouchanywhereintheStatusDetailspanel.TheQuickSettingspanelisdisplayed.
c.TouchAirplanemode. - Becarefulabouttheseatinfrontofyouontheairplane.Placeyourtabletinasafepositionsothatit doesnotgetcaughtwhenthepersoninfrontofyouleansback.
Travelaccessories
The following is a checklist of thing to consider packing when you are going to be away from your office or home:
Travelessentials:
•TheThinkPadTabletACChargerthatcomeswithyourtablet
•ThesuppliedUSBcable
- Aqualitycarryingcasethatprovidesadequatecushionandprotection
If you are traveling to another country or region, you might want to consider these items:
- AThinkPadTabletACChargerforthecountrytowhichyouaretraveling
•ASIMcardforthelocalmobileservicesinthatcountryorregion
Otheritemsyoumightwanttoconsider:
•ThinkPadheadphones
•Additionalstoragedevicesorflashmediacards
- AThinkPadTabletDCChargerifyouaretravelingbyautomobile
- ThinkPadTabletKeyboardFolioCase
Careandmaintenance
Handleyourtabletwithcaresothatyoucanenjoythisproductforalongtime.
Cleaningyourtablet
Tocleanyourtablet,unplugallcablesandturnoffthetabletbypressingandholdingthepowerbuttonforafewseconds.Thenwipethetabletscreenwithasoft,lint-free,dryclothtoclearstainsandsmudges.
Notes:
- Donotusescreencleaners, householdcleaners, aerosolsprays, solvents, alcohol, ammonia, or abrasives to clean your tablet.
- Thetablethasanoleophobiccoatingonthescreen. Theabilityofthiscoatingtorepeloilwilldiminish overtimewithnormalusage,andrubbingthescreenwithanabrasivematerialwillfurtherdiminishits effectandmightscratchyourscreen.
Protectingthescreenwithareplaceablefilm
Yourtablethasahighlysensitivemultitouchscreen.Anytinyscratchorabrasionwillaffectthe performanceofthemultitouchscreen.Toprotectthescreenfromscratching,cleanthescreenfirst andthenapplyareplaceablefilmonthescreen.ThereplaceablefilmsareavailablefromLenovoat http://www.lenovo.com/accessories/services/index.html.
Storingthetabletforextendedperiods
If you are not going to use your tablet for an extended period of time, remove the SIM card and the flash mediacard from your tablet, and then pack your tablet with a protective case and store it in well-ventilated and dry area without direct exposure to sunshine.
Chapter10.Settings
Readthischaptertofamiliarizeyourselfwiththevarioussettingsavailabletohelpyoupersonalizeand optimizeyourtablet.
The following table lists the main menu items on the Android Setting screen.
Table2.MainmenuitemsontheAndroidSettingsscreen
| MainmenuDescription | |
| Wireless&networks | ConfigureandmanageconnectionstonetworksanddevicesthroughWi-Fi,Bluetooth,andmobilenetworks. |
| SoundConfigurethevolumelevel | landtype;configureringtonesandalarms. |
| ScreenConfigurebrightnessand | dotherscreensettings. |
| Location&security | Configurehowyouwantthetablettodetermineyourlocationandhowyouwantto shareyourlocationwithGoogleandothers. |
| ApplicationsViewdetailsabout | theapplicationsinstalledonyourtablet,manageapplicationdata, closeapplications,andsetwhetheryouwanttopermittheinstallationofapplications thatyouobtainfromWebsitesande-mail. |
| Accounts&sync | Add,remove,andmanageyourGoogleAccountsandotheraccounts. |
| PrivacyBackupdataorresetyour | tablet. |
| USBsettingsConfiguretheUSB | modewhenaUSBstoragedeviceconnectstothetablet. |
| Storage | Monitortheusedandavailablespaceonyourtabletinternalstorage. |
| Language&input | Selectthelanguagethatyouwanttoworkwithonyourtabletandconfiguretheinput method. |
| AccessibilityEnableordisableaccessibilitytechnologies. | |
| OpticalTrackPointrefunctionsoft | theOpticalTrackPointbuttons.NoteThismenusavailableonlywheryouconnectyourtabletThinkPadTabletKeyboardFolioCase. |
| Date&time | Setdateandtime. |
| Abouttablet | Viewinformationaboutyourtablet. |
Toaccessanyitem, dothefollowing:
From the main home screen touch the Android Settings (open the launch zone) to touch the application for the other hand touch Settings The Android Settings screen opens.
- Touchanitemfromthemainmenu. Thesubmenufortheitemisdisplayed.
Wireless networks
Use Wireless network settings to configure and manage connections on networks and devices through Wi-Fi Bluetooth mobile networks and USB connection You also can use Wireless network settings to configure connections between your tablet and virtual private networks (VPNs), connect other device to the Internet using your tablet's mobile data connection, and turnoffall radios by enabling the Airplanemode.
Toenableasetting,touchthesettingitemtoselectthecheckbox.Whenasettingisenabled,agreencheck isdisplayedinthecheckbox.Todisableasetting,touchthesettingitemtoclearthecheckbox.Ifother actionsarerequired,followtheinstructiononthescreen.
The following able lists the settings that you can configure through the WirelessNetworksmenu.
Table3. Wireless&networksettings
| Menu | Submenu | Description |
| AirplanemodeWhenairplan | emodeisenabled,allwireless | connectionsaredisabled,andyoucannotconnecttonetworks.Ifallowedby theaircraftoperatorandapplicablelawsandregulations,you cancontinuetouseotherfeatures,suchasplayingmusic, watchingvideos,checkingyourcalendar,viewingpictures, andsoon. |
| Wi-Fi | TurnonorturnoffWi-Fi. | |
| Wi-Fisettings | Wi-Fi | TurnonorturnoffWi-Fi. |
| NetworknotificationWhener | abled,yourtabletnotifiesyouwhenanopennetwork isavailable. | |
| Import | TheimportfeatureenablesyoutoimportyourWi-Fisettings profilesfromyourThinkPadnotebookcomputertoyourtablet. | |
| Show/Edit/Export | ThisfeatureenablesyoutoexportyourWi-Fisettingsprofiles fromonetablettoanother,toeditaWi-Finetworkprofilethat youpreviouslyconfigured.Note:ExportingWi-Fiprofilesfromatablettoacomputer isnotsupported. | |
| Wi-Finetworks | DisplaysalistofWi-Finetworksyouhavepreviously configuredandthosedetectedwhenthetabletlastscanned forWi-Finetworks. | |
| AddWi-FinetworkEnablesyou | utoaddaWi-Finetworkmanuallybyentering itsSSID(thenameitbroadcasts),securitytype,andother properties. | |
| Wi-FiadvancedsettingsNote:Toopenthe Wi-Fiadvancedsettings screen.touchtheMenuiconfromtheWi-Fi settingsview,andthen touchAdvanced. | WirelessEnhanced Settings | Configurethewirelessdisconnectpolicy.Selectwhenyouwanttoturnoffawirelessconnection:TurnoffWi-FiwhendisplayisoffNeverturnoffWi-Fiwhenconnecttothespecified [SSID]TurnoffWi-Fionschedule |
| Bluetooth | TurnonorturnofftheBluetoothfeature. | |
| Bluetoothsettings | Bluetooth | TurnonorturnofftheBluetoothfeature. |
| Devicename | Thedefaultnameforyourtabletisdisplayedonthescreen. WhentheBluetoothfeatureisturnedon,touchthedefault nametochangeit. | |
| Discoverable | SetyourtablettobevisibletootherBluetoothdevices.This functionisonlyavailablewhenBluetoothison. | |
| Discoverabletimeout | Sethowlongyouwanttokeepyourdevicediscoverable. | |
| ShowreceivedfilesCheckfor | filesreceivedthroughBluetooth. | |
| Paireddevices | CheckforBluetoothdevicesthatyouhavepreviously configuredandthosedetectedwhenthetabletlastscanned forBluetoothdevices. | |
| Findnearbydevices | ScanfornearbyavailableBluetoothdevices.Whenthesearch resultsaredisplayed,touchadevicetopairwithit.Formore information,see“UsingBluetoothdevices”onpage26. | |
| Tethering&portable hotspotNote:TheTethering &portablehotspot functionmightnotbe supportedbyallcarriers. | USBtetheringShareyourtab | et’smobilenetworkdataconnectionwithyour computerthroughaUSBconnection. |
| PortableWi-Fihotspot | Shareyourtablet’smobilenetworkdataconnectionasa portableWi-Fihotspot. | |
| ConfigureWi-FihotspotOpe | hascreenwithsettingstoturnonorturnoffthehotspot andtosetitsSSID(itsbroadcastname)andsecurityfeatures. | |
| Bluetoothtethering | Shareyourtablet’smobilenetworkdataconnectionwithother devicesthroughaBluetoothconnection. | |
| Help | OpenascreenthatcontainsinformationaboutUSBtethering, portableWi-Fihotspots,Bluetoothtethering,andwhereto learnmore. | |
| VPNsettings | AddVPN | SelectthetypeofVPNtoadd.•AddPPTPVPN:SetupaconnectiontoaVPNwith Point-to-PointTunnelingProtocol(PPTP).•AddL2TPVPN:SetupaconnectiontoaVPNwithLayer2 TunnelingProtocol(L2TP).•AddL2TP/IPSecPSKVPN:SetupaconnectiontoaVPN withPresharedkey-basedL2TP/IPsec(InternetProtocol Security).•AddL2TP/IPSecCRTVPN:SetupaconnectiontoaVPN withcertificate-basedL2TP/IPsec. |
| VPNs | OpenthelistofVPNsthatarecurrentlyconfigured. | |
| MobilenetworksNote:Thisoption isonlyavailablefor theWAN-supported models. | Dataenabled | Disablethissettingtopreventyourtabletfromtransmitting dataonanymobilienetwork.Thisisusefulifyouaretravelingin anareawhereyoudonothaveamobiledataplanandwantto avoidchargesfordatauseonlocalcarriers’mobilenetworks.Note:Disablingthissettingdoesnotpreventyourtabletfrom transmittingdataonotherwirelessnetworks,suchasWi-Fi orBluetooth. |
| ActivatedeviceActiveyourW | ANadapterandyourmobilenetworkaccountto connecttoamobilienetwork. | |
| Dataroaming | Disablethissettingtopreventyourtabletfromtransmitting dataonothercarriers’mobilienetworkswhenyoucannot accessyourowncarrier’smobilenetworks. | |
| AccessPointNames (GSMmobilenetworks only) | OpentheAPNsscreentoselectmobileaccesspoint configurationsandsetupaccesspointnames(APNs).Consultyourcarrierabouthowtousethetoolsonthisscreen. | |
| Useonly2Gnetworks (GSMmobilenetworks only) | Whenthebatterypowerislow,enablethisselectionontoextend thebatterylifebypreventingyourtabletfromconnectingto higher-speednetworks. | |
| Networkoperators (GSMmobilenetworks only) | Searchforavailablelenetworksandselectanetworkfor roaming. |
Sound
Use the Sound settings to configure how and what volume the able plays music and audio from other media, notification ringtones, and alarms. You also can us these settings stop pick then notification ringtones you prefer and set whether you hear a audible feedback when touching, locking, or unlocking the screen.
Toenableasetting,touchthesettingitemtoselectthecheckbox.Whenasettingisenabled,agreencheck isdisplayedinthecheckbox.Todisableasetting,touchthesettingitemtoclearthecheckbox.Ifother actionsarerequired,followtheinstructiononthescreen.
The following table settings that you can configure through the Soundmenu.
Table4. Soundsettings
| Menu | Submenu | Description |
| General | Vibrate | Whenenabled,thetabletvibratestoalertyoutonewnotifications. |
| Volume | Adjustthevolumeofmusicandaudiofromothermedia,notificationringtones, andalarms. | |
| Microphone | Enabletoallowtheuseofthemicrophone. | |
| NotificationNotification | ringtone | Selecttheringtonetosoundwhenyoureceiveanotification,suchasincoming e-mails. |
| Feedback | Audible selection | Whenenabled,soundsplaywhenyoutouchiconsandotheritemsonthe screen. |
| Screenlock sounds | Whenenabled,tonesplaywhenyouunlockandlockthescreen. | |
| Hapticfeedback | Whenenabled,thetabletvibratestoindicatescreentouchesandother interactions. |
Screen
UsetheScreensettingstoconfigurebrightnessandotherscreenfeatures.
Toenableasetting,touchthesettingitemtoselectthecheckbox.Whenasettingisenabled,agreencheck isdisplayedinthecheckbox.Todisableasetting,touchthesettingitemtoclearthecheckbox.lfother actionsarerequired,followtheinstructiononthescreen.
The following table settings that you can configure through the Display menu.
Table5. Displaysettings
| Menu | Submenu | Description |
| Brightness | Adjustthebrightnessofthescreen.Dragthebrightnesssliderhorizontallyortouchthedesiredportionontheslider.Thelengthofthehighlightedbaronthesliderindicatethebrightnessofthescreen.Bydefault,Automaticbrightnessisenabledandthetabletadjuststhescreenbrightnessautomaticallyusingtheambientlightsensor. | |
| Auto-rotatescreen | Enableordisablethescreenauto-rotationationfunction.Whenenabled,thescreenswitchestheorientationtolandscapeorportraitviewasyourotatethetablet. | |
| Animation | Noanimation | Setthetablettoplayornottoplayananimationwhenyouopenorcloseascreen,orswitchbetweenscreens.Note:TheNoanimationoptiondoesnotcontrolnnationalapplications. |
| Someanimations | ||
| Allanimations(default) | ||
| Timeout | Xsecond/minuteNote:Xstandsforanumber. | Selectatimeoutvalueforhowlongthescreenremainsonafterthelastoperation.Forthelongestbatterylifebetweencharges,usetheshortestconvenienttimeoutvalue. |
| Attacheddisplay | EnableordisabletheuseofHDMIdevices. |
Location&security
Used Location & security settings to configure how you want the tablet to determine your location (this affects accuracy) and how you want to share your location with Google and others. You also can configure settings that help secure your tablet and data on it.
Toenableasetting,touchthesettingitemtoselectthecheckbox.Whenasettingisenabled,agreencheck isdisplayedinthecheckbox.Todisableasetting,touchthesettingitemtoclearthecheckbox.lfother actionsarerequired,followtheinstructiononthescreen.
The following able lists the settings that you can configure through the Location & security menu.
Table6.Location&Securitysettings
| Menu | Submenu | Description |
| Mylocation | UsewirelessnetworksEnableMouseWi-Fiandmobilenetworkstodetermineyourapproximatelocation. | |
| UseGPSsatellitesEnabletouseyourtablet'sglobalpositioningsystem(GPS)satelliterceivertoaccuratelydetermineyourlocationtoseveralmeters.GPSaccuracycanbeimpactedbyatmosphericconditions,obstructions,andotherfactors. | ||
| UselocationforGoogleSearch | EnabletoimproveGooglesearchresultsandotherGoogleservices. | |
| Lockscreen | Configurelockscreen•Off:Neverlockthescreen.•Notsecured:Nothingisneededtounlockthescreen.•Pattern:Setanunlockpatterntounlockthescreen.•PIN:SetaPIN(numeric)tounlockthescreen.•Password:Setapassword(alphanumeric)tounlockthescreen.•CorporateLogon:UseyourActiveDirectorydomainpasswordtounlockthescreen. | |
| Timeout | Setupwhentolockthescreenafterthescreenisturnedoff.Thisoptionisonlyavailableifyouhavesetupascreenunlockpassword,PIN,orpattern. | |
| Usetactilefeedback | Whenenabled,thetabletvibrateswhileyoutypingthescreenunlockpasswordorPIN.ThisoptionisonlyavailableifyouhavesetupascreenunlockpasswordorPIN,orapattern. | |
| OwnerinfoSetwhetheryouwanttodisplayinformationaboutyourself(suchasyourcontactinformation)onthelockedscreenandwheretotypethetextyouwanttodisplay. | ||
| Encryption | EncrypttabletEncryptyouraccounts,settings,downloadedapplications,andso on.Afteryouencryptyourtablet,youhavetotypeapasswordor PINtodecryptiteachtimeyouturniton. | |
| Encryptdataonremovable SDcard | Encryptthedataontheinstalledflashmediacard.Onceencrypted, itrequiresapasswordorPINtodecryptyourflashmediacardif thecardisusedonothertablets. | |
| SIMcardlockSetup | SIMcardlock | Note:ThisoptionisonlyavailablefortheWAN-supportedmodels. ConfigurethetablettorequireenteringtheSIMPINTousethetablet. |
| PasswordsVisible | passwordEnabletoshowthepass | swordasyoutype. |
| Device administration | Deviceadministrators | Activateanapplicationtobeadeviceadministratorforyourtablet. Then,yourITpersonnelareabletoperformsomeadministrative tasksonyourtabletthroughtheapplication. |
| Credential storage | UsesecurecredentialsEnable | toallowapplicationstoaccessyourtablet'sencryptedstore ofsecurecertificatesandrelatedpasswordsandothercredentials. |
| InstallfromSDcard | Installasecurecertificatefromtheflashmediacardinstalledon thetablet. | |
| SetpasswordSetorchangethe | passwordforyoursecurecredentialstorage. | |
| Clearcredentials | Deleteallsecurecertificatesandrelatedcredentialsanderasethe credentialstoragepassword. | |
Applications
Use the Application settings to view details about the applications installed by our tablet, manage their data, to forcethem to stop if they donot function correctly, and to set whether you want to permit the installation of application that you obtain from Websites and e-mail.
Toenableasetting,touchthesettingitemtoselectthecheckbox.Whenasettingisenabled,agreencheck isdisplayedinthecheckbox.Todisableasetting,touchthesettingitemtoclearthecheckbox.lfother actionsarerequired,followtheinstructiononthescreen.
The following table includes the settings that you can configure through the Application menu.
Table7. Applicationssettings
| Menu | Submenu | Description |
| Manageapplications | Openalistoftheapplicationsinstalledonthetablettochecktheapplicationinformationorremovetheapplication. | |
| Runningservices | Openalistofapplications,processes,andservicesthatarecurrentlyrunning.Tostopaservice,touchtheservice,andthentouchStopattheconfirmationprompt. | |
| Storageuse | Viewtheinformationaboutthestorageusedbyeachapplication. | |
| arBasingthebatterypower | sinceyoulast | chargedyourtablet. |
| Unknownsources | EnabletoallowtheinstallationofapplicationsfromsourcesotherthanAndroidMarket.Note:ThisoptionmustbeenabledtoallowinstallationofapplicationsfromLenovoAppShop. |
chapplications
Table7. Applicationssettings(continued)
| Menu | Submenu | Description |
| Development | USBdebugging | Enabletoallowdebuggingwhenyourtabletisattachedtoacomputer throughaUSBcable. |
| StayawakeWhenenabled,thescreenwillnotgotosleep(lock)whilethebattery ischarging,orwhilethetabletisconnectedtoacomputerthrougha USBcable. | ||
| Allowmock locations | Thissettingisusedbydeveloperswhendevelopinglocation-based applications.Enablethisfunctiontoallowmocklocationsandservice informationtobesenttoaLocationManagerservicefortesting. | |
| HDCPcheckingSetifyd | uwanttousehigh-bandwidthdigitalcopyprotection(HDCP) tocheckfordigitalrightsmanagement(DRM)content. | |
Accounts&sync
Use the Accounts & Sync settings to add remove and manage you Google Accounts and the accounts.
Youalsousethesesettingstocontrolhowandwhetherapplicationssend,receive,andsynchronizedataon theirownschedules,andwhetherapplicationscansynchronizeuserdataautomatically.
Toenableasetting,touchthesettingitemtoselectthecheckbox.Whenasettingisenabled,agreencheck isdisplayedinthecheckbox.Todisableasetting,touchthesettingitemtoclearthecheckbox.lfother actionsarerequired,followtheinstructiononthescreen.
The following table includes the settings that you can configure through the Accounts & Sync menu.
Table8.Accounts&syncsettings
| Menu | Submenu | Description |
| Generalsync settings | BackgrounddataEnable | ordisablethebackgroundsynchronizationwithoutopening applications. |
| Auto-syncEnabletoper | mitapplicationstosynchronizedataontheirown schedule.Ifyouclearthischeckbox,youmusttouchanaccounton thelisttosynchronizedataforthataccount.Auto-syncisdisabledanddimmedBackgrounddatacleared. | |
| AllowsyncwithPC | Enablethisfunctiontoallowconnectiontoyourpersonalcomputer throughthemicro-USBconnector. | |
| Manageaccounts | AlltheGoogleAccountsandotheraccountsyouhaveaddedtothe tabletaredisplayedunderManageaccounts.Differentoptionsare displayedwhenyoutouchanaccountdependingontheaccounttype.ForeachGoogleAccount,thekindsofdatathatcanbesynchronized tothetabletarelisted.Touchtheoptiontostartsynchronizingthat kindofdata.Toaddanaccount,touchAddaccountfromthetoprightcornerof thescreen.Todeleteanaccount,touchtheaccountandthentouchRemove accountfromthetoprightcornerofthescreen.Note:Removinganaccountalsodeletesallofitsmessages,contacts, andotherdatafromthetablet. |
Privacy
Use the Privacy settings to manage whether you settings and the data are backed up to Google servers with your Google Account. You also set these settings to erase all the data on your tablet by performing a factory data reset operation.
Toenableasetting,touchthesettingitemtoselectthecheckbox.Whenasettingisenabled,agreencheck isdisplayedinthecheckbox.Todisableasetting,touchthesettingitemtoclearthecheckbox.Ifother actionsarerequired,followtheinstructiononthescreen.
The following table includes settings that you can configure through the Privacy menu.
Table9. Privacysettings
| Menu | Submenu | Description |
| Backupand restore | Backupmydata | EnabletobackupsomeofyourpersonaldatatoGoogleserversusing yourGoogleAccount.Ifyoureplaceyourtablet,youcanrestorethe datayouhavebackedupthefirstimeyousignintoyournewtablet withyourGoogleAccount.TheinformationthatcanbebackedupincludesyourWi-Fipasswords, Browserbookmarks,alistoftheapplicationsyouhaveinstalledfrom Market,thewordsyouhaveaddedtotheuserdictionaryusedbythe onscreenkeyboard,andmostofthesettingsthatyouhaveconfigured withtheSettingsapplication.Somethird-partyapplicationsmightalsotakeadvantageofthis feature,soyoucanrestoreyourdataifyoureinstallanapplication.Ifyouclearthisoption,youstopbackingupyourdatatoyouraccount, andanyexistingbackupsaredeletedfromGoogleservers. |
| Backupaccount | ViewtheGoogleAccountthatyoursettingsandotherdataarebacked upwith.ThisistheaccountyouneedtosignintoonanewAndroid tabletorotherdevice,ifyouwanttorestorethesettingsfromthis tablettothenewone. | |
| Automaticrestore | Selectthisoptiontorestoresettingsandotherdatawhenyoureinstall anapplication.Tousethisfeature,youmusthavebeenbackingup yourdatawithyourGoogleAccountandtheapplicationhasbeen usingthebackupservice. | |
| PersonaldataFactorydatareset | UseFactorydataresettoresetyoursettingstothefactorydefault values.Thissettingerasesalldatafromthetablet,includingGoogle orothere-mailaccountsettings,systemandapplicationdataand settings,anddownloadadapplications.Itwillnoterasecurrentsystem softwareandbundledapplications,orfilesstoredonaninstalledflash mediacard,suchasmusicorpictures. | |
| CamerasCameras | Enableordisableboththefront-facingcameraandtherear-facing camera. | |
USBsettings
Use the USB settings to decide how you want to use your table when attached to compute through the microUSB connector. You can choose any your table as a massive storage device to charge your table only.
Toenableasetting,touchthesettingitemtoselectthecheckbox.Whenasettingisenabled,agreencheck isdisplayedinthecheckbox.Todisableasetting,touchthesettingitemtoclearthecheckbox.Ifother actionsarerequired,followtheinstructiononthescreen.
The following able lists the settings that you can configure through the USB settings menu.
Table10.USBsettings
| Menu | Submenu | Description |
| MicroUSB | Low-power chargeonly. (Pleaseturnoff yourtablet's screen) | Enabletoputyourtabletintochargingmodeautomaticallywhenconnected toacomputer. |
| Viewcontentsof SDcard(Mount) | Ifyourtabletisinstalledwithaflashmediacard,whenconnectedtoa computer,youcanviewthecontentsoftheflashmediacardfromthe connectedcomputerbychoosingthisoption. | |
| Transferfiles (MediaTransfer Protocol) | Enablethisoptiontotransferfiles. | |
| AskonconnectionWhenenabled,everytimethetabletisconnectedtoacomputer,apop-up menuwillbedisplayedtoaskyoutoselectamicro-USBmode. | ||
| SecurityforMedia Connection | ShowLock Screen | Ifyouenablethisfunction,beforeyoucanviewthecontentsstoredonyour tabletfromtheconnectedcomputer,youwillbeaskedtoinputthescreen unlockpasswordorPIN,ordrawapattern.Note:Ifyoudonotsetupascreenunlockfunction,thisselectionisdimmed. |
Storage
Use Storage settings monitoth used and available space you table internal storage and the installed flashmediacard.
Toenableasetting,touchthesettingitemtoselectthecheckbox.Whenasettingisenabled,agreencheck isdisplayedinthecheckbox.Todisableasetting,touchthesettingitemtoclearthecheckbox.lfother actionsarerequired,followtheinstructiononthescreen.
The following able lists settings that you can configure through the Storagemenu.
Table11. Storagesettings
| Menu | Submenu | Description |
| SDcard | Totalspace | Viewthetotalspaceonaninstalledflashmediacard. |
| Available | Viewtheavailablespaceonaninstalledflashmediacard. | |
| MountSDcard | Mounttheflashmediacard. | |
| EraseSDcard | Erasethedataontheinstalledflashmediacardandprepareitforusewithyourtablet. | |
| AllowSDcards | Alloworprohibittheuseofflashmediacards. | |
| USBstorageUSB | BstoragedevicesEnableto | allowtheuseofUSBstoragedevices. |
| Internal storage | Totalspace | Viewthetotalspaceofyourinternalstoragedevice. |
| ApplicationsViewthespaceusedbyanapplication. | ||
| Downloads | Viewthespaceusedbyadownloadedfileorapplication. | |
| Pictures,Videos | Viewthespaceusedbyamediafile. | |
| Audio(music, ringtones,podcast etc) | ||
| Misc. | ||
| AvailableViewtheavailablespaceonthetabletinternalstorage. | ||
| USBstorage | Totalspace | ViewthetotalspaceontheexternalUSBstoragedevice. |
| Available | ViewtheavailablespaceontheexternalUSBstoragedevice. | |
| MountUSBstorageMounttheUSBstoragedevice. | ||
Language&input
Use the Language Input settings to select the language you want to work with your outabletando configure these settings of input method.
Toenableasetting,touchthesettingitemtoselectthecheckbox.Whenasettingisenabled,agreencheck isdisplayedinthecheckbox.Todisableasetting,touchthesettingitemtoclearthecheckbox.lfother actionsarerequired,followtheinstructiononthescreen.
The following table includes the settings that you can configure through the Language input menu.
Table12.Language&inputsettings
| Menu | Submenu | Description |
| Languagesettings | SelectlanguageSelectth | elanguagetouseforthetextonyourtablet. |
| Userdictionary | Openalistofthewordsyouhaveaddedtothedictionary,as describedin“Usingtheonscreenkeyboard”onpage15.Touchawordtoedititordeleteit.Toaddaword,touchAdd. | |
| Voiceinput(Voice recognizersettings) | Language | Setthelanguageyouwanttousewheninputingtextbyspeaking. |
| SafeSearchSetwhether | youwantGoogleSafeSearchfilteringtoblocksome resultswhenyouuseGoogleVoiceSearch. | |
| Blockoffensivewords | Googlevoicerecognitionrecognizesandtranscribeswordsmany peopleconsideroffensivewhenyouinputtextbyspeaking.Whenenabled,Googlevoicerecognitionreplacethosewordsin transcriptionswithaplaceholdercomprisedofhashsymbols. | |
| Voiceoutput(Text-to-speech settings)Note:Ifyoudonothavespeechsynthesizerdata installed,onlytheInstallvoicedataoptionisavailable. | Listentoanexample | Playabriefsampleofthespeechsynthesizerusingyourcurrent settings. |
| Alwaysusemysettings | Enabletousethesettingsonthisscreeninplaceofspeechsynthesizersettingsavailableinotherapplications. | |
| Defaultengine | Setthetext-to-speechapplicationyouwanttouse,ifyouhavemore thanoneinstalled. | |
| Installvoicedata | Ifyourtabletdoesnothavespeechsynthesizerdatainstalled,touch thisoptiontoconnecttoAndroidMarket.Youwillbeguidedthrough theprocessofdownloadingandinstallingthedata.Note:Thissettingisnotavailableifthdataisalreadyinstalled. | |
| SpeechrateSethowquid | klyyouwantthesynthesizertospeak. | |
| Language | Selectthelanguageofthetextyouwantthesynthesizertoread. | |
| Engines | Openalistofthetext-to-speechenginesinstalledonyourtablet.Touchonetovieworchangeitssettings. | |
| Keyboardsettings | CurrentinputmethodOpen | enalistofinputmethods,ifyouhavemorethanoneinstalled.Selecttheinputmethodyouwanttouse.Youcandownloadalternativekeyboardsandotherinputmethods fromAndroidMarket. |
| Inputmethodselector | Configurewhethertoshowtheinputmethodselectorwheneveryou needtotype. | |
| Configureinput methods | Displayssettingsfortheinputmethodsyouhaveinstalled.FortheAndroidkeyboard,thefollowingsettingsarelisted:Activeinputmethods:Openascreentoselectmultiplelanguages fortypingandspeakingwhenusingtheonscreenkeyboardand voiceinput.Settings:Configurethefollowingsettings:-Auto-capitalization:Whenenabled,theonscreenkeyboard automaticallycapitalizeshefirstletterofthefirstwordaftera period,thefirstwordinatextfield,andeachwordinnamefields.-Vibrateonkeypress:Whenenabled,thetabletvibrateswhen youtouchakeyontheonscreenkeyboard.-Soundonkeypress:Playabriefsoundeachtimeyoutoucha keyontheonscreenkeyboard.-Auto-correction:Automaticallytypesasuggestedwordthatis highlightedinthestripabovethekeyboardwhenyouentera spaceorpunctuation.-Showcorrectionsuggestions:Showsuggestedwordsinastrip abovetheonscreenkeyboardasyoutype. |
Accessibility
AccessibilityservicesarespecialfeaturestomakeusingthetableteasierforthosewithcertainphysicaldisabilitiesUsetheAccessibilitysettingstoconfigureanyaccessibilityplug-insyouhavenstalledonyourtablet.
Toenableasetting,touchthesettingitemtoselectthecheckbox.Whenasettingisenabled,agreencheck isdisplayedinthecheckbox.Todisableasetting,touchthesettingitemtoclearthecheckbox.Ifother actionsarerequired,followtheinstructiononthescreen.
Note: accessibility-related applications are installed after you touch Accessibility from the settings panely you are prompted to download accessibility software. Touch OK if you want download Otherwise, touch Cancel.
The following able lists the settings that you can configure through the Accessibility menu.
Table13. Accessibilitysettings
| MenuDescription | |
| Accessibility | Selectthisoptiontoenableallinstalledaccessibilityplug-ins. |
| Accessibilityscripts | EnabletoallowapplicationstodownloadaccessibilityscriptsfromGoogle. |
| Touch&holddelay | Configurehowlongyoumustkeepyourfingeronanobjectbeforeitisrecognizedasatouchandholdoperation. |
Date&time
Use Dat× settings to you preferences how dates are displayed. You also can use these settings to your own time and time zone, rather than obtaining the current time from thenetwork.
Toenableasetting,touchthesettingitemtoselectthecheckbox.Whenasettingisenabled,agreencheck isdisplayedinthecheckbox.Todisableasetting,touchthesettingitemtoclearthecheckbox.lfother actionsarerequired,followtheinstructiononthescreen.
The following able lists the settings that you can configure through the DateTimemenu.
Table14. Date×ettings
| MenuDescription | |
| Automaticdate&time | Disabletomanuallysetthedateandtime.Enabletoobtainthecurrenttimefromthe wirelessnetwork. |
| Automatictimezone | Disabletomanuallysetthetimezone.Enabletoobtainthetimezonefromthewireless network. |
| Setdate | IfAutomaticdate&timeisunchecked,touchtomanuallysetthedate. |
| Settime | IfAutomaticdate&timeisunchecked,touchtomanuallysetthetime. |
| Selecttimezone | IfAutomatictimezoneisunchecked,touchtomanuallysetthetimezone. |
| Use24-hourformatEnableto | displaythetimeusingthe24-hourtimeformat. |
| SelectdateformatSetthefor | matforddisplayingdates. |
OpticalTrackPoint
Note: This menu is available only when you connect your tablet to a ThinkPad Tablet Keyboard Folio Case.
If you are using ThinkPadTableKeyboardFolioCase, use OpticalTrackPointsetting to configure the function of the left and right button so the OpticalTrackPoint on the ThinkPadTabletKeyboardFolioCase.
The following able lists the settings that you can configure through the OpticalTrackPointmenu.
Table15. OpticalTrackPointsettings
| MenuDescription | |
| ButtonFunction | ConfiguretherightbuttonandleftbuttonoftheOpticalTrackPointtofunctionas“select”or“openmenu.” |
| TutorialVideoTouchtowatch | atutorialvideo. |
Abouttablet
Use Aboutable settings to check information about you tablet including h status battery use legal information, hardware and software versions, and build number.
Toenableasetting,touchthesettingitemtoselectthecheckbox.Whenasettingisenabled,agreencheck isdisplayedinthecheckbox.Todisableasetting,touchthesettingitemtoclearthecheckbox.lfother actionsarerequired,followtheinstructiononthescreen.
The following table includes the settings that you can configure through the Aboutable menu.
Table16.Abouttabletsettings
| MenuDescription | |
| SystemupdatesOpenascre | enthatreportsthelatestavailabileAndroidsoftwareupdatesforyourtablet. |
| Status | Viewinformationaboutyourbatterystatus,mobilenetworkconnection,andotherdetails.NotetyousePoorundeBatteryconditioncontactLenovdofurtheinstructions.Thebatterymightneedtobereplacedwithanewone. |
| Batteryuse | Viewalistoftheapplicationsandoperatingsystemcomponentsyouhaveusedsinceyou lastchargedthetablet,sortedbytheamountofpowertheyhaveused. |
| Legalinformation | Obtainlegalinformationaboutthesoftwareincludedwithyourtablet. |
| ModelnumberViewyourtable | letmodelnumber. |
| VersioninformationViewdet | ailsabouttheversionsofyourtablet’shardwareandoperatingsystemsoftware.Thisinformationisusefulifyouneedtoworkwithyourcarrier’ssupportteam. |
| Otherinformation | Viewotherinformation,suchastheserialnumber,universallyuniqueidentifierUUID,machinetype,andassettag. |
Chapter11.Troubleshootingproblems
This chapter describes some common problems and suggested solutions, and how to recovery your tablet from acrash.
Beawarethattheproblemsandsolutionsdescribedinthischapteraremeantonlyasaguide.Theyare notdefinitiveproblemsolvingtechniques.Forsomeproblems,youmightneedhelpfromLenovo,your reseller,oryourserviceprovider.
When you observe a problem, stop operation immediately, because taking further action might result in data loss or damage. Take an annotation of what the system is doing and what actions you performed before the problem occurred. Provided detailed information to Lenovo your service provider for quicker problem resolution.
Internetproblem
Problem: Unable to connect to the wireless network
Suggested solution: Makesurethat:
•TheSIMcardisvalidandworkableifyouareusingamobiledatanetwork(2Gor3G).
- You are within the network's servicer range and the signal strength this good.
- YourtabletisnotinAirplanemode.
If the problempersists, contact Lenovofortechnical support.
Multitouchscreenproblem
Problem: Themultitouchscreenrespondsslowlyorimproperly.
Suggested solution: If your multitouch screen respond slowly or improperly, do the following:
- Remove any protective covers from them multitouchscreen. Protective covers might prevent the tablet from recognizing your inputs and are not recommended for touch screen devices.
- Ensure that your hands are clean and dry when touching the screen.
3.Restartyourtablettotryagain.
If the problempersists, contact Lenovofortechnical support.
Batteryproblem
Problem: The battery does not charge correctly.
Suggested solution: Check if the accharger is connected correctly. If the connection is good but the battery still does not charge, contact Lenovotore place with anew battery.
Systemproblems
- Problem: Unabletoturnthetableton.
Suggested solution: Connect your tablet to an ac power outlet to see if the problem is caused by a drained battery. If the problem persists, contact Lenovofortechnical support. - Problem: Unabletoturnthetabletoff.
Suggested solution: If you cannot turn off your tablet by pressing and holding the power button, insert a straightened paper clip into the emergency reset holet to turn it off. To locate the emergency reset hole, see "Tablet layout" on page 1.
Mediaproblems
- Problem: Theaudioqualityispoororthereisnosoundoutput.
Suggested solution: Check and makes sure that:
- Thespeakerisnotcovered.
- Thespeakermutefunctionisdisabled.
-If you are using aheadset, unplugit, then plugitin again.
–The volume is not turned to the lowest level.
If the problempersists, contact Lenovofortechnical support.
- Problem: Asong, video, orothermediafile cannot be played.
Suggested solution: Check and makes sure that the media file is not corrupted.
Externaldeviceconnectionproblems
Problem: connection is not established when you connect the tablet a computer.
Suggested solution: Ensure that the computer USB cable you are using is compatible with your tablet.
Alsoensure that the USB cable is connected to the micro-USB connector of your tablet.
- Problem:Bluetoothdevicescannotbelocated.
Suggested solution: Makesurethat:
-TheBluetoothwirelessfeatureisactivatedonyourtablet.
-TheBluetoothwirelessfeatureisactivatedonthedevicetowwhichyouwanttoconnect.
-YourtableandtheBluetoothdevicearewithinthemaximumBluetoothrange(10m).
If the problem persists, contact Lenovofortechnical support.
- Problem: The image cannot be mirrored on the external display.
Suggested solution: Makesurethat:
- The external display is powered on.
- The external display is connected to your tablet through them in HDMI connector.
If the problempersists, contact Lenovofortechnical support.
Recoveringfromaseveresoftwareproblem
If your tablet stops responding and you cannot turn off the tablet by pressing holding the power button, insert a straightened paper clip into the emergency resetholetoreset the tablet. Then restart your tablet.
Tolocatetheemergencyresethole,see"Tabletlayout"onpage1.
If you still encounter the same problem after your rest or your tablet, reset your tablet and restart it again, and then perform a factory data reset operation by doing the following:
- From the main Home screen touch the Android Settings, do not open a launch zone, to touch the application for the other hand touch Settings. The Android Settings screen opens.
2TouchPrivacyFactorydataset.
3TouchResetystemThisactionwileras@data#ronyoutableIncludingyouGoogleAccounts, applicationandsystemsettings,anddownloadedapplications.
Chapter12.Gettingsupport
ThischapterprovidesinformationaboutgettinghelpandsupportfromLenovo.
Lenovotechnicalsupport
AfteryoubuyaThinkPadTablet, registryourtabletwithLenovo.Usingtheregisteredinformation, Lenovo canprovideefficientservicewhenyoucallLenovoforhelp, sendnotificationsoffreesoftwareandspecial promotionaloffers,andcontactyouincaseofarecallorothersevereproblem.Somelocationsoffer extendedprivilegesandservicestoregisteredusers.
ToregistryourtabletwithLenovo,gotohttp://www.lenovo.com/register.Thenfollowtheinstructionson thescreen.
If you need help, service, technical assistance, or just want more information about Lenovo products, you can either goto the Lenovo technical support website at http://support.lenovo.com or call the Lenovo Customer Support Center directly.
OntheLenovotechnicalsupportWebsite,youcangetthefollowingtechnicalinformationorsupport:
DownloadDrivers&Software Downloaddrivers,flashtheBIOS,andupdateyour software.
Diagnose&FixUseself-diagnostictoolstodiagnosetheproblem yourself, searchcommunityboards, or work without VirtualAgenttoanswerquestions.
Product&ServiceWarrantyCheckyourwarrantystatusandupgradeyourwarranty.
FinProduct&PartsDetailacementparts,learnhowto
replaceparts, and viewotherpartsinformationrelated to your product.
UserGuides&Manuals
Readordownloadthedocumentationrelatedtoyour product.
Research&Learn
Search the community knowledge base for your computer to share and discover information with other users.
If you need to call the Lenovo Customer Support Center, goto http://www.lenovo.com/support/phonefor the latest telephonenumber sand hour so operation.
During the warranty period, you can get the following services from the Customer Support Center:
Problem determination Trainee personnel are available to assist you with determining you have hardware problem and deciding what action is necessary to fix the problem.
Lenovchardware repair the problem is determined because Lenovchardware under warranty, trained service personnel are available to provide the applicable level of service.
EngineeringchangemanagementOccasionallytherenighbechangeshaarequiredoften producthasbeensold.Lenovooryourreseller,ifauthorizedbyLenovo,willmakeselectedEngineering Changes(ECs)thatapplytoyourhardwareavailable.
ForthetermsandconditionsoftheLenovoLimitedWarrantythatappliestoyourtablet,refertotheSafety and WarrantyGuidethatcomeswithyourtablet.
Lenovouserforums
LenovoForumsontheLenovoWebsiteprovidesyouwithaplacetosearchthecommunityknowledgebase foryourtablet,shareanddiscoverinformationwithotherusers,makesuggestionstoLenovo,askquestions onproblemsyouencountered,andgetechnicalsupportfromLenovoengineers.
TogotoLenovoForums,dothefollowing:
- Gotohttp://support.lenovo.com.
- Touch Lenovo Community to start with your first post.
Note: Posting or Lenovo Forums requires user account Touch Register to create your account if you donothave one.
AppendixA.Regulatoryinformation
Thisappendixprovidesregulatoryinformation.
Wirelessrelatedinformation
Wirelessinteroperability
WirelessLANPCIExpressMiniCardisdesignedtobeinteroperablewithanywirelessLANproductthat isbasedonDirectSequenceSpreadSpectrum(DSSS), ComplementaryCodeKeying(CCK), and/or OrthogonalFrequencyDivisionMultiplexing(OFDM) radiotechnology, andiscompliantto:
•The802.11b/gStandard,802.11a/b/gor802.11ndraft2.0onWirelessLANs,asdefinedandapprovedby theInstituteofElectricalandElectronicsEngineers.
- TheWirelessFidelity(WiFi)certificationasdefinedbytheWi-FiAlliance.
ABluetoothdeviceisdesignedtobeinteroperablewithanyBluetoothproductthatiscomplianttoBluetooth Specification2.1+EDRasdefinedbytheBluetoothSIG.ThefollowingprofilesaresupportedbyBluetooth devices:
•AudioGateway
AV
- BasicImage
•Dial-upNetworking - FileTransfer
- GenericAccess
- GenericObjectExchange
- GenericObjectPush
- Handsfree
- Headset
• HumanInterfaceDevices(Keyboard/Mouse)
•LANAccessusingPPP
•PersonalAreaNetwork
- Printer
- SerialPort
•ServiceDiscovery
•Synchronization
Usageenvironmentandyourhealth
Integratedwirelesscardsemitradiofrequencyelectromagneticenergylikeotherradiodevices. However, thelevelofenergyemittedisfarmuchlessthantheelectromagneticenergyemittedbywirelessdevices suchasmobilephones.
Duetothefactthatintegratedwirelesscardsoperatewithintheguidelinesfoundinradiofrequencysafety standardsandrecommendations,Lenovobelievestheyaresafeforusebyconsumers.Thesestandardsand recommendationsreflecttheconsensusofthescientificcommunityandresultfromdeliberationsofpanels andcommitteesofscientistswhocontinuallyreviewandinterprettheextensiveresearchliterature.
Insomesituationsorenvironments, theuseofintegratedwirelesscardsmightberestrictedbytheproprietor ofthebuildingorresponsiblerepresentativesoftheorganization. Thesesituationsandareasmightfor exampleinclude:
- Using the integrated wireless cardsonboard of airplanes, inhospitals or near petrol stations, blasting areas (with electro-explosive devices), medical implants or body-wornelectronic medical devices.
• Inanyotherenvironmentwheretheriskofinterferencetootherdevicesorservicesisperceivedor identifiedasharmful.
If you are uncertain of the policy that applies on the use of wireless devices in a specific organization, you are encouraged to ask for authorization to use integrated wireless cards prioritoturning on the tablet.
LocationoftheUltraConnectwirelessantennas
TheThinkPadTabletfeaturesanintegrateddiversityantennasystembuiltintothedisplayforoptimal reception,enablingwirelesscommunicationwhereveryouare.
The following illustrations show the location of each built-in wireless antenna.

Figure17.LocationoftheUltraConnectwirelessantennas
1 WirelessLANantenna(Main)
2 WirelessWANantenna(Main)
3 GPSantenna
4 WirelessLANantenna(Auxiliary)
5 WirelessWANantenna(Auxiliary)
The following information refer to the ThinkPad Tablet machinetypes 1838 and 1839.
FederalCommunicationsCommission(FCC)DeclarationofConformity
This equipment has been tested and found to comply with the limits for a Class B digital device, pursuant to Part 15 of the FCC Rules. These limits are designed to provide reasonable protection against harmful interference in a residential installation. This equipment generates, uses, and can radiate radio frequency energy and, if not installed and used in accordance with the instructions, might cause harmful interference toradiocommunication. However, there is no guarantee that interference will not occur in particular installation. If this equipment does cause harmful interference or radio television reception, which can be determined by turning the equipment off and on, the user is encouraged to try to correct the interference by one or more of the following measures:
•Reorientorrelocatethereceivingantenna.
- Increase these separation between the equipment and receiver.
- Connecttheequipmentintoanoutletonacircuitdifferentfromthattowhichthereceiverisconnected.
- Consultanaauthorizeddealerorservicerepresentativeforhelp.
Lenovoisnotresponsibleforanyradioortelevisioninterferencecausedbyusingotherthanspecifiedor recommendedcablesandconnectorsorbyunauthorizedchangesormodificationstothisequipment. Unauthorizedchangesormodificationscouldvoidtheuser'sauthoritytooperatetheequipment.
This device complies with Part 15 of the FCC Rules. Operation is subject to the following two conditions: (1) this device might not cause harmful interference, and (2) this device must accept any interference received, including interference that might cause undesired operation.
ResponsibleParty:
Lenovo(UnitedStates)Incorporated
1009ThinkPlace-BuildingOne
Morrisville, NC27560
PhoneNumber:919-294-5900

IndustryCanadaClassBemissioncompliancestatement
ThisClassBdigitalapparatuscomplieswithCanadianICES-003.
CetappareilnumériquedelaclasseBestconformeàlanormeNMB-003duCanada.
EuropeanUnion-CompliancetotheElectromagneticCompatibility Directive
ThisproductisinconformitywiththeprotectionrequirementsofEUCouncilDirective2004/108/EConthe approximationofthelawsoftheMemberStatesrelatingtoelectromagneticcompatibility.Lenovocannot acceptresponsibilityforanyfailuretosatisfytheprotectionrequirementsresultingfromanonrecommended modificationoftheproduct,includingtheinstallationofoptioncardsfromothermanufacturers.
ThisproducthasbeentestedandfoundtocomplywiththelimitsforClassBInformationTechnology EquipmentaccordingtoEuropeanStandardEN55022.ThelimitsforClassBequipmentwerederived fortypicalresidentialenvironmentstoprovidereasonableprotectionagainstinterferencewithlicensed communicationdevices.

GermanClassBcompliancestatement
KoreaClassBcompliancestatement
B급 기기(가정용 방송통신기자재)
Additionalregulatoryinformation
FomoreinformationaboutthewirelessregulatorynoticesrefertheRegulatoryNoticehatcamewithyourtablet.
If you tablet shipped without the Regulatory Notice you can obtain the website: http://www.lenovo.com/ThinkPadUserGuides
AppendixB.Environmental,recycling,anddisposal information
Lenovorecyclingstatement
Lenovoencouragesownersofinformationtechnology(IT)equipmenttoresponsiblyrecycletheirequipment whenitisnolongerneeded.Lenovooffersavietyofprogramsandservicestoassistequipmentownersin recyclingtheirITproducts.ForinformationonrecyclingLenovoproducts,goto: http://www.lenovo.com/recycling
Japanrecyclingstatements
環境配慮に関して
If you are a company employee and need to dispose of a Lenovo computer or monitor that is the property of the company, you must do so in accordance with the Law for Promotion of Effective Utilization of Resources. Computers and monitors are categorized as industrial waste and should be properly disposed of by an industrial waste disposal contractor certified by local government. In accordance with the Law for Promotion of Effective Utilization of Resources, Lenovo Japan provides, through its PC Collecting and Recycling Services, for the collecting, reuse, and recycling of disused computers and monitors. For details, visit the Lenovo Website at http://www.lenovo.com/recycling/japan. Pursuant to the Law for Promotion of Effective Utilization of Resources, the collecting and recycling of home-used computers and monitors by them manufacturer was begun on October 1, 2003. This service is provided free of charge for home-used computers sold after October 1, 2003. Ford details, visit the Lenovo Website at http://www.lenovo.com/recycling/japan.
DisposingofLenovocomputercomponents
SomeLenovocomputerproductssoldinJapanmighthavecomponentsthatcontainheavymetalsorotherenvironmentalsensitivesubstances.Toproperlydisposeofdisusedcomponents,suchasaprintedcircuitboardordrive,usethemethodsdescribedaboveforcollectingandrecyclingadisusedcomputerormonitor.
Disposing of disused lithium batteries from Lenovo computers
Abutton-shapedlithiumbatteryisinstalledonthesystemboardofyourLenovocomputertoprovidepower tothecomputerclockwhilethecomputerisoffordisconnectedfromthemainpowersource.Ifyouwantto replaceitwithanewone,contactyourplaceofpurchaseoraskforarepairserviceprovidedbyLenovo.If youhavereplaceditbysyselfandwanttodisposeofthedisusedlithiumbattery,insulateitwithvinyltape, contactyourplaceofpurchase,andfollowtheirinstructions.IfyouuseaLenovocomputerathomeand needtodisposeofalithiumbattery,youmustcomplywithlocalordinancesandregulations.
DisposingofadisusedbatterypackfromLenovnotebookcomputers
Your Lenovonotebookcomputerhasalithiumionbatterypackoranickelmetalhydridebatterypack.Ifyou areacompanyemployeewhousesaLenovonotebookcomputerandneedtodisposeofabatterypack, contacttheproperpersoninLenovosales, service, ormarketing, and followthatperson'sinstructions. You also can referto the instructions at http://www.lenovo.com/jp/ja/environment/recycle/battery/.
If you use a Lenovonotebook computerathome and need to dispose of a battery pack, you must comply with local ordinances and regulations. You also can referto the instructions at http://www.lenovo.com/jp/ja/environment/recycle/battery/.
RecyclinginformationforBrazil
natural_image
Simple line drawing of a trash bin with crossed lines indicating no waste or discharge (no text or symbols)EU Only
TheWasteElectricalandElectronicEquipment(WEEE)markappliesonlytocountrieswithintheEuropeanUnion(EU)andNorway.AppliancesarelabeledinaccordancewithEuropeanDirective2002/96/ECconcerningwasteelectricalandelectronicequipment(WEEE).TheDirectivedeterminestheframeworkforthereturnandrecyclingofusedappliancesasapplicablethroughouttheEuropeanUnion.Thislabelisappliedtovariousproductstoindicatethattheproductisnottobethrownaway,butratherreclaimeduponendoflifeperthisDirective.Usersofelectricalandelectronicequipment(EEE)withtheWEEEmarkingperAnnexIVoftheWEEEDirectivemustnotdisposeofendoflifeEEEasunsortedmunicipalwaste,butusethe
collectionframeworkavailabletothemforthereturn,recycle,recoveryofWEEEandminimizeanypotential effectsofEEEontheenvironmentandhumanhealthduetothepresenceofhazardoussubstances.For additionalWEEEinformation,gotohttp://www.lenovo.com/lenovo/environment.
BatteryrecyclinginformationforTaiwan

廢電池請回收
BatteryrecyclinginformationfortheUnitedStatesandCanada

US & Canada Only
BatteryrecyclinginformationfortheEuropeanUnion

Notice: This mark applies only to countries within the European Union (EU).
BatteriesorpackagingforbatteriesarelabeledinaccordancewithEuropeanDirective2006/66/EC concerningbatteriesandaccumulatorsandwastebatteriesandaccumulators.TheDirectivedeterminesthe frameworkforthereturnandrecyclingofusedbatteriesandaccumulatorsasapplicablethroughoutthe EuropeanUnion.Thislabelisappliedtovariousbatteriestoindicatethatthebatteryisnottobethrown away,butratherreclaimeduponendoflifeperthisDirective.
InaccordancewiththeEuropeanDirective2006/66/EC,batteriesandaccumulatorsarelabeledtoindicate thattheyaretobecollectedseparatelyandrecycledatendoflife. Thelabelonthebatterymayalso includeachemicalsymbolforthemetalconcernedinthebattery(Pbforlead,Hgformercury,andCdfor cadmium).Usersofbatteriesandaccumulatorsmustnotdisposeofbatteriesandaccumulatorsasunsorted municipalwaste,butusethecollectionframeworkavailabletocustomersforthereturn,recycling,and treatmentofbatteriesandaccumulators.Customerparticipationisimportanttominimizeanypotential effectsofbatteriesandaccumulatorsontheenvironmentandhumanhealthduetothepotentialpresenceof hazardoussubstances.Forpropercollectionandtreatment,goto:
http://www.lenovo.com/lenovo/environment
ChinarecyclinginformationforWasteElectricalandElectronic Equipment(WEEE)
The Lenovoproductmeetstherequirements of the Republic of Turkey Directive on the Restriction of the Use of Certain Hazardous Substances in Electrical and Electronic Equipment (EEE).
Lenovomightnotoffertheproducts,services,orfeaturesdiscussedinthisdocumentinalCountries. ConsultyourlocalLenovorepresentativeforinformationontheproductsandservicescurrentlyavailablein yourarea.AnyreferencetoaLenovoproduct,program,orserviceisnotintendedtostateorimplythatonly thatLenovoproduct,program,orservicemightbeused.Anyfunctionallyequivalentproduct,program,or servicethatdoesnotinfringeanyLenovointellectualpropertyrightmightbeusedinstead.However,itisthe user'sresponsibilitytoevaluateandverifytheoperationofanyotherproduct,program,orservice.
Lenovomighthavepatentsorpendingpatentapplicationscoveringsubjectmatterdescribedinthis document. Thefurnishingofthisdocumentdoesnotgiveyouanylicensetothesepatents.Youcansend licenseinquiries,inwriting,to:
Lenovo(UnitedStates), Inc.
1009ThinkPlace-BuildingOne
Morrisville, NC27560
U.S.A.
Attention: LenovoDirectorofLicensing
LENOVOPROVIDESTHISPUBLICATION“ASIS”WITHOUTWARRANTYOFANYKIND,EITHEREXPRESS ORIMPLIED,INCLUDING,BUTNOTLIMITEDTO,THEIMPLIEDWARRANTIESOFNON-INFRINGEMENT, MERCHANTABILITYORFITNESSFORAPARTICULARPURPOSE.Somejurisdictionsdonotallow disclaimerofexpressorimpliedwarrantiesincertaintransactions,therefore,thisstatementmightnot applytoyou.
This information could include technical inaccuracies in typographical errors. Changes are periodically made to the information herein; these changes will be incorporated in new editions of the publication. Lenovomight make improvements and/or changes in the product(s) and/or the program(s) described in this publication at any time without notice.
Theproductsdescribedinthisdocumentarenotintendedforuseinimplantationorotherlifesupport applicationswheremalfunctionmightresultininjuryordeathtopersons.Theinformationcontainedinthis documentdoesnotaffectorchangeLenovoproductspecificationsorwarranties.Nothinginthisdocument shalloperateasanexpressorimpliedlicenseorindemnityundertheintellectualpropertyrightsofLenovo orthirdparties.Allinformationcontainedinthisdocumentwasobtainedinspecificenvironmentsandis presentedasanillustration.Theresultobtainedinotheroperatingenvironmentsmightvary.
Lenovomightuseordistributeanyoftheinformationyousupplyinanywayitbelievesappropriatewithoutincurringanyobligationtoyou.
Anyreferencesinthispublicationtonon-LenovoWebsitesareprovidedforconvenienceonlyanddonotin anymannerserveasanendorsementofthoseWebsites. ThematerialsatthoseWebsitesarenotpartof thematerialsforthisLenovoproduct,anduseofthoseWebsitesisatyourownrisk.
Any performed data contained herein was determined in a controlled environment. Therefore, there is obtained in other operating environments might vary significantly. Somemeasurements might have been made on development-level systems and there is no guarantee that these measurements will be the same on generally available systems. Furthermore, some measurements might have been estimated through extrapolation. Actual results might vary. Users of this document should verify the applicable data for their specific environment.
Trademarks
The following terms are trademark of Lenovoin the United States, other countries, or both:
| AccessConnections |
| Lenovo |
| ThinkPad |
| TrackPoint |
| UltraConnect |
Microsoft,Excel,PowerPoint,Windows,andWindowsMediaaretrademarksoftheMicrosoftgroupof companies.
Othercompany,product,andservicenamesmaybetrademarksorservicemarksofothers.
ThinkPad®
PartNumber:
Printedin
(1P)P/N:

- Contents
- Readthisfirst......iii
- Chapter1.Productoverview.....1
- Chapter2.Gettingstarted......9
- Chapter3. Connectingwireless networksanddevices....23
- Chapter4.Batteryandacpowe29
- Chapter5.Usingyourtable\$3
- Chapter6. ThinkPadTableoption55
- Chapter7. Using your tablet within an enterprise......61
- Chapter8.Security....63
- Chapter9.Youandyourtable6.7
- Chapter10.Settings......71
- Chapter11.Troubleshooting problems......85
- Chapter12.Gettingsupport..87
- AppendixA.Regulatory information....89
- AppendixB.Environmental, recycling,and disposal information....95
- AppendixC.Notices......99
- Readthisfirst
- Importantsafetyandhandlinginformation
- Handleyourtabletwithcare:
- Donotdisassembleormodifyyourtablet:
- Preventyourtabletandchargerfromgettingwet:
- Useapprovedchargingmethodsonly:
- Preventhearingdamage:
- CAUTION: Excessivesoundpressurefromearphonesandheadphonescancausehearingloss.Adjustmentof theequalizertomaximumincreasestheearphoneandheadphoneoutputvoltageandthesound pressurelevel.Therefore,topprotectyourhearing,adjusttheequalizertoanappropriatelevel.
- Take care when using your tablet in an motor vehicle or on a bicycle:
- Disposeaccordingtolocallawsandregulations:
- Keepyourtabletandaccessoriesawayfromsmallchildren:
- Protectyourdataandsoftware:
- Takeprecautionswithplasticbags:
- DANGER
- Beawareofheatgeneratedbyyourtablet:
- PolyvinylChloride(PVC)cableandcordnotice
- Chapter1.Productoverview
- Powerbutton
- Microphone
- Rear-facingcamera
- Headphoneormicrophoneconnector
- 5MiniHDMIconnector
- MicroUSBconnector
- ThinkPadTabletDockconnector
- SIMcardslot
- Emergencyresethole
- 103-in-1mediacardreader
- 11USBconnector
- Speaker
- ThinkPadTabletPenstorage
- ThinkPadTabletPenstringholes
- Volumecontrolbutton
- Ambientlightsensor
- Front-facingcamera
- Multitouchscreen
- Homebutton
- Backbutton
- Browserbutton
- Screenrotationlockbutton
- Accessories
- Features
- Processor
- Operatingsystem
- Memory
- Internalstorage
- Display
- Integratedcameras
- Connectors
- Cardslotorcardreader
- Wirelessfeatures
- Specifications
- Size
- Battery
- Powersource(accharger)
- Operatingenvironment
- Preinstalled widgets and applications
- Widgets
- Applications
- Chapter2.Gettingstarted
- InstallingtheSIMcard
- Settingupyourtablet
- LanguageandTimeZone
- Licenseagreement
- Using theonscreenkeyboard
- Wirelessconnection
- GoogleAccountandLocationServices
- YourGoogleAccount
- CreatingaGoogleAccount
- AddingandremovingaGoogleAccount
- SynchronizingyourGoogleAccountwithyourtablet
- ChangingthesynchronizationsettingsforaGoogleAccount
- Homescreens
- Actionbar
- Desktop
- Systembar
- Usingthemultitouchscreen
- Touch
- Touchandhold
- Drag
- Swipeorslide
- Zoom
- Double-tap
- Editing
- Rotatethescreen
- Usingtheonscreenkeyboard
- Typingtext, numbers, symbols, and other characters
- •FortheAndroidkeyboard:
- •FortheFlexT9keyboard:
- Changingtheinputmethodwhentyping
- - FortheFlexT9keyboard:
- Usingtheonscreenkeyboardinotherlanguages
- - FortheAndroidkeyboard:
- Dictionary
- - Accepting or rejecting dictionaries suggestions
- - Correctingawordusingthedictionarysuggestedcorrections
- Disablingtheonscreenkeyboard
- UsingtheThinkPadTabletPen
- Screenlockmode
- Downloadinggamesandapplications
- DownloadinggamesandapplicationsfromAndroidMarket
- DownloadinggamesandapplicationsfromLenovoAppShop
- CustomizingyourHomescreens
- AddinganitemtoaHomescreen
- MovingaHomescreenitem
- RemovinganitemfromaHomescreen
- ChangingtheHomescreenwallpaper
- ChangingthemainHomescreen
- ReorderingtheHomescreens
- CustomizingLenovoLaunchZone
- Chapter3. Connecting to wireless networks and devices
- Determining which mobilenetwork you are using
- Disablingdataroamingonmobilenetworks
- Limitingmobiledataconnectionto2Gnetworks
- EditingorcreatingaGSMaccesspointname
- Connectingtoa2Gor3Gmobiledatanetwork
- ConnectingtoaWi-Finetwork
- AddingaWi-Finetwork
- DisablinganautomaticWi-Ficonnection
- UsingBluetoothdevices
- EnablinganddisablingtheBluetoothfunction
- ChangingtheBluetoothnameofyourtablet
- PairingwithaBluetoothdevice
- ConnectingtoaBluetoothdevice
- TransferringdatabetweenyourtabletandaBluetoothdevice
- ConfiguringBluetoothoptions
- DisconnectingaBluetoothdevice
- UnpairingaBluetoothdevice
- ViewingBluetoothstatus
- Chapter4.Batteryandacpower
- Chargingthebattery
- Extendingthebatterylifebetweencharges
- Checkingthebatterystatus
- Chapter5. Usingyourtablet
- Frequentlyaskedquestions
- CanlgettheUserGuideinanotherlanguage?
- Howcanlusethebatterypowermoreeffectivelywhenlamoutoftheoffice?
- Concernedaboutinformationsecurity?
- Isgettingconnectedindifferentlocationsachallenge?
- Needtogivepresentationsorattachanexternalmonitor?
- BrowsingtheInternet
- ConnectingtotheInternet
- Usingthebrowser
- NavigatingtheWeb
- •Usingthebrowsermenu
- - ViewingWebpages
- Settingupyourhomepage
- Downloading applications from the Web
- Managebookmarksandhistory
- Configurebrowsersettings
- Searchinghɛnternet
- GoogleSearch
- GoogleVoiceSearch
- Usingenhancedwirelessfeatures
- ImportingWi-FiprofilesfromaThinkPadnotebookcomputertoyour tablet
- CapturingWi-FiprofilesfromyourThinkPadnotebookcomputer
- ImportingWi-Fiprofilestoyourtablet
- Configuringthewirelessnetworkdisconnectpolicy
- - NeverturnoffWi-Fiwhenconnecttothespecified[SSID]
- •TurnoffWi-Fionschedule
- Usingyourtabletforentertainment
- Usingheadphonesorearphones
- Takethefollowingprecautions:
- Usingcameras
- Cameracontrols
- Takingapicture
- Recordingavideo
- Disablingcameras
- Viewingpictures
- Watchingvideos
- Listeningtomusic
- Readingbooks
- Obtainingmultimediafiles
- WorkingwithEmail
- SettingupyourEmailaccount
- Readingane-mail
- Sendingane-mail
- Managingaccounts
- Managingyourcontacts
- Addingacontact
- Editingcontacts
- Usingcontacts
- Workingwithyourfavoriteapplications
- Managing recently launched applications
- Sharingyourmobiledataconnection
- Toshareyourtablet'smobiledataconnectionthroughUSB:
- Toshareyourtablet'smobiledataconnectionthroughBluetooth:
- Toshareyourtablet'smobiledataconnectionbyturningyourtabletintoaportableWi-Fihotspot:
- TosecureyourportableWi-Fihotspot:
- WorkingwithUSBdevices
- UsingthemicroUSBconnector
- •Transferfiles(MediaTransferProtocol)
- Usingthefull-sizeUSBconnector
- WorkingwithUSBstoragedevices
- WorkingwithotherUSBdevices
- UsingHDMIdevices
- Usingthe3-in-1mediacardreader
- Insertingaflashmediacard
- Removingaflashmediacard
- Securingyourflashmediacard
- Workingwiththeclock
- Settingdateandtime
- Settinganalarm
- WorkingwithGoogleMapsandGPS
- FindingyourlocationonGoogleMaps
- FindingaspecificlocationonGoogleMaps
- Gettingdirections
- UsingotherfunctionsofGoogleMap
- GoogleTalk
- Addinganewfriendtoyourfriendslist
- Startingaconversation
- YouTube
- WachingvideosonYouTube
- UploadingvideostoYouTube
- Chapter6.ThinkPadTableoptions
- ThinkPadTabletKeyboardFolioCase
- Keyboard
- OpticalTrackPoint
- Hotkeys
- ThinkPadTabletDock
- Dockconnector
- 2USBconnector
- MicroUSBconnector
- Headphoneconnector
- Microphoneconnector
- Powerconnector
- UsingtheThinkPadTabletKeyboardFolioCase
- Usingthehotkeys
- Volumeandmutecontrol
- Applicationcontrol
- Screencontrol
- Audioandvideocontrol
- UsingtheOpticalTrackPoint
- UsingtheThinkPadTabletDock
- Chapter7. Using your tablet within an enterprise
- SettingupMicrosoftExchangeaccounts
- Accessingyourcompany'sVPN
- ConfiguringtheVPNsettings
- Connectingtoyourcompany'sVPN
- EditingordeletingaVPN
- Chapter8.Security
- Protectingdataagainstviruses
- Lockingthetabletscreen
- Settingupthescreenunlockfunction
- Attention:
- Changingthescreenunlockpassword, PIN, or pattern
- Disablingthescreenunlockfunction
- Encryptingthetabletinternalstorage
- Encryptingtheflashmediacard
- Encryptingaflashmediacard
- Notes:
- Readingdatafromanencryptedflashmediacard
- Chapter9.Youandyourtablet
- Comfortandaccessibility
- Usingyourtabletmorecomfortably
- Accessibilityinformation
- Screenbrightness
- VoiceActions
- Screenreader
- Moreaccessibilitytechnologies
- Gettingupdates
- GettingupdatesfromLenovo
- GettingupdatesfromAndroid
- Travelingwithyourtablet
- Traveltips
- Traveltipsonairplanes
- Travelaccessories
- Careandmaintenance
- Cleaningyourtablet
- Protectingthescreenwithareplaceablefilm
- Storingthetabletforextendedperiods
- Chapter10.Settings
- Wireless networks
- Sound
- Screen
- Location&security
- Accounts&sync
- Privacy
- USBsettings
- Storage
- Language&input
- Accessibility
- Date&time
- OpticalTrackPoint
- Abouttablet
- Chapter11.Troubleshootingproblems
- Internetproblem
- Multitouchscreenproblem
- Batteryproblem
- Systemproblems
- Mediaproblems
- Externaldeviceconnectionproblems
- Recoveringfromaseveresoftwareproblem
- Chapter12.Gettingsupport
- Lenovotechnicalsupport
- Lenovouserforums
- AppendixA.Regulatoryinformation
- Wirelessrelatedinformation
- Wirelessinteroperability
- AV
- Usageenvironmentandyourhealth
- LocationoftheUltraConnectwirelessantennas
- FederalCommunicationsCommission(FCC)DeclarationofConformity
- IndustryCanadaClassBemissioncompliancestatement
- EuropeanUnion-CompliancetotheElectromagneticCompatibility Directive
- GermanClassBcompliancestatement
- KoreaClassBcompliancestatement
- Additionalregulatoryinformation
- AppendixB.Environmental,recycling,anddisposal information
- Lenovorecyclingstatement
- Japanrecyclingstatements
- DisposingofLenovocomputercomponents
- Disposing of disused lithium batteries from Lenovo computers
- DisposingofadisusedbatterypackfromLenovnotebookcomputers
- RecyclinginformationforBrazil
- BatteryrecyclinginformationforTaiwan
- BatteryrecyclinginformationfortheUnitedStatesandCanada
- BatteryrecyclinginformationfortheEuropeanUnion
- ChinarecyclinginformationforWasteElectricalandElectronic Equipment(WEEE)
- Trademarks
- ThinkPad®
Brand : LENOVO
Model : ThinkPad 1839
Category : Graphic tablet