P32LCD - Television Pyle - Free user manual and instructions
Find the device manual for free P32LCD Pyle in PDF.


| Product Type | Television |
| Brand | Pyle |
| Model | P32LCD |
| Screen Size | 32 inches |
| Display Type | LCD |
| Resolution | 1366 x 768 (HD) |
| Aspect Ratio | 16:9 |
| Built-in Speakers | Yes (2 x 8W) |
| HDMI Inputs | 2 |
| USB Port | 1 |
| VGA Input | 1 |
| Composite Input | 1 |
| RF Antenna Input | 1 |
| Remote Control | Included |
| VESA Mount Pattern | 200 x 200 mm |
| Power Supply | AC 100-240V, 50/60Hz |
| Power Consumption (Typical) | 60W |
| Dimensions (WxHxD) without stand | 73 x 43 x 8 cm |
| Weight (without stand) | 5.5 kg |
| Cleaning Instructions | Use a soft dry cloth. Avoid abrasive cleaners. |
| Safety Warning | Place on stable surface; ensure ventilation. |
Frequently Asked Questions - P32LCD Pyle
User questions about P32LCD Pyle
0 question about this device. Answer the ones you know or ask your own.
Ask a new question about this device
Download the instructions for your Television in PDF format for free! Find your manual P32LCD - Pyle and take your electronic device back in hand. On this page are published all the documents necessary for the use of your device. P32LCD by Pyle.
USER MANUAL P32LCD Pyle
natural_image
Black-and-white photo of a football team lined up on the field, viewed from a computer monitor (no visible text or symbols)Contents
| 1 | PREFACE | 3 | ||
| 2 | SAFETY PRECAUTIONS | 3 | ||
| 3 | FRONT, BACK, CONNECTIONS OF LCD | 5 | ||
| 4 | TV INSTALLATION GUIDE | 4.1 | CONNECTION ANTENNAS | 6 |
| 4.2 | AV VIDEO INPUT DRAWING | 6 | ||
| 4.3 | S-VIDEO INPUT DRAWING | 6 | ||
| 4.4 | PC (VGA) CONNEXION DRAWING | 7 | ||
| 5 | Basic operation | Turningonandoff TV | 8 | |
| Select on screen language | 8 | |||
| Volumeadjustment | 8 | |||
| How to adjust the OSD | 9 | |||
| Choosing a TV channel | 9 | |||
| Selecting input source | 9 | |||
| MENU operation | Picture menu options | 10 | ||
| Audio menu options | 10 | |||
| Setup menu options | 11 | |||
| Featuremenuoptions | 13 | |||
| VGA menuoptions | 15 | |||
| YPbPr menu options | 16 | |||
| HDMImenuoptions | 16 | |||
| 6 | REMOTE CONTROLS INSTUCTIONS | A | Remote control instructions | 18 |
| B | Battery Usage Caution | 20 | ||
| 7 | ACCESSORIES | 21 |

bar
| Category | Value | |---|---| | TROUBLESHOOTING ANDADVICE | 21 | | SPECIFICATIONS | 22 |PREFACE
Thank you for buying this TV ! Please read this manual thoroughly before operating the monitor. Make sure the monitor was not damaged in transit. Should the monitor is damaged, do no install it and contact your dealer. Check that you have all the accessories according to the model.
SAFETY PRECAUTIONS
Preparation

Put the monitor on a stable surface.

natural_image
Simple line drawing of a computer monitor with a floral symbol above it (no text or labels)Do not use the monitor with others fixations than those provided or suggested by the manufacturer.

Do not place any material on the monitor.
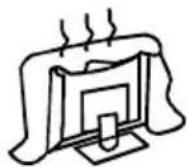
Do not block or cover the ventilation openings on the monitor
If you have a wall mount, check that it is steady
Power source
The monitor must be plugged with a tension source of 110 volts and 60 Hz.
Connexion cables

Power cord and cables must be properly routed and protected to prevent people from stepping on them and causing the monitor to fall.
Heating sources and humidity

natural_image
Cartoon illustration of a computer monitor with lightning bolts and a broken screen (no text or symbols)Keep the monitor dry and away from humidity.

Keep the monitor away from heat sources
Cleaning and maintenance

Unplug the monitor before cleaning it. Do not use solvents or liquids to clean the monitor.
Only clean the monitor with a soft and dry cloth.
In case of troubleshooting, do not use spare parts other than those suggested by the manufacturer. Using inadequate spare parts can lead to electric shocks, short-circuits fire or other incidents.
Departure in holidays

Unplug the LCD during lighting storms or when unused for long periods of time.
Front, Back, Connections of LCD Front View

Back View and Control Connections

natural_image
Illustration of a computer monitor with ventilation grilles and a central screen (no text or symbols visible)
| 1 | RF input |
| 2 | S-VIDEOIN |
| 3 | HDMI1 |
| 4 | HDMI2 |
| 5 | PC IN |
| 6 | PC AUDIO IN |
| 7 | Pr2 |
| 8 | Pb2 |
| 9 | Y2 |
| 10 | R(CVBS/S-VIDEO) |
| 11 | R2(YPbPr2) |
| 12 | R1(YPbPr1) |
| 13 | L1(YPbPr1) |
| 14 | L2(YPbPr2) |
| 15 | L(CVBS/S-VIDEO) |
| 16 | Y1 |
| 17 | Pb1 |
| 18 | Pr1 |
| 19 | CVBS |
TV INSTALLTION DRAWINGS
CONNECTION ANTENNAS
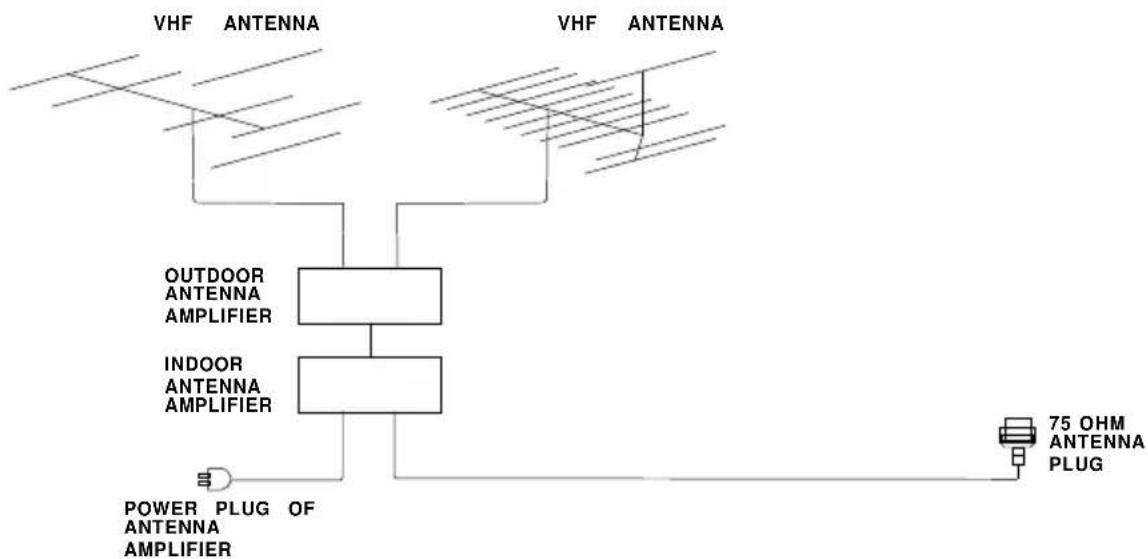
flowchart
graph TD
    A["VHF ANTENNA"] --> B["OUTDOOR ANTENNA AMPLIFIER"]
    C["VHF ANTENNA"] --> D["INDOOR ANTENNA AMPLIFIER"]
    B --> E["POWER PLUG OF ANTENNA AMPLIFIER"]
    D --> F["75 OHM ANTENNA PLUG"]
To ensure good picture and sound, TV antenna system needs to be installed. The antenna system as shown can be sourced from TV equipment shops, which will provide service for correct installation and connection. After installation, insert the 75-ohm antenna plug into the antenna jack as shown. In case of signal of closed circuit TV,
VIDEO CONNECTION
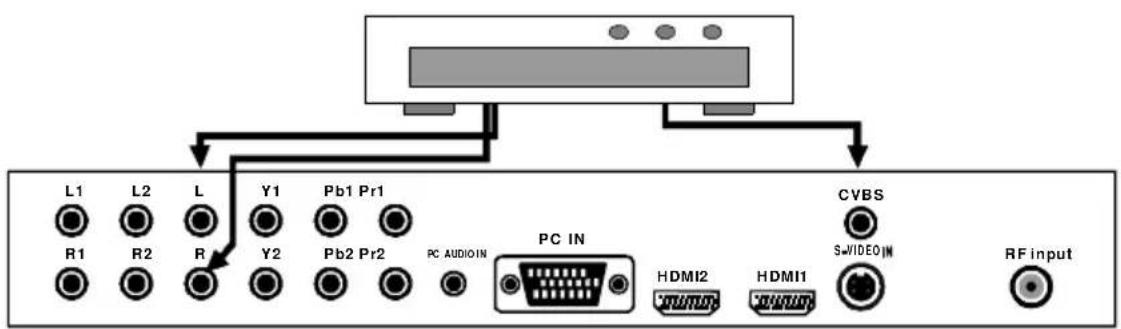
S-VIDEO CONNECTION

PCINPUT CONNECTION
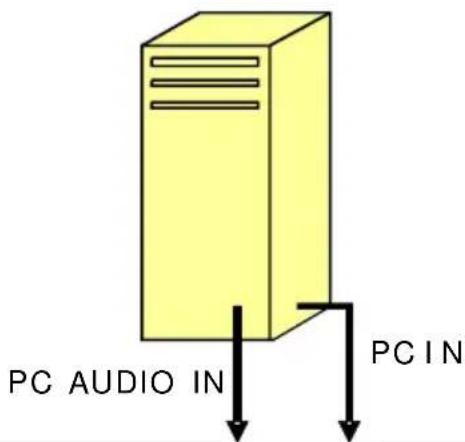

Menu Operation
Basic operation
Turning on and off the TV
TURN ON LCD TV
- Connecting to the AC input cable then press the main power switch to switch ON LCD TV. At this time the TV will enter standby mode and indicator show red.
- Use POWER button can turn ON LCD TV from standby mode.
TURN OFF LCD TV
- Press POWER button or ⏻ button on the remote control to enter standby mode. The indicator is red.
- Using main power switch turns off LCD TV completely.
Select on screen language
NOTE: If you use your LCD TV for the first time, you should select the language which will be used for displaying menus and indications.
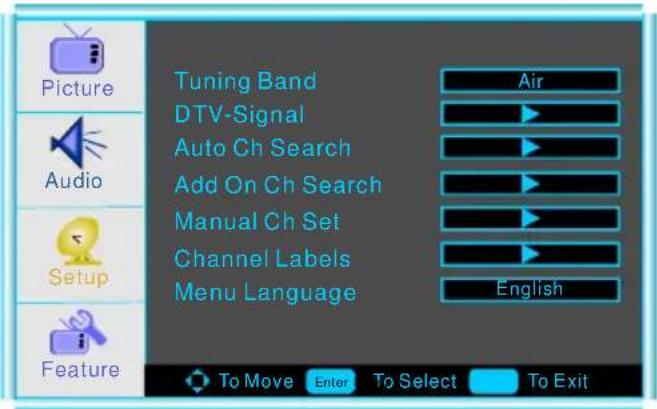
- Press MENU to display the main menu.
- Press ▲/▼ repeatedly to select the SET MENU.
- Use◀/▶ and ▲/▼ to select LANGUAGE.
- Press ◀ and ▶ button to select your desired language.
- When you are satisfied with your choice, press the MENU to exit.
Volume adjustment
- Press VOL+/- to adjust the volume.
- If you want to switch the sound OFF, press the MUTE OK.
- You can cancel this function by pressing MUTE or VOL+.
How to adjust the OSD screen
- Press the MENU button to display the main menu.
- Use ▲/▼/◄/► buttons to select and adjust the available menus.

flowchart
graph TD
    A["Picture Mode"] --> B["Contrast 50"]
    A --> C["Brightness 50"]
    A --> D["Sharpness 50"]
    A --> E["Color 50"]
    A --> F["Tint 50"]
    A --> G["Aspect Ratio Wide"]
    H["Audio Mode"] --> I["Audio Language"]
    H --> J["Bass 30"]
    H --> K["Treble 30"]
    H --> L["Balance 0"]
    H --> M["Digital Audio Output PCM"]
    N["Feature"] --> O["To Move Enter To Select Menu To Exit"]
    P["Time Set"] --> Q["Sleep Timer Off"]
    R["Advanced Video Menu"] --> S["Password Set"]
    T["Parental Control"] --> U["Digital Closed Caption"]
    V["Ntscs CC"]
    W["Atscs CC"]
    X["Tuning Band"] --> Y["DTV-Signal Air"]
    Z["Setup"] --> AA["Auto Ch Search"]
    AB["Manual Ch Set"] --> AC["Channel Labels English"]
    AD["Reset"] --> AE["To Move Enter To Select To Exit"]

The OSD (On Screen Display) function enables you to adjust the screen status conveniently since it provides graphical presentation.
Choosing a TV channel
1. Using the CH+/CH- on the front panel or on the remote control.
- Press CH+ to increase channel number.
- Press CH - to decrease channel number.
2. Using 0-9 digital buttons and -/-button
You can select the channel number by pressing 0 to 9 or -/-.
3. Example:
• To select 1-digit channel (e.g. Channel 5): Press the 5 button.
• To select 2-digit channel (e.g. Channel 20): Press the -/-- button repeatedly to display -- then press 2, follow by 0.
- To select 3-digit channel (e.g. Channel 103): Press the -/-- button repeatedly to display -- then press 1, follow by 0, followby 3.
Note: After select the digit button, the digit will be memorized.
Selecting input source
You can select the input source by pressing the INPUT on the remote control or on the front panel.

flowchart
graph TD
    A["Video 7 S-Video"] --> B["Video 6 HDMI-2"]
    B --> C["Video 5 HDMI-1"]
    C --> D["Video 4 VGA"]
    D --> E["Video 3 Component-2"]
    E --> F["Video 2 Component-1"]
    F --> G["Video 1 Composite Rear"]
    G --> H["Ch2-1"]
Picture menu options

In this manual, the OSD (On Screen Display) may be different from your TV's because it is just example to help the TV operation.
Press the MENU on the front panel or on the remote control and then use ▲ / ▼ to select the Picture menu.

- Use ▲/▼ to select what you want to adjust in the Picture menu.
- Press ◀ and ▶ button to adjust.
- When you are satisfied with your adjustment, press MENU to exit the main menu.
Picture Mode
Select the type of picture which best corresponds to your viewing requirements by selecting Picture Mode in PICTURE menu. You may select the picture mode directly by pressing the PMODE button on the remote control.
Contrast
Press ▼ / ▲ button and then use ◀ / ▶ to adjust the contrast of the picture.
Brightness
Press ▼/ ▲ button and then use ◀/ ▶ to adjust the brightness of the picture.
Sharpness
Press ▼/ ▲ button and then use ◀/ ▶ to adjust the sharpness level of picture.
Color
Press ▼/ ▲button and then use ◀/ ▶to adjust the color saturation.
Tint
Press ▼/ ▲button and then use ◀/ ▶to adjust the tint of picture.
Aspect Ratio
Press ◀/▶ to select the ratio of picture display such as Normal/ Zoom/ Wide and Cinema.
AUDIO menu options
Press MENU on the front panel or on the remote control and then use ▲ / ▼ to select the AUDIO menu.
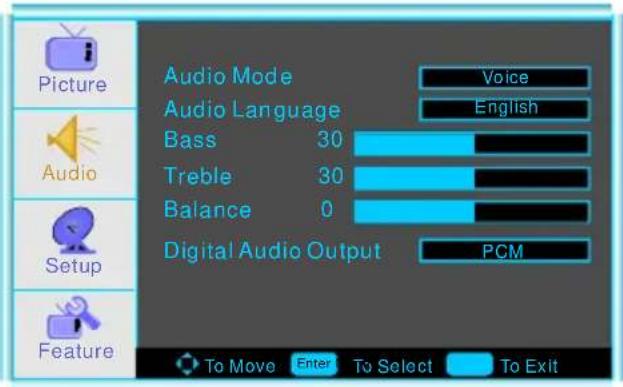
- Use ▲/▼ to select what you want to adjust in the menu. Audio
- Press ◀ and ▶ button to adjust.
- When you are satisfied with your adjustment, press MENU or EXIT to exit the main menu.
Audio Mode
You can select the type of sound which best corresponds to your listening requirements by selecting Sound in SOUND menu. You may select the sound mode directly by pressing the SMODE button on the remote control.
Audio Language
Press ◀ / ▶ to select one of the audio language such as English/ French and Spain, but the condition is that the program system has included the language code.
Bass
Press▼ /▲ button and then use◄ /► to increase or decrease the level of the lower-pitched sounds.
Treble
Press▼ /▲ button and then use◄ /► to increase or decrease the level of the higher-pitched sounds.
Balance
Press▼ /▲ button and then use◀ /▶ to adjust the audio output between left and right speakers.
Digital Audio Output
Press ◀ / ▶ to select the one of mode of the digital audio output such as PCM and RAW.
Setup menu options
Press MENU on the front panel or on the remote control and then use ▲ / ▼ to select the Setup menu.
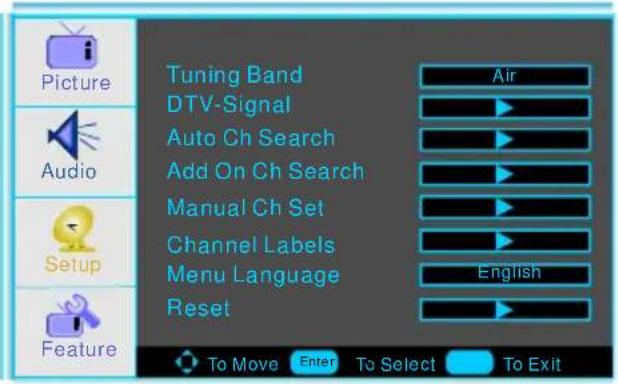
- Use ▲ /▼ to select what you want to adjust in the Setup menu.
- Press ◀ and ▶ button to adjust.
- When you are satisfied with your adjustment, press MENU to exit the main menu.
Tuning Band
Press Enter key to select Air, Cable, Cable HRC, Cable IRC or Cable Auto.
DTV-Signal
In DTV mode, you can tune manually and adjust the angle, orientation of the antenna etc
Auto Ch Search
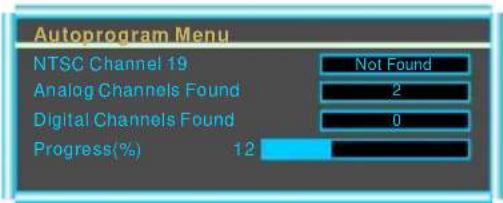
Press ▲ / ▼ key to move the cursor to the item to be selected (item selected is highlighted in yellow). Press Enter key to enter your selection and scan. After the scan is finished, the following menu will display. The channels found are automatically saved as below:
Add On Ch Search
When the channels are found, use ◀/▶ to add it to the channel list.
Manual Ch Set
Press Enter button to display a channel list that you can select channel as below:

Channellabels
Allows you to name the channel that is selected. Use ◀/▶ to move the cursor and use ▲/▼ to input the name and then press Menu or Enter to return or exit as following:

Manual Language
To select language of the OSD such as English/ French and Spain
Feature menu options
Press MENU on the front panel or on the remote control and then use ◀ / ▶ to select the Feature menu.

- Use ▲/▼ to select what you want to adjust in the Feature menu.
- Press ◀ and ▶ button to adjust.
- When you are satisfied with your adjustment, press MENU to exit the main menu.
Time Set
Press▼ / ▲ button and then use Enter the time set menu as below that allows you to set the time the TV will display.

Time Set Mode
You can select one of auto and manual to set the time. When selected auto, the item of year/date and time will be disabled and can not to adjust. When select the manual mode, you can press ◀/▶ and ▲/▼ to set the corresponding functions.
Time Zone
Press ◀/▶ to select the time zone such as Pacific/Alaska/Hawaii/Eastern/Central/Mountain.
Sleep Timer
Press ◀/▶ to select the amount of time before your TV turn off automatically and press the Enter that can select the 30 min /60min/90min and OFF.
Advance Video Menu
Press Enter to enter the advance video menu as below:

- Noise Reduction--Spatial: press Enter to select on or off.
- Noise Reduction--Speckle: press Enter to select on or off.
- Noise Reduction--Temporal: press Enter to select on or off.
- Auto Contrast Enhancement: press Enter to select on or off.
- Color Temperature: press Enter to select one of Normal/Cool and Warm.
- 3D Y/C: press Enter to select on or off.
- Adaptive Contrast: press Enter to select on or off.
- Setting: press Enter to return to the factory setting.
Password Set
Press Enter to enter the Enter Old Password menu, and then input the number of 0-9 as below, and you can change the password when you input the new one twice.

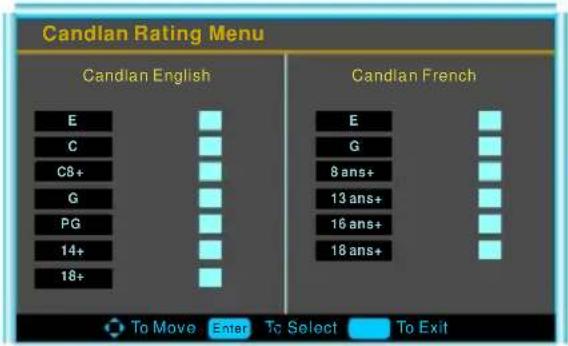
Parental Control
Press Enter to enter the sub-menu and then uses the 0-9 to enter the correct password.
Digital Closed Captions
This item allows you to set the closed caption, and press Enter to enter Closed Caption Options menu as below:
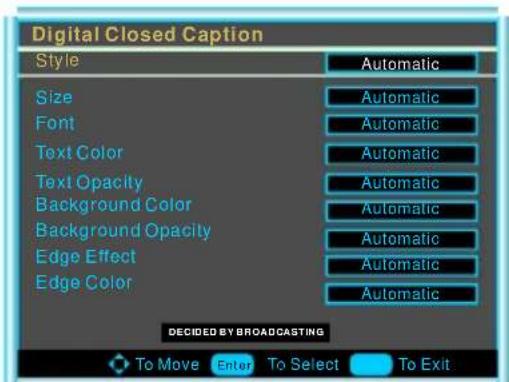
- Style: press Enter to select one of Automatic and Custom, when you select automatic, the others are disable and can not be adjusted.
- Size: press Enter to select one of Normal/Large and Small.
- Font: press Enter to select one of Default and from Font1 to Font7.
- Text Color: press Enter to select one of Red/Green/Blue/Yellow/Magenta/Cyan/Black and White.
- Text Opacity: press Enter to select one of the Solid/Flashing/Transparent/Translucent.
- Background Color: press Enter to select one of the Black/White/Red/Green/Blue/Yellow/Magenta/Cyan.
- Background Opacity: press Enter to select one of the Solid/Flashing/Transparent/Translucent.
- Edge Effect press Enter to select one of the None/Raised/Depressed/Uniform/Left Shadow/Right Shadow.
- Edge Color pressEnter to select one of the Black/White/Red/Green/Blue/Yellow/Magenta/Cyan.
VGA menu options
Press MENU on the front panel or on the remote control and then use ▼ / ▲ to select the Feature menu in VGA mode.

- Use ▲/▼ to select what you want to adjust in the Feature menu.
- Press ◀ and ▶ button to adjust.
- When you are satisfied with your adjustment, press MENU to exit the main menu.
VGA Set
Press ▲/▼ button and then use Enter to enter the VGA set menu as below:

H-Pos
Press ▼/▲ button and then use ◀/▶ adjust the horizontal position of the picture.
V-Pos
Press ▼/▲ button and then use ◀/▶ adjust the vertical position of the picture.
Phase
Press ▼/ ▲ button and then use ◀/ ▶ to adjust the phase of the picture.
Clock
Press ▼/ ▲ button and then use ◀ / ▶ to adjust the clock of the picture.

-Phase This function allows you to remove any horizontal noise and clear or sharpen the image of characters
-Clock This function is to minimize any vertical bars or stripes visible on the screen background. And the horizontal screen size also will change.
-Position This function is to adjust the picture to Left/Right and Up/Down as you prefer..
Auto Adjust
Press ▼/ ▲ button and then use ◀/ ▶ to do auto adjust that automatically adjusts the available options for the best viewing configuration.
Setting
Press Enter to do preset that can return to the factory setting.
YPbPr menu options
Press MENU on the front panel or on the remote control and then use ▼ / ▲ to select the Feature menu in YPbPr mode.
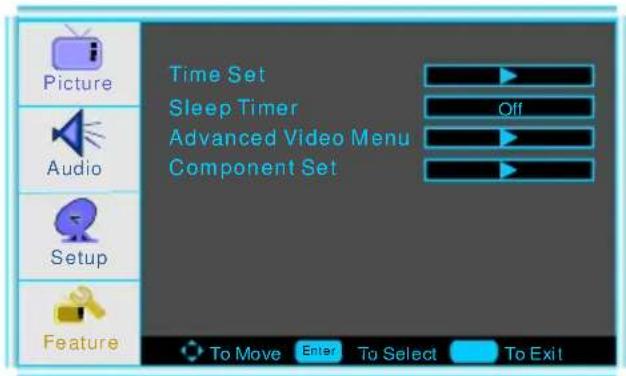
- Use ▲/▼ to select what you want to adjust in the Feature menu.
- Press ◀ and ▶ button to adjust.
- When you are satisfied with your adjustment, press MENU to exit the main menu.
Component Set
Press ▲/▼ button and then use Enter to enter the VGA set menu as below:

HDMI and S-VIDEO menu options
Press MENU on the front panel or on the remote control and then use ▼ / ▲ to select the Feature menu in HDMI or S-VIDEO mode.

Time Set
Press▼ / ▲ button and then use Enter the time set menu as below that allows you to set the time the TV will display.
Sleep Timer
Press ◀/▶ to select the amount of time before your TV turn off automatically and press the Enter that can select the 30 min /60min/90min and OFF.
Advance Video Menu
Press Enter to enter the advance video menu.

REMOTECONTROL
Remote control instructions


Battery Usage Caution
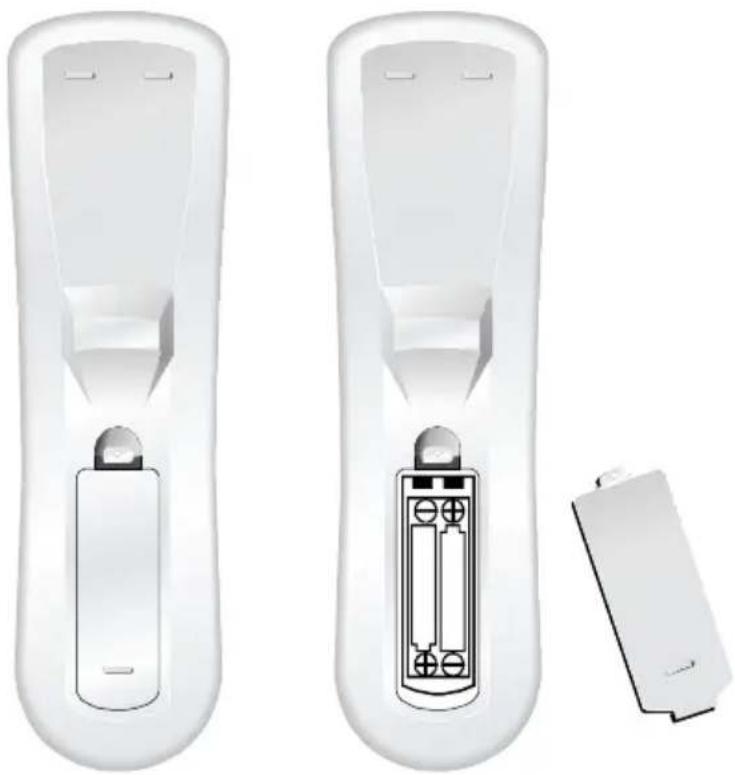
a) Open the cover
b) AA size batteries, When inserting the batteries, make sure correct polarities as per" + "and" - "marks on the batteries and within the battery compartment
c)Replace the battery cover
To prevent battery leakage which may result in bodily injury or damage to the remote:
-
Install all batteries correctly, and as marked on the remote control.
-
Do not mix batteries: (OLD and NEW or CARBON and ALKALINE, etc)
Remove batteries when the remote is not used for a long time.
natural_image
Two white remote control devices with internal battery modules and a separate battery cover (no text or symbols visible)ACCESSORIES
1 Adapter Plug
2 One Remote Control
3 2 Batteries 1.5V
4 One User Manual
TROUBLESHOOTING AND ADVICE
Before calling our SAS centre, please check if you can solve the troubleshooting by yourself.
| Troubleshooting | Control |
| No signal | Please check that all cables and cord's are correctly plugged in. |
| No color shades | Adjust the contrast, the color and the brightness |
| Stain show on the screen. | May be result from a lighting signal from car, motor, neon light and other electrical devices or appliances. |
| Double or multiple display image | May be the result of an electrical wave disturb from other TV, Computer and Game machine or Radio |
| Snow on the screen | The cables of the antenna are not correctly plugged in. |
| The remote control does not work | Please check the batteries order and alignment.Check that the IR of the remote control is not hidden by something. |
| "Zip" made noise on TV cover | Even if the display image is correct, the noise may come from an unsteady fixation of the panel. |
| No sound | Make sure that you have not press the MUTE button of the panel or of the remote control. |
SPECIFICATIONS
| Screen Size | 32 Inch | |
| Display Type | TFT | |
| Resolution(Pixel) | 1366 * 768 | |
| Brightness | 500cd/m2 | |
| Color | 16.7 M | |
| Contrast Ratio | 1000: 1 | |
| View Angle(H/V) | 176°/176° | |
| Aspect Ratio | 16:9 | |
| AC INPUT | 110V/220 Voltage Selectable | |
| TV System | NTSC | |
| Video Input Format | NTSC | |
| Antenna Input | Standard antenna socket 75Ω | |
| Audio Output | L/R 20W*2 | |
| Input | Video | 1.0vp-p75Ω; RCA |
| S-Video | Y:1.0Vp-p±3db C:0.3Vp-p±3db | |
| PC | 640*480/60Hz、800*600/60Hz、1024*768/60Hz | |
| Audio (Videos-Video-PC) | R/L200mVrms (max3.0vp-p) 20ΩkRCA | |
| Weight | 33 lbs | |
| Dimensions (with stand) | 32"W x 24.3"H x 4"D | |
This manual is only for your reference, any change to the design and specification will not be advised.
- PREFACE
- SAFETY PRECAUTIONS
- Preparation
- Power source
- Connexion cables
- Heating sources and humidity
- Cleaning and maintenance
- Departure in holidays
- TV INSTALLTION DRAWINGS
- PCINPUT CONNECTION
- Menu Operation
- Basic operation
- Turning on and off the TV
- TURN ON LCD TV
- TURN OFF LCD TV
- Select on screen language
- Volume adjustment
- How to adjust the OSD screen
- Choosing a TV channel
- Using the CH+/CH- on the front panel or on the remote control.
- Using 0-9 digital buttons and -/-button
- Example:
- Selecting input source
- Picture menu options
- Picture Mode
- Contrast
- Brightness
- Sharpness
- Color
- Tint
- Aspect Ratio
- AUDIO menu options
- Audio Mode
- Audio Language
- Bass
- Treble
- Balance
- Digital Audio Output
- Setup menu options
- Tuning Band
- DTV-Signal
- Auto Ch Search
- Add On Ch Search
- Manual Ch Set
- Channellabels
- Manual Language
- Feature menu options
- Time Set
- Time Set Mode
- Time Zone
- Sleep Timer
- Advance Video Menu
- Password Set
- Parental Control
- Digital Closed Captions
- VGA menu options
- VGA Set
- H-Pos
- V-Pos
- Phase
- Clock
- Auto Adjust
- Setting
- YPbPr menu options
- Component Set
- HDMI and S-VIDEO menu options
- Battery Usage Caution
- ACCESSORIES
- TROUBLESHOOTING AND ADVICE
Brand : Pyle
Model : P32LCD
Category : Television