SSH-240 - Garden shredder Ozito - Free user manual and instructions
Find the device manual for free SSH-240 Ozito in PDF.


| Product Type | Garden Shredder |
| Brand | Ozito |
| Model | SSH-240 |
| Power Supply | 2400W, 230V~50Hz |
| Max Branch Thickness | 40 mm |
| Cutting Mechanism | Steel cutting blade |
| Collection Bag Capacity | 50 L |
| Weight | 13 kg |
| Dimensions (L x W x H) | 50 x 40 x 80 cm |
| Cable Length | 1.5 m |
| Noise Level | 95 dB(A) |
| Safety Features | Overload protection, safety switch |
| Maintenance | Regular blade sharpening, clean after use |
| Spare Parts Available | Blade, collector bag, screws |
| Repairability | Replacement parts available; easy to disassemble |
| Usage Instructions | Refer to manual for detailed operation |
Frequently Asked Questions - SSH-240 Ozito
User questions about SSH-240 Ozito
0 question about this device. Answer the ones you know or ask your own.
Ask a new question about this device
Download the instructions for your Garden shredder in PDF format for free! Find your manual SSH-240 - Ozito and take your electronic device back in hand. On this page are published all the documents necessary for the use of your device. SSH-240 by Ozito.
USER MANUAL SSH-240 Ozito
2 Year Replacement Warranty
SSH-240
CAUTION: Read this operation manual before using this tool.

natural_image
Exterior view of a modern ozone spray gun (Ozito 2400W) with wheels and control panel, no visible text or symbols on the device itself.SPECIFICATIONS - MODEL NO. SSH-240
Motor:
2400W (S1 2000W / S6 (40%) 2400W)
Duty type S1: continuous running duty
S6: continuous-operation / periodic duty
(4 min. Full load, 6 min. No load)
Input:
230-240V \~ 50Hz
No load speed:
40/min
Max cutting diameter:
40mm
Blades:
Roller cutting system
Protection class:
I (earthed appliance)
Tool weight:
23kg
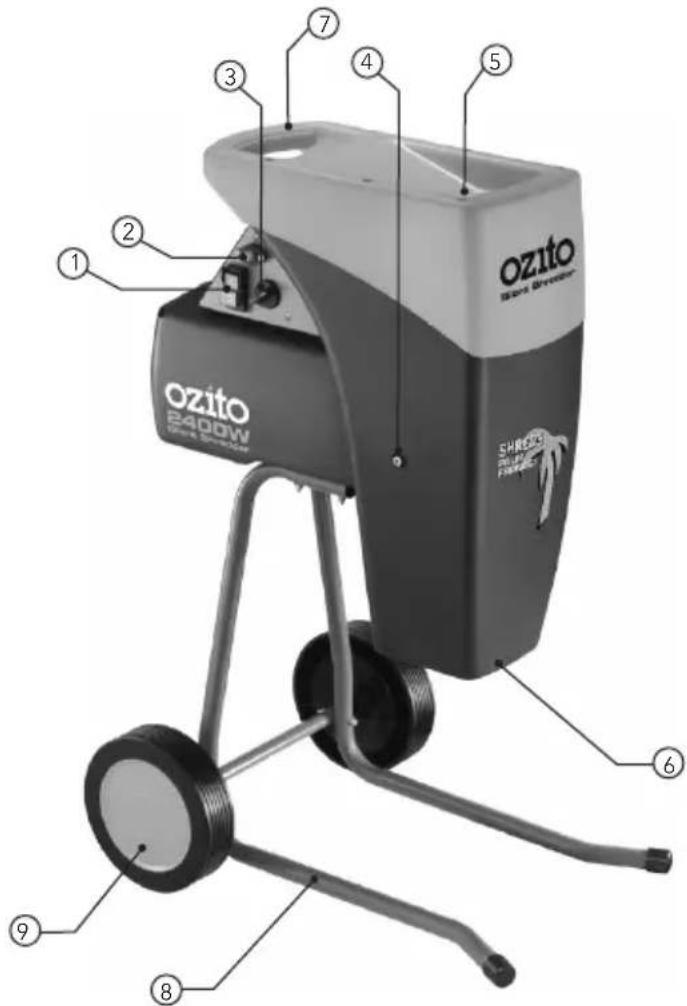
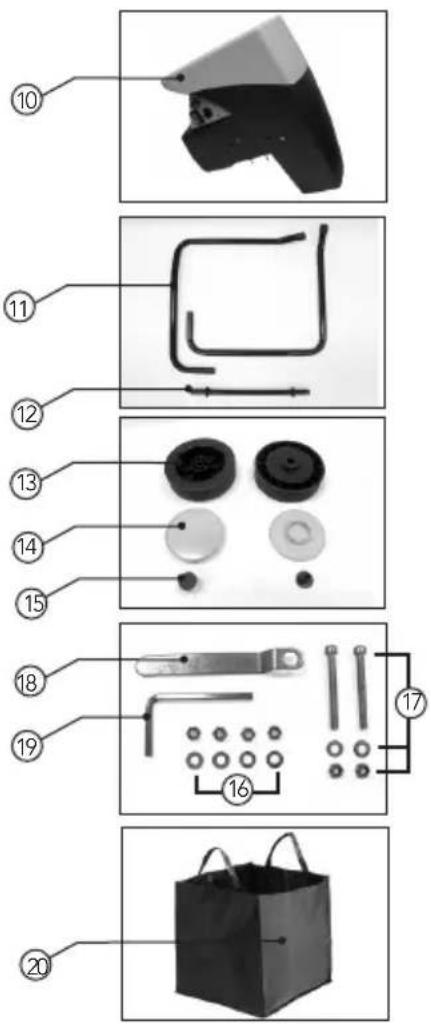
Assembly components
- On/off switch
- Reset button/overload protector
- Direction control switch
- Cutting adjustment bolt
- Feeding hopper
- Discharge chute
- Transport handle
- Stand
-
Wheels
-
Shredder housing
- Support legs (x2)
- Wheel axle
- Wheels (x2)
- Wheel caps (x2)
- Wheel locking insert (x2)
- Nut & washers (to attach legs) (x4)
- 55mm screws, nut & washers (to attach axle) (x2)
- Hex wrench
- Hex key
- Collection bag
TABLE OF CONTENTS
SPECIFICATIONS ......Page 2
INTRODUCTION...... Page 4
GENERAL SAFETY RULES......Page 5
ASSEMBLY Page 8
OPERATION Page 9
MAINTENANCE Page 12
TROUBLESHOOTING ......Page 13
WARRANTY...... Page 16
INTRODUCTION
Congratulations on purchasing an Ozito Silent Shredder. We aim to provide quality tools at an affordable price. We hope you will enjoy using this shredder for many years.
The SSH-240 Silent Shredder has been designed for shredding garden material including dry plant residue, twigs, sticks and branches up to 40mm thick.
The shredder quietly breaks your waste into small pieces which helps accelerate the composting process. The shredded material can be recycled, used for composting purposes or spread over garden beds to provide nutritional value to your plants.
This product is intended for DIY use only.
ELECTRICAL SAFETY

WARNING! When using mains-powered equipment, basic safety precautions, including the following, should always be followed to reduce risk of fire, electric shock, personal injury and material damage.
Read and understand the manual prior to operating this tool.
Save these instructions and other documents supplied with this tool for future reference.
GENERAL SAFETY INSTRUCTIONS
The electric motor has been designed for 230V and 240V only. Always check that the power supply corresponds to the voltage on the rating plate.
Note: The supply of 230V and 240V on Ozito tools are interchangeable for Australia and New Zealand.
Using an extension lead
Always use an approved extension lead suitable for the power input of this tool. Before use, inspect the extension lead for signs of damage, wear and ageing. Replace the extension lead if damaged or defective. When using an extension lead on a reel, always unwind the lead completely. Use of an extension lead not suitable for the power input of the tool or which is damaged or defective may result in a risk of fire and electric shock.

WARNING! Read all instructions. Failure to follow all instructions listed below may result in electric shock, fire and/or serious injury. The term "power tool" in all of the warnings listed below refers to your mains-operated (corded) power tool or battery-operated (cordless) power tool.
SAVE THESE INSTRUCTIONS
Save these instructions
1) Work area
a) Keep work area clean and well lit. Cluttered and dark areas invite accidents.
b) Do not operate power tools in explosive atmospheres, such as in the presence of flammable liquids, gases or dust. Power tools create sparks which may ignite the dust or fumes.
c) Keep children and bystanders away while operating a power tool. Distractions can cause you to lose control.
2) Electrical safety
a) Power tool plugs must match the outlet. Never modify the plug in any way. Do not use any adapter plugs with earthed (grounded) power tools. Unmodified plugs and matching outlets will reduce risk of electric shock.
b) Avoid body contact with earthed or grounded surfaces such as pipes, radiators, ranges and refrigerators. There is an increased risk of electric shock if your body is earthed or grounded.
c) Do not expose power tools to rain or wet conditions. Water entering a power tool will increase the risk of electric shock.
d) Do not abuse the cord. Never use the cord for carrying, pulling or unplugging the power tool. Keep cord away from heat, oil, sharp edges or moving parts. Damaged or entangled cords increase the risk of electric shock.
e) When operating a power tool outdoors, use an extension cord suitable for outdoor use. Use of a cord suitable for outdoor use reduces the risk of electric shock.
3) Personal safety
a) Stay alert, watch what you are doing and use common sense when operating a power tool. Do not use a power tool while you are tired or under the influence of drugs, alcohol or medication. A moment of inattention while operating power tools may result in serious personal injury.
b) Use safety equipment. Always wear eye protection. Safety equipment such as dust mask, non-skid safety shoes, hard hat, or hearing protection used for appropriate conditions will reduce personal injuries.
c) Avoid accidental starting. Ensure the switch is in the off-position before plugging in. Carrying power tools with your finger on the switch or plugging in power tools that have the switch on invites accidents.
d) Remove any adjusting key or wrench before turning the power tool on. A wrench or a key left attached to a rotating part of the power tool may result in personal injury.
GENERAL SAFETY RULES (cont.)
e) Do not overreach. Keep proper footing and balance at all times. This enables better control of the power tool in unexpected situations.
f) Dress properly. Do not wear loose clothing or jewellery. Keep your hair, clothing and gloves away from moving parts. Loose clothes, jewellery or long hair can be caught in moving parts.
g) If devices are provided for the connection of dust extraction and collection facilities, ensure these are connected and properly used. Use of these devices can reduce dust related hazards.
4) POWER TOOL USE AND CARE
a) Do not force the power tool. Use the correct power tool for your application. The correct power tool will do the job better and safer at the rate for which it was designed.
b) Do not use the power tool if the switch does not turn it on and off. Any power tool that can not be controlled with the switch is dangerous and must be repaired.
c) Disconnect the plug from the power source before making any adjustments, changing accessories, or storing power tools. Such preventive safety measures reduce the risk of starting the power tool accidentally.
d) Store idle power tools, unplugged & out of the reach of children and do not allow persons unfamiliar with the power tool or these instructions to operate the power tool. Power tools are dangerous in the hands of untrained users.
e) Maintain power tools. Check for misalignment or binding of moving parts, breakage of parts and any other condition that may affect the power tools operation. If damaged, have the power tool repaired before use. Many accidents are caused by poorly maintained power tools.
f) Keep cutting tools sharp and clean. Properly maintained cutting tools with sharp cutting edges are less likely to bind and are easier to control.
g) Use the power tool, accessories and tool bits etc., in accordance with these instructions and in the manner intended for the particular type of power tool, taking into account the working conditions and the work to be performed. Use of the power tool for operations different from intended could result in a hazardous situation.
5) SERVICE
a) Have your power tool serviced by a qualified repair person using only identical replacement parts. This will ensure that the safety of the power tool is maintained.
b) If the supply cord is damaged, it must be replaced by the manufacturer, its service agent or similarly qualified persons in order to avoid a hazard.
ADDITIONAL SAFETY INSTRUCTIONS FOR SHREDDERS
This appliance is not intended for use by persons (including children) with reduced physical, sensory or mental capabilities, or lack of experience and knowledge, unless they have been given supervision or instruction concerning use of the appliance by a person responsible for their safety.
Recommendations for the use of a residual current device with a rated residual current of 30mA or less.
- Only operate the machine in open space (eg. not close to a wall or other fixed object) and on a firm, level surface.
- Do not operate the machine on a paved or gravel surface where ejected material could cause injury.
- Before starting the machine, look into the feeding chamber to make certain that it is empty.
- Keep your face and body away from the feed intake opening.
• Always stand clear of the discharge zone when operating this machine.
- Do not transport this machine while the power source is running.
- Do not tilt the machine while the power source is running.
- When the machine is stopped for servicing, inspection, or storage, or to change an accessory, shut off the power source, disconnect the spark plug wire from the spark plug (electric unit disconnect from supply), make sure that all moving parts have come to a complete stop and, where a key is fitted remove the key. Allow the machine to cool before making any inspections, adjustments, etc.
- Only use the shredder in dry conditions and never outdoors when it is raining.
- Do not allow children or any person who has not read this instruction manual or who is not familiar with the shredder operate the product.
- Remember that the operator may be held responsible for accidents or hazards occurring to other people and/or their property.
- Ensure the shredder is placed on a firm and level surface prior to using.
- Never use the shredder with damaged safety devices or without protection.
- Wear ear protection when operating the shredder.
- Do not allow processed material to build up in the discharge chute. This may prevent proper discharge and can result in kickback of material through the feeding hopper.
- If the machine becomes clogged, switch off the machine and disconnect from the power. Allow the cutter to come to a stop. Clear debris from the cutter assembly.
- Never attempt to shred bones, stone, glass, metals, plastic or rags.
- Wear protective gloves, safety glasses and avoid loose clothing.

WARNING! Rotating cutter head. Keep hands and feet out of openings
- Store shredder upright in a dry place when not in use.
- Never put your hands in the cutter area while the cutter assembly is running or the shredder is plugged in. The cutter continues to run for a few seconds after the shredder has been switched off.
-
If the cutter strikes any foreign objects or if the shredder starts making any unusual noise or vibration, switch off the shredder immediately and disconnect the power. Allow the cutter to come to a stop and take the following steps:
-
Inspect for damage.
- Check and tighten any loose parts.
- Have any damaged parts replaced and /or repaired by an electrician or power tool repairer.
- Always switch off the shredder and disconnect the power whenever you leave the work area.
ASSEMBLY
- Remove the silent shredder and all components from the carton.

WARNING! You may require assistance lifting the shredder out of the carton.
-
Carefully place the shredder housing (10) upside down on a flat surface (Fig. 1).
-
Place each leg over the 2 screws on the base of the shredder housing. For maximum stability ensure that the legs are facing outwards (Fig. 2).
-
Place a flat washer followed by the locking nut (16) over each of the 4 screws. Lightly tighten using the hex wrench (18) supplied (Fig. 3).
-
Fit the wheel axle (12) to the base of the legs ensuring that it is positioned towards the rear of the shredder.
-
Secure the axle onto the legs using 2 x 55mm screws, nuts & washers (17).
a. Fit a flat washer over each screw and place the screw through the hole in the leg followed by the axle.
b. Attach the nut (17) onto the screw and tighten using the hex wrench (18) and hex key (19) (only partially tighten at this stage) (Fig. 4).
c. Repeat for the opposite leg.
-
Securely tighten the 4 screws on the base of the shredder followed by the 2 screws on the wheel axle. Ensure the stand and axle are secure and do not wobble.
-
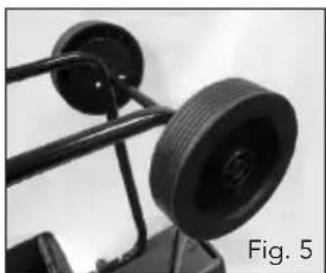
Fit a wheel (13) onto each side of the axle (Fig. 5).
-
Fit a wheel locking insert (15) onto each end of the axle to secure the wheels on the axle. Use a rubber mallet and lightly tap the inserts into position on the axle (Fig. 6).
-
Fit a wheel cap (14) over each wheel making sure they click into position (Fig. 7).
natural_image
Close-up of a mechanical pulley system with two wheels and a connecting rod (no text or symbols visible)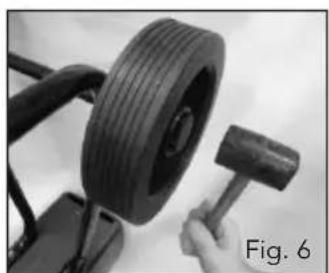
natural_image
Close-up of a hand using a hammer to handle a tire, with no visible text or symbols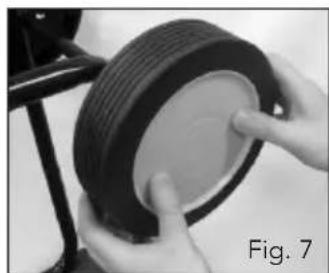
natural_image
Close-up of hands holding a tire component, labeled Fig. 7 (no text or symbols on the object itself)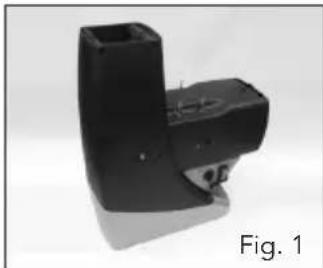
natural_image
Black plastic mechanical component with a stepped base and mounting holes, labeled Fig. 1 (no text or symbols on the object itself)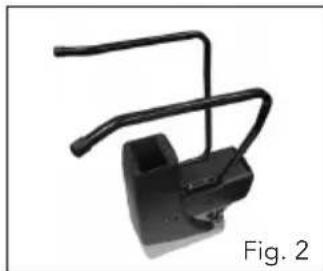
natural_image
Mechanical component with curved arms and a black housing, labeled Fig. 2 (no text or symbols on the object itself)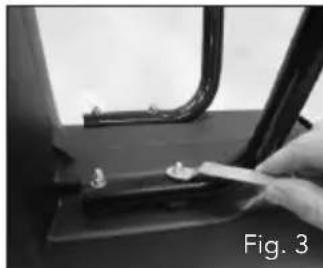
natural_image
Close-up of a hand using a tool to apply material to a small component on a metal bracket (no visible text or symbols)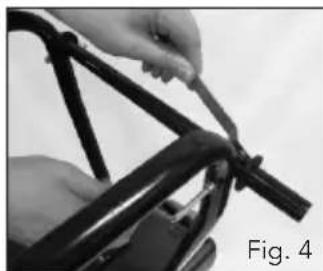
natural_image
Close-up of hands assembling a bicycle frame (no visible text or symbols)- Carefully turn the shredder over onto its stand.
OPERATION
Prior to Operation
The shredder operates by using a rolling cutter head, the cutter head rotates and pulls the material past a metal plate which grinds and cuts the material.
Prior to operation the metal plate will need to be adjusted to ensure efficient performance. Adjust the metal plate as follows:
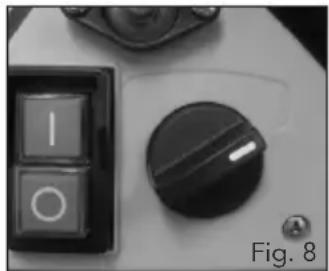
- Turn the rotation direction switch (3) to the right hand side so it is set to the feed ↓position (Fig. 8).
natural_image
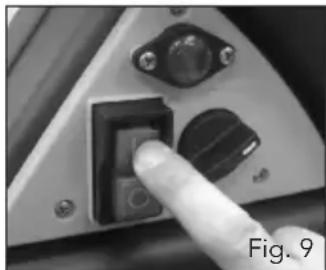
Close-up of a control panel with two buttons (one open, one closed) and a labeled dial, no readable text or symbols beyond the label.- Turn on the shredder by pressing the green ON button "I" on the on/off switch (1) (Fig. 9).
natural_image
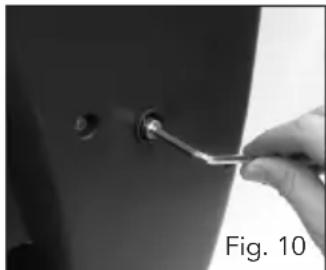
Close-up of a finger pressing a button on a device panel (no visible text or symbols)- Using the 5mm hex key (19) adjust the cutting adjustment bolt (4) located on the left hand side of the shredder (when viewed from the front) (Fig. 10).
Note: Rotating the bolt in a clockwise direction will move the metal plate closer to the rolling cutter head, rotating in an anti-clockwise direction will move the metal plate away from the cutter head.
natural_image
Close-up of a hand using a screwdriver to adjust a small mechanical component (no text or symbols visible)- With the motor running slowly adjust the cutting adjustment bolt by turning in a clockwise direction, continue to do this until a scraping noise is heard (metal plate making contact with the cutter head). Fine metal shavings will fall from the discharge chute (6).
- As soon as the scraping noise is heard rotate the adjustment bolt (4) anti-clockwise 1/4 of a turn. Ensure that the metal plate is not making contact with the cutter head.
- Once adjustment is complete check that the shredder is cutting efficiently by feeding some material into the feeding hopper (5). Do this by following the instructions outlined in the "Shredding" section.
Note: When shredding hard material it may need to be put through the shredder twice, firstly to crush the material and secondly to cut it. In order to crush material the cutting adjustment bolt (4) will need to be loosened by turning it anti-clockwise half a turn, this will increase the gap between the metal plate and the rolling cutter head. Re-adjust the metal plate once crushing is complete.
OPERATION (cont.)
Direction Control Switch

WARNING! The direction control switch can only be used when the shredder is turned off.
-
Prior to operation the direction control switch (3) must be set either to the feed or reverse ↑ position.
-
When set to the feed position the shredder will pull material through the hopper, into the rolling cutter head and shred it (Fig. 11).
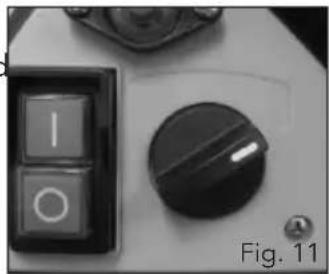
natural_image
Close-up of a control panel with an open button and a black knob, labeled Fig. 11 (no readable text or symbols beyond basic markings)- When set to the reverse ↑position the shredder will run in the opposite direction and release any blocked or clogged material (Fig. 12).
Note: The direction control switch will not start the motor, it only sets the direction of the rolling cutter head.
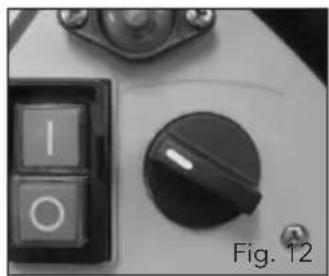
natural_image
Close-up of a control panel with a black knob and two buttons (no readable text or symbols)Starting the Shredder

WARNING! Prior to starting the motor ensure that the shredder is empty.
-
Connect the shredder power cord to an appropriate extension cord and plug the extension cord into a mains power point.
-
Set the direction control switch (3) to either the feed ↓ or reverse ↑ position.
-
To start the shredder press the green "I" button on the on/off switch (1) (Fig. 13).
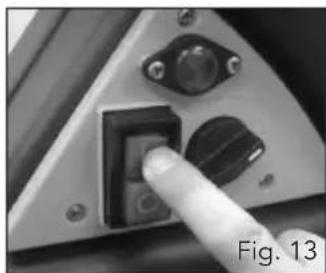
natural_image
Close-up of a finger pressing a button on a triangular device (no visible text or symbols)- To stop the shredder press the red "O" button on the on/off switch (1) (Fig. 14).

WARNING! Do not feed material into the shredder after the shredder has been stopped, this can lead to material being trapped in the shredder and make it very difficult to remove.
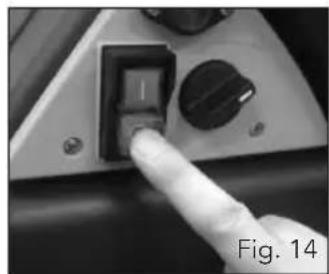
natural_image
Close-up of a hand inserting a black component into a control panel (no visible text or symbols)OPERATION (cont.)
Overload Protection
-
The shredder is equipped with a built-in motor protection system that prevents the motor from being overloaded. The motor will switch off automatically in the event of overloading.
-
If overloading occurs disconnect the shredder from the power supply and move the direction control switch (3) to the "O" position.
-
Allow at least 5 minutes for the motor to cool down.
-
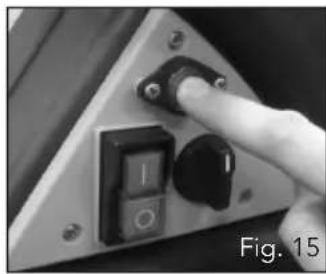
Press the reset button (2) (Fig. 15).
-
Plug the shredder back into mains power and switch on.
-
If the cutting blades are jammed turn off the shredder and turn the direction control switch (3) to the ↑ position, turn on the shredder to clear any blocked or clogged material.
natural_image
Close-up of a hand pressing a triangular control panel with a black square dial and indicator lights (no text or symbols visible)No-volt Release Switch
- The shredder is equipped with an internal no-volt release switch. If there is a loss of power the machine will automatically turn-off.
- To re-start the shredder reconnect the power cord to the extension lead and press the green "I" button on the on/off switch (1).
Shredding

WARNING! The shredder is not recommended for materials including glass, metal, plastic bags, stones, fabric, earth covered roots, soft leafy material and waste without a firm consistency (eg. kitchen waste).

WARNING! To prevent damage to the machine it is recommended that garden material greater than 40mm is not fed into the shredder.
The following types of material can be used in the shredder:
- Twigs - Branches
- Waste from cut bushes
-
Waste from hedge trimming
-
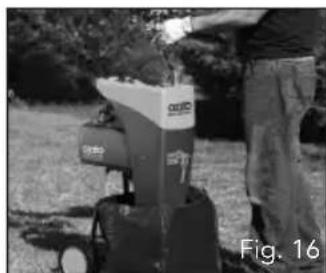
Feed the material to be shredded into the feeding hopper (5) (Fig. 16).
-
The shredder will automatically pull the material through the rolling cutter head, shred it and extract it through the discharge chute (6).
Following the below procedures will improve operation and prolong the life of the shredder.
natural_image
Person operating a portable industrial machine outdoors, no visible text or symbols on the device or background- Branches and twigs should be shredded shortly after they are cut. They become extremely hard once dry and the maximum cutting diameter is reduced.
- Garden waste such as fresh foliage, creepers and vines contain a lot of moisture, this can result in material sticking to the cutter head. Such material should be allowed to dry for a few days before being fed into the shredder.
- Always check material before shredding, ensure it does not contain any stones or nails as this may severely damage the shredder.
• Always store the shredder indoors in a dry place.
OPERATION (cont.)
Mulching Palm Fronds
The shredder can shred palm fronds, reducing them to an easily disposable waste.
If the head of the palm frond is particularly large or hard it will need to be removed before being inserted into the shredder.
If the material is very hard the cutting adjustment bolt (4) may need to be adjusted as described in “Prior to operation” and run through the shredder once to soften it. Retighten the cutting adjustment bolt and insert the material a second time to effectively shred it.
Composting
The shredded material can be composted in many various ways:
- The material can be placed in a heap directly on the ground (cold composting).
- The material can be placed in a plastic container, wooden crate, skeleton container or similar (cold composting).
- The material can be placed in an insulated compost holder. The heat is then maintained for longer periods and the rotting process continues during the winter. This method produces faster results (warm composting).
- The material can be spread directly onto the garden (surface composting).

WARNING! Always use a dust mask and safety gloves when handling composted material to prevent contamination from micro organisms.
MAINTENANCE

WARNING! Always disconnect the shredder from the power supply before performing any maintenance.
The shredder requires very little maintenance. In order to maintain the efficiency of the machine and achieve a long service life observe the following:
- Keep the air openings clean and free of obstructing material.
- Periodically check that all nuts and screws are secure.
- Spray the rolling cutter head after each use with a spray lubricant to protect against corrosion.
- Always clean the shredder after each use. Brush away dirt and plant residue which may be caught in the roller cutter. Wipe clean the outside of the shredder with a cloth which has been moistened with a mild detergent and water.
- Store the shredder upright in a dry place.
Note: Ozito Industries will not be responsible for any damage or injuries caused by the repair of the tool by an unauthorised person or by mishandling of the tool.
MAINTENANCE (cont.)
Cleaning
Always clean the shredder after each use.

WARNING! Never use a high-pressure washer or running water when cleaning the shredder!
Brush away dirt and plant residue which may be caught in the rolling cutter blade. Wipe clean the outside of the shredder with a cloth which has been moistened with a mild detergent and water.
TROUBLE SHOOTING
| Causes | Solutions |
| The motor does not run | Set the direction control switch (3) to position “0” and press the reset button (2).Turn the direction control switch to either the feed or reverse position and turn on the shredder.Possible power failure, check the power supply/cord and house fuse box. |
| The material to be shredded is not pulling through the unit | The cutting blade is running in reverse.Turn off the shredder and change the direction control switch to the feed position.The material is jammed in the roller blade.Set the control switch to the “O” position and switch the shredder on. Pull the material from the hopper. Carefully re-feed thick branched material making sure the blade does not immediately grasp the pre-cut notches again.The rolling cutter head is blocked. Set the direction switch to the reverse position and switch the shredder on. The cutter head will now run backwards and release the blocked material. |
| Material is not being shredded sufficiently | Ensure the metal plate is correctly adjusted in relation to the rolling cutter head. Refer to the “Prior to operation” section for detailed instructions. |
CAUTION! Only change the direction of rotation after the shredder has come to a complete stop and the blades have stopped rotating.
SPARE PARTS
Limited spare parts are available subject to availability. Please contact your local Bunnings Special Orders Desk to order the required spare parts.
Most common spare parts listed below
Spare Part/Accessories Part No.
Blade Holder SPSSH240-49
Blade SPSSH240-53
Blade Plate SPSSH240-56
Switch SPSSH240-85
DESCRIPTION OF SYMBOLS
| V | Volts | Hz | Hertz |
| ~ | Alternating current | W | Watts |
| /min | Revolutions orreciprocation per minute | No | No load speed |
| dB | Decibel (noise) rating | 5124 | Regulator compliance mark |
 | Read operator's manual |  | Warning |
 | Do not use in wet weather |  | Disconnect and discontinue use should the power-cord be damaged |
 | Keep by standers away |  | Beware of debris being ejected from the shredder |
 | Wear eye protection |  | Wear safety gloves |
 | Danger - Rotating blades.Keep hands and feet outof openings whilemachine in running | 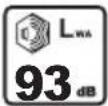 | Sound power level |
 |
CARING FOR THE ENVIRONMENT
Power tools that are no longer usable should not be disposed of with household waste but in an environmentally friendly way. Please recycle where facilities exist. Check with your local council authority for recycling advice.

Recycling packaging reduces the need for landfill and raw materials. Reuse of recycled material decreases pollution in the environment. Please recycle packaging where facilities exist. Check with your local council authority for recycling advice.
CONTENTS
1 x Shredder housing
2 x Support legs
1 x Wheel axle
2 x Wheels
2 x Wheel caps
2 x Wheel locking inserts
4 x Nut & washers (to attach legs)
2 x 55mm screws, nut & washers (to attach axle)
1 x Hex wrench
1 x Hex key
1 x Collection bag
1 x Instruction manual
OZITO INDUSTRIES PTY LTD
AUSTRALIA (Head Office)
1 - 23 Letcon Drive, Bangholme, Victoria, Australia 3175
Telephone: 1800 069 486
Facsimile: +61 3 9238 5588
Website: www.ozito.com.au
Email: enquiries@ozito.com.au
WARRANTY
YOUR WARRANTY FORM SHOULD BE RETAINED BY YOU AT ALL TIMES. IN ORDER TO MAKE A CLAIM UNDER THIS WARRANTY YOU MUST RETURN THE PRODUCT TO YOUR NEAREST BUNNINGS WAREHOUSE WITH YOUR BUNNINGS REGISTER RECEIPT. PRIOR TO RETURNING YOUR PRODUCT FOR WARRANTY PLEASE TELEPHONE OUR CUSTOMER SERVICE HELPLINE:
Australia 1800 069 486 New Zealand 0508 069 486
TO ENSURE A SPEEDY RESPONSE PLEASE HAVE THE MODEL NUMBER AND DATE OF PURCHASE AVAILABLE. A CUSTOMER SERVICE REPRESENTATIVE WILL TAKE YOUR CALL AND ANSWER ANY QUESTIONS YOU MAY HAVE RELATING TO THE WARRANTY POLICY OR PROCEDURE.
The benefits provided under this warranty are in addition to other rights and remedies which are available to you at law.
Our goods come with guarantees that cannot be excluded at law. You are entitled to a replacement or refund for a major failure and for compensation for any other reasonably foreseeable loss or damage. You are also entitled to have the goods repaired or replaced if the goods fail to be of acceptable quality and the failure does not amount to a major failure. Generally you will be responsible for all costs associated with a claim under this warranty, however, where you have suffered any additional direct loss as a result of a defective product you may be able to claim such expenses by contacting our customer service helpline above.
2 YEAR REPLACEMENT WARRANTY
Your product is guaranteed for a period of 24 months from the original date of purchase and is intended for DIY (Do It Yourself) use only. If a product is defective it will be replaced in accordance with the terms of this warranty. Warranty excludes consumable parts, for example: rolling cutter heads, wheels and wheel caps.
WARNING
The following actions will result in the warranty being void.
• Professional, Industrial or high frequency use.
• If the tool has been operated on a supply voltage other than that specified on the tool.
- If the tool shows signs of damage or defects caused by or resulting from abuse, accidents or alterations.
- Failure to perform maintenance as set out within the instruction manual.
• If the tool is disassembled or tampered with in any way.
OZITO
Australia/New Zealand (Head Office)
1-23 Letcon Drive, Bangholme, Victoria, Australia 3175
- SPECIFICATIONS - MODEL NO. SSH-240
- Motor:
- Assembly components
- TABLE OF CONTENTS
- INTRODUCTION
- ELECTRICAL SAFETY
- GENERAL SAFETY INSTRUCTIONS
- Using an extension lead
- SAVE THESE INSTRUCTIONS
- GENERAL SAFETY RULES (cont.)
- ADDITIONAL SAFETY INSTRUCTIONS FOR SHREDDERS
- WARNING! Rotating cutter head. Keep hands and feet out of openings
- ASSEMBLY
- OPERATION
- Prior to Operation
- OPERATION (cont.)
- Direction Control Switch
- Starting the Shredder
- Overload Protection
- No-volt Release Switch
- Shredding
- Mulching Palm Fronds
- Composting
- MAINTENANCE
- MAINTENANCE (cont.)
- Cleaning
- SPARE PARTS
- Most common spare parts listed below
- Spare Part/Accessories Part No.
- DESCRIPTION OF SYMBOLS
- CARING FOR THE ENVIRONMENT
- CONTENTS
- OZITO INDUSTRIES PTY LTD
- AUSTRALIA (Head Office)
- WARRANTY
- YEAR REPLACEMENT WARRANTY
- WARNING
- The following actions will result in the warranty being void.
- OZITO
Brand : Ozito
Model : SSH-240
Category : Garden shredder