
Clié PEGA-MD700 - Modem SONY - Free user manual and instructions
Find the device manual for free Clié PEGA-MD700 SONY in PDF.


| Type of product | Handheld PDA (Personal Digital Assistant) with email capabilities |
| Dimensions | Approx. 114 x 76 x 18 mm |
| Weight | Approx. 160 g (including stylus) |
| Power supply | Rechargeable lithium-ion battery (internal, not user-replaceable) |
| Main functions | Email client (send/receive), address book, memo pad, HotSync synchronization with PC, JogDial navigation, attachment support |
| Maintenance and cleaning | Wipe with a soft dry cloth; avoid using water, solvents, or abrasive cleaners |
| Safety | Do not expose to moisture or extreme temperatures; use only supplied or specified accessories |
| Spare parts and repairability | Battery replacement by qualified service; limited user-serviceable parts |
| General information | Palm OS operating system; connects via modular cable for modem; cradle for HotSync |
Frequently Asked Questions - Clié PEGA-MD700 SONY
User questions about Clié PEGA-MD700 SONY
0 question about this device. Answer the ones you know or ask your own.
Ask a new question about this device
Download the instructions for your Modem in PDF format for free! Find your manual Clié PEGA-MD700 - SONY and take your electronic device back in hand. On this page are published all the documents necessary for the use of your device. Clié PEGA-MD700 by SONY.
USER MANUAL Clié PEGA-MD700 SONY
CLIE Mail Version1.0
for CLIE MODEM
User Guide
CLIÉ
- Sony, CLIE and their logos are trademarks of Sony Corpolation.
- Microsoft, Windows and Outlook are registered trademarks of Microsoft Coprpolation.
- Palm OS, Palm Computing, Graffiti, HotSync and the Palm Platform Compatible Logo are registered trademarks of Palm, Inc.
- Palm, the Palm logo, the HotSync Logo and Palm Powered are trademarks of Palm, Inc.
- Eudora is a registered trademark of the University of Illinois Board of Trustees, licensed to QUALCOMM Incorporated. Eudora Pro is a registered trademark of QUALCOMM Incorporated.
- All other product and brand names may be trademarks or registered trademarks of their respective owners.
Table of contents
What you can do with CLIE Mail ...... 4
Installing CLIE Mail 5
Installing on your CLIE handheld ..... 5
Installing on your computer 6
Sending a test e-mail message ...... 7
Writing and sending a test e-mail ...... 7
Using the screen 10
Receiving a test e-mail 12
Writing/reading an e-mail 13
Replying to an e-mail message 13
Rewriting/sending draft e-mail 15
Forwarding an e-mail 17
Sending/receiving an attachment ..... 19
Reading sent/received e-mail messages 21
Managing your e-mail 22
Deleting e-mail 22
Managing your e-mails using original categories 24
Storing an e-mail from your
computer 26
Compatibility with other e-mail software 26
Choosing the e-mail client software on your computer 27
Setting up the HotSync option on your computer 29
Setting up the HotSync option on your CLIE handheld 30
Transferring an e-mail.... 31
Advanced CLIE Mail operations ...... 32
Sorting e-mails according to specific conditions (Filter) 32
Receiving only part of an e-mail 34
Registering a signature 36
Setting display options 37
Switching mail accounts 38
CLIE Mail Menu items 39
E-mail list screen 39
E-mail screen 40
E-mail edit screen 40
Address edit screen 41
What you can do with CLIE Mail
CLIE Mail is an e-mail client application for the CLIE handheld.
Checking your e-mail anytime, anywhere
You can check your e-mail anytime, anywhere using the mobile kit.
Managing your e-mail on your computer with your CLIE handheld
You can transfer e-mail messages from your computer to your CLIE handheld and read them on your CLIE handheld screen. You can not only read them, but also write a reply and send it from your computer.
Managing multiple mail accounts
If you have several e-mail accounts, you can receive and send messages using any account simply by switching the account setting.
Managing your e-mails by category
You can manage your e-mail not only by standard categories such as Inbox or Send, but also categories you have chosen yourself, such as Private or Business.
Attaching information to your e-mail messages
You can attach Memo Pad or Address Book information to your e-mail message.
Note
The CLIE Mail application can display up to 30,000 characters for each e-mail message.
Installing CLIE Mail
Installing on your CLIE handheld
You can install CLIE Mail on the hard disk on your computer.
Install the CLIE Palm Desktop software on your computer from the supplied CD-ROM and place your CLIE handheld in the cradle.
1 Insert the Installation CD-ROM into the CD-ROM drive. The installation launcher window appears.
2 Click Install CLIE Mail.
The Install Tool dialog box appears.
3 Select a user name from the user list.
The file is added to the File Name list.
4 Click Exit.
5 Press the HotSync button on the cradle.
CLIE Mail will be installed on your CLIE handheld.
Installing CLIE Mail
Installing on your computer
You can synchronize the e-mail messages on your computer and on your CLIE handheld, after installing the CLIE Mail Conduit software on the supplied CD-ROM.
1 Insert the Installation CD-ROM into the CD-ROM drive.
The installation launcher window appears.
2 Click Install CLIE Mail Conduit.
A confirmation dialog box appears.
The CLIE Mail Conduit software installation starts.
Follow the instructions on-screen to finish the installation.
3 Click Exit.
For details on how to use CLIE Mail Conduit, see "Storing an e-mail from your computer" on page 26.
Sending a test e-mail message
Writing and sending a test e-mail
To get used to operating CLIE Mail, write and send a test e-mail message.
1 With the supplied modular cable, connect your CLIE handheld to the modular jack on the wall.
2 Rotate the JogDial navigator to select the CLIE Mail icon, then press the dial.
You can also start CLIE Mail by tapping the CLIE Mail icon directly.

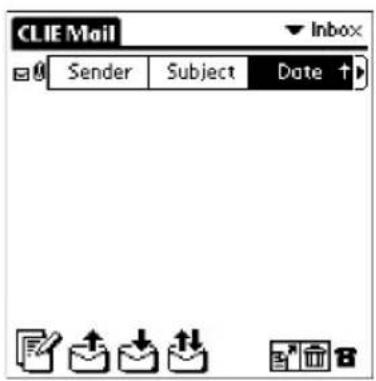
CLIE Mail starts and the e-mail list screen appears.
Sending and receiving a test e-mail
3 Tap
The e-mail edit screen appears.

4 Enter the address, subject and body text.
You can use an address which you have already registered using the Address Book (refer to the Operating Instructions manual).
For details, see page 9.
5 Tap Send.
A menu appears.

6 If you want to send the mail message immediately, tap Send Now, otherwise tap Send Later.
- Send Now: CLIE Mail sends the mail immediately.
- Send Later: CLIE Mail stores the mail in the Outbox category. You can send an e-mail which is stored in the Outbox category by tapping 📄. When you want to check e-mail messages saved in the Outbox category, tap the arrow ▼ in the top right-hand corner of the screen and then tap Outbox.
Sending and receiving a test e-mail
When you want to save an e-mail message without sending it immediately
Tap Draft before performing step 5 above.
To check the contents of the draft e-mail, tap the arrow ▼ in the top right-hand corner of the screen and then tap Draft.
When you want to send the mail later from the Outbox
Tap or .
The e-mail messages which are stored in the Outbox category are sent all at once.
You can choose an e-mail address from the Address Book
When you tap To, CC or BCC on the e-mail edit screen, the address screen appears.
You can use the address reference function by tapping Lookup.
For details on the Lookup function, refer to the Operating Instructions manual.
Sending and receiving a test e-mail
Using the screen
flowchart
graph TD
    A["1"] --> B["IE Mail"]
    C["2"] --> B
    D["3"] --> E["Sender"]
    F["4"] --> G["Email"]
    H["5"] --> I["Email"]
    J["6"] --> K["Email"]
    L["7"] --> M["Inbox"]
    N["8"] --> O["Email"]
    P["9"] --> Q["Email"]
    R["10"] --> S["Email"]
    B --> T["Subject"]
    T --> U["Date"]
    U --> V["Report 3/21 8:3..."]
    U --> W["Tomorro... 3/21 8:3..."]
    U --> X["Fwd:Wed... 3/21 8:3..."]
    U --> Y["Wedding ... 3/21 8:3..."]
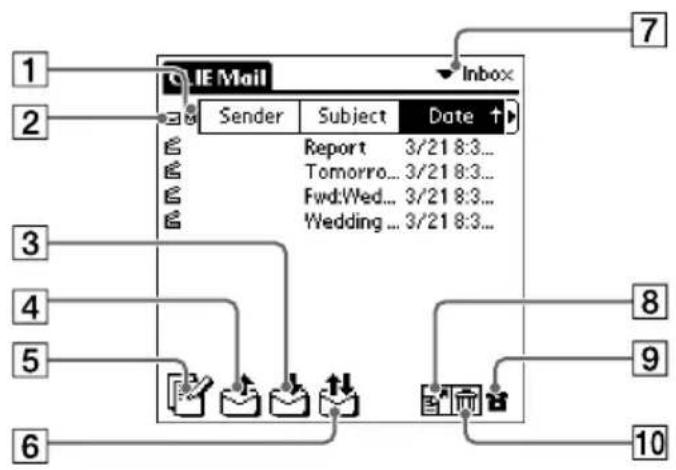
1 The attachment icon
If a file is attached to your mail, the attachment icon appears to the left of the Sender column.
2 The read/unread display
The icon of e-mails you have already read changes to the open icon.
3 (Receive) button
Downloads new e-mails.
4 (Send) button.
Sends e-mails stored in the Outbox category.
5 (New mail) button.
Displays the New Mail edit screen.
6 (Send and Receive) button
Sends e-mails stored in the Outbox category and downloads new e-mails at the same time.
7 Categories list
Switches the category which is currently displayed on your CLIE handheld. To switch the category, tap the arrow ▼ in the top right-hand corner of the screen and then tap the desired category.
Sending and receiving a test e-mail
8 (Move) button
Displays the E-mail Move screen. For details, see page 25.
9 (delete) button
Displays the E-mail Delete screen. For details, see page 22.
10 (Telephone) icon
Displays the online status. You can also switch between online and offline modes.
• Our CLIE handheld is connected to the Internet (online).
• 📞: your CLIE handheld is not connected to the Internet (offline).
Sending and receiving a test e-mail
Receiving a test e-mail
Download the e-mail you sent on page 7 using CLIE Mail.
1 With the supplied modular cable, connect your CLIE handheld to the modular jack on the wall.
2 Rotate the JogDial navigator to select the CLIE Mail icon, then press the dial.
CLIE Mail starts and the e-mail list screen appears.
You can also start CLIE Mail by tapping the CLIE Mail icon directly.
3 Tap
Your CLIE handheld connects to the Internet and can receive new e-mails. The new e-mail appears in the e-mail list screen.

4 Rotate the JogDial navigator to select the e-mail message you want to read, then press the dial.
You can also simply tap the desired e-mail message directly. The text of the e-mail appears.
If the text of the message extends beyond the screen
Rotate the JogDial navigator to scroll the screen, or tap the scroll bar.
Writing/reading an e-mail
Replying to an e-mail message
1 With the supplied modular cable, connect your CLIE handheld to the modular jack on the wall.
2 Rotate the JogDial navigator to select the CLIE Mail icon, then press the dial.
You can also start CLIE Mail by tapping the CLIE Mail icon directly.
CLIE Mail starts and the e-mail list screen appears.
3 Tap the arrow ▼ in the top right-hand corner of the screen, then tap Inbox.
The Inbox e-mail list screen appears.
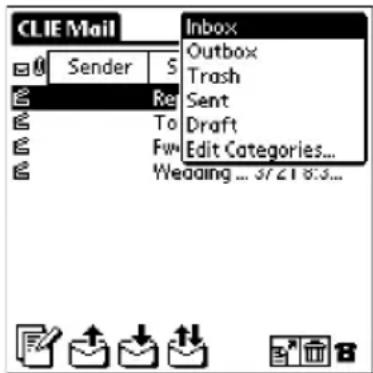
4 Rotate the JogDial navigator to select the e-mail message you want to answer, then press the dial.
You can also tap the e-mail directly.
The text of the e-mail appears.
Writing/reading an e-mail
5 Tap Reply.
Re: is added to the original subject line, and the e-mail edit screen in which appears.

6 Enter the text of your message.
You can use an address which you have already registered using the Address Book (refer to the Operating Instructions manual).
For details, see page 9.
7 Tap Send.
A menu appears.
6 If you want to send the mail message immediately, tap Send Now, otherwise tap Send Later.
- Send Now: CLIE Mail sends the mail immediately.
- Send Later: CLIE Mail stores the mail in the Outbox category. You can send an e-mail which is stored in the Outbox category by tapping 📄. When you want to check e-mail messages saved in the Outbox category, tap the arrow ▼ in the top right-hand corner of the screen and then tap Outbox.
When you want to save an e-mail message without sending it immediately
Tap Draft before performing step 5 above.
To check the contents of the draft e-mail, tap the arrow ▼ in the top right-hand corner of the screen and then tap Draft.
When you want to send the mail later in the Outbox
Tap or .
The e-mail messages which are stored in the Outbox category are sent all at once.
Writing/reading an e-mail
Rewriting/sending draft e-mail
1 With the supplied modular cable, connect your CLIE handheld to the modular jack on the wall.
2 Rotate the JogDial navigation to select the CLIE Mail icon, then press the dial.
You can also start CLIE Mail by tapping the CLIE Mail icon directly.
CLIE Mail starts and the e-mail list screen appears.
3 Tap the arrow ▼ in the top right-hand corner of the screen, then tap Draft.
The Draft e-mail list screen appears.

4 Rotate the JogDial navigation to select the e-mail message you want to rewrite and send, then press the dial.
You can also tap the e-mail directly.
The text of the e-mail message appears.
5 Rewrite the text.
6 Tap Send.
A menu appears.
Writing/reading an e-mail
7 If you want to send the mail message immediately, tap Send Now, otherwise tap Send Later.
- Send Now: CLIE Mail sends the mail immediately.
- Send Later: CLIE Mail stores the mail in the Outbox category. You can send an e-mail which is stored in the Outbox category by tapping 📄. When you want to check e-mail messages saved in the Outbox category, tap the arrow ▼ in the top right-hand corner of the screen and then tap Outbox.
When you want to save an e-mail message without sending it immediately
Tap Draft before performing step 5 above.
To check the contents of the draft e-mail, tap the arrow ▼ in the top right-hand corner of the screen and then tap Draft.
When you want to send the mail later in the Outbox
Tap 📊 .
The e-mail messages which are stored in the Outbox category are sent all at once.
Writing/reading an e-mail
Forwarding an e-mail
1 Perform operations in Steps 1 to 3 of "Replying to an e-mail message" on page 13.
2 Rotate the JogDial navigation to select the e-mail message you want to forward, then press the dial.
You can also simply tap the desired e-mail directly.
The text of the e-mail message appears.
3 Tap Forward.
Fwd: is added to the original subject line, and the e-mail edit screen appears.
4 Enter the e-mail address to which you want to forward the message.
You can use an address which you have already registered using the Address Book (refer to the Operating Instructions manual).
For details, see page 9.
5 Tap Send.
A menu appears.
6 If you want to send the mail message immediately, tap Send Now, otherwise tap Send Later.
- Send Now: CLIE Mail sends the mail immediately.
- Send Later: CLIE Mail stores the mail in the Outbox category. You can send an e-mail which is stored in the Outbox category by tapping 📂.
When you want to check e-mail messages saved in the Outbox category, tap the arrow ▼ in the top right-hand corner of the screen and then tap Outbox.
Writing/reading an e-mail
When you want to save an e-mail message without sending it immediately
Tap Draft before performing step 5 above.
To check the contents of the draft e-mail, tap the arrow ▼ in the top right-hand corner of the screen and then tap Draft.
When you want to send the mail later in the Outbox
Tap or .
The e-mail messages which are stored in the Outbox category are sent all at once.
Writing/reading an e-mail
Sending/receiving an attachment
Attaching a document to your e-mail
You can send or receive an attached document such as address information from the Address Book or a memo from the Memo Pad using CLIE Mail.
1 Write an e-mail message.
2 Tap Attach.
The Attachments screen appears.

3 Tap the arrow ▼ and tap the desired type of document you want to attach.
- Address: address information from your Address Book
- Memo: a memo from your Memo Pad
The type of document which you can now attach to your e-mail appears, based on your selection.
4 Tap the document you want to attach.
5 Tap OK.
The e-mail edit screen appears.
6 Send your e-mail message.
Writing/reading an e-mail
Viewing an attached document
When address information from the Address Book or a memo from the Memo Pad is attached to an e-mail message, you can check the contents of the document while downloading it. If necessary, you can save the attached document on your CLIE handheld and add the information to your Address Book or Memo Pad database.
1 Download the e-mail message.
For details, see "Receiving a test e-mail" on page 12.
If you receive an e-mail message to which a document is attached, the Attach Document screen appears.
2 If you want to check the contents of the attachment, tap Preview.
The contents of the attached document appears.
After you check the contents, tap OK.
3 If you want to save the contents, tap Save.
The attached document is saved on your CLIE handheld and the information is added to your Address Book or Memo Pad database.
4 Tap OK.
Writing/reading an e-mail
Reading sent/received e-mail messages
Received or sent e-mail messages are stored on your CLIE handheld according to the category.
1 Rotate the JogDial navigation to select the CLIE Mail icon, then press the dial.
You can also start CLIE Mail by tapping the CLIE Mail icon directly. CLIE Mail starts and the e-mail list screen appears.
2 Tap the arrow ▼ in the top right-hand corner of the screen, then tap the category in which the e-mail message you want to read is stored.

The e-mail list screen of the selected category appears.
- Inbox:
- Outbox
- Trash
- Sent
- Draft
- Edit Categories
3 Rotate the JogDial navigation to select the e-mail message you want to read.
You can also tap the desired e-mail message directly.
The text of the e-mail message appears.
Managing your e-mail
Deleting e-mail
1 Rotate the JogDial navigation to select the CLIE Mail icon, then press the dial.
You can also start CLIE Mail by tapping the CLIE Mail icon directly. CLIE Mail starts and the e-mail list screen appears.
2 Tap the arrow ▼ in the top right-hand corner of the screen, then tap the category in which the e-mail message you want to delete is stored.
3 Tap
A check box ☐ appears to the left of the e-mail list.
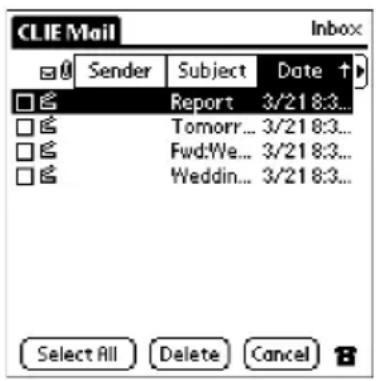
4 Tap and select the check box of the e-mail messages you want to delete.
5 Tap Delete.
E-mail messages you have selected are moved to the Trash category.
6 Tap the arrow ▼ in the top right-hand corner of the screen, then tap Trash.
The Trash e-mail list screen appears.
Managing your e-mails
7 Tap
A check box appears to the left of the e-mail list.
8 Tap and select the check box of the e-mail messages you want to delete.
9 Tap Delete.
The confirmation screen appears.
10 To delete the selected e-mail messages, tap OK.
E-mail messages you have selected are completely deleted.
To cancel the deletion of the selected messages
Tap Cancel in step 10 above.
The e-mail messages selected in step 4 are still stored in the Trash category.
If you want to check e-mail messages in the Trash category, tap the arrow ▼ in the top right-hand corner of the screen and then tap Trash.
You can delete messages simply using the Empty Trash command
By tapping Menu 📂 en Mail - then the Empty Trash command after you perform steps 1 to 5 above, you can delete all of the e-mail messages in the Trash category at once.
Managing your e-mails
Managing your e-mails using original categories
Making original categories
You can manage your e-mail messages using original categories you have chosen, such as Private, Business or New Project. To manage your e-mails using an original category, first create the desired category and then use it to manage your e-mail.
1 Tap the arrow ▼ in the top right-hand corner of the screen, then tap Edit Categories.
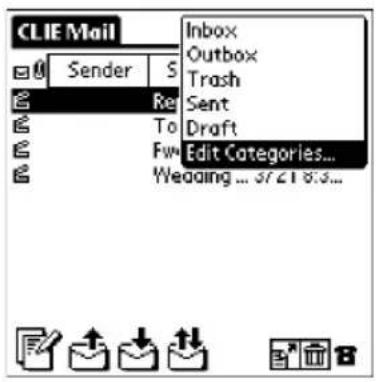
The Edit Category screen appears.
2 Tap New.
The Edit Category screen appears.
3 Enter a new category name, then tap OK.
Your original category will be registered.
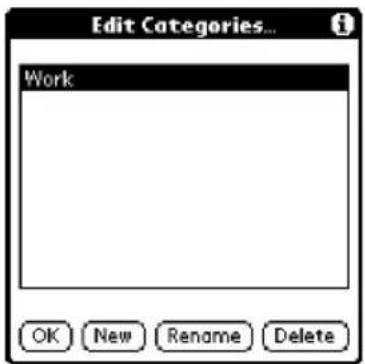
4 Tap OK.
Managing your e-mails
Managing your e-mail messages using original categories
As an example, move the e-mail messages in the Inbox category to an original category you have created.
1 Tap the arrow ▼ in the top right-hand corner of the screen, then tap Inbox.
The Inbox e-mail list screen appears.
2 Tap
A check box appears to the left of the messages in the e-mail list.

3 Tap and select the check box of the e-mail messages you want to move.
4 Tap Move and tap the category to which you want to move your e-mail messages.
E-mail messages you selected in step 3 are moved to the selected category.
To cancel the move
Tap Cancel in step 4 above.
You can move your e-mail messages automatically when downloading (Filter)
By setting a filter, you can refuse e-mail messages which meet specific conditions or move e-mail messages to a specific category automatically when you receive them.
This function is useful for e-mail messages from a particular person or for managing a mailing list.
Storing an e-mail from your computer
You can transfer e-mails from your computer to your CLIE handheld and read them on your CLIE's screen. You can not only read them, but also write a reply and send it from your computer.
Compatibility with other e-mail software
When you use the following e-mail client software, you can transfer e-mails from your computer and store them on your CLIE handheld.
• Microsoft Outlook Express
- Microsoft Outlook
• Eudora 3.0.3 or later
Note
You can only transfer e-mails in the Inbox and Outbox folders on your computer, and in the Inbox and Outbox categories on your CLIE handheld. You cannot transfer e-mails stored in other locations.
Storing an e-mail from your computer
Choosing the e-mail client software on your computer
To transfer an e-mail from your computer to your CLIE handheld, follow the procedures below.
Choosing the Microsoft Outlook Express 5.0 or later
1 Click Start - Settings - Control Panel.
The Control Panel window appears.
2 Double-click the Internet icon.
If you have the Windows 2000 operating system on your computer, double-click the Internet Options icon.
The Internet Options dialog box appears.
3 Click the Programs tab.
4 Make sure that Outlook Express is selected in the E-mail drop down list of the Internet programs group.
5 Click OK.
Choosing Eudora Pro
1 Start Eudora Pro on your computer, then click Options from the Tools menu.
The Options window appears.
2 Click MAPI in the left pane.
3 Click Always from Use Eudora MAPI server.
4 Click OK.
Storing an e-mail from your computer
Changing the detailed settings for transferring e-mails
You can change the detailed settings for transferring e-mails. For details, see Help files for the procedures below.
1 Click the 📄con in the Windows task tray, then click Modify Setting from the shortcut menu.
2 Double-click CLIE Mail.
Or, click Modify after clicking CLIE Mail.
The CLIE Mail window appears.
3 Click Help.
The Help window appears.
Storing an e-mail from your computer
Setting up the HotSync option on your computer
Specify the e-mail client software and mail folders for use in the HotSync transfer.
1 Double-click the CLIE Palm Desktop icon, or click Start - Program files - Sony CLIE - CLIE Palm Desktop.
The CLIE Palm Desktop software starts.
2 Click Setup from the HotSync menu.
3 Double-click CLIE Mail.
Or click Modify after clicking CLIE Mail.
The CLIE Mail window appears.

4 Click Synchronize the files or Overwrites handheld.
5 Select the e-mail client software you use from the drop-down list.
6 Click OK.
7 Click Finish.
Storing an e-mail from your computer
Setting up the HotSync option on your CLIE handheld
When you select the HotSync setting in step 4 in "Setting up the HotSync option on your computer" on page 29, you can specify various settings for transferring your e-mail.
1 Tap Menu on the e-mail list screen, then tap Options - HotSync Options.
The HotSync Options screen appears.

2 Select the e-mails to be transferred.
- All: transfers and synchronizes all e-mail messages. You can also specify how many day's worth of mail should be transferred.
- Send only: transfers e-mail messages in the Outbox category on your CLIE handheld to the Outbox folder of the e-mail client software on your computer.
- Filter: transfers e-mail messages that matches specific conditions. Specify the conditions under which messages are to be transferred, or not transferred.
- Unread: transfers unread e-mail messages on your computer to your CLIE handheld. You can also specify how many day's worth of mail should be transferred.
3 Tap OK.
Storing an e-mail from your computer
Transferring an e-mail
Place your CLIE handheld in the cradle, then press the HotSync button on the cradle.
HotSync starts and synchronizes your e-mail.
Advanced CLIE Mail operations
Sorting e-mails according to specific conditions (Filter)
You can specify filters to sort your e-mail automatically to specific categories when you receive e-mail.
By setting a filter, you can refuse e-mail messages which meet the specific conditions or sort e-mail messages, sending them to a specific category automatically.
1 Tap Menu 📋 the e-mail list screen, then tap Options - Filters.1
The Filter screen appears.
2 Tap New.
The Edit Filter screen appears.
3 Specify the filter setting.
- Filter name: enter the name of the filter.
- To: specifies the trigger that filters your e-mail. You can choose from among Subject, From and CC.
- Contains next strings: specifies characters or words that filter your email.
- Retrieve: specifies whether the filtered e-mail is to be received or refused.
- Move to: specifies the category to which the filtered e-mail is to be moved.

Advanced operations for CLIE Mail
4 Tap OK.
5 To activate the filter, tap and select the check box of the desired filter.
The selected filter is activated.
6 Tap OK.
The e-mail list screen appears.
To cancel filtering temporarily
Tap and deselect the check box of the filter in step 5 above.
To delete the filter
Tap Delete in step 4 above.
Tap OK after the confirmation screen appears.
Advanced operations for CLIE Mail
Receiving only part of an e-mail
You can choose to receive only the e-mail header, which contains the from, subject and date items, and so on, and just the beginning of the text. You can also choose to receive the remainder of the e-mail text for messages you want to read in their entirely. You can also specify the number of e-mail messages to be downloaded in a single connection.
Using this function, you can cut telecommunication costs, but still get the messages you need.
1 Tap or on the e-mail list screen.
The Receive screen appears.
2 Select the number of text lines you want to receive in one connection.
- All: downloads all of your e-mail.
- Headers + Bodies: downloads only the header, which contains the from, subject, and date items, and so on, and the beginning of the body text. You can specify the number of text lines you want to receive in one connection.
3 Select the number of e-mail messages you want to receive in one connection.
- All: downloads all of your e-mail messages.
- Most Recent: Specify the number of e-mail messages you want to download in one connection. If the number of e-mail messages on your mail server is more than the specified number, you will only receive e-mail messages up to the specified number.
4 When you want to use several filters at the same time, tap and check Use Filters for each one.
When using filters together, you receive only the e-mail messages which meet all of the filter conditions. For details of the filter, see page 32.
5 Tap OK.
Advanced operations for CLIE Mail
If you have chosen to receive only part of an e-mail message
"Download remainder of the message" check box appears at the end of the text.
If you want to receive the remainder of the message the next time you download your e-mail, tap and check the box. In the next time you download, you will receive the remainder of any selected e-mail.
Advanced operations for CLIE Mail
Registering a signature
You can register a mail signature.
After registering your signature, you can add it automatically when you send e-mail messages.
1 Tap Menu ☐ on the e-mail list screen, then tap Options - Signatures.
The Signatures screen appears.
2 Tap the arrow ▼, then tap the type of signature.

You can register up to 3 types of the signature.
This function is convenient for using different signatures in different situations.
3 Enter the signature, then tap OK.
The registered signature is automatically added to your e-mail messages.
To switch the signature
Tap the arrow ▼, then tap the type of signature you want on the signature screen.
To cancel the adding of the signature
Tap the arrow ▼, then tap No Signatures on the signature screen.
Advanced operations for CLIE Mail
Setting display options
Selecting the display order
In CLIE Mail, e-mail messages are displayed in order by date and time. You can also display e-mail messages by sender or subject.
Tap the column you want to sort by when displaying e-mail messages on the e-mail list screen.
E-mail messages are displayed in the selected order.
When you tap the same column again, e-mail messages are displayed in the reverse order.
Selecting the items displayed
In CLIE Mail, the sender, date and time and subject are displayed for each e-mail message. However, you can select which items are to be displayed.
1 On the e-mail list screen, tap the arrow ▶ on the right side of the e-mail screen.
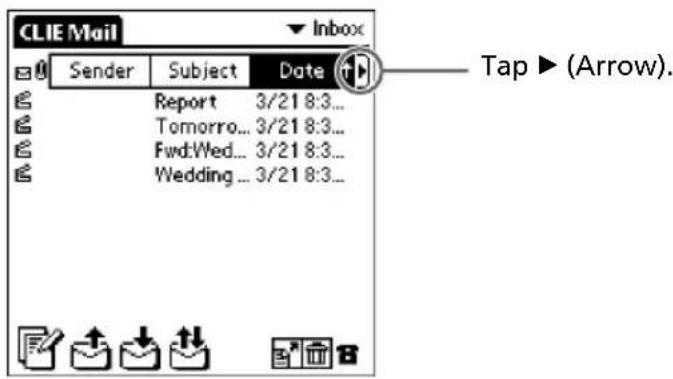
The Show Options dialog box appears.

2 Tap and select the check box next to the items you want to display on the e-mail list screen.
3 Tap OK.
The items you have selected are displayed.
Advanced operations for CLIE Mail
Switching mail accounts
You can switch the mail account you are currently using and receive/send e-mail using up to 8 accounts with CLIE Mail.
Note
You can receive e-mail from all mail accounts at once, but you can only send e-mails from one account at a time. If you want to send an e-mail message from different account, switch to the account you want to use and then send the e-mail message.
1 Tap Menu on the e-mail list screen, then tap Options - Accounts.
The Accounts screen appears.

2 Tap and select the check box of the account you want to activate.
3 To switch to the e-mail account you want to use to send a message, tap the desired account and then tap Set to Outgoing Server.
The Outgoing server changes to that of the selected account.
4 Tap OK.
CLIE Mail Menu items
The following items appear when you tap the MENU icon.
This section explains the menu commands specific to CLIE Mail. For the menu common to all CLIE applications, see “Using the Edit menu” in the Operating Instructions manual.
E-mail list screen
Mail menu
Empty Trash
Deletes all e-mail messages stored in the Trash category.
Options menu
Accounts
Shows the Account screen.
Preferences
Shows the Preference screen.
- Server Timeout: specifies the length of the timeout interval to be used when connecting to the mail server.
- Disconnect after send/receive: cuts the connection immediately after CLIE Mail sends/receives e-mail messages.
- Disconnect on Exit: cuts the connection after you exit CLIE Mail.
- Redial: specifies the number of redial attempts to be used when making a connection.
Signatures
Shows the Signature screen.
For details, see "Registering a signature" on page 36.
CLIE Mail Menu items
Show Options
Shows the Show Options screen.
You can choose whether or not to display the subject, sender and date and time. Tap and select the check box of items you want to display.
Filters
Shows the Filter screen.
For details, see “Sorting e-mails according to specific conditions (Filter)” on page 32.
HotSync Options
Changes the settings to be used for e-mail synchronization.
For details, see “Setting up the HotSync option on your CLIE handheld” on page 30.
E-mail screen
Options menu
Go to Top
Shows the beginning of the e-mail list.
Go to Bottom
Shows the end of the e-mail list.
E-mail edit screen
Edit menu
Keyboard
Shows the screen keyboard.
Graffiti Help
Shows the Graffiti Help screen.
CLIE Mail Menu items
Address edit screen
Edit menu
Keyboard
Shows the screen keyboard.
Graffiti Help
Shows the Graffiti Help screen.
Options menu
Lookup
Shows the Lookup screen.
- CLIE Mail Version1.0
- for CLIE MODEM
- Table of contents
- What you can do with CLIE Mail
- Checking your e-mail anytime, anywhere
- Managing your e-mail on your computer with your CLIE handheld
- Managing multiple mail accounts
- Managing your e-mails by category
- Attaching information to your e-mail messages
- Note
- Installing CLIE Mail
- Installing on your CLIE handheld
- Installing on your computer
- Sending a test e-mail message
- Writing and sending a test e-mail
- Sending and receiving a test e-mail
- Tap
- Enter the address, subject and body text.
- Tap Send.
- If you want to send the mail message immediately, tap Send Now, otherwise tap Send Later.
- When you want to save an e-mail message without sending it immediately
- When you want to send the mail later from the Outbox
- You can choose an e-mail address from the Address Book
- Using the screen
- Receiving a test e-mail
- Rotate the JogDial navigator to select the e-mail message you want to read, then press the dial.
- If the text of the message extends beyond the screen
- Writing/reading an e-mail
- Replying to an e-mail message
- Tap Reply.
- Enter the text of your message.
- Tap Send.
- When you want to send the mail later in the Outbox
- Rewriting/sending draft e-mail
- Forwarding an e-mail
- Sending/receiving an attachment
- Attaching a document to your e-mail
- Viewing an attached document
- Reading sent/received e-mail messages
- Managing your e-mail
- Deleting e-mail
- Managing your e-mails
- Tap
- To cancel the deletion of the selected messages
- You can delete messages simply using the Empty Trash command
- Managing your e-mails using original categories
- Making original categories
- Managing your e-mail messages using original categories
- To cancel the move
- You can move your e-mail messages automatically when downloading (Filter)
- Storing an e-mail from your computer
- Compatibility with other e-mail software
- Choosing the e-mail client software on your computer
- Choosing the Microsoft Outlook Express 5.0 or later
- Choosing Eudora Pro
- Changing the detailed settings for transferring e-mails
- Setting up the HotSync option on your computer
- Setting up the HotSync option on your CLIE handheld
- Tap Menu on the e-mail list screen, then tap Options - HotSync Options.
- Select the e-mails to be transferred.
- Tap OK.
- Transferring an e-mail
- Advanced CLIE Mail operations
- Sorting e-mails according to specific conditions (Filter)
- Advanced operations for CLIE Mail
- To cancel filtering temporarily
- To delete the filter
- Receiving only part of an e-mail
- If you have chosen to receive only part of an e-mail message
- Registering a signature
- To switch the signature
- To cancel the adding of the signature
- Setting display options
- Selecting the display order
- Selecting the items displayed
- Switching mail accounts
- CLIE Mail Menu items
- E-mail list screen
- Mail menu
- Empty Trash
- Options menu
- Accounts
- Preferences
- Signatures
- Show Options
- Filters
- HotSync Options
- E-mail screen
- Go to Top
- Go to Bottom
- E-mail edit screen
- Edit menu
- Keyboard
- Graffiti Help
- Address edit screen
Brand : SONY
Model : Clié PEGA-MD700
Category : Modem