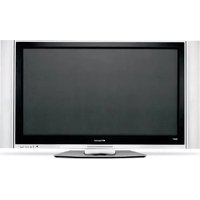
PLA-5048 - Television POLAROID - Free user manual and instructions
Find the device manual for free PLA-5048 POLAROID in PDF.


| Product Type | LED Television |
| Screen Size | 50 inches (127 cm) |
| Resolution | 1920 x 1080 (Full HD) |
| Refresh Rate | 60 Hz |
| Dimensions (without stand) | 112.5 x 65.4 x 8.5 cm (W x H x D) |
| Dimensions (with stand) | 112.5 x 70.2 x 24.5 cm (W x H x D) |
| Weight (without stand) | 10.2 kg |
| Weight (with stand) | 12.5 kg |
| Power Supply | 100-240 V, 50/60 Hz |
| Power Consumption (typical) | 100 W |
| Standby Power Consumption | < 0.5 W |
| Audio Output | 2 x 10 W |
| Connectivity | 2 x HDMI, 1 x USB, 1 x VGA, 1 x Composite AV, 1 x RF Input |
| Built-in Tuner | DVB-T2/C/S2 |
| Media Player | USB playback: video, music, photo |
| VESA Mount | 400 x 200 mm |
| Energy Class | A+ (EU) |
| Remote Control | IR remote included |
| Accessories Included | Remote control, batteries, power cord, stand base & screws, user manual |
| Cleaning Instructions | Use a soft, dry cloth. Do not use chemical cleaners. |
| Safety | Class II equipment; ensure proper ventilation |
| Spare Parts Availability | Remote, stand, power board (contact support) |
| Repairability Index | 7/10 (France) |
Frequently Asked Questions - PLA-5048 POLAROID
User questions about PLA-5048 POLAROID
0 question about this device. Answer the ones you know or ask your own.
Ask a new question about this device
Download the instructions for your Television in PDF format for free! Find your manual PLA-5048 - POLAROID and take your electronic device back in hand. On this page are published all the documents necessary for the use of your device. PLA-5048 by POLAROID.
USER MANUAL PLA-5048 POLAROID
50" HD Plasma TV with ATSC Tuner
PLA-5048

Polaroid

natural_image
Front view of a Polaroid CRT monitor with a blank screen and control panel (no visible text or symbols on the screen)Polaroid. Add a little color to your life.
Since 1937, America has turned to Polaroid for their photography needs. Today, families look to Polaroid for consumer electronics that define the digital age: plasma and LCD TVs, portable and standard DVD players, digital cameras. And while our selection has changed, you'll still receive the same friendly, helpful service that made Polaroid an American icon. Congratulations on your new Polaroid Plasma TV purchase. To ensure your newPlasmaTVprovidesyouwithyearsofenjoyment,pleasereadthisguidecarefully.
Table of Contents
Important Information ....1
Important Safety Precautions 2
Setup 5
Identification of Controls 8
Connections 11
Basic Operations....17
Memorizing the Channels....18
Channel Selection ....20
Setting Picture 21
Setting Sound 22
Time Set and Sleep Timer ....23
Viewing Closed Captions 24
Setting Parental Control 5....2
Screen Setup for VGA(PC) Mode/Component Mode ....28
Troubleshooting ....29
Care and Maintenance....30
Specifications....31
Programming the Universal Remote Control ....32
WARNING: TO REDUCE THE RISK OF FIRE OR ELECTRIC SHOCK, DO NOT EXPOSE THIS APPARATUS TO RAIN OR MOISTURE.

CAUTION
RISK OF ELECTRIC SHOCK DO NOT OPEN

CAUTION-To reduce the risk of electric shock, do not perform any servicing other than that contained in the operating instructionsunlessyouarequalifiedtodoso.

The lightning flash with arrowhead symbol, within an equilateral triangle is intended to alert the user to the presence of uninsulated dangerous voltage within the product's enclosure that may be of sufficient magnitude to constitute riskofelectricshocktopersons.

The exclamation point within an equilateral triangle is intended to alert the user to the presence of important operating and maintenance (servicing) instructions in the literature accompanying the appliance.
This product utilizes tin-lead solder, and fluorescent lamp containing a small amount of mercury. Disposal of these materials may be regulated due to environmental considerations. For disposal or recycling information, please contact your local authorities or the Electronic Industries Alliance: www.eia.org
FCC STATEMENT
FCC Notice
PDP TV: A CLASS B digital device
This equipment has been tested and found to comply with the limits for a Class B digital device, pursuant to part 15 of the FCC Rules. These limits are designed to provide reasonable protection against harmful interference when the equipment is operated in a commercial environment.
This equipment generates, uses, and can radiate radio frequency energy and, if not installed and used in accordance with the instruction manual, may cause harmful interference to radio communications. Operation of this equipment in a residential area is likely to cause harmful interference in which casetheuserwillberequired to correct the interference at this own expense.
FCC CAUTION:
Pursuant to 47CFR, Part 15.21 of the FCC rules, any changes or modifications to this monitor not expressly approved by the manufacturer could cause harmful interference and would void the user's authority to operate this device.
WARNING: This is a CLASS B product. In a domestic environment this product may cause radio interference in which casetheuser may be required to take adequate measurement counterinterference.
Electrical energy can perform many useful functions, but it can also cause personal injuries and property damage if improperly handled. This product has been engineered and manufactured with the highest priority on safety. But IMPROPER USE CAN RESULT IN POTENTIAL ELECTRICAL SHOCK OR FIRE HAZARD. In order to prevent potential danger, please observe the following instructions when installing, operating and cleaning the product. To ensure your safety and prolong the service of your PDPTV product, pleaseread the following precautions carefully before using the product.
-
Read these instructions---All operating instructions must be read and understood before the product is operated.
-
Keep these instructions---These safety and operating instructions must be kept in a safe place for future reference.
3.Heedallwarnings---Allwarningsontheproductandintheinstructionsmustbeobservedclosely.
4.Followallinstructions---Alloperatinginstructionsmustbefollowed.
-
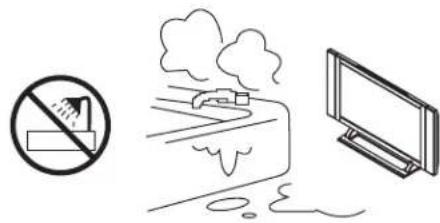
Do not use this apparatus near water---for example, near a bathtub, washbowl, kitchensink, orlaundrytub, inawetbasement, ornearaswimmingpool, and thelike. Do not use immediately after moving from a low temperature to high temperature environment, as this causes condensation, which may result in fire, electric shock, or other hazards.
-
Clean only with dry cloth---Unplug this product from the wall outlet before cleaning. Donotuseliquidcleanersoraerosolcleaners.Useadampclothforcleaning.
-
Ventilation---Do not block any ventilation openings. Install in accordance with the manufacturer instructions. The vents and other openings in the cabinet are designed for ventilation. Do not cover or block these vents and openings since insufficient ventilation can cause overheating and/or shorten the life of the product. Donot place the product on a bed, sofa, rug or other similar surface, since they can block ventilation openings. This product is not designed for built-in installation; do not place the product in an enclosed place such as a bookcase or rack, unless proper ventilation is provided or the manufacturer's instructions are followed.
-
Heat sources---Do not install nearany heatsources suchas radiators, heat registers, stoves, orotherapparatus(includingamplifiers)thatproduceheat.
natural_image
Illustration showing a no-smoking sign, a street scene with smoke and water, and a TV (no text or symbols)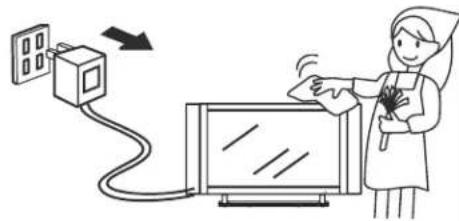
natural_image
Illustration of a medical procedure showing a nurse attending to a patient using a monitor and cable (no text or symbols present)

-
Grounding or Polarization---Do not defeat the safety purpose of the polarized or grounding-type plug. A polarized plug has two blades with one wider than the other. A grounding type plug has two blades and a third grounding prong. The wide blade or the third prong are provided for your safety. If the provided plug does not fit into your outlet, consult an electrician for replacement of the obsolete outlet.
-
Power cord protection---Protect the power cord from being walked on or pinched particularly at plugs, convenience receptacles, and thepointwheretheyexitfromtheapparatus.
-
Attachments---Only use attachments/accessories specified by the manufacturer. Do not use attachments not recommended by the manufacturer. Use of improper attachments can result in accidents.
-
Stand---Useonlywiththecart,stand,tripod,bracket,ortablespecifiedbythemanufacturer,or sold with the apparatus. Do not place the product on an unstable trolley, stand, tripod or table. Placing the product on an unstable base can cause the product to fall, resulting inserious personal injuries as well as damage to the product. When mounting the product on a wall, be sure to follow the manufacturer's instructions. Use only the mounting hardware recommended by the manufacturer.
-
Move carefully---When a cart is used, use caution when moving the cart/apparatus combinationtoavoidinjuryfrom tip-over.Suddenstops, excessiveforceand unevenfloorsurfaces cancausetheproducttofallfromthetrolley.
-
Lightning---Unplug this apparatus during lightning storms or when unused for long periods of time. For added protection for this television equipment during a lightning storm, or when it is left unattended and unused for long periods of time, unplug it from the wall outlet and disconnect the antenna. This will prevent damage to the equipment duetolightning and power-linesurges.
-
Servicing---Refer all servicing to qualified service personnel. Servicing is required when the apparatus has been damaged in any way, such as power-supply cord or plug is damaged, liquid has been spilled or objects have fallen into the apparatus, the apparatus has been exposedtorainormoisture, does not operateateronormally, or has been dropped.
-
Replacement parts---In case the product needs replacement parts, make sure that the service person uses replacement parts specified by the manufacturer, or those with the same characteristics and performance as the original parts. Use of unauthorized part scan result in fire, electric shock and/or other danger.
-
Overloading---Do not overload wall outlets, extension cords, or convenience receptacles on other equipment as this can result in a risk offireorelectricshock.
-
Entering of objects and liquids---Never insert an object into the product through vents or openings. High voltage flows in the product, and inserting an object can cause electric shock and/or short internal parts. For the same reason, donotspill water or liquid on the product.
-
Damage requiring service---If any of the following conditions occurs, unplug the power cord from the AC outlet, and request a qualified servicepersontoperformrepairs.
a. Whenthepowercordorplugisdamaged. b. Whenaliquidisspilledontheproductorwhenobjectshavefallenintotheproduct. c. Whentheproducthasbeenexposedtorainorwater. d. Whentheproductdoesnotoperateproperlyasdescribedintheoperatinginstructions.
Do not touch the controls other than those described in the operating instructions. Improper adjustment of controls not described in the instructions can cause damage, which often requires extensive adjustment work by a qualified technician.
e. If the product has been dropped orthecabinethas beendamaged in any way.
f. When the product displays an abnormal condition or exhibits a distinct change in performance. Any noticeable abnormality in the product indicates that the product need servicing.
-
Safety checks---Upon completion of service or repair work, request the service technician to perform safety checkstoensurethattheproductisinproperoperatingcondition.
-
Wall or ceiling mounting---When mounting the product on a wall or ceiling, be sure to install the product according to the method recommended by the manufacturer. This is as safety feature.

natural_image
Simple line drawing of a chair, no text or symbols present
natural_image
Silhouette of a person holding a large circle with a diagonal line, next to a small monitor and stand (no text or symbols)
-
Power source---This product is intended to be supplied by a listed power supply indicated on the marking label. If you are not sure of the type of power supply to your home, consult your product dealer or local power company. For added protection for this product during a lightning storm, or when it is left unattended and unused for long periods of time, unplug it from the wall outlet and disconnect the cable system. This will prevent damage to the product due to lightning and power line surges. When the unit has to be used with another power supply voltage, the power cable must be changed. Consult your product dealer. The socket outlet should be installed near the equipment and easily accessible. Use only the power cord designated by our dealer to ensure safety and EMC. When connecting other products such as VCRs and personal computers, you should turn off the power of the unit for protection against electric shock.
-
Panel protection---The PDP panel used in this product is made of glass. Therefore, it can break when the product is dropped or impacted upon by other objects. Be careful not to be injured by brokenglass pieces incasethe PDP panel breaks.

natural_image
Illustration of a prohibition symbol, a megaphone, and a TV with radiating lines (no text or symbols)24.Pixel defect---The PDP panel is a very high technology product, giving you finely detailed pictures. Occasionally, a few non-active pixelsmayappearonthescreenasafixedpointofblue,greenorred.Pleasenotethatthisdoesnotaffecttheperformanceofyourproduct.
Using the Remote Control
■ Usetheremotecontrolbypointingitowardstheremotesensorwindowoftheset. Objectsbetweentheremotecontrolandsensorwindowmaypreventproperoperation.
Note: This illustration is for reference only. The remote sensor may be in different locations on different models.

Cautions regarding use of remote control
■ Do not expose the remote control to shock. In addition, do not expose the remote control to liquids, and donotplaceinanareawithhighhumidity.
■ Do not install or place the remote control under direct sunlight. The heat may cause deformation of the unit.
■ The remote control may not work properly if the remote sensor window of the main unit is under direct sunlight or strong lighting. In such a case, changetheangleofthelightingorPDPTVset, oroperatetheremotecontrolclosertotheremotesensorwindow.
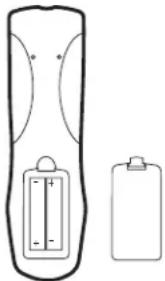
Batteries for the Remote Control
1 Openthebatterycover.

natural_image
Simple line drawing of a remote control with two buttons and a battery (no text or symbols)2 Inserttwosize-AAbatteries.
■ (Place the batteries with their terminals corresponding to the (+) and (−) indications in the battery compartment.)
natural_image
Simple line drawing of a remote control with battery and casing (no text or symbols)3 Replacethecover.

Precaution on battery use
Improperuseofbatteriescanresultinaleakageofchemicalsand/orexplosion.Besuretofollowtheinstructionsbelow.
■ Placebatteries with their terminals corresponding to the (+) and (−) indications.
■ Differenttypesofbatterieshavedifferentcharacteristics.Donotmixbatteriesofdifferenttypes.
■ Do not mix old and new batteries. Mixing old and new batteries can shorten the life of new batteries and/or cause old batteries to leak chemicals.
■ Remove batteries as soon as they are non-operable. Chemicals that leak from batteries can cause a rash. If chemical leakage is found, wipewithacloth.
■ Thebatteriessuppliedwiththeproductmayhaveashorterlifeexpectancyduetostorageconditions.
■ Iftheremotecontrolisnotusedforanextendedperiodoftime,removethebatteriesfromtheremotecontrol.
Power connection
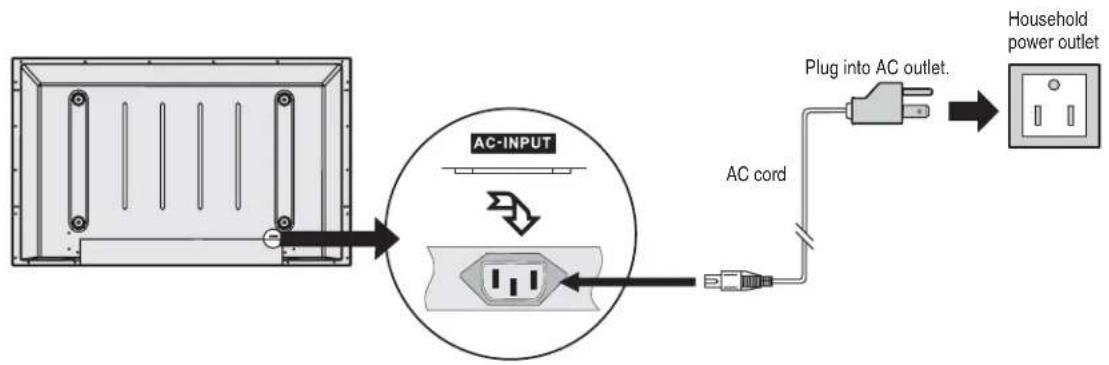
flowchart
graph TD
    A["AC INPUT"] --> B["AC cord"]
    B --> C["Plug into AC outlet."]
    C --> D["Household power outlet"]
- Connecting the female plug to the AC socket on the unit.
- Connecting themaleplugtothewalloutletasillustrated.
Note:
■ This product should be operated only from the type of power source indicated on the marking label.
■ Always unplug theAC cord from power outlet when not using for a long period of time.
Speaker connection

Note:
- Unplug the plasma display and all connected components before connecting the speakers
- The illustration may be different depending on model.
Antenna Connection
Cable TV (CATV) connection
A 75-ohm coaxial cable connector is built into the set for easy hookup. When connecting the 75- ohm coaxial cable to the set, screw the 75-ohm cable to the ANT. Terminal.
Some cable TV companies offer "premium pay channels". Since the signals of these premium pay channels are scrambled, a cable TV converter/descrambler is generally provided to the subscriber by the cable TV company.
This converter/descrambler is necessary for normal viewing of the scrambled channels. For more specific instructions on installing cable TV, consult your cable TV company. One possible method of utilizing the converter/descrambler provided by your cable TV company is explained below. Please note: An RF switch provided with two inputs (A and B) is required (not supplied).

flowchart
graph LR
    A["RF switch (not supplied)"] --> B["OUT"]
    B --> C["A IN B"]
    C --> D["Two-set signal splitter (not supplied)"]
    D --> E["Cable TV Line"]
    F["Cable TV converter/descrambler (not supplied)"] --> G["OUT"]
    G --> H["A IN B"]
    H --> I["Two-set signal splitter (not supplied)"]
    I --> J["Cable TV Line"]
"A" position on the RF switch (not supplied): You can view all unscrambled channels by using the TV's channel keys.
"B" position on the RF switch (not supplied): You can view the scrambled channels via the converter/descrambler by using the converter's channel keys.
Note:
Consult your Dealer or Service Center for the type of splitter, RF switch or combiner that might be required.
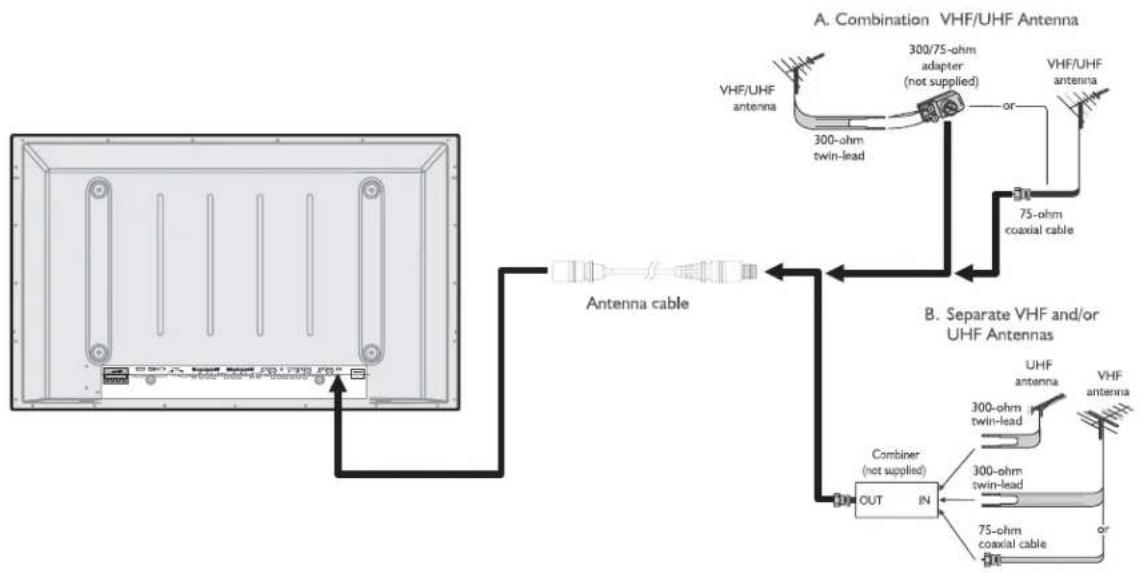
Antennas
The antenna requirements for good color television reception are more important than those for black & white television reception. For this reason, a good quality outdoor antenna is strongly recommended.
The following is a brief explanation of the type of connections that are provided with the various antenna systems.
-
A 75-ohm system is generally a round cable with F-type connector that can easily be attached to a terminal without tools (not supplied).
-
A 300-ohm system is a flat "twin-lead" cable that can be attached to a 75-ohm terminal through a 300-75-ohm adapter (not supplied).

Outdoor antenna connection
Use one of the following two diagrams if you connect an outdoor antenna.
A: Using a VHF/UHF combination outdoor antenna.
B: Using separate VHF and/or UHF outdoor antennas.
Connect the outdoor antenna cable lead-in to the ANT. terminal on the rear of the TV set.
flowchart
graph TD
    A["Device Array"] --> B["Antenna cable"]
    B --> C["Combiner (not supplied)"]
    C --> D["OUT IN"]
    D --> E["VHF/UHF antenna"]
    E --> F["300-ohm twin-lead"]
    F --> G["300/75-ohm adapter (not supplied)"]
    G --> H["or"]
    H --> I["VHF/UHF antenna"]
    I --> J["75-ohm coaxial cable"]
    J --> K["Antenna cable"]
    K --> L["Combiner (not supplied)"]
    L --> M["VHF/UHF antenna"]
    M --> N["300-ohm twin-lead"]
    N --> O["300/75-ohm adapter (not supplied)"]
    O --> P["or"]
    P --> Q["VHF/UHF antenna"]
    Q --> R["75-ohm coaxial cable"]
Main unit (front view)


1. POWER ⏻
Press this button to turn the unit ON from STANDBY mode. Press it again to turn the set back to STANDBY.
2. MENU
Press this button to access the MENU main page.
3. Volume /
Press the VOL ▶ or VOL ◀ button to directly increase or decrease the sound volume level. In OSD Menu, press these buttons to adjust the value or setting of each item
4. Channel ▲ ▼
Channel Down or up. In OSD Menu, press these buttons to choose the OSD items.
Note:
POWER ⏻ VOL ◀/ ▶, ▲ ▼/CHand MENU on the main unit have the same functions as the corresponding buttons on the remote control.
This operation manual provides a description based on operating functions with the remote control.
Main unit (rear view)


- Speaker output jacks
- RS232 control interface
For service only. The user cannot operate the unit through the RS232 terminals.
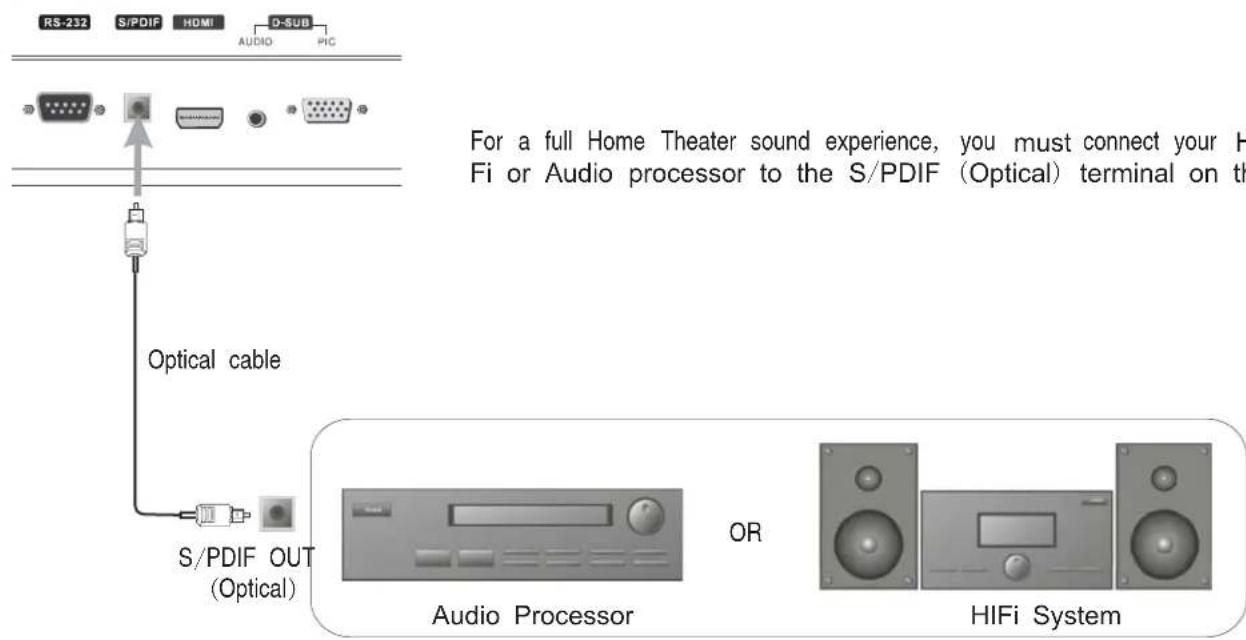
- S/PDIF digital audio out terminal (optical)
- HDMI input
To connect with those equipments with HDMI interface, for example, Set-top box or DVD player.
- D-Sub interface /Audio in
Connect with those equipments with D-Sub interface, for example, PC.
Connect the audio jacks as well with audio cable.
- Component inputs 1
Connect to the audio and component output jacks of a DVD player or Set-Top Box.
- Component inputs 2
Connect to the audio and component output jacks of a DVD player or Set-Top Box.
- AV outputs
Connect to the VCR input jacks to record programs.
-
Earphone jack
-
S-Video input
Receive a S-Video signal from external source such as VCR or DVD player.
- AV inputs 1
Receive a video/audio signals from external sources such as VCR or DVD player.
- AV inputs 2
Receive a video/audio signals from external sources such as VCR or DVD player.
- Antenna input
Allow you to connect cable or outdoor antenna.
- AC power input
Remote Control
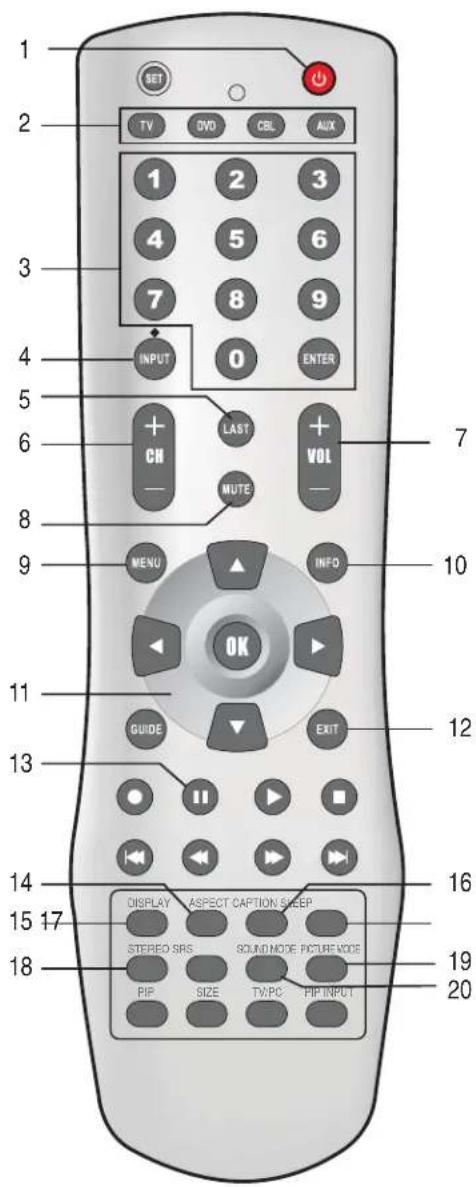
- POWER ⏻ Turn the unit on or off
- Toselectadditionalproductstobecontrolledwithremotecontrol Note: Thisremote control is an universal remote control. If your remote control does not work correctly when you operate the unit, pleasetrytopressTVbutton.
3.Direct channel selector/number buttons Usethesenumberbuttonstoselectchannelorinputpassword.
-
INPUT / ● To quickly select input source DOT( ) used to enter a program number for multiple program channels such as 2-1,2-2, etc.
-
LAST To quickly return to the previous channel
- CH+/- To select channels upward or downward
- VOL+/- Used to adjust volume.
8.MUTE Sound mute
-
MENU To access the Menu main page
-
INFO To display channel status or signal information
-
Menu navigation button: ▲▼◀▶ ▲▼: To move upward or downward in menu operation; ◀▶: To move left or right in menu operation; To adjust selected menu item in menu operation; OK button: To confirm or toggle between the settings of the selected menu item.
-
EXIT Used to exit the menu
-
STILL To freeze current picture
-
ASPECT To select screen aspect ratio
-
DISPLAY To display channel status or signal information
-
CAPTION To select closed caption mode
-
SLEEP To set Sleep timer
-
STEREO To select STEREO, SAP or MONO
-
PICTURE MODE To select the picture mode
-
SOUND MODE To select the sound mode
Connections
Cautions before connecting
● Carefullychecktheterminalsforpositionandtypebeforemakinganyconnections.
Theillustrationoftheexternalequipmentmaybedifferentdependingonyourmodel.
- Looseconnectorscanresultinimageorcolorproblems.Makesurethatallconnectorsaresecurelyinsertedintotheirterminals.
Refertotheusermanualoftheexternaldeviceaswell.
- Whenconnectinganexternaldevice,turnthepoweroffonthepaneltoavoidanyissues.
Connect an Audio Processor or Hi-Fi (Digital Audio)
Connect a VCR
How to connect:
Connect theAudio/Video cables between theAudio(L/R)/Video jacks on the unit and VCR.
Note: For better video, you can use the S-video terminal if your source supports it.
To play VCR
- Turn on your PDP TV, press INPUTComposite remote control to select S-Video if using S VIDEO terminal.
- Turn on your VCR, insert a videotape and press the Play button.
Y Yellow (VIDEO)
⑧ White (AUDIO L)
® Red (AUDIO R)

Rear of the VCR
Connect a Camcorder
Y Yellow (VIDEO)
W White (AUDIO L)
® Red (AUDIO R)

How to connect:
Connect the Audio/Video cables between the Audio (L/R)/Video jacks on the unit and camcorder.
To playback Camcorder
- Turn on your PDP TV, press INPUT Composite2 remote control to select
- Turn on your VCR, insert a videotape and press the Play button.
- Turn on your camcorder and set it to output mode. (For details, refer to your camcorder user manual.)
- Insert the tape into the camcorder and press Play button.
Note:
The operations of the camcorder may be different and is dependant on your model. Please read the user manual of your camcorder to confirm operation.
Connect a DVD player

flowchart
graph TD
    A["RS-232"] --> B["+"]
    C["SIPDIF"] --> D["+"]
    E["HDMI"] --> F["+"]
    G["AUDIO"] --> H["+"]
    I["PCI"] --> J["+"]
    K["COMPONENT INPUT 1"] --> L["+"]
    M["COMPONENT INPUT 2"] --> N["+"]
    O["Y C1/P2"] --> P["+"]
    Q["C/A"] --> R["+"]
    S["R-AUDIO-L"] --> T["+"]
    U["Y C2/P3"] --> V["+"]
    W["C/A"] --> X["+"]
    Y["R-AUDIO-L"] --> Z["+"]
    AA["HDMI cable"] --> AB["HDMI OUTPUT"]
    AC["HDMI OUTPUT"] --> AD["+"]
DVD player with HDMI interface
How to connect a DVD Player using HDMI Connection:
Connect the HDMI cable between the HDMI interface on the unit and HDMI output on the DVD player.
To play DVD
- Turn on your PDP TV, press INPUT button on the remote control to select HDMI.
- Turn on your DVD player, insert a DVD disc and press the Play button.
Note :
If the external device has DVI output only use a DVI to HDMI adapter cable to connect to the HDMI terminal Connect the audio cable to the AUDIO IN terminal of D SUB on the TV
Connect a DTV receiver
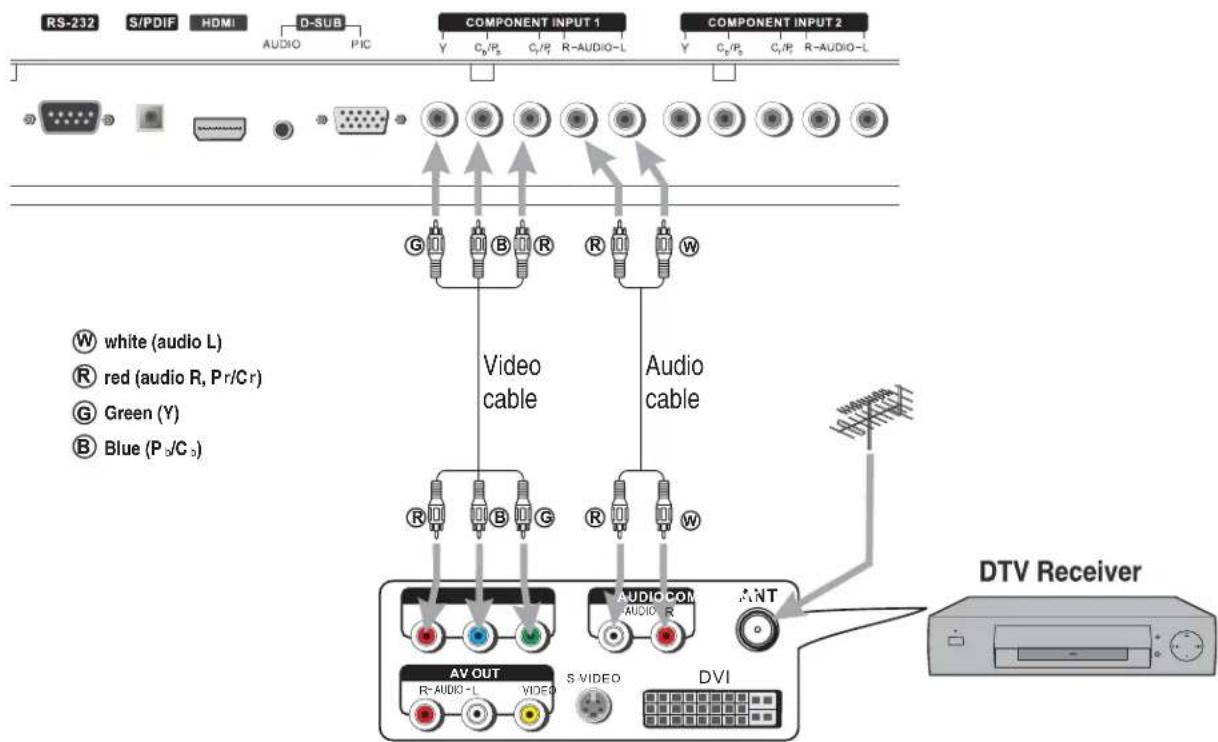
Rear of the DTV receiver
How to connect:
Connect the cable or antenna to the antenna input jack on the DTV receiver.
Connect the Video cable between the Y, Pb, Pr input jacks on the unit and Y, Pb, Pr output jacks on the DTV receiver.
Connect the Audio cable between the AUDIO input jack on the unit and AUDIO output jacks on the DTV receiver.
To Watch DTV
- Turn on your PDP TV, press INPUT Component remote control to select
- Turn on your DTV receiver.
Connect a PC

How to connect:
Connect a D-sub cable between the D-sub jack on the PC and the D-sub input jack on the unit. Connect an Audio cable between the AUDIO output on the PC and AUDIO input jack on the unit.
To Watch the PC screen
- Turn on your PDP TV, press INPUT but then to AMe remote control
- Turn on your PC and check for PC system requirements.
- Adjust the PC screen.
Connect a VCR (for recording) or external amplifier

How to connect:
Connect the Audio/Video cables between the Audio (L/R)/Video jacks on the unit and VCR.
$$ \circledcirc \text { or } \circledcirc $$
Connect the Audio cables between the Audio (L/R) jacks on the unit and external amplifier.
To record program
- Turn on your PDP TV, select a program you wish to record.
- Turn on your VCR, insert a videotape for recording.
- Press the Record button to begin recording.
To enjoy high-quality sound through an external amplifier
Note:
The operations of the amplifier may be different depending on model. Please read the user manual of your amplifier to confirm proper operation.
TheAV output terminals outputaudio/video signal inputted fromAntenna input orAV inputs.
Turning the Unit On and Off
Turning On
Insert the power cord into the wall outlet.
Press the Power button on the remote control, the unit will be turned on and you will be ready to use its features.
Turning Off
With the power on, press the button on the remote control to turn off. Power
Note: Power You can also set the button on the control panel on themain unit.
Viewing the Menus and Displays
This unit has a simple, easy-to-use menu system that appears on the screen. This system makes it convenient and fast to use features on the unit. The unit also lets you display the status of many of your TV features.
Menu navigation
1 With the power on, press the button to display the main menu.MENU
2 Press ▲ or ▼ button to select menu page.
3 Press OK or ▶ button to enter the menu page.
4 Within the menu, use▲,▼,◄ or ► to navigate or adjust.
Press OKor ► button to confirm, enter sub-menu or toggle the settings of the selected menu item.
5 Press MENU button to return to the previous level menu.
Press EXIT button to exit the main menu and return to your program.
Note: to clearly introduce the menu operations, this operation manual provides a description based on operation with theremote control.
Displaying Status Information
Press the INFO on the remote control, the unit will display current status information such as channel number or signal source, etc.
On-screen Menus Language Selection
1 Press MENU.
2 Press ▲ or ▼ to select Feature menu, press OK or ▶ to access the submenu.
3 Press ▲ or ▼ to select Menu Language item, press OK or ▶ to select your desired language.
4 Press EXIT button to return to TV viewing.

Selecting Input Source Signal
1 Navigate to the Feature menu and highlight Source.
2 Press OK or ▶ to select your desired input source.
Note: You may directly press INPUT button on the remote control to select input source.

TV ----SelectTVsignal.
Composite1----Select signal from AV INPUT1 terminals.
Composite2----Select signal from AV INPUT2 terminals.
Component1----SelectsignalfromCOMPONENTINPUT1terminals.
Component2----SelectsignalfromCOMPONENTINPUT2terminals.
VGA----SelectsignalfromD-SUBinputinterface.
HDMI----SelectsignalfromHDMinputinterface.
S-Video----Select signal from S-VIDEO input terminal.
This unit can automatically find all channels available through antenna or cable inputs, and store them in memory.
: Be sure to select the source before operationNote.TV
Selecting the Tuning Band
Before your TV can memorize the available channels, you must specify the type of signal source that is connected to the unit. (i.e., an antenna or cable system)
1 Press to display the menu main page.MENU
2 Press ▲ or ▼ repeatedly to select Setup menu.
3 Press OK or ▶ to access the submenu.
4 Press ▲ or ▼ to select Tuning Band item.
5 Press OK or ▶ to select the Tuning Band.

Air, Cable, Cable HRC, Cable IRC and Cable Auto can be selected.
◆ If using antenna, select Air;
If using cable, select one of Cable/Cable HRC/Cable IRC/Cable Auto according to your local area's cable system. Normally please select Cable Auto. (For further band information, contact your cable service provider.)
Auto Channel Search
1 Navigate to the Setup sub-menu and highlight Auto Ch Search.
2 Press OK or ▶ to begin the auto channel search. The unit will automatically search for all available TV/DTV (if using antenna), CATV/CADTV (if using cable) program.
Note: if you want to stop the auto-search, press EXIT button.

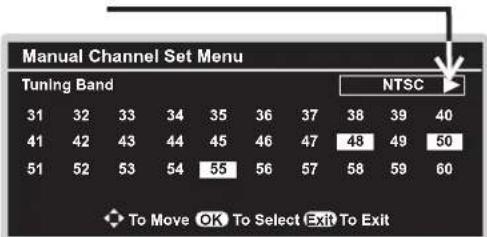
Manual Channel Set
After setting channels into memory, you can add or delete channels from the default channel list as follows:
1 Navigate to the Setup sub-menu and highlight Manual Ch Set.
2 Press OK or ▶ to open Manual Channel Set Menu sub-menu.
3 Use navigation buttons (▲, ▼, ◀ or ▶) to navigate and select, use OK button to add (the added channel will have a mark) or delete the channel. (If you want to toggle between NTSC and ATSC, use navigation buttons to highlight it, and then use OK to toggle
4 Press EXITbutton to exit.
Now when you use CH+/- buttons to cycle among the channels, the deleted channels can not be selected.


Note:
- For DTV program, you can only delete the programs from the list, you can not add it.
- You can make use of Manual Channel Set Menu to know whether an ATSC channel exists as a sub channel.
Use OK button to toggle between NTSC and ATSC after highlighted.
DTV Signal Strength
You can make use of DTV signal strength monitor to check how strong your DTV signal is and whether you need to adjust your antenna or digital cable input. The higher the signal strength, the less likely you are to experience picture degradation.
1 Navigate to the sub-menu and highlight .Setup DTV Signal
2 Press OK or to view the on-screen signal strength monitor to see the quality of the signal being received.


Channel Label Setup
If required, you can give a name to the programs.
Note: if a channel label is provided on the signal from the broadcasting station, the TV displays a short name for a DTV channel even if you didn't setup a label for the channel.
1 Navigate to the sub-menu and highlight .Setup Channel Labels
2 Press OK or ▶ to open Channel Labels Menu.
3 Within the menu, use ◀ / ▶ to move the highlight or cursor. Use ▲/▼ to toggle between NTSC and ATSC, or select channel number, or select character.
You may use OK button to return to the previous level menu.


4 To quit, press EXIT button.
Information about USA channel numbering
● ATSC PSIP channel has two part channel number:
— Major channel number Frequency
— Minor channel number⇒ Sub channel on frequency
- In USA, the major channel number is same for both analog and digital frequencies. (It is equal to the NTSC channel number for existing broadcasters.)
- In USA, a minor channel number of zero is used for a broadcaster's analog channel.
Channel Numbering Example
● Original NTSC Channels for Des Moines:
— 5, 8, 11, 13, 17
● Possible NTSC + ATSC Channels for Des Moines:
— 5-0, 8-0, 11-0, 13-0, 17-0 (channel numbers for existing analog channels, all on original NTSC analog frequencies)
— 5-1, 5-2, 8-1, 8-2, 8-3, 8-4, 13-1 (channel numbers for digital channels on three new digital frequencies)
Channel Selection
Using the Channel up/down buttons (CH+ or CH-)
Press the or to cycle among available channels found.CH+ CH-
Using the direct select buttons (0-9 and dot buttons)
Press the number because(01-9) to elchatoel.()
For example, if you want to select channel 8-3, just key in '8', '', '3' on the remote control.
Note:
- Whenyouusethenumberbuttons,youcandirectlyselectanychannelwithinthechannelrange.
- Insomesituationsvirtualchannelnumbershavenocorrespondencetophysicalfrequencies.
Using the LAST button
Press this button to switch between the current channel and the last viewed channel.
Customizing the Picture
1 Press to display the menu main page.MENU
2 Press ▲ or ▼ repeatedly to select Video menu.
3 Press OK or ▶ to access the submenu.
4 Within the menu, use▲,▼,◄ or ► to navigator adjust. Press OK or ► button to confirm, enter sub-menu or toggle the settings of the selected menu item.
5 Press EXIT button to exit.
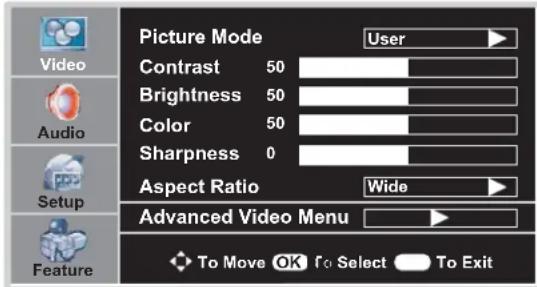
Notes :
The OSD illustration shown above is Video menu in RF(TV) mode.
The menu items may be different when the unit works in different mode.
| Option | Function Choice/remarks | ||
| Picture Mode | Selects a desired picture mode. | User/Nature/Soft/BrightNote: you may directly pressPICTURE MODEbutton onthe remote controlto select. | |
| Contrast | Adjusts image contrast. | ▸ : stronger▸ : weaker | |
| Brightness | Adjusts screen brightness for easier viewing of dark picture such as night scenes and black hair. | ▸ : lighter▸ : darker | |
| Color | Adjusts color saturation. | ▸ : stronger▸ : weaker | |
| Sharpness | Adjusts image sharpness and displays a sharp image. | ▸ : sharper▸ : softer | |
| Aspect Ratio | Selects screen aspect ratio. | Wide/Cinema/Normal/ZoomNote: you may directly pressASPECTbutton on the remote controlto select. | |
| Advanced Video Menu | Noise Reduction-Spatial Noise Reduction-Speckle Noise Reduction-Temporal | Reduces noise in the picture, commonly called snow. | On/Off |
| Tint | Adjusts tint for image. | ▸ : greenish▸ : purplish | |
| Color Temperature | Selects one of three automatic color adjustments. Sets to warm to enhance hotter colors such as red, or set to cool to see less intense colors with more blue. | Cool/Warm/Normal | |
| 3D Y/C | Selects 3D comb filter on/off, normally please select On. | On/Off | |
To still the picture
Press the STILL® button to hold on the image on the screen (the video sources are still operating). Press the button again to reactivate the image.
Note:
For the sake of protecting the screen, please do NOT still a picture for a long time.
Adjusting the Volume
Using the volume buttons (VOL+ and VOL-)
Press the or to or the volume. VOL + VOL - increase decrease
Using the Mute
At any time, you can temporarily cut off the sound using the MUTE button.
1 Press the button and the sound cuts off.MUTE
2 To turn mute off, press the button againMUTE.
Customizing the sound
1 Press MENUo display the menu main page.
2 Press ▲ or ▼ repeatedly to select Audio menu.
3 Press OK or ▶ to access the submenu.
4 Within the menu, use ▲,▼,◀ or ▶ to navigate or adjust. Press OK or ▶ button to confirm, enter sub-menu or toggle the settings of the selected menu item.
5 Press EXIT button to exit.

(The above menu is shown as an example. It is in TV mode and the signal is analog)
| Option | Function | Choice/Range/Remarks |
| Sound Mode | Selects sound mode. | User/News/Music/MovieNote: you may directly press SOUND MODE button on the remote control to select. |
| Bass | Adjusts Bass (low sounds) | ▸ : stronger▸ : weaker |
| Treble | Adjusts Treble (high sounds). | ▸ : stronger▸ : weaker |
| Balance | Adjusts volume balance (left and right volumes). | ▸ :Higher volume from right speaker.▸ :Higher volume from left speaker. |
| Earphone Vol | Adjusts earphone volume. | ▸ : stronger▸ : weaker |
| Digital Audio Output | Selects audio output mode from SPDIF.RAW:AC-3 in AC-3 out PCM:AC-3 in PCM outPCM in PCM out PCM in PCM out | RAW/PCM |
| MTS(In analog signal only) | Selects MTS (multi-channel TV sound) mode:Mono, Stereo and SAP (Second Audio Program). | The choice may be different in different situationNote: you may directly press STEREO button on the remote control to select. |
| Audio Language(In digital signal only) | Other languages may be available if a digital signal is provided by the broadcasting station. | The choice may be different in different situation |
Notes: the menu items may be different when the unit works in different mode.
Auto Clock Setup
- The time is set automatically from a digital channel signal.
- The digital channel signal includes information for the current time provided by the broadcasting station.
- Set the clock manually, if the current time is set incorrectly by the auto clock function.
1 Press to display the menu main page.MENU
2 Press repeatedly to select menu ress or to access the submenu.
OK▲▼
3 Highlight Time Set menuitem, press OK or to access the Time
4 Highlight Time Set Mode and then use OK or ▶ to select Auto.
5 Highlight Time Zone and then use OKor ▶ to select your viewing area time zone: Pacific, Alaska, Hawaii, Eastern, Central, Mountain.
6 Press EXIT button to return to TV viewing or press MENU button to return to the previous menu.
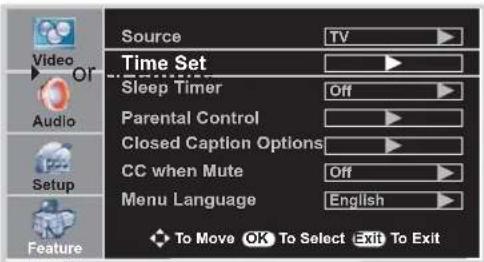

Exit
Manual Clock Setup
- If current time setting is wrong, reset the clock manually.
1 Navigate to theFeature sub-menu, highlightTime Set Mode and then use OK or ▶ to select Manual.
2 Press ▲ or ▼ to select either the Year, Date, or Time option. Once selected, use OK or ◀ / ▶ to set the year, date, and time options.
3 Press EXIT button to return to TV viewing or presMENU button to return to the previous menu.
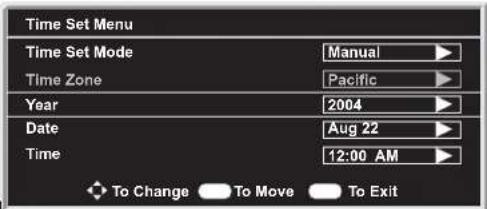
Note: if you power off the TV set, the clock will be reset.
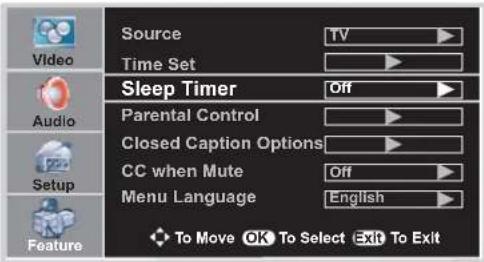
Sleep timer
Sleep timer lets you select the amount of time before your TV turns itself off automatically.
Navigate to the Feature sub-menu, highlight Sleep Timer and then use OK or ▶ to select the amount of time. To turn off sleep timer, select Off.
Note: you may directly press SLEEP button on the remote control to set sleep timer.
The unit decodes and displays the closed captions that are broadcast with certain TV shows. These captions are usually subtitles for the hearing impaired or foreign language translations. All VCRs record the closed caption signal from television programs, so home-recorded video tapes also provide closed captions. Most prerecorded commercial video tapes provide closed captions as well. Check for the closed caption symbol in your television schedule and on the tape's packaging
Note:
The Caption feature does not work with Component, VGA,HDMI.
Not all the programs and videos will offer closed captioning. Please look for the ☑ symbol to ensure that captions will be shown.
Analog Broadcasting System Captions
- Select a caption mode for displaying captioning information if provided on a program.
-Analog caption displays information on the screen usually the program's dialog.
Press CAPTIONbutton on the remote control to select caption mode: CC1, CC2, CC3, CC4, TEXT1, TEXT2, TEXT3 or TEXT4.
To turn off closed captioning, presCAPTIONOff to select.
The Closed Caption broadcasts can be viewed in two modes: CAPTION and TEXT. For each mode, four channels are available.
The [CAPTION] mode shows subscripts of dialogues and commentaries of TV dramas and news programs while allowing a clear view of the picture.
The [TEXT] mode displays various information over the picture (such as TV program schedule, weather forecast, etc.) that is independent of the TV programs.
Digital Broadcasting System Captions
- You may use CAPTION button on the remote control to select caption mode.
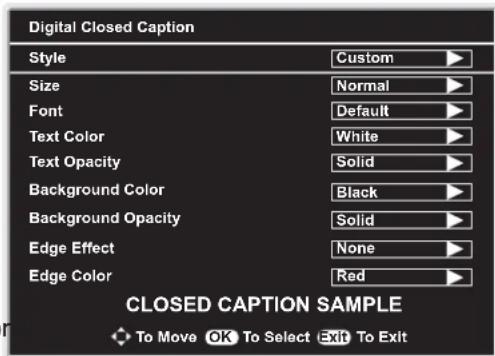
◆ You can customize the digital closed captions that appear on your screen.
1 Navigate to the Feature sub-menu, highlight Closed Caption Options and then use OK or ▶ to open the Digital Closed Caption sub-menu.
2 Highlight Style and then use OK or ▶ to select Custom.
3 Press ▲ or ▼ to select your desired item, and then use OK or ▶ to customize the Size, Font, etc. to your preference. A preview sample is provided at the bottom of the menu screen for you to see the effect.
◆ Size: Set the size the words will appear in.
◆ Font: Select a typeface for the words.
◆ Text Color: Choose a color for the text.
◆ Text Opacity: Specify the opacity for the text color.
◆ Background Color: Select a background color.
◆ Background Opacity: Select the opacity for the background color
◆ Edge Effect: Select an edge effect.
◆ Edge Color: Select a color for the edges.
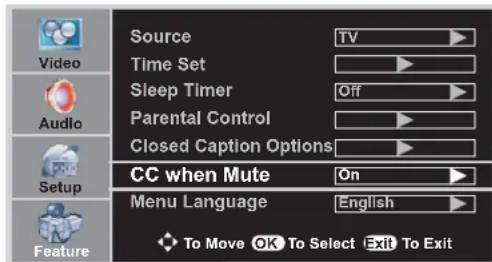
Setting CC When Mute
1 Navigate to the Feature sub-menu, highlight CC when Mute.
2 Press OK or ▶ to select On or Off.
When On is selected, the unit will automatically display closed caption when you mute the sound.

Parental Control
This function allows TV programs to be restricted and TV usage to be controlled based on FCC data. It prevents children from watching violent or sexual scenes that may be harmful.
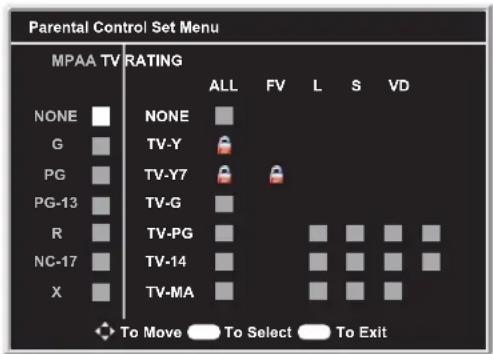
Restriction of TV programs includes two ratings that contain information about the program: the MPAA rating and the TV Parental Guidelines. The MPAA rating is restricted by age. TV Parental Guidelines are restricted by age and content.
Since a TV program may use either the MPAA rating or the TV Guidelines, both should be adjusted for complete control.
[1] Movie Rating (MPAA)
| Rating | ||
| age based | G | GENERALAUDIENCES. All ages admitted. |
| PG | PARENTAL GUIDANCE SUGGESTED. Some material may not be suitable for children. | |
| PG-13 | PARENTAL STRONGLY CAUTIONED. Some material may be inappropriate for children under 13. | |
| R | RESTRICTED. Under 17 requires accompanying parent or adult guardian. | |
| NC-17 | NO ONE 17 AND UNDERADMITTED. | |
| X | X Rating is an older rating that is unified with NC-17 but may be encoded in the data of older movies. | |
| NONE | NOT RATED. | |
Note:
TheMovieratingisonlyage-based.
Example 1:
"PG-13" in the age-based rating is blocked, this will automatically block the higher ratings "R", "NC-17", "X" also.

Example 2:
“R” in the age-based rating is blocked, this will automatically block the higher rating “NC-17”, “X” also.

[2] TV Rating
| Rating | ←content based → | |||||
| D | V | S | L | FV | ||
| age based | TV-Y (All children) | × | × | × | × | × |
| TV-Y7 (Direct to Older Children) | × | × | × | × | ● | |
| TV-G (General Audience) | × | × | × | × | ||
| TV-PG (Parental Guidance Suggested) | ● | ● | ● | ● | ||
| TV-14 (Parents Strongly Cautioned) | ● | ● | ● | ● | ||
| TV-MA (Mature Audience Only) | ● | ● | ● | |||
× —— Content Rating can be set but this Rating is not D: Sexually Suggestive Dialog normally broadcast by TV Station. V: Violence
● —— Content Rating can be set.
S: Sexual Situation
L: Adult Language
FV: Fantasy Violence
Note:
Age-basedratingscanbemodifiedbythecontent-basedratingsbutonlyinthecombinationsindicatedbyanin thetableabove.
Choosinglowerage-basedratingblocksthehigherage-basedratingsregardlessofcontentratingssettings.
Example 1:
When TV-Y in the age-based rating is set to BLOCK, this will automatically block the higher rating: TV-Y7.
Example 2:
When TV-G in the age-based rating is set to BLOCK, this will automatically block the higher ratings: TV-PG, TV-14, TV-MA.

Password Setup
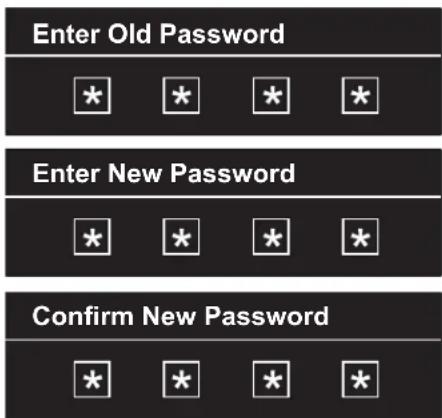
To use the Parental Control function, you first need to set your password.
1 Navigate to the sFeatureParentalControl and then use OK Parental Control Menuor to access.
2 Highlight and then use or to access.Password Change OK ▶
3 Input old password (4-digit, the preset password is 0000), then input a new password and then confirm again. Now your new password has been created successfully. Be sure to write down your password and retain it for future use.


MPAA Rating Setup
1 Navigate to theFeature sub-menu, highlightParental Control and then useOK Parental Control Menuor to access.
2 Highlight Parental Control Set and then use OK or ▶ to access.
3 Input your password correctly to access Parental Control Set Menu.
4 Within the menu, use ▲,▼,◄ or ► to navigate, use OK to block or unblock the rating.
When “PG-13” in the age-based rating is blocked, this will automatically block the higher ratings “R”, “NC-17”, “X” also.


TV Rating Setup
1 Navigate to theFeature sub-menu, highlightParental Control and otherwise OK Parental Control Menu
2 Highlight Parental Control Set and then use OK or ▶ to access.
3 Input your password correctly to access Parental Control Set Menu.
4 Within the menu, use ▲,▼,◄ or ► to navigate, use OK to block or unblock the rating.
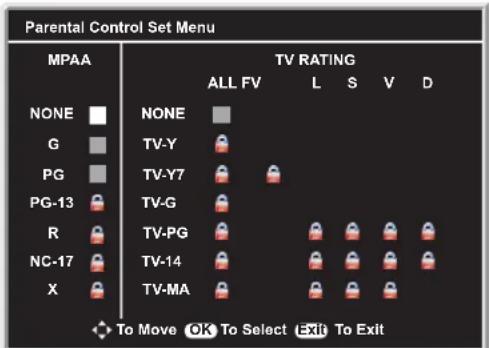
When TV-Y in the age-based rating is set to BLOCK, this will automatically block the higher rating: TV-Y7.
When TV-G in the age-based rating is set to BLOCK, this will automatically block the higher ratings: TV-PG, TV-14, TV-MA.
- Be sure to select the correct source (VGA or Component) before operation.
Customizing the picture
1 Navigate to the sub-menuVideo.
2 Within the menu, use to ▼, ◀ or ▶ navigate or adjust.
Press 🔒 Kutton to confirm enter sub-menu or toggle the settings of the selected menu item.


3 Press EXIT button to exit.
(Video menu in VGA mode)
(Video menu in Component mode)
| Option | Function | Choice/remarks | |
| Picture Mode | Selects a desired picture mode. | User/Nature/Soft/BrightNote: you may directly pressPICTUREMODEbutton on the remote control to select. | |
| Contrast | Adjusts image contrast. | ▸ : stronger▸ : weaker | |
| Brightness | Adjusts screen brightness for easier viewing of dark picture such as night scenes and black hair. | ▸ : lighter▸ : darker | |
| Color | Adjusts color saturation. | ▸ : stronger▸ : weaker | |
| Sharpness | Adjusts image sharpness and displays a sharp image. | ▸ : sharper▸ : softer | |
| Aspect Ratio | Selects screen aspect ratio. | Wide/Cinema/Normal/ZoomNote: you may directly pressASPECTbutton on the remote control to select. | |
| Advanced Video Menu | Noise Reduction--Spatial Noise Reduction--Speckle Noise Reduction--Temporal | Reduces noise in the picture, commonly called snow. | On/Off |
| Tint | Adjusts tint for image. | ▸ : greenish▸ : purplish | |
| Color Temperature | Selects one of three automatic color adjustments. Sets to warm to enhance hotter colors such as red, or set to cool to see less intense colors with more blue. | Cool/Warm/Normal | |
| 3D Y/C | Selects 3D comb filter on/off, normally please select On. | On/Off | |
| VGA Set (for PC mode) Component Set (for Component mode) | H-Pos | Adjusts the horizontal position of the image. | ▸ : rightward▸ : leftward |
| V-Pos | Adjusts the vertical position of the image. | ▸ : upward▸ : downward | |
| Clock | Adjusts the sample frequency. | ||
| Phase | Improves the focussing of stable image. | ||
| Setting | Selects and activates Preset to reset the adjusted values to original factory values. | ||
Before calling for repair service, check the following items for possible remedies to an encountered symptom.
| Symptoms | Check item |
| No power | Check that the AC power cord is plugged into themains socket.Unplug the power cord, wait for 60 seconds. Then re-insert plug into the mains socket and turn on the unit again. |
| No picture | Check video connections at the rear of the unit to see if it is properly connected to the unit.Adjust the contrast and brightness settings.Select a correct input.Is a non-compatible signal being input? |
| Good picture but no sound | Increase the VOLUME.Check that the unit is not muted. |
| Good sound but poor color | Adjust the contrast, color and brightness settings. |
| Poor picture | Sometimes, poor picture quality occurs when an activated S-VHS camera or camcorderisconnectedwhile another activated peripheral is connected. In this case, switch off one of the peripherals.Check whether the room is too bright. |
| Horizontal dotted line | This may be caused by electrical interference (e.g. hairdryer, nearby neon lights, etc.).Turn off the equipment. |
| Remote operation fails. | This remote control is a universal remote control. If the remote control does not work correctly when operating the monitor, try pressing the TV button.Check whether the batteries are working. Replace if necessary.Clean the remote control sensor lens on the unit.Do not use the remote control under strong or fluorescent lighting.The batteries should be inserted with polarity (+,-) aligned. |
| Snowy picture and noise | Check the A/V connections. |
| No stable or not synchronized VGA picture | Check if you have selected the correct VGA mode in your PC. |
| No output from one of the speakers | Adjust Balance in the SOUND menu. |
| Control buttons do not work. | Unplug the power cord, wait for afew seconds. Then re-plug the power cord and turn on the unit again. |
☐ Donotuseinhotandcoldrooms(locations)
- Whentheunitisusedinrooms(locations)withlowtemperature,thepicturemayleavetrailsorappearslightlydelayed. Thisisnot amalfunction,andtheunitwillrecoverwhenthetemperaturereturnstonormal.
- Donotleavetheunitinahotorcoldlocation. Also, donotleavetheunitinalocationexposedtodirectsunlightornearaheater, as thismaycausethecabinettodeformandthePDPpaneltomalfunction.
(Storage temperature: 0°C to +50°C Working temperature: 5°C to +40°C)
Note:
If your problem is not solved, turn your unit off and then on again.
Never attempt to repair a PDP TV yourself.
Plasma Display panel
| Symptoms | Check item |
| Somepartsofthescreendonotlightup. | The plasma display panel is manufactured using an extremely high level of precision technology, however, sometimes some parts of the screen may be missing picture elementsorhaveluminousspots.Thisisnotamalfunction. |
| After-imagesappear | Do not allow a still picture to be displayed for an extended period, as this can cause a permanentafter-imagetoremainonthePlasmaDisplay.Examples of still pictures include logos, video games, computer images, teletext and imagesdisplayedin4:3mode.Note:Thepermanentafter-image onthePlasma Display resulting fromfixed image use is not anoperatingdefect.Thisproductisnotdesignedtodisplayfixedimagesforextendedperiodsoftime. |
| Snapping sounds may be heard from the displayunit. | This sound is produced when the cabinet expands or contracts due to variations in temperatureandisnotamalfunction. |
Cleaning and Maintenance
The front of the display panel has been specially treated. Wipe the panel surface gently using only a cleaningclothorasyoft,lint-freecloth.
If the surface is particularly dirty, soak as soft, lint-free cloth in a weak detergent solution and then wring the cloth to remove excess liquid. Use this cloth to wipethesurface of the display panel, then wipe it evenly with adry cloth, of the sametype, until the surface is dry.
☑ Donotscratchorhitthesurfaceofthepanelwithfingernailsorotherhardobjects. Furthermore, avoidcontactwith volatile substances such as insect sprays, solvents and thinner, otherwise the quality of the surface may be adverselyaffected.
Ifthecabinetbecomesdirty, wipeitwithasoft,drycloth.
If the cabinet is particularly dirty, soak the cloth in a weak detergent solution and then wring the cloth dry. Use this cloth to wipe the cabinet, and then wipe it dry with adry cloth.
☑DonotallowanydetergenttocomeintodirectcontactwiththesurfaceofthePlasmaDisplay.
☑ Ifwaterdropletsgetinsidetheunit, operatingproblemsmayresult.
☑ Avoid contact with volatile substances such as insect sprays, solvents and thinner, otherwise the quality of the cabinetsurfacemaybeadverselyaffectedorthecoatingmaypeeloff. Furthermore, donotleaveitforlongperiods incontactwitharticlesmadefromrubberorPVC.
| Power supply: | AC 100-240V 50/60Hz |
| Power Consumption: | 400W |
| Screen: | 50” |
| Weight: |
Channel coverage:
| VHF | UHF | CATV | CADTV | DTV |
| 2-13 | 14-69 | 1~125 | 1~135 | 2~69 |
TV system: NTSC-M, ATSC
Accessories Operating manual X 1 Remote control unit X 1
Unit Dimensions (WxHxD) (inch) 62.2 x 37.6 x 15.8


natural_image
Technical line drawing of a mechanical component with vertical supports and mounting brackets (no text or symbols)
- Design and specifications are subject to change without notice.
- Weight and Dimensions shown are approximate.
- Specifications and external appearance may be changed for the sake of improvement.
Programming your Remote Control
Introduction
Your remote lets you control four devices with one easy-to-use, compact unit. After installing batteries, you can program the remote to control your Universal TV, VCR or DVD, Cable or Satellite Receivers, Amplifier or Tuner, and Auxiliary devices. To do so, follow the instructions in "Programming a Device". For best results, please read and follow all the remaining instructions. Keep this guide for future reference.
A Quick Look at Programming a Device
To control VCR or DVD, Cable or Satellite Receivers, Amplifier or Tuner, and Auxiliary devices, follow these steps. Before proceeding, find the codes for the devices you want to program in "Manufacturer's Codes" in pages 35-47 and write them down or highlight them.
NOTE: To program a DVD Player, TV/DVD Combo, TV/VCR/DVD Combo, portable DVD player, or mobile DVD player, use the DVD key.
- Turn on the device (for example, DVD player) and, if needed, load media (for example, a DVD).
- Press a device key (VCR/DVD, CBL/ SAT, or AUX).
- Press and hold SET until the red LED blinks twice; then release.
- Enter the first five-digit code for your device. The LED blinks once as each digit is entered. If the code is correct, the LED blinks twice.
NOTE: If the LED does not blink twice, repeat steps 2 to 4 and try entering the code again. - Aim the remote at the device and press Power. The device should turn off. If it does not, repeat steps 35, trying each code for your brand until you find one that works. If you cannot find a code that works, see "Searching for Your Code".
- Repeat steps 15 for the other devices you want to control. For future reference, write down each working device code below:
AUX Code:
CBL Code:
CD Code:
DVD Code:
SAT Code:
TNR Code:
VCR Code:
- Press set to save and exit
Searching for your Code
If your device does not respond to the remote after trying all codes listed for your brand, or if your brand is not listed, try searching for your code:
- Press a device key once.
- Press and hold SET until the red LED blinks twice; then release.
- Enter 9-9-1, then the device group number (0= Cable, 1= TV, 2= VCR, 3= Audio). The LED blinks twice.
- Aim the remote at the device and press Power. The remote sends IR codes from its library to the selected device, starting with the most popular code first. If the device responds, go to step 7.
- If the device does not respond, press CH+. The remote will try the next code. Continue until the device responds. ♦NOTE: Press CH- to try the previous code.
- To search for other device codes, repeat steps 1 to 5.
- Press to SETe and exit.
Checking the Codes
If you have set up the remote using the procedure in “Searching for Your Code”, you may need to find out which four-digit code is operating your equipment.
For example, to find out which code is assigned to your TV:
- Press on TV.
- Press and hold SET until the red LED blinks twice; then release.
- Enter 9-9-0. The LED blinks twice.
- To view the code for the first digit, press 1. Count the LED blinks (for example, three blinks = 3), and write down the number in the appropriate code listing in step 8 under "Programming a Device".
♦NOTE: If a code digit is 0, the LED does not blink. - Repeat step 4 for the four remaining digits, using 2 for the second digit, 3 for the third digit, 4 for the fourth digit, and for the fifth digit.
- To check for other device codes, repeat steps 15, substituting the device key for TV.
Changing Volume Lock
The remote comes preset to allow independent volume control of each selected device (Global Volume Unlock). However, you may change the Volume Lock setting to Global Volume Lock so that one device's volume will control volume in all other modes. After that, you can perform Individual Volume Unlock on a selected device to set its volume control for independent operation or Global Volume Unlock to remove all volume locking.
Locking Volume Control to One Mode (Global Volume Lock)
-
Press and hold SET until the red LED blinks twice; then release.
-
Enter 9-9-3 and then press the mode key for the device you want to control volume (for example, TV). The LED blinks twice. Now when you press VOL+, VOL-, or Mute, the selected device (for example, TV) will control the volume regardless of the current mode.
Unlocking All Volume Control (Restoring Global Unlock)
-
Press and hold SET until the red LED blinks twice; then release.
-
Enter 9-9-3 and then press VOL+. The LED blinks four times.
Volume is now independently controlled for all programmed devices.
Unlocking a Single Device's Volume Control
-
Press a device key (TV, VCR/DVD, CBL/ SAT, or AUX).
-
Press and hold SET until the red LED blinks twice; then release.
-
Enter 9-9-3 and then press VOL-. The LED blinks four times.
Volume is now independently controlled for the selected devices.
Troubleshooting
PROBLEM: LED does not blink when you press a key.
SOLUTION: Replace battery with one new 3.3 V 2032 Lithium battery.
PROBLEM: LED blinks when you press a key, but device does not respond.
SOLUTION: Make sure the remote is aimed at your device and is not more than 15 feet away.
PROBLEM: LED blinks one long blink.
SOLUTION: An entry error has occurred (for example, wrong key). Try entry sequence again.
PROBLEM: Remote does not control devices or commands are not working properly.
SOLUTION: Try all listed codes for the device. Make sure the device operates with an infrared remote control.
PROBLEM: CH+, CH-, La8T do not work for your RCA TV.
SOLUTION: Due to RCA design from 1983 to 1987, only the original remote control will operate these functions.
PROBLEM: No volume on a device.
SOLUTION: See "Changing Volume Lock".
PROBLEM: Channels do not change properly.
SOLUTION: If the original remote control required you to press Enter to change channels, press Enter on this remote after entering the channel number.
MANUFACTURER'S CODES
Set Codes for Audio Amplifiers
Bose 30674
GE 30078
JVC 30331
Marantz 30321
Nakamichi 30321
NEC 30264
Optimus 30395
Realistic 30395
Sansui 30321
Shure 30264
Sony 30689
Soundesign 30078
Victor 30331
Wards 30078
Yamaha 30354, 30133
Set Codes for Audio Amp/Tuners
ADC 30531
Aiwa 31405, 31243, 30121
Anam 31609, 31074
Audiotronic 31189
Bose 31229
Capetronic 30531
Carver 31189
Coby 31263
Denon 31360, 31142, 30904
Fonmix 31360
Glory Horse 31263
Harman/Kardon 30110
Hitachi 31273
Inkel 30027
Integra 30135
JBL 30110
JVC 30074, 31263
Kenwood 31313, 31570, 30027
KLH 31428
Magnavox 31189, 31269, 30531
Marantz 31189, 31269, 30039
MCS 30039
Onkyo 30842, 30135
Optimus 31023, 30670, 30531, 31074
Panasonic 31518, 30039
Philips 31189, 31269
Pioneer 31023, 30150, 30014, 30630, 30531
Proscan 31254
Qisheng 31609
Quasar 30039
RadioShack 31263
RCA 31023, 31609, 31254, 30531, 31074
Sharper Image 31263
Silsonic 30176
Sony 31258
Soundesign 30670
Stereophonics 31023
Sunfire 31313
Teac 31074, 31267
Technics 31308, 31518, 30039
Thorens 31189
Victor 30074
Wards 30014
Yamaha 30176, 31276, 31176
Set Codes for Cable Converters
ABC 00003, 00008, 00014
Americast 00899
Bell & Howell 00014
Bell South 00899
Clearmaster 00883
ClearMax 00883
Coolmax 00883
Daeryung 01877, 00877, 00477, 00008
Digi 00637
Director 00476
Dumont 00637
Gehua 00476
General Instrument 00476, 00810, 00276, 00003, 00014
GoldStar 00144
Hamlin 00009, 00273
Hitachi 00014
Jerrold 00476, 00810, 00276, 00003, 00012, 00014
KNC 00008
LG 00144
Memorex 00000
Motorola 00476, 00810, 00276, 01254, 01376
MultiVision 00012
Pace 01877,00237
00000, 00008, 00107
Panther 00637
Paragon 00000
Philips 00317, 01305
Pioneer 01877, 00877, 00144, 00533
Pulsar 00000
Quasar 00000
RadioShack 00883
Regal 00279, 00273
Runco 00000
00000, 00144
Scientific Atlanta 01877, 00877, 00477, 00008
Sony 01006
Starcom 00003, 00014
Supercable 00276
Supermax 00883
Tocom 00012
Torx 00003
Toshiba 00000
Trans PX 00276
Tristar 00883
TS 00003
V2 00883
Viewmaster 00883
Vision 00883
Vortex View 00883
Zenith 00000, 00525, 00899
Set Codes for CD Players
Aiwa 30157
Burmester 30420
California Audio Labs 30029
Carver 30157, 30179
Denon 30873
DKK 30000
DMX Electronics 30157
Dynamic Bass 30179
Fisher 30179
Garrard 30420
Genexxa 30032
Harman/Kardon 30157, 30173
Set Codes for Cable Converters
ABC 00003, 00008, 00014
Americast 00899
Bell & Howell 00014
Bell South 00899
Clearmaster 00883
ClearMax 00883
Coolmax 00883
Daeryung 01877, 00877, 00477, 00008
Digi 00637
Director 00476
Dumont 00637
Gehua 00476
General Instrument 00476, 00810, 00276, 00003, 00014
GoldStar 00144
Hamlin 00009, 00273
Hitachi 00014
Jerrold 00476, 00810, 00276, 00003, 00012, 00014
KNC 00008
LG 00144
Memorex 00000
Motorola 00476, 00810, 00276, 01254, 01376
MultiVision 00012
Pace 01877,00237
Panasonic 00000, 00008, 00107
Panther 00637
Paragon 00000
Philips 00317, 01305
Pioneer 01877, 00877, 00144, 00533
Pulsar 00000
Quasar 00000
RadioShack 00883
Regal 00279, 00273
Runco 00000
Samsung 00000, 00144
Scientific Atlanta 01877, 00877, 00477, 00008
Sony 01006
Starcom 00003, 00014
Supercable 00276
Supermax 00883
Tocom 00012
Torx 00003
Toshiba 00000
Trans PX 00276
Tristar 00883
TS 00003
V2 00883
Viewmaster 00883
Vision 00883
Vortex View 00883
Zenith 00000, 00525, 00899
Set Codes for CD Players
| Aiwa | 30157 | |
| Burmester | 30420 | |
| California Audio Labs | 30029 | |
| Carver | 30157, 30179 | |
| Denon | 30873 | |
| DKK 30000 | ||
| DMX Electronics | 30157 | |
| Dynamic Bass | 30179 | |
| Fisher | 30179 | |
| Garrard | 30420 | |
| Genexxa | 30032 | |
| Harman/Kardon | 30157, 30173 |
Hitachi 30032
Integra 30101
JVC 30072
Kenwood 30826, 30626, 30028, 30037, 30036, 30190
Krell 30157
Linn 30157
Magnavox 30157
Marantz 30626, 30029, 30157
MCS 30029
Miro 30000
Mission 30157
MTC 30420
NSM 30157
Onkyo 30868, 30101
Optimus 31063, 30000, 30032, 30037, 30420, 30179, 31075, 30145
Panasonic 30029
Parasound 30420
Philips 30626, 30157
Pioneer 31063, 31062, 30032
Polk Audio 30157
Proton 30157
QED 30157
Quad 30157
Quasar 30029
RadioShack 31075
RCA 31062, 30032, 30420, 30179, 30053
Realistic 30420, 30179
Rotel 30157, 30420
SAE 30157
Sansui 30157
Sanyo 30179
SAST 30157
Sharp 30861, 30037
Silsonic 30888, 30036
Sonic Frontiers 30157
Sony 30490, 30000, 30100
Soundesign 30145
TAG McLaren 30157
Tascam 30420
Teac 30420
Technics 30029
Victor 30072
Wards 30157, 30053
Yamaha 30888, 30036
Zonda 30157
Set Codes for DVD Players
| Aiwa | 20641, 21912 |
| Akai 20770 | |
| Allegro 20869 | |
| Apex Digital | 20672, 20717, 20797, 21061, 20796, 21056, 21937, 20794, 21020, 21915 |
| Blaupunkt | 20717 |
| Blue Parade | 20571 |
| Broksonic | 20695 |
| Changhong | 20627, 21061 |
| CineVision | 20869 |
| Coby | 21086 |
| Curtis Mathes | 21087 |
| CyberHome | 21024, 21023, 21129, 20816, 21117 |
| Daewoo | 20833, 21172, 20869 |
| Denon | 20490 |
| DVD2000 | 20521 |
| Emerson | 20591, 20675 |
Enterprise 20591
Fisher 21919
Funai 20675
Gateway 21158, 21073
GE 20522, 20717
Go Video
20744, 20833, 21099, 20783, 21075, 20869, 21730
Greenhill 20717
Harman/Kardon 20582, 20702
Hitachi 20573, 20664, 21919
Hiteker 20672
Initial 20717
Integra 20627, 21924
JBL 20702
JVC 20558, 20623, 20867
Kenwood 20490, 20534
KLH 20717, 21020, 21149
Koss
20651, 21980
Lasonic
20798
LG
20591, 20869, 20801
Liquid Video
21980
Lite-On
21158, 21058
Loewe
20511
Magnavox
20503, 20539, 21976, 21914, 20675
Marantz
20539
Memorex 20695
Microsoft
20522
Mintek
20717
Mitsubishi
21521, 20521
Nesa 20717
Norcent
21003
Onkyo
20503, 20627, 21924, 20792
Oritron 20651, 21980
Panasonic
20490, 21762, 21990
Philips
20503, 20539, 20646, 21914
Pioneer
20525, 20571
Polaroid
21086, 21061
Polk Audio
20539
Portland
20770
Proscan
20522
Qwestar
20651
RCA
20522, 20571, 20717, 20822
Rio
20869
Rotel 20623
Sampo 20752, 20698
Samsung
20490, 20573, 21932, 21075, 20820
Sansui
20695
Sanyo
20695
Sharp
20630, 20752
Sharper Image
21117
Sherwood
20770
Shinco 20717
Shinsonic
20533
20869, 21099
Sonic Blue
20533, 20864, 21033, 21904, 21903
Sony
[Non-Text]
Sylvania
20675
Symphonic
20675
Teac
20717, 21984, 20809
Technics
20490
Theta Digital
20571
Toshiba
20503, 20695
Urban Concepts
20503
Xbox
20522
Yamaha
20490, 20539, 20545
Zenith 20503, 20591, 20869
Set Codes for Satellite Receivers
| AlphaStar 00772 | |
| Chaparral 00216 | |
| Crossdigital 01109 | |
| DirecTV | 00392, 00566, 00639, 01142, 00247, 00749, 01749, 00724, 00819, 01856, 01076, 01109, 00099, 01392, 01640, 01442, 01414, 01108 |
| Dish Network System | 01005, 00775, 01505 |
Dishpro 01005, 00775, 01505
Echostar 01005, 00775, 01505
Expressvu 00775
GE 00566
General Instrument 00869
GOI 00775
Goodmans 01246
Hisense 01535
Hitachi 00819, 00222, 01250
HTS 00775
Hughes Network Systems 01142, 00749, 01749, 01442
| I-Lo | 01535 | |
| JVC | 00775 | |
| LG | 01414, 01226 | |
| Magnavox | 00724, 00722 | |
| Memorex | 00724 | |
| Mitsubishi | 00749 | |
| Motorola | 00869 | |
| NEC | 01270 | |
| Next Level | 00869 | |
| Panasonic | 00247, 00701 |
Paysat 00724
Philips 01142, 00749, 01749, 00724, 01076, 00722, 00099, 01442
| Proscan | 00392, 00566 |
Proton 01535
RadioShack 00869
RCA 00392, 00566, 00855, 00143, 01392
Samsung 01276, 01109, 01108
Sanyo 01219
SKY 00856
Sony 00639, 01640
Star Choice 00869
Tivo 01142, 01442
Toshiba 00749, 01749, 00790, 01285
UltimateTV 01640, 01392
Uniden 00724, 00722
US Digital 01535
USDTV 01535
Voom 00869
Zenith 00856, 01856
Set Codes for TVs
| Addison 10092 | |
| Admiral | 10093, 10463 |
| Advent | 10761, 10842 |
| Aiko | 10092 |
| Aiwa | 11914 |
| Akai | 10812, 10702, 10030, 10672, 11903 |
| Albatron | 10700, 10843 |
| America Action | 10180 |
| Anam | 10250, 10180, 10700 |
| Anam National | 10250, 10650 |
| Anhua | 10051 |
| AOC | 10451, 10093, 10180, 10060, 10030, 10178, 10092 |
| Apex Digital | 10748, 10765, 10879, 10767, 11943 |
| Audiovox | 10451, 10180, 10875, 10092, 10623 |
Baile 10661
Beijing 10812, 10661
Bell & Howell 10154
BenQ 11032
Bradford 10180
Broksonic
10236, 10463, 11911, 11938, 11905, 11935, 11929
Cailing 10748
Candle 10030
Carnivale 10030
Carver 10054
Celebrity 10000
Celera 10765
Changcheng 10051, 10661
Changhong 10156, 10765, 11156, 10767
Ching Tai 10092
Chun Yun
10000, 10180, 10700, 10092, 10843
Chung Hsin
10180, 10053
Cinema
10672
Citizen 10180
Commercial Solutions
11447, 10047
Conrowa
10156, 10145, 11156
Contec 10180
Craig
10180
Crosley
10054
Crown
10180
10047, 10054, 10154, 10451, 10093, 10060, 10702, 10030, 10145, 10166
CXC
10180
Daewoo
10154, 10451, 10180, 10030, 10178, 10672, 11928, 10092, 10661, 11909, 10623, 10700
Dayu
10661
Dell
11080
Denon 10145
Dumont
10017
Durabrand
10463, 10180, 10178, 10171, 11034
Electroband
10000
Emerson
10154, 10236, 10463, 10180, 10178, 10171, 11944, 11909, 11929, 11905, 11928, 10623, 11911
Envision
10030
Ether
10030
Firstar
10236
Fisher
10154
Fortress
10093
Fujitsu 10809, 10853
Funai
10180, 10171, 11904
Furi
10145
Futuretech
10180
Gateway 11756, 11755
GE
11447, 10047, 11454, 10051, 10451, 10180, 10030, 10178, 11917, 10092, 11907, 11922
Gibraltar 10017, 10030
GoldStar 10154, 10030, 10178, 11926
Grunpy 10180
Haier
11034
Hallmark 10178
Hankook
10180, 10030, 10178
Harley Davidson
11904
Harman/Kardon
10054
Harvard
10180
Havermy
10093
Helios
10865
Hello Kitty
10451
Hisense
10156, 10748, 10145, 11156
Hitachi
10156, 10030, 10178, 11145, 10145, 10092, 11904, 11156
Hongmei
10093
Huafa
10145
Huari
10145
Huodateji 10051
10661
Imperial Crown
Infinity 10054
Inteq 10017
JBL 10054
JCB 10000
Jean 10156, 10051, 10236, 10092
Jensen 10761
Jiahua 10051
Jinfeng 10051
Jinxing 10054, 10156, 10145
JVC 10053, 11923, 11253
Kangli 10661
KEC 10180
Kenwood 10030
KLH 10765, 10767
Kolin 10180, 10150, 10053
KTV 10180, 10030
Kunlun 10051, 10661
LG 10060, 10030, 10178, 10856, 10700, 10025
Lloyd's 11904
LXI 10047, 10054, 10154, 10156, 10178
Magnasonic 11928, 11913
Magnavox 11454, 10054, 10030, 10706, 11931, 11254, 11913, 11904, 11944
Magnin 11907
Marantz 10054, 10030, 10704
Matsushita 10250, 10650
Maxent 11755
Megapower 10700
Megatron 10178, 10145
Memorex 10154, 10463, 10150, 10178, 11911, 11926, 11924, 11920, 11927
MGA 10150, 10030, 10178, 11907
Midland 10047, 10017, 10051
Mitsubishi 10154, 10250, 10093, 10236, 10180, 11250, 10150, 10030, 10178, 11917, 10836
Monivision 10843, 10700
Motorola 10093
MTC 10060, 10030
Mudan 10051
Multitech 10180
NAD 10156, 10178, 10866
National 10051
NEC 10154, 10156, 10051, 10053, 10030, 10178, 11704
Newave 10093, 10178, 10092
Nikko 10030, 10178, 10092
Norcent 10748, 10824
NTC 10092
Onwa 10180
Optimus 10154, 10250, 10166, 10650, 11927, 11924, 11913
Optonica 10093
Orion 10236, 10463, 11929, 11911, 11905
Panasonic 10054, 10250, 10051, 10650, 11941, 11927, 11924
Panda 10051, 10706
Penney 10047, 10156, 10051, 10060, 10030, 10178, 11926, 11907
Philco 10054, 10180, 10030, 10178
Philips 11454, 10054, 10000, 10051, 10030, 10178, 10092, 10690
Pilot 10030
Pioneer 10166, 10866, 10679
Portland 10092
Prima 10761
Princeton 10700
Prism 10051
Proscan 11447, 10047, 11922
Proton 10030, 10178
Pulsar 10017
Qingdao 10051
Quasar 10250, 10051, 11924, 10650
RadioShack 10047, 10154, 10180, 10030, 10178, 11920, 11904
RCA 11447, 10047, 11454, 10000, 10030, 10178, 11547, 11922, 11917, 10092, 11907, 11948, 10090, 10679
Realistic 10154, 10180, 10030, 10178
Rowa 10748
Runco 10017, 10030
Sampo 10154, 10093, 10030, 10178, 10171, 10700, 10650, 11755, 10092
Samsung 10154, 10156, 10060, 10812, 10702, 10030, 10178, 11060, 10814, 10092, 11903, 10090, 10766
Sansui 10463, 11904, 11935, 11929, 11911
Sanyo 10154, 10156, 10180, 10145, 11907
Sanyuan 10093
Scotch 10178
Scott 10236, 10180, 10178
Sears 10047, 10054, 10154, 10156, 10178, 10171, 11926, 11904
Shaofeng 10145
Sharp 10093, 10030, 10650, 11917
Shen Ying 10092
Shencai 10145
Sheng Chia 10093, 10236
Skygiant 10180
Skyworth 10748
Sony 11100, 10000, 10650, 11925, 11904
Soundesign 10180, 10178
Sowa 10156, 10051, 10060, 10178, 10092
Squareview 10171
SSS 10180
Starlite 10180
Studio Experience 10843
Supreme 10000
SVA 10748, 10865
Sylvania 10054, 10030, 10171, 11944, 11931
Symphonic 10180, 10171, 11913, 11904
Synco 10000, 10451, 10093, 10060, 10178, 10092
Tacico 10178, 10092
Tandy 10093
Tashiko 10092, 10650
Tatung 10054, 10154, 10156, 10051, 10060, 11156, 11756, 11254
Technics 10250, 10051
Techwood 10051
Teco 10051, 10093, 10178, 10092
Teknika 10054, 10180, 10150, 10060, 10092
Telefunken 10702
Tera 10030
Thomas 11904
Tiane 10093
TMK 10178
TNCi 10017
Tobo 10748
Toshiba 10154, 10156, 10060, 10145, 11945, 11704, 11936, 11156, 11935, 10650, 11918
Tuntex 10030, 10092
TVS 10463
V Inc. 11756, 10885, 10864
Vector Research 10030
Victor 10250, 10053, 10650
Vidikron 10054
Vidtech 10178
Viewsonic 11755, 10885, 10864
Wards 10054, 10030, 10178, 10866, 11156
Warumaia 10661
Waycon 10156
White Westinghouse 10463, 11909, 10623
Yamaha 10030
Yapshe 10250
Zenith 10017, 10463, 10178, 11904, 11929, 11911, 11909, 10092
Set Codes for VCRs
ABS 21972
Admiral 20048, 20209
Aiko 20278
Aiwa 20037, 20479
Alienware 21972
America Action 20278
American High 20035
Amoisonic 20479
Anam 20162, 20037, 20240, 20278
Anam National 20162
Asha 20240
Audiovox 20037, 20278
Beaumark 20240
Bell & Howell 20104
Broksonic
20184, 20121, 20209, 20002, 20479
Calix 20037
Canon 20035
Carver 20081
CCE 20072, 20278
Changhong 20048, 20081
Citizen 20037, 20278
Colt 20072
Craig 20037, 20047, 20240, 20072
Curtis Mathes 20060, 20035, 20162
Cybernex 20240
CyberPower 21972
Daewoo 20045, 20104, 20278
Dell 21972
Denon 20042
DirecTV 20739
Durabrand 20039, 20038
Electrohome 20037
Electrophonic 20037
Emerex 20032
Emerson 20035, 20037, 20184, 20240, 20045, 20121, 20043, 20209, 20002, 20278, 20479
Fisher 20047, 20104
Fuji 20035, 20033
Fujitsu 20045
Gateway 21972
GE 20060, 20035, 20240
General 20045
Go Video 20432
GoldStar 20037, 20209, 20038, 20225
Haojie 20240
Harman/Kardon 20081, 20038
Harwood 20072
Hewlett Packard 21972
HI-Q 20047
Hitachi 20037, 20042, 20055
Howard Computers 21972
HP 21972
Hughes Network Systems 20042, 20739
iBUYPOWER 21972
JVC 20045, 20067
KEC 20037, 20278
Kenwood 20067, 20038
KLH 20072
Kodak 20035, 20037
Kolin 20043
LG 20037, 20045, 20042, 20209, 20038
Logik 20072
LXI 20037
Magnavox 20035, 20039, 20081
Magnin 20240
Marantz 20035, 20081
Marta 20037
Matsushita 20035, 20162
Media Center PC 21972
MEI 20035
Memorex
MGA 20240, 20043
MGN Technology 20240
Microsoft 21972
Mind 21972
Minolta 20042
Mitsubishi 20067, 20043
Motorola 20035, 20048
MTC 20240
Multitech 20072
NEC
Newave 20037
Nikko 20037
Noblex 20240
Northgate 21972
Olympus 20035
Optimus 21062, 20162, 20037, 20048, 20104, 20432
Orion 20184, 20209, 20002, 20479
Panasonic 21062, 20035, 20162, 20616, 20225
Penney 20035, 20037, 20240, 20042, 20038
Pentax 20042
Philco 20035, 20479
Philips 20035, 20081, 20739, 20618
Pilot 20037
Pioneer 20042, 20067
Polk Audio 20081
Profitronic 20240
Proscan 20060
Protec 20072
Pulsar 20039
Qisheng 20060
Quasar 20035, 20162
Radix 20037
Randex 20037
RCA 20060, 20035, 20240, 20042, 20880
Realistic 20035, 20037, 20048, 20047, 20104
ReplayTV 20616
Runco 20039
Sampo 20037, 20048
Samsung 20240, 20045, 20432
Sanky 20048, 20039
Sansui 20067, 20209, 20479
Sanyo 20047, 20240, 20104
Scott 20184, 20045, 20121, 20043
Sears 20035, 20037, 20047, 20042, 20104
Sharp 20048, 20209
Shintom 20072
Shogun 20240
Singer 20072
Sonic Blue 20616
Sony 20035, 20032, 20033, 20636, 21972
STS 20042
Sylvania 20035, 20081, 20043
Systemax 21972
Tagar Systems 21972
Tashiko 20037
Tatung 20045, 20067
Technics 20035, 20162
Teco 20035, 20037, 20048, 20038
Teknika 20035, 20037
Tivo 20636, 20618, 21503, 20739
TMK 20240
Toshiba 20045, 20042, 20067, 20043, 21503, 21008, 21972
Totevision 20037, 20240
Touch 21972
Unitech 20240
Vector 20045
Vector Research 20038
Victor 20067
Video Concepts 20045
Videomagic 20037
Videosonic 20240
Viewsonic 21972
Wards 20060, 20035, 20048, 20047, 20081, 20240, 20042, 20072
White Westinghouse 20209, 20072
XR-1000 20035, 20072
Yamaha 20038
Zenith 20039, 20033, 20209, 20479
ZT Group 21972
CARE
♦ Keep the remote dry. If it gets wet, wipe it dry immediately.
◆ Use and store the unit only in normal temperature environments.
◆ Handle the remote gently and carefully. Don't drop it.
◆ Wipe the remote with a damp cloth to keep it looking like new.

natural_image
Horizontal row of alternating blue and light blue vertical stripes (no text or symbols)
PRINTED ON
RECYCLED PAPER
- 50" HD Plasma TV with ATSC Tuner
- Polaroid. Add a little color to your life.
- Table of Contents
- CAUTION
- FCC STATEMENT
- FCC Notice
- PDP TV: A CLASS B digital device
- FCC CAUTION:
- Using the Remote Control
- Cautions regarding use of remote control
- Batteries for the Remote Control
- Inserttwosize-AAbatteries.
- Precaution on battery use
- Power connection
- Note:
- Speaker connection
- Antenna Connection
- Cable TV (CATV) connection
- Antennas
- Outdoor antenna connection
- Main unit (front view)
- POWER ⏻
- MENU
- Volume /
- Channel ▲ ▼
- Main unit (rear view)
- Remote Control
- Connections
- Cautions before connecting
- Connect a VCR
- How to connect:
- To play VCR
- Connect a Camcorder
- To playback Camcorder
- Connect a DVD player
- How to connect a DVD Player using HDMI Connection:
- To play DVD
- Note :
- Connect a DTV receiver
- To Watch DTV
- To Watch the PC screen
- To record program
- To enjoy high-quality sound through an external amplifier
- Turning the Unit On and Off
- Turning On
- Turning Off
- Viewing the Menus and Displays
- Menu navigation
- Displaying Status Information
- On-screen Menus Language Selection
- Selecting Input Source Signal
- Selecting the Tuning Band
- Auto Channel Search
- Manual Channel Set
- DTV Signal Strength
- Channel Label Setup
- Information about USA channel numbering
- Channel Numbering Example
- Channel Selection
- Using the LAST button
- Customizing the Picture
- Notes :
- To still the picture
- Adjusting the Volume
- Using the Mute
- Customizing the sound
- Auto Clock Setup
- Manual Clock Setup
- Sleep timer
- Analog Broadcasting System Captions
- Digital Broadcasting System Captions
- Setting CC When Mute
- Parental Control
- [1] Movie Rating (MPAA)
- Example 1:
- Example 2:
- Password Setup
- MPAA Rating Setup
- TV Rating Setup
- ☐ Donotuseinhotandcoldrooms(locations)
- Cleaning and Maintenance
- Ifthecabinetbecomesdirty, wipeitwithasoft,drycloth.
- Programming your Remote Control
- Introduction
- A Quick Look at Programming a Device
- Searching for your Code
- Checking the Codes
- Changing Volume Lock
- Locking Volume Control to One Mode (Global Volume Lock)
- Unlocking All Volume Control (Restoring Global Unlock)
- Unlocking a Single Device's Volume Control
- Troubleshooting
- MANUFACTURER'S CODES
- Set Codes for Audio Amplifiers
- Set Codes for Audio Amp/Tuners
- Set Codes for Cable Converters
- Set Codes for CD Players
- Set Codes for VCRs
- CARE
Brand : POLAROID
Model : PLA-5048
Category : Television