
FLM-2011 - Television POLAROID - Free user manual and instructions
Find the device manual for free FLM-2011 POLAROID in PDF.


| Product Type | 20-inch LCD Television |
| Screen Size | 20 inches (measured diagonally) |
| Resolution | 640 x 480 pixels |
| Brightness | 450 cd/m² (nit) |
| Contrast Ratio | 500:1 |
| Viewing Angle | 160° horizontal / 140° vertical |
| Power Consumption | 70W |
| Power Supply | AC 100-240V, 50/60Hz (via external adapter) |
| Dimensions (with stand) | 25.3" (W) x 7.1" (D) x 17.7" (H) |
| Weight | 20.9 lbs |
| TV System | NTSC-M |
| Audio Output | 8W (8Ω) built-in speaker |
| Inputs | Composite (AV), S-Video, VGA (D-sub 15-pin), YPbPr/YCbCr, Antenna (VHF/UHF/CATV) |
| Other Connections | AV output (for recording), Headphone jack |
| Parental Control | V-Chip (movie and TV ratings) with password protection |
| Closed Captioning | CC1-CC4, Text1-Text4 |
| Sleep Timer | Up to 240 minutes |
| Accessories Included | Remote control, AC adapter, AV cable, VGA cable, operating manual |
| Safety Features | Auto power-off after 15 minutes with no signal (when Blue Screen is on) |
| Cleaning | Wipe with soft dry cloth; use eyeglass cleaner for stubborn dirt; avoid alcohol or solvents |
| Operating Temperature | 5°C to 40°C (41°F to 104°F) |
| Storage Temperature | 0°C to 50°C (32°F to 122°F) |
Frequently Asked Questions - FLM-2011 POLAROID
User questions about FLM-2011 POLAROID
0 question about this device. Answer the ones you know or ask your own.
Ask a new question about this device
Download the instructions for your Television in PDF format for free! Find your manual FLM-2011 - POLAROID and take your electronic device back in hand. On this page are published all the documents necessary for the use of your device. FLM-2011 by POLAROID.
USER MANUAL FLM-2011 POLAROID
20" LCD Television FLM-2011
Operating Manual

natural_image
Front view of a black CRT computer monitor with a stand, placed on a white surface with textured fabric in the background (no visible text or symbols)Important Safety Information


The lightning flash with the arrowhead symbol within an equilateral triangle is intended to alert the user to the presence of uninsulated “DANGEROUS VOLTAGE” within the product’s enclosure that may be of sufficient magnitude to constitute a risk of electric shock to persons.

The Exclamation point within an equilateral triangle is intended to alert the user to the presence of important operating and maintenance (Servicing instructions in the literature accompanying the product).
Federal Communication Commission Information (FCC)
This Equipment has been tested and found to comply with the limits for a TV Broadcast Receiver, pursuant to Part 15 of the FCC Rules. These limits are designed to provide reasonable protection against harmful interference in a residential installation. This equipment generates, uses and can radiate radio frequency energy and, if not installed and used in accordance with the instructions, may cause harmful interference to radio communications. If this equipment does cause or receive interference, which can be determined by turning equipment off and on, the user is encouraged to try to correct the interference by one of the following measures:
Reorient or relocate the TV antenna
Increase the separation between TV and other equipment.
Connect TV into separate outlet from equipment.
Consult the dealer or an experienced radio/TV technician for help
FCC Caution: Any changes or modifications not expressly approved by the party responsible for compliance could void the user's authority to operate this equipment
Contents
Congratulations on your purchase of this LCD TV.
We recommend that you thoroughly read this manual before use to fully enjoy the many functions and excellent features of this set.
Retain this manual in an easily accessible location for future reference.
* Screen displays and illustrations in this manual may differ from the actual ones for better visibility.
Contents
Important safety cautions .... 1
Identification of controls ....3
Remote Control....5
Installation....7
Basic Operations ......14
Main OSD introduction 15
Channel setting....16
Selecting Channel ....18
Picture adjustment....19
Sound setting 20
System setting 22
OSD Setting 27
Timer setting....28
Operations in VGA/YPbPr mode....29
Troubleshooting ....31
Care and Maintenance....32
Specifications....33
Important Safety Cautions
When any unusual situation occurs, turn off the power supply at once and remove the plug from the wall outlet. Contact a qualified service department in your local area.
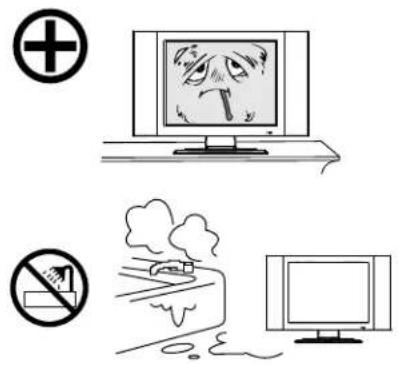
Do not expose this to rain or spattering liquids. Do not use this product near water - for example, near a bathtub, washbowl, kitchen sink, or laundry tub, in a wet basement, or near a swimming pool, and the like. Do not use immediately after moving from a low temperature to high temperature environment, as this causes condensation, which may result in fire, electric shock, or other hazards.
Heat sources-Keep the product away from heat sources such as radiators, heaters, stoves and other heat generating products (including amplifiers).
Requirement of environment temperature: 0°C\~50 C for storage; 5 C\~40 C for working
The vents and other openings in the cabinet are designed for ventilation. Do not cover or block these vents and openings since insufficient ventilation can cause overheating and/or shorten the life of the product.
Do not place the product on a bed, sofa, rug or other similar surface, since they can block ventilation openings.
This product is not designed for built-in installation; do not place the product in an enclosed place such as a bookcase or rack, unless proper ventilation is provided or the manufacturer's instructions are followed.
Unplug this product from the wall outlet before cleaning. Do not use liquid cleaners or aerosol cleaners. Use a damp cloth for cleaning.
Do not place the product on an unstable trolley, stand, tripod or table. Placing the product on an unstable base can cause the product to fall, resulting in serious personal injuries as well as damage to the product. Use only a trolley, stand, tripod, and bracket or table recommended by the manufacturer or sold with the product.


natural_image
Simple line drawing of a chair, monitor, and prohibition symbol (no text or labels)Important Safety Cautions
When relocating the product placed on a trolley, it must be moved with the utmost care. Sudden stops, excessive force and uneven floor surfaces can cause the product to fall from the trolley.
The power cords must be routed properly to prevent people from stepping on them or objects from resting on them. Check the cords at the plugs and product. Power-supply cords should be routed so that they are not likely to be walked on or snagged by items placed upon or against them. Pay particular attention to cords at doors, plugs, receptacles, and the point where they exit from the product. If the power cord or the plug is damaged contact a qualified service department for service.
Do not overload wall outlets, extension cords, or convenience receptacles on other equipment as this can result in a risk of fire or electric shock.
High Voltage exists in this TV set. Do not remove the cover.
In case the product needs replacement parts, make sure that the service person uses replacement parts specified by the manufacturer, or those with the same characteristics and performance as the original parts. Use of unauthorized parts can result in fire, electric shock and/or other danger.
The LCD panel used in this product is made of glass. Therefore, it can break when the product is dropped or impacted upon by other objects. Be careful not to be injured by broken glass pieces in case the LCD panel breaks.
Don't try to push anything into the cabinet or place any vessel with water on the TV set.
For added protection for this television equipment during a lightning storm, or when it is left unattended and unused for long periods of time, unplug it from the wall outlet and disconnect the antenna. This will prevent damage to the equipment due to lightning and power-line surges.

Identification of controls
Control buttons

- Power on/standby
- SOURCE: To select input signal
- MENU: To access menu
- VOL+/-: press to raise/lower the volume or adjust the selected item.
5.CH+/-:press to select a higher/lower numbered channel or cycle through the menus.
6.Power Indicator - Remote sensor
Note:
SOURCE, MENU, CH+/-, VOL+/- and POWER( ⏻ ) on the main unit have the same functions as the corresponding buttons on the remote control.
This operation manual provides a description based on operating functions with the remote control.
Identification of controls (continued)
Back

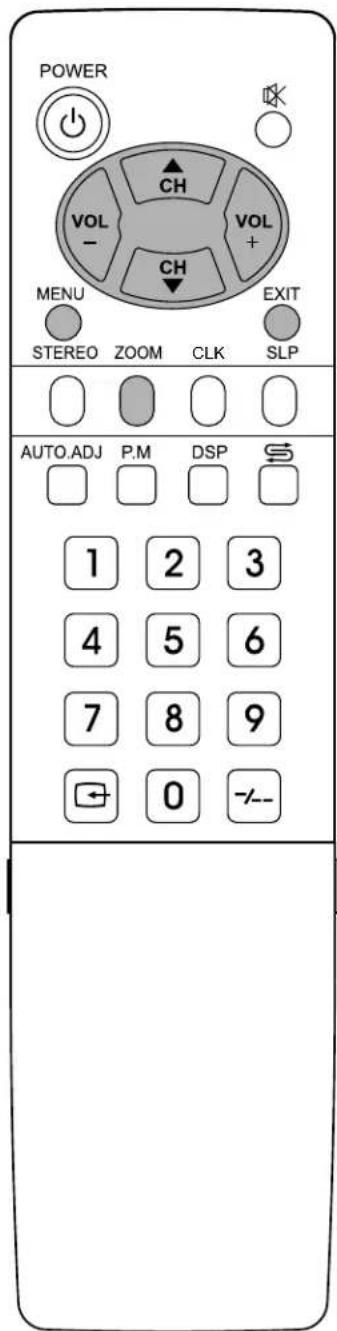
Remote Control

Preparing the Remote Control
Please install the batteries before using the remote control.
Batteries for the Remote Control
If the remote control fails to operate the LCD TV functions, replace the batteries in the remote control.
1 Open the battery cover.

natural_image
Illustration of a hand holding a coiled spring and a rectangular device with an arrow pointing to it (no text or symbols)■(Slide the cover while pressing down.)
2 Insert two size-AAA batteries.

■(Place the batteries with their terminals corresponding to the (+) and (-) indications in the battery compartment.)
3 Replace the cover and slide in reverse until the lock snaps.

natural_image
Illustration of a hand holding a coiled spring or scroll with an arrow indicating motion (no text or symbols)Effective range of the remote control


Notes:
-
When the remote control will not be used for a long period of time or when the batteries are worn out, remove the batteries.
-
Do not drop or dampen the remote control.
3.Do not disassemble the remote control.
4.There should be no obstacle between the TV and the transmitter.
-
Use the remote control within the effective range as shown in the figure on the left.
-
If the remote control does not work, please check whether the batteries are exhausted or if they have been installed properly.
-
When direct sunlight, and incandescent lighting, fluorescent lamp or any other strong light shines on the remote sensor of the TV, the remote operation can be come erratic.
8.Do not mix different types of batteries in the remote.
Antenna connections
OUTDOOR VHF/UHF ANTENNA CONNECTION (ANTENNA NOT INCLUDED)
Follow the instructions for the type of antenna system you intend to use. If using Cable or satellite, see the next page.
Combination VHF/UHF
Antenna (Single 75 Ohm cable Antenna (Separate VHF and or 300 Ohm twin-lead wire) UHF 300 Ohm twin-leads)
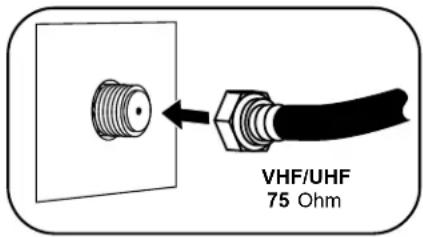
Connect the 75 Ohm cable from combination VHF/UHF antenna to the antenna jack.
OR
If your combination antenna has a 300 Ohm twin-lead wire, use a 300-75 Ohm matching transformer (NOT SUPPLIED).
Combination VHF/UHF
Antenna (Separate VHF and UHF 300 Ohm twin-leads)
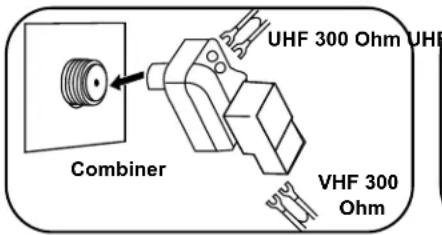
Connect the UHF twin-lead wire to a combiner (NOT SUPPLIED). Connect the VHF twin-lead to a 300-75 Ohm matching transformer (NOT SUPPLIED). Attach the transformer to the combiner. Attach the combiner to the antenna jack.

Connect the 75 Ohm cable from the VHF antenna and the UHF antenna twin-lead wire to a combiner (NOT SUPPLIED). Attach the combiner to the antenna jack.
NOTE: If your VHF antenna has a twin-lead wire use a 300-75 Ohm matching transformer, then connect the transformer to the combiner.
Cable (CATV)/satellite connections
This TV has an extended tuning range and can tune most cable channels without using a Cable TV converter box. Some Cable TV companies offer "premium pay channels" in which the signal is scrambled. Descrambling these signals for normal viewing requires the use of a descrambler device which is generally provided by the cable company.
FOR SUBSCRIBERS TO BASIC CABLE TV SERVICE
For basic cable service not requiring a converter/descrambler box, connect the CATV 75 ohm coaxial cable to the VHF/UHF jack on the rear of the TV.
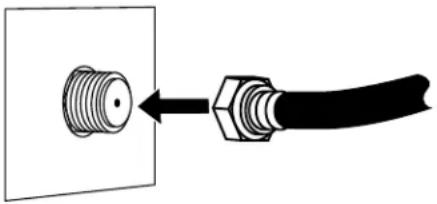
natural_image
Diagram showing a connector with threaded body and cable, no text or symbols presentFOR SUBSCRIBERS TO SCRAMBLED CABLE TV SERVICE OR SATELLITE
If you subscribe to a satellite service or a cable TV service which requires the use of a converter/descrambler box, connect the incoming 75 Ohm coaxial cable to the converter/descrambler box. Using another 75 Ohm cable, connect the output of the converter/descrambler or satellite box to the antenna jack on the TV. Follow the connections shown below. Set the TV/VCR to the output channel of the converter/descrambler or satellite box (usually 3 or 4) and use the converter/descrambler or satellite box to select channels.

FOR SUBSCRIBERS TO UNSCRAMBLED BASIC CABLE TV SERVICE WITH SCRAMBLED PREMIUM CHANNELS
If you subscribe to a satellite service or a cable TV service in which basic channels are unscrambled and premium channels require the use of a converter/descrambler box, you may wish to use a signal splitter and an A/B switch box (available from the cable company or an electronic supply store). Follow the connections shown below. With the switch in the "B" position, you can directly tune any nonscrambled channels on your TV. With the switch in the "A" position, tune your TV to the output of the converter/descrambler box (usually channel 3 or 4) and use the converter/descrambler box to tune

flowchart
graph LR
    A["INCOMING 75 Ohm CATV CABLE"] --> B["SPLITTER (NOT SUPPLIED)"]
    B --> C["CONVERTER/DESCRAMBLER (NOT SUPPLIED)"]
    C --> D["A/B SWITCH (NOT SUPPLIED)"]
    D --> E["75 Ohm CABLE"]
Power connection
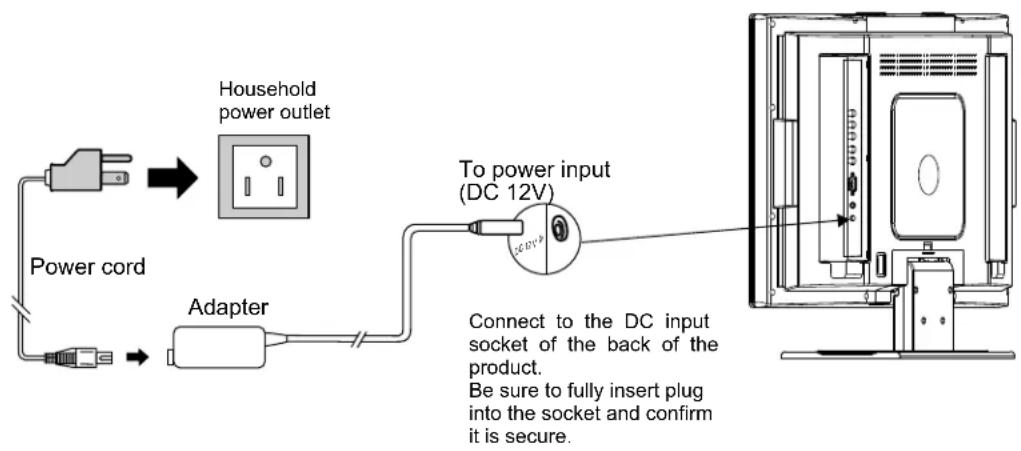
flowchart
graph TD
    A["Power cord"] --> B["Adapter"]
    B --> C["Household power outlet"]
    C --> D["To power input (DC 12V)"]
    D --> E["Connect to the DC input socket of the back of the product. Be sure to fully insert plug into the socket and confirm it is secure."]
-
Connecting the female plug to the AC socket on AC adapter.
-
Connecting the AC adapter to the DC power input of the set.
-
Connecting the male plug to the wall outlet as illustrated.
Note:
■Always turn off the Power to the LCD TV when connecting the AC adapter.
■ This product should only be operated with the type of power source marked on the label on the unit.
■ Always unplug the AC adapter from the product and power outlet when the LCD TV is not in use for an extended period of time of time.
■ The illustration of power cord and power outlet is only for your reference and may vary depending on your area.
Elevation adjustment
You can adjust the angle of the LCD TV as follows.
The elevation can be adjusted from -5^ to +10 average.
Installation(continued)
Notes about connection
- Carefully check the terminals for position and type before making any connections.
- Loose connectors will result in image or color problems. Make sure that all connectors are securely inserted into their terminals.
- When connecting an external device, turn off the power of the main unit first to prevent any possible damage.
Connecting the Video/Audio equipment
You can connect the unit to a DVD or VCR to enjoy playback with high quality picture and sound. Please refer to the instruction manual of the equipment to be connected.
Composite Video signal connection
Connect the composite video signal terminal on the TV to the output of AV equipment through composite cable. If you select the video signal, please set the input signal source of LCD TV to AV1/AV2 mode.

Note: Composite video is the most common used signal, but the picture quality is not as high as S-video.
S-VIDEO Signal Connection
Connect the S-video terminal on the TV to the output of AV equipment using a S-video cable. If you select S-video signal, please set the input signal source of LCD TV to SVIDEO mode.
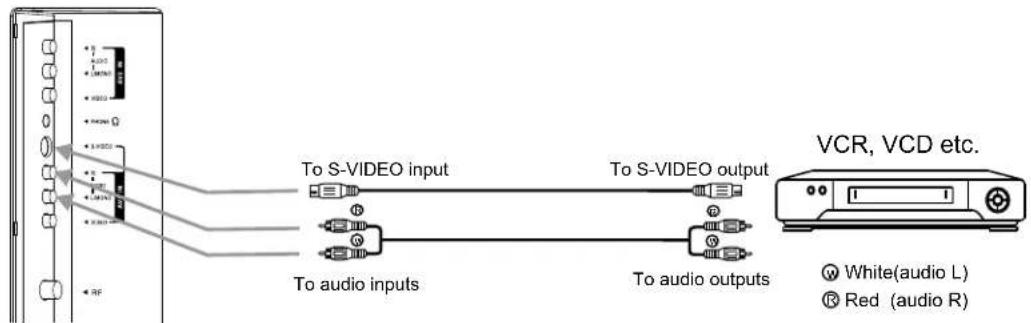
S-Video is a signal format which transfers the color and brightness of the picture with higher quality than a Composite connection. The S-Video signal connection is recommended to produce the best picture.
The PC input signal connection
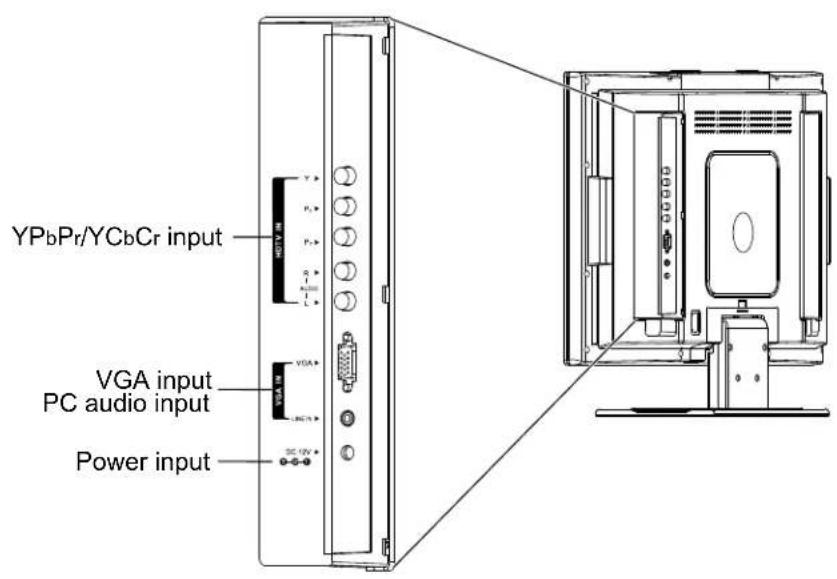
Connect the VGA(D-sub) input interface on the TV to the output of a PC through the D-sub 15 pin cable as illustrated. For the audio connection, use an audio cord that matches the audio output terminal on the computer.
If you select PC signal, please set the input signal source of LCD TV to VGA mode.

flowchart
graph LR
    A["Desktop Computer"] -->|To VGA output| B["Resistor"]
    A -->|To audio output| C["Switch"]
    B --> D["Resistor"]
    C --> E["Switch"]
    D --> F["Terminal Interface"]
    E --> F
    style A fill:#f9f,stroke:#333
    style F fill:#bbf,stroke:#333
Equipment with VGA output
Notes:
- The native display resolution is 640 x 480. If the signal resolution exceeds this resolution, it may not be possible to show fine detail with sufficient clarity.
- We strongly recommend that you set the refresh rate on the PC to 60Hz. If you set it above 60Hz, the unit may not display correctly. (Control Panel/Display Settings)
- Use the OSD to make final image adjustments.
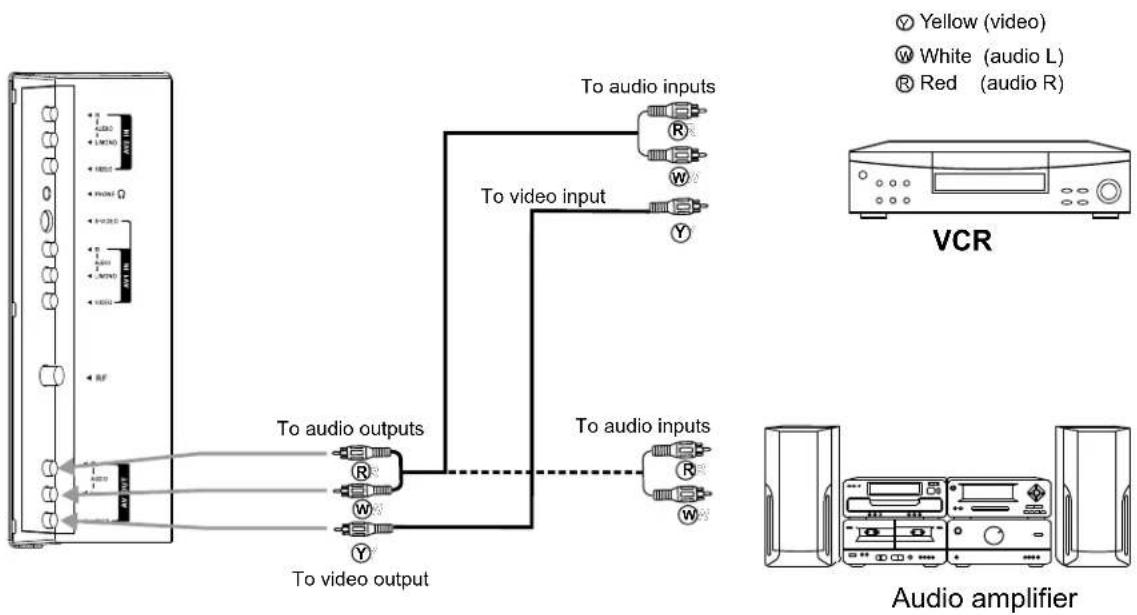
AV OUT connection
flowchart
graph TD
    A["Audio amplifier"] --> B["VCR"]
    B --> C["To video output"]
    C --> D["To audio outputs"]
    D --> E["To video input"]
    E --> F["To audio inputs"]
    F --> G["To audio outputs"]
    style A fill:#f9f,stroke:#333
    style B fill:#ccf,stroke:#333
    style C fill:#cfc,stroke:#333
    style D fill:#fcc,stroke:#333
    style E fill:#cff,stroke:#333
    style F fill:#ffc,stroke:#333
    style G fill:#cfc,stroke:#333
How to connect:
Connect the video/audio output terminals on the TV set to the signal input terminals of the VCR equipment or the video/audio input terminals on other TV set through a video/audio cable.
Connect the audio output terminals on the TV set to the Audio amplifier through audio cable.
How to record the TV program:
- Connect cables as shown above.
- Turn on the LCD TV and select source.
- Turn on the VCR and insert the tape.
- Select the video input from the VCR menu that corresponds to the AV in on the VCR.
- Press the "RECORD" button to begin recording.
How to enjoy high quality sound by Audio amplifier:
- Connect cables as shown above.
- Turn the volume of the Audio amplifier to minimum.
- Turn on the LCD TV and select source.
- Turn on the audio amplifier and adjust for a proper volume.
Installation(continued)
YPbPr input connection
Use the YPbPr input terminals on the TV set for better picture quality. Connect the audio outputs with the corresponding audio input terminals on the TV set.
If you select YPbPr signal, please set the input signal source of the LCD TV to YPbPr/YCbCr mode.

Notes:
The Y, Pb, Pr outputs on your DVD player are sometimes labeled Y, Cb, Cr. If so, connect the cables to like colors.
Basic Operations

Turning on
1 Connect the AC power and the standby indicator lights up and the unit is in STANDBY mode.
2 Press the POWER (⏻)button on the remote control or on the unit to turn on the TV set.
Turning off
1 With the power on, press the POWER (⏻) button to turn off the TV and put the TV in STANDBY mode.
2 If you want to turn off the power completely, unplug the power cord from the wall outlet.
Note: Do not switch the unit on and off quickly. The interval between switching on/off should at least 5 seconds.
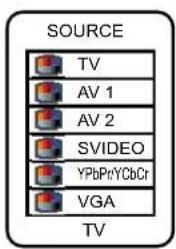
Selecting input signal
1 Press the SOURCE button on the unit or button on the remote control. The screen displays the menu as shown on the right.
2 Press CH▲/▼ to highlight your desired input signal source. Press VOL+/- or wait for about 4 seconds and the desired signal source will be selected.
Note: All buttons shown in the manual are located on the remote control unless otherwise indicated.
Main On-Screen-Display (OSD) introduction
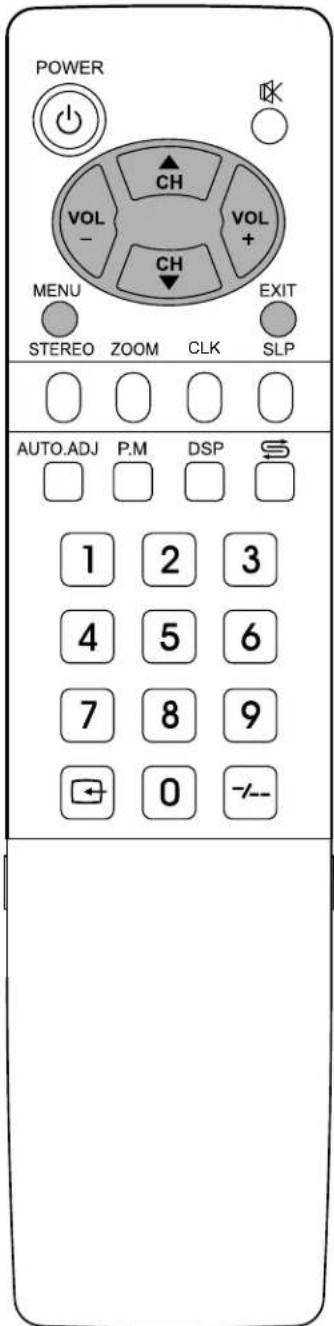
1 Press MENU button to display menu screen.
2 Press VOL+/- to select the menu.
3 Press CH▼ to access the menu.
4 Press CH▲/▼ to select the item.
5 Press VOL+/- to adjust the item.
6. Press EXIT button twice to exit the menu.
TV/AV/S-VIDEO MODE
Picture Setting Menu

System Setting Menu

Audio Setting Menu

Channel Setting Menu
OSD Setting Menu

Signal Information Menu

Note: in AV/S-VIDEO mode, Channel Setting menu can not be accessed and there is no MTS menu item in Audio Setting menu.
YPbPr/YCbCr/VGA MODE
Picture Setting Menu

Picture Position MENU

Audio Setting Menu

System Setting Menu

OSD Setting Menu

Signal Information Menu

Note: in YPbPr/YCbCr mode, there are no color temp and customer temp setting menu items in Picture Setting menu.
Operations (continued)
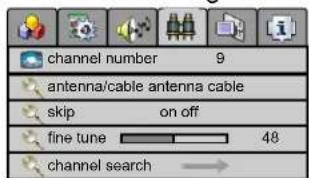
Channel Setting

Selecting antenna/cable
1 Access Channel Setting menu.
2 Press CH to select antenna/cable item.
3 Press VOL+/- button to select antenna or cable.

Please select antenna or cable before you start Auto Search. If the TV is connected to antenna, please select antenna. If the TV is connected to cable, please select cable.
Auto Search
Please access the Channel Setting menu first.
1 In Channel Setting menu, press CH button repeatedly to ▲/▼
2 Press VOL+/- to start Auto Search.
All active channels will be preset and stored into the memory automatically.


Operations (continued)
Channel Setting

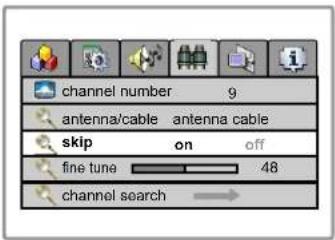
Skipping the program
After the Channel SEARCH, you can skip the channels that you won't watch when you press CH▲/▼ to change channels.
1 Select the channel number which you want to skip using the keypad.
2 Access the Channel Setting menu.
3 Press CH to setup item.
4 Press VOL+/- to select on. Later, when you press CH ▲/▼ to change channels, this channel will be skipped.
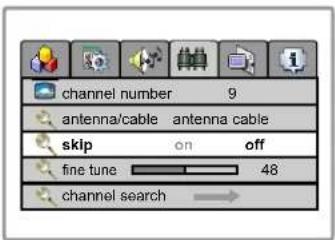
If you want to resume a skipped channel, use the keypad buttons to enter the channel, then access the Channel Setting menu and select skip, press VOL+/- to select off.
Later, when you press CH to change channels, the channel will be present.
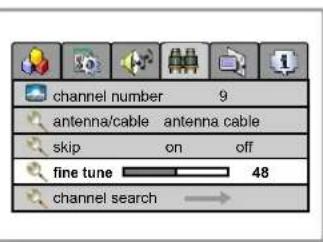
Fine tuning
Please access the Channel Setting menu first.
1 In Channel Setting menu, press CH button repeatedly to highlight Fine tune item.
2 Press VOL+/- to fine tune to achieve best picture and sound.
Operations (continued)
Selecting channel
Using Keypad buttons
1 To select one-digit channel numbers:
Input the channel using the 0-9 number button.
2 To select two-digit channel numbers:
Press -/-- to display "--", then input the channel.
3 To select three-digit channel numbers:
Press -/-- to display "----", then input the channel.
Note: The period between presses should be within 2 seconds.
Using Channel up/down buttons
1 Press CH ▲ button, the channel number increases;
2 Press CH▼ button, the channel number decreases.
NOTE: This feature works after a channel search is complete.
Using previous channel button
Press button to switch between the current channel and previous channel.
Operations Picture adjustment

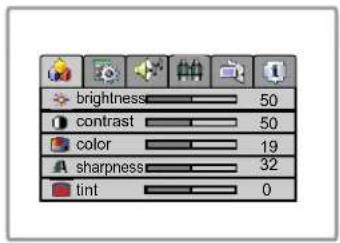
1 Access Picture Setting menu by pressing MENU.
2 Press CH▲/▼ to select the item that you want to adjust.
3 Pres s VO L+ /- to adjust t selected item.
| Item Function | Range | |
| brightness | To adjust picture's brightness | 0-100 |
| contrast | To adjust picture's contrast | 0-100 |
| color | To adjust picture's color | 0-36 |
| sharpness | To adjust picture's sharpness | 0-63 |
| tint | To adjust picture's tint | -32-+31 |
You can select picture mode by P.M button. There are four picture modes: Bright, Nature, Soft and User.

Bright: Select for a bright picture.
Nature: Select for a standard picture.
Soft: Select for a soft picture.
NOTE: Setting the unit to a Bright Picture with high brightness and contrast levels will cause picture quality loss.
Operations (continued)
Sound Setting

Selecting the MTS
1 Access the Audio Setting menu.
2 Press CH▲/▼ to select MTS item.
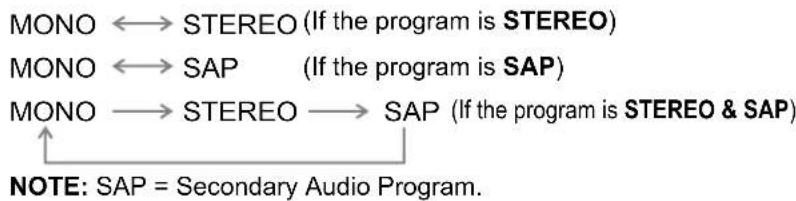
3 Press VOL+/- to select mono, stereo or SAP(secondary audio program).

You can also directly press STEREO button on the remote control to select the MTS. The MTS mode changes as follows:
flowchart
graph LR
    A["MONO"] --> B["STEREO (If the program is STEREO)"]
    C["MONO"] --> D["SAP (If the program is SAP)"]
    E["MONO"] --> F["STEREO → SAP (If the program is STEREO & SAP)"]
    G["NOTE: SAP = Secondary Audio Program."]
Adjusting volume
Press VOL+/- to adjust volume. Press VOL+ button, the volume increases. Press VOL- button, the volume decreases.

bar
| Category | Value | |---|---| | volume | 28 |Muting the sound
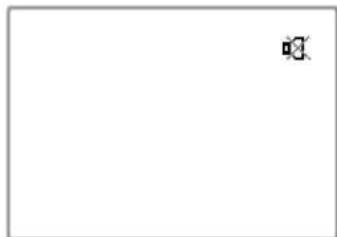
You can press the 📧 button on the remote control to mute the sound. Press the 📧 button again to restore. You can also press VOL+ to restore the sound.
Selecting the sound mode
You can press S.MODE button on the remote control to switch the sound mode between user, movie, music, and news.
Movie: Select for a movie program. Music: Select for a music program. News: Select for a speech or talk program. Custom settings mode in the Audio Setting OSD are saved under USER mode.
Operations (continued)
Sound Setting

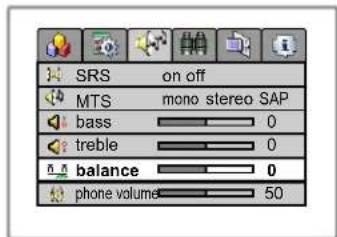
Adjusting the bass/treble
1 Access the Audio Setting menu.
2 Press CH▲/▼ to select bass or treble item.
3 Press VOL+/- to adjust the bass or treble.
You can press the Bass+/- buttons on the remote control to adjust the bass directly; and you can also press the Treb+/- buttons on the remote control to adjust the treble directly.
Adjusting the sound balance
1 Access the Audio Setting menu.
2 Press CH▲/▼ to select balance item.
3 Press VOL+/- to adjust the balance of the left track and right track.
Adjusting the SRS
1 Access the Audio Setting menu.
2 Press CH▲/▼ to select SRS item.
3 Press VOL+/- to select on or off.
SRS (Sound Retrieval System®) is an audio enhancement technology that restores the spatial cues that are present in a live listening environment and processes it to provide a natural 3D sound field.
* The SRS symbol is a trademark of SRS Labs, Inc.
SRS technology is incorporated under license from SRS Labs, Inc.
Adjusting the headphone volume
1 Access the Audio Setting menu.
2 Press CH▲/▼ to select phone volume item.
3 Press VOL+/- to adjust the headphone volume.



Operations (continued)
System setting
Blue screen setting
1 Access the System Setting menu.
2 Press CH▲/▼ to select blue screen item.
3 Press VOL+/- to select off or on.

If you select on, the screen displays blue background when there is no signal. If you select off, the screen displays static when there is no signal.
Note: Only when the blue screen is on, the set will turn off automatically after 15 minutes if there is no signal.
Backlight adjustment
1 Access the System Setting menu.
2 Press CH▲/▼ to select backlight item.
3 Press VOL+/- to adjust the backlight brightness.

Zoom mode adjustment
1 Access the System Setting menu.
2 Press CH▲/▼ to select zoom mode item.
3 Press VOL+/- to select between fill all or wide.
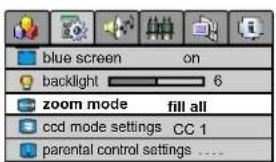
You can also press ZOOM button on the remote control to select the zoom mode.
NOTE:
Under the YPbPr or VGA mode, the ZOOM button is not active.
Operations (continued)
System setting

Setting Closed Caption(CCD)
1 Access the System Setting menu.
2 Press CH▲/▼ to select ccd mode settings item.
3 Press VOL+/- to select. You can select the caption data channel (CC1, CC2, CC3, CC4), the text service channel(text1, text2, text3, text4) or turn off the Closed Caption(Off).

Note:
- Some TV programs may not be broadcast with closed caption signals, and therefore the TV will not be able to display captions. Also, text information is not offered by all stations.
- Some TV programs only provide one channel caption, one channel text, or only caption without text.
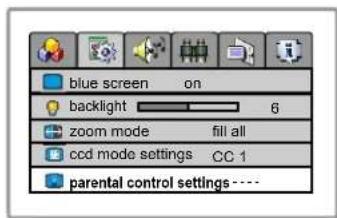
Parental Control Setup
1 Access the System Setting menu.
2 Press CH▲/▼ to select parental control settings item.
3 Enter the password using the keypad to access the Parental control sub-menu.(The default password is 1234 and you should change the password after you access the sub-menu.)
4 Press CH▲/▼ to select global setting item. Use VOL+/- to select disable or enable. If you select enable, the function is activated. If you select disable, the function is not active.

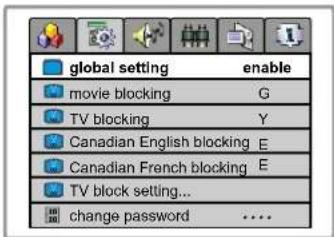
Operations (continued)
System setting (Parental control Sub-menu)
Movie Blocking setting
This function allows programs to be restricted and TV usage to be controlled based on program rating. It prevents children from watching violent or sexual scenes that may be harmful.
Please enter the Parental control sub-menu (previous page).
1 Press CH button to select movie blocking item.
2 Press VOL+/- button to select desired rating.

Movie Ratings:
* NONE
* G and Above (general audience)
* PG and Above (parental guidance suggested)
* PG-13 and Above (13 years and up)
* R and Above (restricted)
* NC-17 and Above (18 years and up)
* X (adult)
If you set PG-13, G and PG movies will be available, and PG-13, R, NC-17 and X will be blocked.
TV blocking setting
This function allows TV programs to be restricted and TV usage to be controlled based on age and content. It prevents children from watching violent or sexual scenes that may be harmful.
Age base
Please enter the Parental control sub-menu (previous page).
1 Press CH button to select TV blocking item.
2 Press VOL+/- button to select the desired rating.
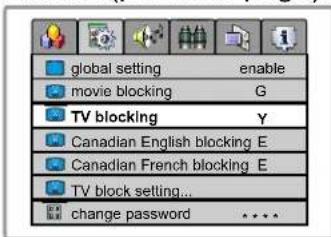
TV Ratings:
* NONE
* Y and Above (all children) (individual content categories do not apply)
* Y7 (7 years and up)
* G and above (general audience) (individual categories do not apply)
* PG and Above (parental guidance suggested)
* 14 and above (14 years and up)
* MA (mature audience)
Parental control enables parents to prevent their children from watching inappropriate material on TV. Parental control reads the ratings for programming (except for news, sports, unedited movies on premium cable, and Emergency System signals), then denies access to programming if the program's rating meets the limitations you select. In this case, the program will be blocked.

Content based
Please enter the Parental control sub-menu first.
1 Press CH button to select TV blocking setting... item.
2 Press VOL+ button to access the sub-menu.
3 Setting the content with CH+/- and VOL+/- buttons.

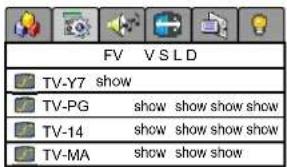
Content Categories:
* FV: fantasy violence (applies only to TV-Y7)
* V: violence (applies to TV-PG and above, TV-
14 and Above, TV-MA)
* S: sexual situations (applies to TV-PG and above, TV-14 and Above, TV-MA)
* L: adult language (applies to TV-PG and above, TV-14 and Above, TV-MA)
* D: sexual dialogue (applies to TV-PG and Above, TV-14)
Canadian English Blocking setting
Please enter the Parental control sub-menu first.
1 Press CH▲/▼ button to select Canadian English blocking item.
2 Press VOL+/- button to select the desired rating.
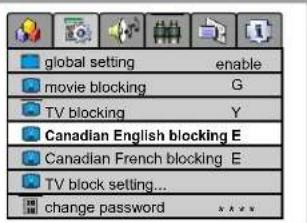
Canadian English Language Ratings:
* E: Exempt.
* C: Children.
* C8+: Children 8 years and older.
* G: General programming, suitable for all audiences.
* PG: Parental guidance.
* 14+: Viewers 14 years and older.
* 18+: Adult programming.
Operations (continued)
System setting (Parental control Sub-menu)

Canadian French blocking setting
Please enter the Parental control sub-menu first.
1 Press CH button to select Canadian French blocking item.
2 Press VOL+/- button to select desired rating
Canadian French Language Ratings:
* E: Exempt.
* G: Children.
* 8 ans+: Children 8 years and older.
* 13 ans+: Children 13 years and older.
* 16 ans+: Viewers 16 years and older.
* 18 ans+: Adult programming.

Changing the password
Please enter the Parental control sub-menu first.
1 Press CH button to select change password item.
2 Input a new 4-digit password by using

Next time when you want to access the Parental control menu, you will use your new password. Make sure to remember the password.
If you forget the password, you can use master password (9093) to enter it.
Make sure not let children know the master password.
Operations (continued)
OSD Setting

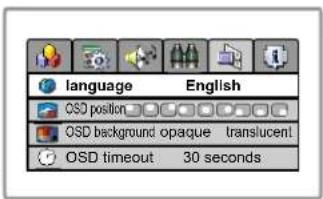
Setting the language of the menu
1 Access the OSD Setting menu.
2 Press CH to select the language item.
3 Press VOL+/- to select an OSD language. English, Spanish and French can be selected.
Setting the position of the menu
1 Access the OSD Setting menu.
2 Press CH to /select the OSD position item.
3 Press VOL+/- to select the position of the menu displaying.
You can also press the OSD POSITION button on the remote control to select OSD menu position.

Setting the background of the menu
1 Access the OSD Setting menu.
2 Press CH to/select the OSD background item.
3 Press VOL+/- to select opaque or translucent. If you select Opaque, the background of the menu is opaque. If you select translucent, the background of the menu is translucent.

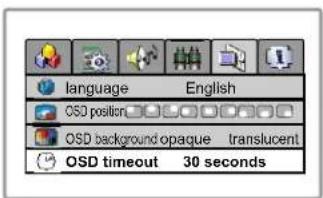
Setting the OSD timeout
1 Access the OSD Setting menu.
2 Press CH to /select the OSD timeout item.
3 Press VOL+/- to set the timeout: 5, 10, 15, 20, 25, 30, 35, 40, 45, 50, 55, 60 seconds.
Operations (continued)
Timer setting
Using Sleep button
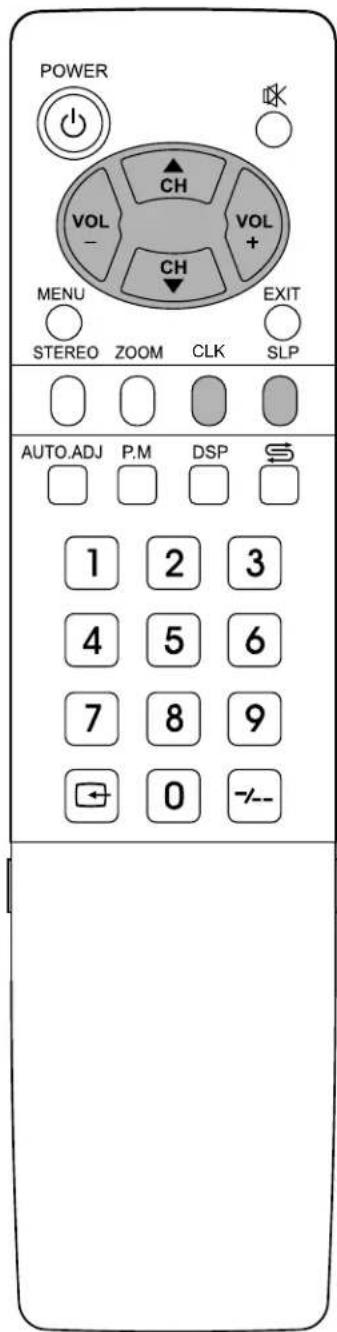
Press SLP button to display sleep timer menu bar. Press CH+/▼ or VOL+/- repeatedly to set sleep time between:0, 10, 20, 30, 60, 90, 120, 180, 240 minutes. If you select 0 minute, the sleep timer function is turned off.

Using Clock button
1 Press CLK button, the current time menu bar appears. Press VOL+/- to select hour or minute. Use CH▲/▼ to set time.

2 After setting current time menu bar, press CLK button again to display turn off menu bar.
Press VOL+/- to select hour, minute or status. Press CH▲/▼ to adjust turn off time and turn off status(off, today, everyday)
today: means the turn off setting
everyday: means the turn off

3 Press CLK once more to display turn on menu bar.

Press VOL+/- to select hour, minute or status. Press CH▲/▼ to adjust turn on time and turn on status(off, today, everyday).
today: means the turn on setting effects today.
everyday: means the turn on setting effects everyday.
Operations in VGA /YPbPr mode

Select VGA/YPbPr mode
1 Press the SOURCE button on the unit or □ button on the remote control. The screen displays the menu shown as right.
2 Press CH▲/▼ to highlight the VGA or YPbPr/YCbCr item. Press VOL+/- or wait about 4 seconds and the signal source is selected.

PC signal format
Connect VGA input and be sure that there is VGA input signal. The signal format should be set to: 640 x 480@60Hz.
Note:
The resolution of the LCD panel is 640 x 480; any higher resolution output from your PC Video card might not come in clear.
Auto adjusting
When VGA signal format is changed or when you switch to VGA mode from another source, the unit adjusts frequency and phase automatically to obtain the best display. During the process of auto correction, the screen displays Analog RGB Acquiring
Signal, and all buttons on the set and on the remote control do not work until this process is finished.
When the set displays some nonstandard VGA signals and can not adjust the picture to the best status by itself, you can adjust it again by pressing the AUTO. ADJ button on the remote control.
NOTE: Please note your final phase and frequency settings as you might need to re-adjust your screen.

Operations in VGA /YPbPr mode(continued)
Picture Settings

Adjusting Brightness/Contrast
1 Access the PICTURE menu.
2 Press CH▲/▼ to select brightness or contrast item.
3 Press VOL+/- to adjust the selected item.

| Item Function | Notes | |
| brightness | Adjust the brightness of the picture. | Adjusting the picture under the displaying mode will not affect the display settings in the TV, AV mode. |
| contrast | Adjust the contrast of the picture. | |
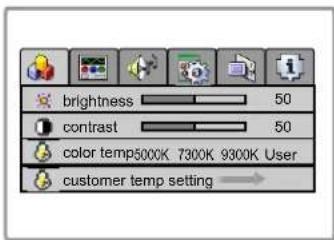
Setting the color temperature
1 Access the Picture Setting menu.
2 Press CH▲/▼ to select color temp item.
3 Press VOL+/- to switch the color temperature between 5000K, 7300K, 9300K and User.
4 If you want to change the value of the user mode, set color temp to user at first, then select customer temp setting item, and press VOL+/- to access the sub-menu.
5 Press CH▲/▼ to select the item and press VOL+/- to adjust it. The value you set will be stored.

Troubleshooting
Before calling for repair service, check the following items for possible remedies to an encountered symptom.
| Symptoms | Check item |
| Ghost or double images | This may be caused by obstruction to the antenna due to high rise buildings or hills. Using a highly directional antenna may improve the picture. |
| No power | Check that the AC power cord is plugged into the mains socket.Unplug the power cord, wait for 60 seconds. Then re-insert plug into the mains socket and turn on the unit again. |
| No picture | Check antenna connections at the rear of the unit to see if it properly connected to the unit.Possible broadcast station trouble. Try another channel.Adjust the contrast and brightness settings.Check the Closed Captions control. Some TEXT modes could block the screen.Select a correct input.Is a non-compatible signal being input? |
| Good picture but no sound | Increase the VOLUME.Check that the unit is not muted.Check whether headphones are connected. |
| Good sound but poor color | Adjust the contrast, color and brightness settings. |
| Poor picture | Sometime poor picture quality occurs when an S-VHS camera or camcorder is connected while another peripheral is connected at the same time. In this case, switch off one of the peripherals.Check whether the room is too bright |
| Horizontal dotted line | This may be caused by electrical interference (e.g. hairdryer, nearby neon lights, etc.)Turn off the equipment which produces the interference. |
| Television not responding to remote control | Check whether the batteries are working. Replace if necessary.Clean the remote control sensor lens on the unit.Do not use the remote control under strong or fluorescent lighting.The batteries should be inserted with polarity (+,-) aligned. |
| Snowy picture and noise | Check the antenna connection. |
| Unstable or not synchronized VGA picture | Check if you have selected the correct VGA mode in your PC. |
| No output from one of the speakers | Adjust Sound Balance. |
| Control buttons do not work. | Unplug the power cord, wait for a few seconds. Then plug the power cord in again and turn on the unit back on. |
Note:
If your problem is not solved, restart your TV by turning it off and then on again once.
Never attempt to repair any TV yourself.
Troubleshooting/Care and Maintenance
LCD Display panel information
Note:
The marking or retained image on the LCD panel resulting from fixed image use is not an operating defect and as such is not covered by Warranty. This product is not designed to display fixed image patterns for extended periods of time.
Important Information Regarding Use of Video Games, Computers, Captions or Other Fixed Image Displays.
The extended use of fixed image program material can cause a permanent "shadow image" on the LCD panel. This background image is viewable on normal programs in the form of a stationary fixed image. This type of irreversible LCD panel deterioration can be limited by observing the following steps:
A. Reduce the brightness/contrast setting to a minimum viewing level.
B. Do not display the fixed image for extended periods of time.
C. Turn the power off when not in actual use.
Cleaning and Maintenance
To clean this unit, wipe with a soft, dry cloth.
If the surfaces are extremely dirty, use a soft cloth dipped in a soap and water solution or a weak detergent solution.
- Use eyeglass cleaner to remove stubborn dirt from the LCD.
- Never use alcohol, paint thinner or benzine to clean this unit.
- Before using a chemically treated cloth, read the instructions that came with the cloth carefully.
CAUTION :
If water or similar substances get inside the monitor via the liquid crystal panel surface, a malfunction may result.
Specification
Power supply for AC adapter: \~ 100–240V, 50/60Hz
Power Consumption: 70W
Resolution: 640 x 480
Pixel Pitch: 0.2125mm x 0.6375mm
Brightness: 450 nit
Contrast: 500:1
Viewing angle: 160 /140
Dimensions(inch): 25.3(W) x 7.1(D) x 17.7(H) (with stand)
Weight(lb): 20.9
Screen: 20"
TV system & channel coverage:
SYSTEM VHF UHF CATV
NTSC-M 2-13 14-69 1-125
Color system: NTSC
Speaker output: 8W, 8Ω
Accessories: Operating manual x 1, Power cord x 1,
AV cable x 1, VGA cable x 1,
Remote control x 1,
AC Adapter x 1
Note: Design and specification are subject to change without notice.
For service, support and warranty information, visit www.cplm-866-896-6322.
"Polaroid" is a registered trademark of Polaroid Corporation of Waltham, MA USA and licensed for use on the FLM-2011 to Petters Consumer Brands, LLC.
- 20" LCD Television FLM-2011
- Operating Manual
- Important Safety Information
- Federal Communication Commission Information (FCC)
- Contents
- Congratulations on your purchase of this LCD TV.
- Important Safety Cautions
- Identification of controls
- Control buttons
- Note:
- Identification of controls (continued)
- Remote Control
- Preparing the Remote Control
- Batteries for the Remote Control
- Notes:
- Antenna connections
- OUTDOOR VHF/UHF ANTENNA CONNECTION (ANTENNA NOT INCLUDED)
- Combination VHF/UHF
- OR
- Cable (CATV)/satellite connections
- FOR SUBSCRIBERS TO BASIC CABLE TV SERVICE
- FOR SUBSCRIBERS TO SCRAMBLED CABLE TV SERVICE OR SATELLITE
- FOR SUBSCRIBERS TO UNSCRAMBLED BASIC CABLE TV SERVICE WITH SCRAMBLED PREMIUM CHANNELS
- Power connection
- Elevation adjustment
- Installation(continued)
- Notes about connection
- Connecting the Video/Audio equipment
- Composite Video signal connection
- S-VIDEO Signal Connection
- The PC input signal connection
- AV OUT connection
- How to connect:
- How to record the TV program:
- How to enjoy high quality sound by Audio amplifier:
- YPbPr input connection
- Basic Operations
- Turning on
- Turning off
- Selecting input signal
- Main On-Screen-Display (OSD) introduction
- Operations (continued)
- Channel Setting
- Selecting antenna/cable
- Auto Search
- Skipping the program
- Fine tuning
- Selecting channel
- Using Keypad buttons
- Using Channel up/down buttons
- Using previous channel button
- Operations Picture adjustment
- Sound Setting
- Selecting the MTS
- Adjusting volume
- Muting the sound
- Selecting the sound mode
- Adjusting the bass/treble
- Adjusting the sound balance
- Adjusting the SRS
- Adjusting the headphone volume
- System setting
- Blue screen setting
- Backlight adjustment
- Zoom mode adjustment
- Setting Closed Caption(CCD)
- Parental Control Setup
- System setting (Parental control Sub-menu)
- Movie Blocking setting
- Please enter the Parental control sub-menu (previous page).
- TV blocking setting
- Age base
- TV Ratings:
- Content based
- Content Categories:
- Canadian English Blocking setting
- Canadian French blocking setting
- Changing the password
- OSD Setting
- Setting the language of the menu
- Setting the position of the menu
- Setting the background of the menu
- Setting the OSD timeout
- Timer setting
- Using Sleep button
- Using Clock button
- Operations in VGA /YPbPr mode
- Select VGA/YPbPr mode
- PC signal format
- Auto adjusting
- Operations in VGA /YPbPr mode(continued)
- Picture Settings
- Adjusting Brightness/Contrast
- Setting the color temperature
- Troubleshooting
- Troubleshooting/Care and Maintenance
- LCD Display panel information
- Important Information Regarding Use of Video Games, Computers, Captions or Other Fixed Image Displays.
- Cleaning and Maintenance
- To clean this unit, wipe with a soft, dry cloth.
- CAUTION :
- Specification
Brand : POLAROID
Model : FLM-2011
Category : Television