
L22W861 - Television AOC - Free user manual and instructions
Find the device manual for free L22W861 AOC in PDF.


| Product Type | LED TV |
| Model | L22W861 |
| Screen Size | 22 inches (diagonal) |
| Resolution | 1366 x 768 pixels (HD) |
| Refresh Rate | 60 Hz |
| Contrast Ratio | 1000:1 (typical) |
| Brightness | 250 cd/m² |
| Viewing Angle | 178° / 178° |
| Audio Output | 2 x 3W speakers |
| Connectivity | HDMI (1), VGA (1), USB (1), Composite (1), Headphone out (1) |
| Dimensions (with stand) | 508 x 370 x 170 mm (W x H x D) |
| Weight (with stand) | 3.5 kg |
| Power Consumption | 30 W (typical), <0.5 W standby |
| Power Supply | AC 100-240V, 50/60Hz |
| Remote Control | Included (batteries not included) |
| Mounting | VESA 100 x 100 mm |
| Supported TV Formats | PAL, NTSC, SECAM |
| Digital TV Tuner | DVB-T/T2/C |
| Cleaning Instructions | Use a soft, dry cloth. Do not use solvents or abrasive cleaners. |
| Safety Note | Ensure adequate ventilation; do not block vents. Keep away from heat sources and moisture. |
| Repairability | Contact authorized service center for spare parts and repairs. Do not open the TV yourself. |
Frequently Asked Questions - L22W861 AOC
User questions about L22W861 AOC
0 question about this device. Answer the ones you know or ask your own.
Ask a new question about this device
Download the instructions for your Television in PDF format for free! Find your manual L22W861 - AOC and take your electronic device back in hand. On this page are published all the documents necessary for the use of your device. L22W861 by AOC.
USER MANUAL L22W861 AOC
IMPORTANT SAFETY INSTRUCTIONS 6
Package Contents.... 8
Attaching the Base 8
Preparing Your LCD HDTV for Wall Mounting 9
PREPARATION 10
PERIPHERAL CONNECTION GUIDE 12
OPERATING INSTRUCTIONS 14
TO USE THE FRONT PANEL CONTROL 14
TO USE THE REMOTE CONTROL 15
VIEWING MODES ILLUSTRATIONS 16
CONNECTING EQUIPMENT 18
TO USE THE MENUS 30
SETUP MENU 30
VIDEO MENU 31
AUDIO MENU 32
FEATURE MENU 33
TIPS 37
PRODUCT SPECIFICATION 39
BEFORE CALLING SERVICE 40
GLOSSARY 41
| SYMBOL | SYMBOL | DEFINITION |
 SA 1965 SA 1965 | DANGEROUS VOLTAGE: The lightning flash with arrowhead symbol, within an equilateral triangle, is intended to alert the user to the presence of uninsulated “dangerous voltage” within the product’s enclosure that may be of sufficient magnitude to constitute a risk of electrical shock to persons. | |
 SA 1966 SA 1966 | INSTRUCTIONS: The exclamation point within on equilateral triangle to alert the User to the presence of important operating and maintenance (servicing) instruction In the literature accompanying the appliance. | |
Apparatus shall not be exposed to dripping or splashing and no objects filled with liquids, Such as vases, Shall be placed on the apparatus.
Caution - Danger of explosion if battery is incorrectly replaced. Replace only with the same or equivalent type.
FOR YOUR SAFETY
Before operating the TV please read this manual thoroughly. This manual should be retained for future reference.
FCC Class B Radio Frequency Interference Statement WARNING: (FOR FCC CERTIFIED MODELS)
NOTE: This equipment has been tested and found to comply with the limits for a Class B digital device, pursuant to Part 15 of the FCC Rules. These limits are designed to provide reasonable protection against harmful interference in a residential installation. This equipment generates, uses and can radiate radio frequency energy, and if not installed and used in accordance with the instructions, may cause harmful interference to radio communications. However, there is no guarantee that interference will not occur in a particular installation. If this equipment does cause harmful interference to radio or television reception, which can be determined by turning the equipment off and on, the user is encouraged to try to correct the interference by one or more of the following measures:
- Reorient or relocate the receiving antenna.
- Increase the separation between the equipment and receiver.
- Connect the equipment into an outlet on a circuit different from that to which the receiver is connected.
- Consult the dealer or an experienced radio/TV technician for help.
NOTICE
- The changes or modifications not expressly approved by the party responsible for compliance could void the user's authority to operate the equipment.
- Shielded interface cables and AC power cord, if any, must be used in order to comply with the emission limits.
- The manufacturer is not responsible for any radio or TV interference caused by unauthorized modification to this equipment. It is the responsibilities of the user to correct such interference.
WARNING:
To prevent fire or shock hazard, do not expose the TV to rain or moisture. Dangerously high voltages are present inside the TV. Do not open the cabinet. Refer servicing to qualified personnel only.
SAFETY: Lamp Disposal

LAMP(S) INSIDE THIS PRODUCT CONTAIN MERCURY AND MUST BE RECYCLED OR DISPOSED OF ACCORDING TO LOCAL, STATE OR FEDERAL LAWS. FOR MORE INFORMATION, CONTACT THE ELECTRONIC
INDUSTRIES ALLIANCE AT WWW.EIAE.ORG.
DIGITAL TELEVISION TRANSITION NOTICE
This device contains a digital television tuner, so it should receive digital over the air TV programming, with a suitable antenna, after the end of full-power analog TV broadcasting in the United States on February 17, 2009. Some older television receivers, if they rely on a TV antenna, will need a TV Converter to receive over the air digital pro-gramming, but should continue to work as before for other purposes (e.g., for watching low-power TV stations still broadcasting in analog, watching pre-recorded movies, or playing video games).
For more information, call the FCC at 1-888-CALL-FCC (1-888-225-5322)
or see www.DTV.gov. For information on the TV Converter program, and on government coupons that may be used toward the purchase of one, see www.dtv2009.gov, or call the NTIA at 1-888-DTV-2009.
Place unit on even surfaces. | Don't place the TV in confined spaces or in a box when using it. |
 Unplug immediately if is malfunction like no picture, no video/audio, smoke and bad odor from TV. Unplug immediately if is malfunction like no picture, no video/audio, smoke and bad odor from TV. |  Unplug immediately if other foreign materials are put inside TV box or if the TV fell down. Unplug immediately if other foreign materials are put inside TV box or if the TV fell down. |
 Don't throw any object inside the TV box like metals or other flammable materials. Don't throw any object inside the TV box like metals or other flammable materials. |  Prohibit/Avoid opening TV cabinet Prohibit/Avoid opening TV cabinet |
Remember to unplug the AC cord from the AC outlet before cleaning. Do not use liquid cleaners or aerosol cleaners to clean the display. 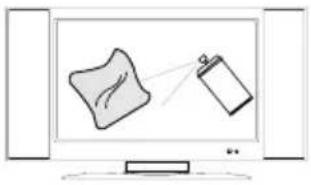 | Avoid direct sunlight, dusty, high humidity and smoky areas. |
Make sure to unplug the unit when not in use for a long period of time (days). | Call service personnel to clean the internal part of the TV once a year. |
Do not cover or block any vents and openings. Inadequate ventilation may shorten the life of the display unit and cause overheating. 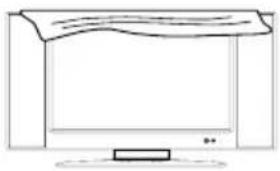 | Do not place the display near water, such as bathtub, washbasin, kitchen sink laundry tub, swimming pool or in a damp basement.  |

otice for Remote Controller
| Avoid Dropping | Avoid Liquids | Avoid Aerosol Cleaners |
 |  |  |
Read before operating equipment
- Read these instructions.
- Keep these instructions.
- Heed all warnings.
- Follow all instructions.
- Do not use this apparatus near water.
- Clean only with a dry cloth.
- Do not block any of the ventilation openings. Install in accordance with the manufacturers instructions.
- Do not install near any heat sources such as radiators, heat registers, stoves, or other apparatus (including amplifiers) that produce heat.
- Do not defeat the safety purpose of the polarized or grounding type plug. A polarized plug has two blades with one wider than the other. A grounding type plug has two blades and third grounding prong. The wide blade or third prong is provided for your safety. When the provided plug does not fit into your outlet, consult an electrician for replacement of the obsolete outlet.
- Protect the power cord from being walked on or pinched particularly at plugs, convenience receptacles, and the point where they exit from the apparatus.
- Only use attachments/accessories specified by the manufacturer.
- Use only with a cart, stand, tripod, bracket, or table specified by the manufacturer, or sold with the apparatus. When a cart is used, use caution when moving the cart/apparatus combination to avoid injury from tip-over.

- The TV should be operated only from the type of power source indicated on the label. If you are not sure of the type of power supplied to your home, consult your dealer or local power company.
- Unplug this apparatus during lightning storms or when unused for long periods of time.
- Refer all servicing to qualified service personnel. Servicing is required when the apparatus has been damaged in any way, such as power-supply cord or plug is damaged, liquid has been spilled or objects have fallen into apparatus, the apparatus has been exposed to rain or moisture, does not operate normally, or has been dropped.
- This product may contain lead or mercury. Disposal of these materials may be regulated due to environmental considerations. For disposal or recycling information, please contact your local authorities or the Electronic Industries Alliance: www.eiae.org
- Damage Requiring Service – The appliance should be serviced by qualified service personnel when:
A. The power supply cord or the plug has been damaged; or
B. Objects have fallen, or liquid has been spilled into the appliance; or
C. The appliance has been exposed to rain; or
D. The appliance does not appear to operate normally or exhibits a marked change in performance; or
E. The appliance has been dropped, or the enclosure damaged.
-
Tilt/Stability – All televisions must comply with recommended international global safety standards for tilt and stability properties of its cabinets design.
-
Do not compromise these design standards by applying excessive pull force to the front, or top, of the cabinet, which could ultimately overturn the product.
-
Also, do not endanger yourself, or children, by placing electronic equipment/toys on the top of the cabinet. Such items could unsuspectingly fall from the top of the set and cause product damage and/or personal injury.
-
Wall or Ceiling Mounting – The appliance should be mounted to a wall or ceiling only as recommended by the manufacturer.
-
Power Lines – An outdoor antenna should be located away from power lines.
-
Outdoor Antenna Grounding – If an outside antenna is connected to the receiver, be sure the antenna system is grounded so as to provide some protection against voltage surges and built up static charges.
Section 810 of the National Electric Code, ANSI/NFPA No. 70-1984, provides information with respect to proper grounding of the mats and supporting structure grounding of the lead-in wire to an antenna-discharge unit, size of grounding connectors, location of antenna-discharge unit, connection to grounding electrodes and requirements for the grounding electrode. See Figure below.

EXAMPLE OF ANTENNA GROUNDING AS PER NATIONAL ELECTRICAL CODE
Note to the CATV system installer: This reminder is provided to call the CATV system installer's attention to Article 820-40 of the NEC that provides guidelines for proper grounding and, in particular, specifies that the cable ground shall be connected to the grounding system of the building, as close to the point of cable entry as practical.
Please, make sure to connect the power plug to the wall outlet socket after connecting the TV to the adapter!
- Objects and Liquid Entry – Care should be taken so that objects do not fall and liquids are not spilled into the enclosure through openings.
Package Contents
©AOC L22W861 TV unit
©Remote Control
◎Two (AAA) Batteries for the Remote Control
©Base
©Power Cord
©User Manual
◎Quick Setup Guide
IMPORTANT: Do not apply pressure to the screen display area which may compromise the integrity of the display. The manufacturer's warranty does not cover user abuse or improper installations.
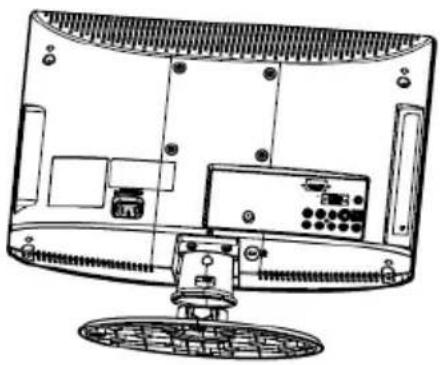
Attaching the Base
IMPORTANT: The Base of the HDTV must be assembled prior to usage.
- Place TV unit face down on a soft and flat surface (blanket, foam, cloth, etc.) to prevent any damage to the HDTV.
- Carefully align and insert the Base to the stand.
- Gently push the Base towards the HDTV until the locking mechanism locks into place.
natural_image
Line drawing of a computer monitor with visible ports and control panel (no text or symbols)Preparing Your LCD HDTV for Wall Mounting
We suggest that you keep your TV at least
2.36 inches (60 mm) from the wall to prevent
cable interference.
Before mounting your TV on the wall, you need to remove the base.
To attach a wall mount bracket to your TV:
1 Remove the screws holding your TV to the stand.
2 Remove the stand base.
3 Secure the wall mount bracket to the back of your TV using four M4 screws, as indicated in the illustration.
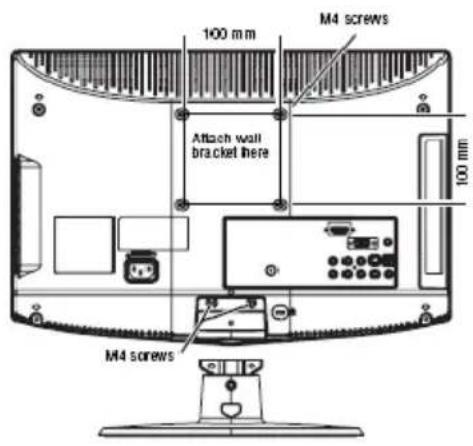
Note: 100mmx100mm wall mount bracket & M4 screws not included.
PREPARATION
Please, make sure to connect the power plug to the wall outlet socket after connecting the TV to the power cord!
- Install the base stand; place the TV on a solid surface.
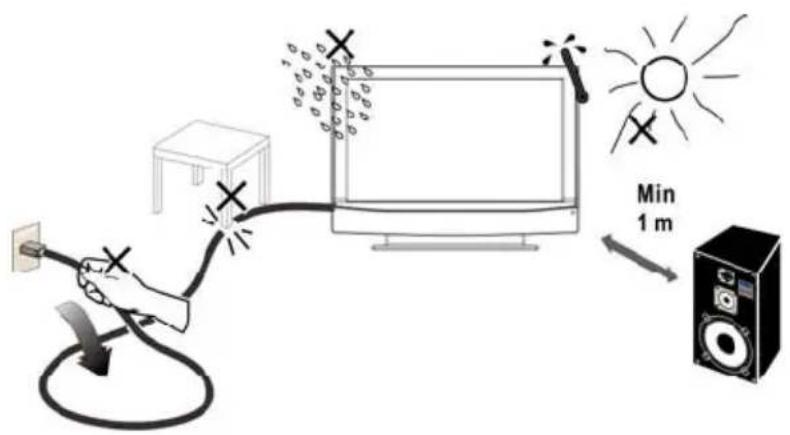
Ensure that the TV is placed in a position to allow free flow of air. Do not cover the ventilation openings on the back cover.
To prevent any unsafe situations, no naked flame sources, such as lighted candles, should be placed on or in the vicinity.
Avoid heat, direct sunlight and exposure to rain or water. The equipment shall not be exposed to dripping or splashing.
- Connect the antenna cable or CATV cable to the aerial socket ANT IN 75Ω at the back of the TV set.

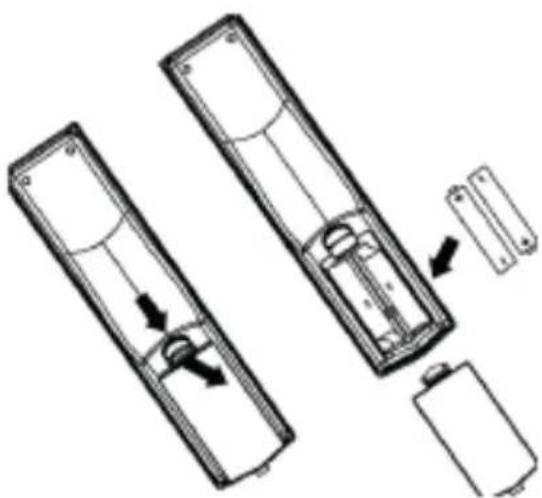
3. Remote control:
Remove the cover of the battery compartment. Insert the 2 batteries supplied (Type AAA 1.5V).
natural_image
Diagram of three battery cells with internal components and directional arrows indicating movement (no text or symbols)4. Power:
Insert the power cord in the wall socket having an AC power supply. You can see LED states at the front panel. If the LED color is Blue, means the TV set is power on. If the LED color is Red, which means this TV set is in standby state.
5. Turn the TV on:
Push the POWER key on the Remote control or the Front panel control knobs. Wait a minute, the TV will power on and can see the display on the screen

PERIPHERAL CONNECTION GUIDE
HDMI

S-Video

Composite

Pr

Pb

Y

P

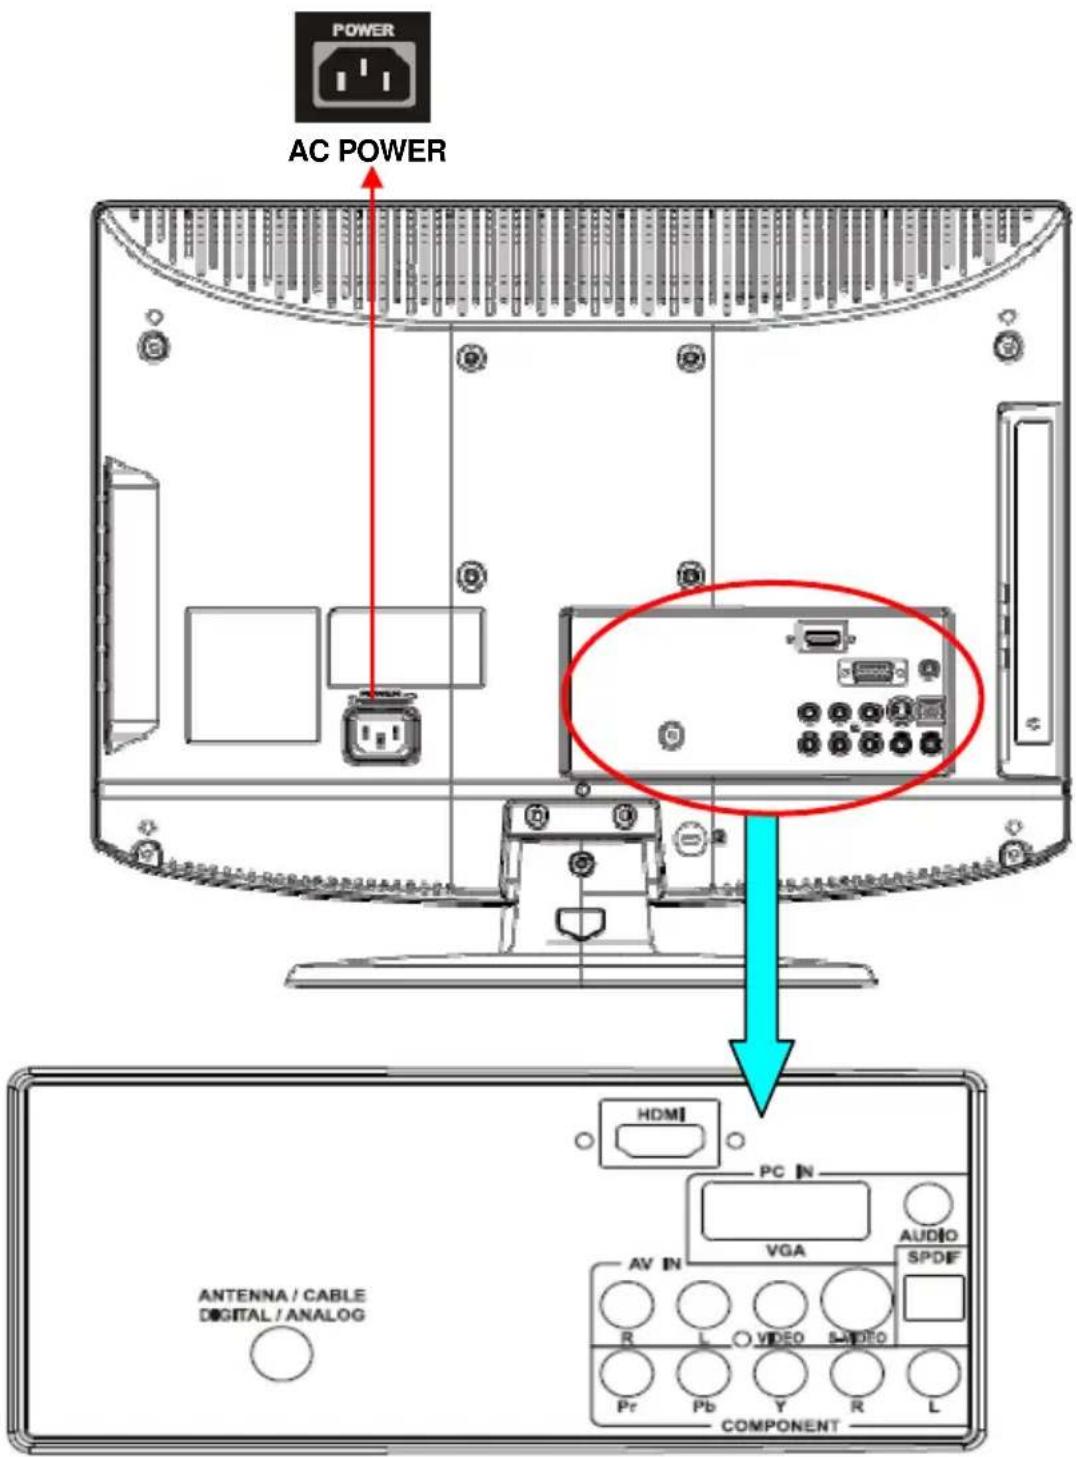
- HDMI – Connect the primary source for digital video such as a DVD multimedia player or set top box through this all digital connector. The white color band on the rear of the TV indicates this connection.
- RGB PC – Connect the video and audio cables from a computer here.
- AV/S-VIDEO IN – Connect the primary source for composite video devices, such as a VCR or video game. Use the white and red connectors to connect the external audio from the same source. The signal being carried by the S-Video cable and connector, if connected, will take priority over the Video RCA connector (yellow connector).
- COMPONENT (YPb/CbPr/Cr with Audio L/R) – Connect the primary source for component video devices such as a DVD Player or set top box here. From left to right, use red for Pr, blue for Pb, green for Y, red for right audio (R) and white for left audio (L) inputs.
- DTV – Connect to an antenna or digital cable (out-of-the-wall, not from Cable Box) for Digital TV.*
- SPDIF (Optical Digital Audio Out) - When a digital audio signal is associated with the input selected for viewing, the digital audio will be available on this SPDIF connection to your home theater system.
Once your equipment is connected, use the following procedure to view the input signal:
Press the source button on the remote controller to select the relevant source to view. (ex: Press VIDEO button to select "Composite Rear" if you have connected a video recorder to Composite Rear socket.)
TO USE THE FRONT PANEL CONTROL
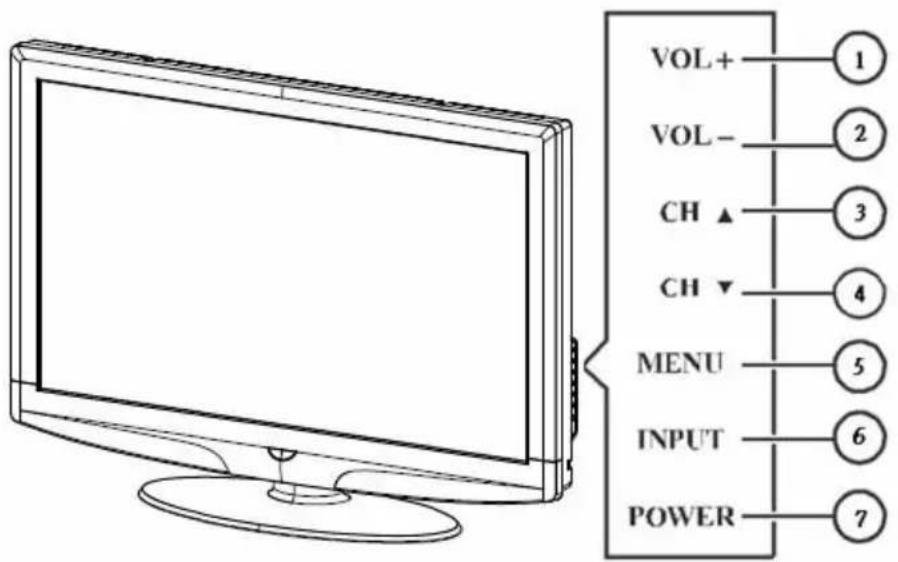
| 1 VOL + | VOL +: Press to increase the sound volume level. |
| 2 VOL - | VOL - : Press to decrease the sound volume level. |
| 3 CH ▲ | CH +: Press to select the next higher Program number. |
| 4 CH ▼ | CH - : Press to select the next lower Program number. |
| 5 MENU | Menu key: Press to open or exit the OSD menu. |
| 6 INPUT | Source key: Press to select the input source. |
| 7 POWER | Power key: Press to turn on / off (standby) the TV set.(Please re-turn on TV after the Power-ON status LED had changed to the Red color and finished flashing.) |
TO USE THE REMOTE CONTROL
POWER
Press to power ON/OFF (standby) TV.(Note:1.TV is never completely power off.
unless physically unplugged.
- Press to turn on TV after the power
on status LED had changed to the red color and stopped flashing.)
VIDEO
Press repeatedly to choose S-Video/
Composite source mode (Video 1 \~ 2)
COMP
Press repeatedly to choose
Component source mode (Video 3).
PC/HDMI
Press repeatedly to choose VGA or HDMI source mode (Video 4 \~ 6).
TV
Press to choose ATSC/NTSC TV source mode.
0 \~ 9 /- number
Press to enter TV channel number to select channel (Press '-' to indicate choosing the sub-channel).
SLEEP
Press to set a time period (off/30min/60min/90min) after which the TV should switch itself to standby mode.
FREEZE
Press to freeze the displayed picture
VOL- / VOL+
Press + or - to adjust the volume.
MENU
Press to open or exit menu.
$$ " \wedge "," \vee "," < ,, " >", \quad " $$
ENTER"
Press to adjust the various function items on the menu.

PREV CH
Press to display the previous TV.
MTS/SAP
Press to activate the NTSC TV sounds, such as: Stereo, SAP or Mono tone. And languages of DTV.
WIDE
Press to choose the display aspect as: Normal, Wide, Zoom or Cinema mode.
SOURCE
Press repeatedly to choose the various input sources (Video 1 \~ 6).
EPG
This function is not support.
MUTE
Press to set TVsound mute ON/OFF
DISPLAY
Press to show the information about the input source、TV channel、display resolution and current time.
VOL- / VOL+
Press + or - to adjust the volume.
Exit
Press to exit menu or OSD.
V-CHIP
Press to lock / unlock Parental Control temporarily. (After setting the restricted table of MPAA or TV Rating.)
VIDEO ADJ
Press to choose the Brightness or Contrast adjustment.
AUDIO ADJ
Press to switch the ATSC multi-channel TV sounds.
CC
Press repeatedly to change the closed caption type as CC ON/CC OFF/CC ON WHEN MUTE.
FAVORITE
Press to toggle the Favorite/Normal mode.
VIEWING MODES ILLUSTRATIONS
Normal Mode on 16:9 Display screen
The original content would be at the center of the screen.
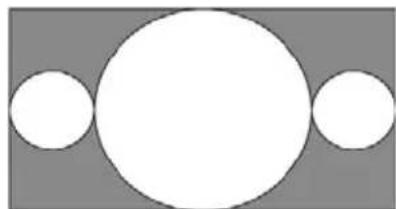
Wide Mode on 16:9 Display screen
The original content in this mode has to fill the entire width of the display horizontally.
natural_image
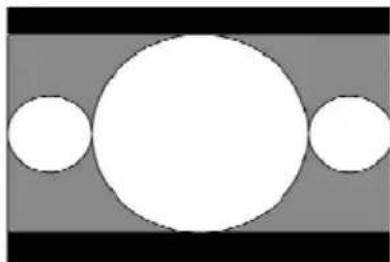
Abstract geometric composition with three white circles on a gray background (no text or symbols)Wide Mode on 16:10 Display screen
Wide1 and Wide2 are applied:
Wide1: The original content would fill the full screen while the proper ratio of 16:9 content is still maintained. Little cropping of the content on the sides is necessary.

natural_image
Abstract geometric composition with three white circles arranged around a central circle, on a gray background (no text or symbols)Wide2: The original content would fill the width of the screen while the proper ratio of 16:9 content is still maintained. Small black bars are added.
natural_image
Abstract geometric composition with three white circles centered on a gray rectangular background (no text or symbols)ZOOM Mode on 16:9 Display screen
For those wide format images which are originally programmed into 4:3 frames with top and bottom black bars, this mode has to stretch the image in both wide and high directions to the full display with active data.

natural_image
Abstract geometric composition with three white circles on a gray background (no text or symbols)16:9 image in 4:3 frame

natural_image
Abstract geometric composition with three white circles on a gray background (no text or symbols)Same image in ZOOM mode
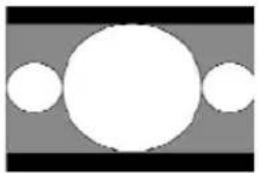
ZOOM Mode on 16:10 Display screen
For those wide format images which are originally programmed into 4:3 frames with top and bottom black bars, this mode has to stretch the image in both wide and high directions to the full display with active data. Little cropping on sides is necessary for full display.
natural_image
Abstract geometric composition with three white circles on a gray background (no text or symbols)16:9 image in 4:3 frame

natural_image
Abstract geometric composition with a central white circle and two smaller white circles on a gray background (no text or symbols)Same image in ZOOM mode
CINEMA Mode on 16:9 or 16:10 Display screen
This mode is applied to view 2.35:1 format content on 16:9 displays. To crop both right and left sides a little for keeping the undistorted ratio of the image is provide for users.

natural_image
Abstract geometric composition with three white circles on a gray background, no text or symbols present.
Coaxial (RF)
Using Your Antenna or Digital Cable for DTV

- Turn off the power to the HDTV.
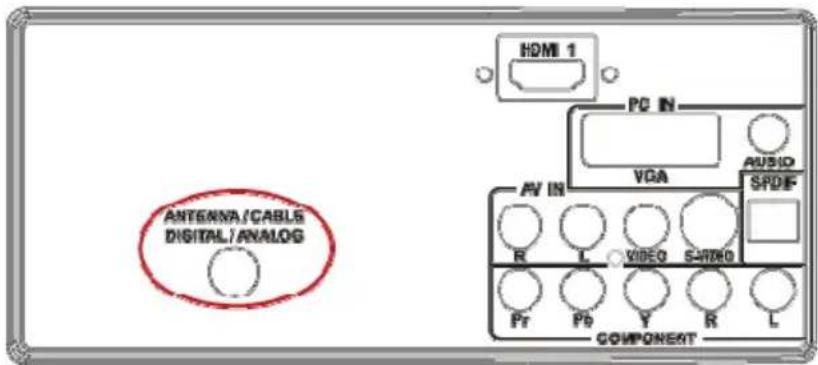
- Connect the coaxial (RF) connector from your antenna or digital cable (out-of-the-wall, not from the Cable Box) to the ANTENNA/CABLE DIGITAL/ANALOG connector.
- Turn on the power to the HDTV.
- Select DTV using the INPUT button on the remote, side of the HDTV or directly by pressing the TV button on the Remote Control.
Using Your Antenna or Cable for TV

- Turn off the power to the HDTV.
- Connect the coaxial (RF) connector from your antenna or cable (out-of-the-wall, not from the Cable Box) to the ANTENNA/CABLE DIGITAL/ANALOG connector at the rear of the HDTV
- Turn on the power to the HDTV.
- Select TV using the INPUT button on the remote, side of the HDTV or directly by pressing the TV button on the Remote Control.
Using the Antenna or Cable for your VCR
- Turn off the power to the HDTV and VCR.
- Connect the "Output to TV", "RF Out" or "Antenna Out" connector on the rear of your VCR to the ANTENNA/CABLE DIGITAL/ANALOG connector at the rear of the HDTV.
- Turn on the power to the HDTV and VCR.
- Select TV using the INPUT button on the remote, side of the HDTV or directly by pressing the TV button on the Remote Control.
Note: If you have an off-air antenna or cable TV, connect it to the "Antenna In" connector on the rear of your VCR.
Connecting Your HDTV Set-Top Box
Using HDMI
HDTV Set-Top Boxes that have a HDMI digital interface should be connected to the HDMI input of the LCD HDTV for optimal results.
Connecting your HDTV Set-Top Box (Best)

- Turn off the power to the HDTV and HDTV Set-Top Box.
- Connect a HDMI cable to the HDMI output of your HDTV Set-Top Box and the other end to the HDMI Input at the rear of the HDTV.
- Turn on the power to the HDTV and HDTV Set-Top Box.
- Select HDMI using the INPUT button on the remote, side of the HDTV, or directly by pressing the HDMI button on the Remote Control.
Note:
a) The HDMI input on the HDTV supports High-bandwidth Digital Content Protection (HDCP). HDCP encrypts the transmission between the video source and the digital display for added security and protection.
b) Refer to your HDTV Set-Top Box user manual for more information about the video output requirements of the product or consult your cable or satellite operator.
For HDTV Set-Top Boxes with DVI
- Turn off the power to the HDTV and HDTV Set-Top Box.
- Using a HDMI-DVI cable, connect the DVI end to your HDTV Set-Top Box and the HDMI end to the HDMI Input at the rear of the HDTV.
- Turn on the power to the HDTV and HDTV Set-Top Box.
- Select HDMI using the INPUT button on the remote, side of the HDTV, or directly by pressing the HDMI button on the Remote Control.
Note:
a) The HDMI input on the HDTV supports High-bandwidth Digital Content Protection (HDCP). HDCP encrypts the transmission between the video source and the digital display for added security and protection.
b) Refer to your HDTV Set-Top Box user manual for more information about the video output requirements of the product or consult your cable or satellite operator.
c) The DVI to HDMI connection provides video only. Connection to an alternate audio player is required for audio.
Using Component Video Connecting your HDTV Set-Top Box (Better):

- Turn off the power to the HDTV and HDTV Set-Top Box.
- Connect the Pr (red color) connector on your HDTV Set-Top Box to the corresponding Pr (red color) connector in the Component group.
- Connect the Pb (blue color) connector on your HDTV Set-Top Box to the corresponding Pb (blue color) connector in the Component group.
- Connect the Y (green color) connector on your HDTV Set-Top Box to the corresponding Y (green color) connector in the Component group.
- Using an audio cable (red and white connectors), connect the cable to the audio output connectors associated with the Component output on your
HDTV Set-Top Box and connect the other end to the audio connectors associated with the Component.
- Turn on the power to the HDTV and HDTV Set-Top Box.
- Select Component (Video 3) using the INPUT button on the remote, side of the HDTV or directly by pressing the Component button on the Remote Control.
Note:
Refer to your HDTV Set-Top Box user manual for more information about the video output requirements of the product or consult your cable or satellite operator.
Connecting Your Basic Set-Top Box
Using Composite Video

- Turn off the power to the HDTV and Set-Top Box.
- Using an AV Cable, connect the Video (yellow color) connector on your Set-Top Box to the corresponding Video (yellow color) connector in the AV group at the rear of the HDTV.
- Using the red and white connectors, connect the cable to the audio output connectors associated with the Video output on your Set-Top Box and connect the other end to the audio connectors associated with the AV input at the rear of the HDTV.
- Turn on the power to the HDTV and Set-Top Box.
- Select Composite (Video 1) using the INPUT button on the remote, side of the HDTV or directly by pressing the AV button on the Remote Control.
Using Coax (RF)

- Turn off the power to the HDTV and Set-Top Box.
- Using a Coax (RF) cable, connect one end to the TV OUT (RF) on your Set Top Box and the other end to the DTV/TV input at the rear of the HDTV.
- Turn on the power to the HDTV and Set-Top Box.
- Select TV using the INPUT button on the remote, side of the HDTV or directly by pressing the TV button (below the WIDE button) on the Remote Control.
Note: Refer to your Set Top Box user manual for more information about selecting the video or RF output of the product.
Connecting Your DVD Player
Using HDMI
DVD players that have a digital interface such as HDMI (High Definition Multimedia Interface) should be connected to the HDMI input of the LCD HDTV for optimal results.
Connecting your DVD Player (Best)

- Turn off the power to the HDTV and DVD player.
- Connect a HDMI cable to the HDMI output of your DVD player and the other end to the HDMI Input at the rear of the HDTV.
- Turn on the power to the HDTV and DVD player.
- Select HDMI using the INPUT button on the remote, side of the HDTV or directly by pressing the HDMI button on the Remote Control.
For DVD Players with DVI:
- Turn off the HDTV and DVD player.
- Using a HDMI-DVI cable, connect the DVI end to your DVD player and the HDMI end to the HDMI Input at the rear of the HDTV.
- Turn on the power to the HDTV and your DVD player.
- Select HDMI using the INPUT button on the remote or side of the HDTV, or directly by pressing the HDMI button on the Remote.
Note:
- Refer to your DVD player user manual for more information about the video output requirements of the product.
- The DVI to HDMI connection provides video only. Connection to an alternate audio player is required for audio output.
Using Component Video
Connecting your DVD Player (Better)

- Turn off the power to the HDTV and DVD player.
- Connect the Pr (red color) connector on your DVD player to the corresponding Pr (red color) connector in the Component at the rear of the HDTV.
- Connect the Pb (blue color) connector on your DVD player to the corresponding Pb (blue color) connector in the Component group at the rear of the HDTV.
- Connect the Y (green color) connector on your DVD player to the corresponding Y (green color) connector in the Component group at the rear of the HDTV.
- Using an audio cable (red and white connectors), connect the cable to the audio output connectors associated with the Component output on your DVD player and connect the other end to the audio connectors associated with the Component input at the rear of the HDTV.
- Turn on the power to the HDTV and DVD player.
- Select Component using the INPUT button on the remote, side of the HDTV or directly by pressing the Component button on the Remote Control.
Note: Refer to your DVD player user manual for more information about the video output requirements of the product.
Using S-Video (AV)
Connecting your DVD Player (Good):
- Turn off the power to the HDTV and DVD player.
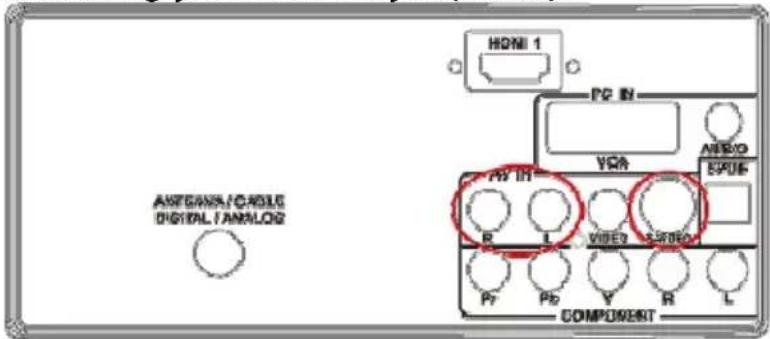
- Connect the S-Video jack on the rear of your DVD player to the S-Video jack in the AV group on the rear of the HDTV.
- Connect an audio cable (white and red connectors) to the audio output connectors associated with the S-Video output on your DVD player and connect the other end to the audio connectors associated with the AV input on the rear of the HDTV.
- Turn on the power to the HDTV and DVD player.
- Select S-Video (Video 2) using the INPUT button on the remote, side of the HDTV, or directly by pressing the AV button on the Remote Control.
Using Composite (AV) Video
Connecting your DVD Player (Good)
- Turn off the power to the HDTV and DVD player.
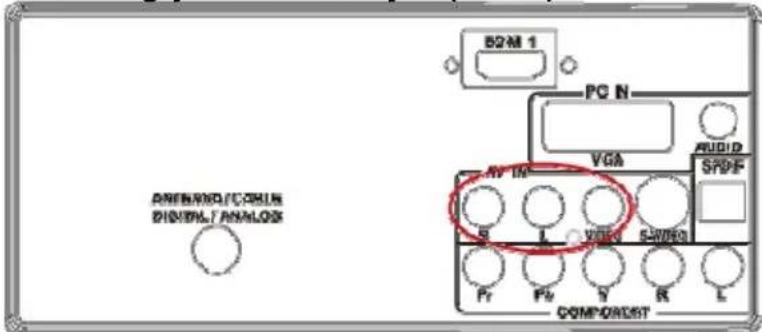
- Connect the Video (yellow color) connector on your DVD player to the Video (yellow color) connector in the AV group.
- Connect the R (red color) and L (white color) audio connectors on your DVD player to the corresponding R (red color) and L (white color) audio input connectors in the AV group.
-
Turn on the power to the HDTV and DVD Player.
-
Select Composite (Video 1) using the INPUT button on the remote, side of the HDTV or directly by pressing the AV button on the Remote Control.
Connecting Your VCR or Video Camera
- Turn off the HDTV and VCR or Video Camera.
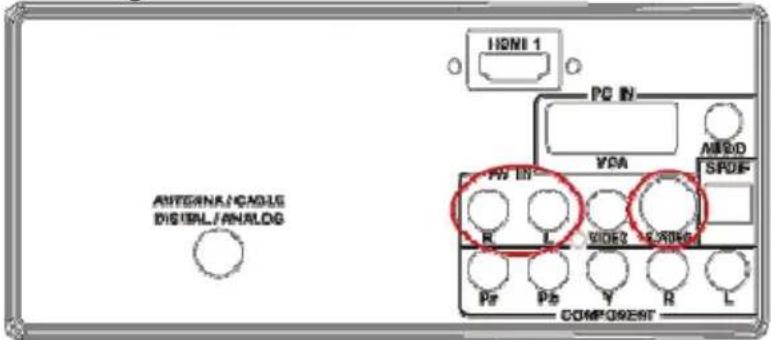
- Connect the S-Video jack on the rear of your VCR or Video Camera to the S-Video jack in the AV group on the rear of the HDTV.
- Connect an audio cable (white and red connectors) cable to the audio output connectors associated with the S-Video output on your VCR or Video Camera and connect the other end to the audio connectors associated with the AV input on the rear of the HDTV.
- Turn on the power to the HDTV and VCR or Video Camera.
- Select S-Video (Video 2) using the INPUT button on the remote, side of the HDTV or directly by pressing the AV button on the Remote Control.
Note: Refer to your VCR or Video Camera user manual for more information about the video output requirements of the product.
Connecting to a PC Computer

- Turn off the power to the HDTV and PC Computer.
- Connect a 15-pin D-Sub RGB (VGA) cable to the RGB output of your pc computer and the other end to the RGB PC input at the rear of the HDTV.
- Connect the Audio Out on your pc computer to the RGB PC Audio input at the rear of the HDTV.
- Turn on the HDTV and PC Computer.
- Select RGB using the INPUT button on the remote, side of the HDTV or directly by pressing the RGB button on the Remote.
Note: For the best picture quality when connecting a PC computer through RGB PC, set your PC computer timing mode to native resolution of panel. Please refer to the PC or graphic card's user guide for additional information on how to set the timing mode and the video output requirements of the product.
TO USE THE MENUS
- Press the MENU button to display the main menu
- Use the cursor up/down to select a menu item.
- Use the cursor left/right to enter a submenu.
- Press the ENTER button to enable/disable the function.
- Press the MENU or EXIT button to exit the menu.
Press the MENU button to enter the main OSD (On Screen Display). Adjust the items including Setup menu, Video menu, Audio menu and Feature menu. However, some function items in the menus may only be enabled in the particular source modes.
SETUP MENU
The Setup menu in TV mode shows as below. In others source modes, the Setup menu only shows Menu Language and Aspect Ratio items.

- Tuning Band: Select TV source signal from the Air (antenna) or Cable (CATV).
- DTV Signal: Show the intensity of the received DTV signal.

- Auto Ch Search: Automatically scan all NTSC / ATSC TV channels and then store in the channel table. In channel scan process, the OSD can display the number of channels which had been found.
- Add on Ch search: Add channels which are new found.
-
Manual Channel Set: Show the channel setup table. User can choose to display the ATSC or NTSC TV channels and then edit (add/delete) the channel numbers.
-
Channel Labels: Show the NTSC / ATSC TV channel label menu for user modifying channel labels specifically.
- Menu Language: Select the menu display language. (English / Espanol / Francais)
- Aspect Ratio: Select the display aspect ratio. (Normal/Zoom/Wide/Cinema)
- Favorite Channel Mode: When favorite channel mode on user can edit favorite channel table in favorite channel set option.
VIDEO MENU
The Video menu in most source modes shows as below. It provides several video adjustment items for user fine tuning the video display. Only in VGA source modes, the Video menu simply provides Contrast, Brightness, Back light and Settings (Preset) items.

- Contrast: Video contrast adjustment, the tuning range is 0 \~ 100.
- Brightness: Video brightness adjustment, the tuning range is 0 \~ 100.
- Sharpness: Video sharpness adjustment, the tuning range is -50 \~ 50.
- Color: Video color chroma adjustment, the tuning range is 0 \~ 100.
- Tint: Video tint adjustment, the tuning range is R50 \~ G50.
- BackLight: Backlight strength adjustment, the tuning range is 0 \~ 10.
- Settings: Restore the default video settings.
AUDIO MENU
The Audio menu in TV mode shows as below. It provides audio adjustment for user to modify the audio setting. Audio language setting is only available with ATSC TV source, the option is disable under other source modes.

- Audio Language: Change the audio language setting on ATSC TV programs The number of the supported audio languages depends on the ATSC TV programs.
- Bass: Bass tone adjustment, the tuning range is 0 \~ 63. (The default state is enabled)
- Treble: Treble tone adjustment, the tuning range is 0 \~ 63. (The default state is enabled)
- Balance: Audio balance adjustment, the tuning range is L31 \~ R31.)
- Digital Audio Output: Digital audio output format selection, user can choose RAW (default) or PCM format or off.
- TV Speaker: Choose to turn on / off the TV internal speaker. The digital audio output signals 、 earphone output signals will not be turn-off even though the TV speaker is off. The default setting is On.
- Settings: Restore the default audio settings.
FEATURE MENU
The Feature menu in TV mode shows as below. It provides certain optional control functions such as time set, sleep timer, advanced video menu, Password Set, parental control (V-chip) and Digital closed caption setting. This menu gives users the most flexibilities to satisfy their generally demands. According to the various requirements in different source modes, certain features should be hidden (disable) on the menu. The details footnotes will be described clearly below.

- Time Set: Set current time. This sub-menu includes Time Set Mode, Time Zone and Time items. 【Time Set Mode】user can choose Auto or Manual, 【Time Zone】item provides user to set current time zone, such as: Pacific、Alaska、Hawaii、Eastern、Central and Mountain. 【Time】item provides user to set the time clock.

- Sleep Timer: Enable or disable the TV standby timer. User can set the TV standby timer as off / 5 min / 10 min / 15 min/ 30 min / 45 min / 60 min/ 90 min / 120 min / 180min/ 240min. Timer starts to count down after cursor leaving the sub-menu. (At the moment, the item shows『** min Left』 and the cursor highlights on the Feature icon.)
- Advanced Video Menu: Provide the Noise Reduction · Color Temperature and 3D Y/C. Dynamic Contrast options for enhancing video quality.
【Noise Reduction】gives four NR effect degrees, such as: Low、Mid、High and Off. The default setting is Mid.
【Colour Temp】gives three color temperature modes as: Normal、Warm and Cool. The default mode is Warm.
【3D Y/C】 provides On / Off switches. The default setting is On.
【 Dynamic Contrast】 user can choose 0n or Off.
【Setting】 restores the default advanced video option settings.
- Password Set: Change the 4-numeral parental control password. Three steps are required for changing the password: Enter Old Password -> Enter New Password -> Confirm New Password. Note: This item is only available in TV, Composite and S-Video source modes. The default password is『0 0 0 0』.

- Parental Control: provide the parental Control (V-chip) function setting. Before entering the Parental Control sub-menu, user has to key in the password first. Then enter the Parental Lock item, User can modify the restricted table about MPAA or TV Rating respectively. While exiting the sub-menu, the parental control function is working. The inhibitive channels or source signals can be un-lock through pressing the V-CHIP key on the remote control and then key in the correct password. Note: This feature is only available in TV, Composite and S-Video source modes. (The default password is: 0 0 0 0.)
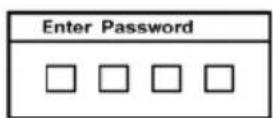


- Digital Captions: Select the close caption options (Service 1-6, Text 1-4 and CC 1-4) in digital TV mode. When select service 1 to service 6 you can modulate parameters in the Digital Close Caption.
- Digital Close Caption: Provide numerous options for setting the digital close caption style. In the sub-menu.
【Style】item can be set as Automatic or Custom mode. If Custom mode is selected, user can modify the detail styles described below. The setting result will be shown immediately on the bottom side of the sub-menu OSD. Note: This feature is only available in Digital TV(ATSC) mode.

【Size】: Digital close caption font size, which can be set as Small、Normal or Large.
【Font】: Digital close caption font style, which can be chosen as Default or Font 1 \~ 7.
【Text Color】: Giving Red / Green / Blue/ Yellow / Magenta / Cyan / Black / White Colors.
【Text Opacity】: Giving Transparent / Translucent / Solid / Flashing modes.
【Background Color】: Giving Red / Green / Blue / Yellow / Magenta / Cyan / Black / White Colors.
【Background Opacity】: Giving Transparent / Translucent / Solid / Flashing modes.
【Edge Effect】: The text edge effects, which gives None / Raised / Depressed / Uniform / Left Shadow / Right Shadow modes.
【Edge Color】: The colors of text edge effects, which provides Red / Green / Blue / Yellow / Magenta / Cyan / Black / White Colors.
- Component Set: This option only shows and is available in component mode, which provides fine tuning component display, such as: 【H-Position】、【V-Position】, 【Clock】, 【Phase】 and 【Auto Adjust】. All these items are giving the tuning range from 0 to 100. 【Setting】 item provides the default component setting values restoring.

- VGA Set: This option only shows and is available in VGA mode, which provides several items for the VGA display fine tuning, such as : 【H-Position】、【V-Position】、【Clock】and【Phase】. All these items giving the tuning range from 0 to 100.【Setting】item provides the default VGA setting values restoring.

Care of the screen
Do not rub or strike the screen with anything hard as this may scratch, mar, or damage the screen permanently.
Unplug the power cord before cleaning the screen. Dust the TV by wiping the screen and the cabinet with a soft, clean cloth. If the screen requires additional cleaning, use a clean, damp cloth. Do not use liquid cleaners or aerosol cleaners.
Mobile telephone warning
To avoid disturbances in picture and sound, malfunctioning of your TV or even damage to the TV, keep away your mobile telephone from the TV.
End of life directives
We are paying a lot of attention to produce environmentally friendly in green focal areas. Your new receiver contains materials, which can be recycled and reused.
At the end of its life specialized companies can dismantle the discarded receiver to concentrate the reusable materials and to minimize the amount of materials to be disposed of.
Please ensure you dispose of your old receiver according to local regulations.
Regulatory Notices – Federal Communications Commission Notice
This equipment has been tested and found to comply with the limits for a Class B digital device, pursuant to part 15 of the FCC Rules. These limits are designed to provide reasonable protection against harmful interference in a residential installation. This equipment generates, uses, and can radiate radio frequency energy and, if not installed and used in accordance with the instructions, may cause harmful interference to radio communications. However, there is no guarantee that interference will not occur in a particular installation. If this equipment does cause harmful interference to radio or television reception, which can be determined by turning the equipment off and on, the user is encouraged to try to correct the interference by one or more of the following measures:
*Reorient or relocate the receiving antenna.
Increase the separation between the equipment and the TV.
Connect the equipment into wall power outlet on a circuit different from that to which the receiver is connected.
Consult the dealer or an experienced radio or television technician for help.
Modifications –
The FCC requires the user to be notified that any changes or modifications made to this device that are not expressly approved by by our company. may void the user's authority to operate the equipment.
Cables –
Connections to this device must be made with shielded cables with metallic RF/EMI connector hoods to maintain compliance with FCC Rules and Regulations.
Canadian notice –
This Class B digital apparatus meets all requirements of the Canadian Interference-Causing Equipment Regulations.
Avis Canadian –
*This model complies with the specifications listed below.
*Designs and specifications are subject to change without notice.
*This model may not be compatible with features and/or specifications that may be added in the future.
*22" LCD TV (21.6" viewable) Viewable image size: diagonal 548mm
Television System:
NTSC standard
ATSC standard (8-VSB, Clear-QAM)
HDMI Terminals:
HDMI INPUT: Rear HDMI x1
HDCP compliant
E-EDID compliant
Supported scan rates: 1080i, 720p, 480p, 480i
Channel Coverage:
VHF: 2 through 13
UHF: 14 through 69
Cable TV: Mild band (A-8 through A-1, A through E-EDID compliant
l)
Super band (J through W)
Hyper band (AA through ZZ, AAA, BBB)
Ultra band (65 through 94, 100 through 125)
VGA Terminals:
VGA INPUT:
Rear VGA (D-SUB 15 Pin) Input x1
E-EDID compliant
Supported scan rates: 640X480 /60Hz
800x600 /60Hz
1024X768 /60Hz
1680X1050 /60Hz
Recommended: 1680X1050 /60Hz
Audio INPUT: Headphone Mini-jack for stereo (3.5Φ)
Power Source:
AC power supply: 100V\~240 V, 50/60 Hz
Power Consumption
≤ 75 W
1 W in standby mode (power cord plugged in and power OFF)
Dimensions:
Include Stand:
512mm(W) × 400mm(H) × 145mm(L)
Audio Power
3 W + 3 W, Internal Speaker
Weight: 5kg(With Stand)
Video/Audio Terminals:
Rear AV x1:
S-Video/Video/Audio Input
Wall Mounting:
100x100mm
(Wall mount kit is not included)
S-VIDEO INPUT:
Y : 1 V(p-p), 75 ohm, negative sync.
C : 0.286 V(p-p) (burst signal), 75 ohm
Supplied Accessories:
1pcs Power cord
1pcs Remote control (with two size AAA alkaline batteries)
1pcs User manual
1pcs Setup Guide
VIDEO/AUDIO INPUT:
VIDEO: 1 V(p-p), 75 ohm, negative sync.
AUDIO: 500 mV(rms)
Component INPUT:
Rear Component x1:
Y : 1V(p-p), 75 ohm, including sync.
Pr/Cr: ±0.35V(p-p), 75 ohm
Pb/Cb: ±0.35V(p-p), 75 ohm
AUDIO: 500 mV(rms)
Supported resolutions:1080i, 720p, 480p,
480i
BEFORE CALLING SERVICE
Please make these simple checks before calling service. These tips may save you time and money since charges for receiver installation and adjustments of customer controls are not covered under your warranty.
| Symptoms Items to Check and Actions to follow | |
| “Ghost” or double image | *This may be caused by obstruction to the antenna due to high rise buildings or hills. Using a highly directional antenna may improve the picture. |
| No power *Check that the TV's AC power cord is plugged into the mains socket.*Unplug the TV, wait for 60 seconds. Then re-insert plug into the mains socket and turn on the TV again. | |
| No picture *Check antenna connections at the rear of the TV to see if it is properly connected to the TV.*Possible broadcast station trouble. Try another channel.*Adjust the contrast and brightness settings.*Check the Closed Captions control. Some TEXT modes could block the screen, | |
| Good picture but no sound *Increase the VOLUME.*Check that the TV is not muted; press the MUTE button on the remote control. | |
| Good sound but poor color *Adjust the contrast, color and brightness settings. | |
| Poor picture *Sometimes, poor picture quality occurs when having activated an S-VHS camera or camcorder connected and having connected another peripheral at the same time. In this case switch off one of the other peripherals | |
| Snowy picture and noise *Check the antenna connection | |
| Horizontal dotted line *This may be caused by electrical interference (e.g. hairdryer, nearby neon lights, etc.)*Turn off the equipment. | |
| Television not responding to remote control | *Check whether the batteries are working. Replace if necessary*Clean the remote control sensor lens on the TV.*You can still use the buttons at the front of your TV.*Select the TV mode to be sure your remote control is in the TV mode. |
GLOSSARY
HDTV
HDTV displays are technically defined as being capable of displaying a minimum of 720p or 1080i active scan lines.
HDMI Inputs
High-Definition Multimedia Interface
Audio / Video Inputs
Located on the rear of the receiver, these connectors (RCA phono type plug) are used for the input of audio and video signals. Designed for use with VCRs (or other accessories) in order to receive higher picture resolution and offer sound connection options.
Menu
An on-screen listing of features shown on the TV screen is made available for user adjustments.
MPAA
Motion Picture Association of America
Multichannel Television sound (MTS)
The broadcasting standard, which allows stereo sounds to be transmitted with the TV picture.
RF
Radio Frequency or modulated signal design used as the carrier for television broadcasts.
Second Audio Program (SAP)
Another or additional audio channel provided for in the Multichannel Television Sound (MTS) broadcast standard. A monaural soundtrack included within the recorded or video signal (usually containing a second language translation for the displayed program).
Sleep Timer
You can set a time period for which the TV will automatically turn itself off.
S-Video Input
You can connect your TV set to a high-resolution video source (such as Super VHS video-cassette recorder, Laser Disc player and DVD Home Theater Set) in-order to provide maximum consumer viewing satisfaction.
- FOR YOUR SAFETY
- FCC Class B Radio Frequency Interference Statement WARNING: (FOR FCC CERTIFIED MODELS)
- NOTICE
- WARNING:
- SAFETY: Lamp Disposal
- DIGITAL TELEVISION TRANSITION NOTICE
- Read before operating equipment
- Package Contents
- Attaching the Base
- Preparing Your LCD HDTV for Wall Mounting
- PREPARATION
- Remote control:
- Power:
- Turn the TV on:
- TO USE THE FRONT PANEL CONTROL
- TO USE THE REMOTE CONTROL
- POWER
- VIDEO
- COMP
- PC/HDMI
- TV
- \~ 9 /- number
- SLEEP
- FREEZE
- VOL- / VOL+
- MENU
- ENTER"
- PREV CH
- MTS/SAP
- WIDE
- SOURCE
- EPG
- MUTE
- DISPLAY
- Exit
- V-CHIP
- VIDEO ADJ
- AUDIO ADJ
- CC
- FAVORITE
- VIEWING MODES ILLUSTRATIONS
- Normal Mode on 16:9 Display screen
- Wide Mode on 16:9 Display screen
- Wide Mode on 16:10 Display screen
- ZOOM Mode on 16:9 Display screen
- ZOOM Mode on 16:10 Display screen
- CINEMA Mode on 16:9 or 16:10 Display screen
- Coaxial (RF)
- Using the Antenna or Cable for your VCR
- Connecting Your HDTV Set-Top Box
- Using HDMI
- Connecting your HDTV Set-Top Box (Best)
- Note:
- For HDTV Set-Top Boxes with DVI
- Using Component Video Connecting your HDTV Set-Top Box (Better):
- Connecting Your Basic Set-Top Box
- Using Coax (RF)
- Connecting Your DVD Player
- Connecting your DVD Player (Best)
- For DVD Players with DVI:
- Using Component Video
- Using S-Video (AV)
- Connecting your DVD Player (Good):
- Using Composite (AV) Video
- Connecting your DVD Player (Good)
- Connecting Your VCR or Video Camera
- Connecting to a PC Computer
- TO USE THE MENUS
- SETUP MENU
- VIDEO MENU
- AUDIO MENU
- FEATURE MENU
- Care of the screen
- Mobile telephone warning
- End of life directives
- Regulatory Notices – Federal Communications Commission Notice
- Modifications –
- Cables –
- Canadian notice –
- Avis Canadian –
- Television System:
- HDMI Terminals:
- Channel Coverage:
- VGA Terminals:
- Power Source:
- Power Consumption
- Dimensions:
- Audio Power
- Video/Audio Terminals:
- Wall Mounting:
- S-VIDEO INPUT:
- Supplied Accessories:
- VIDEO/AUDIO INPUT:
- Component INPUT:
- BEFORE CALLING SERVICE
- GLOSSARY
- HDTV
- HDMI Inputs
- Audio / Video Inputs
- MPAA
- Multichannel Television sound (MTS)
- RF
- Second Audio Program (SAP)
- Sleep Timer
- S-Video Input
Brand : AOC
Model : L22W861
Category : Television