
H-2 - Loudspeaker TOA - Free user manual and instructions
Find the device manual for free H-2 TOA in PDF.


| Product Type | Speaker |
| Brand | TOA |
| Model | H-2 |
| Dimensions (W x H x D) | 200 mm x 150 mm x 120 mm |
| Weight | 2 kg |
| Power Rating | 30 W |
| Impedance | 8 Ω |
| Frequency Response | 150 Hz – 15 kHz |
| Sensitivity | 92 dB |
| Connector Type | Screw terminal |
| Enclosure Material | Plastic |
| Mounting | Wall or ceiling bracket |
| Power Supply | None (passive) |
| Primary Function | Public address and background music |
| Protection Rating | IP65 (dust and water resistant) |
| Operating Temperature | -10°C to 50°C |
| Accessories Included | Mounting bracket, screws, manual |
| Cleaning Instructions | Wipe with a soft, dry cloth. Do not use solvents. |
| Safety Precautions | Keep away from rain and moisture. Do not overload. |
| Spare Parts Availability | Contact TOA authorized dealers for replacements. |
Frequently Asked Questions - H-2 TOA
User questions about H-2 TOA
0 question about this device. Answer the ones you know or ask your own.
Ask a new question about this device
Download the instructions for your Loudspeaker in PDF format for free! Find your manual H-2 - TOA and take your electronic device back in hand. On this page are published all the documents necessary for the use of your device. H-2 by TOA.
USER MANUAL H-2 TOA
Please follow the instructions in this manual to obtain the optimum results from this unit. We also recommend that you keep this manual handy for future reference.
TABLE OF CONTENTS
- SAFETY PRECAUTIONS ...... 2
- GENERAL DESCRIPTION 3
- FEATURES 3
- HANDLING PRECAUTIONS 3
- NOMENCLATURE 4
- INSTALLATION
6.1. Direct Wall/Ceiling Mounting 5
6.2. Mounting the Speaker using an Electrical Box 8
6.3. Mounting the Speaker using Supporting Rails 9
6.4. Removing the Front Grille 9
- OUTDOOR USE (H-2WP ONLY)
7.1. Waterproofing 10
7.2. Speaker Mounting Angle 10
- REPAINTING THE GRILLE AND TRIM PIECE 11
- PROTECTION CIRCUITRY INFORMATION 11
- EQUALIZATION 11
- SPECIFICATIONS 12
Accessories 12
1. SAFETY PRECAUTIONS
- Be sure to read the instructions in this section carefully before use.
- Make sure to observe the instructions in this manual as the conventions of safety symbols and messages regarded as very important precautions are included.
- We also recommend you keep this instruction manual handy for future reference.
Safety Symbol and Message Conventions
Safety symbols and messages described below are used in this manual to prevent bodily injury and property damage which could result from mishandling. Before operating your product, read this manual first so you are thoroughly aware of the potential safety hazards as well as understand the safety symbols and messages.

WARNING
Indicates a potentially hazardous situation which, if mishandled, could result in death or serious personal injury.

CAUTION
Indicates a potentially hazardous situation which, if mishandled, could result in moderate or minor personal injury, and/or property damage.

WARNING

CAUTION
■ When Installing the Unit
• Install the unit only in a location that can structurally support the weight of the unit and the mounting bracket. Doing otherwise may result in the speaker falling down and causing personal injury and/or property damage.
■ When the Unit is in Use
- Do not operate the speaker for an extended period of time with the sound distorting. This is an indication of a malfunction, which in turn can cause heat to generate and result in a fire.
■ When the Unit is in Use
- Should the following irregularity be found during use, immediately stop operating the unit and contact your nearest TOA dealer. Make no further attempt to operate the unit in this condition as this may cause fire or electric shock.
- If you detect smoke or a strange smell coming from the unit.
- If water or any metallic object gets into the unit
- If it is malfunctioning (no tone sounds.)
2. GENERAL DESCRIPTION
TOA's H-2 and H-2WP are small, dome-shaped 2-way speakers featuring high sound quality. The H-2 is designed for indoor use, and the H-2WP is designed for outdoor use.
Note: Protect the H-2WP from rain when installing. (Refer to P. 10 "7.1. Waterproofing".)
3. FEATURES
- The speaker's smooth curved surface allows it to blend in with the interiors of most modern buildings.
- The speaker's small (10 cm) woofer features a magnetic circuit (employing a neodymium magnet) that ensures powerful low-frequency sound reproduction.
- The one-inch balanced dome tweeter features ferro-fluid to ensure superb transient response characteristics for clear, high frequency sound output and high power-handling capabilities.
- The speaker's built-in, crossover network circuitry features sharp cut-off characteristics that realize uniform energy radiation while suppressing unwanted input signals to the woofer or tweeter.
- The speaker is designed with an emphasis on installation ease and safety, as well as easier conduit wiring when an electrical box is installed.
- The speaker's round mounting base frame allows the speaker to be installed at any mounting angle.
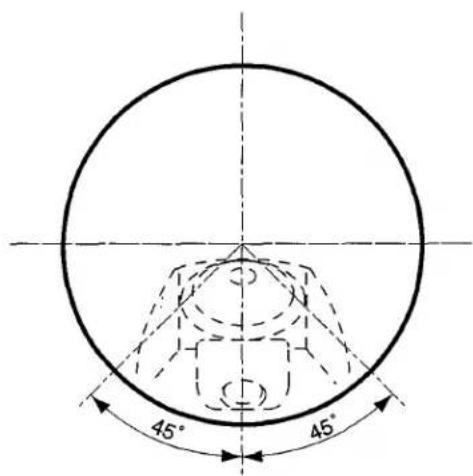
Note: When mounting the H-2WP speaker to a wall, to ensure its watertightness it must not be tilted any more than 45 degrees up from its downward-facing position. - A built-in matching transformer permits the speaker to be used for both high- and low-impedance applications. For low-impedance applications, either the 4 or 16 terminal can be selected. Impedance can be easily changed from outside the unit.
- Detachable screw terminals facilitate connection. Dual positive and negative terminals also facilitate bridge connections.
- The H-2's enclosure and front grille are made of fire-resistant ABS (UL Standard 94: V-0 Grade).
- The structure of the speaker's front grille is specially designed for ease of refinishing and repainting.
4. HANDLING PRECAUTIONS
- Avoid using the speaker on the beach because the speaker's life can be greatly shortened by sea breezes.
- The speakers are not magnetically shielded. Install them as far away as possible from television sets or computer's CRTs to avoid degradation in picture quality.
5. NOMENCLATURE
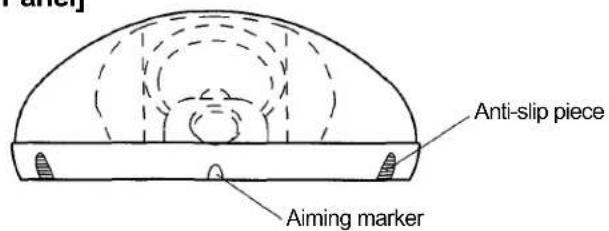
[Front Panel]
![t Panel] Front grille (Grille) [Side Panel] 111 Unit: mm φ268 Front grille (grille frame)](/content/2026/05/974455/images/3b4652f4594e6b491268271124a00258e30a63dec61ab52e3c747722cdfaaa40.jpg)
[Side Panel]
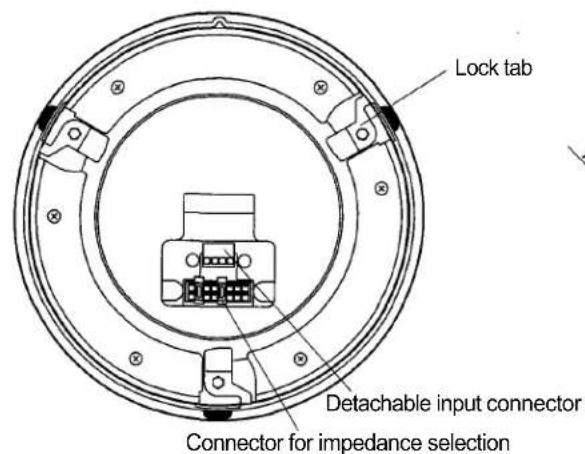
[Rear Panel]
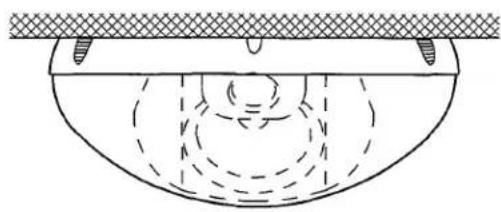
[Installation Example]
natural_image
Diagram of a basketball court with dashed lines indicating seating or movement paths (no text or labels)- Accessory (Base frame)
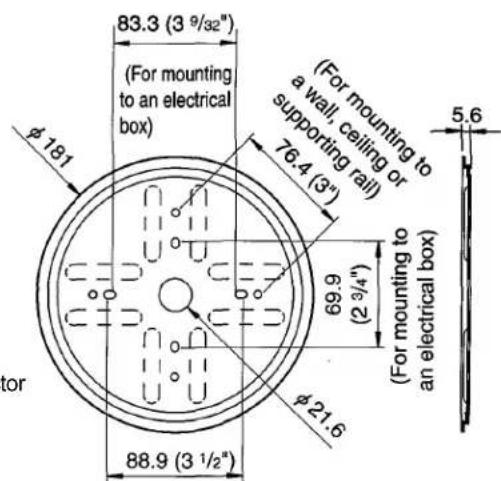
(For mounting to an electrical box)
6. INSTALLATION
6.1. Direct Wall/Ceiling Mounting
Step 1. Base frame mounting
1-1. Pull the cables out of the wall or ceiling through the hole in the center of the base frame, then strip the insulation back about 5mm from the cable ends.
Tip
- Usable cable: Solid cable or stranded cable (0.2 mm² - 2.5 mm²) (Corresponding to AWG No. 24-14)
- The base frame hole can also be used for 1/2 EMT conduit fitting.
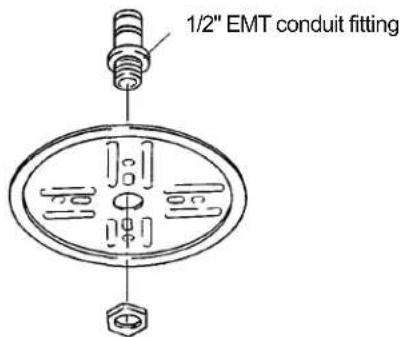
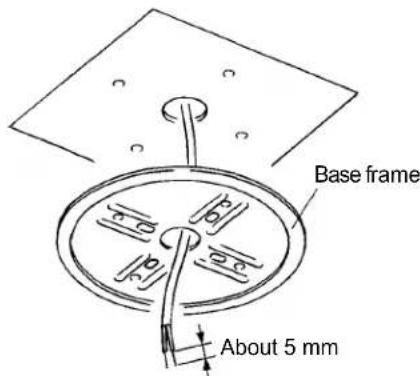
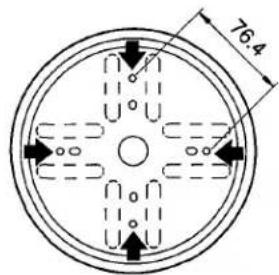
1-2. Secure the base frame to the wall or ceiling panel with screws at four places shown on the right.
Notes
- Use nuts and bolts (not supplied with the unit) that are appropriate for the structure and composition of the wall or ceiling.
- Protect the H-2WP from rain when installing. (Refer to P. 10 "7.1. Waterproofing".)
Step 2. Wiring and impedance changes
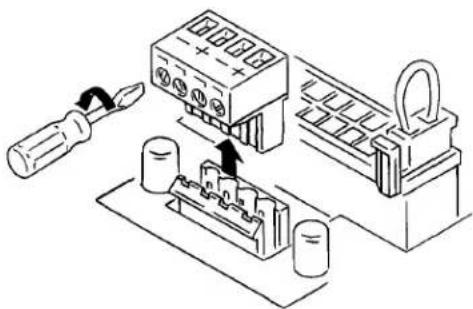
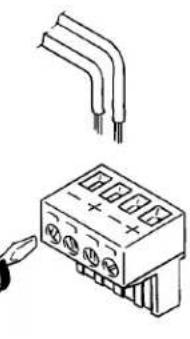
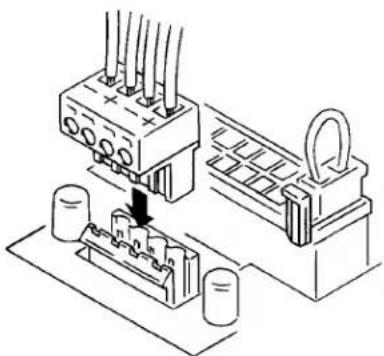
2-1. Unplug the detachable input connector from the speaker socket, and with a small slot screwdriver, loosen the screws of the terminals to use.
natural_image
Technical line drawing of a battery terminal assembly with tool and components (no text or symbols)2-2. Insert the stripped cable ends into the input connector, and tighten the connector screws.
- When not bridging connections
- When bridging connections
Note
When not bridging connections, be sure to also tighten the screws of the terminals not in use to avoid vibration or rattle noises.
natural_image
Technical line drawing of a terminal connector with three leads and a terminal block (no text or symbols)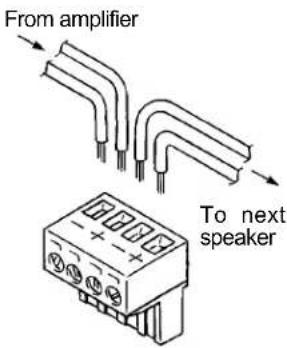
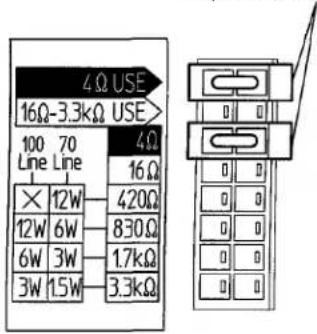
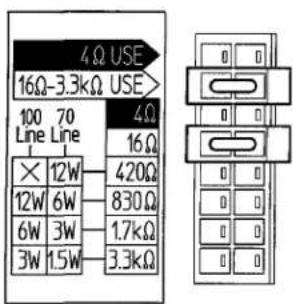
2-3. Attach two impedance selector sockets to the 16-pin connector to select the desired impedance. (Preset to 12 W for 100 V line and 6 W for 70 V line.)
Note
The speakers are designed to be used for both 70 V and 100 V line applications. When using the 100 V line, do not select the "420 Ω impedance, since the speaker itself or power amplifier may be damaged.
- When selecting 4
- When selecting 16
- When selecting 830 (preset by the factory)
Impedance selector socket
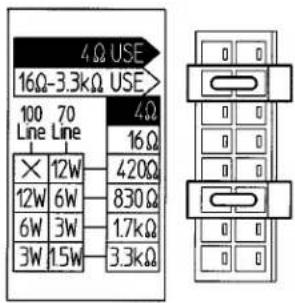
2-4. Insert the detachable input connector into the speaker socket.
natural_image
Technical line drawing of an electrical connector assembly with no visible text or symbolsStep 3. Speaker and grille mounting
3-1. Rotate the three speaker lock tabs away from their locking position on the edge of speaker.
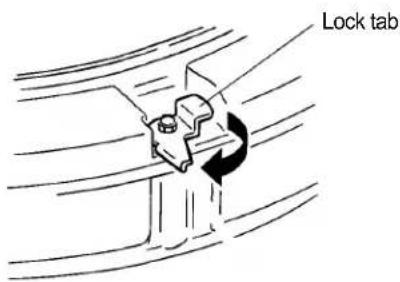
3-2. After aligning the speaker with the base frame, rotate the three lock tabs back into position to clamp the speaker to the base frame. (Temporary fixing state.)
Note
When mounting the speaker, do not touch its paper cone, as permanent damage to the speaker may result.
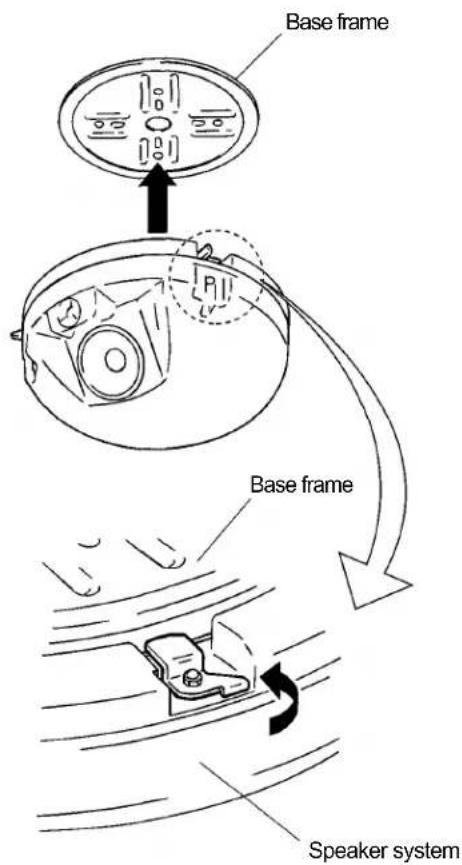
3-3. Position the speaker and tighten the three locking screws.
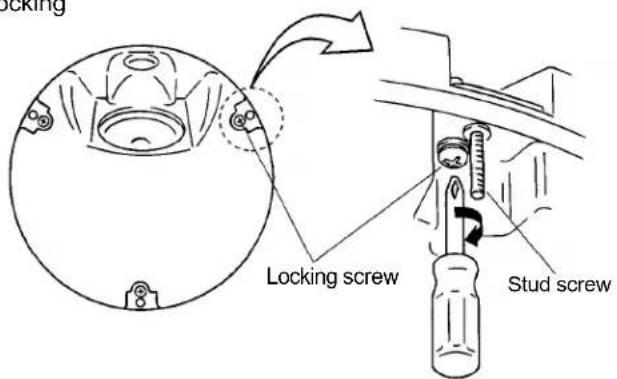
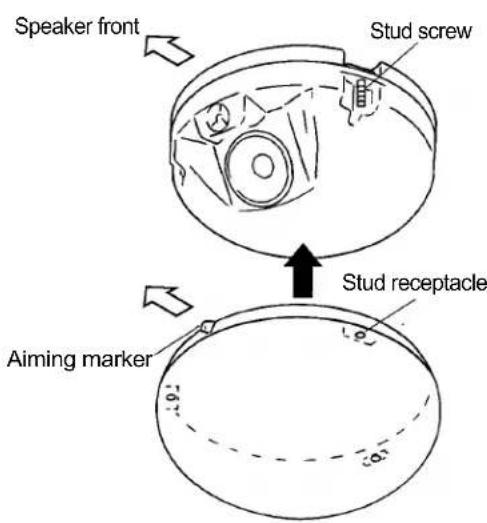
3-4. Set the front grille's aiming marker to the speaker front (i.e. speaker orientation) so that the three stud screws align with the corresponding stud receptacles, then push the grille onto the speaker.
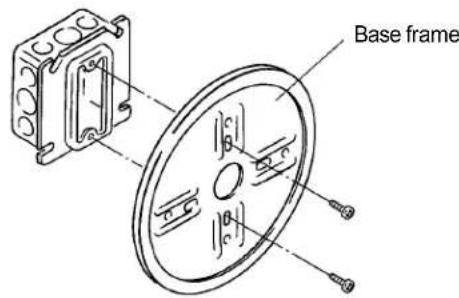
6.2. Mounting the Speaker using a Electrical Box
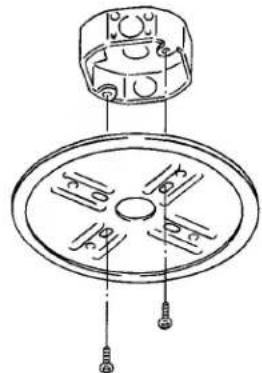
The speaker system can be mounted to walls or ceilings using a electrical box*. Mount the base frame to the electrical box using two holes shown in the figure below. Further mounting procedures are the same as detailed in Steps 2 and 3.
* Distance between mounting holes: 69.9 mm (2 3/4), 83.3 mm (3 9/32) or 88.9 mm (3 1/2)
- Mounting example 1
- Mounting example 2
natural_image
Technical line drawing of a mechanical component with mounting holes and a central hub (no text or symbols)Memo
Electrical box mounting screws are attached to the speaker.
6.3. Mounting the Speaker using Supporting Rails
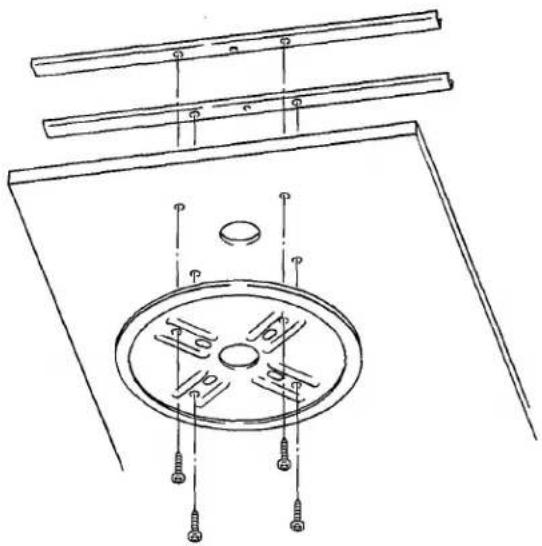
The speaker system can also be mounted to walls or ceilings using supporting rails. Mount the base frame to the rails using four holes shown in the figure below. Follow Steps 2 and 3.
natural_image
Technical line drawing of a mechanical assembly with mounting brackets and a central circular component (no text or symbols)6.4. Removing the Front Grille
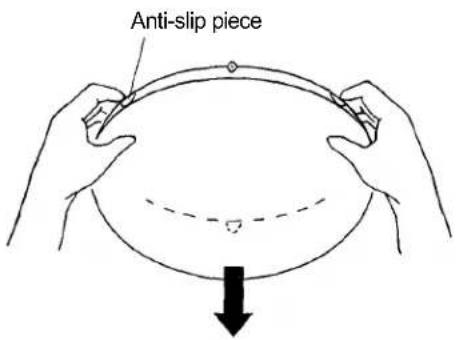
Be sure to use the front grille's three anti-slip pieces when detaching the grille from the speaker. First carefully pull the grille by hand from two positions, and then detach from the one remaining position.
Caution
If you raise only one or two of the three anti-slip pieces, the front grille may be broken. Be sure to pull its three pieces out evenly and gradually.
7. OUTDOOR USE (H-2WP ONLY)
7.1. Waterproofing
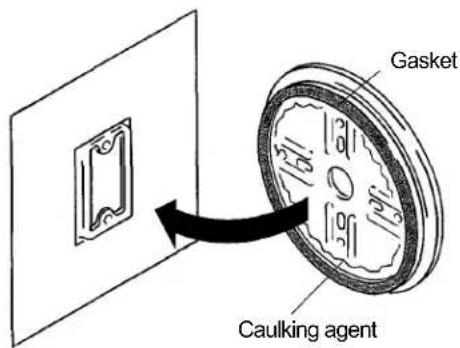
The H-2WP's base frame has a gasket for watertightness. To completely prevent water from getting into a gap between the base frame and wall or ceiling panel, apply caulking agent over the inside of the gasket before mounting the base frame.
7.2. Speaker Mounting Angle
When mounting the H-2WP speaker on a wall, to ensure its watertightness it must not be tilted any more than 45 degrees up from its downward-facing position.
Notes
- The H-2WP features drip-proof construction. However, do not dash water over it when cleaning as this may cause damage to the speaker components.
- When installing the H-2WP outdoors in a snowy area, protect the speaker so that it is not covered with snow.
8. REPAINTING THE FRONT GRILLE
Follow the procedures below to change the color of the grille.
- Wipe dirt off the front grille with a soft cloth moistened with a detergent before painting. Do not use volatile liquids such as thinner.
- Uniformly spray a thin coating of paint over the grille changing the spraying positions gradually.
Notes
- Do not use a roller or brush to paint because the meshes of the grille could be clogged with paint.
- Use paint that is appropriate for the composition of the front grille (grille and frame).
[H-2] Grille: Rolled steel plate
Frame: Fire-resistant ABS resin
[H-2WP] Grille: Stainless steel
Frame: AES resin
- Follow the instructions on the paint when painting.
- After the paint dries, repeat Step 2 once or twice to repaint.
Note: Be sure to repeat Step 2 at least twice.
9. PROTECTION CIRCUITRY INFORMATION
- The speaker has built-in overload protection circuitry. If there is an extremely high level input signal to the speaker, the overload protection circuitry is activated and cuts off the signal input to the speaker component.
- A sudden drop of the sound volume level during speaker operation indicates that the overload protection circuitry has been activated. In such a case, reduce the amplifier volume and wait. The protection circuitry is automatically reset after approximately 3-30 seconds. After the circuitry is reset, set the volume at a lower level than before.
Important Note
This overload protection circuitry does not completely protect the speaker component. Depending on the nature of the excessive signal applied to the loudspeaker, there may be damage to the loudspeaker components before the protection circuitry can operate. Also, depending on the duration of the excessive input signal, the protection circuitry may be damaged and will not recover. Take special care that the excessive input is not applied to the speaker during use.
10. EQUALIZATION
- The H-2 and H-2WP are designed to provide good quality sound without additional equalization. However, by equalizing them as shown below, sounds can be made more powerful and intelligible.
- Using a digital signal processor such as DP-0202 or DP-0204, make the following equalization setting.
| Filter | Frequency | Gain | Q |
| HPF | 63 Hz | — | Q 0.707 |
| PEQ | 100 Hz | +10 dB | Q 1.871 |
| PEQ | 200 Hz | -5 dB | Q 1.414 |
| PEQ | 5 kHz | + 1.5dB | Q 0.305 |
| LPF | 15.8 kHz | — | Q 0.500 |
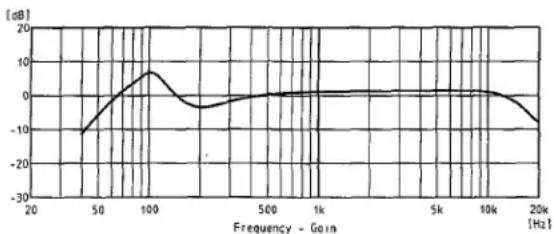
line
| Frequency - Gain [Hz] | Value (dB) | | --------------------- | ---------- | | 20 | -10 | | 50 | -5 | | 100 | 5 | | 500 | 0 | | 1k | 0 | | 5k | 0 | | 10k | 0 | | 20k | -5 |11. SPECIFICATIONS
| Model No. | H-2 |
| Enclosure Type | Sealed type |
| Power Handling | 120 W (continuous program input, 4 loaded)40 W (continuous pink noise input, 4 loaded)*1 |
| Rated Input | 12 W (16 or high impedance) |
| Rated Impedance | 4 Ω16 Ω70 V line: 420 (Ω2 W), 830 (6ΩW), 1.7 k (3 W), 3.3 k (1.5 W)100 V line: 830 (Ω2 W), 1.7k (6 W), 3.3k (3 W)Ω |
| Output Sound Pressure Level | 88 dB (1 W, 1 m, 2πloading)*2 |
| Frequency Response | 100 Hz to 20 kHz—10 dB, 2π loading) |
| Crossover Frequency | 5,000 Hz |
| Speaker Element | Low frequency: 10 cm cone woofer (neodymium magnet)High frequency: Balanced dome tweeter |
| Input Terminal | Detachable screw terminal, (+)/(-) 2 each (for bridging connection) |
| Usable Cable | Solid cable or stranded cable: 0.2 mm2 - 2.5 mm2 (Corresponding to AWG No. 24-14) |
| Material and Finish | Enclosure: Fire-resistant ABS resin (UL 94V-0), blackGrille frame: Fire-resistant ABS resin (UL 94V-0), whiteGrille: Rolled steel plate, white, paintBase frame: Rolled steel plate, pre-coating |
| Dimensions | φ 268 x 111 mm |
| Weight | 2.1 kg (including base frame) |
| Model No. | H-2WP |
| Enclosure Type | Sealed type |
| Power Handling | 120 W (continuous program input, 4 loaded)40 W (continuous pink noise input, 4 loaded)* ^1 |
| Rated Input | 12 W (16 Ω or high impedance) |
| Rated Impedance | 4Ω6 Ω70 V line: 420 Ω (12W), 830 Ω (6W), 1.7k Ω (3W), 3.3k Ω (1.5W)100 V line: 830 Ω(2W), 1.7k (6W), 3.3k (3W)Ω |
| Output Sound Pressure Level | 88 dB (1 W, 1m, 2 loading)* ^2 |
| Frequency Response | 100 Hz to 20 kHz (—10 dB, 2π loading) |
| Crossover Frequency | 5,000 Hz |
| Speaker Element | Low frequency: 10 cm cone woofer (neodymium magnet)High frequency: Balanced dome tweeter |
| Input Terminal | Detachable screw terminal, (+)/(-) 2 each (for bridging connection) |
| Usable Cable | Solid cable or stranded cable: 0.2 mm ^2 - 2.5 mm ^2 (Corresponding to AWG No. 24-14) |
| Material and Finish | Enclosure: Fire-resistant ABS resin (UL 94V-0), blackGrille frame: AES resin, whiteGrille: Stainless steel, white, paintBase frame: Stainless steel |
| Dimensions | 268 x 111 mm |
| Weight | 2.1 kg (including base frame) |
*1 Continuous 24 hours, band-limited pink noise (50 to 20,000 Hz)
*2 Pink noise (1,000 Hz to 10,000 Hz)
Note : The design and specifications are subject to change without notice for improvement.
- Accessories
Base frame 1
Electrical box mounting screw
M4 × 25 2
UNC No. 8-32 x 32 mm 2
UNC No. 6-32×32 mm 2
Spring washer 2
Plain washer 2
- TABLE OF CONTENTS
- SAFETY PRECAUTIONS
- Safety Symbol and Message Conventions
- WARNING
- CAUTION
- ■ When Installing the Unit
- ■ When the Unit is in Use
- GENERAL DESCRIPTION
- FEATURES
- HANDLING PRECAUTIONS
- NOMENCLATURE
- INSTALLATION
- Direct Wall/Ceiling Mounting
- Step 1. Base frame mounting
- Tip
- Notes
- Step 2. Wiring and impedance changes
- Note
- Step 3. Speaker and grille mounting
- Mounting the Speaker using a Electrical Box
- Memo
- Mounting the Speaker using Supporting Rails
- Removing the Front Grille
- OUTDOOR USE (H-2WP ONLY)
- Waterproofing
- Speaker Mounting Angle
- REPAINTING THE FRONT GRILLE
- PROTECTION CIRCUITRY INFORMATION
- Important Note
- EQUALIZATION
- SPECIFICATIONS
- - Accessories
Brand : TOA
Model : H-2
Category : Loudspeaker