GPS Mini SG006 - Smartwatch Soleus - Free user manual and instructions
Find the device manual for free GPS Mini SG006 Soleus in PDF.


| Product Type | Smartwatch with GPS |
| Brand | Soleus |
| Model | GPS Mini SG006 |
| Category | Smartwatch |
| Dimensions | Approx. 45 x 45 x 10 mm |
| Weight | Approx. 50 g |
| Display | 1.3-inch LCD touchscreen |
| Power Source | Rechargeable lithium-ion battery, 200 mAh |
| Battery Life | Up to 7 days typical usage, 10 hours GPS mode |
| Charging | USB magnetic charging cable |
| Connectivity | Bluetooth 4.0, GPS |
| Compatibility | iOS 9.0+ / Android 4.4+ |
| Main Functions | GPS tracking, step counter, heart rate monitor, sleep tracking, notifications, stopwatch, alarm, sedentary reminder |
| Water Resistance | IP67 (splash proof, not for swimming) |
| Maintenance | Clean with a soft, dry cloth. Avoid harsh chemicals. |
| Safety | Keep away from strong magnetic fields. Do not expose to extreme temperatures. |
| Spare Parts & Repairability | Battery not user-replaceable. Damage may require professional repair. |
| General Information | Sync with Soleus app. Supports call and message alerts. |
Frequently Asked Questions - GPS Mini SG006 Soleus
User questions about GPS Mini SG006 Soleus
0 question about this device. Answer the ones you know or ask your own.
Ask a new question about this device
Download the instructions for your Smartwatch in PDF format for free! Find your manual GPS Mini SG006 - Soleus and take your electronic device back in hand. On this page are published all the documents necessary for the use of your device. GPS Mini SG006 by Soleus.
USER MANUAL GPS Mini SG006 Soleus
Thank you for purchasing the GPS mini Watch. This GPS Watch is packed with personal Training features like speed, trip time, laps, etc. Watch features include but not limited to the following:
12/24H Time format
World time
Dual Time T1 and T2
5 daily Alarms
RUN mode
Chronograph mode
Data mode
Set modes
This Watch can communicate with a PC to store and review your performance.
This Watch uses a rechargeable battery that can be charged through USB port of your PC.
Caring for your GPS Watch:
Clean your GPS Watch with a dampened cloth preferably with mild detergent solution. Wipe dry using a dry cloth. Do not use chemical cleaners and solvents that may damage plastic components.
Do not store your GPS Watch to prolonged exposure to extreme temperatures as this may result to permanent damage to your unit.
About GPS:
Global Positioning System (GPS) is a satellite- based navigation system made up of a network of 24 or more satellites. GPS works best in clear weather condition, anywhere in the world, 24 hours a day. Tall buildings may interfere with GPS accuracy. When 3 satellite signals are received, the Watch will have 2D GPS fixed (Latitude and Longitude). When 4 or more satellite signals are received, the Watch will have 3D GPS Fixed.
Water immersion:
This GPS Watch is designed to be water resistant up to 3 ATM. It can resist water pressure up to 30 meters. After submersion to water, please make sure to wipe dry and air dry the unit before using or charging.
Caution:
❖ Prolonged water submersion may cause electronic shorting in the unit which may cause minor skin burn or irritation.
Getting Started
Step 1) Know your Watch:
Push button location:
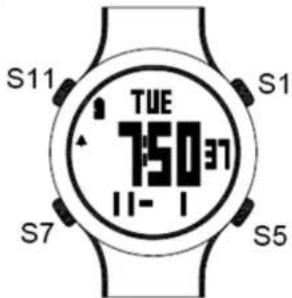
Push button Main function:
S1 - Start / Stop / Save / Increase adjust (+)
S5 - View / OK
S7 - Change Mode / Exit
S11 - Light / Set / Save / Lap / Decrease adjust (-)

SOLEUS
GPS mini
Step 2) Charging the Battery:
Charge the unit for at least 4.5 hours before first use. The length of time for a fully charged battery will last depending on the actual usage. It is recommended to regularly re-charge your battery every 1-2 months even if it is not used to maintain good battery condition.
2.1) Plug your Watch to your PC USB port.
2.2) Make sure the contact pins of the watch are properly connected to your PC.
Note: Please thoroughly dry the charging contacts and surrounding area to ensure proper electrical contact and prevent corrosion.
When the battery is low, it is time to charge the watch.
Battery low condition:
You cannot turn ON the GPS when the battery is low. The watch will display LOW BATT. You need to recharge the battery in order to use the GPS again.
When the battery is almost low and you still perform your exercise, your data may not be saved. Please make sure the battery have enough battery power before doing your exercise in order not to lose your data.
Step 3) Configure your Watch:
Before using your watch, please set your Watch.
3.1) Go to SET mode and set the following parameters: AUTO LAP, TIME, UNITS, USER, NIGHT, Contrast, CHIME, ALARM, and VIEW.
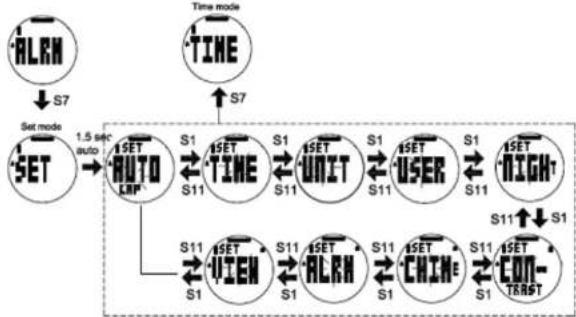
flowchart
graph TD
    A["ALRN"] -->|S7| B["SET"]
    C["TIME"] -->|S7| D["1.5 sec auto"]
    B --> E["AUTO ERP"]
    D --> E
    E --> F["S1"]
    E --> G["S11"]
    H["UNIT"] --> I["S1"]
    H --> J["S11"]
    K["USER"] --> L["S1"]
    K --> M["S11"]
    N["HIGH"] --> O["S11"]
    N --> P["S1"]
    Q["CHIME"] --> R["S1"]
    Q --> S["S1"]
    T["CON-TERST"] --> U["S1"]
    U --> V["S11"]
    W["S1"] --> X["SET"]
    W --> Y["PIEN"]
    X --> Z["ALRN"]
    Y --> AA["CHIME"]
    Z --> AB["S1"]
    AA --> AC["S1"]
    AD["S1"] --> AE["S11"]
    AF["S1"] --> AG["S1"]
    AH["S1"] --> AI["S11"]
    AJ["S1"] --> AK["S1"]
- Press S1 or S11 to change the values of the blinking digit.
- Press S5 to enter and set the selected parameter.
- The watch will auto exit setting mode if there is no push button operation in 3 to 4 minutes.
How to set the AUTOLAP:
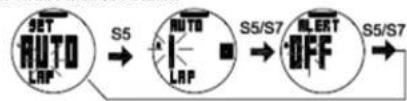
flowchart
graph LR
    A["SET AUTO LAP"] -->|S5| B["AUTO LAP"]
    B -->|S5/S7| C["BLERT OFF"]
    C -->|S5/S7| D["End"]
Auto Lap setting range: 0.4, 1, 2, 3, 4, 5, and OFF
How to set the TIME:
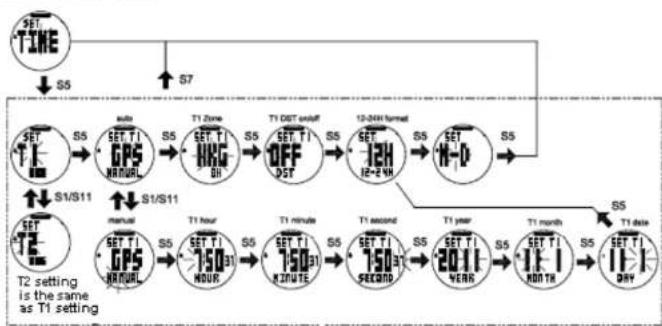
flowchart
graph TD
    A["SET TIME"] --> B["S5"]
    B --> C["S7"]
    C --> D["T2 setting is the same as T1 setting"]
    D --> E["S5"]
    E --> F["S7"]
    F --> G["T1 Date"]
    D --> H["S5"]
    H --> I["S7"]
    I --> J["T1 Month"]
    J --> K["S5"]
    K --> L["S7"]
    L --> M["T2 setting"]
    style A fill:#f9f,stroke:#333
    style D fill:#ccf,stroke:#333
• Year range: 2001 to 2099
• Total of 36 city codes are available for various Time zones.
• Time can be displayed in 12 hour or 24 hour format
• Dual time zone Time 1 and Time 2

SOLEUS
GPS mini
How to set the UNITS:
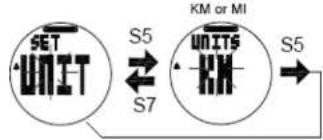
flowchart
graph LR
    A["UNIT"] -->|S5| B["KMT"]
    B -->|S5| C["Output"]
    A <-->|S7| B
How to set USER details:

flowchart
graph LR
    A["SET USER"] --> B["GENDER HALE FEMALE"]
    B --> C["AGE 25"]
    C --> D["HEIGHT 65 KG"]
    D --> E["HEIGHT 170 CH"]
    E --> F["S5/S7"]
    E --> G["S5/S7"]
    E --> H["S5/S7"]
• Age range: 7 to 99 default: 25
• Weight range: 20-255 KG (44-561 LBS) default 65 KG (143 LBS)
• Height range: 91-241 cm (3'00" to 7'11")
How to set the NIGHT mode function:
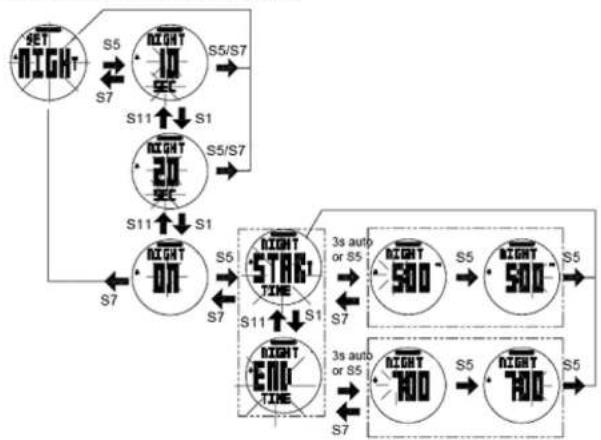
flowchart
graph TD
    A["SET/RIGHT"] -->|S5| B["S5"]
    A -->|S7| C["S11"]
    C -->|S1| D["S5/S7"]
    D --> E["S5"]
    E --> F["S11"]
    F --> G["S1"]
    G --> H["S5"]
    H --> I["S5"]
    I --> J["S5"]
    J --> K["S5"]
    K --> L["S5"]
    L --> M["S5"]
    M --> N["S5"]
    N --> O["S5"]
    O --> P["S5"]
    P --> Q["S5"]
    Q --> R["S5"]
    R --> S["S5"]
    S --> T["S5"]
    T --> U["S5"]
    U --> V["S5"]
    V --> W["S5"]
    W --> X["S5"]
    X --> Y["S5"]
    Y --> Z["S5"]
    Z --> AA["S5"]
    AA --> AB["S5"]
    AB --> AC["S5"]
    AC --> AD["S5"]
    AD --> AE["S5"]
    AE --> AF["S5"]
    AF --> AG["S5"]
    AG --> AH["S5"]
    AH --> AI["S5"]
    AI --> AJ["S5"]
    AJ --> AK["S5"]
    AK --> AL["S5"]
    AL --> AM["S5"]
    AM --> AN["S5"]
    AN --> AO["S5"]
    AO --> AP["S5"]
    AP --> AQ["S5"]
    AQ --> AR["S5"]
    AR --> AS["S5"]
    AS --> AT["S5"]
    AT --> AU["S5"]
    AU --> AV["S5"]
    AV --> AW["S5"]
    AW --> AX["S5"]
    AX --> AY["S5"]
    AY --> AZ["S5"]
    AZ --> BA["S5"]
    BA --> BB["S5"]
    BB --> BC["S5"]
    BC --> BD["S5"]
    BD --> BE["S5"]
    BE --> BF["S5"]
    BF --> BG["S5"]
    BG --> BH["S5"]
    BH --> BI["S5"]
    BI --> BJ["S5"]
    BJ --> BK["S5"]
    BK --> BL["S5"]
    BL --> BM["S5"]
    BM --> BN["S5"]
    BN --> BO["S5"]
    BO --> BP["S5"]
    BP --> BQ["S5"]
    BQ --> BR["S5"]
    BR --> BS["S5"]
    BS --> BT["S5"]
    BT --> BU["S5"]
    BU --> BV["S5"]
    BV --> BW["S5"]
    BW --> BX["S5"]
    BX --> BY["S5"]
    BY --> BZ["S5"]
    BZ --> CA["S5"]
    CA --> CB["S5"]
    CB --> CC["S5"]
    CC --> CD["S5"]
    CD --> CE["S5"]
    CE --> CF["S5"]
    CF --> CG["S5"]
    CG --> CH["S5"]
    CH --> CI["S5"]
    CI --> CJ["S5"]
    CJ --> CK["S5"]
    CK --> CL["S5"]
    CL --> CM["S5"]
    CM --> CN["S5"]
    CN --> CO["S5"]
    CO --> CP["S5"]
    CP --> CQ["S5"]
    CQ --> CR["S5"]
    CR --> CS["S5"]
    CS --> CT["S5"]
    CT --> CU["S5"]
    CU --> CV["S5"]
    CV --> CW["S5"]
    CW --> CX["S5"]
    CX --> CY["S5"]
    CY --> CZ["S5"]
Night mode settings:
• 10 SECONDS – Press S11 will turn ON the Light for 10 seconds.
• 20 SECONDS – Press S11 will turn ON the Light for 20 seconds.
- NIGHT ON – Default Start Time / END Time for NIGHT ON setting is 5 PM to 7 AM. Following are the characteristics of NIGHT ON setting:
Start Time and END TIME for NIGHT ON setting can be changed in SET mode/ NIGHT.
When the Night setting is ON, pressing any button within the Start Time / End Time will turn ON the EL for 10 seconds.
- Outside the Start time / End Time, only press S11 will turn ON the EL for 10 seconds.
When the chronograph is running within the Start Time/ End Time, the EL will be always ON. It will turn OFF 10 seconds after the chronograph is stopped.
How to set the LCD display CONTRAST:
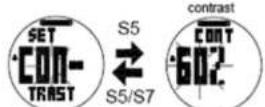
Contrast range = 10 to 100%
How to set the CHIME:

- When Chime is ON, the Vibration alarm function is also ON.
How to set the ALARM:
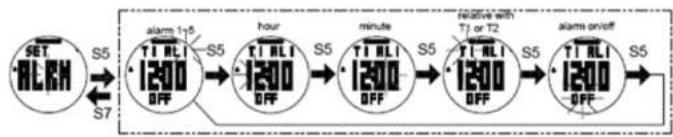
flowchart
graph LR
    A["ALRH SET"] -->|S5| B["1200 OFF alarm 1+5"]
    B -->|S5| C["1200 OFF hour"]
    C -->|S5| D["1200 OFF minute"]
    D -->|S5| E["1200 OFF relative with T1 or T2"]
    E -->|S5| F["1200 OFF alarms on/off"]
    F -->|S5| G["1200 OFF"]
    G -->|S5| H["1200 OFF"]
    H -->|S7| I["←"]

SOLEUS
GPS mini
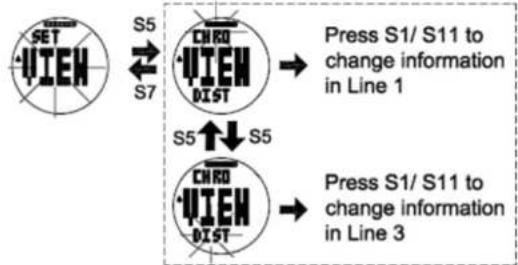
How to set the VIEW
flowchart
graph TD
    A["SET/VIEW"] -->|S5 S7| B["CHED/VIEW/DIST"]
    B --> C["Press S1/S11 to change information in Line 1"]
    A -->|S5 S7| D["CHED/VIEW/DIST"]
    D --> E["Press S1/S11 to change information in Line 3"]
You can select what information to display in Line 1 & Line 3 for RUN mode
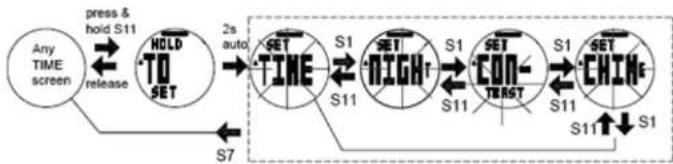
3.2) TIME, NIGHT, CONTRAST, & CHIME, can also be set in TIME quick SET mode.
flowchart
graph LR
    A["Any TIME screen"] -->|press & hold S11| B["HOLD TO SET"]
    B --> C["2s auto"]
    C --> D["SET TIME"]
    D --> E["S1"]
    D --> F["NIGHT"]
    F --> G["S1"]
    F --> H["CON-TERST"]
    H --> I["S1"]
    H --> J["CHINE"]
    J --> K["S11"]
    K --> L["S7"]
    L --> M["← release"]
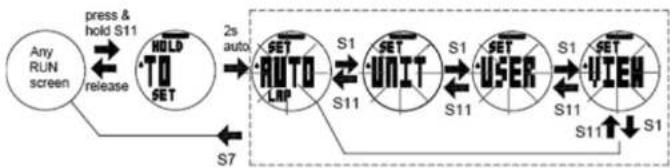
3.3) AUTO LAP, UNITS, USER, and VIEW can also be set in RUN quick SET mode.
flowchart
graph LR
    A["Any RUN screen"] -->|press & hold S11| B["HOLD TO SET"]
    B --> C["2s auto"]
    C --> D["SET AUTO LAB"]
    D --> E["S1"]
    E --> F["UNIT"]
    F --> G["S1"]
    G --> H["USER"]
    H --> I["S1"]
    I --> J["VIEW"]
    J --> K["S11"]
    K --> L["S7"]
    L --> M["release"]
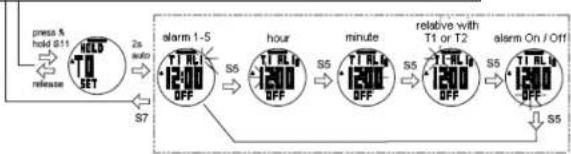
3.4) ALARM can also be set in ALARM quick SET mode.

flowchart
graph LR
    A["Any ALARM screen"] -->|press & hold S11| B["HOLD TO SET"]
    B -->|2s auto| C["alarm 1x5"]
    C --> D["S5"]
    D --> E["TI BLI 1200 OPP"]
    E --> F["hour"]
    F --> G["S5"]
    G --> H["TI BLI 1200 OPP"]
    H --> I["minute"]
    I --> J["S5"]
    J --> K["TI BLI 1200 OPP"]
    K --> L["relative with T1 or T2"]
    L --> M["S5"]
    M --> N["TI BLI 1200 OPP"]
    N --> O["S5"]
    O --> P["alarm onoff"]
    P --> Q["S5"]
    Q --> R["open"]
    R --> S["S7"]
Step 4) Acquire Satellite signals:
In order to get the correct time of day and begin using your watch, you have to acquire the Satellite signals. It may take a few minutes to get the signals.
4.1) Go outside to an open area away from tall buildings and trees. Orient the GPS antenna towards the sky for best reception. The antenna is located at the 12 o'clock position of the watch.
4.2) Stand still and do not begin moving while locating the Satellites until the GPS signals are already received.
4.3) How to Turn ON the GPS: Following are the possible ways to turn on the GPS.
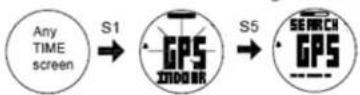
4.3.1) Press S1 in TIME mode. The Watch will display the GPS / INDOOR selection screen. Select GPS and press S5. The watch will start searching for GPS and go to RUN mode.
-Start searching GPS and go to RUN mode

SOLEUS
GPS mini
4.3.2) Press S7 to enter RUN or CHRONO mode.
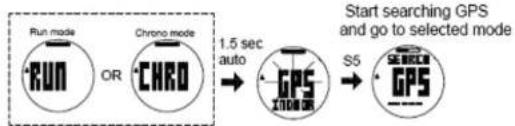
flowchart
graph LR
    A["Run mode"] --> B["OR"]
    C["Chro mode"] --> D["CHRD"]
    E["Start searching GPS and go to selected mode"] --> F["S5"]
    style A fill:#f9f,stroke:#333
    style C fill:#f9f,stroke:#333
    style E fill:#f9f,stroke:#333
    style F fill:#f9f,stroke:#333
4.4.3) When the chronograph is stopped and reset in any mode, the GPS will go to TIME mode after 10 minutes and the GPS will be on Standby mode (GPS ring icon flashing). The GPS will auto turn OFF after 1 hour (GPS ring icon is OFF).
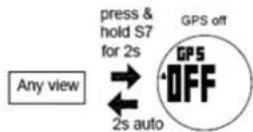
4.3.3) Press and hold S7 for 2 seconds from any mode while GPS is initially OFF.

flowchart
graph LR
    A["Any view"] --> B["press & hold S7 for 2s"]
    B --> C["GPS ON"]
    C --> D["2s auto"]
    D --> E["SEARCH GPS"]
    E --> F["Start searching GPS and go to RUN mode"]
4.4) How to turn OFF the GPS:
4.4.1) Press and hold S7 for 2 seconds from any mode while GPS is initially ON.
GPS signals and its meaning:
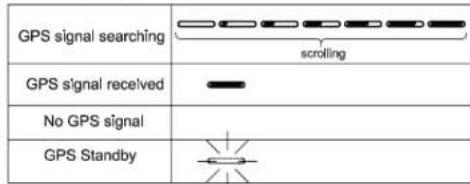
You will hear a beep sound when the Watch has received a GPS signal or when the GPS signal has been lost. LOST GPS signal will also be displayed in the screen.
4.4.2) Press S7 to enter RUN or CHRONO mode. Select INDOOR and press S5 to confirm.
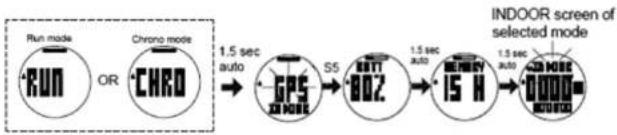
flowchart
graph LR
    A["Run mode"] --> B["OR"]
    B --> C["Chron Mode"]
    C --> D["GPS"]
    D --> E["802"]
    E --> F["15 H"]
    F --> G["INDOOR screen of selected mode"]
    style A fill:#f9f,stroke:#333
    style B fill:#f9f,stroke:#333
    style C fill:#f9f,stroke:#333
    style D fill:#ccf,stroke:#333
    style E fill:#ccf,stroke:#333
    style F fill:#ccf,stroke:#333
    style G fill:#ccf,stroke:#333

SOLEUS
GPS mini
Step 5) Go for a RUN:
5.1) Using RUN mode:
5.1.1) How to enter RUN mode:
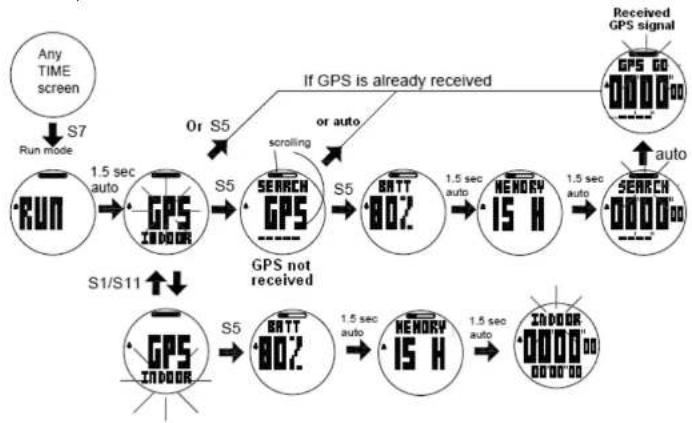
flowchart
graph TD
    A["Any TIME screen"] --> B["Run mode"]
    B --> C["1.5 sec auto"]
    C --> D["GPS I/OODR"]
    D --> E["S5"]
    E --> F["SEARCH GPS"]
    F --> G["S5"]
    G --> H["BATT 802"]
    H --> I["1.5 sec auto"]
    I --> J["HENDRY IS H"]
    J --> K["1.5 sec auto"]
    K --> L["SEARCH 0000"]
    L --> M["Received GPS signal"]
    M --> N["GPS GO 0000000"]
    N --> O["Auto"]
    P["On/Down"] --> Q["S1/S11"]
    Q --> R["GPS I/OODR"]
    R --> S["S5"]
    S --> T["BATT 802"]
    T --> U["HENDRY IS H"]
    U --> V["1.5 sec auto"]
    V --> W["INDOOR 0000000"]
    W --> X["Auto"]
    style A fill:#f9f,stroke:#333
    style M fill:#ccf,stroke:#333
5.1.2) How to START, TAKE LAP, STOP, and SAVE:
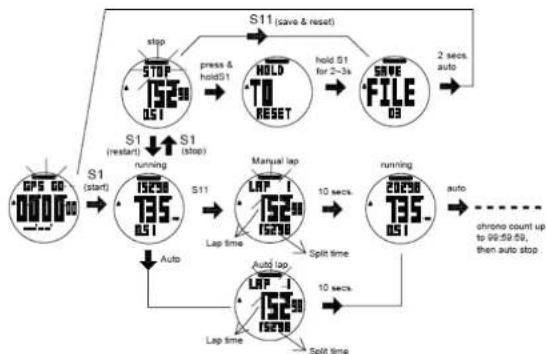
flowchart
graph TD
    A["GPS 60 0000"] --> B["S1 (start)"]
    B --> C["S1 (restart)"]
    C --> D["S1 running"]
    D --> E["S11"]
    E --> F["Manual lap"]
    F --> G["running"]
    G --> H["auto"]
    H --> I["chrona count up to 95:50:50, then auto stop"]

    subgraph S11
        J["stop"] --> K["S11 (save & reset)"]
        L["press & holdS1"] --> M["HOLD TO RESET"]
        N["hold S1 for 2-3s"] --> O["SAVE FILE 03"]
        P["2 secs. auto"] --> Q
    end

    subgraph S1
        R["S1 (stop)"] --> S["S1 (restart)"]
        T["simult"] --> U["simult running"]
        V["simult"] --> W["simult lap"]
        X["simult"] --> Y["simult lap"]
        Z["simult"] --> AA["simult lap"]
        AB["simult"] --> AC["simult lap"]
        AD["simult"] --> AE["simult lap"]
        AF["simult"] --> AG["simult lap"]
        AH["simult"] --> AI["simult lap"]
        AJ["simult"] --> AK["simult lap"]
        AL["simult"] --> AM["simult lap"]
        AN["simult"] --> AO["simult lap"]
        AP["simult"] --> AQ["simult lap"]
        AR["simult"] --> AS["simult lap"]
        AT["simult"] --> AU["simult lap"]
        AV["simult"] --> AW["simult lap"]
        AX["simult"] --> AY["simult lap"]
        AZ["simult"] --> BA["simult lap"]
        BB["simult"] --> BC["simult lap"]
        BD["simult"] --> BE["simult lap"]
        BF["simult"] --> BG["simult lap"]
        BH["simult"] --> BI["simult lap"]
        BJ["simult"] --> BK["simult lap"]
        BL["simult"] --> BM["simult lap"]
        BN["simult"] --> BO["simult lap"]
        BP["simult"] --> BQ["simult lap"]
        BR["simult"] --> BS["simult lap"]
        BT["simult"] --> BU["simult lap"]
        BV["simult"] --> BW["simult lap"]
        BX["simult"] --> BY["simult lap"]
        BZ["simult"] --> CA["simult lap"]
        CB["simult"] --> CC["simult lap"]
        DD["simult"] --> EE["simult lap"]
        FF["simult"] --> DG["simult lap"]
        DH["simult"] --> DI["simult lap"]
        DJ["simult"] --> DK["simult lap"]
        DL["simult"] --> DM["simult lap"]
        DE["simult"] --> DF["simult lap"]
        DG["Simult"] --> DG
    end
Note: The watch will take Auto Lap based on the Distance set in Auto Lap setting.
5.1.3) How to change views: Press S5 to change the information displayed in Line 2. Following are the information displayed as you press S5:
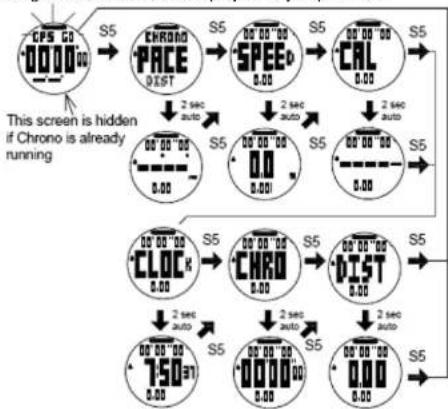
flowchart
graph TD
    A["CPS CO 0000"] --> B["S5"]
    B --> C["CHRONO PACE DIST"]
    C --> D["S5"]
    D --> E["00:00'00 SPEED 0.00"]
    E --> F["S5"]
    F --> G["00:00'00 CAL 0.00"]
    G --> H["S5"]
    H --> I["2 sec auto"]
    I --> J["2 sec auto"]
    J --> K["S5"]
    K --> L["00:00'00 0.00"]
    L --> M["S5"]
    M --> N["2 sec auto"]
    N --> O["S5"]
    O --> P["00:00'00 CLOCK 0.00"]
    P --> Q["S5"]
    Q --> R["00:00'00 CHRO 0.00"]
    R --> S["S5"]
    S --> T["00:00'00 DIST 0.00"]
    T --> U["S5"]
    U --> V["2 sec auto"]
    V --> W["S5"]
    W --> X["750 371 0.00"]
    X --> Y["S5"]
    Y --> Z["2 sec auto"]
    Z --> AA["S5"]
    AA --> AB["00:00'00 0.00"]
    AB --> AC["S5"]
    AC --> AD["2 sec auto"]
    AD --> AE["S5"]
    AE --> AF["00:00'00 0.00"]
    AF --> AG["S5"]
    AG --> AH["S5"]
Notes:
- Information displayed in Lines 1 and 3 can be changed in SET mode/ VIEW.

SOLEUS
GPS mini
- The watch will remember your previous screen view the next time you come back to RUN mode.
5.1.4) How to view your current data before saving while the chronograph is stopped. Following are the information as you press S5:
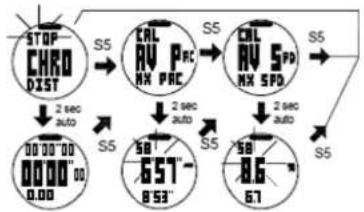
flowchart
graph TD
    A["STOP CHRD DIST"] -->|S5| B["CAI AV 5PD"]
    B -->|S5| C["CAI AV 5PD"]
    C -->|S5| D["CAI AV 5PD"]
    D -->|S5| E["CAI AV 5PD"]
    E -->|S5| F["CAI AV 5PD"]
    F -->|S5| G["CAI AV 5PD"]
    G -->|S5| H["CAI AV 5PD"]
    H -->|S5| I["CAI AV 5PD"]
    I -->|S5| J["CAI AV 5PD"]
    J -->|S5| K["CAI AV 5PD"]
    K -->|S5| L["CAI AV 5PD"]
    L -->|S5| M["CAI AV 5PD"]
    M -->|S5| N["CAI AV 5PD"]
    N -->|S5| O["CAI AV 5PD"]
    O -->|S5| P["CAI AV 5PD"]
    P -->|S5| Q["CAI AV 5PD"]
    Q -->|S5| R["CAI AV 5PD"]
    R -->|S5| S["CAI AV 5PD"]
    S -->|S5| T["CAI AV 5PD"]
    T -->|S5| U["CAI AV 5PD"]
    U -->|S5| V["CAI AV 5PD"]
    V -->|S5| W["CAI AV 5PD"]
    W -->|S5| X["CAI AV 5PD"]
    X -->|S5| Y["CAI AV 5PD"]
    Y -->|S5| Z["CAI AV 5PD"]
    Z -->|S5| AA["CAI AV 5PD"]
    AA -->|S5| AB["CAI AV 5PD"]
    AB -->|S5| AC["CAI AV 5PD"]
    AC -->|S5| AD["CAI AV 5PD"]
    AD -->|S5| AE["CAI AV 5PD"]
    AE -->|S5| AF["CAI AV 5PD"]
    AF -->|S5| AG["CAI AV 5PD"]
    AG -->|S5| AH["CAI AV 5PD"]
    AH -->|S5| AI["CAI AV 5PD"]
    AI -->|S5| AJ["CAI AV 5PD"]
    AJ -->|S5| AK["CAI AV 5PD"]
    AK -->|S5| AL["CAI AV 5PD"]
    AL -->|S5| AM["CAI AV 5PD"]
    AM -->|S5| AN["CAI AV 5PD"]
    AN -->|S5| AO["CAI AV 5PD"]
    AO -->|S5| AP["CAI AV 5PD"]
    AP -->|S5| AQ["CAI AV 5PD"]
    AQ -->|S5| AR["CAI AV 5PD"]
    AR -->|S5| AS["CAI AV 5PD"]
    AS -->|S5| AT["CAI AV 5PD"]
    AT -->|S5| AU["CAI AV 5PD"]
    AU -->|S5| AV["CAI AV 5PD"]
    AV -->|S5| AW["CAI AV 5PD"]
    AW -->|S5| AX["CAI AV 5PD"]
    AX -->|S5| AY["CAI AV 5PD"]
    AY -->|S5| AZ["CAI AV 5PD"]
    AZ -->|S5| BA["CAI AV 5PD"]
    BA -->|S5| BB["CAI AV 5PD"]
    BB -->|S5| BC["CAI AV 5PD"]
    BC -->|S5| BD["CAI AV 5PD"]
    BD -->|S5| BE["CAI AV 5PD"]
    BE -->|S5| BF["CAI AV 5PD"]
    BF -->|S5| BG["CAI AV 5PD"]
    BG -->|S5| BH["CAI AV 5PD"]
    BH -->|S5| BI["CAI AV 5PD"]
    BI -->|S5| BJ["CAI AV 5PD"]
    BJ -->|S5| BK["CAI AV 5PD"]
    BK -->|S5| BL["CAI AV 5PD"]
    BL -->|S5| BM["CAI AV 5PD"]
    BM -->|S5| BN["CAI AV 5PD"]
    BN -->|S5| BO["CAI AV 5PD"]
    BO -->|S5| BP["CAI AV 5PD"]
    BP -->|S5| BQ["CAI AV 5PD"]
    BQ -->|S5| BR["CAI AV 5PD"]
    BR -->|S5| BS["CAI AV 5PD"]
    BS -->|S5| BT["CAI AV 5PD"]
    BT -->|S5| BU["CAI AV 5PD"]
    BU -->|S5| BV["CAI AV 5PD"]
    BV -->|S5| BW["CAI AV 5PD"]
Notes:
Before going for a run exercise, it is highly recommended that you set your user profile first so that the calories will be calculated properly. Go to SET mode/USER.
When the Chronograph is stopped and reset in RUN mode, if no activity for 10 minutes, the GPS will be on Standby mode (GPS ring icon flashing) and return to TIME mode.
While in RUN mode, then the GPS signal suddenly becomes weak lost for any reason, the Watch will display LOST GPS signal until it receives GPS signal again.
Maximum of 15 hours of track record / 30 data files/ 100 laps for each data file can be saved in memory.
5.2) Using Chronograph mode:
RUN mode & CHRONO mode has the same chronograph counter. When the chronograph is started or stopped in RUN mode, the same thing happens in CHRONO mode.
5.2.1) How to enter CHRONO mode:
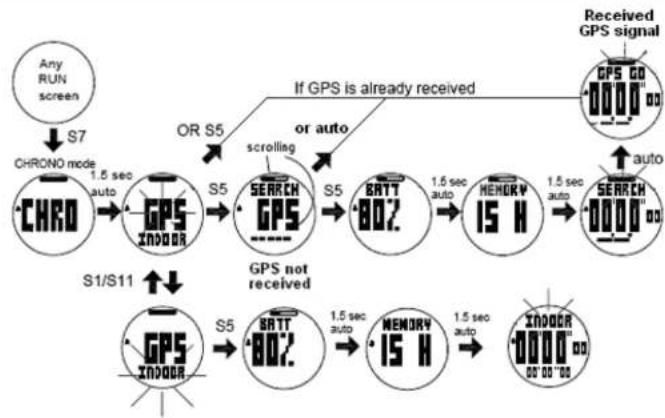
flowchart
graph TD
    A["Any RUN screen"] --> B["S7"]
    B --> C["CHRONO mode"]
    C --> D["GPS XNDOOR"]
    D --> E["S5"]
    E --> F["SEARCH GPS"]
    F --> G["S5"]
    G --> H["BATT 802"]
    H --> I["MHOKRY IS H"]
    I --> J["SEARCH 0000"]
    J --> K["Received GPS signal"]
    D --> L["OR S5"]
    L --> M["scrolling"]
    M --> N["or auto"]
    N --> O["GPS is already received"]
    O --> P["GPS not received"]
    P --> Q["S5"]
    Q --> R["BATT 802"]
    R --> S["MHOKRY IS H"]
    S --> T["1.5 sec auto"]
    T --> U["XNDOOR 0000"]
    U --> V["Received GPS signal"]
    style A fill:#f9f,stroke:#333
    style V fill:#f9f,stroke:#333
5.2.2) How to START, take LAP, STOP, and SAVE:
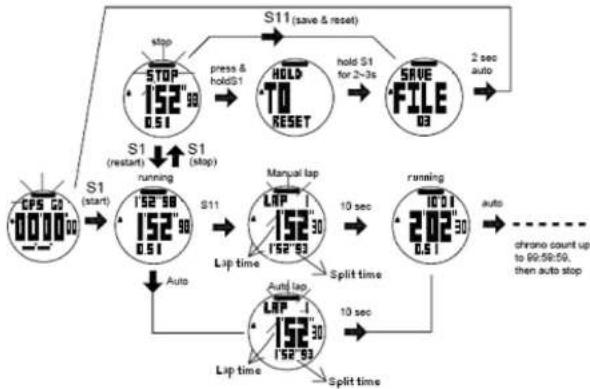
flowchart
graph TD
    A["S1 (save & reset)"] --> B["STOP: 152 90 0.51"]
    B --> C["S11 (save & reset)"]
    C --> D["hold S1 for 2-3s"]
    D --> E["SAVE FILE 03"]
    E --> F["2 sec auto"]
    F --> G["manual lap: 152 90 152'93"]
    G --> H["Lap time: 10 sec"]
    H --> I["Auto"]
    I --> J["Lap time: 10 sec"]
    J --> K["Lap time: split time"]
    K --> L[" Manual lap: 152 90 152'93"]
    L --> M["Lap time: split time"]
    M --> N["Lap time: auto"]
    N --> O["auto"]
    O --> P["chrano count up to 99:58:59, then auto stop"]
    P -.-> Q["Auto stop"]
    Q -.-> R["Auto step"]
    R --> S["S1 (start)"]
    S --> T["S1 (restart)"]
    T --> U["S1 (stop)"]
    U --> V["S1 (start)"]
    V --> W["S1 (start)"]
• The watch will take Auto Lap based on the Distance set in Auto Lap setting.

SOLEUS
GPS mini
5.2.3) Press S5 to change the information displayed in Line 3. Following are the views as your press S5:
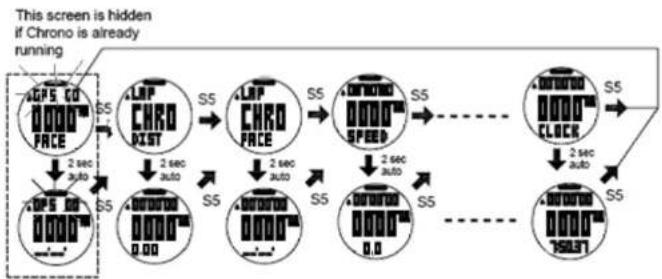
flowchart
graph TD
    A["GPS CO FACE"] -->|S5| B["LRP CHRO DIST"]
    B -->|S5| C["LRP CHRO FACE"]
    C -->|S5| D["100000 SPEED"]
    D -->|S5| E["100000 CLOCK"]
    E -->|S5| F["100000 ISO37"]
    F -->|S5| G["Clock"]
    style A fill:#f9f,stroke:#333
    style B fill:#ccf,stroke:#333
    style C fill:#ccf,stroke:#333
    style D fill:#ccf,stroke:#333
    style E fill:#ccf,stroke:#333
    style F fill:#ccf,stroke:#333
    style G fill:#ccf,stroke:#333
Note: The watch will remember your previous screen view the next time you come back to CHRONO mode.
5.2.4) How to view your current data before saving while the chronograph is stopped. Following are the information as you press S5:
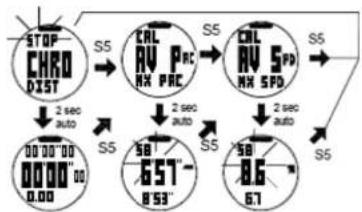
flowchart
graph TD
    A["STOP CHRD DIST"] -->|S5| B["CAL AV 5PD"]
    B -->|S5| C["CAL AV 5PD"]
    C -->|S5| D["0000 00 0.00"]
    D -->|S5| E["651-853'"]
    E -->|S5| F["67"]
    F -->|S5| G["86"]
    G -->|S5| H["2 sec auto"]
    H --> I["0000 00 0.00"]
    I --> J["2 sec auto"]
    J --> K["651-853'"]
General Operations
The Watch has the following main modes: Time, Run, Chronograph, Data, Alarm and Set modes. Press S7 to scroll through these modes. Press S1 from Time mode will also go to RUN mode (GPS/INDOOR screen appears).
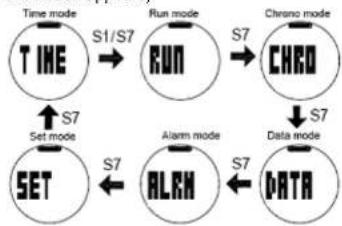
flowchart
graph TD
    A["TIME"] -->|S1/S7| B["RUN"]
    B -->|S7| C["CHRO"]
    C -->|S7| D["DATA"]
    E["SET"] -->|S7| F["ALRN"]
    F -->|S7| G["Data mode"]
    H["Set mode"] -->|S7| I["Alarm mode"]
EL backlight:
This Watch has a Night mode function. Following are the options in SET mode and their functions:
10 SECONDS – Press S11 will turn ON the Light for 10 seconds.
20 SECONDS – Press S11 will turn ON the Light for 20 seconds.
NIGHT ON - Default Start Time / END Time for NIGHT ON setting is 5 PM to 7 AM. Following are the characteristics of NIGHT ON setting:
- Start Time and END TIME for NIGHT ON setting can be changed in SET mode/ NIGHT.
When the Night setting is ON, pressing any button within the Start Time / End Time will turn ON the EL for 10 seconds. - Outside the Start time / End Time, only press S11 will turn ON the EL for 10 seconds.
When the chronograph is running within the Start Time/ End Time, the EL will be always ON. It will turn OFF 10 seconds after the chronograph is stopped.

SOLEUS
GPS mini
TIME mode
• How to enter TIME mode:
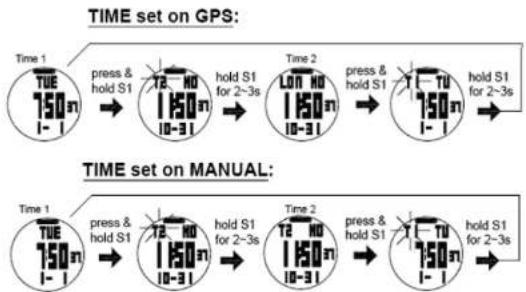
flowchart
graph LR
    subgraph_GPS_TUE_1["Time 1 TUE 750n 1-1"]
        A1["press & hold S1"] --> B1["Time 2 LON HD 150n 10-31"]
        B1 --> C1["hold S1 for 2-3s"]
    end
    subgraph_MANUAL_TUE_1["Time 1 TUE 750n 1-1"]
        A2["press & hold S1"] --> B2["Time 2 TE HD 150n 10-31"]
        B2 --> C2["hold S1 for 2-3s"]
        C2 --> D2["press & hold S1"]
        D2 --> E2["hold S1 for 2-3s"]
    end
Travelling between different Time zones
- When you are traveling to a different Time zone, you have to set your GPS Watch to your destination Time zone. We recommend setting Time 1 to your current location and Time 2 set to your destination Time zone.
- When you arrive to your destination Time zone, press & hold S1 for 2-3 seconds to change the time to Time 2.
- When you go back to your original location (Time 1), press & hold S1 for 2-3 seconds to change the time back to Time 1.
- The Time of the Watch will be synchronized with GPS TIME when you turn ON the GPS.
- Make sure that the Watch is set to the correct CITY CODE and DST ON or OFF setting so that it can display the correct time.
DATA mode
• How to enter DATA mode, view details, and delete Data:
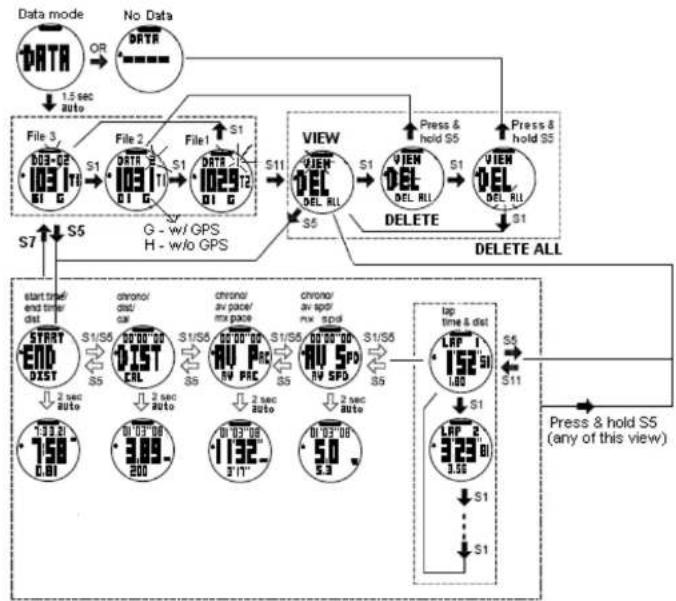
flowchart
graph TD
    A["DATA"] -->|OR 1.5 sec auto| B["File 3"]
    B -->|S1| C["File 2"]
    C -->|S1| D["File 1"]
    D -->|S1| E["VIEW"]
    E -->|S1| F["DELETE"]
    F -->|S1| G["CREATE ALL"]
    G --> H["UP time & dist"]
    H -->|S5| I["Press & hold S5 (any of this view)"]
    H -->|S11| J["Start Time/End Time Dist"]
    H -->|S11| K["Chronor/ dist/ car"]
    H -->|S11| L["Chronor/ av pace/ mix pace"]
    H -->|S11| M["Chronor/ av spd/ mix spd"]
    H -->|S11| N["LP 2 3.00"]
    H -->|S11| O["LP 3 3.00"]
    H -->|S11| P["S1"]
    H -->|S11| Q["S1"]
    H -->|S11| R["S1"]
    H -->|S11| S["S1"]
    H -->|S11| T["S1"]
    H -->|S11| U["S1"]
    H -->|S11| V["S1"]
    H -->|S11| W["S1"]
    H -->|S11| X["S1"]
    H -->|S11| Y["S1"]
    H -->|S11| Z["S1"]
    H -->|S11| AA["S1"]
    H -->|S11| AB["S1"]
    H -->|S11| AC["S1"]
    H -->|S11| AD["S1"]
    H -->|S11| AE["S1"]
    H -->|S11| AF["S1"]
    H -->|S11| AG["S1"]
    H -->|S11| AH["S1"]
    H -->|S11| AI["S1"]
    H -->|S11| AJ["S1"]
    H -->|S11| AK["S1"]
    H -->|S11| AL["S1"]
    H -->|S11| AM["S1"]
    H -->|S11| AN["S1"]
    H -->|S11| AO["S1"]
    H -->|S11| AP["S1"]
    H -->|S11| AQ["S1"]
    H -->|S11| AR["S1"]
    H -->|S11| AS["S1"]
    H -->|S11| AT["S1"]
    H -->|S11| AU["S1"]
    H -->|S11| AV["S1"]
    H -->|S11| AW["S1"]
    H -->|S11| AX["S1"]
    H -->|S11| AY["S1"]

SOLEUS
GPS mini
Data numbering system/ Legend:

Sample data number: D03 03 1031 - 1 02 G
| D | Data |
| 03 | Total number of files |
| 03 | File number counter |
| 10 | Month |
| 31 | Date |
| 1 | Refer to Time 1 or 2 for time 2 |
| 02 | File number of the day |
| G | GPS workout, H for INDOOR workout |
ALARM mode
- Alarm will sound for 20 seconds at alarm time. Pressing any button will stop the alarm sound without the button function. When Alarm is ON, the alarm icon is displayed in all modes.
• How to enter ALARM mode (ALARM setting):


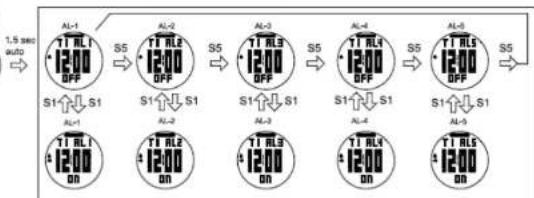
flowchart
graph LR
    A["AL-1 T1 RLI 1200 OFF"] --> B["S5"]
    B --> C["AL-2 T1 RLE 1200 OFF"]
    C --> D["S5"]
    D --> E["AL-3 T1 RLS 1200 OFF"]
    E --> F["S5"]
    F --> G["AL-4 T1 RLN 1200 OFF"]
    G --> H["S5"]
    H --> I["AL-5 T1 RLS 1200 OFF"]
    I --> J["S5"]
    J --> K["AL-6 T1 RLS 1200 OFF"]
    K --> L["S5"]
    L --> M["AL-7 T1 RLS 1200 OFF"]
    M --> N["S5"]
    N --> O["AL-8 T1 RLS 1200 OFF"]
    O --> P["S5"]
    P --> Q["AL-9 T1 RLS 1200 OFF"]
    Q --> R["S5"]
    R --> S["AL-10 T1 RLS 1200 OFF"]
    S --> T["S5"]
    T --> U["AL-11 T1 RLS 1200 ON"]
    U --> V["S1 ↑↓ S1"]
    V --> W["S1 ↑↓ S1"]
    W --> X["S1 ↑↓ S1"]
    X --> Y["S1 ↑↓ S1"]
    Y --> Z["S1 ↑↓ S1"]
    Z --> AA["S1 ↑↓ S1"]
    AA --> AB["S1 ↑↓ S1"]
    AB --> AC["S1 ↑↓ S1"]
    AC --> AD["S1 ↑↓ S1"]
    AD --> AE["S1 ↑↓ S1"]
    AE --> AF["S1 ↑↓ S1"]
    AF --> AG["S1 ↑↓ S1"]
    AG --> AH["S1 ↑↓ S1"]
    AH --> AI["S1 ↑↓ S1"]
    AI --> AJ["S1 ↑↓ S1"]
    AJ --> AK["S1 ↑↓ S1"]
    AK --> AL["S1 ↑↓ S1"]
    AL --> AM["S1 ↑↓ S1"]
    AM --> AN["S1 ↑↓ S1"]
    AN --> AO["S1 ↑↓ S1"]
    AO --> AP["S1 ↑↓ S1"]
    AP --> AQ["S1 ↑↓ S1"]
    AQ --> AR["S1 ↑↓ S1"]
    AR --> AS["S1 ↑↓ S1"]
    AS --> AT["S1 ↑↓ S1"]
    AT --> AU["S1 ↑↓ S1"]
    AU --> AV["S1 ↑↓ S1"]
    AV --> AW["S1 ↑↓ S1"]
    AW --> AX["S1 ↑↓ S1"]
    AX --> AY["S1 ↑↓ S1"]
    AY --> AZ["S1 ↑↓ S1"]
    AZ --> BA["S1 ↑↓ S1"]
    BA --> BB["S1 ↑↓ S1"]
    BB --> BC["S1 ↑↓ S1"]
    BC --> BD["S1 ↑↓ S1"]
    BD --> BE["S1 ↑↓ S1"]
    BE --> BF["S1 ↑↓ S1"]
    BF --> BG["S1 ↑↓ S1"]
    BG --> BH["S1 ↑↓ S1"]
    BH --> BI["S1 ↑↓ S1"]
    BI --> BJ["S1 ↑↓ S1"]
    BJ --> BK["S1 ↑↓ S1"]
    BK --> BL["S1 ↑↓ S1"]
    BL --> BM["S1 ↑↓ S1"]
    BM --> BN["S1 ↑↓ S1"]
    BN --> BO["S1 ↑↓ S1"]
    BO --> BP["S1 ↑↓ S1"]
    BP --> BQ["S1 ↑↓ S1"]
    BQ --> BR["S1 ↑↓ S1"]
    BR --> BS["S1 ↑↓ S1"]
    BS --> BT["S1 ↑↓ S1"]
    BT --> BU["S1 ↑↓ S1"]
    BU --> BV["S1 ↑↓ S1"]
    BV --> BW["S1 ↑↓ S1"]
    BW --> BX["S1 ↑↓ S1"]
    BX --> BY["S1 ↑↓ S1"]
    BY --> BZ["S1 ↑↓ S1"]
    BZ --> CA["S1 ↑↓ S1"]
    CA --> CB["S1 ↑↓ S1"]
    CB --> CC["S1 ↑↓ S1"]
    CC --> CD["S1 ↑↓ S1"]
    CD --> CE["S1 ↑↓ S1"]
    CE --> CF["S1 ↑↓ S1"]
    CF --> CG["S1 ↑↓ S1"]
    CG --> CH["S1 ↑↓ S1"]
    CH --> CI["S1 ↑↓ S1"]
    CI --> CJ["S1 ↑↓ S1"]
    CJ --> CK["S1 ↑↓ S1"]
    CK --> CL["S1 ↑↓ S1"]
    CL --> CM["S1 ↑↓ S1"]
    CM --> CN["S1 ↑↓ S1"]
    CN --> CO["S1 ↑↓ S1"]
    CO --> CP["S1 ↑↓ S1"]
    CP --> CQ["S1 ↑↓ S1"]
    CQ --> CR["S1 ↑↓ S1"]
    CR --> CS["S1 ↑↓ S1"]
    CS --> CT["S1 ↑↓ S1"]
    CT --> CU["S1 ↑↓ S1"]
    CU --> CV["S1 ↑↓ S1"]
    CV --> CW["S1 ↑↓ S1"]
flowchart
graph LR
    A["press & hold S11"] --> B["release"]
    B --> C["2s audio"]
    C --> D["12:00 OFF"]
    D --> E["alarm 1-5"]
    E --> F["12:00 OFF"]
    F --> G["12:00"]
    G --> H["12:00"]
    H --> I["12:00"]
    I --> J["12:00"]
    J --> K["12:00"]
    K --> L["12:00"]
    L --> M["12:00"]
    M --> N["12:00"]
    N --> O["12:00"]
    O --> P["12:00"]
    P --> Q["12:00"]
    Q --> R["12:00"]
    R --> S["12:00"]
    S --> T["12:00"]
    T --> U["12:00"]
    U --> V["12:00"]
    V --> W["12:00"]
    W --> X["12:00"]
    X --> Y["12:00"]
    Y --> Z["12:00"]
    Z --> AA["12:00"]
    AA --> AB["12:00"]
    AB --> AC["12:00"]
    AC --> AD["12:00"]
    AD --> AE["12:00"]
    AE --> AF["12:00"]
    AF --> AG["12:00"]
    AG --> AH["12:00"]
    AH --> AI["12:00"]
    AI --> AJ["12:00"]
    AJ --> AK["12:00"]
    AK --> AL["12:00"]
    AL --> AM["12:00"]
    AM --> AN["12:00"]
    AN --> AO["12:00"]
    AO --> AP["12:00"]
    AP --> AQ["12:00"]
    AQ --> AR["12:00"]
    AR --> AS["12:00"]
    AS --> AT["12:00"]
    AT --> AU["12:00"]
    AU --> AV["12:00"]
    AV --> AW["12:00"]
    AW --> AX["12:00"]
    AX --> AY["12:00"]
    AY --> AZ["12:00"]
    AZ --> BA["12:00"]
    BA --> BB["12:00"]
    BB --> BC["12:00"]
    BC --> BD["12:00"]
    BD --> BE["12:00"]
    BE --> BF["12:00"]
    BF --> BG["12:00"]
    BG --> BH["12:00"]
    BH --> BI["12:00"]
    BI --> BJ["12:00"]
    BJ --> BK["12:00"]
    BK --> BL["12:00"]
    BL --> BM["12:00"]
    BM --> BN["12:00"]
    BN --> BO["12:00"]
    BO --> BP["12:00"]
    BP --> BQ["12:00"]
    BQ --> BR["12:00"]
    BR --> BS["12:00"]
    BS --> BT["12:00"]
    BT --> BU["12:00"]
    BU --> BV["12:00"]
    BV --> BW["12:00"]
    BW --> BX["12:00"]
    BX --> BY["12:00"]
    BY --> BZ["12:00"]
Battery:
The Watch is using a rechargeable Lithium Ion battery that will require about 4.5 hours charging time. While battery is charging, the Watch cannot be used and all buttons are disabled. User needs to recharge the battery when the Watch indicates a "low batt".
Battery Life (full charge): 8 hrs typical (continuous GPS).

soleus
GPS mini
GPS watch troubleshooting guide:
| PROBLEM/ QUESTION | SOLUTION/ ANSWER |
| I cannot get a GPS signal | Take your GPS Watch outdoors and away from trees and tall buildings. Remain stationary and try acquiring GPS signal again. Be sure that the antenna is pointing towards the sky for better signal reception. |
| Can I reset the Watch? | You can reset the Watch by pressing S1, S5, S7, and S11 together. The date and time will be reset to default values. You can set it again manually or automatically thru GPS. |
| Will my data and personal settings be lost after Watch reset? | Your data and personal settings are saved in the flash memory and will not be lost after Watch reset. |
| The battery indicator does not seem to be accurate | Allow your GPS Watch to fully discharge and then fully charge it without interruption. It is recommended to regularly re-charge your battery every 1-2 months even if it is not used to maintain good battery condition. |
Key Function Matrix
| Keys | |||||||||
| Main mode | Sub mode | S1 | S5 | S7 | S11 | ||||
| Press | Hold | Press | Hold | Press | Hold | Press | Hold | ||
| Time | Run mode GPS/INDOOR | toggle T1/T2 | view | Run mode | GPS on/off | EL | time setting mode | ||
| Time setting | increase | fast increase | next digit | Exit | GPS on/off | descrease/ EL | fast decrease | ||
| Run | start/ stop | save & reset | view | Chrono mode | GPS on/off | Lap/EL/ save & reset | Run setting mode | ||
| Run setting | increase | fast increase | next digit | Exit | GPS on/off | decrease/ EL | fast decrease | ||
| Chrono | start/ stop | save & reset | view view data details | Data mode | GPS on/off | Lap/EL/ save & reset | SET | ||
| Data | select File# | Alarm mode | GPS on/off | EL | SET | ||||
| Alarm | ON/OFF | select AL-1~5, chime | Set mode | GPS on/off | EL | alarm setting mode | |||
| Alarm setting | increase | fast increase | next digit | Exit | GPS on/off | decrease/ EL | fast decrease | ||
| Set | increase | fast increase | next digit | Exit/ time mode | GPS on/off | decrease/ EL | fast decrease | ||
- Caring for your GPS Watch:
- About GPS:
- Water immersion:
- Caution:
- Getting Started
- Step 1) Know your Watch:
- Push button Main function:
- SOLEUS
- Step 2) Charging the Battery:
- Battery low condition:
- Step 3) Configure your Watch:
- Step 4) Acquire Satellite signals:
- Step 5) Go for a RUN:
- 5.1) Using RUN mode:
- Notes:
- 5.2) Using Chronograph mode:
- General Operations
- EL backlight:
- TIME mode
- Travelling between different Time zones
- DATA mode
- Data numbering system/ Legend:
- ALARM mode
- Battery:
Brand : Soleus
Model : GPS Mini SG006
Category : Smartwatch