link6 - Audio/video converter Wāvtech - Free user manual and instructions
Find the device manual for free link6 Wāvtech in PDF.


| Product Type | Audio/Video Converter |
| Brand | Wāvtech |
| Model | link6 |
| Dimensions (approx.) | 100 x 60 x 25 mm |
| Weight (approx.) | 150 g |
| Power Supply | USB 5V DC (cable included) |
| Input Connectors | HDMI, USB, 3.5mm audio |
| Output Connectors | HDMI, USB, 3.5mm audio, optical |
| Video Resolution Support | Up to 1080p 60Hz |
| Audio Formats | PCM, Dolby Digital, DTS |
| Main Functions | Convert HDMI to analog, extract audio, upscale/downscale |
| Operating Temperature | 0°C to 45°C |
| LED Indicators | Power and signal status |
| Housing Material | Aluminum alloy |
| Cable Length | Power cable: 1m, HDMI cable: 1m (if included) |
| Compatible Devices | Gaming consoles, Blu-ray players, PCs, set-top boxes |
| Cleaning and Maintenance | Wipe with a dry, soft cloth. Avoid liquids. |
| Safety Warnings | Do not expose to moisture; use in dry location only. |
| Spare Parts and Repairability | Not user-serviceable. Contact support for repairs. |
| Warranty | 1 year limited warranty |
Frequently Asked Questions - link6 Wāvtech
User questions about link6 Wāvtech
0 question about this device. Answer the ones you know or ask your own.
Ask a new question about this device
Download the instructions for your Audio/video converter in PDF format for free! Find your manual link6 - Wāvtech and take your electronic device back in hand. On this page are published all the documents necessary for the use of your device. link6 by Wāvtech.
USER MANUAL link6 Wāvtech
6-Channel Line Output Converter
Summing • AUX Input • Multi-Function Remote
Owner's Manual
natural_image
Simple line drawing of a washing machine with two circular components and a waveform icon (no text or symbols)| WARNING | This symbol means important instructions.Failure to heed them can result in serious injury or death. |
| CAUTION | This symbol means important instructions.Failure to heed them can result in injury or property damages. |

WARNING
- DO NOT DRIVE WHILE DISTRACTED. Any function that requires your prolonged attention should not be performed while driving. Always stop the vehicle in a safe location before performing any such function. Failure to do so may result in an accident.
- KEEP THE VOLUME AT MODERATE LEVELS WHILE DRIVING. Excess volume levels can obscure sounds such as emergency vehicle sirens or road warning signals and may result in an accident. Continuous exposure to high sound pressure levels may cause permanent hearing loss. Use common sense and practice safe sound.
- FOR USE WITH 12V NEGATIVE GROUND VEHICLE APPLICATIONS ONLY. Using this product other than in its designed application may result in fire, injury or product damage.
- MAKE THE CORRECT WIRING CONNECTIONS AND USE PROPER FUSE PROTECTION. Failure to connect wiring correctly or use appropriate fuse protection may result in fire, injury or product damage. Ensure proper fusing of all system power wiring and install a 1-ampere in-line fuse (not included) with the +12V lead to the unit's power supply connector.
• DISCONNECT THE NEGATIVE BATTERY TERMINAL BEFORE INSTALLATION. Failure to do so may result in fire, injury or damage to the unit. - DO NOT ALLOW CABLES TO BECOME ENTANGLED IN SURROUNDING OBJECTS. Arrange wiring and cables to prevent obstructions when driving. Cables or wiring that obstruct or hang up on places such as steering wheel, brake pedals, etc. can be extremely hazardous.
• DO NOT DAMAGE VEHICLE SYSTEMS OR WIRING WHEN DRILLING HOLES. When drilling holes in the chassis for installation, take precautions so as not to contact, puncture or obstruct brake lines, fuel lines, fuel tanks, electrical wiring, etc. Failure to take such precautions may result in fire or an accident. - DO NOT UTILIZE OR CONNECT TO ANY PART OF VEHICLE SAFETY SYSTEMS. Bolts, nuts or wires used in the brake, airbag, steering or any other safety-related systems or fuel tanks should NEVER be used for mounting, power or ground connections. Using such parts may disable control of the vehicle or result in fire.

CAUTION
- STOP USE IMMEDIATELY IF A PROBLEM OCCURS. Failure to do so may result in personal injury or damage to the product. Return it to your authorized Wāvtech dealer.
• HAVE AN EXPERT DO THE WIRING AND INSTALLATION. This unit requires special technical skill and experience for wiring and installation. To insure safety and proper function, always contact the authorized dealer where you purchased the product to have it done professionally. - INSTALL THE UNIT SECURELY WITH SPECIFIED PARTS. Be sure to use only the included parts and specified installation accessories (not included). Use of other than designated parts may damage this unit. Install the unit securely so that it will not come loose during a collision or sudden jolt.
- ROUTE WIRING AWAY FROM SHARP EDGES AND MOVING PARTS. Arrange cables and wiring away from sharp or pointed edges and avoid moving parts such as seat hinges or rails to prevent pinching or wear. Use loom protection where appropriate and always use a grommet for any wiring routed through metal.
- NEVER RUN SYSTEM WIRING OUTSIDE OR UNDERNEATH THE VEHICLE. All wiring must be routed, secured and protected inside the vehicle. Failure to do so may result in fire, injury or property damage.
• INSTALL THE UNIT IN A DRY AND VENTILATED LOCATION. Avoid mounting locations where the unit will likely be exposed to high moisture or heat without adequate ventilation. Moisture penetration or heat buildup may result in product failure. - REDUCE GAIN AND SOURCE VOLUME TO MINIMUM LEVELS FOR INITIAL SYSTEM TUNING AND BEFORE CONNECTION TO AN AMPLIFIER. Ensure amplifier power is off before connecting RCA cables and follow proper system gain setting procedures. Failure to do so may result in damage to the amplifier and/or connected components.
Package Contents:
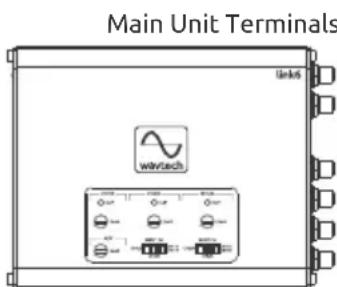
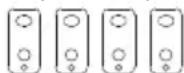
Mounting Tabs (detachable)
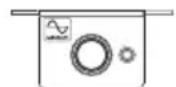
Multi-Function Remote
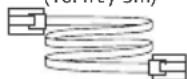
Remote Cable (16.4ft / 5m)
Accessories Required for Installation (not included):
- RCA Interconnects
18AWG Wire
• In-line Fuse Holder w/1A fuse - Battery Ring Terminal
• Wire Crimp Connectors
• Grommets and Loom - Cable Ties
- Mounting Screws
Introduction
Welcome to Wävtech, exceptional mobile audio integration products for audiophiles. Our products are engineered to provide a truly remarkable listening experience. Built for the professional installer, our OEM integration and signal processor models are simply the best solution available for unlimited sound system upgrades while retaining the factory receiver.
Features
• 6-Channel Line Output Converter
• 6-Channel Summing Processor
• Multi-Function Remote
- Master Volume
- AUX Volume
- Independent CH5/6 Level
- Source/Function Select
- AUX 3.5mm Input
• Differential Balanced Inputs
• Low Impedance Outputs
• Variable Gain Adjustments w/Clip LEDs
• 2/4/6-Channel Input Select
• 2/3-Way Summing w/Retained CH5/6 Level Control
• Never-Zero CH5/6 Output with Front & Rear Inputs
- Selectable DC-Offset and/or Audio Detect Auto Turn-On
- Generated +12V Remote Output
• OEM Load Detect Compatible
- Locking Detachable Power/Speaker Terminals
• Panel Mount RCA Jacks
- Compact Aluminum Chassis w/Detachable Mounting Tabs
Connections & Functions
1 Power Indicator: This red LED indicates when the link6 is powered on. Once illuminated, there will be a short delay before audio signal output is enabled. During initial power connection, the LED may illuminate for a brief period.
2 Auto Turn-On Detect Jumpers: By default, the link6 is set to detect both DC-offset and audio signal for turning itself on/off automatically. These jumpers allow either mode to be independently defeated for cases where only one turn-on mode is preferred or to bypass both modes
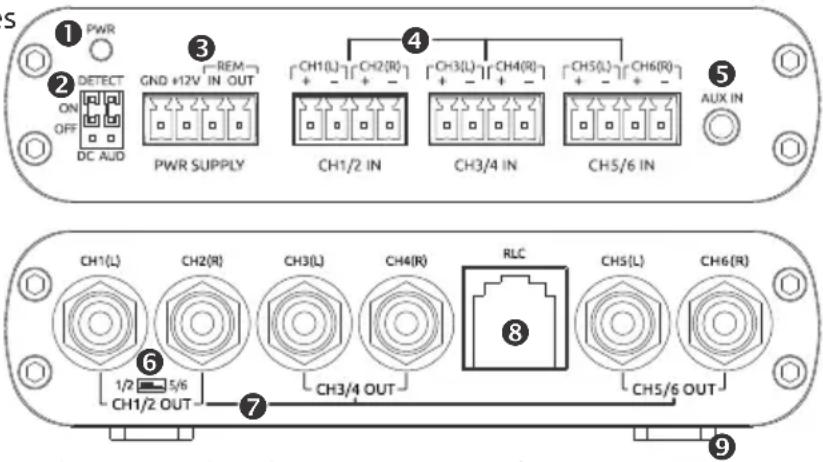
when a switched +12V trigger is available and connected to the REM IN terminal.
③ Power Supply Terminal: For +12V battery, chassis ground, remote input and remote output wire connections. A minimum of 18AWG wire is recommended for power and ground connections. Always protect the +12V power wire with a 1-amp fuse.
④ Speaker Level Input Terminals: For up to six channels of speaker level input connections to the source. Input signals ranging from 2Vrms to 20Vrms will produce up to 10Vrms RCA output from maximum to minimum gain. For factory amplifiers with more than 20Vrms signal or if the link6's output is too high for the connected aftermarket amplifier(s) with all gains at minimum, internal jumpers are available to reduce the input sensitivity range by half (-6dB) for 4Vrms up to 40Vrms.
5 Auxiliary Input Jack: This 3.5mm stereo AUX input is for the connection of a portable device such as a smartphone or MP3 player, but may also be used for other low level (a.k.a line level) sources using a 3.5mm adapter. AUX may be selected as a separate source via the multi-function remote, or programmed as the primary source for stand-alone systems where the speaker level inputs are not used (see pg4). Input signals ranging from 0.5Vrms to 5Vrms will produce up to 10Vrms RCA output at maximum to minimum gain setting. This input is differential but may be set to unbalanced via internal jumpers (labeled BAL/UNBAL) if required for a particular source.
⑥ CH1/2 Output Select: This switch allows CH1/2's output to be selected between 1/2 for direct input pass-through (default) or 5/6 to copy signal from CH5/6 internally after its summing stage. The latter is particularly useful when summing 3-way systems for retaining remote level control over CH5/6 while also providing a separate summed full-range output from CH1/2.
⑦ RCA Output Jacks: These six channels of RCA outputs are for signal connections to your amplifier(s). For a speaker level source, output from CH3/4 and CH5/6 will depend upon their respective INPUT CH settings (see pg3), while CH1/2 is set by its output select switch (see ⑥ above). For an AUX source, left/right stereo signals will be routed to all output pairs. Use quality interconnects to ensure stable connections and minimize the possibility for induced noise.
⑧ Remote Level Control Jack: This RJ45 jack is for connecting the multi-function remote to the main unit with the supplied cable. A standard ethernet cable may also be used.
⑨ Mounting Tabs: These mounting tabs are for securing the link6 during installation with screws or cable ties. They are removable if the unit can be safely secured by another method.
Top Panel Adjustments
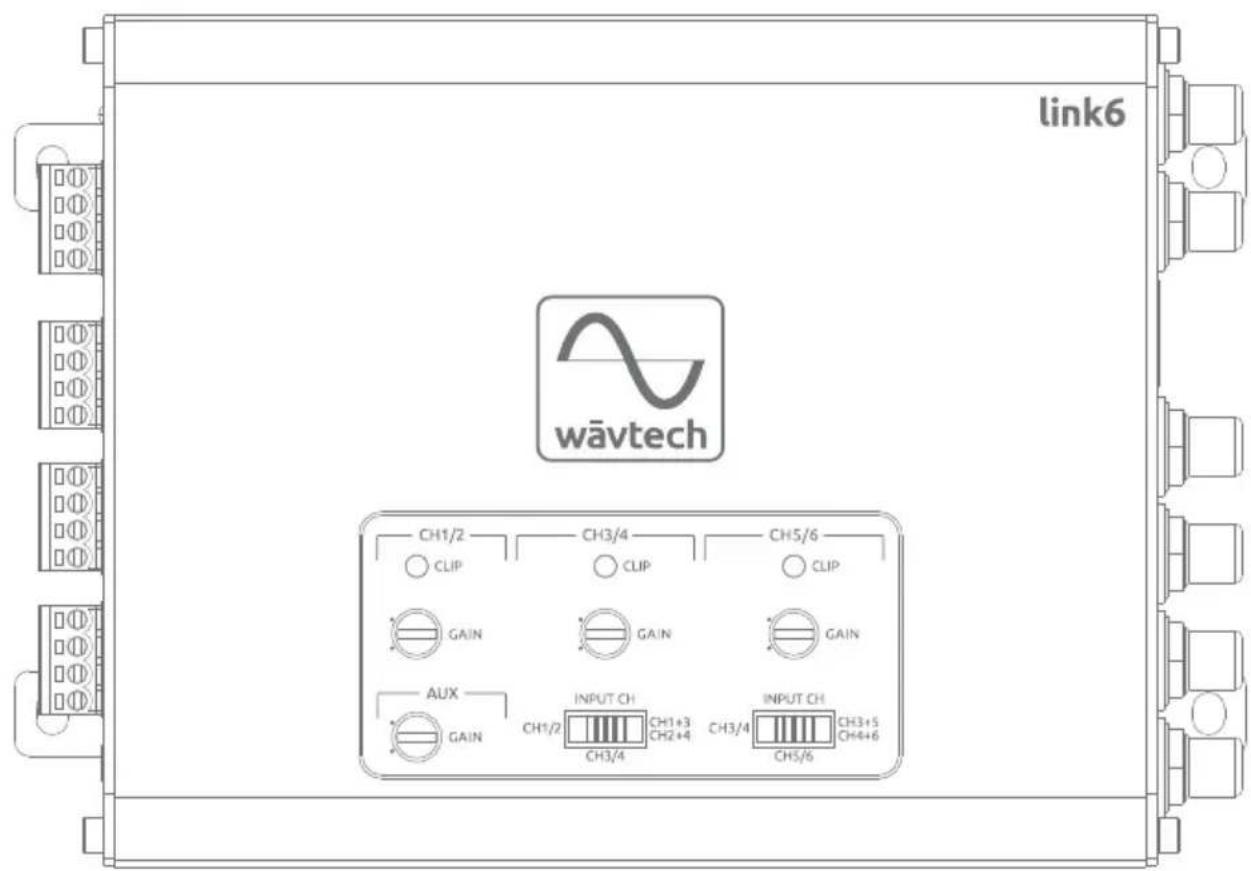
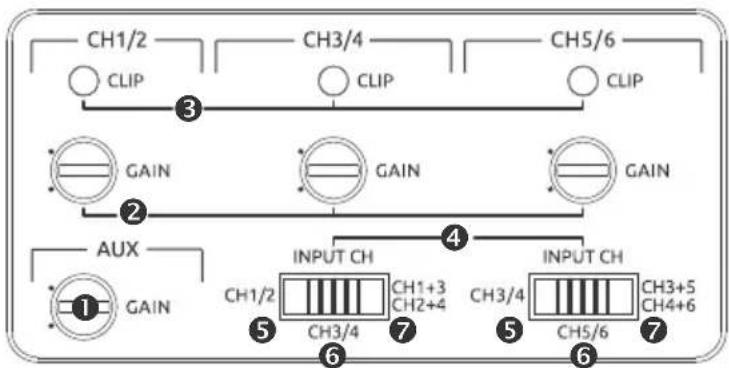
AUX Gain Adjustment: This adjustment sets the gain for all output channels from a low level source connected to the AUX input jack. In systems using both the link6's main speaker level inputs and auxiliary input, this gain adjustment is primarily for matching the AUX output level with that of the main source. It is recommended to set the speaker level input gain(s) first, particularly when summing.
② CH1/2, CH3/4, and CH5/6 Gain Adjustments: These gain adjustments are for matching each
flowchart
graph TD
    A["CH1/2"] --> B["CLIP"]
    C["CH3/4"] --> D["CLIP"]
    E["CH5/6"] --> F["CLIP"]
    G["AUX"] --> H["GAIN"]
    I["INPUT CH"] --> J["CH1/2"]
    I --> K["CH3/4"]
    I --> L["CH1+3 CH2+4"]
    I --> M["CH3/4"]
    I --> N["CH5/6"]
    O["INPUT CH"] --> P["CH3+5 CH4+6"]
    Q["1"] --> R["GAIN"]
    S["2"] --> T["GAIN"]
    U["3"] --> V["GAIN"]
    W["4"] --> X["GAIN"]
    Y["5"] --> Z["GAIN"]
    AA["6"] --> AB["INPUT CH"]
    AC["7"] --> AD["INPUT CH"]
output channel pair's signal level with the source's maximum unclipped signal range and the maximum input capability of connected amplifier(s). When summing channels together, these gain adjustments should be used for matching relative output levels so that the combined signals sum as close to flat as possible. If a gain difference between channel pairs is desired with direct signal input, adjustments made at the link6 should also minimize amplifier gain settings for best S/N. Note that the gain adjustment will be bypassed if its input select is set to copy the previous channel pair.
③ Clipping Indicators: These yellow LEDs indicate when the output signal from each channel pair is at maximum level before clipping (distortion) occurs, whether the source is main speaker level or AUX input. Each will be dimly lit just before the onset of clipping and full bright at clipping. Since the link6 can produce up to 10Vrms output before clipping, it is likely that gain(s) will need to be reduced below the illumination point(s) to match your amplifier(s) maximum input capability or optimize source volume range. Note that the AUX input is controlled by its own unified gain that affects all output channel pairs equally and will illuminate all LEDs simultaneously when clipping.
4 CH3/4 and CH5/6 Input Select: These 3-position switches are for selecting which signal is routed internally to each channel pair's output stage. It provides for 2-channel, 4-channel or 6-channel input, as well as various independent and summed input configurations:
⑤ Copy: In the left switch position, this input setting will copy the internal signal from after the previous channel pair's gain stage and route to its outputs. This bypasses the gain adjustment so its outputs are controlled by the previous channel pair's gain. If independent gain is desired, use jumper wires at the speaker input terminals and select direct input instead.
6 Direct: In the middle switch position, this input setting will route the channel pair's input signal directly to its gain and output stages.
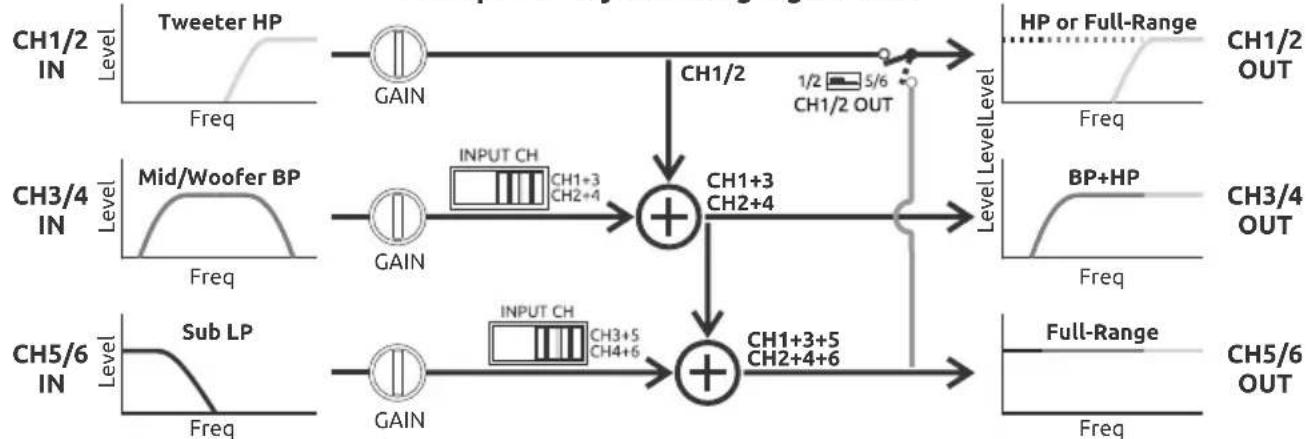
7 Sum: In the right switch position, this input setting will sum the indicated channel signals from after their respective gain stages and route the combined signals to its left and right RCA outputs. For example, if CH3/4's input select is set to CH1+3/2+4, CH1+3 will be sent to the CH3(L) output, and CH2+4 will be sent to the CH4(R) output. For vehicles without an available full-range signal, this function can be used to sum pre-filtered signals together to create a useable frequency range output from up to a 3-way factory system. Note that CH1/2's output is selectable, getting its signal either directly from CH1/2's input or copied from CH5/6 (after its summing stage). Also note that if rear channels are input to CH3/4 and front channels are input to CH5/6 (or vise versa), selecting CH3+5/CH4+6 can be used to ensure CH5/6's output will always retain at least 50% or more signal (Never-Zero) for a subwoofer, regardless of fader changes made at the source.
Example: 3-way Summing Signal Flow
flowchart
graph TD
    subgraph Input_Levels
        direction TB
        A["Tweeter HP"] --> B["GAIN"]
        C["Input CH"] --> D["CH1+3 CH2+4"]
        E["Input CH"] --> F["CH3+5 CH4+6"]
    end
    subgraph Output_Levels
        direction TB
        G["HP or Full-Range"] --> H["Freq"]
        I["BP+HP"] --> J["Freq"]
        K["Full-Range"] --> L["Freq"]
    end
    M["Sub LP"] --> N["GAIN"]
    O["Input CH"] --> P["CH1+3 CH2+4+6"]
    Q["Input CH"] --> R["CH3+5 CH4+6"]
    S["Input CH"] --> T["CH1+3+5 CH2+4+6"]
    end
Multi-Function Remote
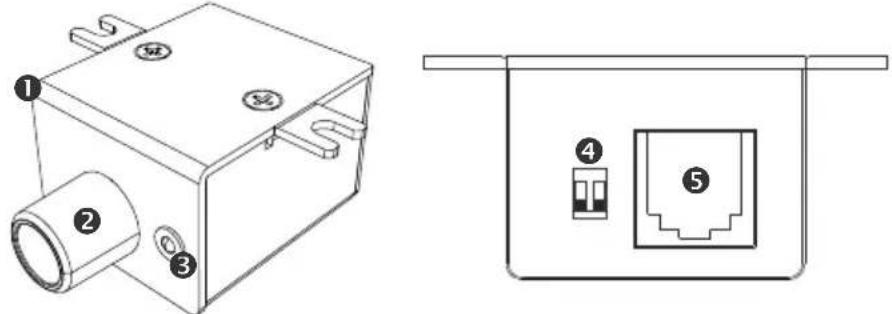
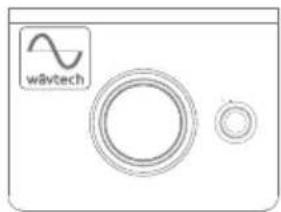
1 Remote Housing: This 2-piece housing design provides both convenient mounting and simple dissassembly for customization. The integrated screw mount tabs are scored to aid removal if securing by another method and the lower housing can be detached by removing the two top screws for reducing weight or size. For panel mounting, the housing can be completely disassembled by also removing the knob, shaft nut, and circuit board screw. It is recommended to protect the exposed PCB with heat shrink. For LED relocation, carefully release the LED from the back side of the snap ring, then push the snap ring though to the front to remove. Follow the reverse process for re-mounting.
② Rotary Encoder: This control knob is for adjusting CH1/2/3/4/5/6 master volume, CH5/6 level and source selection (toggle). The factory setting for knob function is CH5/6 output level adjustment only for a speaker level source. Other knob functions can be enabled via the dip-switches at the back of the remote (see ④ below). To toggle between Main and AUX sources, short-press the knob. To activate the selected source's CH5/6 level mode, long-press for 2 seconds. To reset to factory defaults for the selected system type, long-press the knob for >5 seconds.
③ Source/Function LED: Depending upon which system type is selected (see ④ below), this LED will indicate which source and level mode is currently selected. There are four LED modes: solid red, flashing red, solid blue and flashing blue. In the default system Type-1, the only LED indication is solid red when the link6 is powered on. For the other three system types, solid red indicates Main speaker level source is selected and solid blue is for AUX source. Flashing indicates CH5/6 level mode is active for the current source, which will timeout after 5 seconds if no adjustments are made.
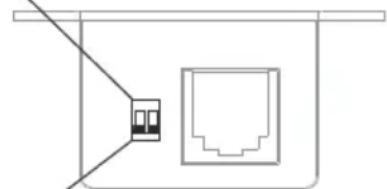
4 System Type Select: These dip-switches are for selecting one of four available system types for setting which knob functions and priority are enabled. Note that the up/down position for each switch is when looking at the back of the remote as shown above. Switch settings can be changed at any time on the remote without requiring access to the main link8 unit.

Type-1: Main CH5/6 Level Only (factory setting)
For systems where only subwoofer level control is needed with a speaker level source, and no AUX source is connected to the link6. In this setting, the knob's short-press and long-press functions (except reset) are disabled to prevent accidental selection.

Type-2: Main CH5/6 Level, AUX Volume & AUX CH5/6 Level
For systems using the factory radio as the master volume for Main speaker level input and an auxiliary source is connected to the link6's AUX input. When Main source is selected, the knob adjusts CH5/6 level only. When AUX source is selected, knob priority is AUX volume and its CH5/6 level mode can be selected with a 2sec long-press.

Type-3: AUX Volume & AUX CH5/6 Level
For stand-alone applications without a factory radio where only the link6's AUX input is used as the system source. In this setting, AUX CH5/6 level mode can be accessed with a 2sec long-press, while short-press for source select is disabled so cannot be accidentally changed.

Type-4: Master Volume & CH5/6 Level
This setting is primarily for systems where factory radio volume is not used (e.g. fixed input signal level, volume dependent EQ, etc.), and that may also have an AUX source connected to the link6. In system Type-4, all knob functions are enabled. When either Main or AUX input is selected, knob priority is master volume for that source. Independent CH5/6 level adjustment is also accessible for each source with a 2sec long-press.
5 Remote Level Control Jack: This RJ45 jack is for connecting the remote to the RLC port on the main link6 unit with the supplied cable. A standard 8-conductor ethernet cable may also be used.
Note: The link6 will remember all level settings and which source was selected at last power off and return at next power on, even if the battery is disconnected. However, if the remote is disconnected at power on, the memory will be overridden to factory defaults and all levels will return to maximum 0dB.
Installation & System Wiring
It is important to read this manual thoroughly before starting your installation and always plan accordingly. Before installing any Wāvtech product, disconnect the negative (ground) wire from the vehicle's battery to avoid damage to the vehicle or yourself. Following all guidelines will help provide years of enjoyment with your Wāvtech link6 audio interface.
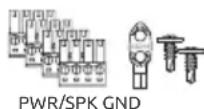
Ground Connection (GND): The GND terminal must be connected to a metal part of the vehicle that is welded to the vehicle body with ground plane back to the main battery ground attachment point (a.k.a. chassis ground). This wire should be a minimum of 18AWG and as short as possible to minimize potential for noise to enter the system. The chassis ground connection point should have all of the paint removed and be scuffed to the bare metal. The ground wire should be terminated by a ground specific interlocking terminal such as the included EARL terminal or a ring terminal securely bolted to the vehicle with star or lock washer and nut to prevent from coming loose. Avoid using factory ground points to reduce the chance of induced noise from other components.
Power Connection (+12V): The constant power connection should be made at the vehicle battery when possible. For direct battery connection, a 1-amp fuse must be installed in-line with the power wire within 18" of the battery and securely connected to the positive battery terminal bolt with a ring terminal. If connecting to another available constant +12V power source, a 1-amp in-line fuse must be added at the connection point. The power wire should be a minimum of 18AWG. Do not install the fuse until all other system connections have been made.
Speaker Level Inputs (SPK): Connect the speaker wires from the source unit to corresponding input terminals at the interface. Always ensure correct polarity of each channel when making these connections, as failure to do so can severely effect sound performance.
Remote Input (REM IN): If a switched +12V or remote trigger wire is available, it is recommended to connect it to the REM IN terminal. If unavailable, the link6 also has an auto turn-on circuit that simultaneously detects audio signal from SPK and AUX inputs as well as DC-offset from SPK inputs. While auto turn-on will work well in most applications, a +12V trigger may be required for satisfactory results under certain vehicle or system conditions. Additionally, DC-offset and/or audio signal detect functions can be independently defeated via the external jumpers if necessary.
Remote Output (REM OUT): Use the remote output to provide a +12V trigger to turn on amplifiers or other components. This +12V output is generated internally by the interface when turned on either by REM IN or automatic sensing, and will provide over 500mA continuous current for external devices.
Auxiliary Input (AUX): Connect the auxiliary low level source to the 3.5mm AUX input jack with a quality 3-conductor stereo 3.5mm audio cable. If the source has RCA outputs, an adapter will be required. Ensure the audio cable is routed away from power wires to minimize potential for induced noise.
Remote Level Control (RLC): Connect the multi-function remote to the link6's RLC port with the supplied 16.4ft/5m cable. Plan cable routing before mounting the remote to ensure proper length. If additional length is required, a standard 8-conductor CAT5 or CAT6 ethernet cable or extension may be used. The cable may also be shortened and re-terminated with a RJ45 connector and ethernet crimping tool.
System Examples
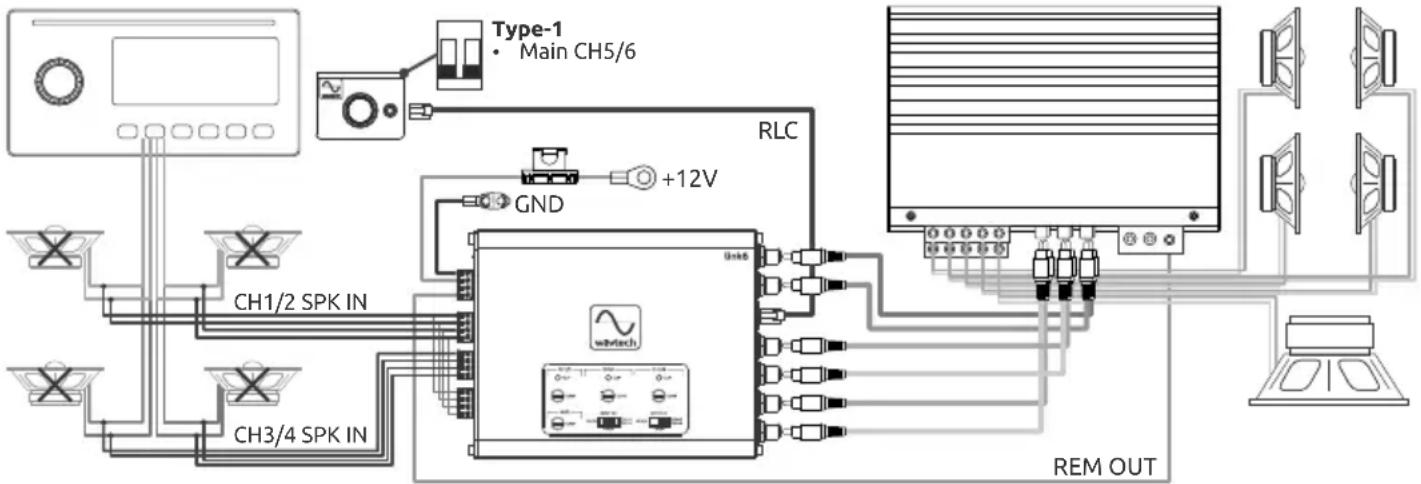
Example-1: Factory Radio (4-in/6-out)
flowchart
graph TD
    A["Main CH5/6 Controller"] --> B["RLC"]
    B --> C["GND"]
    C --> D["Switch"]
    D --> E["+12V"]
    E --> F["Switch"]
    G["Type-1 Main CH5/6"] --> H["Switch"]
    I["CH1/2 SPK IN"] --> D
    J["CH3/4 SPK IN"] --> D
    K["SWITCH"] --> D
    L["REMO OUT"] --> M["Switch"]
    N["Switch"] --> O["Switch"]
    P["Switch"] --> Q["Switch"]
    R["Switch"] --> S["Switch"]
    T["Switch"] --> U["Switch"]
    V["Switch"] --> W["Switch"]
    X["Switch"] --> Y["Switch"]
    Z["Switch"] --> AA["Switch"]
Note: For systems where only remote sub level control is needed for a speaker level source, select system Type-1 (factory setting) at the multi-function remote. For a 4-channel source such as shown above, there are multiple input configurations that can be chosen with the link6. This particular 5-channel aftermarket system could benefit from retaining front/rear fading as well as a Never-Zero subwoofer output with independent gain. To achieve this, the front speaker level signals from CH1/2 are also connected to CH5/6's input via jumper wires, which allows CH5/6's input select to be set to sum CH3+5/CH4+6 front and rear channels together for output to the subwoofer.
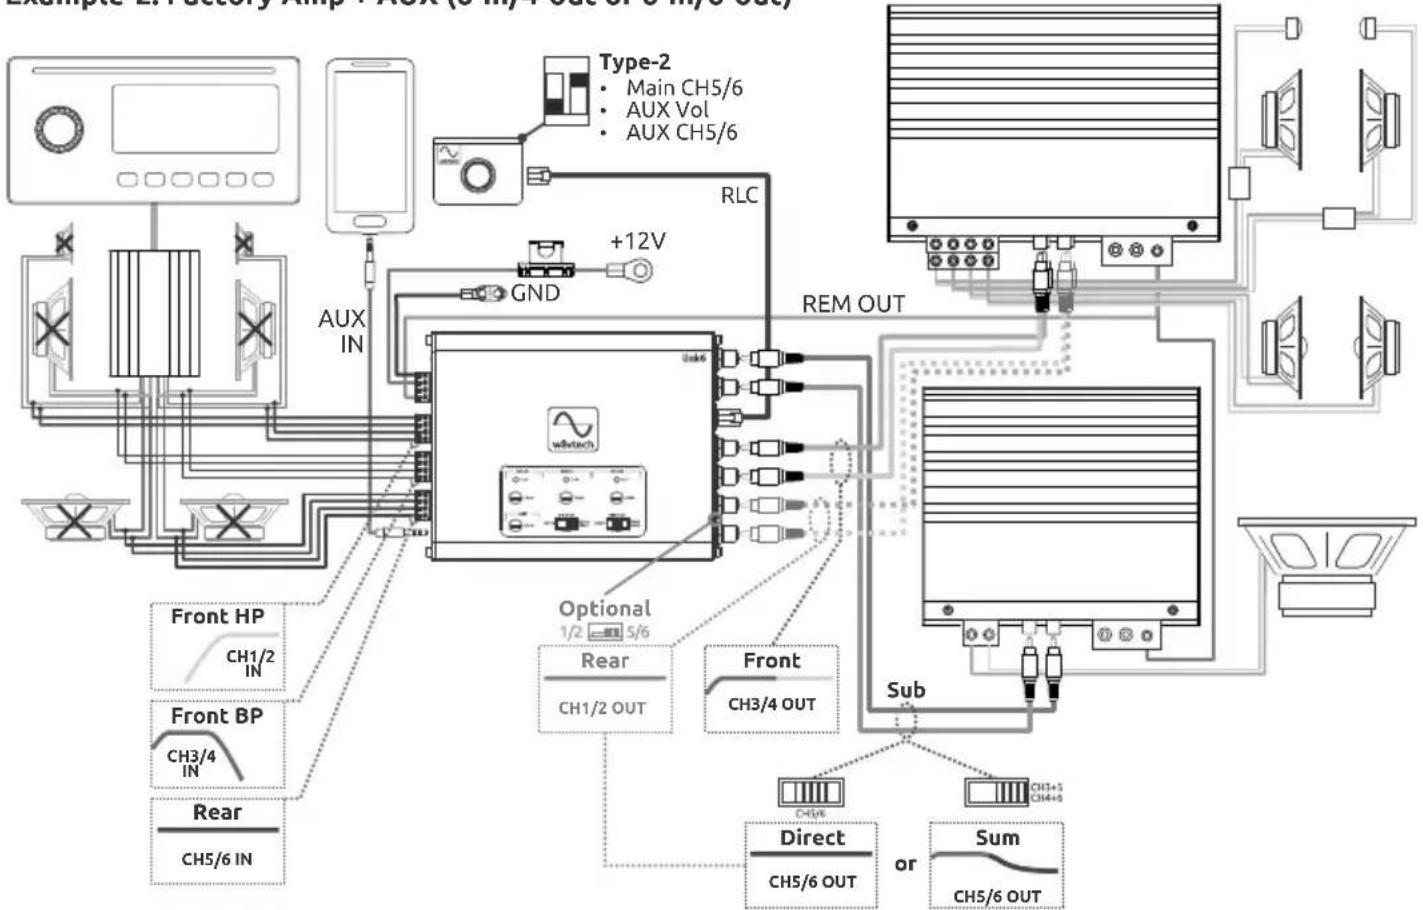
Example-2: Factory Amp + AUX (6-in/4-out or 6-in/6-out)
flowchart
graph TD
    A["Speaker"] --> B["Type-2"]
    B --> C["Main CH5/6"]
    B --> D["AUX Vol"]
    B --> E["AUX CH5/6"]
    F["Speaker"] --> G["GND"]
    G --> H["+12V"]
    H --> I["RLC"]
    I --> J["REM OUT"]
    K["Front HP CH1/2 IN"] --> L["Optional 1/2 5/6"]
    M["Front BP CH3/4 IN"] --> L
    N["Rear CH5/6 IN"] --> L
    O["Sub"] --> P["Direct or Sum CH5/6 OUT"]
    Q["CH3/4 OUT"] --> P
    R["CH3/6 OUT"] --> P
    S["CH3+1 CH4+5"] --> P
Notes:
- For systems with a main speaker level source that will serve as the master volume control, and an auxiliary source is connected to the link6's AUX input jack, select system Type-2 at the multi-function remote. This provides AUX volume control as well as independent CH5/6 level adjustment for both main and AUX sources.
- As a typical factory amplified system example, a front 2-way signal needs to be summed to full-range for an aftermarket component set with passive crossovers. However, there are several options for what to do for the rear and subwoofer channels, depending upon frequency content and whether preserving front/rear fading is important:
In this example the factory front door signal content is fine for components but its bass rolls off too high for a sub, whereas the rear channel has enough bass content. Therefore CH5/6's input select switch can be set to direct or sum, depending on whether CH5/6's signal is only used for bass or also routed to CH1/2 outputs as rear full-range.
To preserve fader and prevent remote sub level adjustments from affecting rear speaker output, set CH5/6 input select to direct, then select "5/6" at the CH1/2 output select switch to copy CH5/6's internal signal and route to the to CH1/2 RCA outputs for connection to the amp as full-range rear channels.
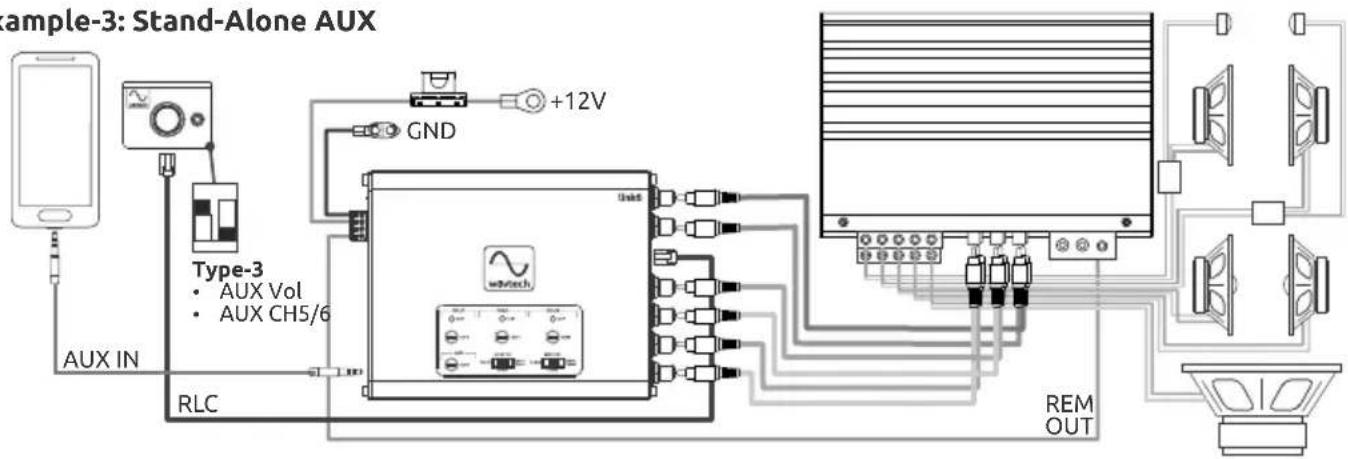
Example-3: Stand-Alone AUX
flowchart
graph TD
    A["AUX IN"] --> B["Type-3"]
    B --> C["AUX Vol"]
    B --> D["AUX CH5/6"]
    C --> E["RLC"]
    D --> E
    E --> F["GND"]
    F --> G["+12V"]
    G --> H["Device"]
    H --> I["REM OUT"]
    I --> J["Speaker"]
    J --> K["Ground"]
Note: For stand-alone systems where only the AUX input is used, select system Type-3 at the multi-function remote. This disables the remote's source select function and sets knob priority to master volume control for AUX input. Portable devices such as smartphones or MP3 players typically have an output voltage of 1Vrms or less, so it is recommended to maximize the device's unclipped output level and use the remote for the system's master volume.
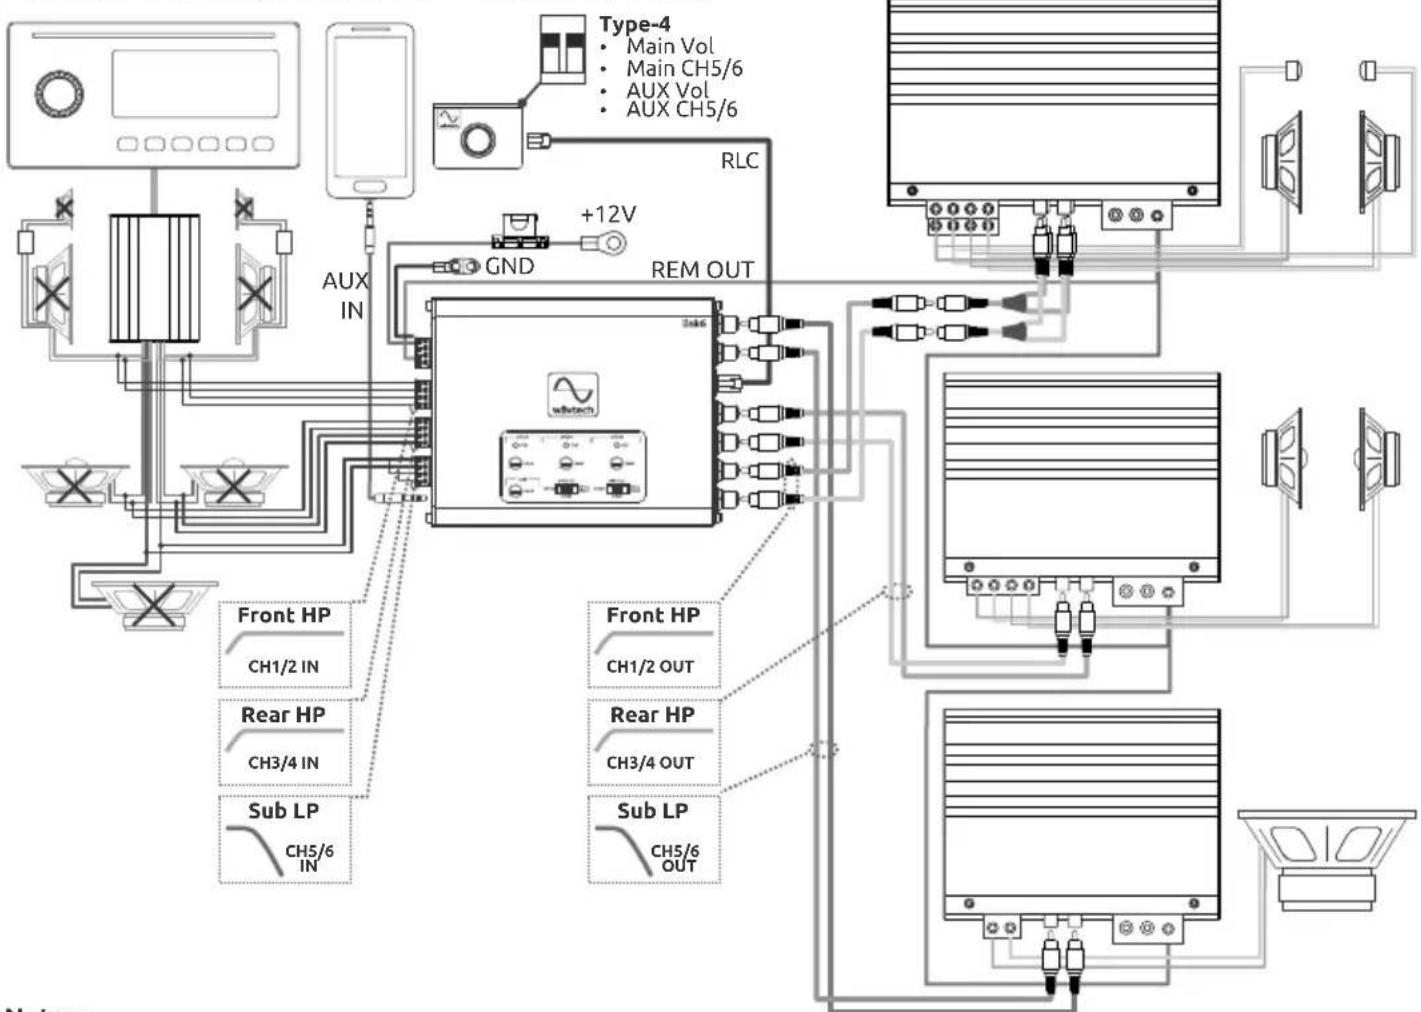
Example-4: Factory Amp w/DSP + AUX (6-in/6-out)
flowchart
graph TD
    A["Front HP CH1/2 IN"] --> B["RELIC"]
    C["Rear HP CH3/4 IN"] --> B
    D["Sub LP CH5/6 IN"] --> B
    B --> E["REM OUT"]
    F["Type-4 Main Vol Main CH5/6 AUX Vol AUX CH5/6"] --> G["RLC"]
    G --> H["+12V"]
    H --> I["GND"]
    I --> J["AUX IN"]
    J --> K["AC System"]
    L["Front HP CH1/2 OUT"] --> M["RELIC"]
    N["Rear HP CH3/4 OUT"] --> M
    O["Sub LP CH5/6 OUT"] --> M
    P["AC System"] --> Q["Power Supply"]
    R["AC System"] --> S["Power Supply"]
    T["AC System"] --> U["Power Supply"]
Notes:
- For factory amplified systems with more extreme volume dependent DSP effects such as EQ or limiters, or for a standalone system where the source volume will not be accessible after installation, select system Type-4 at the multifunction remote. This enables all remote functions and sets knob priority to master volume control for both Main and AUX inputs. Independent CH5/6 level mode is also selectable for each source. Once the system is tuned for a specific source volume where the factory signal is optimized (make note of the volume setting), do not use the factory radio's volume again, but instead use the multi-function remote as the system's sole master volume control.
- In this example, all factory amplifier signal outputs are useable without summing, as the front and rear high-pass crossover points are low enough for aftermarket speakers and it has a dedicated subwoofer channel. Note that when using the link6's AUX input for an auxiliary source in addition to the Main input, all speakers must be powered by amplifier(s) connected to link6's RCA outputs and not powered directly by the original factory system.
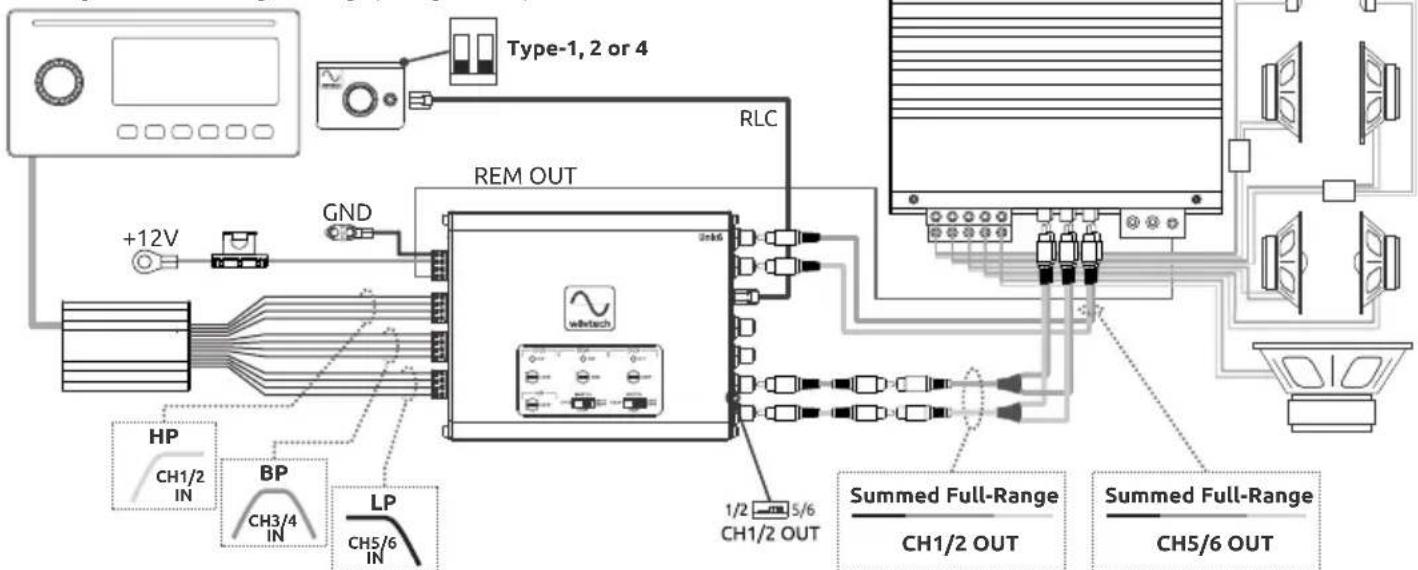
Example-5: Factory 3-way (6-in/4-out)
flowchart
graph TD
    A["+12V"] --> B["Switch"]
    B --> C["Remote Output"]
    C --> D["RLC"]
    D --> E["Switch"]
    E --> F["Summed Full-Range CH1/2 OUT"]
    E --> G["Summed Full-Range CH5/6 OUT"]
    H["Type-1, 2 or 4"] --> I["GND"]
    I --> J["Switch"]
    J --> K["Remote Output"]
    L["HP CH1/2 IN"] --> M["BP CH3/4 IN"]
    M --> N["LP CH5/6 IN"]
    O["Link6"] --> P["Switch"]
    Q["1/2 5/6 CH1/2 OUT"] --> R["Switch"]
    S["Line 6"] --> T["Switch"]
    U["Line 7"] --> V["Switch"]
Note: The link6 can sum up to 3-way factory systems to full-range while also retaining independent remote level control over CH1/2 and CH5/6 outputs. If using the remote, choose the appropriate system type (see pg4) and set CH1/2's output select switch to 5/6 for a separate full-range output for main speakers and use CH5/6's output for subwoofer(s).
Internal Jumper Locations and Settings
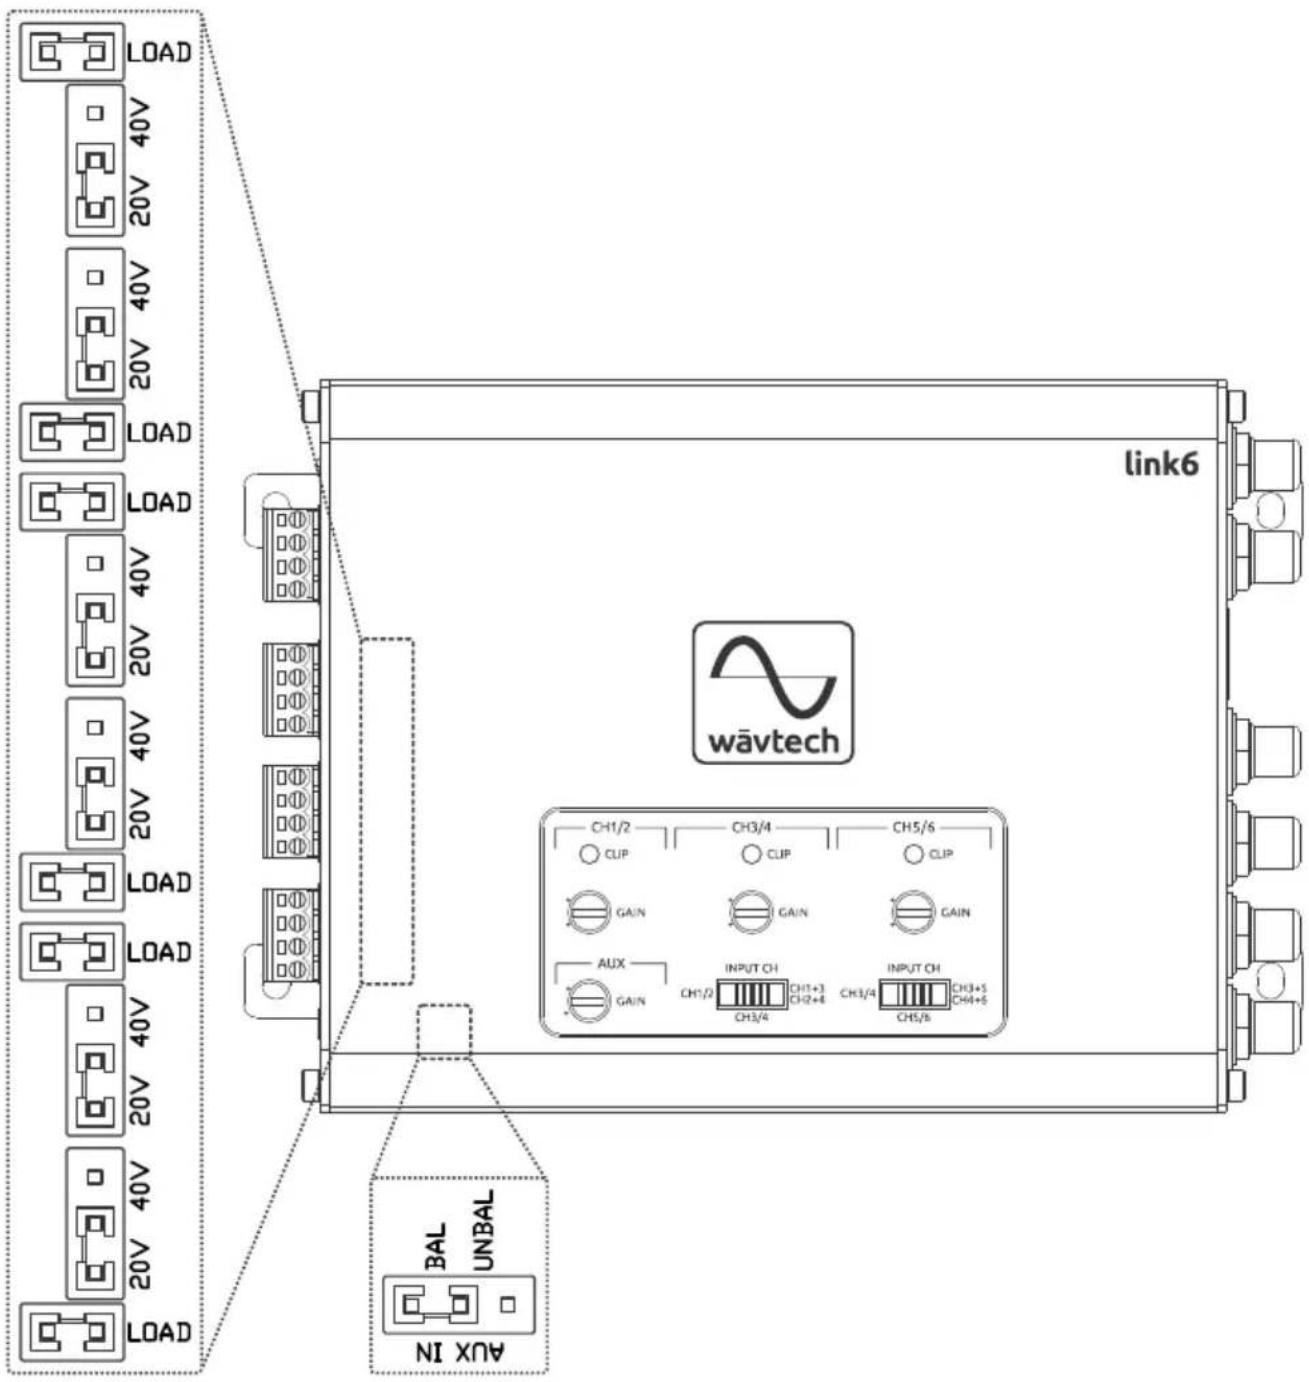
While all Wävtech models provide external controls for main adjustments, there are also a few internal configuration jumpers available to resolve certain special vehicle or system conditions. The link6's internal jumper locations and default settings are shown in the illustration below. To access these jumpers, simply remove the two top screws from each end panel and loosen two bottom screws on one side in order to easily remove the chassis top cover. It is recommended to detach the power supply connector first to ensure that the unit is completely powered off while making any jumper changes.
Notes:
- Input sensitivity range jumpers (20V/40V) are independent for each SPK input channel, so may be set differently between channels as system conditions require.
- Load bypass jumpers (LOAD) are independent for each SPK input channel and must be removed or moved to a single pin in order to disconnect the internal loading from that channel.
- AUX input balanced-unbalanced jumper (BAL/UNBAL) affects both left and right channels.
Specifications
| Frequency response | Max Flat (+0/-1dB) | <10Hz to >80kHz | |
| Extended (+0/-3dB) | <5Hz to >100kHz | ||
| Input Impedance | Spk Input | 180Ω / >20kΩ | |
| AUX Input | >20kΩ | ||
| Input Sensitivity | Spk Input (max-min gain) | 2-20Vrms / 4-40Vrms | |
| AUX Input (max-min gain) | 0.5 - 5Vrms | ||
| Max Input Voltage | Spk Input peak, <5sec cont. | 40Vrms | |
| Output Impedance | <50Ω | ||
| Max Output Voltage | at 1% THD+N | >10Vrms | |
| THD+N | Spk Input at 10V output | <0.05% | |
| AUX Input at 10V output | <0.05% | ||
| S/N | Spk Input | at 1V output | >94dBA |
| at 4V output | >106dBA | ||
| at 10V output >114dBA | |||
| AUX Input | at 1V output >94dBA | ||
| at 4V output >106dBA | |||
| at 10V output | >114dBA | ||
| Remote Level Control | Master Volume Range | 0dB to -50dB | |
| CH5/6 Level Range | 0dB to -80dB | ||
| CH5/6 vs. CH1-4 max Δ at min Vol | -30dB | ||
| Knob Press Function | Source Select | <0.5sec | |
| CH5/6 Level | 2-3sec (5sec timeout) | ||
| Reset | >5sec | ||
| Turn-On Trigger | Remote via REM | IN >10.5V | |
| DC-offset | via Spk Input | >1.3V | |
| Audio Signal | via Spk Input | <100mV | |
| via AUX Input | <10mV | ||
| Turn-off Delay up to 60sec | |||
| Remote Output | Current Capacity | >500mA | |
| Voltage | Within 3% of B+ | ||
| Current Draw | Max Draw (w/o REM OUT) | <370mA | |
| Sleep Current | <2mA | ||
| Operating Voltage | Power On (B+) | 10.5V-18V | |
| Power Off (B+) | <8.5V | ||
| Product Dimensions | Main Chassis(HxWxL not incl. terminals, jacks) | 1.1"x4.7"x5.8" | |
| 29x120x148mm | |||
| Remote Housing(HxWxD not incl. knob, tabs) | 1.1"x1.5"x1.8" | ||
| 28x38x45mm | |||
Notes:
- Speaker level input sensitivity range is selectable per channel via internal jumpers (20V/40V)
• Built-in speaker level input loading is defeatable per channel via internal jumpers (LOAD)
- DC-offset and/or audio signal detect functions are defeatable via external jumpers (DC, AUD)
- All specifications are subject to change without notice
Multi-Function Remote System Type Settings
| Source | Knob Function | ||||
| Main | Master Volume | — | — | — | √ |
| CH5/6 Level | √ | √ | — | √ | |
| AUX | Master Volume | — | √ | √ | √ |
| CH5/6 Level | — | √ | √ | √ |


natural_image
Pure technical diagram of a mechanical or electrical component without any text, numbers, or symbolsWarranty & Service Care
Wāvtech warrants this product to be free from defects in material and workmanship for a period of one (1) year when purchased from an authorized Wāvtech retailer within the United States. This warranty will be extended to a period of two (2) years when the installation is performed by an authorized Wāvtech retailer. A valid sales receipt is required to verify eligibility of purchase and installation.
This warranty is valid only to the original purchaser and is not transferrable to subsequent parties. This warranty is void if the product serial number has been altered or removed. Any applicable implied warranties are limited in duration to a period of express warranty as provided herein beginning with the date of the original purchase at retail, and no warranties, whether expressed or implied, shall apply to this product thereafter. Some states do not allow limitations on implied warranties, therefore these exclusions may not apply to you. This warranty gives you specific legal rights. You may also have other rights which vary from state to state.
If your product needs service, you should contact Wāvtech Customer Service to receive a Return Authorization (RA) Number. Any product received without an RA number will be returned to sender. Once your product is received and inspected by customer service, Wāvtech at its sole discretion, will repair or replace it with a new or remanufactured product at no charge. Damage caused by the following is not covered under warranty: accident, abuse, failure to follow instructions, misuse, modification, neglect, unauthorized repair or water damage. This warranty does not cover incidental or consequential damages. This warranty does not cover the cost of removing or reinstalling the product. Cosmetic damage and normal wear are not covered under warranty.
For Service within the United States:
Wāvtech Customer Service: (480) 454-7017
Monday – Friday, 8:30am to 5:00pm MST
Serial Number: ____
Installation Date: ____
Place of Purchase: ____
Important Notice for International Customers:
For products purchased outside the United States of America or its Territories, please contact your local distributor concerning specific procedures for your country's warranty policy. International purchases are not covered by Wāvtech, LLC.
- 6-Channel Line Output Converter
- WARNING
- CAUTION
- Accessories Required for Installation (not included):
- Introduction
- Features
- Connections & Functions
- Top Panel Adjustments
- Multi-Function Remote
- Type-1: Main CH5/6 Level Only (factory setting)
- Type-2: Main CH5/6 Level, AUX Volume & AUX CH5/6 Level
- Type-3: AUX Volume & AUX CH5/6 Level
- Type-4: Master Volume & CH5/6 Level
- Installation & System Wiring
- System Examples
- Notes:
- Internal Jumper Locations and Settings
- Warranty & Service Care
- For Service within the United States:
- Important Notice for International Customers:
Brand : Wāvtech
Model : link6
Category : Audio/video converter