
KPF449 - Household Fan Kambrook - Free user manual and instructions
Find the device manual for free KPF449 Kambrook in PDF.


| Type of Product | Pedestal Fan |
| Model | KPF449 |
| Brand | Kambrook |
| Blade Diameter | 45 cm (approx.) |
| Height Adjustment | Adjustable from 110 cm to 140 cm |
| Base Diameter | 60 cm (approx.) |
| Net Weight | 5.2 kg |
| Power Supply | 220-240 V ~ 50 Hz |
| Power Consumption | 55 W |
| Speed Settings | 3 speeds (Low, Medium, High) |
| Oscillation | 90° wide oscillation |
| Tilt Adjustment | Manual tilt up/down |
| Control Type | Rotary knob on motor housing |
| Remote Control | Not included (manual operation only) |
| Safety Features | Overheat protection, tip-over auto shut-off |
| Grille Material | High-impact plastic |
| Blade Material | ABS plastic |
| Cleaning | Detachable front grille for easy cleaning; wipe with damp cloth |
| Maintenance | Lubrication-free motor; occasional cleaning of grille |
| Spare Parts Availability | Replacement blades and grilles available via Kambrook service centers |
| Certifications | CE, RoHS compliant |
| Warranty | 2 years limited warranty |
Frequently Asked Questions - KPF449 Kambrook
If the problem persists, contact Kambrook customer service.
User questions about KPF449 Kambrook
0 question about this device. Answer the ones you know or ask your own.
Ask a new question about this device
Download the instructions for your Household Fan in PDF format for free! Find your manual KPF449 - Kambrook and take your electronic device back in hand. On this page are published all the documents necessary for the use of your device. KPF449 by Kambrook.
USER MANUAL KPF449 Kambrook
natural_image
Exterior view of a Kambrook air conditioner fan with visible blades and radial mesh pattern (no text or symbols on the fan itself)Suits all KPF449
modelsINSTR
Important
Please retain your instruction book for future use.
In the event that you need some assistance with your Kambrook appliance, please contact our Customer Service Department on 1300 139 798 (Australia) or 0800 2738 45 (New Zealand). Alternatively, visit us on our website at www.kambrook.com.au or www.kambrook.co.nz
Contents
Kambrook Recommends p4
Safety First
Your Kambrook Arctic p6
Gunmetal Pedestal Fan
Using Your Kambrook Fan p8
Care, Cleaning and Storage p14
IMPORTANT: Please retain your instruction book for future use.
At Kambrook, we believe that safe performance is the first priority in any consumer product, so that you, our valued customer can confidently use and trust our products. We ask that any electrical appliance that you use be operated in a sensible fashion with due care and attention placed on the following important operating instructions.
Important Safeguards For Your Kambrook Arctic Gunmetal Pedestal Fan
- Carefully read all instructions before operating the fan for the first time and save for future reference.
- Remove and safely discard any packaging material and promotional labels before using the fan for the first time.
- To eliminate a choking hazard for young children, remove and safely discard the protective cover fitted to the power plug of this fan.
- When unpacking the fan, check to see you have received all the items listed in the parts list, = before discarding the packaging.
- Do not place the fan near the edge of a bench or table during operation. Ensure that the surface is level, stable, clean and free of water and other substances.
- Always ensure the fan is properly assembled before use. Follow the instructions provided in this book.
- This fan is intended for household use only and not for commercial or industrial use.
- Disconnect the power plug before dismantling, assembling or before cleaning and when the fan is not in use.
- Avoid touching moving parts of the fan.
- Never insert fingers, pencils or any other objects through the guards whenever the power plug is connected, in particular while the fan is switched on.
-
The fan must not be used if the guards are not fastened correctly, according to instructions provided in this book.
-
When positioning the rear grille on the motor shaft, always ensure the carry handle on the grille is positioned in the upright position.
- Ensure the fan blade engages fully onto the shaft. Please note this may require some force to ensure it is fully engaged.
- The fan must not be used if the base is not fastened correctly, according to the instructions provided in this book.
- Do not operate in the presence of explosives and/or flammable fumes or liquids.
- Never leave the fan unattended when in use.
- Do not unplug the fan by pulling on the cord.
- Never carry the fan by the cord or yank to disconnect from an outlet; instead, grasp the cord and pull to disconnect. Do not pull the cord around sharp edges or corners.
- Allow the fan blade to stop completely, always switch off at the power outlet, and then unplug the fan from the outlet:
- Before leaving it unattended
- Before attempting to move the fan
- Before cleaning and maintenance unless otherwise specified in this booklet
- Immediately after use.
- To prevent damage to the fan, do not use alkaline cleaning agents when cleaning, uses a soft cloth and mild detergent.
- Do not place anything on top of the fan when assembled, when in use and when stored.
- Store the unit out of reach of children.
- Keep the fan clean. Follow the cleaning instructions provided in this book.
Important safeguards for all electrical appliances
- Fully unwind the power cord before use.
- Connect only to a 230V or 240V power outlet.
- Do not let the power cord hang over the edge of a bench or table, touch hot surfaces or become knotted.
- To protect against electric shock, do not immerse the power cord, power plug or appliance in water or any other liquid or allow moisture to come in contact with the part, unless it is recommended in the cleaning instructions.
- The appliance is not intended for use by persons (including children) with reduced physical, sensory or mental capabilities, or lack of experience and knowledge, unless they have been given supervision or instruction concerning use of the appliance by a person responsible for their safety.
- Children should be supervised to ensure that they do not play with the appliance.
- It is recommended to regularly inspect the appliance. To avoid a hazard, do not use the appliance if power cord, power plug or appliance becomes damaged in any way. Return the entire appliance to the nearest authorized Kambrook service centre for examination and / or repair.
- Any maintenance other than cleaning should be performed at an authorised Kambrook Service Centre
- This appliance is for household use only. Do not use this appliance for anything other than its intended use. Do not use in moving vehicles or boats. Do not use outdoors. Misuse may cause injury.
- The installation of a residual current device (safety switch) is recommended to provide additional safety protection when using electrical appliances. It is advisable that a safety switch with a rated residual operating current not exceeding 30mA be installed in the electrical circuit supplying the appliance. See your electrician for professional advice.
- Always turn the appliance to the OFF position, switch off at the power outlet and unplug at the power outlet when the appliance is not in use.
- Before cleaning, always turn the appliance to the OFF position, switch off at the power outlet, unplug at the power outlet and remove the power cord, if detachable, from the appliance and allow all parts to cool.
- Do not place this appliance on or near a heat source, such as hot plate, oven or heaters.
- Position the appliance at a minimum distance of 20cm away from walls, curtains and other heat or steam sensitive materials and provide adequate space above and on all sides for air circulation.
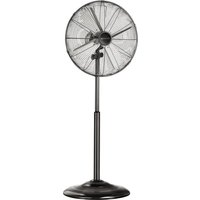
Your Kambrook Arctic Gunmetal Pedestal Fan
Insert 1:
- Fan speed selection dial with choice of 3 speed settings
- Swing button turns the oscillation on and off to disperse the air throughout the room
- Convenient carry handle for easy portability
- Fan motor head
Insert 2:
-
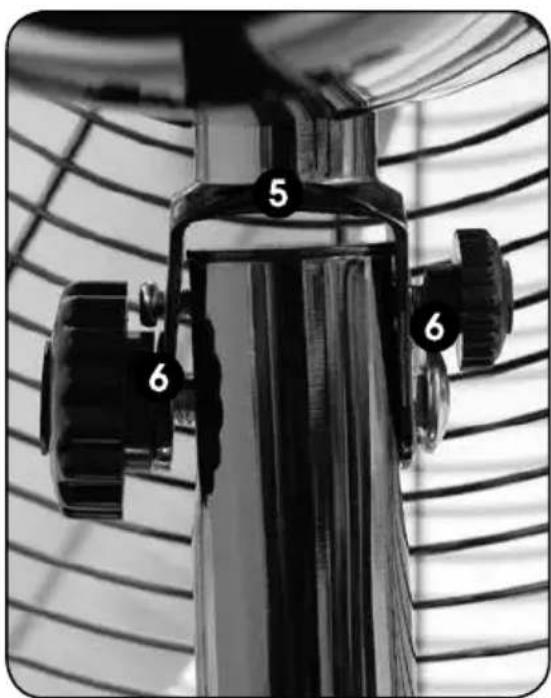
Tilt adjustable head to control direction of the air
-
Tilt control knobs (1 screw and 1 nut)
Insert 1

Insert 2
Main Image:
-
45cm metal fan blades
-
Front and rear metal grilles
-
Height adjustable extension tube made up of the following
a) inner extension tube attaches to the motor head
b) outer extension tube attaches to the base
c) height adjustment knob
- Anti-topple base for stability
Parts List Not Shown:
- Bolt, large washer and weight for fitting base
- 4x small screws to fix the rear metal grille to the motor head
- 1x long screw and 1x small screw to assemble motor head and extension tube
- 1x small screw and nut to fix front and rear metal grilles together
- 1x small screw to secure the fan blades to the motor shaft.
NOTE: When first unpacking the fan from the giftbox, some of the screws and nuts listed come screwed in other fan parts.

Model KPF449GUN shown
Using Your Kambrook Pedestal Fan
Before First Use
Remove any promotional material from fan.
NOTE: Assembly of the fan requires a Phillips head screwdriver.

WARNING: When unpacking the fan, check to see you have received all the items listed before discarding the packaging.
Assembling Your Arctic Pedestal Fan
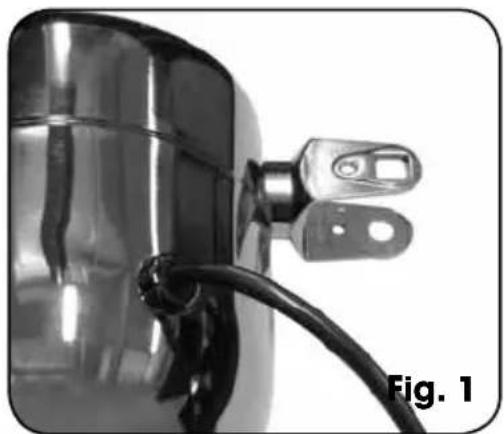
- Place the motor head on a smooth flat surface, ensuring that the large squared opening located on the tilt adjustable head assembly is face up (See Fig. 1).
natural_image
Close-up of a metallic cylindrical device with attached electrical connector and cable, labeled 'Fig. 1' (no text or symbols on the device itself)- Insert the inner extension tube into the tilt adjustable head assembly, ensuring that the side of the tube with ONLY one large round opening is inserted (See Fig. 2).

- Align the large squared opening on the tilt adjustable head assembly with the large round opening on the extension tube (See Fig. 3).

natural_image
Close-up of a mechanical component with a circular feature and an arrow pointing to it, labeled 'Fig. 3' (no readable text or symbols beyond label)- Fully insert the long screw into the squared opening of the tilt adjustable head, ensuring that it is fully inserted through the extension tube (See Fig. 4) and comes out the other end of the tilt adjustable head.

natural_image
Close-up of a metallic mechanical component with a nail inserted, labeled Fig. 4 (no text or symbols on the object itself)- Insert and tighten the screw knob into the aperture above the long screw head (See Fig. 5).

natural_image
Close-up of a metallic mechanical component with a knob and spherical end, labeled Fig. 5 (no text or symbols on the object itself)-
Turn the whole motor head and extension tube assembly over.
-
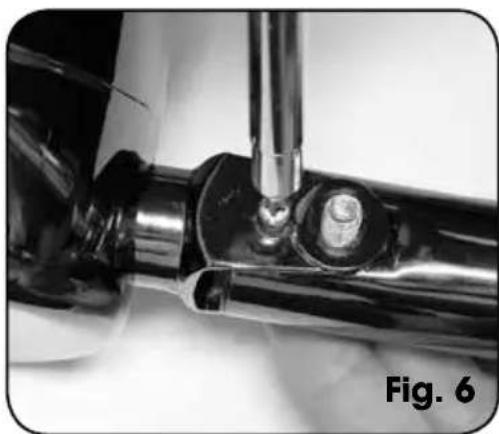
Align the upper hole on the tilt adjustable head with the round opening on the extension tube. Insert and tighten the small screw in a clockwise direction into the upper hole on the tilt adjustable head (See Fig. 6).
natural_image
Close-up of a metallic mechanical component with a screw and pipe inserted, labeled 'Fig. 6' (no other text or symbols)Using Your Kambrook Pedestal Fan Continued...
- Secure the long screw with the nut knob and tighten (See Fig. 7).

natural_image
Close-up of a mechanical component with a circular knob and arrow indicator, labeled Fig. 7 (no text or symbols on the object itself)NOTE: When assembled correctly, the fully-assembled metal fan grilles should not make contact with the pedestal extension tube. If contact or scratching on the tube is detected, the fan motor head has been fitted to the extension tube backwards.
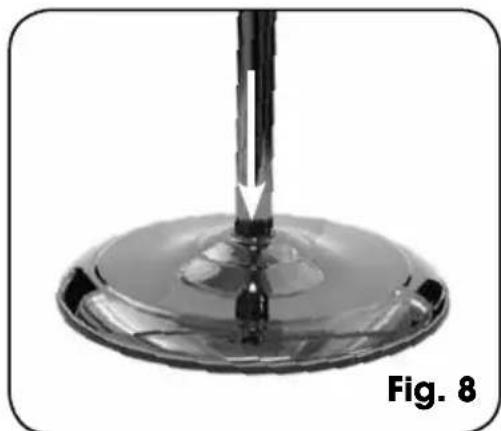
- Fit the bottom of the outer extension tube into the aperture located at the centre of the base (See Fig. 8).
natural_image
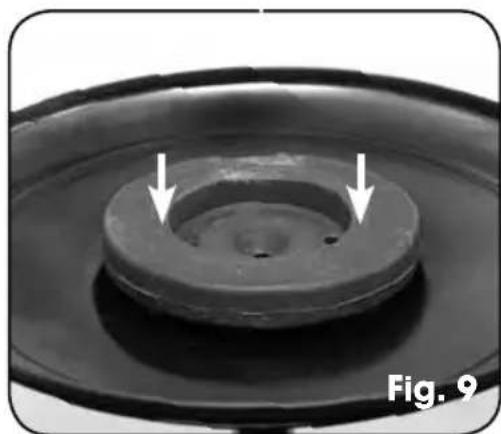
Close-up of a glass droplet on a circular base, with a vertical rod inserted (no text or symbols visible)- Turn the extension tube and base assembly over and fit the base weight to the centre of the base (See Fig. 9).
natural_image
Close-up of a circular mechanical component with two white arrows pointing to its center, labeled 'Fig. 9' (no other text or symbols)- Place the large washer on top of the weight and secure the assembly with the bolt provided (See Fig. 10).

natural_image
Close-up of a black circular mechanical component with a central hole and a white arrow symbol, labeled 'Fig. 10' (no readable text or symbols on the object itself)-
Tip the whole assembly so that the unit is standing on its base.
-
Loosen the height adjustment knob on the extension tube and pull up the inner extension tube to the desired height (See Fig. 11). Fully tighten the height adjustment knob to hold the inner extension tube in place.

natural_image
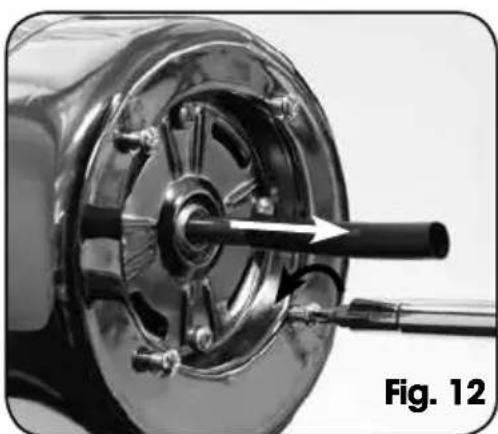
Close-up of a black cylindrical object with a knob, labeled Fig. 11 (no other text or symbols visible)- Remove the black PVC protective sleeve from the motor head shaft. Unscrew the 4 small screws situated on the motor head (See Fig. 12).
natural_image
Close-up of a mechanical component with a black arrow pointing to a shaft, labeled 'Fig. 12' (no other text or symbols)-
Separate the blades, front and rear grilles by opening the securing clips all around the front grille and undoing the twist tie away from the fan blades.
-
Thread the motor head through the centre hole of the rear grille, placing the rear grille into position. Make sure that the carry handle on the back of the rear grille is located above the motor head.
-
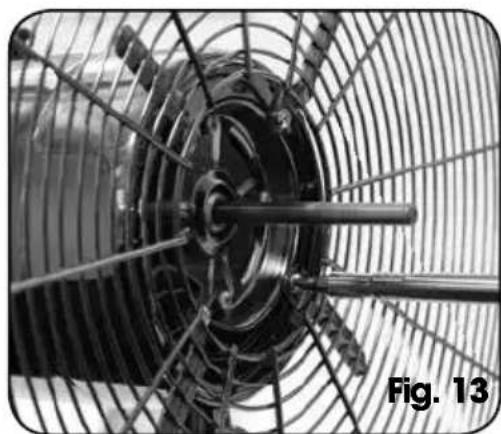
Ensure the rear grille mounting holes are aligned with the mounting holes on the motor head and fix the grille into position with the 4 small screws provided (See Fig. 13). Make sure that the rear grille has not slipped off the mounting holes before tightening the screws.
natural_image
Close-up of a mechanical fan or impeller with visible blades and mesh structure (no text or symbols)NOTE: When positioning the rear grille on the motor shaft, always ensure the carry handle on the grille is positioned in the upright position.
Using Your Kambrook Pedestal Fan Continued...
-
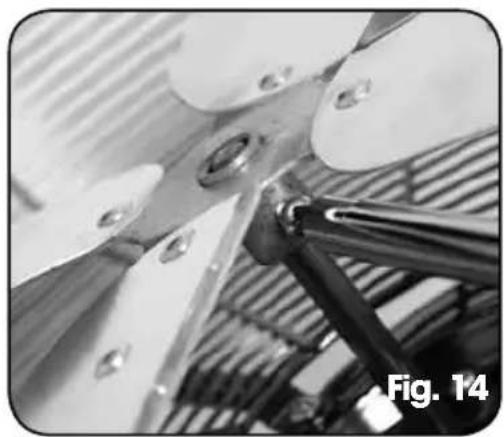
Slightly loosen the securing screw located on the back of the fan blades so you can insert the blades onto the motor shaft. Make sure the blades are inserted onto the motor shaft with the securing screw side facing the rear grille.
-
Align the screw with the groove in the motor shaft. Tighten the screw making sure the fan blades are secure to the motor shaft and the blades are able to move freely (See Fig. 14 & 15).
natural_image
Close-up of a mechanical assembly with metal components and a metallic bracket (no visible text or symbols)
natural_image
Close-up of a four-bladed industrial fan or propeller with radial blades and mesh structure (no text or symbols visible)- Loosen the small screw and nut assembly at the bottom of the front grille by hand. Locate the positioning tab on the top end of the front grille and slot into the top of the rear grille See Fig. 16).

natural_image
Close-up of metal wire mesh structure with diagonal bracing, no text or symbols visible-
Thread the screw through the small holes at the bottom of both the front and rear grilles and loosely secure the screw using the nut provided.
-
Secure the front and rear grille by snapping shut the securing clips over the edges of both grilles (See Fig. 17).

natural_image
Close-up of a mesh wire mesh structure with directional arrows indicating movement, labeled 'Fig. 17' (no text or symbols on the mesh itself)- Tighten the small screw and nut together (See Fig. 18).

natural_image
Close-up of a metallic wire mesh structure with a cylindrical rod, labeled Fig. 18 (no text or symbols on the diagram itself)Operating your Arctic Pedestal Fan
Plug the cord into a 230V or 240V power point and switch on.
The fan has 3 speed settings. To adjust the flow of air, turn the fan speed selection dial located at the back of the fan motor head to the preferred speed setting - 'LOW', 'MED', 'HI'. To turn Off, turn the fan speed selection dial to the 'OFF' position.

WARNING: Never insert fingers, pencils or any other objects through the guards whenever the power plug is connected, in particular while the fan is switched on.
Setting the Oscillation
The oscillation works in all air flow settings.
Press the 'SWING' button down to activate. The fan will begin to oscillate from side to side.
Lift the 'SWING' button to stop the fan from oscillating.
NOTE: The 'SWING' button is located behind the rear grille, on the motor head.
Adjustable Tilting Head
The Arctic Pedestal Fan incorporates an manually adjustable tilt head for directional air coverage.
To adjust the angle of the head, loosen the tilt control knob located beneath the motor head, tilt the head to the required angle, then re-tighten the control knob.
Adjustable Height
The fan height can be manually adjusted. Simply loosen the height adjustment knob on the extension tube of the fan, then adjust to the required height. Re-tighten the height adjustment knob when the desired height has been reached.
Care, Cleaning and Storage
Always switch the fan off, switch off at the power outlet and unplug prior to cleaning the housing, base, grilles and blades.
To clean the outside of the fan, wipe the exterior with a soft, damp cloth. Never use an abrasive cleaner.
When not in use, store the fan in a cool, clean and dry location.

CAUTION: When unpacking the fan, check to see you have received all the items listed in the parts List, before discarding the packaging.
Notes
Kambrook - Australia
Ground Floor, Suite 2, 170-180 Bourke Rd
Alexandria NSW 2015, Australia
Locked Bag 2000
Botany NSW 1455
Customer Service Line 1300 139 798
Customer Service Fax 1800 621 337
www.kambrook.com.au
Kambrook - New Zealand
Private Bag 94411
Botany, Manukau
Auckland 2163
New Zealand
Customer Service Line/
Spare Parts 0800 273 845
Customer Service Fax 0800 288 513
www.kambrook.co.nz


- Important
- Please retain your instruction book for future use.
- Contents
- IMPORTANT: Please retain your instruction book for future use.
- Important Safeguards For Your Kambrook Arctic Gunmetal Pedestal Fan
- Important safeguards for all electrical appliances
- Your Kambrook Arctic Gunmetal Pedestal Fan
- Insert 1:
- Insert 2:
- Main Image:
- Parts List Not Shown:
- Using Your Kambrook Pedestal Fan
- Before First Use
- Assembling Your Arctic Pedestal Fan
- Using Your Kambrook Pedestal Fan Continued...
- Operating your Arctic Pedestal Fan
- Setting the Oscillation
- Adjustable Tilting Head
- Adjustable Height
- Care, Cleaning and Storage
- Notes
Brand : Kambrook
Model : KPF449
Category : Household Fan