
CCV 150 BL - Drink cooler CANDY - Free user manual and instructions
Find the device manual for free CCV 150 BL CANDY in PDF.


| Product Type | Drink Cooler / Beverage Refrigerator |
| Model | CCV 150 BL |
| Brand | Candy |
| Capacity | Approximately 150 liters (holds about 150 standard cans) |
| Dimensions (H x W x D) | Approx. 850 x 500 x 500 mm |
| Weight | Approx. 35 kg |
| Power Supply | 220-240 V ~ 50 Hz |
| Power Consumption | Approx. 100-150 W |
| Climate Class | N (16°C – 32°C) |
| Cooling Type | Compressor cooling with automatic defrost |
| Temperature Range | Adjustable, typically 2°C – 15°C |
| Refrigerant | R600a (isobutane) |
| Noise Level | Approx. 42 dB |
| Door Type | Glass door with UV protection and lock |
| Shelves | Adjustable wire shelves |
| Interior Light | LED interior light with on/off switch |
| Control Type | Electronic thermostat with digital display |
| Installation | Freestanding; ensure proper ventilation around unit |
| Maintenance | Clean condenser coil yearly; defrost manually if needed |
| Safety Features | Automatic defrost, door lock, leveling feet |
| Repairability | Spare parts available; user-replaceable door gasket and shelves |
Frequently Asked Questions - CCV 150 BL CANDY
User questions about CCV 150 BL CANDY
0 question about this device. Answer the ones you know or ask your own.
Ask a new question about this device
Download the instructions for your Drink cooler in PDF format for free! Find your manual CCV 150 BL - CANDY and take your electronic device back in hand. On this page are published all the documents necessary for the use of your device. CCV 150 BL by CANDY.
USER MANUAL CCV 150 BL CANDY
natural_image
Interior view of a black double-burden refrigerator with multiple wine bottles and a bottle on the side (no visible text or labels)INSTRUCTION MANUAL INSTRUCTION MAN
Please read this instruction booklet carefully before using your Candy Wine Cooler
Table of Contents
Parts and Features----2
Important Safety Instructions---- 3
Installation Instructions---- 3
Before Using Your Wine Cooler---- 3
Installation of Your Wine Cooler---- 3
Reversing the Door Swing of Your Wine Cooler---- 4
Operating Your Wine Cooler----5
How To Use The Thermostat 5
Care and Maintenance----6
Change The Light Bulb---- 6
Cleaning Your Wine Cooler---- 6
Maintenance Your Wine Cooler 6
Vacation Time----7
Moving Your Wine Cooler 7
Troubleshooting 7
Technical Specifications 8
PARTS AND FEATURES PARTS AND FEATURES
REVERSIBLE DOOR
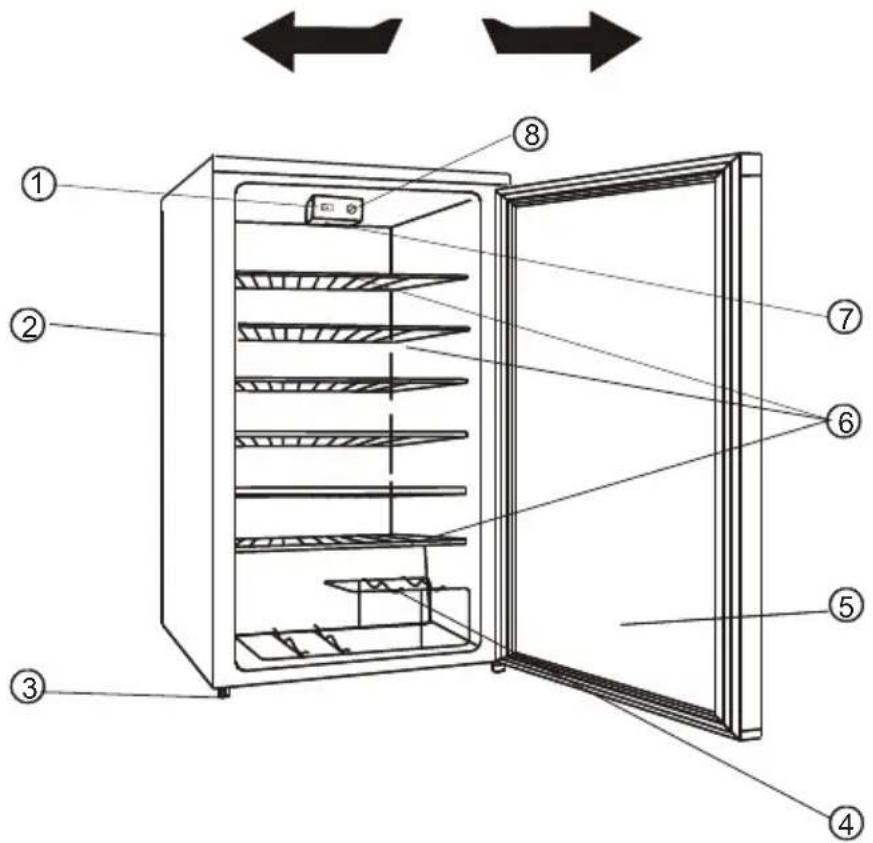
- LAMP SWITCH
- CABINET
- LEVELLING LEGS
- WINE RACK
- GLASS DOOR
- CHROME SHELVES
- INTERIOR LAMP
- THERMOSTAT KNOB
Important Safety Instructions
- Read all instructions before using the appliance.
• Before you throw away your old wine cooler:
take off the door, leave the shelves in place, so that children may not easily climb inside. - Never allow children to operate, play with, or crawl inside the appliance.
- Never clean appliance parts with flammable fluids. The fumes can create a fire hazard or explosion.
- Do not store or use gasoline or any other flammable vapours and liquids in the vicinity of this or any other appliance. The fumes can create a fire or explosion.
INSTALLATION INSTRUCTIONS
Before Using Your Wine Cooler
- Remove the exterior and interior packing, including protective foam on door panels.
- Check to be sure the following parts are included:
- 6 slide out shelves
■ 1 wine rack - 1 user manual
- Before connecting the appliance to the power source, let it stand upright for approximately 2 hours. This will reduce the possibility of a malfunction in the cooling system from handling during transportation.
• Clean the interior surface with lukewarm water using a soft cloth.
Installation of Your Wine Cooler
- Place your appliance on a floor that is strong enough to support the appliance when it is fully loaded. To level your appliance, adjust the legs at the front of the appliance.
- Allow 5 inches of space between the back and sides of the appliance, which allows the proper air circulation to cool the compressor.
- Locate the appliance away from direct sunlight and sources of heat (stove, heater, radiator, etc.). Direct sunlight may affect the acrylic coating and heat sources may increase electrical consumption. Extreme cold ambient temperatures may also cause the appliance not to perform properly.
- Avoid locating the appliance in moist areas. Too much moisture in the air will cause frost to form quickly on the evaporator.
- Plug the appliance into an exclusive properly installed-grounded wall outlet. Do not under any circumstances cut or remove the third (ground) prong from the power cord. Any questions concerning power and or grounding should be directed toward a certified electrician or an authorized products service center.
Warning: Improper use of the grounded plug can result in the risk of electrical shock. If the power cord is damaged, have it replaced by an authorized products service center.
Reversing the Door Swing of Your Wine Cooler
This wine cooler has the capability of either opening the door from the left or right side. The unit is delivered to you with the door opening from the left side. Should you desire to reverse the opening direction, please follow these instructions.
NOTE:
Before reversing the door, the power must be shut off.
All parts removed must be saved to do the reinstallation of the door.
This wine cellar has been built with the door hinges on the right. If you wish to change the opening direction, follow the instructions below:
- Remove the upper hinge cover(6) first
- Remove the two screws (1) that hold the upper hinge (5) (right side) to the frame. Take away the upper hinge (5).
- Lift the door and place it on a padded surface to prevent scratching it.
- Remove the two screws(8) that hold the lower hinge(2) and Make sure to Remove the lower hinge(2).
- Remove the left front leg (4) and transfer it to the right side.
- Remove the hole cover plate(7) to the right side.
- Before placing this lower hinge(2), remove the bolt-pin (9) and reverse the direction of the lower hinge(2). Then install the lower hinge (2) onto the left side of the lower frame with two screws (8).
- Insert the bolt-pin(9) to the lower hinge (2).
- Set the door to its place making sure the door seat at the lower hinge(2).
-
While holding the door in the closed position secure the upper hinge (5) in the top frame of left side with two screws (1). Please remember that do not tighten the two screws(1) until the top of the door is levelled with the counter top.
-
Install the upper hinge cover(6) on the upper hinge..
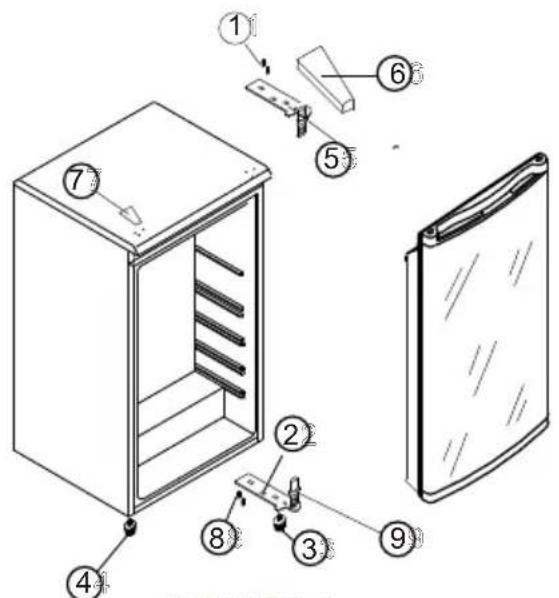
FIGURE 1
Door opening from left side
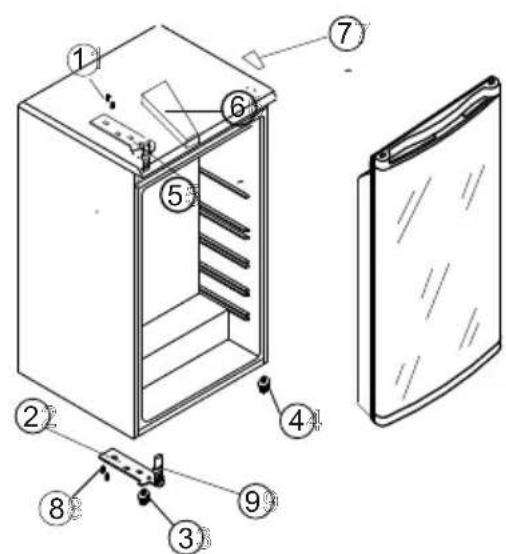
FIGURE 2
Door opening from right side
IMPORTANT SAFEGUARDS
Do not store food in wine cooler, as interior temperature may not get cool enough to prevent spoilage. As a natural result of condensation, in summer months or area of high humidity, the glass door may build up moisture on the outside .Just wipe it away.
It is recommended you install the wine cooler in a place where the ambient temperature is between 22 -25 degree Celsius. If the ambient temperature in above of below the recommended temperature, conditions may cause interior temperature to fluctuate.
If the interior light is left on, the temperature inside the wine cooler will be higher.
Recommended Temperatures for chilling Wine
Red wines: 15.5-18.5°C
Dry/White Wines 10-15°C
Sparkling Wines 7.2-9.5°C
Rose Wines 9.5-10.5 C
The above temperatures may fluctuate depending on whether or not the interior bulb is on or off of whether the bottles are located on the lower/middle or lower section.
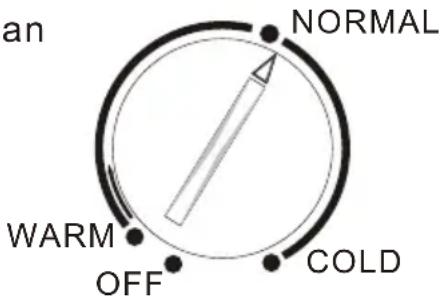
HOW TO USE THE THERMOSTAT
By turning the thermostat knob, you can adjust the temperature of the compartment you desired. Turn it clockwise, the temperature of the compartment will become cooler and cooler. To store red wine you can adjust it anti-clockwise, to store white wine you can adjust it clockwise.
Shelves
Shelf is chrome plated. To accommodate different size bottles, they can be moved up or down by sliding them out the tracks first. Shelves are designed to accommodate maximum amount of bottles.
Wine Rack
There is an additional wine rack at bottom section of the unit where you can store up to 6 wine bottles. This rack is removable for cleaning purpose.
There is a 4 to 6 C variance between the top and bottom shelves of the wine chiller. Therefore, If you have set the wine chiller for red wine only and you want to place a mix of white and red wines, you should place the white wine bottles on the bottom shelves and the red wines on the top shelves.
CARE AND MAINTENANCE
CHANGING THE LIGHT BULB
NOTE:
All parts removed must be saved to do the replacement of the light bulb.
Before removing the light bulb, either unplug the refrigerator or disconnect the electricity leading into the refrigerator at the main power supply. Failure to do so could result in electrical shock or personal injury.
Light bulb should not exceed 5 watts.
Cleaning Your Wine Cooler
- Unplug the wine cooler, and remove the bottles.
- Wash the inside with a warm water and baking soda solution. The solution should be about 2 tablespoons of baking soda to a liter of water.
- Wash the shelves and trays with a mild detergent solution.
- The outside of the wine cooler should be cleaned with mild detergent and warm water.
- It may also be necessary to periodically wipe the bottom part of the storage area, as the wine cooler is designed to retain humidity, and condensation may collect there.
Maintenance of Your Wine Cooler
- Power Failure
Most power failures are corrected within a few hours and should not affect the temperature of your wine cooler if you minimize the number of times the door is opened. If the power is going to be off for a longer period of time, you need to take the proper steps to protect your contents.
Vacation Time
During long absences, remove all the bottles; unplug your wine cooler, clean your wine cooler, and leave the door open slightly to avoid possible formation of condensation, mold, or odors.
Moving Your Wine Cooler
- Remove all the bottles.
- Securely tape down all loose items inside your wine cooler.
• Turn the levelling screws up to the base to avoid damage. - Tape the doors shut.
- Be sure the wine cooler stays in the upright position during transportation.
Troubleshooting
You can solve many common wine cooler problems easily, saving you the cost of a possible service call. Try the suggestions below to see if you can solve the problem before calling the servicer.
TROUBLESHOOTING GUIDE
| PROBLEM | POSSIBLE CAUSE |
| Wine cooler does not operate. | Not plugged in.The circuit breaker tripped or blown fuse. |
| Wine cooler is not cold enough. | Check to be sure the temperature control setting.External environment may require a higher setting.The door is opened too often.The door is not closed completely.The door gasket does not seal properly.The wine cooler does not have the correct clearances. |
| Compressor turns on and off frequently | The room temperature is hotter than normal.A large amount of contents has been added to the wine cooler.The door is opened too often.The door is not closed completely.The temperature control is not set correctly.The door gasket does not seal properly.The wine cooler does not have the correct clearances. |
| The light does not work. | The home circuit breaker or fuse has tripped.The wine cooler is unplugged.The bulb has burned out.The switch is in the "OFF" position. |
| Vibrations. | Check to assure that the wine cooler is level. |
| The wine cooler seems to make too much noise. | The rattling noise may come from the flow of the refrigerant,which is normal.As each cycle ends, you may hear gurgling sounds caused by the flow of refrigerant in your wine cooler.Contraction and expansion of the inside walls may cause popping and crackling noises.The wine cooler is not level. |
| The door will not close properly. | The wine cooler is not level.The doors were reversed and not properly installed.The gasket is dirty.The shelves are out of position. |
Technical specifications:
For detailed specifications, please refer to the nameplate at the back of the wine cellar. The specifications are subject to change without prior notice due to products improvement.
Sommario
- INTERRUTTORE LUCE
- CABINET
- GAMBE DI LIVELLAMENTO
- PORTA-VINI
- SPORTELLO IN VETRO
- RIPIANI CROMATI
- LUCE INTERNA
- MANOPOLA DEL TERMOSTATO
Afbeelding 1
Abeelding 2
Leggers
Figure 1
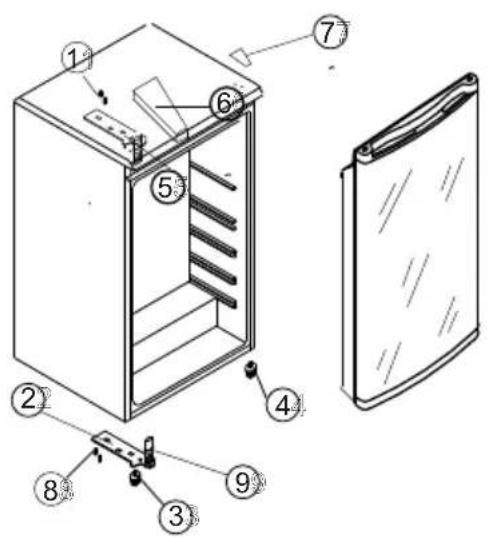
Figure 2
Etagères
Die Weinregale
FIGURA 1
FIGURA 2
Baldas
- WYŁĄCZNIK OŚWIETLENIA
- SZAFKA
- NÓŻKI POZIOMUJĄCE
- STOJAK NA BUTELKI
- DRZWICZKI SZKLANE
- CHROMOWANE PÓŁKI
- OŚWIETLENIE WNETRZA
- POKRETŁO TERMOSTATU
Półki
- LYSKONTAKT
- KABINET
- JUSTERBARE F∅DDER
- VINSTATIV
- GLASD∅R
- HYLDER I KROM
- INDVENDIGT LYS
- TERMOSTATKNAP
VIGTIGE SIKKERHEDSFORANSTALTNINGER
Hylder
- LAMPUN KATKAISIN
- KAAPPI
- TASAUSJALAT
- VIINITELINE
- LASIOVI
- KROMIHYLLYT
- SISÄVALO
- TERMOSTAATIN SÄÄDIN
Hyllyt
- LYSBRYTER
- KABINETT
- F∅TTER
- VINSTATIV
- GLASSD∅R
- KROMHYLLER
- LAMPE
- TERMOSTATBRYTER
VIKTIG
Hyller
STELL OG VEDLIKEHOLD
SKIFTE LYSPÆREN
MERK:
- INTERRUPTOR DA LUZ
- CAIXA
- PÉS REGULÁVEIS
- SUPORTE ESPECIAL PARA GARRAFAS
- PORTA DE VIDRO
- PRATELEIRAS CROMADAS
- LUZ INTERIOR DO FRIGORÍFICO
- BOTÃO DE REGULAÇÃO DO TERMÓSTATO
FIGURA 1 PORTA A ABRIR PARA A DIREITA
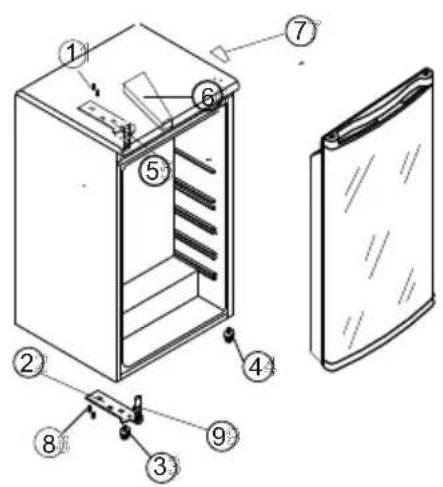
FIGURA 2 PORTA A ABRIR PARA A ESQUERDA
ADVERTÊNCIAS IMPORTANTES
LEGENDA:
WARM = TEMPERATURA MAIS ALTA
NORMAL = NORMAL
COLD = TEMPERATURA MAIS BAIXA
OFF = DESLIGADO
Prateleiras
- LAMPANS STRÖMBRYTARE
- SKÅP
- JUSTERBARA BEN
- VINSTÄLL
- GLASDÖRR
- KROMADE HYLLOR
- LAMPA
- TERMOSTATVRED
VIKTIGA FÖRSIKTIGHETSÅTGÄRDER
Hyllor
- Table of Contents
- PARTS AND FEATURES PARTS AND FEATURES
- Important Safety Instructions
- INSTALLATION INSTRUCTIONS
- Before Using Your Wine Cooler
- Installation of Your Wine Cooler
- Reversing the Door Swing of Your Wine Cooler
- NOTE:
- Before reversing the door, the power must be shut off.
- All parts removed must be saved to do the reinstallation of the door.
- IMPORTANT SAFEGUARDS
- HOW TO USE THE THERMOSTAT
- Shelves
- Wine Rack
- CARE AND MAINTENANCE
- CHANGING THE LIGHT BULB
- Cleaning Your Wine Cooler
- Maintenance of Your Wine Cooler
- Vacation Time
- Moving Your Wine Cooler
- Troubleshooting
- Technical specifications:
- Sommario
- Leggers
- Etagères
- Die Weinregale
- Baldas
- Półki
- VIGTIGE SIKKERHEDSFORANSTALTNINGER
- Hylder
- Hyllyt
- VIKTIG
- Hyller
- STELL OG VEDLIKEHOLD
- SKIFTE LYSPÆREN
- MERK:
- ADVERTÊNCIAS IMPORTANTES
- Prateleiras
- VIKTIGA FÖRSIKTIGHETSÅTGÄRDER
- Hyllor
Brand : CANDY
Model : CCV 150 BL
Category : Drink cooler