
Io 4K - Professional audiovisual equipment AJA - Free user manual and instructions
Find the device manual for free Io 4K AJA in PDF.


| Product Type | 4K Video I/O Interface |
| Model | Io 4K |
| Brand | AJA |
| Dimensions (W x D x H) | 221 x 140 x 43 mm |
| Weight | 1.2 kg |
| Power Supply | AC Adapter (Input: 100-240V, Output: 12V DC) |
| Video Inputs | 2x 12G-SDI, 1x HDMI 2.0 |
| Video Outputs | 2x 12G-SDI, 1x HDMI 2.0 |
| Supported Video Formats | Up to 4K/UltraHD 60p, 2K/HD up to 120p |
| Audio I/O | 8-channel embedded SDI/HDMI, analog stereo input/output |
| Computer Interface | Thunderbolt 3 (USB-C) |
| Software Compatibility | macOS, Windows, popular NLEs (Avid, Final Cut Pro, Premiere Pro) |
| Reference Input | BNC for Genlock/Sync |
| Accessories Included | Power adapter, Thunderbolt 3 cable, quick start guide |
| Operating Temperature | 0 to 40°C |
| Storage Temperature | -20 to 60°C |
| Cleaning Instructions | Use a dry, soft cloth; avoid liquid cleaners |
| Safety Certifications | CE, FCC, UL, RoHS |
| Repairability | No user-serviceable parts; contact AJA support |
Frequently Asked Questions - Io 4K AJA
User questions about Io 4K AJA
0 question about this device. Answer the ones you know or ask your own.
Ask a new question about this device
Download the instructions for your Professional audiovisual equipment in PDF format for free! Find your manual Io 4K - AJA and take your electronic device back in hand. On this page are published all the documents necessary for the use of your device. Io 4K by AJA.
USER MANUAL Io 4K AJA
Installation & Operation Guide
Version 10.5r2
Published: April 2, 2014
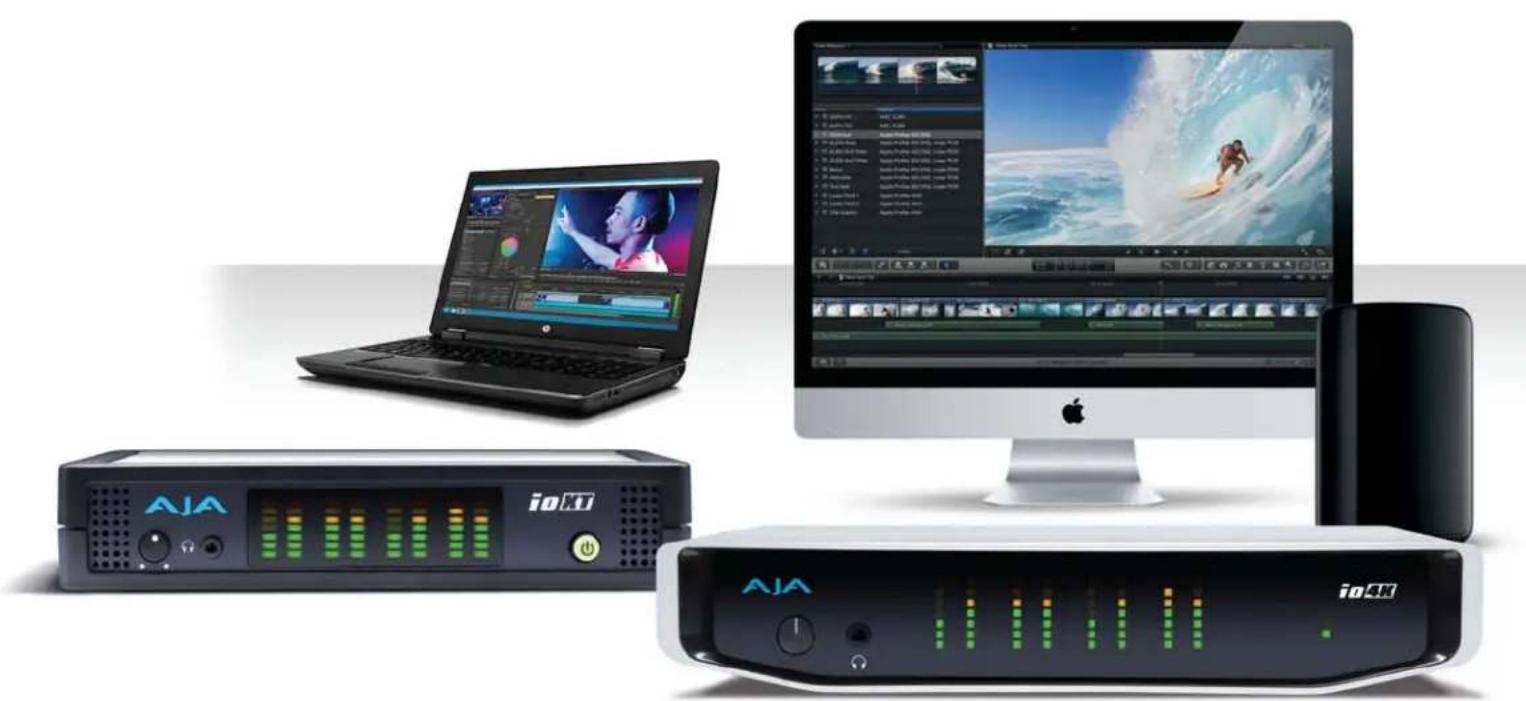
natural_image
Product display setup featuring a laptop, iOS video player interface, and two connected audio equipment units (no visible text or symbols)Table of Contents
Notices....4
Trademarks 4
Copyright....4
Contacting Support 4
Chapter 1: Introduction .... 5
Overview 5
Features: 6
Broadcast-Quality Conversion....6
lo XT/4K Audio....7
AJA Software 7
System Requirements 7
What's In The Box? 8
In This Manual 8
Chapter 2: Installation ...... 9
Installation Overview....9
Connecting to your Computer....10
Cable Connections....10
Connector Descriptions....11
Installing lo XT/4K Software 12
Macintosh Software Installation 12
Windows Software Installation 17
Re-Installation & Repair 21
Chapter 3: Operation....22
Using lo XT/4K with Professional Video /Audio Software....22
AJA Control Panel Overview 23
Single-user & Network Settings....23
Block Diagram Screen....24
Control Panel Operation....28
Control Screen....28
Format Screen....30
Input Select Screen 33
SDI Out Screen 34
HDMI Screen 36
Analog Out Screen (Io XT Only)....37
Video Setup Screen 38
Audio Setup Screen (Io XT Only)....39
Conversion Screen (Mac OS only)....40
DS Keyer Screen 42
Timecode Screen 43
Presets Screen 45
Firmware Screen....46
Info Screen 47
Using lo 4K for UHD/4K....47
Configuring Quad SDI I/O 48
Input Select Screen in 4K Mode....49
SDI Output Screen in 4K Mode 50
HDMI Screen in 4K Mode....50
Video Setup Screen in 4K....51
Downstream Keyer Screen in 4K Mode ....51
Chapter 4: Troubleshooting ....52
If You Run Into Problems 52
Updating Software....53
Support....53
Appendix A: Specifications 54
lo XT Specifications 54
Video Formats 54
Video Input....54
Video Output Digital....54
Video Output Analog 54
Audio Input Digital 55
Audio Output Digital....55
Audio Output Analog 55
Downstream Keyer 55
Up-Conversion 55
Down-conversion....55
Cross-conversion 55
SD to SD aspect ratio conversion 55
Reference Input or LTC Input 56
lo 4K Specifications ....56
Video Formats 56
Video Inputs....56
Video Outputs....57
Audio Inputs Digital 57
Audio Output Digital....57
Audio Output Analog 57
Downstream Keyer 57
4K to HD Down-Conversion 57
Reference Input or LTC Input 57
Physical 57
Machine Control 58
Appendix B: Safety and Compliance 59
Federal Communications Commission (FCC) Compliance Notices....59
Class A Interference Statement....59
FCC Caution 59
Canadian ICES Statement 59
European Union and European Free Trade Association (EFTA)
Regulatory Compliance 60
Declaration of Conformity....60
Korean Compliance Statement 61
Taiwan Compliance Statement 61
Japanese Compliance Statement 62
Translated caution statements, warning conventions and warning messages ..... 62
Before operating your AJA unit, read the instructions in this document ..... 62
Warranty and Liability Information 70
Limited Warranty 70
Limitation of Liability....71
Index 72
Notices
Trademarks
AJA® , KONA®, Ki Pro®, KUMO® and XENA® are registered trademarks of AJA Video, Inc., TruZoom™, TruScale™, Ki Pro Mini™, Io Express™, Io HD™, Io™ and "Work. Flow." are trademarks of AJA Video, Inc. AirPort, Apple, the Apple logo, AppleShare, AppleTalk, FireWire, iPod, iPod Touch, Mac, and Macintosh are registered trademarks of Apple Computer, Inc. Final Cut Pro, QuickTime and the QuickTime Logo are trademarks of Apple Computer, Inc. Avid, Avid Media Composer and Avid DNxHD are trademarks of Avid Technology, Inc. All other trademarks are the property of their respective holders.
HDMI, the HDMI logo and High-Definition Multimedia Interface are trademarks or registered trademarks of HDMI Licensing LLC. DVI is a registered trademark of DDWG. All other trademarks are the property of their respective holders.
Copyright
Copyright © 2014 AJA Video, Inc. All rights reserved. All information in this manual is subject to change without notice. No part of the document may be reproduced or transmitted in any form, or by any means, electronic or mechanical, including photocopying or recording, without the express written permission of AJA Inc.
Contacting Support
When calling for support, have all information at hand prior to calling.
To contact AJA Video for sales or support, use any of the following methods:
Telephone: +1.530.271.3190
FAX:+1.530.271.3140
Web: http://www.aja.com
Support Email: support@aja.com
Sales Email: sales@aja.com
Chapter 1: Introduction

natural_image
Two black electronic devices labeled 'AJA' and 'iOMI', showing audio and signal waveforms (no readable text beyond branding)Overview
AJA's Io XT and Io 4K provide professional-grade I/O for high-end computers. Io XT and 4K are the ideal companion for lightning-fast video capture, playback and up/down/cross conversion. Designed for today's workflows, Io XT/4K provides a new interface for video Pro's working with 10-bit uncompressed, Apple ProRes 422, Apple ProRes 422 (HQ), XDCAM HD, DVCPRO HD, stereoscopic 3D workflows, and more. Io 4K provides additional support for Ultra HD (UHD) and 4K.
Io XT and Io 4K connect with a single Thunderbolt cable and provide a second Thunderbolt connector for storage, making them perfect for on set, or in the edit suite.
Based on the KONA 3G hardware, these lo products provide 3G/Dual-link/HD/SD-SDI, Component Analog, and HDMI connectivity.
Io XT's 10-bit hardware conversion capability paired with a Thunderbolt RAID System creates a super-fast editing system, portable enough to fit in a backpack—with desktop level power.
4K Workflows:
Io 4K is the evolution of AJA's popular devices for professional video I/O, now updated and customized for Thunderbolt™ 2 technology and 4K workflows. Io 4K connects to any Thunderbolt™ 2-enabled device, and offers an additional Thunderbolt™ 2 port for daisy-chaining other peripherals such as high-resolution displays and high-capacity storage.
Io 4K offers a broad range of video and audio connectivity, supporting the latest 4K and UltraHD devices. AJA's proven conversion technology allows realtime high-quality scaling of 4K and UltraHD to HD.
Features: The following table provides a comparison of Io 4K and Io XT features.
Table 1. Io 4K/XT Feature Comparison
| Feature lo 4K lo XT | ||
| Two Thunderbolt ports (supports pass-through/"daisy-chaining") X X | ||
| Supports Thunderbolt 2 connectivity X - | ||
| Two SD-SDI, HD-SDI, and 3G HD-SDI inputs and outputs X X | ||
| Single link SDI 4:2:2 or 4:4:4; Dual-link SDI 4:4:4 X X | ||
| Bidirectional SDI BNCs configurable for four 4K inputs or outputs X - | ||
| HDMI Input and Output | X X | |
| Analog component/composite output, 10-bit | X | |
| Broadcast quality hardware-based 10-bit up-conversion | X | |
| Broadcast quality hardware-based 10-bit down-conversion | X | |
| Broadcast quality hardware-based 10-bit cross-conversion (1080 to 720 and 720 to1080) | X | |
| Dedicated realtime 4K to HD down-conversion output (SDI 5 BNC) | X | |
| DVCProHD hardware scaling acceleration | X X | |
| HDV hardware scaling acceleration | X X | |
| Broadcast quality hardware-based 10-bit SD aspect ratio conversion (anamorphic to letterbox, etc.) | X | X |
| 16-Channel Embedded SDI audio | X X | |
| Eight channels analog audio output (Tascam-style DB25-type cable) | X X | |
| Front panel LED VU meters and Headphone output w/level control | X X | |
| Reference In/LTC In (selectable) | X X | |
| LTC Output | X X | |
| RS-422 control via 9-pin | X X | |
| Rugged Chassis, Small Size | X X | |
| 12V DC, 4-pin XLR Power (AC adapter included) | X X |
Broadcast-Quality Conversion
Io XT features hardware-based full 10-bit broadcast quality motion adaptive SD to HD up-conversion, HD to SD down-conversion and HD to HD cross-conversion.
The quality of the conversion features found in the Io XT is virtually identical to AJA's award winning stand-alone converter products used throughout the post production market. The Io XT built-in up converter uses a full 10-bit path, fully motion adaptive de-interlacing, and large multi-point digital interpolators. Down-conversion uses large multi-point digital interpolators, anti-alias filtering and interpolation.
Cross-conversion is high-quality hardware-based and offers true broadcast picture quality in realtime. Because these functions are in hardware, they are available full time, all the time—with no CPU load. Such conversions are useful for cost effective monitoring, making standard definition dubs of an HD project, or up-converting from a standard definition project to an HD deliverable.
Video Formats
For a complete list of supported video formats, see "Appendix A: Specifications on page 54".
Io XT/4K Audio
Io XT and Io 4K provide up to 16 channels of SDI embedded audio. The front panels have a mini TRS headphone output with a lockable level control knob.
For analog audio output monitoring, Io XT and 4K provide a DB25 connector with eight channels of audio to be used with industry standard Tascam-style audio breakout cables. The front panel has an eight-channel VU meter display to monitor output levels.
HDMI Audio: Both Io XT and Io 4K also support HDMI Audio, 2 or 8 channels.
AJA Software
AJA's Io XT/4K software and hardware were developed for powerful integrated video/audio capture, editing, and production with a variety of 3rd-party software. With an Io XT/4K and qualified Thunderbolt-enabled computer, you have the ultimate system for standard and high definition production, post-production, broadcast, and streaming work. AJA software is available for download at the AJA website.
- AJA device drivers for tightly integrated hardware/software operation.
- AJA Control Panel for source selection and controlling lo XT/4K within either Mac or Windows environment, Input Pass through, and more. AJA Control Panel uses a block diagram to show visually what is happening inside lo XT/4K.
- AJA ControlRoom—a unified cross-platform software application for ingest, playback and output with AJA products.
- AJA-provided plugins for popular 3rd-party Professional Video Applications from Adobe, Avid, Apple, Telestream, and more.
NOTE: For a complete software compatibility list, see the AJA website link:
http://www.aja.com/en/category/edit/compatibility
System Requirements
NOTE: See the vendor of your system software for requirements/recommendations of GPU and additional hardware requirements.
For best performance AJA recommends:
- OS 10.7.5 or later
• Windows 7/8 with all updates
• 2.5GHz dual core i5 or better
• 2.0 GHz quad core i7 or better
• 4GB RAM Minimum, 8GB Recommended
What's In The Box?
As you unpack the shipping box(es), carefully examine the contents. Ensure you received everything and that nothing was damaged during shipment. If you find any damage, immediately notify the shipping service and supply them with a complete description of the damage. AJA will repair or replace damaged items. If you find shipping damage, contact your AJA dealer or distributor for details on how to have your lo XT/4K repaired or replaced. Save packing materials and the shipping box. If you ever require service or move your system—use the packaging materials and box for safe shipment.
Figure 1. Io XT/4K Shipping Box Contents (Io 4K shown)

When you unpack your AJA Io XT/4K, you'll find the following components:
- lo XT or lo 4K
• 12V power adapter and power cord - Read Me First Notice—Contains late-breaking news and/or errata related to the product and it's documentation.
- Registration Sheet—allows you to register your lo XT/4K by mail or online (details provided).
In This Manual
Chapter 1 Discusses features, system requirements, and shipping box contents.
Chapter 2 Provides complete instructions for installing and configuring the AJA Io XT/4K. The user is guided through unpacking, cabling the Io XT/4K, installing AJA & third-party support software, then getting it up and running. Important configuration information is also provided on video settings and use of genlock/external reference.
Chapter 3 Discusses operational aspects of Io XT/4K and how to work with 3rd-party software.
Chapter 4 Discusses troubleshooting problems with your system and what to do when there's a problem you can't solve.
Appendix A Presents a list of technical specifications for the product.
Appendix B Provides important Safety and Compliance information.
The balance of the book provides Warranty information and an Index.
Chapter 2: Installation

natural_image
Close-up illustration of a mechanical component with a cylindrical shaft and a circular connector (no text or symbols visible)Installation Overview
The installation and set up of an lo XT and lo 4K is very simple. A functional description of each connector is provided in this chapter. The steps of installation and configuration are outlined here and each of these steps are explained in greater detail on the remaining pages of this chapter:
-
If not previously installed on your Thunderbolt equipped computer, ensure that appropriate application software is installed as detailed in its user documentation.
-
For latest System Compatibility and Software Version information for Io XT or Io 4K visit the AJA website.
For lo XT, visit:
http://www.aja.com/en/products/io-xt/#/overview
For lo 4K visit:
www.aja.com/en/products/io-4k#overview
- Install the latest AJA software on your computer from the AJA website.
For lo XT, visit:
http://www.aja.com/en/products/io-xt/#support
For lo 4K visit:
www.aja.com/en/products/io-4k#support
- First install the lo XT or lo 4K driver package (includes the AJA Control Panel) and then finally install any AJA plug-ins for 3rd-party software.
Connecting to your Computer
- With your computer off, connect a Thunderbolt cable between the computer and the lo XT/4K.
- Power the unit (AC supply or battery) and if it is lo XT, turn it on using the power button on the front. lo 4K does not have a power button.
- Cable the system audio and video sources, VTR, audio monitor, and video monitor.
- When you run the AJA Control Panel, you'll notice that the Io XT/4K is auto-discovered as long as it is properly cabled and powered up.
- Please read "Chapter 3: Operation on page 22". (The latest version of the manual can be downloaded from the AJA support page provided above.)
Cable Connections
Io XT and Io 4K connections are made directly to the unit's rear connector plate. Both have a Tascam-style DB25 connector providing 8 audio output channels.
Figure 2. Io XT Connectors

Figure 3. Io 4K Connectors

Connector Descriptions
The following section describes the connectors offered on the lo XT and lo 4K chassis in the following order:
- Connectors common to both models
- lo XT connectors
- lo 4K connectors
Connectors Common to Both Models
HDMI Input and Output:
Two HDMI connectors on the Io XT/4K provide input and output of HDMI video and multi-channel embedded audio.
- lo XT has HDMI v1.3a capability at 30 bits per pixel allows full support of the latest 10-bit monitors.
- lo 4K has HDMI 1.4 capability, supporting Ultra HD and 4K resolutions at up to 30 frames per second.
- Both Io XT and Io 4K support 2 or 8 channel HDMI audio input and output.
HDCP is not supported on either input or output. Io XT/4K HDMI output does not have HDCP, and input sources having HDCP are not supported. The HDMI input is designed to support long cable runs—up to 100 ft. when using 22 or 24AWG HDMI cable, or up to 50 ft. using 28 or 30AWG HDMI cable. The HDMI output supports standard HDMI cables only.
RS422 Machine Control:
A female DE-9 connector on Io XT/4K provides connection for VTRs, camcorders, disk media servers, and other devices using RS422 SMPTE (Sony) protocol. (Connector pinout is listed in Appendix A, see "Machine Control" on page 58.)
Reference Video and LTC Input:
Two BNC connectors on lo XT/4K provide reference Input and Output. The Reference Video input can also be used for LTC input. The selection of Reference (sync) or LTC is set using the AJA Control Panel ("Input Select Screen" on page 33).
In Video Pass-through mode, these connectors are effectively loop-through. Supplying reference signal to the Reference input allows you to synchronize lo XT/4K outputs to your house analog reference video signal (or black burst). If you have a sync generator or central piece of video equipment to use for synchronizing other video equipment in your studio, then connect its analog composite output here. When lo XT/4K outputs video, it uses this reference signal for locking. When connecting a reference video source, the locking signal should be the same format as the Primary format selected in the AJA Control Panel. It is possible in some circumstances to use an alternate format video signal as long as the basic frame rate is compatible.
Balanced Analog Audio Output:
A 25-pin DB connector provides 8-channel, 24-bit D/A analog audio, 48kHz sample rate, balanced via 8x XLR on DB-25 breakout cable. (Cable not supplied.)
12V Power Connector:
A standard 4-pin XLR type connector is provided for either battery or line source power using the supplied AC power adapter.
Io XT Connectors These connectors are used only on the Io XT model.
Thunderbolt ports:
Two Thunderbolt ports are provided as describe in the figure above. These are first generation Thunderbolt connections.
HD/SD SDI Input and Output:
BNC connectors are provided on Io XT for two HD/SD-SDI inputs and two HD/SD-SDI outputs. The input and output support video and embedded 24-bit digital audio. Use SDI wherever possible for the best quality 10-bit uncompressed video input, capture and
| output. If peripheral equipment has a variety of inputs/outputs, look to see if it has SDI I/O, and use it where possible. Most high-end professional broadcast equipment supports SDI (VTRs, cameras, media storage servers, etc.). | |
| Component Video Output: | Io XT features a group of 3 BNC connectors for output of component, composite and Y/C functions. The signals are labeled on the BNC connectors on the rear panel of Io XT. |
| A Note About YPbPr: | Component Video, or YPbPr, has been given several names over time. YUV, Y/R-Y/B-Y, and YCbCr, are just some examples. Although these various formats have some differences in levels, they are all basically the same. Io XT uses the modern YPbPr terminology exclusively. Io XT supports three different types of YPbPr: SMPTE/EBU N10, Betacam (NTSC), and Betacam (NTSC Japan). These three formats differ in level only and are configured via the AJA Control Panel. |
Io 4K Connectors These connectors are offered only on the Io 4K model.
Thunderbolt 2: The Io 4K provides the second-generation Thunderbolt ports to support UHD and 4K signals. Two ports are provided for "daisy-chained" network configurations.
Bi-directional SDI I/O: Four bidirectional BNC connectors can be configured via the AJA Control Panel for:
• HD/SD inputs (x2) and outputs (x2)
- Or you can input or output 4 channels of video representing individual quadrants of the higher definition Ultra HD (3840x2160) and 4K (4096x2160) formats.
NOTE: The lo 4K can only be configured for either input or output of 4K at a time. It cannot support 4K input and output at the same time since both require four BNCs.
Dedicated SDI HD/SD Output: One BNC connector is provided for full-time, real-time output of HD/SD video. 4K video is down-converted to 2K HD and UHD is down-converted to HD.
Installing lo XT/4K Software
Go to the AJA website and download the latest Io XT/4K driver software containing the AJA Control Panel application. While there, also download any AJA plug-ins for 3rd-party applications (such as Adobe and Avid). All of these software installers can be found here:
http://www.aja.com/en/support/downloads/
System software updates may occasionally become available to AJA lo XT/4K owners on our website (www.aja.com). We recommend checking occasionally for both software updates and additional product information.
NOTE: If your computer has previously had another video capture or multimedia device installed, ensure you uninstall any related software before installing lo XT/4K This will prevent any hardware or software conflicts.
If you add lo XT/4K supported applications at a later date and have not previously installed the appropriate drivers, you must run the install program again selecting the appropriate application support software to be installed.
Macintosh Software Installation
NOTE: If you have trouble installing lo XT or lo 4K software, turn off any virus protection and security software that you may have installed on your computer and try again.
Mountain Lion OS and Gatekeeper:
With the addition of Gatekeeper functionality in Mac OS Mountain Lion, you should go to System Preferences>Security & Privacy and choose to allow "Mac App Store and identified developers."
Figure 4. Mac Security & Privacy Gatekeeper Setting

-
Locate the lo XT or lo 4K software downloaded from AJA.
-
Double-click the package to log on and begin software installation. Start by installing the Io XT/4K driver package with AJA Control Panel and then finally install any AJA plug-ins for 3rd-party software.
NOTE: The system will respond by asking you to authenticate who you are as currently defined on your OS X user profile. Enter the proper name and password at the Authenticate prompt; if you have multiple users defined, ensure that you log on as a user with administrator-level authority.
Figure 5. Log On Authenticate Prompt

-
Click on the Install Software button after entering a valid user and password.
-
The installer will launch and you'll see a series of installer screens.
-
On the following pages, we show the series of screens you'll see when installing the lo XT/4K driver software package. The lo 4K installation uses a different package but is the same process.
- When you launch the installer, you'll see a series of installer screens.
Figure 6. Initial Installer Screen
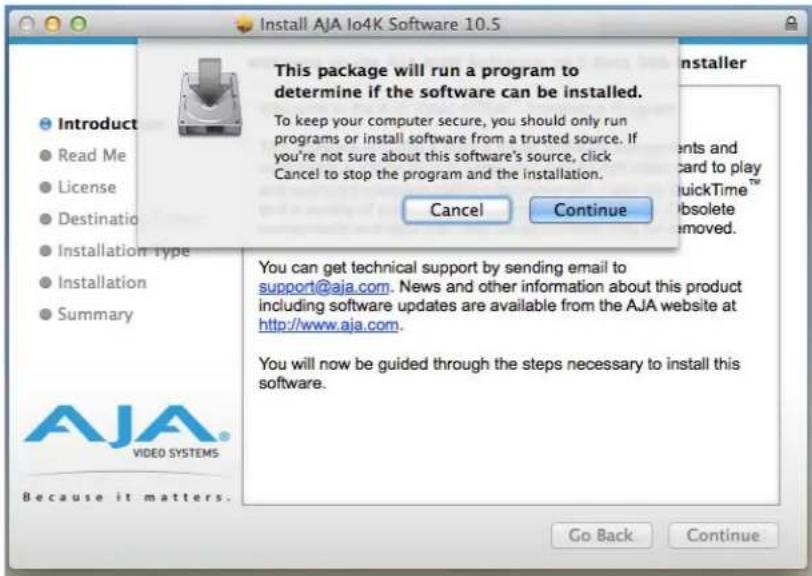
- Click Continue to begin installation.
- The next screen lets you know that the installer will check your Mac to ensure it has the hardware and software resources required ("System Requirements" on page 7).
Figure 7. System Check Installer Screen

- Read and agree to the Software License Agreement.
Figure 8. Io XT/4K Software License Agreement Screen

- At the next screen, select the "Io XT/4K Setups" checkbox. Check any Easy Setups that you want to use (or all of them) and then click the Continue button to place the software on the drive you previously selected. Some 3rd-party applications provide native setups so you can uncheck the "IoXT Setups" checkbox before clicking Continue.
Figure 9. Installer Screen, Select Easy Setups to be Installed

- The installer tells you how much room the installation will take and prompts you to click Install to begin (or go back). Click the Install button to proceed.
Figure 10. Installer Screen, Space Reminder

- Next, the system will display a reminder that you'll have to Restart the Mac after installation concludes. Click Continue Installation.
Figure 11. Installer Screen, Reminder about Restarting

- The installer runs and puts all the necessary lo XT/4K drivers and software on the desired hard drive. When it has completed installation, a final screen will be displayed announcing that "software was successfully installed."
Figure 12. Installation Success and Restart Message

- Click the Restart button to complete the installation procedure. The system will perform software restart.
- After installing the lo XT or lo 4K system driver package, you will find the AJA Control Panel software installed in your applications.
- Finally, install any AJA plug-ins required for 3rd-party software. You can download these from the AJA website:
http://www.aja.com/en/products/io-xt/#support - For example, if you wish to use the Io XT/4K with Adobe Premiere or Adobe After Effects, you would go the AJA website Io XT or Io 4K support page (URL above) and download the "AJA Adobe Plug-ins for Creative Cloud". These plug-ins come with complete documentation on how to use them.
Windows Software Installation
Locate the AJA Windows Software download file and follow the procedure below to install the required software on the host system.
NOTE: If you have trouble installing AJA Windows Software, turn off any virus protection and security software that you have installed on your computer and try again.
Open the AJA Windows Software download package.
Install Wizard
The AJA Windows Software installation program will launch and extract the necessary Io XT/4K drivers, AJA Control Panel Software, for installation on the desired hard drive.
NOTE: The Windows installation requires separate download and installation of application plugins for AVID, Adobe, Eyeon Fusion, and Telestream Wirecast plugins. (See the web-link above.)
Figure 13. Install Wizard Welcome

When you see the Welcome page, click "Next" to view the AJA Windows Software license agreement.
Figure 14. License Agreement

Read the Windows Software license agreement and click "Yes" to accept. You will be asked to choose the type of installation you would like to perform. Click on the Custom button to see the installation options.
The default selections include AJA Drivers for KONA cards, lo Express/XT/4K, and T-TAP. Software not installed is marked with a red X.
You may choose to perform a Custom installation to select the specific software necessary for your applications. If you use the entire collection, use the "Complete" installation.
NOTE: By default, AJA ASIO drivers are not installed. (If you will be using the Voice-over feature in Adobe Premiere Pro, you will need to click on the pulldown menu and include them in the installation. For more information on using ASIO drivers, refer to the AJA Adobe Plugins Installation and Operation Guide.
Figure 15. Custom Installation Window
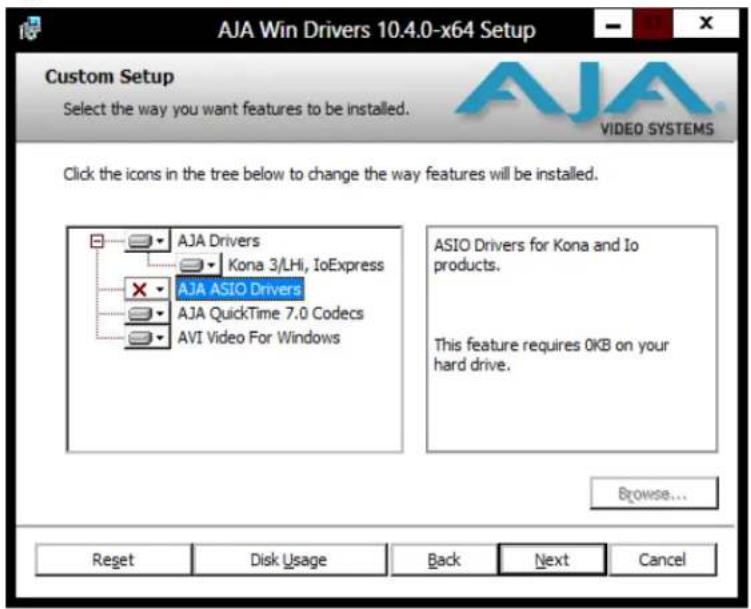
The following screens depict the more elaborate Custom installation. Shown below are the pull-down options. Click (triangle) to expand or contract.
Figure 16. Installation Item Selection
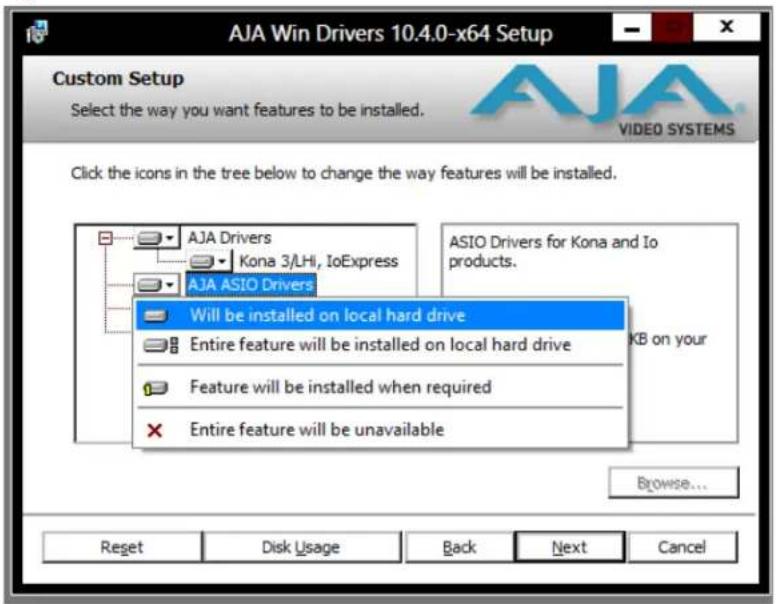
You may deselect any Item for installation by using the pulldown to make it unavailable. Before clicking Next to install, you can verify your disk space availability by clicking the Disk Usage button.
Figure 17. Workstation Disk Usage Display

To return to the installation click OK. Then click Next to begin the installation.
Figure 18. Installation Progress Screen

When the installer has completed copying the AJA Windows Software to disk, you will see a standard Windows Logo test warning. Click on the "Continue Anyway" button to finish the installation.
When the installation is completed, a final screen will be displayed announcing that "Setup has finished installing AJA Windows Software on your computer." Click on the Finish button after the installation is complete. Restart the computer after installation to activate the lo XT/4K.
Re-Installation & Repair
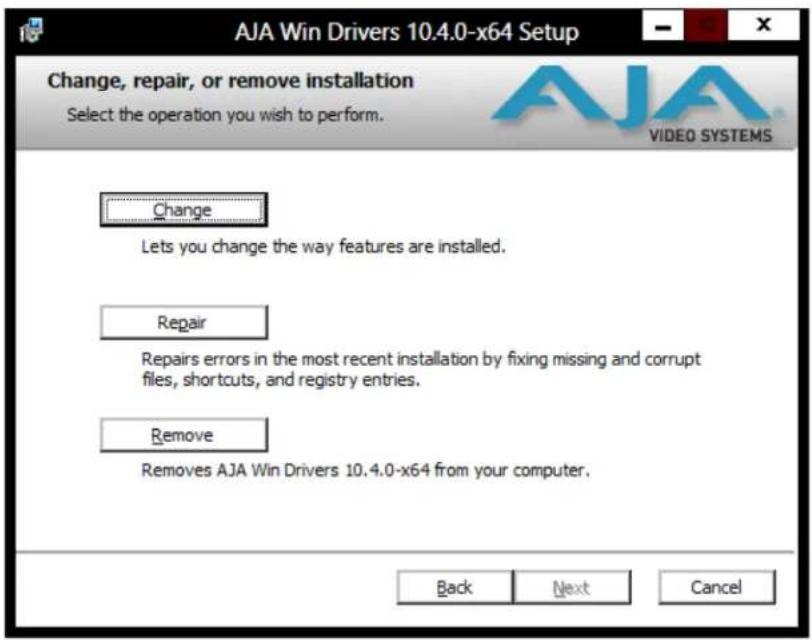
If you have problems running your newly installed plugins or need to re-install for added applications, you can relaunch the install package and access the following window.
NOTE: Always uninstall AJA Windows Software before installing a new version.
Figure 19. Change, Repair, or Remove Installation Menu
Chapter 3: Operation
natural_image
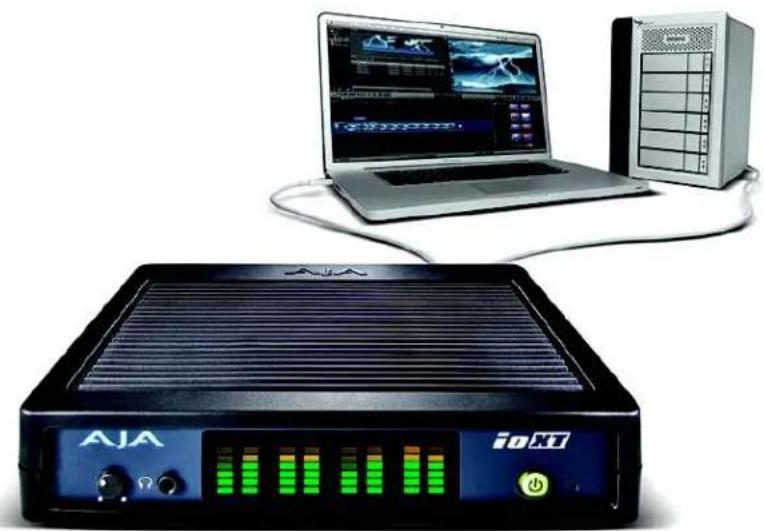
Exterior view of a black AJA audio equipment unit with a laptop and tower connected by cables (no visible text or symbols on main components)Using Io XT/4K with Professional Video /Audio Software
NOTE: This chapter initially describes the Io XT version of the Control Panel screens that support video formats up to 2K bandwidths. Io 4K differences will be noted and detailed UHD/4K operations are discussed in the section "Configuring Quad SDI I/O" on page 48
After you install the lo XT or lo 4K software and any AJA plug-ins to support your choice of 3rd-party software, you're ready to begin capturing and playing back video and audio.
Go to the AJA website for AJA plug-ins and documentation for your favorite 3rd-party software applications.
For lo XT, visit:
http://www.aja.com/en/products/io-xt/#support
For lo 4K, visit:
www.aja.com/en/products/io-4k#support
For further support information and downloads for third-party software and DirectShow for Developers, go to this link:
http://www.aja.com/en/support/resources/
Once you've installed all the AJA software as detailed in Chapter 2, you'll find the AJA Control Panel application in your Applications.
| The AJA Control Panel is a software application that provides a simple visual window showing how the lo XT/4K interface is currently configured, and that allows you to make changes. Settings—both those you changed and those you didn’t—can be named and saved as a snapshot for recall at anytime. This lets you save settings associated with all your frequent tasks; then as you switch tasks you don’t have to spend extra time resetting interface configurations—just load the previously saved settings for each task. If you work on multiple systems and want to carry your saved setup to another location, you can copy your saved Presets file on to movable storage and load it into any AJA-equipped system (see “Presets Screen” on page 45 for more details). | |
| Single-user & Network Settings | The AJA Control Panel offers preference settings that support both:User Preferences— Preferences stored from the last Control Panel State to be used on next startup of AJA Control Panel.Shared Preferences— Preferences saved by an Administrator for use as a default start state for AJA Control Panel. |
| User Preferences: | This file exists to immediately, automatically, store preference changes made by a user on a particular AJA device. When any control is changed in the Control Panel, that change is recorded in the preferences file stored in a unique user preferences location dedicated to that particular device and serial number. Then, when AJA control panel is restarted for any reason, it will restart with the same preferences it used when it closed.However, if a user sets their preferences, and then replaces the AJA device with a different one, the Control Panel will either:Start up with the factory defaults, orStart up with the “house defaults” dictated by the system administrator (if a Shared Preferences file exists).The User Preferences File can be found in the following locations.On Mac:/Users//Library/Preferences/com.aja.devicesettingsOn Windows 8:C:\Users\AppData\Local\Aja.com.aja.devicesettings |
| Shared Preferences: | An administrator can establish house standards for the AJA Control Panel by creating the user preferences file (described above) and placing it in a shared location where it will establish a standard default startup state for all users of a given computer system. These settings preempt the initial AJA default settings.To establish the House Default for every user on every system, a system or network administrator can move this default file to all systems on the network (manually or by pushing it out across the network). All users on the network will then open to the House Defaults when they launch the AJA control panel for the first time. |
| NOTE: | If the user makes changes to the control panel themselves, those changes will be saved in their user preferences, which will take priority over the house default dictated by the shared preferences file.The Shared Preferences file should be a file created at the User Preferences location described above, and placed by the System Administrator in the following locations. |
On Mac:
• /Users/Shared/Library/Preferences/com.aja.devicesettings
On Windows 8:
• C:\Users\All Users\Aja\com.aja.devicesettings
Block Diagram Screen
The AJA Control Panel represents a visual block diagram of the unit's configuration. The current status, input and output settings, and many other details are depicted in the color-coded block diagram.
The top area of the Control Panel is a visual representation of the processing, if any, that's currently occurring, including inputs/outputs, reference source, and system status. Lines between inputs, the framebuffer, and outputs, show a video path. Where there are no lines, there is no connection; this can be because an input or output isn't selected in the Input Select menu. The lines will also show whether the outputs are video or video + key.
Icon objects in the block diagram screen (input/output icons, frame buffer, etc.—indicate their status by color (described later). You can click any of the screen selection links in the left column to view its current settings or click on an icon to call up its related settings screen (for example, click an HDMI icon to call up the HDMI screen information). You can also right-click or Control-click to see context-sensitive information and choices. Figure 20 & Figure 21 show the IoXT and Io 4K Control screens.
Figure 20. AJA Control Panel, Block Diagram for IoXT
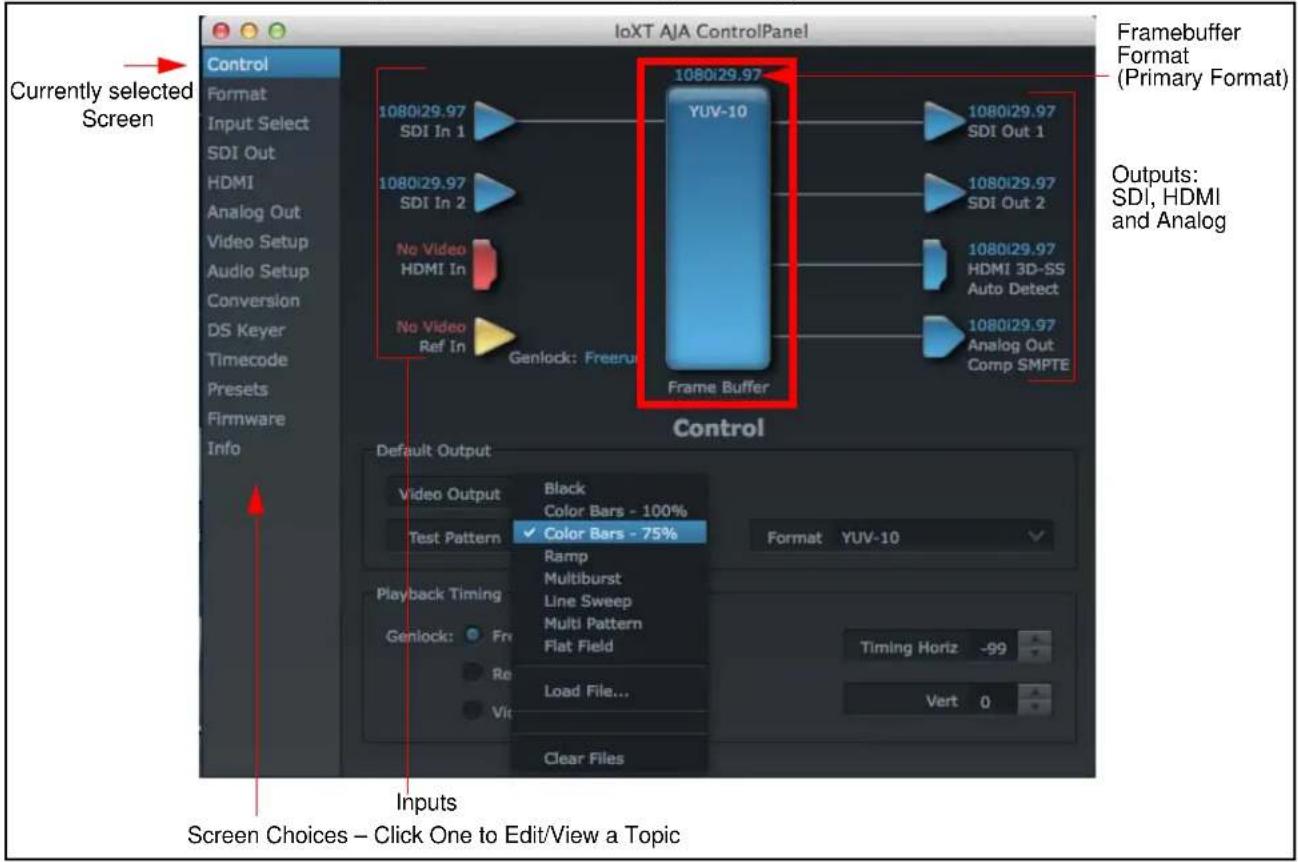
Figure 21. Io 4K, Block Diagram set for UHD Format

Framebuffer:
The framebuffer is the "memory" in Io XT/4K where your third-party applications interface with the hardware. The framebuffer has a format (called the "Primary Format" and color space that it follows, as defined in the linked menu screens or via external application software. It is important to realize that the computer can contain many applications that can use the Io XT/4K (as you switch from window to window) and it may not always be obvious which currently controls it.
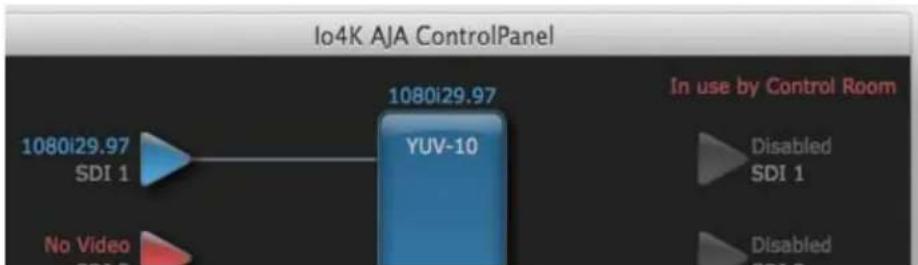
Figure 22. Control Panel In Use Message (in red)
flowchart
graph LR
    A["1080i29.97 SDI 1"] --> B["YUV-10"]
    C["No Video"] --> B
    D["1080i29.97"] --> B
    E["In use by Control Room"] --> F["Disabled SDI 1"]
    G["Disabled SDI 2"] --> H["Disabled"]
In the top right corner, the Control Panel displays the name of the application controlling the unit. In some cases, applications may not always properly "let go" of the I/O interface as another takes over—you'll be able to tell by looking at the Control Panel.
Color Meanings:
All items in the AJA Control Panel block diagram are color-coded to show what is happening in realtime. This applies to both icons and text. These colors have the following corresponding meanings:
- Blue: video is same format as the Primary Format (framebuffer)
• Red: the selected operation cannot be performed - Yellow: reference video (black burst or other reference source)
- Green: indicates that Io XT/4K is performing an active change to the video making it different from the Primary Format (e.g., down-conversion).
Primary & Secondary Video Formats
In Io XT/4K operation, the Primary Format is the media format written to disk and used in your project. The Secondary Format is a selection for format conversion.
Primary Format:
The video format currently assigned to lo XT/4K. This is the format that the framebuffer will use and is shown in the Control Panel using the color blue. It is the format that the third-party application software will either receive from the AJA hardware, or is giving to the hardware. All icons in blue are the same as the Primary Format used by the framebuffer. Also any text descriptions in the block diagram that appear in blue indicate that something is in the primary format. For example:
- If the input and output icons are blue, you know that the same format is used throughout the video path. No format conversion is being performed.
- If the input or output icon colors differ (blue input and green output icons for example), you know that a format conversion is being performed.
Secondary Format:
Any format other than the currently selected Primary Format, is a secondary format. As described previously, this means that either the Inputs or Outputs are somehow different from the framebuffer's assigned format—the Primary Format. A conversion is readily apparent because of the color change from blue. In the example below, a secondary format of 720p59.94 is selected on the Format screen and is then used for output at SDI 2.
Figure 23. Setting the Secondary Input Format
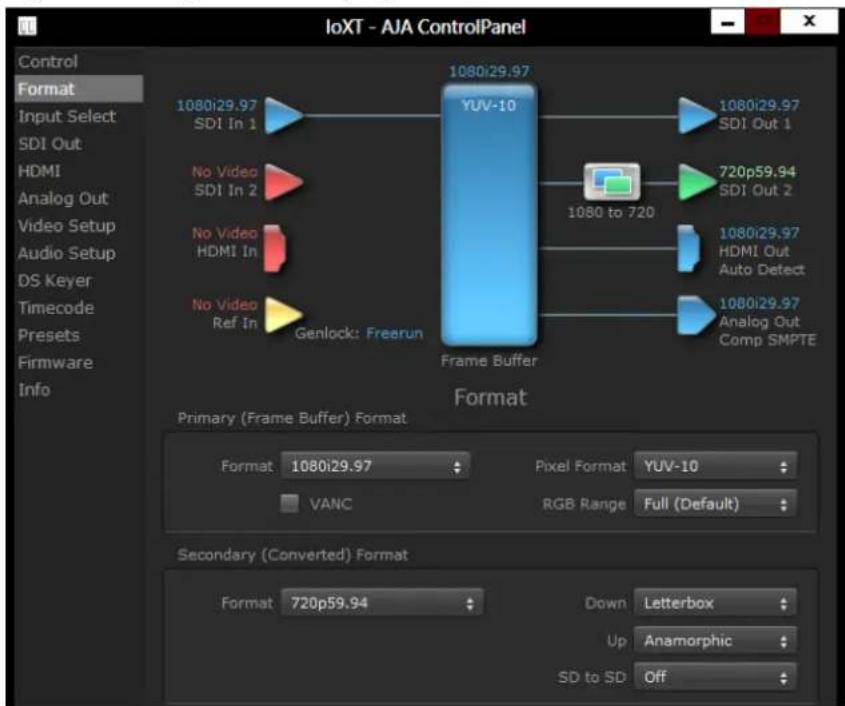
NOTE: In some cases the application you use with the Io XT/4K will automatically set the Primary Format, overriding the user's selected primary format in the AJA Control Panel.
Format Conversion:
Conversion allows selection of a format conversion between High-definition and Standard-definition. The choices offered depend on the AJA device present in your system and the Primary and Secondary format selected. Io XT supports up-, down-, and cross- conversion plus SD-to-SD aspect ratio conversions.
Conversion is performed based upon the Primary or Secondary Format settings. Io XT/4K can down-convert the input format (when designated as a Secondary Format) to the selected Primary Format. Or you can assign a Secondary Format for output that will be a conversion from the Primary (frame buffer) format.
NOTE:
When converting an Input to the Primary Format, select the Secondary Format option that has (I), for input only, appended to it. Conversely, when converting an Output from the Primary Format, you must select an output signal with (O) for output only.
Input/Output Icons:
The input and output icons are triangles that together with their color show all the input and outputs and their status (selected, not selected, input present or not, format, etc.). A complete video path is shown when inputs and outputs are connected with lines going to/from the framebuffer.
Figure 24. Input/Output Icon

Conversion Icons:
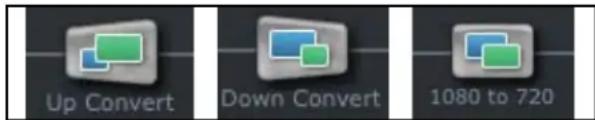
When an input or output is a different standard than the framebuffer, the lo XT/4K may be up-down- or cross-converting the signal to the selected standard. This may be automatic, because it's detected an input signal that differs from the standard currently selected, or because you've explicitly told it to convert. In either case, the block diagram will show the conversion by displaying a conversion icon in between the input/output and the framebuffer.
Figure 25. Up, Down, and Cross-convert Icons
Control Panel Screens:
The side area of the lo XT/4K Control Panel provides different information categorized by topics. Clicking on a topic—or a block diagram element—displays an information screen corresponding to that topic. Screens that can be selected are:
Control: configures lo XT/4K operation and output timing.
Format: select the framebuffer primary video format and any secondary formats for conversion of inputs/outputs
Input Select: view and edit input selections and how they are mapped
SDI Out: select output format
HDMI: configure the HDMI I/O
Analog Out: configure the component/composite analog output
Video Setup: configures Video such as composite black level and filtering specific video parameters for output.
Audio Setup: (lo XT only) configures Audio options such as analog audio monitor level.
Conversion: (available for Mac only) for applications that support selection of codec
options such as whether paused video appears as a full frame or a single field (jitter shown or not shown) and 24 to 30 fps padding patterns, RGB range, and Stereo 3D signal configuration (if applicable).
DS Keyer: setup and control the insertion of keyed video from the frame buffer or graphics files with alpha channel.
Presets: add or delete saved preset configurations (handy for setting up the lo XT/4K for certain workflows and then saving it as a canned configuration for easy later recall)
Firmware: enables installation of AJA card firmware.
Info: displays status information and firmware version # of the lo XT/4K and how it is installed in the host Macintosh. This information is generally intended for troubleshooting/support.
Control Panel Operation
In this section, Control Panel operation for lo 4K using Ultra-HD and 4K formats are described separately (see "Configuring Quad SDI I/O" on page 48). Standard SD, HD, and 2K operations are essentially the same for both lo XT and lo 4K and are illustrated using lo XT screen shots (exceptions are noted).
Control Screen
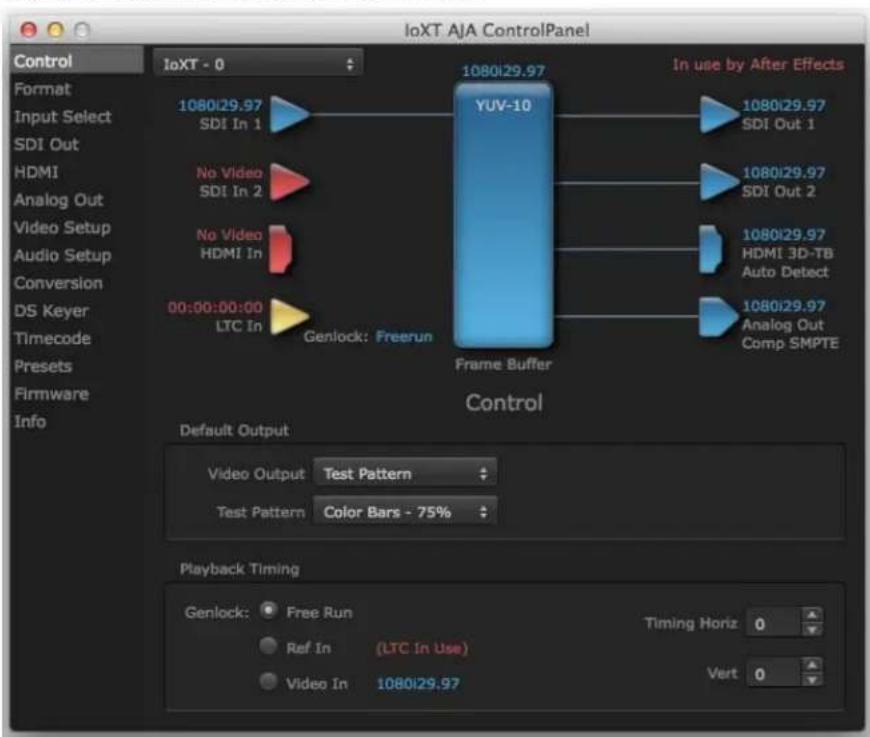
The Io XT/4K can be controlled by various software applications running on a host Mac. The Control screen is where you select how the Io XT/4K directs video and is used by application software. This screen also provides control for configuring output timing with regard to external reference video and horizontal/vertical delay.
At the top of the Control screen it will show the current Default Output and the application currently controlling the lo XT/4K.
Figure 26. AJA Control Panel, Control Screen
Control Screen Settings
Default Output—this is where you select what lo XT/4K will output as a default when no application has control of the board, such as when the Finder is active. Since lo XT/4K can be controlled by software applications as well as its own control panel, the output can change dynamically. When you select many video applications, they will grab control of the lo XT/4K inputs/outputs. These settings determine what happens when an application that doesn't grab the lo XT/4K inputs/outputs is active.
Default Output Choices and their meanings:
- Input Pass through: this selection directs Io XT/4K to route video from its selected input through the card for processing and output. When this selection is in effect, all Primary/Secondary Format selections are available for selection in controlling the output. This, in effect, makes the Io XT a converter when used in conjunction with the AJA Control Panel application and your computer. No applications other than the AJA Control Panel need to be open to convert audio and video from one format to another. For example, if an SD source tape needs to be dubbed to an HD tape, the signal might be routed from the SD VTR to the Io XT, configured for up-conversion in the AJA Control Panel and then passed through to the HD VTR for recording.
NOTE: See "Configuring Quad SDI I/O" on page 48 for using this menu to input UHD/4K formats.
- Test Pattern: this selection directs lo XT to output a choice of preset pattern when no other application is using the lo XT. You can choose from:
Black, Color bars (75% or 100%), Ramp, Multiburst, Line Sweep, Multi Pattern, or Flat Field.
In addition to the preset test pattern choices, a "Load File..." selection at the bottom of the menu allows you to load any standard RGB graphics file (.tif,.psd, etc.) into the frame buffer for display.
While in Test Pattern mode, you can select RGB or YUV output via a pulldown menu.
NOTE: The graphic file will not be scaled to fit. If it's smaller than the current frame buffer format, lo XT/4K will center it in the frame. If it's larger than the current frame buffer format, it will be cropped on the right and bottom. Also some graphics formats and bit depths may not be supported. Once a graphic file is loaded into the frame buffer it will be retained until it is overwritten by another graphic or test pattern, or when power is turned off. Graphic file names are only "remembered" in the menu as long as the AJA Control Panel application is running.
Hold Last Application: this selection directs lo XT/4K to hold and output the last frame of video from the last application to control lo XT/4K. This can be helpful when operating in an environment where you're switching back and forth between multiple application windows.
Playback Timing: Use these controls to set Genlock and Timing adjustment.
Genlock (Freerun, Ref In, Video In)—selects how Io XT/4K will synchronize program video:
- Freerun: In this mode, lo XT/4K generates sync without an external reference source
- Ref In: Directs Io XT/4K to use the Ref Video source for sync (usually an analog black burst video signal)
- Video In: Directs lo XT/4K to use whichever video input source has been selected in the Inputs screen for sync
Timing (Horiz and Vert)—these two pull-downs allow output timing adjustment with reference to the Ref Video source selected. The Horizontal reference can be adjusted by selecting a number of pixels (clocks) to offset. Vertical can be adjusted by specifying a number of lines to offset.
Format Screen
The Formats screen shows the video format currently in use by the Io XT/4K framebuffer (called the Primary Format) and allows you to change it. All throughout the Control Panel, choices are always presented based on what Io XT/4K can do with the signals available and the inputs/outputs selected. For example, on the Format screen, if the output or inputs are a different format than the primary, then you'll see an additional information pane that allows you to view and edit the secondary format—including control over whether up/down/cross conversion is employed.
Figure 27. AJA Control Panel, Formats Screen

Format Screen Settings
Video Format (Primary and Secondary):
These pull-down menus show the currently selected formats. If you select an alternate value in the Primary Format using the pull-down, it will change the format used by Io XT's framebuffer. When a change is made via the Video Format pull-down or by right-clicking or Control-clicking an icon and selecting a new format via a contextual menu, the block diagram will change to reflect the new format. In the case of a Secondary Format, the formats available can vary based on what the Primary Format is and the input signal (frame rates of input sources limits the to/from conversion choices). The "Secondary
Video Format" pull-down menu lists all compatible formats for selection (incompatible formats are not shown). This allows you to see what you've chosen, and also see those formats that are compatible with the selected Primary format.
For a complete list of lo XT/4K Formats see "Appendix A: Specifications on page 54".
NOTE: The AJA Control Panel software uses the abbreviation "sf" instead of "psf" when referring to "progressive segmented frame" formats. In the manual and in other literature you may see either of these acronyms used interchangeably. Visually it is easier to discern at a glance if you are working with progressively segmented frame formats (sf in the AJA Control Panel) as compared to progressive frame formats which will show only "p."
Pixel Format: Use this pulldown menu in lo 4K to choose: YUV-10, YUV-8, RGB-10, or ARGB-8
RGB Range: The RGB Range pulldown menu allows you to select either Full range (0-1023) or SMPTE range (typically 64-940) for RGB color output.
VANC Checkbox: When checked ON, the VANC checkbox tells the Io XT/4K to capture and process any ancillary data in the SDI stream. This can include Closed Captioning data, and other types of metadata. Applications such as Premiere Pro and Final Cut Pro will not capture or output this data through the Io XT/4K, if this box is not checked on.
Io XT Cross-conversion: If you have an HD format as your primary and then select a secondary HD format with a different frame size, the Io XT will perform a cross-conversion where necessary (input or output) for "like Hz" formats. "Like Hz" means that 720P 59.94 may be converted to 1080i 29.97 (59.94Hz). Converting from disparate Hz is not supported on the Io XT for cross-conversions. The example below shows 1080i to 720p.
Io XT Up (Conversion): The Up and Down pull-down menus are available when conversion has been selected for the video path to/from the framebuffer and like Hz formats are selected (the one exception is 1080PsF 23.98 which can be down-converted to 525i 29.97.) Different choices will be available depending on the type of conversion and formats being converted. SD to SD conversions are essentially aspect ratio conversions to accommodate transforming anamorphic images to letterbox or vice versa.
For up-conversion the following choices are available:
Anamorphic: full-screen "stretched" image
Pillar box 4:3: results in a 4:3 image in center of screen with black sidebars
Zoom 14:9: results in a 4:3 image zoomed slightly to fill a 14:9 image with black sidebars
Zoom Letterbox: results in image zoomed to fill full screen
Zoom Wide: results in a combination of zoom and horizontal stretch to fill a 16:9 screen; this setting can introduce a small aspect ratio change
Io XT Down (Conversion): For down-conversion the following choices are available:
Letterbox: image is reduced with black top and bottom added to image area with the aspect ratio preserved
Crop: image is cropped to fit new screen size
Anamorphic: full-screen "stretched" image
Io XT SD to SD: This pulldown is for SD to SD aspect ratio conversion.
Letterbox: this transforms SD anamorphic material to a letterboxed image.
H Crop: will produce a horizontally stretched effect on the image; transforms anamorphic SD to full frame SD
Pillarbox: will produce an image in the center of the screen with black borders on the left and right sides and an anamorphized image in the center
V Crop: will transform SD letterbox material to an anamorphic image
4K to HD Down-conversion:
The lo 4K provides a dedicated SDI Monitor BNC that outputs a quarter-size image of a selected UHD/4K signal format. For details, see "Using lo 4K for UHD/4K" on page 47.
Figure 28. AJA Control Panel, Formats Screen, Example shows lo XT cross-conversion

Input Select Screen
On the Inputs screen you can view the currently selected video and audio input sources and map audio sources to the channels supported by your editing application. Two information panes in the screen are provided: Video Input and Audio Input.
Figure 29. AJA Control Panel, Inputs Screen

Input Select Settings
Video Input:
The pulldown menu allows you to see and change what's currently selected and shows the video format that lo XT has detected (if any). The figure above shows that video is selected at the HDMI input and the format is 1080i with a frame rate of 29.97. Since this text is blue, you can tell that it matches the framebuffer's primary format selected in the "Format" screen. By looking at the input source, you can determine how the primary format should be set (unless you want to perform a conversion on the input.) If you wish to select a different input use the pulldown to select either SDI 1, 2 or Dual Link for two-wire 4:4:4 RGB, or Stereo 3D. For 3G single-link, choose the SDI Source used and select Stereo 3D from the SDI pulldown menu.
Use the LTC/Ref menu pulldown next to Video Input to select how the LTC BNC is used: selecting Reference means it's used a Reference standard; selecting LTC means it's used for linear time code (LTC) input.
System Genlock:
For video stability and proper system operation, you can genlock all equipment to house sync, however genlock is not required for Io XT/4K due to excellent freerun accuracy. To connect genlock, use a black burst generator output looped through the system. On the Io XT/4K house sync is connected to "LTC/Ref In".
NOTE: Be sure to set the Reference/LTC connection to Reference in the pulldown menu in the Video Input pane.
Audio Input:
This pulldown menu allows you to pick where the audio comes from. lo XT/4K supports up to 16 channels of embedded audio. Here you can also select which two channels from the 16 embedded would be mapped to your editing application if only two channels were selected in that application.
SDI Out Screen
The SDI Out screen shows the current settings for the SDI outputs. Because the outputs can be configured independently, one output may be the Primary format and the other output may be the Secondary format. If an input/output has no video, it will be indicated on the block diagram ("No Video").
SDI Output 1 and 2 Configure SDI Out 1 and 2 via pulldowns:
Figure 30. AJA Control Panel, SDI Output Screen

SDI Output Options
Primary: When selected, this indicates that the SDI output is set to the same format as the framebuffer. That value will be listed in blue.
Secondary: When selected, this indicates that the SDI output is set to a format different from the framebuffer (Primary Format). That secondary format value will be listed in green. This shows that active processing of the video is taking place (format change and possibly even up/down-conversion).
Video+Key: When selected, this indicates that the SDI 1 Output video is set to the same format as the framebuffer. SDI 2 Output is set to a video key signal associated with SDI 1 (the shape to be cut out from the video - this will appear as a black and white image/matte). Using the second lo XT output as an Alpha Channel key, with the video output, may be useful for feeding production switchers, DVEs or other professional video equipment.
Figure 31. SDI Outputs Set for Video +Key

flowchart
graph LR
    A["1080i29.97 SDI In 1"] --> B["1080i29.97 YUV-10"]
    C["No Video SDI In 2"] --> B
    D["1080i29.97 SDI Out 1 DL V+K"] --> B
    E["1080i29.97 SDI Out 2 DL V+K"] --> B
Stereo: When selected, this indicates that SDI 1 represents the left eye output and SDI 2 represents the right eye output of stereoscopic material. Io XT also offers single link 3Gb output of multiplexed Stereo 3D.
Dual Stream Options
Dual Link: Output (SMPTE 372M) using SDI 1 and SDI 1 in concert.
3Gb: Output (SMPTE 424M) using a single-link transport.
RGB SMPTE: When selected, sets the output to RGB SMPTE range video for the SDI output.
RGB Full: When selected, sets the output to RGB full range video for the SDI output.
HDMI Screen
The Io XT/ 4K HDMI input and output are configured at this screen. For Io 4K UHD and 4K format setup, see "HDMI Screen in 4K Mode" on page 50.
Figure 32. AJA Io XT HDMI, HDMI Screen

HDMI Output Settings The Source pulldown menu allows you to select either the primary video format (framebuffer) or (if conversion is supported) a secondary one (up/down/cross-conversion).
Pulldowns are also provided for configuring the video output range, color space and number of embedded audio channels (2 or 8) for the HDMI output. A Protocol pulldown allows you to choose either "HDMI" or "DVI" protocol—use DVI if you're outputting to a DVI monitor using an HDMI to DVI adapter.
A pulldown menu for 3D output allows you to select either Side-by-Side or Top-Bottom (Stacked) output of left-eye and right-eye signals.
NOTE: This selection must agree with format selection in the third-party CineForm Codec (NOT included with AJA lo XT) pulldown menu.
Audio Channels: An Audio Channel pulldown allows you to select the number of embedded audio channels for the HDMI output.
HDMI Input Settings The detected HDMI input video format is displayed and you're given a chance to configure the RGB range (SMPTE or FULL) and select any two embedded channel pairs from those supplied for stereo output (if applicable).
Analog Out Screen (Io XT Only)
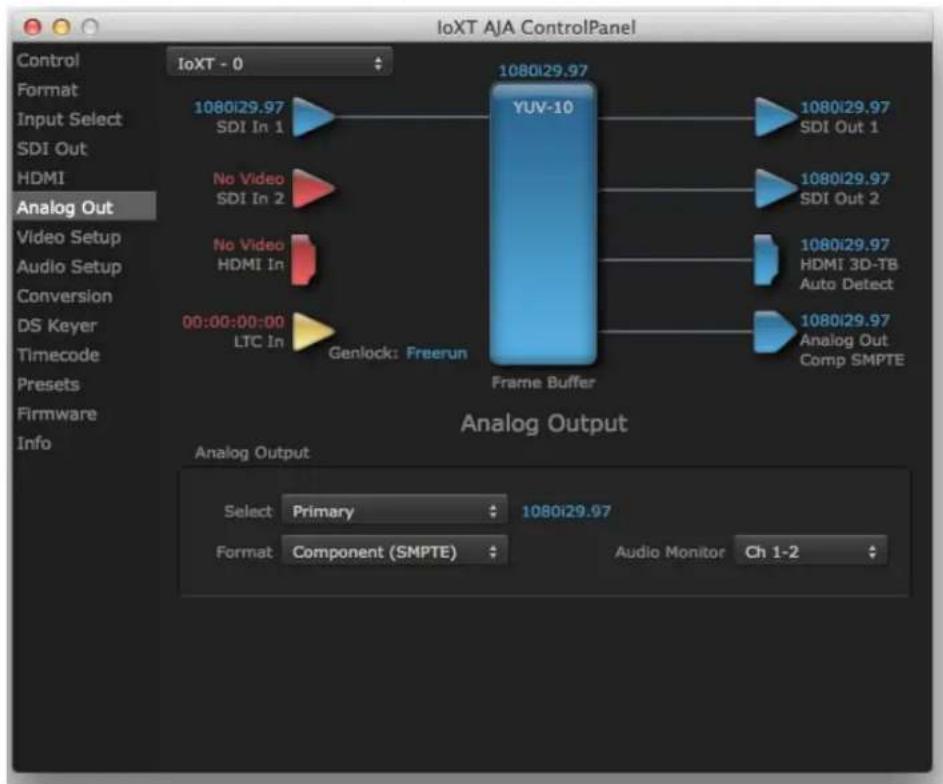
Io XT provides a high-quality analog component or composite + Y/C output, generally used for monitoring. This screen shows the current settings for that analog output, and allows you to re-configure it when desired.
Figure 33. AJA Control Panel, Analog Out Screen
Analog Out Screen Settings
Analog Output:
Select Primary or Secondary (any conversion applied) for the analog output; if a conversion is applied, you'll see the conversion icon appear on the block diagram. Next, select the video format from the Format pulldown.
Analog formats can be:
Composite +Y/C (one composite output and a simultaneous Y/C [S-Video] output)
Component (SMPTE/EBU N10)
Component (Beta)
Component (RGB)
Audio Monitor:
Here you select which two channels will be mapped to the analog audio stereo output (headphone jack).
Video Setup Screen
Io XT provides standard setup adjustments for analog component or composite output. This screen shows the current settings for that analog video output, and allows you to reconfigure it when desired.
Figure 34. AJA Control Panel, Video Setup Screen

Setup Screen Settings
Analog Black Level (in lo XT only):
Choices available for Black Level are the two Composite analog formats. Choices presented are for US or Japan:
• 7.5 IRE (NTSCUS)
• 0 IRE (NTSC Japan)
Progressive Formats:
Radio buttons allow you to choose between psf (progressive segmented frames) and p (progressive frames) non-interlaced output.
QuickTime Video Output Filter (available on Mac OS only):
The QuickTime Video Output Display Filter is designed to help manage the comprehensive list of video outputs that may be available to applications.
By selecting the checkbox next to specified parameters, the video outputs related to these specified parameters are enabled as possible video outputs for applications. For example, if the checkbox next to 25/50 is unchecked, 50Hz video outputs are deselected and would not be available to the user's editing application. To avoid confusion when working in a particular editorial environment, you might choose to leave 50Hz unchecked if working solely in a 60Hz editorial environment. The same might be true if you do not intend to work with true progressive 1080 material.
Audio Setup Screen (Io XT Only)
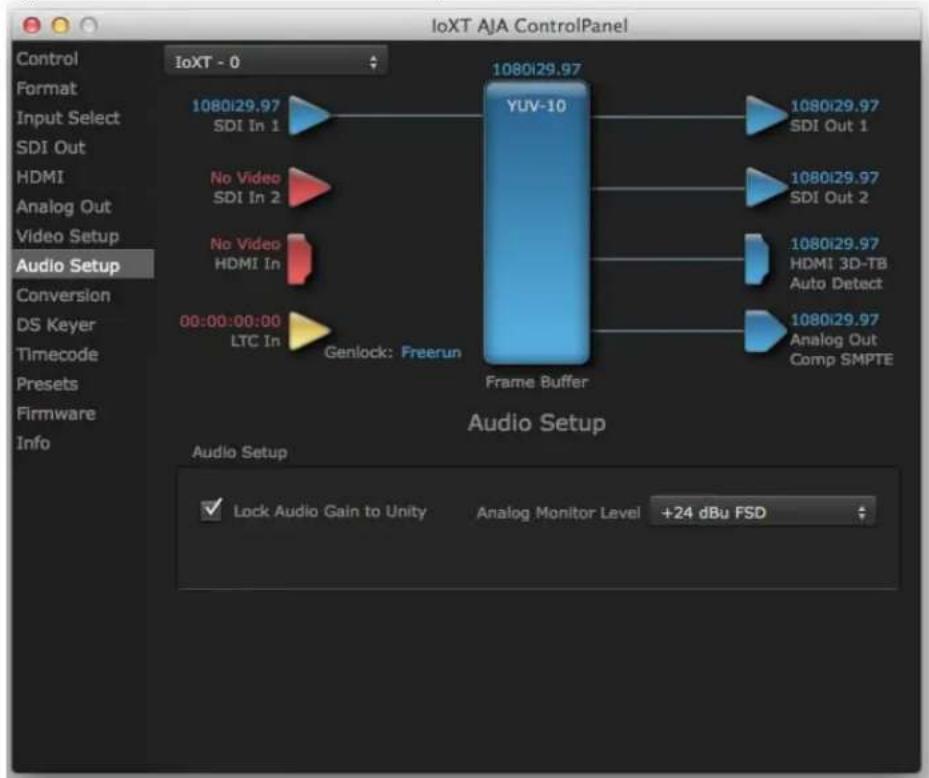
This screen shows the current settings for the analog audio output, allowing you to reconfigure it when desired.
Figure 35. AJA Control Panel, Audio Setup Screen
Audio Setup Screen Settings
Lock Audio Gain To Unity:
When set, the lo XT will ignore the third-party application's gain setting and set the audio gain at unity. When not set, this checkbox tells the lo XT to get the audio gain setting from the editing application (if supported).
Analog Audio Monitor Level:
This selection determines the audio level that will appear at the analog audio outputs ("FSD" is full-scale-deflection reading as measured on a VU meter). Select +18 for Europe or +24 for USA.
Conversion Screen (Mac OS only)
This screen offers controls that determine how the card behaves with 3rd-party applications.
NOTE: This screen is present in the Mac version of AJA Control Panel only and not all applications support these functions.
Figure 36. AJA Control Panel, Conversion Screen
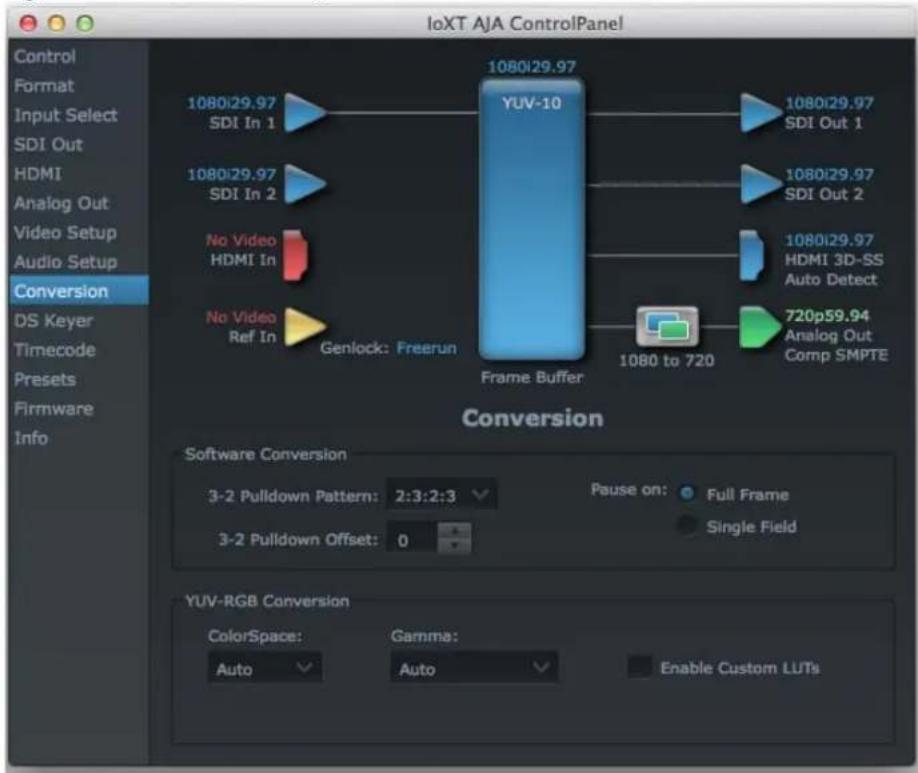
Pause On:
These two choices determine what happens when the editing application is paused in stop mode:
Full Frame: both fields are displayed resulting in some jitter while paused.
Single Field: a single field is displayed, showing no flicker (useful when color correcting or whenever the flickering would be a distraction).
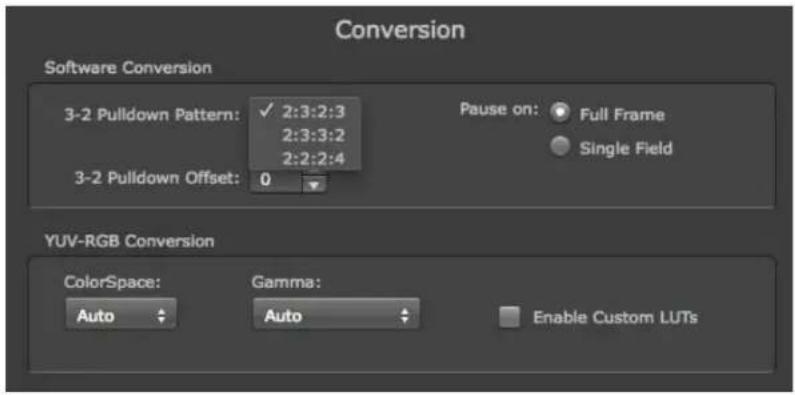
Software Conversion:
The value selected in this pulldown is used whenever, due to format selection, you've chosen to do 24 frames-per-second to 30 conversion where extra fields will be added to pad the existing ones. Depending on video content, selection of different field patterns may be useful in reducing jitter due to the content of adjacent fields. The numbers in the pattern choices specify the frequency with which inserted fields will be repeated. For example, "2:3:2:3" means duplicate a field twice, then the next field three times, then the next twice, and then back to three times.
Figure 37. Conversion Screen Frame-padding Pattern Choices
YUV-RGB Conversion
These pulldowns select industry standard color space and gamma transfer functions for the YUV-RGB conversion, or allow you to direct lo XT to automatically determine it for you.
Colorspace: Choose from:
Gamma: Choose from the following:
• Linear (1.8)
• Rec 601 (2.20)
• Rec 709 (2.22)
• Auto
Enable Custom LUTs: This checkbox enables a custom color lookup table (LUT).
DS Keyer Screen
The Io XT and Io 4K have a hardware-based downstream keyer that is ideal for putting logos, "bugs" or other video material with an alpha channel on top of video being played out or printed to tape.
NOTE: The Io 4K does not support Downstream Keying in UHD and 4K formats.
A typical application would be putting a television station's call letters or channel over program video content. Keyed video can be from the lo XT internal Frame Buffer (from storage, video In, etc.) or from a graphics file that has an alpha channel (PhotoShop etc.).
Figure 38. AJA Control Panel, Downstream Keyer Screen

Settings in the DS Keyer Screen provide control over how the keyer operates and whether it's turned on or off. Controls and their meanings in the screen are as follows:
Mode
Downstream Keyer Off: When this pulldown menu item is selected the downstream keyer will be turned off
Frame Buffer over Matte: Places the keyed video with alpha channel currently in the Frame Buffer over a fixed color matte determined by the "Matte Color" setting set separately.
Frame Buffer over Video In: Places the keyed video currently in the Frame Buffer over the video input for playout or print-to-tape.
Graphic over Matte: Places a graphics file having an alpha channel (chosen in "Graphic File" pulldown) over a fixed color matte determined by the "Matte Color" setting set separately.
Graphic over Video In: Places a graphics file having an alpha channel (chosen in "Graphic File" pulldown) over the video input for playout or print-to-tape.
Graphic over Frame Buffer: Places a graphics file having an alpha channel (chosen in "Graphic File" pulldown) over the current contents of the lo XT Frame Buffer (which might be from storage, video In, etc.).
Matte Color
Only available when the pulldown "Frame Buffer over Matte" or "Graphic over Matte" are selected-pressing this button brings up a color selection dialog. The dialog provides a variety of ways to select a matte color including a color wheel, color picker (choose from a location anywhere on the computer screen), numeric sliders, swatches, "crayons", and spectrums. The matte chosen will be used as a video background under the keyed video.
Foreground pre-multiplied (checkbox)
Use to avoid "matte lines" and improve the appearance of the foreground (key) being composited over the background.
Audio Out
Frame Buffer: Select audio out to be routed from the Frame Buffer.
Audio In: Select audio out to be routed from the Io XT's selected input(s).
Graphic File
This pulldown allows you to choose from any recently accessed file or select a new file ("Load File..."), which then brings up a file dialogue. Remember that the file raster (pixel x pixel count) should match the primary format in the frame buffer or the secondary format if up-converting. Example: you wish to key a logo on top of your 1920x1080 footage, the still image with alpha channel that you load should be 1920x1080.
Timecode Screen The Timecode input:
- Selects the timecode stream read for applications that use it (for example, AJA Control Room, when the timecode source is set to "Use control panel setting," will read the selected stream)
- Is used for monitoring the RP-188 timecode embedded in the digital data stream
- Is used for selecting a timecode offset (if required)
Figure 39. AJA Control Panel, Timecode Screen
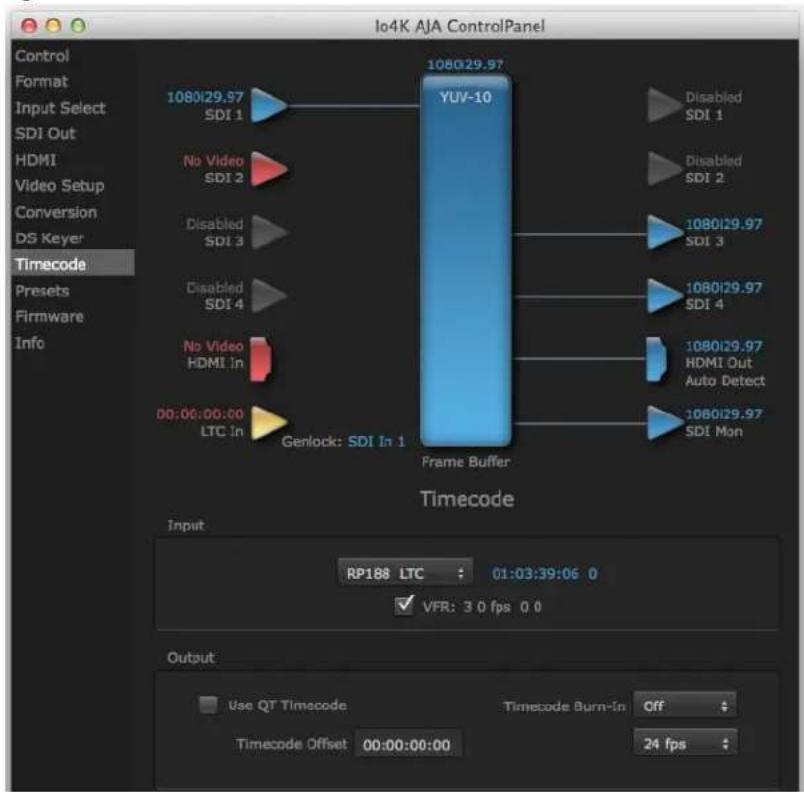
Timecode Input Settings
RP-188 Timecode
In RP-188 timecode (SMPTE 12M-2) there can be multiple timecode types in the data stream. Use this pull-down to select the one you wish to monitor:
• RP188 LTC (Linear timecode)
• RP188 VITC 1 (Vertical Interval timecode)
• RP188 VITC2
• LTC Port input
The selection will be displayed in the timecode value displayed to the right of the pull-down.
User Bits:
For monitoring a variable framerate (VFR) timecode (such as Varicam), you may wish to check the User-bits box. If you set this checkbox, Io XT/4K will detect and interpret the user-bits and display them next to the checkbox. You will see the original framerate (30 fps in the figure below) followed by the adjusted frame padding (two digits reporting discarded and retained frame padding).
NOTE: SMPTE 12M-2 is the updated name and specification for what was RP-188.
Figure 40. AJA Control Panel, Timecode Screen

Timecode Output Settings
Use QuickTime Timecode (Mac OS Only):
Timecode Burn-in:
This feature is for Final Cut Pro 7 (or earlier), VTR Exchange, and AJA TV only. When checked, it directs lo XT/4K to output timecode from the QuickTime timecode track.
This pulldown selects whether the timecode value is displayed in a "burned-in" window in video output. If set to "OFF", timecode will not be keyed over the video. If set to "Timecode", then the timecode value will be keyed over the output video for all of the Io XT/4K outputs. This can be useful for synchronizing, choosing edit points, dailies, and many other purposes.
Timecode Offset (entry field and FPS pull-down):
When QuickTime timecode in disabled, this text entry field allows you to generate a timecode based on the offset entry. You can select a framerate from the pulldown menu at the right side of the pane. Use that same value here as the source video to ensure the timecode is synchronized.
NOTE:
SMPTE RP 188 defines a standard for the transmission of time code and control code in the ancillary data space of a digital television data stream. Time code information is transmitted in the ancillary data space as defined in ANSI/SMPTE 291M. Multiple codes can be transmitted within a single digital video data stream. Other time information, such as real time clock, DTTR tape timer information, and other user-defined information, may also be carried in the ancillary time code packet instead of time code. The actual information transmitted through
the interface is identified by the coding of a distributed binary bit. Equipment manufacturers can use the meta data for different purposes.
Presets Screen
After configuring the AJA Control Panel screens, you can then save all your settings as a snapshot for later recall—called a preset. In this way, you can organize presets for all your typical tasks, eliminating time-robbing manual reconfiguration each time. To save a preset, simply go to the Presets screen and click "Save Preset". A dialog will be presented asking you for a name; enter a meaningful name and click "OK". Thereafter the preset will be available under the Control Panel "Presets" list.
Figure 41. Presets Screen
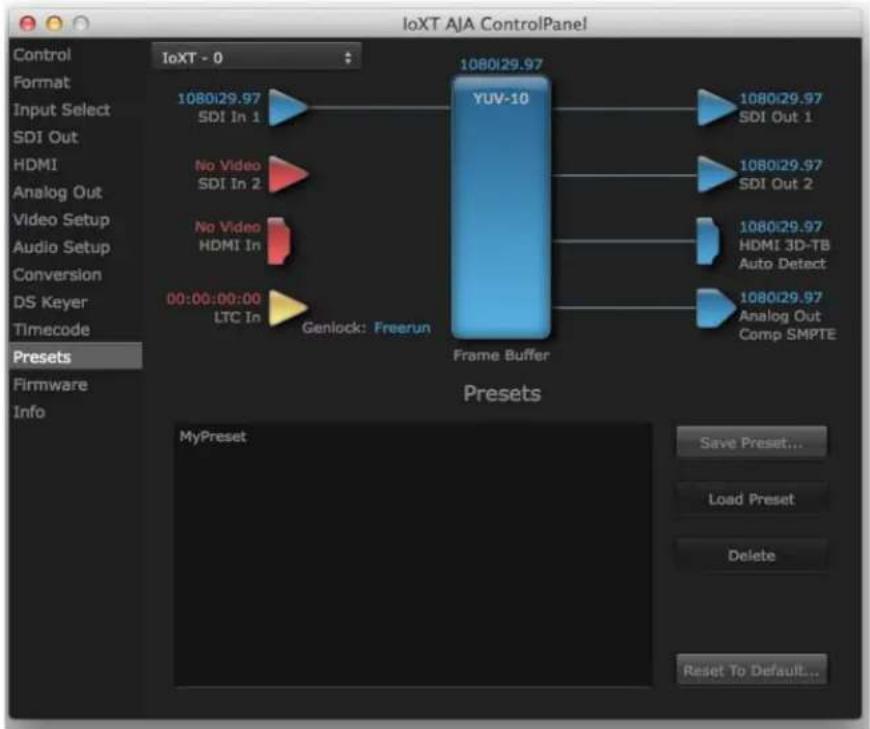
Transferring Saved Presets:
From the Presets screen you can manage your collection of presets easily. To Load or Delete a stored preset, just select it with your mouse and then click the "Load Preset" or "Delete" button respectively.
If you want to use a saved Preset on another workstation, you can simply copy the file on removable storage and install it at the new location. The Preset file is always stored at:
- \~/Library/Application Support/AJA/
Presets/ [on Mac]
• c:\Users\\AppData\Local\AJA\Control Panel\ Presets\ [Windows 8]
Reset to Default:
When you click the 'Reset to default' button the control panel will delete the User's preference file and do one of the following:
A. If "Shared" preferences exist, they are reloaded and the device is set to this state.
B. If the "Shared" preferences file does not exist, "factory defaults" are loaded and the device is set to this state.
For more information on Preset preferences see "Single-user & Network Settings" on page 23.
Firmware Screen
Use the Firmware screen to access the firmware install screen. Click install to erase current firmware and load the firmware version contained in your current driver installation. Note the Installation message shown below.
Figure 42. Firmware Update
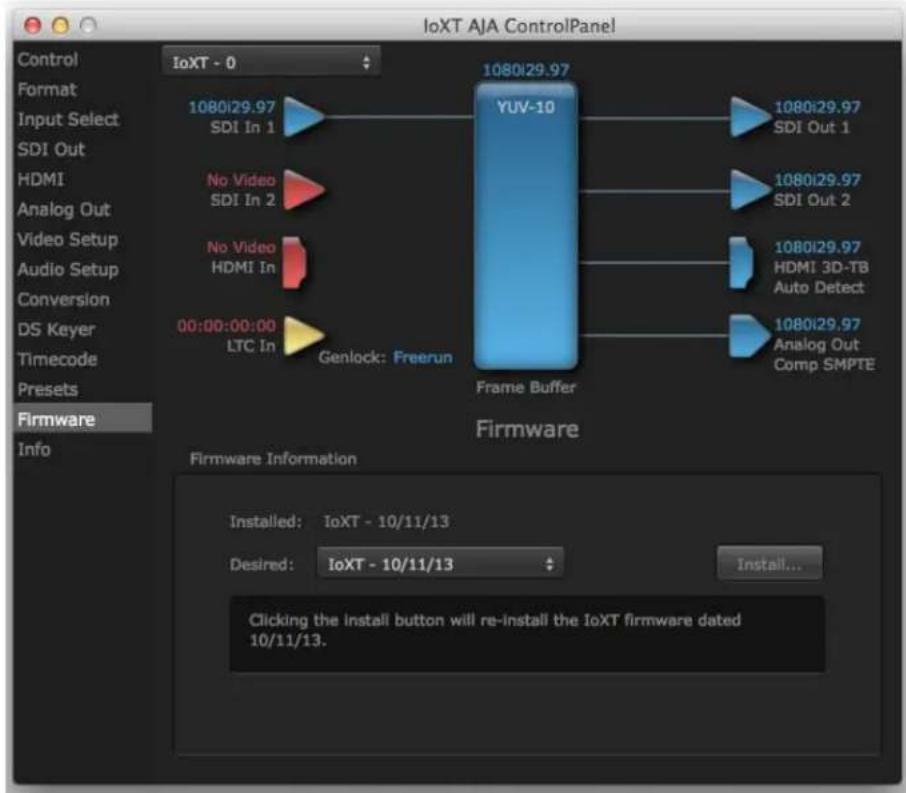
You will be required to power-cycle your computer and Io XT/4K to finish the update.
Figure 43. Update Completed

Info Screen
This screen shows the lo XT/4K software files that have been installed on your system. This information may be needed if you talk to an AJA Customer Service representative to determine if files are missing or need updating.
Figure 44. Information Screen in Standard Mode

Using lo 4K for UHD/4K
In 4K Mode, you can input or output four channels of video representing individual quadrants of Ultra-HD (3840x2160) and 4K (4096x2160) formats. The Io 4K employs all four bi-directional SDI connectors for either input or output It cannot support the input and output at the same time.
Physical connections of the quadrants will be mapped to the Io 4K SDI connectors as shown in the following screens. For the HDMI, you can choose full, quarter, or one of the quadrants for viewing (see "HDMI Screen in 4K Mode" on page 50 HDMI output selection).
Configuring Quad SDI I/O
This section describes the AJA Control Panel operations specific to UHD/4K Format selection.
Output Configuration:
When you use the Control Panel Format screen to select a UHD or 4K format for the lo 4K output, you must also make sure the default output mode (Control screen setting) is set to "Test Pattern." Then the SDI connectors 1–4 will automatically configure as outputs (see Figure 46).
Figure 45. Control Screen setting for 4K Output

NOTE: When you select a UHD/4K format, the HDMI monitor output can be set to Full (shown below) or will display the Output Mode selection icon (as shown on the SDI Mon output) when a quarter or quadrant output signal is selected (see "HDMI Screen in 4K Mode" on page 50 for output options).
Figure 46. Io 4K Format Screen with 4K Format selected.

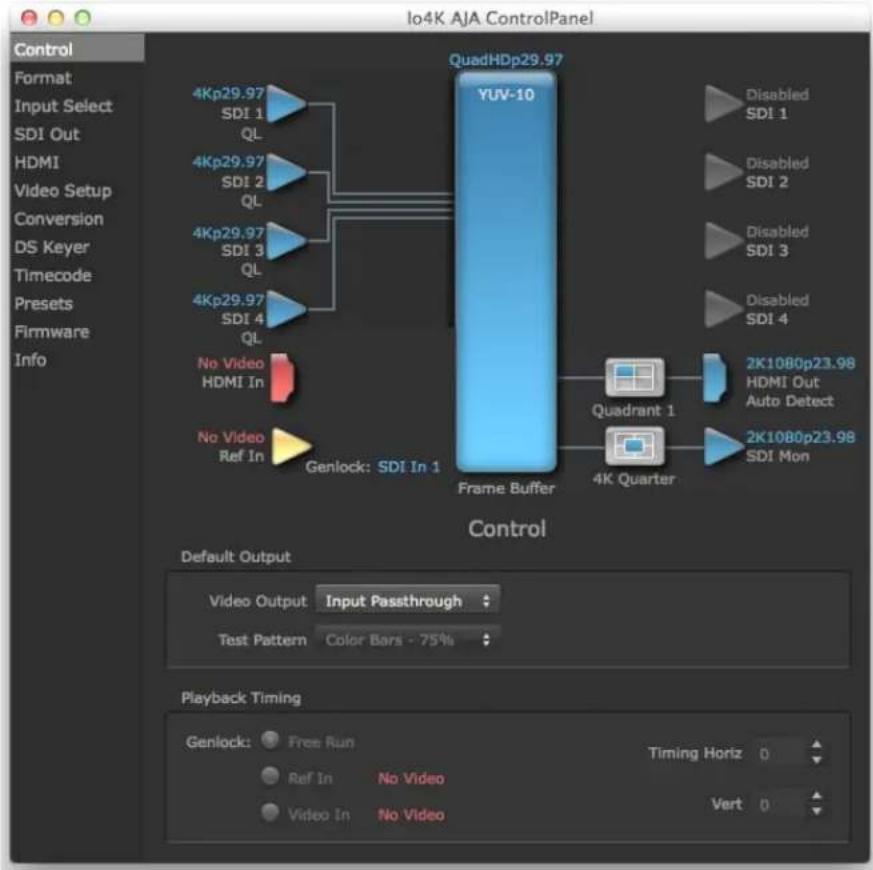
Input Configuration:
To configure the bi-directional SDI connectors for input, select Pass-through in the Default Output>Video Output menu (see Figure 47 on page 49).
Figure 47. Io 4K SDI Input Configuration
flowchart
graph TD
    A["4Kp29.97 SDI 1 QL"] --> B["QuadHDp29.97 YUV-10"]
    C["4Kp29.97 SDI 2 QL"] --> B
    D["4Kp29.97 SDI 3 QL"] --> B
    E["4Kp29.97 SDI 4 QL"] --> B
    F["No Video HDMI In"] --> B
    G["No Video Ref In"] --> B
    H["Genlock: SDI In 1"] --> B
    I["Frame Buffer"] --> J["Quadrant 1"]
    K["4K Quarter"] --> L["2K1080p23.98 HDMI Out Auto Detect"]
    M["2K1080p23.98 SDI Mon"] --> L
    N["Genlock: Free Run"] --> O["Ref In No Video"]
    P["Video In No Video"] --> Q["Vert 0"]
Input Select Screen in 4K Mode
In 4K mode, on the Input Select Menu, the Source selection menu is not applicable. You can, however, still set input video format options (YUV, RGB, etc.) and set the LTC input usage and Audio Input settings. (Refer to "Input Select Screen" on page 33).
Figure 48. Input Select menus.

SDI Output Screen in 4K Mode
The SDI Output Screen allows you to select the Primary format or RGB for 4K output. Video+Key and Stereo 3D are available selections for SD, HD, or 2K formats only.
HDMI Screen in 4K Mode
The HDMI screen allows you to make the same selections previously described lo XT when an SD, HD, or 2K format is selected (refer to "HDMI Screen" on page 36). Exclusive to UHD/4K formats, an HDMI monitor output Select menu is available to choose:
• Primary – the full 4K or UHD format
- 4K Quarter – a downconversion to 2K x 1080 for 4K format or 1920 x1080 for UHD
• A single Quadrant (1, 2, 3, or 4) of the 4K or UHD signal.
Figure 49. HDMI Output Screen with 4K Format
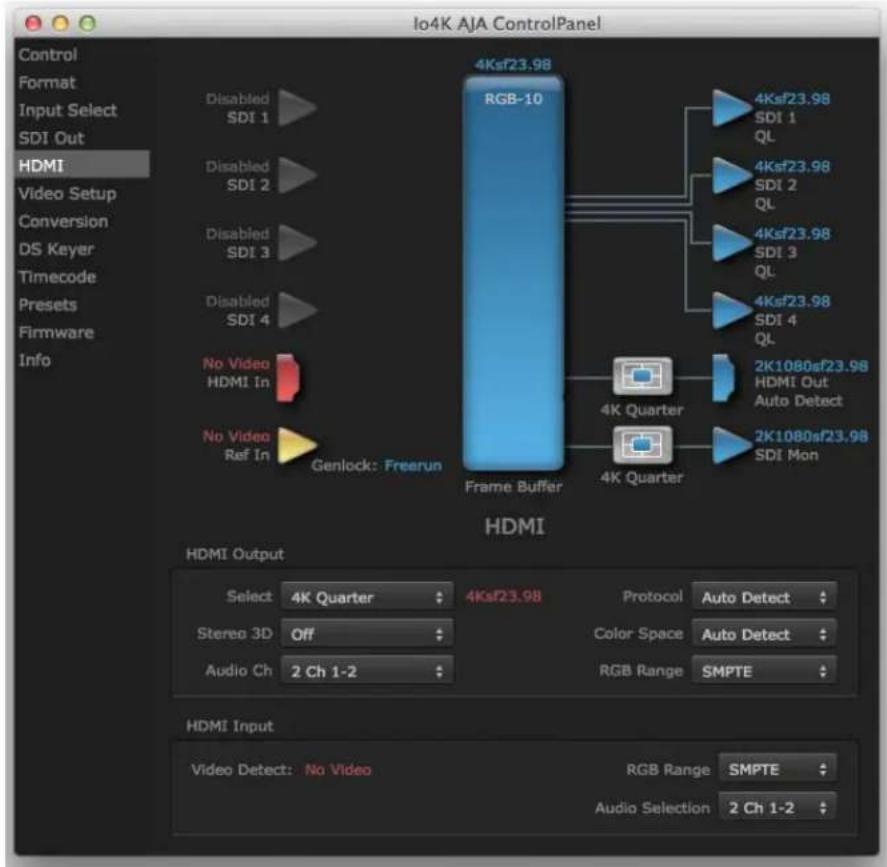
Figure 50. HDMI Output Format Select Menu

Video Setup Screen in 4K
4K Mode adds the 4K Geometry selection (check box). Like other raster sizes, the Geometries checkbox for 4K needs to be enabled for the format to be presented and selectable in applications like AJA VTR Xchange and AJA TV.
Figure 51. QuickTime Video Output Filter 4K Geometry Checkbox

Downstream Keyer Screen in 4K Mode
The Downstream Keyer is not available for use in 4K Mode. If you select the screen and choose an active DSK mode from the menu, you will see:
"Keyer does not support 4K video formats."
Chapter 4: Troubleshooting
If You Run Into Problems
One useful way to find the source of problems is to isolate your system to the smallest size where the problem still occurs and then note all the symptoms. This serves to eliminate areas not involved in the problem and makes finding the problem easier.
Once you've noted problem symptoms, look through the following table and see if any of the symptoms are listed. If so, check the items listed. If you later need to call for customer service, let them know all of the things you've tried and when and how the symptoms appeared.
| Symptom Check | |
| Disk RAID cannot keep up (dropped frames etc.). | Ensure the disk system is providing at least 50 MB/second sustained transfer rate |
| Dropped frames during playback. 1. Virus checking software running in the background (disable it).2. Scratch drive not set to the RAID. | |
| Dropped frames during record. 1. RAID cannot sustain the data rate of the capture preset codec.2. Virus checking software running in the background (disable it).3. Scratch drive not set to the RAID. | |
| Media is not being captured from desired external device. | Check the settings in the Input screen of the lo XT Control Panel application. Also check equipment cables. |
| Dropped frames during playback Look for scroll bars in the viewer or canvas as a warning sign that the zoom setting exceeds the fit-t-window. | |
| Video stutter during playback. RAID cannot sustain data rate. | |
| Red render bar occurs when placing a clip on a sequence. | The sequence setting does not match the clip setting. |
Updating Software
Check on the AJA Video website for software updates.
For lo XT, visit:
http://www.aja.com/en/products/io-xt/#support
For lo 4K, visit:
www.aja.com/en/products/io-4k#support
If any are available, download the file and read any associated instructions prior to installing the software.
Support
When calling for support, first check over your system configuration and ensure everything is connected properly. Even if you cannot find the cause of the problem, having this information at hand will help when you call AJA Customer Support for help.
If the problem is unknown or you need general help, first contact the dealer where you purchased the product. AJA dealers offer product support for many service requirements.
If the problem is a 3rd-party software operational issue, Mac system issue, then call Apple Customer Support or the 3rd-party software manufacturer for help.
If the problem is an AJA Video Io XT issue, then contact AJA Video Customer Support, see "Contacting Support" on page 4.
Appendix A: Specifications
| Software-dependent Formats: | * These formats are dependent on specific software functionality and are not normal 'over-the-wire' formats. |
| 720P 23.98, 24, 25, 29.97, 30 |
Video Input · 3G/SD/HD SDI, SMPTE-259/292/296/424, 10-bits
• Single Link 4:2:2 or 4:4:4 (1 x 3G BNC)
• dual link HD 4:4:4, (2 x BNC)
• HDMI v 1.3
• 1D LUT Support (Mac and PC)
Video Output Digital
• 3G/SD/HD SDI, SMPTE-259/292/296/424
• Single link 4:2:2 or 4:4:4 (1 x BNC)
• Dual link HD 4:4:4, (2 x BNC)
• HDMI v1.4, 30/36 bits/pixel, RGB or YUV, 2.25Gbps
Video Output Analog
- Composite/S-Video (Y/C) (1 x BNC/2x BNC+adapter)
• NTSC, NTSCJ, PAL - Component (3 x BNC)
• HD: YPbPr, RGB
• SD: YPbPr, RGB (component mode) - SMPTE/EBU N10, Betacam 525 line, Betacam 525J, RGB
• 12-bit D/A, 8x oversampling
• +/- .2 dB to 5.0 MHz Y Frequency Response
• +/- .2 dB to 1 MHz C Frequency Response
• .5% 2T pulse response
• < 1 % Diff Phase
• < 1 % Diff Gain
• < 1 ns Y / C delay inequity
| Audio Input Digital | 16-channel, 24-bit SMPTE-259 SDI embedded audio, 48kHz sample rate, Synchronous8-channel, 24-bit HDMI embedded audio, 48kHz sample rate, Synchronous |
| Audio Output Digital | 16-channel, 24-bit SMPTE-259 SDI embedded audio, 48kHz sample rate, Sync8-channel, 24-bit HDMI embedded audio, 48kHz sample rate, Synchronous |
| Audio Output Analog | 8-channel, 24-bit D/A analog audio, 48kHz sample rate, balanced (via 8 x XLR on DB-25 breakout cable)+24dbu Full Scale Digital (0dbFS)+/- 0.2db 20 to 20kHz Frequency Response |
| Downstream Keyer | Supports graphics with alpha channel over video, matte or framebuffer, or framebuffer content over incoming video or matte. |
Up-Conversion Hardware 10-bit
Anamorphic: full-screen
Pillar box 4:3: results in a 4:3 image in center of screen with black sidebars
Zoom 14:9: results in a 4:3 image zoomed slightly to fill a 14:9 image with black side bars
Zoom Letterbox: results in image zoomed to fill full screen
Zoom Wide: results in a combination of zoom and horizontal stretch to fill a 16:9 screen; this setting can introduce a small aspect ratio change
Down-conversion Hardware 10-bit
Anamorphic: full-screen
Letterbox: image is reduced with black top and bottom added to image area with the aspect ratio preserved
Crop: image is cropped to fit new screen size
Cross-conversion · Hardware 10-bit
• 1080i to 720P
• 720P to 1080i
- 720P to 1080PsF
SD to SD aspect ratio conversion
Letterbox: This transforms SD anamorphic material to a letterboxed image
H Crop: Will produce a horizontally stretched effect on the image; transforms anamorphic SD to full frame
SD Pillarbox: Will produce an image in the center of the screen with black borders on the left and right sides and an anamorphized image in the center
V Crop: Will transform SD letterbox material to an anamorphic image
Reference Input or LTC Input
• 1 BNC assignable to Reference video or LTC input
• Reference:
- Analog Color Black (1V) or Composite Sync (2 or 4V)
• Non terminating
• 1080i 50, 59.94, 60
• 1080PsF 23.98, 24, 25, 29.97, 30
• 1080p 23.98, 24, 25, 29.97, 30, 50, 59.94, 60
2K·2048×1080p 23.98, 24, 25, 29.97, 30, 50, 59.94, 60
• 2048 x 1080PsF 23.98, 24, 25, 29.97, 30
4K·3840×2160P 23.98, 24, 25, 29.97, 30, 50, 59.94, 60
• 3840 x 2160PsF 23.98, 24, 25
• 4096 x 2160P 23.98, 24, 25, 29.97, 30, 50, 59.94, 60
• 4096 x 2160PsF 23.98, 24, 25
NOTE: UHD/4K frame rates of 50, 59.94, 60 require optimum Thunderbolt 2 performance, and may require most or all of the available PCIe bandwidth on a single Thunderbolt Port. Sharing a single port with other devices in a daisy chain may not always be possible without risking dropped frames on the AJA device.
Video Inputs · 3G/SD/HD SDI, SMPTE-259/292/296/424,
- 8-or 10-bits
• Single Link 4:2:2 or 4:4:4 (1 x BNC)
• Dual Link HD 4:4:4 (2 x BNC)
• 2K HSDL (High Speed Data Link) 4:4:4, (2 x BNC)
• 4K/QuadHD 4:4:4 (4 x BNC)
• HDMI v 1.4
• 30/36 bits/pixel, RGB or YUV, 2.25Gbps.
• SD, HD, 1080p-50/60, 4K, and stereoscopic HD support
Video Outputs · 3G/SD/HD SDI, SMPTE-259/292/296/424, 8- or 10-bits
• Single Link 4:2:2 or 4:4:4 (1 x BNC)
• Dual Link HD 4:4:4 (2 x BNC)
• 2K HSDL (High Speed Data Link) 4:4:4, (2 x BNC)
• 4K/QuadHD 4:4:4 (4 x BNC)
• HDMI v 1.4
• 30/36 bits/pixel, RGB or YUV, 2.25Gbps.
• SD, HD, 1080p-50/60, 4K, 2K and stereoscopic HD support
Audio Inputs Digital
• 16-channel, 24-bit SDI embedded audio, 48kHz sample rate, Synchronous
• 8-channel, 24-bit HDMI embedded audio, 48kHz sample rate, Synchronous
Audio Output Digital
• 16-channel, 24-bit SDI embedded audio, 48kHz sample rate, Synchronous
- 8-channel, 24-bit HDMI embedded audio, 48kHz sample rate, Synchronous
Audio Output Analog
• 8-channel, 24-bit D/A analog audio, 48kHz sample rate, balanced
• (via 8x XLR on DB-25 breakout cable)
• +24 dBu Full Scale Digital (0 dBFS)
• +/- 0.2 bB 20Hz to 20kHz Frequency Response
Downstream Keyer
- Supports graphics with alpha channel over video, matte or framebuffer content over incoming video or matte.
4K to HD Down- Conversion
• Real time, always-on dedicated down-conversion output (1 x BNC)
• 4K to 2K down-conversion
- UltraHD/QuadHD to HD down-conversion
Reference Input or LTC Input
• 1 x BNCLTC Output
- 1 x BNC assignable to Reference video or LTC input
• Reference:
- Analog Color Black (1V) or Composite Sync (2 or 4V)
- Non-terminating
Physical · Interface: Thunderbolt 2 (2 x)
• Power: 10-20V, 30-60W*
NOTE: Nominal power is 30W. However, multiple connected Thunderbolt devices may place additional power demands on lo 4K, which could increase the power draw to 60W.
Machine Control
•• RS-422, Sony 9-pin protocol
• 9-pin D-connector pinout is as follows:
- GND
- RX-
- TX+
- GND
- No Connection
- GND
- RX+
- TX-
- GND
Shell. GND
Appendix B: Safety and Compliance
Federal Communications Commission (FCC) Compliance Notices
Class A Interference Statement
This equipment has been tested and found to comply with the limits for a Class A digital device, pursuant to Part 15, Subpart B of the FCC Rules. These limits are designed to provide reasonable protection against harmful interference in a commercial installation. This equipment generates, uses, and can radiate radio frequency energy and, if not installed and used in accordance with the instructions, may cause harmful interference to radio communications. However, there is no guarantee that interference will not occur in a particular installation. Operation of this equipment in a residential area is likely to cause harmful interference in which case the user will be required to correct the interference at his own expense. If this equipment does cause harmful interference to radio or television reception, which can be determined by turning the equipment off and on, the user is encouraged to try to correct the interference by one or more of the following measures:
- Reorient or relocate the receiving antenna.
- Increase the separation between the equipment and receiver.
- Connect the equipment into an outlet on a circuit different from that to which the receiver is connected.
- Consult the dealer or an experienced radio/TV technician for help.
FCC Caution
This device complies with Part 15 of the FCC Rules. Operation is subject to the following two conditions: (1) This device may not cause harmful interference, and (2) this device must accept any interference received, including interference that may cause undesired operation.
Canadian ICES Statement
Canadian Department of Communications Radio Interference Regulations
This digital apparatus does not exceed the Class A limits for radio-noise emissions from a digital apparatus as set out in the Radio Interference Regulations of the Canadian Department of Communications. This Class A digital apparatus complies with Canadian ICES-003.
European Union and European Free Trade Association (EFTA) Regulatory Compliance
This equipment may be operated in the countries that comprise the member countries of the European Union and the European Free Trade Association. These countries, listed in the following paragraph, are referred to as The European Community throughout this document:
AUSTRIA, BELGIUM, BULGARIA, CYPRUS, CZECH REPUBLIC, DENMARK, ESTONIA, FINLAND, FRANCE, GERMANY, GREECE, HUNGARY, IRELAND, ITALY, LATVIA, LITHUANIA, LUXEMBOURG, MALTA, NETHERLANDS, POLAND, PORTUGAL, ROMANIA, SLOVAKIA, SLOVENIA, SPAIN, SWEDEN, UNITED KINGDOM, ICELAND, LICHTENSTEIN, NORWAY, SWITZERLAND
Declaration of Conformity
Marking by this symbol indicates compliance with the Essential Requirements of the EMC Directive of the European Union 2004/108/EC.

This equipment meets the following conformance standards:
Safety:
CB- IEC 60065:2001 + A1:2005
NRTL - UL 60065:2003 R11.06, CSA C22.2 NO. 60065:2003 + A1:06
GS - EN 60065:2002 + A1
Additional licenses issued for specific countries available on request.
Emissions:
EN 55103-1: 1996
EN61000-3-2:2006, EN61000-3-3:1995 +A1:2001 +A2:2005
CISPR 22: 2006
Immunity:
EN 55103-2: 1996
EN61000-4-2:1995 + A1:1999 + A2:2001, EN61000-4-3:2006, EN61000-4-4:2004,
EN 61000-4-5: 2005, EN 610004-6:2007, EN61000-4-11:2004
The product is also licensed for additional country specific standards as required for the International Marketplace.

Warning!
This is a Class B product. In a domestic environment, this product may cause radio interference, in which case, the user may be required to take appropriate measures.
Korean Compliance Statement
This radio equipment can be crossed during operation.
This radio equipment cannot provide a service relevant to the human life safety, as it can be crossed.
1) Class A ITE
| Class A(Broadcasting and Communication Equipment for Business Use) | Please note that this equipment has obtained EMC registration for business use (Class A), and it is intended to use in other than home area. |
Taiwan Compliance Statement
警告使用者:
This is a Class A product based on the standard of the Bureau of Standards, Metrology and Inspection (BSMI) CNS 13438, Class A.
Japanese Compliance Statement
2. Class B ITE
This is a Class A product based on the standard of the VCCI Council (VCCI V-3/2008.04). If this equipment is used in a domestic environment, radio interference may occur, in which case, the user may be required to take corrective actions.
Translated caution statements, warning conventions and warning messages
The following caution statements, warning conventions, and warning messages apply to this product and manual.

Warning Symbol

Hazard Warning

Caution Symbol
Before operating your AJA unit, read the instructions in this document

Warning!
Read and follow all warning notices and instructions marked on the product or included in the documentation.
Do not use this device near water and clean only with a dry cloth.
Do not block any ventilation openings. Install in accordance with the manufacturer's instructions.
Do not install near any heat sources such as radiators, heat registers, stoves, or other apparatus (including amplifiers) that produce heat.
Refer all servicing to qualified service personnel. Servicing is required when the device has been damaged in any way, such as power-supply cord or plug is damaged, liquid has been spilled or objects have fallen into the device, the
device has been exposed to rain or moisture, does not operate normally, or has been dropped.
This device is a Class A product. Operation of this equipment in a residential area is likely to cause harmful interference, in which case users will be required to take whatever measures may be necessary to correct the
interference at their own expense.
Disconnect the external AC power supply line cord(s) from the mains power before moving the unit.
High Voltage. This situation or condition can cause injury due to electric shock.
Only use attachments and accessories specified and/or sold by the manufacturer.
Do not defeat the safety purpose of the polarized or grounding-type plug. A polarized plug has two blades with one wider than the other. A grounding type plug has two blades and a third grounding prong. The wide blade or
the third prong are provided for your safety. If the provided plug does not fit into your outlet, consult an electrician for replacement of the obsolete outlet.
Since the Mains plug is used as the disconnection for the device, it must remain readily accessible and operable.
Protect the power cord from being walked on or pinched particularly at plugs, convenience receptacles, and the point where they exit from the device.
Unplug this device during lightning storms or when unused for long periods of time.
Do not open the chassis. There are no user-serviceable parts inside. Opening the chassis will void the warranty unless performed by an AJA service center or licensed facility.
For correct performance, always power up the lo XT before starting your computer and power down your computer before powering down the lo XT.
Warranty and Liability Information
Limited Warranty
AJA Video warrants that the product, not including hard-disk based Storage Modules (HDD), will be free from defects in materials and workmanship for a period of three years from the date of purchase. AJA Video warrants that the hard-disk based Storage Modules (HDD), will be free from defects in materials and workmanship for a period of one year from the date of purchase. If a product proves to be defective during this warranty period, AJA Video, at its option, will either repair the defective product without charge for parts and labor, or will provide a replacement in exchange for the defective product.
To obtain service under this warranty, the Customer must notify AJA Video of the defect before expiration of the warranty period and make suitable arrangements for the performance of service by contacting AJA Video support through the channels set forth on the support contacts web page at http://www.aja.com/support/index.php. Except as stated, the Customer shall bear all shipping, packing, insurance and other costs, excluding parts and labor, to effectuate repair. Customer shall pack and ship the defective product to a service center designated by AJA Video, with shipping charges prepaid. AJA Video shall pay to return the product to Customer but only if to a location within the country in which the AJA Video service center is located.
This warranty shall not apply to any defect, failure or damage caused by negligent, inadequate or improper use, handling or maintenance. Without limiting the foregoing, AJA Video shall not be obligated to furnish service under this warranty or repair any damage or malfunction a) resulting from attempts by personnel other than AJA Video representatives to install, repair or service the product, b) resulting from improper use or connection to incompatible equipment, c) caused by the use of non-AJA Video parts or supplies, d) if the product has been modified or integrated with other products when the effect of such a modification or integration increases the time or difficulty of servicing the product, or (e) resulting from being dropped or otherwise subjected to undue force, exposure to moisture or other corrosive or conductive substances, exposure to strong magnetic fields, use with improperly regulated power supplies, exposure to electric shock, use in temperatures outside the specified operating range, or otherwise failing to treat the product in accordance with the standard of care appropriate to sensitive and delicate electronic equipment.
EXCEPT AS STATED ABOVE, AJA VIDEO AND ITS VENDORS DISCLAIM IN THEIR ENTIRETY ALL OTHER WARRANTIES, EXPRESS OR IMPLIED, INCLUDING WITHOUT LIMITATION ALL WARRANTIES OF MERCHANTABILITY OR FITNESS FOR A PARTICULAR PURPOSE. AJA VIDEO'S RESPONSIBILITY TO REPAIR OR REPLACE TIMELY REPORTED DEFECTIVE PRODUCTS IS THE WHOLE AND EXCLUSIVE REMEDY CUSTOMER IS PROVIDED.
THE PRODUCT IS NOT INTENDED, STATED, OR WARRANTED TO OPERATE UNINTERRUPTED OR ERROR-FREE. YOU UNDERSTAND AND ACKNOWLEDGE THAT THE PRODUCT IS NOT INTENDED TO BE USED AS THE SOLE OR PRIMARY DATA SOURCE OR TARGET FOR CRITICAL DATA, AND THAT IT IS YOUR RESPONSIBILITY TO IMPLEMENT REDUNDANT CAPTURE AND BACKUP SYSTEMS AS APPROPRIATE.
Limitation of Liability
UNDER NO CIRCUMSTANCES SHALL AJA VIDEO BE LIABLE IN ANY WAY FOR ANY LOST, CORRUPTED OR DESTROYED DATA, FOOTAGE OR WORK, OR FOR ANY OTHER INDIRECT, SPECIAL, INCIDENTAL OR CONSEQUENTIAL DAMAGES, OR FOR ANY THIRD PARTY CLAIM, IN CONNECTION WITH THE PRODUCT, WHETHER RESULTING FROM DEFECTS IN THE PRODUCT, SOFTWARE OR HARDWARE FAILURE, OR ANY OTHER CAUSE WHATSOEVER, EVEN IF AJA VIDEO HAS BEEN ADVISED OF THE POSSIBILITY OF SUCH DAMAGES. AJA VIDEO'S LIABILITY IN CONNECTION WITH THIS PRODUCT SHALL UNDER NO CIRCUMSTANCES EXCEED THE PURCHASE PRICE PAID FOR THE PRODUCT.
Index
Numerics
24 frames-per-second to 30 conversion 40
3D output 36
A
alpha channel 42
alpha channel, Video + Key 35
analog audio 39
analog audio output 37
analog component 38
analog component output 37
analog composite 38
Analog Format 37, 38, 40
Analog Out Screen 37
Analog Out Screen Settings 37, 38
Anamorphic 31
anamorphic SD to full frame SD 31
aspect ratio conversion 31
Audio 7
Audio Input 34
audio input, pulldown menu 34
Audio Out 43
B
Betacam 12
Black 29
black borders 32
black burst 11
Black Level 38, 40
black Level pulldown menu 38
Blue 26
borders, black 32
Box 8
C
Cable Connections 10
camcorders 11
CineForm Codec 36
color matte 42
Color Meanings, Control Panel 26
color selection dialog 43
Colorspace choices 41
Component/Composite 12
composite 37
composite output 38
Configuration 12
Connector Descriptions 11
Connectors 11
Control Panel, AJA Software 7
Control Panel, Tabbed Screens 27
Control Screen 42
Control Screen Settings 29
Conversion 6
Conversion Icons, Control Panel 27
conversion, YUV-RGB 41
Crop 31
crossconversion 6, 31
Custom LUTs 41
customer service 52
D
DE9 11
Default Kona Output 29
Device Drivers 7
Down (Conversion) 31
downconversion 6, 31
downstream keyer 42
DS Keyer 42
E
EBU N10 12
F
Foreground pre-multiplied (checkbox) 43
Format Screen Settings 30
format, primary 11
format, secondary 24
Formats Screen 30
Frame Buffer over Matte 42
Frame Buffer over Video In 42
Framebuffer 25
Freerun 29
Full Frame 40
full-screen 31
G
Gamma 41
Gatekeeper 13
Genlock and Your System 33
Getting Help 53
Graphic File 43
graphic file, test pattern output 29
Graphic over Frame Buffer 42
Graphic over Matte 42
Graphic over Video In 42
Green 26
H
H Crop 31
HDMI audio output 36
HDMI output 36
Hold Last Application 29
Horizontal reference 30
horizontally stretched 31
house reference 11
house sync 33
|
Icons 27
Icons, Control Panel 27
Info Screen 47
Input Pass through 29
Input Screen 33
Input Screen Settings 33
Input/Output 27
Installation Overview 9
Installer Screen 14
Installing lo Software 12
motion adaptive de-interlacing 6
Mountain Lion 13
0
offset, video adjustment (timing) 30
P
pattern, test 29
Pillar box 31
Pillarbox 32
Presets 45
Primary 35
Primary Format 25
Primary format 11
problem symptoms 52
problems, what to do if you encounter 52
progressive frame 31
progressive segmented frame 31
psf 31
R
Rec 601 41
Rec 709 41
Red 26
Ref In 29
Reference Video 11
Requirements, System 7
RP 188 definition 44
RP-188 Timecode 44
RS422 11
S
SD letterbox material to an anamorphic image 32
SD to SD aspect ratio conversion 31
Secondary 35
select audio 43
set up 9
Shipping Box Contents 8
sidebars 31
Single Field 40
SMPTE protocol 11
SMPTE RP 188 44
snapshot, Control Panel settings 45
Software 7
software files that have been installed 47
Software installation 12
Software License Agreement Screen 15
software updates 53
software, 3rd-party 22
Sony 11
Specifications 54
Support 53
support 53
Symptoms, problem 52
sync generator 11
synchronizing other video equipment 11
System software 12
T
Test Pattern 29
Timecode Offset 44
Timecode Screen 38, 43
Timecode Screen Settings 44
timing adjustment 30
Timing adjustment, Control Panel 30
troubleshooting 52
U
unpack 8
upconversion 31
upconverter 6
Updating Software 53
Use 46
user and password 13
User Bits, RP-188 44
V
V Crop 32
Vertical reference 30
Video Format 30
Video Input 33
video input source 29
video path 27
Video+Key 35
VTR RS-422 Control Port 11
VTRs, 11
Y
Y/C output 37
Y/R-Y/B-Y 12
Yellow 26
YPbPr 12
YUV 12
YUV-RGB Conversion 41
Z
Zoom 31
Zoom Letterbox 31
Zoom Wide 31


- Installation & Operation Guide
- Table of Contents
- Notices....4
- Chapter 1: Introduction .... 5
- Chapter 2: Installation ...... 9
- Chapter 3: Operation....22
- Chapter 4: Troubleshooting ....52
- Appendix A: Specifications 54
- Appendix B: Safety and Compliance 59
- Warranty and Liability Information 70
- Notices
- Trademarks
- Copyright
- Contacting Support
- Chapter 1: Introduction
- Overview
- 4K Workflows:
- Broadcast-Quality Conversion
- Video Formats
- Io XT/4K Audio
- AJA Software
- System Requirements
- What's In The Box?
- In This Manual
- Chapter 2: Installation
- Installation Overview
- Connecting to your Computer
- Cable Connections
- Connector Descriptions
- Connectors Common to Both Models
- Io 4K Connectors These connectors are offered only on the Io 4K model.
- Installing lo XT/4K Software
- Macintosh Software Installation
- Windows Software Installation
- Install Wizard
- Re-Installation & Repair
- Chapter 3: Operation
- Using Io XT/4K with Professional Video /Audio Software
- Block Diagram Screen
- Color Meanings:
- Primary & Secondary Video Formats
- Primary Format:
- Secondary Format:
- Format Conversion:
- NOTE:
- Input/Output Icons:
- Conversion Icons:
- Control Panel Screens:
- Control Panel Operation
- Control Screen
- Control Screen Settings
- Format Screen
- Format Screen Settings
- Input Select Screen
- Input Select Settings
- SDI Out Screen
- SDI Output Options
- Dual Stream Options
- HDMI Screen
- Analog Out Screen (Io XT Only)
- Analog Out Screen Settings
- Video Setup Screen
- Setup Screen Settings
- Audio Setup Screen (Io XT Only)
- Audio Setup Screen Settings
- Conversion Screen (Mac OS only)
- Pause On:
- Software Conversion:
- YUV-RGB Conversion
- DS Keyer Screen
- Mode
- Matte Color
- Foreground pre-multiplied (checkbox)
- Audio Out
- Graphic File
- Timecode Screen The Timecode input:
- Timecode Input Settings
- Timecode Output Settings
- Presets Screen
- Transferring Saved Presets:
- Reset to Default:
- Firmware Screen
- Info Screen
- Using lo 4K for UHD/4K
- Configuring Quad SDI I/O
- Input Select Screen in 4K Mode
- SDI Output Screen in 4K Mode
- HDMI Screen in 4K Mode
- Video Setup Screen in 4K
- Downstream Keyer Screen in 4K Mode
- Chapter 4: Troubleshooting
- If You Run Into Problems
- Updating Software
- Support
- Appendix A: Specifications
- Video Input · 3G/SD/HD SDI, SMPTE-259/292/296/424, 10-bits
- Video Output Digital
- Video Output Analog
- Up-Conversion Hardware 10-bit
- Down-conversion Hardware 10-bit
- Cross-conversion · Hardware 10-bit
- SD to SD aspect ratio conversion
- Reference Input or LTC Input
- Video Outputs · 3G/SD/HD SDI, SMPTE-259/292/296/424, 8- or 10-bits
- Audio Inputs Digital
- Audio Output Digital
- Audio Output Analog
- Downstream Keyer
- 4K to HD Down- Conversion
- Physical · Interface: Thunderbolt 2 (2 x)
- Machine Control
- Appendix B: Safety and Compliance
- Federal Communications Commission (FCC) Compliance Notices
- Class A Interference Statement
- FCC Caution
- Canadian ICES Statement
- European Union and European Free Trade Association (EFTA) Regulatory Compliance
- Declaration of Conformity
- Warning!
- Korean Compliance Statement
- Taiwan Compliance Statement
- Japanese Compliance Statement
- Class B ITE
- Translated caution statements, warning conventions and warning messages
- Before operating your AJA unit, read the instructions in this document
- Warranty and Liability Information
- Limited Warranty
- Limitation of Liability
- Index
- Numerics
- A
- B
- C
- D
- E
- F
- G
- H
- |
- 0
- P
- R
- S
- T
- U
- V
- Y
- Z
Brand : AJA
Model : Io 4K
Category : Professional audiovisual equipment