
FP8SU - Food processor CUISINART - Free user manual and instructions
Find the device manual for free FP8SU CUISINART in PDF.


| Product Type | Food Processor |
| Brand | Cuisinart |
| Model | FP8SU |
| Work Bowl Capacity | 8 cups (1.9 L) |
| Motor Power | 300 Watts |
| Dimensions (L x W x H) | 10 x 8 x 15 inches (25.4 x 20.3 x 38.1 cm) |
| Weight | 10.5 lbs (4.8 kg) |
| Power Source | 120V ~ 60Hz |
| Cord Length | 36 inches (91 cm) |
| Material | Plastic work bowl, stainless steel blades |
| Functions | Chop, slice, shred, puree, mix, knead, emulsify |
| Included Accessories | Stainless steel chopping blade, slicing disc, shredding disc, work bowl, lid, pusher |
| Speed Settings | 2 speeds plus pulse |
| Cleaning | Dishwasher safe removable parts |
| Safety Features | Safety lock system, overload protection |
| Repairability | Authorized service centers; replacement parts available |
| Warranty | Limited 3-year warranty |
| Country of Origin | China |
Frequently Asked Questions - FP8SU CUISINART
User questions about FP8SU CUISINART
0 question about this device. Answer the ones you know or ask your own.
Ask a new question about this device
Download the instructions for your Food processor in PDF format for free! Find your manual FP8SU - CUISINART and take your electronic device back in hand. On this page are published all the documents necessary for the use of your device. FP8SU by CUISINART.
USER MANUAL FP8SU CUISINART
natural_image
Two Cuisinart kitchen appliances shown in grayscale, no visible text or symbols on the devices themselves.Easy Prep Pro
FP8U / FP8SU
Cuisinart®
Congratulations on your purchase of the Cuisinart Easy Prep Pro.
For over 30 years Cuisinart's aim has been to produce the very finest kitchen equipment. All Cuisinart products are engineered for exceptionally long life, and designed to be easy to use as well as to give excellent performance day after day.
To learn more about our products and for recipe ideas, visit our website www.cuisinart.co.uk
Contents
Product Control Guide 4
Important Safety Cautions 5
Safety During Use 7
Before First Use 8
1 Selecting the Work Bowl....8
2 Selecting the Blade/Disc 9
3 Setting Up the Food Processor
A Fitting and Removing the Large Work Bowl 10
B Fitting and Removing the Large Chopping/Mixing Blade 10
C Fitting and Removing the Reversible Slicing and Grating/Shredding Discs......11
D Setting Up the Small Work Bowl and Chopping/Mixing Blade....12
E Fitting and Removing the Work Bowl Cover 12
4 Machine Controls 13
5 Machine Functions
A Chopping....14
B Mixing 14
C Puréeing/Blending....14
D Slicing....15
E Grating/Shredding....15
6 Cleaning & Maintenance 16
7 Troubleshooting 17
UK Guarantee....19
UK After Sales Service 20
Wiring Instructions.... 21
Product Control Guide
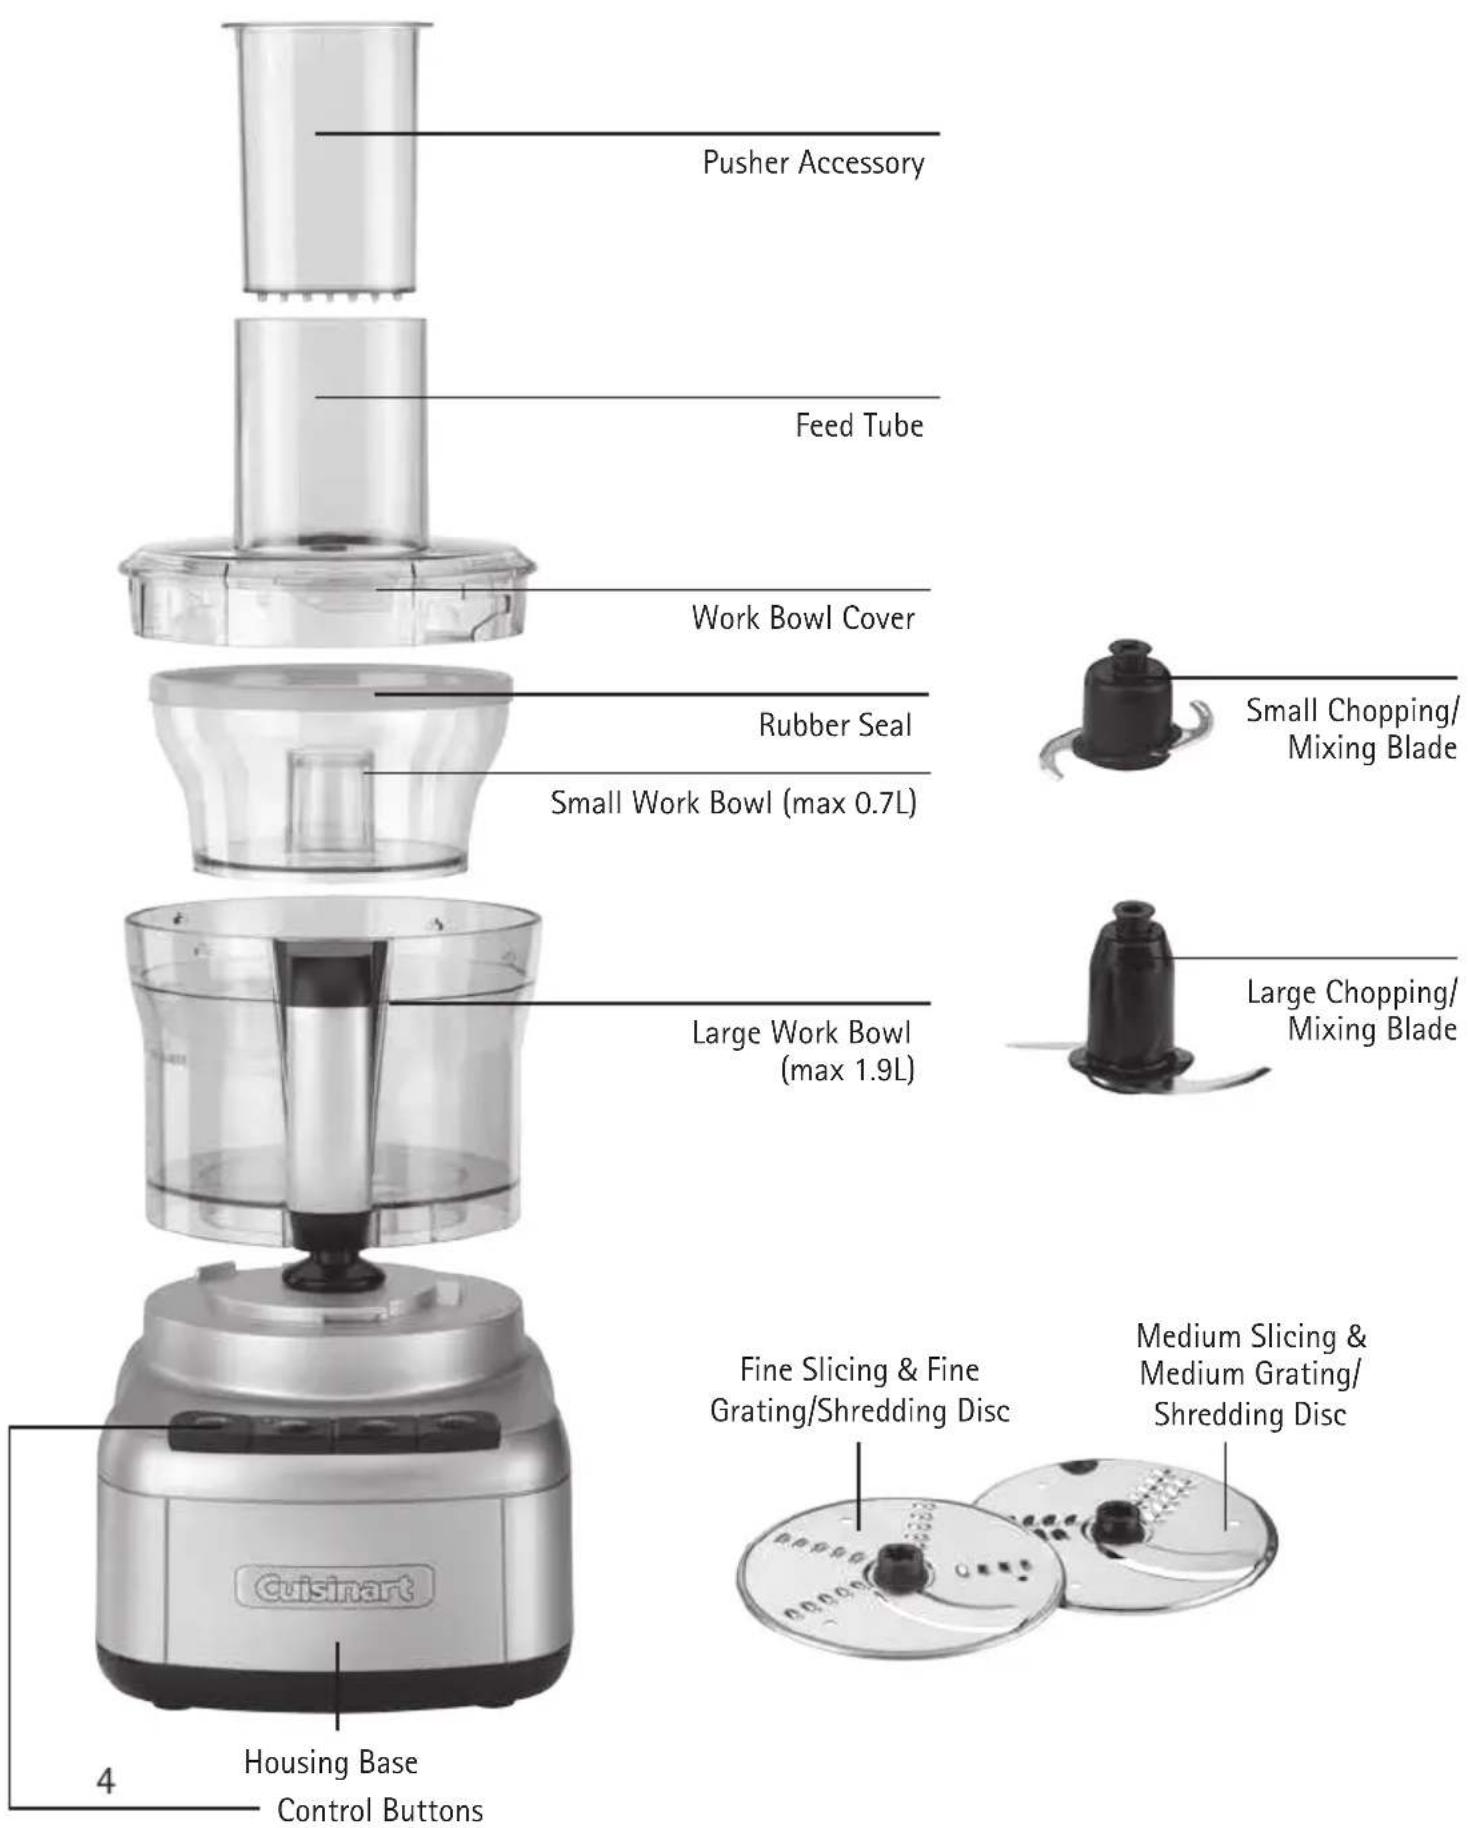
Feed Tube
Work Bowl Cover
Rubber Seal
Small Work Bowl (max 0.7L)
IMPORTANT SAFETY CAUTIONS
Carefully read all the instructions before using the appliance and keep in a safe place for future reference.
Always follow these safety cautions when using this appliance to avoid personal injury or damage to the appliance.
- The appliance is not intended to be operated by means of external timer or separate remote control system.
- This appliance is not intended for use by persons with reduced physical, sensory or mental capabilities, or lack of experience and knowledge, unless they have been given supervision or instruction concerning use of the appliance by a person responsible for their safety.
- Children should always be supervised to ensure that they do not play with this product.
- This appliance shall not be used by children. Keep out of reach of children during and after use.
- Always inspect the appliance and appliance accessories before use for noticeable signs of damage. Do not use if damaged, or if the appliance has been dropped. In the event of damage, or if the appliance develops a fault, contact the Cuisinart Customer Care Line (refer to "UK After Sales Service section" for further information).
- Do not use the appliance if the lead is damaged. In the event of lead damage, discontinue use immediately. If the lead is damaged it must be replaced by the manufacturer. Return the appliance to the Customer Care Centre (refer to 'UK After Sales Service' section for further information). No repair must be attempted by the consumer.
- Never pull the plug out of the mains socket by the lead.
- Do not wrap the lead around the main body of the appliance during or after use.
-
Always ensure the voltage to be used corresponds with the voltage on the appliance; this is indicated on the bottom of the housing.
-
Always disconnect the appliance from the electrical supply if it is left unattended and before assembling, disassembling or cleaning.
- For indoor, domestic use only.
- This product complies fully with all appropriate EU and UK legislation and the standards relevant to this type and class of appliance. We are an ISO9001:2015 certified company that continually evaluates our Quality Management System performance. If you have any queries regarding product safety and compliance, please contact our Customer Services Department (see "U.K. After Sales Service" section).

WARNING: Polythene bags over the product or packaging may be dangerous. To avoid danger of suffocation, keep away from babies and children. These bags are not toys.
Safety During Use
■ Handle the blades and discs with extreme care, they are very sharp.
■ Never place a blade or disc directly on the motor spindle of the housing base. Always ensure the bowl is in place.
■ Before switching on the processor, ensure that the blade/disc is locked into place on the the motor spindle (taking care to avoid the sharp edges), and that the lid is correctly fitted. Do not force or block the lid mechanism.
■ Always carefully insert the blade before adding the ingredients.
■ To grate or slice food always use the pusher provided. Never push food in with your fingers or use other utensils.
- Keep hands, spatulas and other utensils away from moving blades or discs whilst appliance is in operation. Only use the spatula once the food processor motor has stopped.
■ Always wait for the blade / disc to stop before removing the pusher or lid.
■ Disconnect the appliance from the mains supply before cleaning or removing it or any of the attachments.
■ Always remove the bowl from the motor base before very carefully removing the blade / disc.
■ Never leave the appliance unattended when switched on or plugged in.
■ Always ensure the blades and discs have been thoroughly cleaned after each use and have dried completely before storing.
Before First Use
Take care when unpacking the chopping/mixing blades and the reversible slicing/grating discs. The blades are very sharp and could cause injury.
To avoid injury, ensure the raised finger grips on the plastic casing are used to remove the blades from their plastic packaging and carefully remove cardboard and tape from the reversible slicing/grating discs. Retain the plastic casings for safe storage.
Before using your Cuisinart Easy Prep Pro for the first time, wash the large and small work bowls, work bowl cover, pusher accessory, chopping/mixing blades, and both slicing/grating discs.
1. Selecting the Work Bowl
■ The Food Processor is supplied with two work bowls.
■ The large work bowl has a maximum capacity of 1.9L and can be used with the large chopping/mixing blade and the two reversible slicing and grating/shredding discs.
■ The small work bowl has a maximum capacity of 0.7L and can be used with the small chopping/mixing blade only. The seal on the inner bowl prevents any leakage into the large work bowl, allowing you to use the small bowl without the need to wash up the large bowl after use.
N.B. The large work bowl must always be fitted before the small work bowl can be set up inside.
It will not always be possible to use the work bowls to their maximum capacity. The amount of food/liquid you can process in the bowls will depend on the density of the ingredients in the work bowl and the consistency of the desired end result. For example, to achieve a consistent result when chopping or pureeing nuts, fruits, vegetables or meats you may need to process in batches of 300-500g. If you are mixing dough which can be very dense, you may need to process in batches of around 400g.
If you find that the motor is struggling or that the processing results are uneven, then we would recommend that you reduce the amount of ingredients in the work bowl and instead process in batches.
For liquid, we recommend that you do not fill the bowls above the Maximum Liquid Fill markings on each bowl (900ml on the large work bowl and 300ml on the small work bowl.) This is to avoid liquid spilling into the central spindle which may cause leakage.
N.B If you are processing very thin liquid such as water in the large bowl, you may need to reduce the amount of liquid to around 600ml to avoid thin liquid escaping from the lid.
2. Selecting the Blade/Disc
For chopping, mixing, blending and puréeing use the chopping/mixing blades.
■ The large chopping/mixing blade can only be used with the large work bowl.
■ The small chopping/mixing blade can only be used with the small work bowl.
For slicing and grating/shredding use one of the reversible discs.
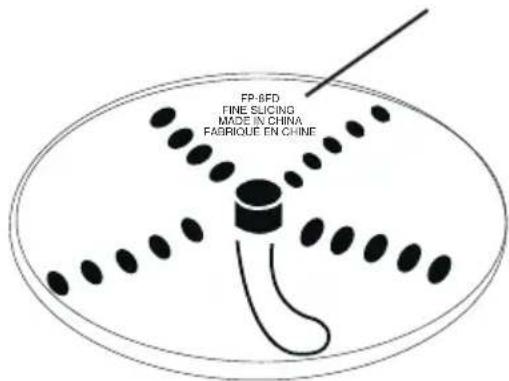
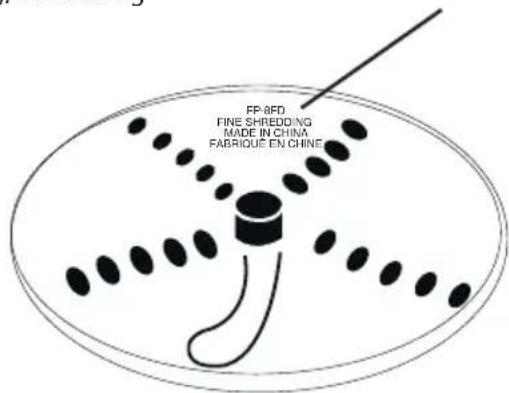
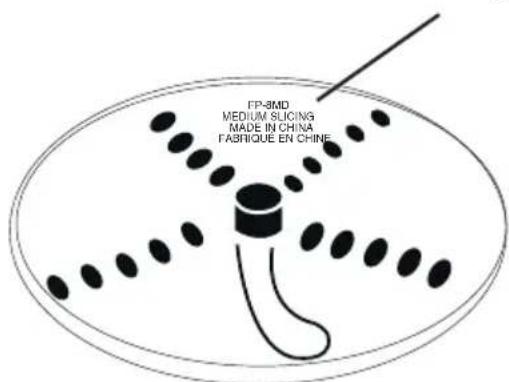
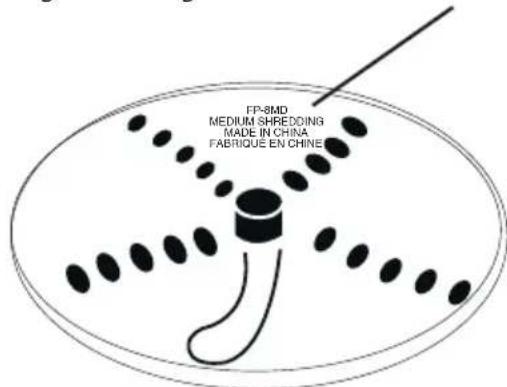
■ Use one disc for fine slicing (2mm) and fine grating/shredding.
■ Use the other disc for medium slicing (4mm) and medium grating/shredding. Both discs are labelled accordingly.
Fine Slicing or Fine Grating/Shredding
Fine Slicing Fine Grating/Shredding
Medium Slicing or Medium Grating/Shredding
Medium Slicing Medium Grating/Shredding
3. Setting Up the Food Processor
A Fitting and Removing the Large Work Bowl
■ Place the food processor base on a dry, flat, sturdy surface.
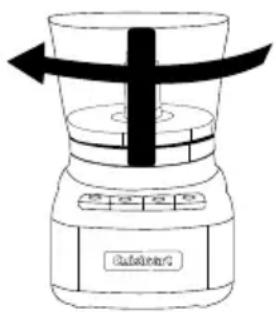
■ Place the large work bowl over the motor spindle, ensuring that the handle of the bowl is positioned to the right of the centre.
■ Turn the work bowl in a clockwise direction until it locks into position on the housing base.
■ To remove, grasp the handle and turn the work bowl anti-clockwise until it unlocks. Lift up and away.
N.B. The work bowl may be stiff during the first few times of use.
B Fitting and Removing the Large Chopping/Mixing Blade
■ Set up the large work bowl as directed in 3A.
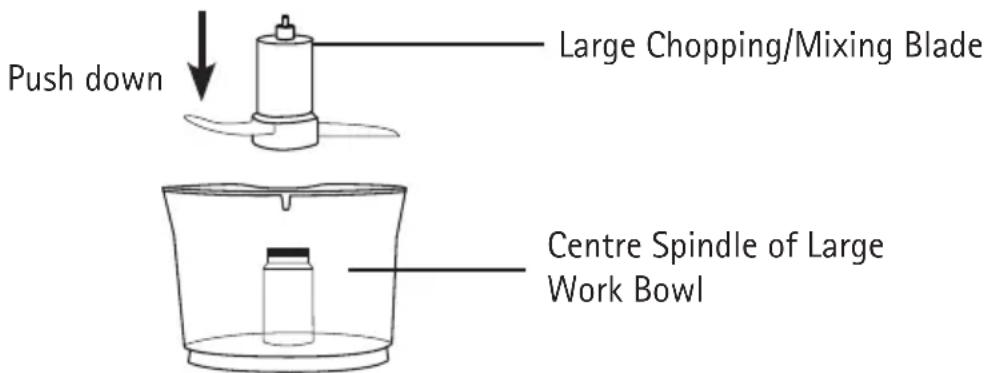
■ Holding the central plastic stem, carefully lift and place the large chopping blade over the work bowl's centre spindle. Push the blade down until it can go no further.
N.B. Always fit the blade in the bowl before adding ingredients.
■ To remove, hold the central plastic stem of the blade and lift up and away from the work bowl's centre spindle.
WARNING: Take great care when handling the blades; they are sharp and can cause injury.
C Fitting and Removing the Reversible Slicing & Grating/Shredding Discs
The reversible slicing and grating/shredding discs can only be used with the large work bowl.
■ Set up the large work bowl as directed in 3A.
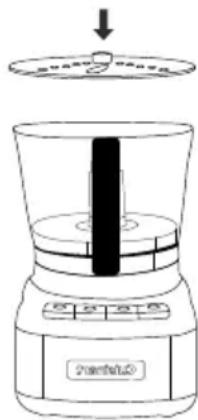
- Choose the desired disc and place it on the motor spindle, ensuring the text for the function you wish to use is facing upwards on the disc (see section 2 for your reference).
■ Slowly twist until the disc and spindle grooves align; the disc will fall into place.
N.B. Never put either disc on the motor spindle until the work bowl is locked in place.
■ To remove, carefully lift the disc upwards and away from the motor spindle.
WARNING: Take great care when handling either disc; the slicing blades are sharp and can cause injury.
Place disc on motor spindle
D Setting Up the Small Work Bowl & Chopping/Mixing Blade
The small chopping/mixing blade can only be used with the small work bowl.
■ Set up the large work bowl as directed in 3A.
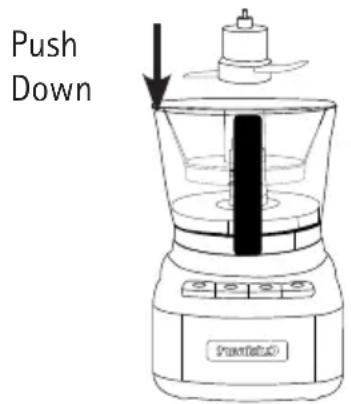
■ Place the rubber seal around the circumference of the small bowl, ensuring the lip of the band covers the top of the bowl. Make sure the seal is fitted correctly so that contents do not spill over the edge into the large work bowl. This allows you to use both bowls for separate tasks without the need for washing up in between.
- Place the small work bowl onto the large work bowl's centre spindle.
■ Holding the central plastic stem, carefully lift and place the small chopping/mixing blade over the large work bowl's centre spindle. Gently push the blade down until it can go no further.
N.B. Always put the blade in the bowl before adding ingredients.
■ To remove, hold the central plastic stem of the blade and lift up and away from the centre spindle.
WARNING: Take great care when handling the blades; they are sharp and can cause injury.
E Fitting and Removing the Work Bowl Cover
■ Place the work bowl cover on top of the work bowl, with the feed tube just to the right of the centre. Turn clockwise to lock onto the work bowl, ensuring the feed tube aligns with the handle of the large work bowl.
■ Align the pusher accessory with the feed tube opening on the work bowl cover and slide down to the bottom.
■ To remove the cover, grasp the feed tube and slide anti-clockwise to unlock and lift away.
4. Machine Controls
High and Low Control Buttons
■ The 'HIGH' or 'LOW' controls are buttons that allow the machine to run until 'OFF' is selected.
■ Properly assemble the machine.
■ Add ingredients to the work bowl, either through the feed tube or directly into the bowl. Ensure the work bowl cover is correctly fitted.
- Press the 'HIGH' or 'LOW' button. The blue LED light will illuminate and the motor will start.
■ Press the 'OFF' button when finished.
WARNING: The unit has a built in safety mechanism which will automatically turn off the motor if the work bowl cover is removed. If the 'OFF' button hasn't been pressed, when the work bowl cover is replaced, the motor will start up automatically. Simply press the 'OFF' button to stop the motor.
Pulse Button
The 'PULSE' control is a button that allows the machine to run only while it is being pressed. This capability provides more accurate control of the duration and frequency of processing. Unless otherwise specified, a 'PULSE' should be about one second.
With the machine properly assembled, ingredients in the work bowl and the work bowl cover correctly fitted, press the 'PULSE' button repeatedly as needed. The blue LED High light will illuminate upon activation. As you get used to using the processor you will get to know which setting works best for the food you are using.
5. Machine Functions
A Chopping
■ You can use your machine for a wide range of chopping tasks, including chopping meats, fish, fruits, vegetables, cheeses and nuts.
■ Set up your chosen bowl and the appropriate mixing/chopping blade.
■ For raw ingredients: peel, core and/or remove seeds and pips. For best results ensure that the pieces of food you add to the work bowl are approximately the same size, i.e. 2.5cm cubed.
- Add ingredients and pulse food in 1-second increments to chop. For the finest chop, either hold the 'PULSE' down or press 'HIGH' or 'LOW' to run the machine continuously. Watch ingredients closely to achieve desired consistency and scrape the work bowl as necessary.
■ High speed is recommended for most chopping.
WARNING! Never try to process ingredients that are too hard to cut with a knife. You may damage the blade or the appliance.
B Mixing
■ You can produce dips, dressings, sauces, cake mixture, bread dough, pastry and crumble toppings.
■ Set up your chosen bowl and the appropriate mixing/chopping blade.
- Add ingredients to the selected work bowl and use the 'PULSE' function or 'LOW' speed (recommended for making doughs and batters).
■ Watch ingredients closely to achieve desired consistency and scrape the work bowl as necessary.
■ Liquids can be added through the feed tube while the machine is running.
C Puréeing/Blending
■ Set up your chosen bowl and the appropriate mixing/chopping blade.
■ Ingredients should be cut into 2.5cm pieces; a smooth purée is best achieved when all the pieces are of equal size.
■ Pulse to initially chop and then process 'HIGH' or 'LOW' until food is puréed/blended; scrape the work bowl as necessary.
N.B. Do not use this method to purée cooked white potatoes. They develop a gluey texture when processed with the metal blade.
■ Purée solid ingredients and add any liquids slowly via the feed tube as required.
D Slicing
■ Use the slicing discs for perfect 2mm or 4mm slices.
■ Set up your chosen slicing disc with the large work bowl and fit the work bowl cover.
■ Turn the machine onto 'HIGH'.
■ Ensure the pusher accessory is removed, then place the food into the feed tube. For best results, always pack food evenly into the tube. Ingredients should fit snugly, but not so tightly that it prevents the pusher accessory from moving.
■ Using the pusher accessory, slowly push the food down the feed tube until it makes contact with the disc and is sliced.
N.B The position of the food in the feed tube will determine the shape and size of the slices. For example, if you insert a whole carrot vertically you will get round slices. To change the shape and size of the slices change the position of the food in the feed tube.
The type/texture of the food will dictate the amount of pressure required. Use light pressure for soft foods, medium pressure for medium foods, and firm pressure for harder foods. Always process with even pressure.
WARNING: Never put fingers into the feed tube; always use the pusher accessory provided. If food becomes stuck, turn the machine off, unplug from the main electric supply and dismantle the processor. Do not attempt to remove food whilst the disc is in operation.
E Grating/Shredding
■ Use the grating/shredding discs for fine or medium shredding/grating.
■ Set up your chosen grating/shredding disc with the large work bowl and fit the work bowl cover.
■ Turn the machine onto 'HIGH'.
■ Ensure the pusher accessory is removed, then place the food into the feed tube. For best results, always pack food evenly into the tube. Ingredients should fit snugly, but not so tightly that it prevents the pusher accessory from moving.
■ Using the pusher accessory, slowly push the food down the feed tube until it makes contact with the disc and is grated/shredded.
The type/texture of the food will dictate the amount of pressure required. Use light pressure for soft foods, medium pressure for medium foods, and firm pressure for harder foods. Always process with even pressure.
WARNING: Never put fingers into the feed tube; always use the pusher accessory provided. If food becomes stuck, turn the machine off, unplug from the main electric supply and dismantle the processor. Do not attempt to remove food whilst the disc is in operation.
6. Cleaning & Maintenance
■ When not in use, leave your food processor unplugged.
- Keep the blades and discs out of the reach of children.
All parts except the housing base are dishwasher safe. We recommend washing them in the dishwasher on the top rack. Due to intense water heat, washing the work bowl(s), cover and accessories on the bottom rack may cause damage over time. Insert the work bowl(s) and pusher accessory upside down for drainage. Take extra care when loading and unloading blades and discs in the dishwasher. N.B Due to food staining, it is normal for the rubber seal to become discoloured over time. We recommenced to remove, clean and replace the rubber seal on the small work bowl after each use.
■ To simplify cleaning, rinse the work bowls, work bowl cover, pusher accessory and blade or disc immediately after use so food won't dry on them. If food lodges in the pusher accessory, remove it by running water through it, or use a bottle brush.
If you wash the blade and discs by hand, do so carefully. When handling, use the plastic stems. Avoid leaving them in soapy water where they may disappear from sight. To clean the metal blade, fill the work bowl with soapy water, hold the blade by its plastic stem and move it rapidly up and down on the centre spindle of the bowl.
■ The work bowls are made of SAN plastic. They should not be placed in a microwave oven.
■ Do not use abrasive cleaners on the housing base, simply wipe with a damp cloth and dry thoroughly. Apply any cleaning agent to the cloth, not the base.
■ If the feet leave spots on the counter, spray them with a spot remover and wipe with a damp sponge.
■ If any trace of the spot remains, repeat the procedure and wipe the area with a damp sponge and non-abrasive cleaning product.
IMPORTANT: Never store any blade or disc on the motor spindle. No blade or disc should be placed on the spindle except when the processor is about to be used.
MAINTENANCE: Any other servicing should be performed by an authorised service representative.
7. Troubleshooting
Q The food is unevenly processed.
A: The ingredients should be cut evenly into 2.5cm pieces before processing.
A: Process in batches to avoid overloading.
Q: Slices are uneven or slanted.
A: Place evenly cut food, cut side down, into the feed tube. Apply even pressure on the pusher accessory.
Q: Food falls over in feed tube.
A: Feed tube should be packed full and evenly for best results. Ingredients should fit snugly, but not so tightly that it prevents the pusher accessory from moving.
Q: Some food remains on top of the disc.
A: It is normal for small pieces to remain; cut remaining bits by hand and add to processed ingredients.
Q: The motor does not start.
A: There is a safety interlock to prevent the motor from starting if it is not properly assembled. Make sure the work bowl(s) and work bowl cover are securely locked into position. If the motor still will not start, check the power cord and outlet.
Q: The food processor shuts off during operation.
A: The cover may have become unlocked; check to make sure it is securely in position. A safety protector in the motor prevents the motor from overheating, which is caused by excessive strain. Press the 'OFF' control button and wait 20 to 30 minutes to allow the food processor to cool off before resuming.
Q: Unable to lock the work bowl cover
A: Ensure the rubber seal is fully fitted to the small work bowl, making sure the lip of the band is covering the bowl's circumference and isn't raised/loose at any point.
Q: The motor slowed down during operation.
A: This is normal as some heavier loads e.g slicing/shredding cheese may require the motor to work harder. Simply reposition the food in the feed tube and try again.
A: Alternatively, the maximum load capacity may have been exceeded. Remove some of the ingredients and continue processing.
Q: The food processor vibrated/moved around the countertop during processing.
A: This is normal as some heavier loads (e.g. slicing/ shredding cheese) may require the motor to work harder.
A: Make sure the rubber feet at the bottom of the unit are clean and dry. Also make sure that the maximum load capacity is not being exceeded.
Q: Liquid is leaking from the small bowl into the large work bowl beneath
A: Check that the rubber seal is correctly fitted on the small work bowl.
A: Check that the maximum liquid fill mark has not been exceeded. If you are processing liquid above the maximum fill line then it is possible for liquid to leak down through the central spindle.
UK Guarantee
The Conair Group Ltd, Unit 3 Waterfront Business Park, Fleet, GU51 3TW
This appliance is guaranteed for consumer use for 5 years and is only valid within the United Kingdom.
This guarantee covers consumer use only i.e. defects occurring under normal use within the home from date of purchase or date of delivery, whichever is later.
If the product develops a fault due to defects in materials or manufacture within 12 months from the date of purchase, to avoid delays and unnecessary inconvenience, where possible please return the product to the point of purchase for an exchange.
If the product develops a fault due to defects in materials or manufacture after 12 months from the date of purchase, and within the guarantee period, Conair UK After Sales Service will repair or replace the product.
Exclusions
This guarantee will no longer be valid meaning that The Conair Group Ltd will not be liable to repair or replace your product where:
- The appliance has been used on a voltage supply other than that which is marked on the product, or advised within this instruction booklet
- The appliance has been purchased from an unauthorised stockist*
- The appliance is used for professional / non domestic usage
- Repairs or alterations have been attempted by unauthorised persons
- The failure of the appliance is a direct result of misuse
- The failure is a result of not following the instructions for use
This guarantee does not cover any cosmetic damage due to misuse of the product nor any damage to persons or property that occurs because of product misuse.
*unauthorised stockists include, but are not limited to online auction sites, private sellers and those selling second hand goods, refurbished products etc
Please contact the Conair Customer Care Line on 03702 406902 (09:00 to 17:00 Monday to Friday) or email support@cuisinart.co.uk for further information on authorised stockists.
It is important to retain your proof of purchase. We recommend attaching your receipt to this page.
Even where a refund may be applicable, no refund will be provided without a valid receipt or proof of purchase, we will only be able to offer a repair or replacement service. Please note this does not apply if the product was purchased directly from The Conair Group Ltd.
Guarantees on replacement products run from the original purchase date or date of delivery, whichever is later, and not from the date of replacement.
This guarantee is an additional benefit and does not affect your statutory rights as a consumer.
If you have any queries regarding this guarantee please contact the Conair Customer Care Line on 03702 406 902 (09:00 to 17:00 Monday to Friday) or email your enquiry to support@cuisinart.co.uk
UK After Sales Service
For further advice on using the appliance or should you need to return your product, please contact the Conair Customer Care Line on 03702 406 902 (09:00 to 17:00 Monday to Friday) or email your enquiry to support@cuisinart.co.uk
Return address:
Customer Care Centre
Conair Logistics
Unit 4, Revolution Park
Buckshaw Avenue
Buckshaw Village
Chorley
PR7 7DW
Please enclose your returns number, name and address details, together with a copy of proof of purchase and details of the fault.
Please note this Instruction Booklet is not the guarantee.
UK Wiring Instructions
The wires in the mains lead are coloured in accordance with the following code:
■ BLUE = NEUTRAL
■ BROWN = LIVE
As the colours of the wire in the mains lead of this appliance may not correspond with the colour marking identifying the terminals on your plug, proceed as follows:
■ The wire which is coloured BLUE must be connected to the terminal which is marked with the letter N
■ The wire which is coloured BROWN must be connected to the terminal which is marked with the letter L
■ Neither the BLUE or BROWN wires should be connected to the terminal which is marked with the letter E or the symbol
This appliance is supplied fitted with a BS1363 mains plug and a BS1362 13A fuse. If this plug is removed from the appliance please ensure it is disposed of safely as a disconnected plug is dangerous if reconnected to the mains. If any other type of plug is used, a 13A fuse must be fitted.

The symbol on the product or on its packaging indicates that this product may not be treated as household waste. Instead it should be handed over to the applicable collection point for the recycling of electrical and electronic equipment.
By ensuring this product is disposed of correctly, you will help prevent potential negative consequences for the environment and human health, which could otherwise be caused by inappropriate waste handling of this product. For more detailed information about the recycling of this product, please contact your local council office or your household waste disposal service.
www.cuisinart.co.uk
- Contents
- Product Control Guide
- IMPORTANT SAFETY CAUTIONS
- Safety During Use
- Before First Use
- Selecting the Work Bowl
- Selecting the Blade/Disc
- Fine Slicing or Fine Grating/Shredding
- Medium Slicing or Medium Grating/Shredding
- Setting Up the Food Processor
- C Fitting and Removing the Reversible Slicing & Grating/Shredding Discs
- D Setting Up the Small Work Bowl & Chopping/Mixing Blade
- E Fitting and Removing the Work Bowl Cover
- Machine Controls
- High and Low Control Buttons
- Pulse Button
- Machine Functions
- A Chopping
- B Mixing
- C Puréeing/Blending
- D Slicing
- E Grating/Shredding
- Cleaning & Maintenance
- Troubleshooting
- Q The food is unevenly processed.
- Q: Slices are uneven or slanted.
- Q: Food falls over in feed tube.
- Q: Some food remains on top of the disc.
- Q: The motor does not start.
- Q: The food processor shuts off during operation.
- Q: Unable to lock the work bowl cover
- Q: The motor slowed down during operation.
- UK Guarantee
- Exclusions
- UK After Sales Service
- UK Wiring Instructions
Brand : CUISINART
Model : FP8SU
Category : Food processor