
SG6BU - Pepper/Salt Mill CUISINART - Free user manual and instructions
Find the device manual for free SG6BU CUISINART in PDF.


| Product Type | Electric Salt & Pepper Mill |
| Brand | Cuisinart |
| Model | SG6BU |
| Dimensions (H x W x D) | Approx. 7.5 x 2.5 x 2.5 inches |
| Weight | 1.2 lbs (0.54 kg) |
| Power Source | 2 x AA batteries (not included) |
| Grind Settings | Adjustable from fine to coarse |
| Capacity | Holds up to 2 oz (57 g) of peppercorns or salt |
| Material | Stainless steel and acrylic body |
| Operation | One-touch automatic operation |
| Cleaning | Wipe with damp cloth; do not immerse in water |
| Safety | Automatic shut-off when released |
| Warranty | Limited 3-year warranty |
| Included | Pepper mill, user manual |
| Spare Parts | Ceramic grinding mechanism available |
| Repairability | Replacement parts can be ordered from Cuisinart |
Frequently Asked Questions - SG6BU CUISINART
User questions about SG6BU CUISINART
0 question about this device. Answer the ones you know or ask your own.
Ask a new question about this device
Download the instructions for your Pepper/Salt Mill in PDF format for free! Find your manual SG6BU - CUISINART and take your electronic device back in hand. On this page are published all the documents necessary for the use of your device. SG6BU by CUISINART.
USER MANUAL SG6BU CUISINART
natural_image
Four stainless steel kitchen grilles with clear glass lids, each labeled 'Culcliner', arranged in a row (no visible text on grilles or background)Seasoning Mill
SG6U / SG6BU / SG6PU / SG6SU
Cuisinart®
Congratulations on the purchase of your new Cuisinart Seasoning Mill.
For over 30 years Cuisinart's aim has been to produce the very finest kitchen equipment. All Cuisinart products are engineered for exceptionally long life, and designed to be easy to use as well as to give excellent performance day after day.
To learn more about our products and for recipe ideas visit our website www.cuisinart.co.uk
Contents
Product Control Guide....5
Important Safety Cautions......6
Instructions for Use 9
A ASSEMBLY 9
B CHARGING INSTRUCTIONS 11
C ADJUSTING THE GRIND....11
D OPERATION INSTRUCTIONS 12
E CHARGING & BATTERY LIFE 12
Cleaning & Maintenance 13
UK Guarantee 15
UK After Sales Service 17
Product Control Guide
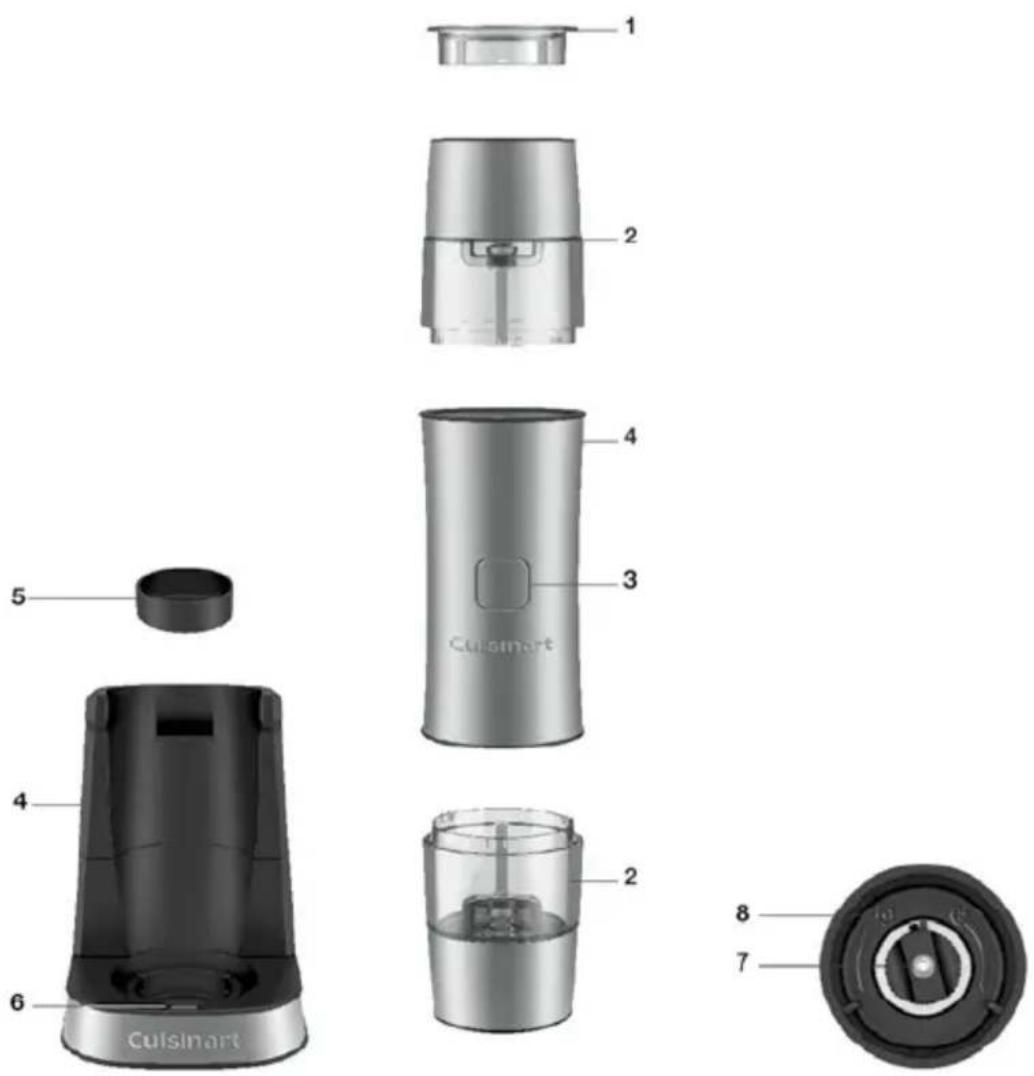
1. Measuring Cap
Grind directly into the cap - perfect for measuring quantities for a recipe.
2. Removable Grinding Containers
Clear for easy viewing, and hold large portions for less refills
3. On/Off Button
Operates mill when pressed
4. Charging Base
Plugs into mains outlet to charge the unit
5. Grind Tray
Removable tray catches loose grinds for easy disposal
6. Charge/Ready Light
Illuminates red when charging and blue when fully charged
7. Adjustable Grind Dial
Choose from 5 set positions from coarse to fine
8. Grind Directional Arrows
Indicates which direction to turn the adjustable grind dial for desired setting
IMPORTANT SAFETY CAUTIONS
Carefully read all the instructions before using the appliance and keep in a safe place for future reference.
Always follow these safety cautions when using this appliance to avoid personal injury or damage to the appliance.
- The appliance is not intended to be operated by means of external timer or separate remote control system.
- This appliance is not intended for use by persons with reduced physical, sensory or mental capabilities, or lack of experience and knowledge, unless they have been given supervision or instruction concerning use of the appliance by a person responsible for their safety.
- Children should always be supervised to ensure that they do not play with this product.
- This appliance shall not be used by children. Keep the appliance, power adapter and charging base out of reach of children during and after use.
- Always inspect the appliance and appliance accessories before use for noticeable signs of damage. Do not use if damaged, or if the appliance has been dropped. In the event of damage, or if the appliance develops a fault, contact the Cuisinart Customer Care Line (refer to "UK After Sales Service section" for further information).
- Do not use the appliance if the lead is damaged. In the event of lead damage, discontinue use immediately. If the lead is damaged it must be
replaced by the manufacturer. Return the appliance to the Customer Care Centre (refer to 'UK After Sales Service' section for further information). No repair must be attempted by the consumer.
-
Never pull the plug out of the mains socket by the lead.
-
Do not wrap the lead around the main body of the appliance during or after use.
-
Always ensure only the adapter supplied is used with the appliance.
-
The appliance is safe to be left plugged into the electrical supply when not in use to ensure the batteries are always charged. However, the product should be switched off and unplugged before cleaning, removing or attaching the grinding containers to refill with salt, pepper or spices, or when handling any parts that are intended to move. It should also be unplugged if not being used for a prolonged period of time.
-
This product contains NiMH rechargeable 2.4V batteries that are not to be removed from the appliance for charging. The batteries in this appliance are non-replaceable by the end user. Only an authorised engineer should perform this task for safety reasons.
-
The supply terminals are not to be short circuited.
-
For indoor, household, domestic use only.
-
For the purposes of recharging the battery, only use the detachable charging supply unit provided with this appliance (model YLJXA-U065018).
-
This product complies fully with all appropriate EU and UK legislation and the standards relevant to this type and class of appliance. We are an
ISO9001:2015 certified company that continually evaluates our Quality Management System performance. If you have any queries regarding product safety and compliance, please contact our Customer Services Department (see "U.K. After Sales Service" section).

WARNING: Polythene bags over the product or packaging may be dangerous. To avoid danger of suffocation, keep away from babies and children. These bags are not toys.
BATTERY DISPOSAL
To minimise hazards to health and the environment at the end of this product's life, laws dealing with Waste Electrical and Electronic Equipment (WEEE) and The Waste Battery Directive require you to dispose of this product at a suitable collection facility where it will be sent for appropriate recycling. Please contact your local authorities for more details on recycling and safe disposal of these in your area.
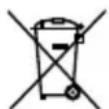
The symbol ■ on the product or on its packaging indicates that this product may not be treated as household waste. Instead it should be handed over to the applicable collection point for the recycling of electrical and electronic equipment. By ensuring this product is disposed of correctly, you will help prevent potential negative consequences for the environment and human health, which could otherwise be caused by inappropriate waste handling of this product. For more detailed information about the recycling of this product, please contact your local council office or your household waste disposal service.
Instructions for Use
A ASSEMBLY
■ Place housing and all removable parts on a clean, flat surface. Make sure that all parts have been cleaned and dried thoroughly before assembling.
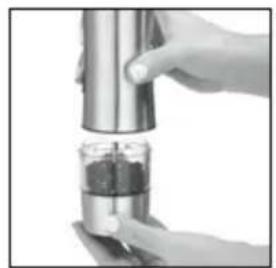
■ Attach grinding container(s) to the unit housing. NOTE: It is best to attach the grinding container from the bottom while holding the unit upright.
■ Line up the arrow on the grinding container with the arrow on the unit housing. NOTE: Both arrows should face each other. This will indicate the grinding container and unit are properly aligned.
■ Gently push the grinding container and unit housing together. The grinding container will fit together comfortably with the unit housing.
- Secure the grinding container in place by twisting the grinding container so that the arrow on the unit housing is now aligned with the lock symbol on the grinding container. NOTE: The two pieces will click together indicating proper assembly.
■ To attach the second grinding container, flip the unit housing over and repeat assembly instructions.
■ Your Cuisinart Seasoning Mill is now assembled.
natural_image
Close-up of hands using a metal grater to press or prepare a glass container (no text or symbols visible)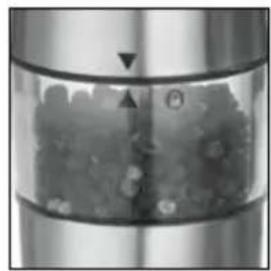
natural_image
Close-up of a metallic cylindrical container with granular material inside, showing a dark triangular object on the left side (no text or symbols visible)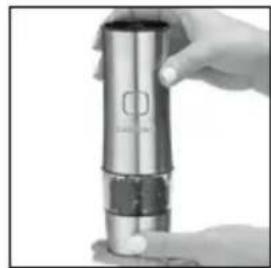
natural_image
Hand holding a cylindrical device with a black lid, no visible text or symbols on the device itself.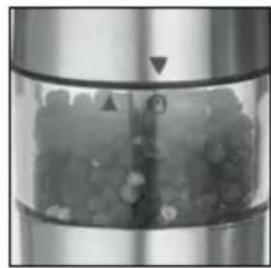
natural_image
Close-up of a metallic cylindrical container with internal granular material and a downward-pointing arrow (no text or symbols visible)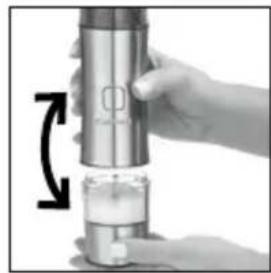
natural_image
Close-up of a hand using a cylindrical device to press or install a metallic component, with no visible text or symbols.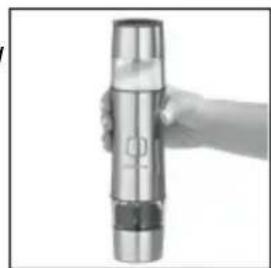
natural_image
Hand holding a metallic cylindrical device with a symbol on its side (no visible text or labels)For use with measuring cap:
■ To use the measuring cap on either grinding container, grasp the measuring cap and connect to grinding container by aligning the grooves on the measuring cap with the ridges in the grinding container.
■ Press together until the ridge of the measuring cap rests flat against the grinding container. NOTE: When not in use, the measuring cap should remain in the uppermost grinding container, as the unit housing will not fit into the charging base if the measuring cap is on the lower container.
To assemble charging base for use:
■ Place housing, charging base and all removable parts on a clean, flat surface. Make sure that all parts have been cleaned and dried thoroughly before assembling.
■ Place the removable grind tray into the charging base so that it fits securely. NOTE: The grind tray will only fit into the charging base one way.
■ Connect power adapter to the charging base by grasping the pin on the power adapter and inserting it vertically into the back of the charging base until secure. NOTE: Do not insert power adapter into the charging base while power adapter is plugged into a power source.
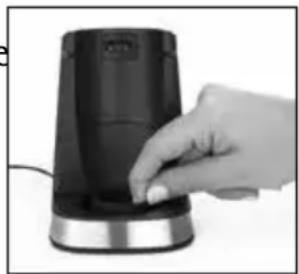
natural_image
Hand placing a small object onto a black cylindrical device (no visible text or symbols)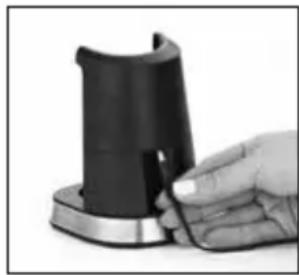
natural_image
Hand holding a black cylindrical device with a metallic base, no visible text or symbolsB CHARGING INSTRUCTIONS
To charge your Cuisinart Seasoning Mill for use:
■ Follow the instructions under the Assembly section.
■ Grasp assembled unit securely and make sure it is facing upright. The Seasoning Mill is facing upright when the Cuisinart logo on the front of the unit is in proper reading orientation (easy to read and horizontal.)
■ Place the fully assembled Seasoning Mill in the charging base so that the recessed area on the back of the unit housing fits comfortably with the protrusion on the charging base.
- Plug charging base into a power socket. The unit is now charging for use. NOTE: Unit is properly charging if the red LED illuminates on the charging base. When the unit is fully charged, the LED indicator will change to blue.
NOTE: Before first use, the batteries must be charged for 12 hours.

natural_image
Hand holding a stainless steel thermos flask with a small button, no visible text or symbols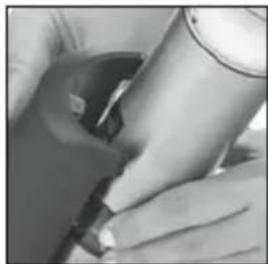
natural_image
Close-up of hands using a handheld device to interact with a cylindrical device (no visible text or symbols)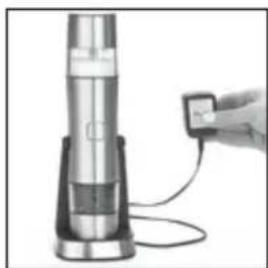
natural_image
Close-up of a metallic cylindrical device connected to a small electronic device via cable (no visible text or symbols)C ADJUSTING THE GRIND
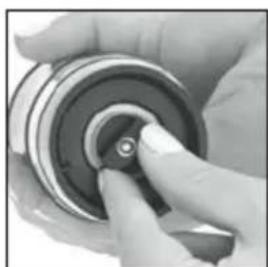
To adjust the grind from fine to coarse, use the adjustment dial on the underside of the mill. Turn clockwise for a finer grind and anticlockwise for a coarser grind, following the arrows on the mill.
natural_image
Close-up of hands adjusting a mechanical bearing component (no visible text or symbols)D OPERATION INSTRUCTIONS
■ Assemble the Cuisinart Seasoning Mill as detailed in Section A.
■ Ensure the unit is fully charged as detailed in Section B
■ Hold the unit with the end that you wish to grind from facing downwards.
■ Press the On/Off button in the centre of the unit housing to begin grinding. NOTE: Only the bottom container will yield any grinding results. Even though the grinding container facing upward will rotate, no grinding will actually take place.
■ To grind from the other end of the unit - simply flip the unit over.
E CHARGING & BATTERY LIFE
Your Cuisinart Seasoning Mill is equipped with NiMH batteries. We have selected these batteries to give you maximum battery life and long running times. Avoid wetting battery contacts. Before first use, the batteries must be charged for 12 hours.
If batteries should run down completely, it will take between 8 and 12 hours to fully recharge them. Normally, you won't run batteries down completely, since the running time with a full charge is up to 20 minutes. It varies depending on your usage, but most grinding tasks take around 5 seconds.
CONTINUOUS CHARGING
The unit is designed so that the batteries may remain on continuous charge. It is recommended that the Seasoning Mill charger be kept plugged into a wall socket, so that the mill will always be ready to use. Leaving the unit on continuous charge is inexpensive in terms of the amount of electricity being used. Use only with the charger provided with the appliance. Do not attempt to use this charger with any other product. Likewise, do not attempt to charge this appliance with any other charger.
HOLDING THE CHARGE
The batteries hold most of their charge even when not plugged in and charging, losing only about 30% of total charge per month.
SHORT RUN TIMES
If, after repeated use, the run time seems to get shorter and the Seasoning Mill has less power, remove the plug from the wall outlet and continue to use mill until it is fully discharged and stops operating. Plug base back into wall outlet and recharge the unit for 12 hours or overnight for a full new charge. This procedure improves battery capacity and should be repeated once every 2–3 months to ensure optimum performance.
Cleaning & Maintenance
The appliance is safe to be left plugged into the electrical supply when not in use to ensure the batteries are always charged. However, the product should be switched off and unplugged before cleaning, removing or attaching the grinding containers to refill with salt, pepper or spices, or when handling any parts that are intended to move. It should also be unplugged if not being used for a prolonged period of time.
■ Clean the mill and base by simply wiping all parts with a damp cloth and thoroughly drying. Do not expose the appliance to moisture.
■ Do not use detergents to clean it.
■ To clean the grinding chambers, simply unlock the container, remove and wash with warm soapy water. Dry thoroughly and replace.
■ To clear a peppercorn that is stuck in the grinding wheel you may either:
√ Turn the mill upside down and shake gently while pressing the On/Off power button.
√ Turn the mill upside down and position the grind selector to coarse, then hold over a plate and grind until peppercorn is dislodged.
■ Never use moist or wet spices in the mill. This will clog the grinding mechanism. We recommend using only store-bought dried spices.
■ N.B Never immerse the full appliance in water, any other liquid or place in a dishwasher.
In some instances grinds can become lodged between the metal spindle in each of the grind containers and the main power unit. If this happens, the unit will not function. The motor will not start when the ON/OFF button is pressed.
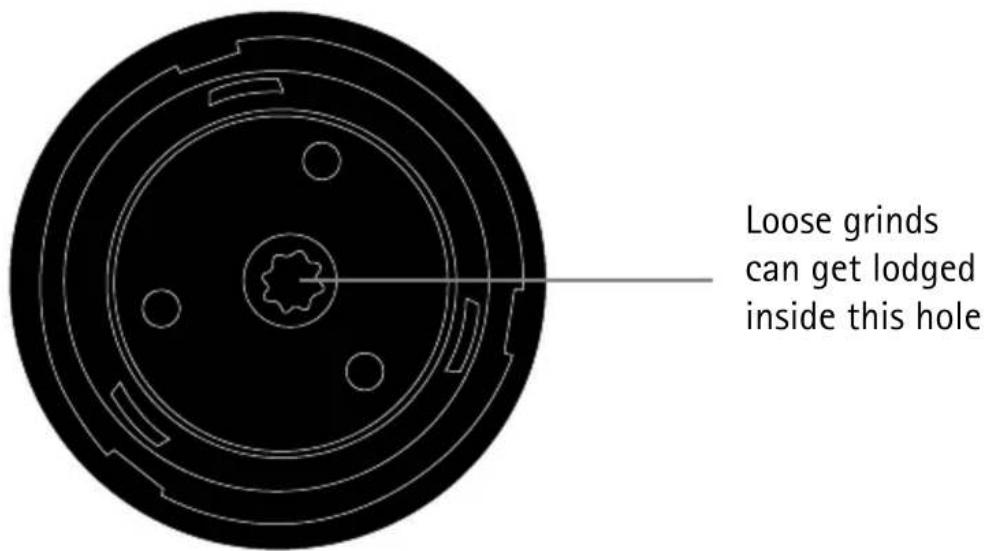
To dislodge loose grinds, remove each of the removable grind containers in turn and shake the main power unit to release any loose grinds. There is no need to empty the containers. Replace the grind containers and use as normal.
UK Guarantee
The Conair Group Ltd, Unit 3 Waterfront Business Park, Fleet, GU513TW
This appliance is guaranteed for consumer use for 3 years and is only valid within the United Kingdom.
This guarantee covers consumer use only i.e. defects occurring under normal use within the home from date of purchase or date of delivery, whichever is later.
If the product develops a fault due to defects in materials or manufacture within 12 months from the date of purchase, to avoid delays and unnecessary inconvenience, where possible please return the product to the point of purchase for an exchange.
If the product develops a fault due to defects in materials or manufacture after 12 months from the date of purchase, and within the guarantee period, Conair UK After Sales Service will repair or replace the product.
Exclusions
This guarantee will no longer be valid meaning that The Conair Group Ltd will not be liable to repair or replace your product where:
- The appliance has been used on a voltage supply other than that which is marked on the product, or advised within this instruction booklet
- The appliance has been purchased from an unauthorised stockist*
- The appliance is used for professional / non domestic usage
- Repairs or alterations have been attempted by unauthorised persons
- The failure of the appliance is a direct result of misuse
- The failure is a result of not following the instructions for use
This guarantee does not cover any cosmetic damage due to misuse of the product nor any damage to persons or property that occurs because of product misuse.
*unauthorised stockists include, but are not limited to online auction sites, private sellers and those selling second hand goods, refurbished products etc
Please contact the Conair Customer Care Line on 03702 406902 (09:00 to 17:00 Monday to Friday) or email support@cuisinart.co.uk for further information on authorised stockists.
It is important to retain your proof of purchase. We recommend attaching your receipt to this page.
Even where a refund may be applicable, no refund will be provided without a valid receipt or proof of purchase, we will only be able to offer a repair or replacement service. Please note this does not apply if the product was purchased directly from The Conair Group Ltd.
Guarantees on replacement products run from the original purchase date or date of delivery, whichever is later, and not from the date of replacement.
This guarantee is an additional benefit and does not affect your statutory rights as a consumer.
If you have any queries regarding this guarantee please contact the Conair Customer Care Line on 03702 406 902 (09:00 to 17:00 Monday to Friday) or email your enquiry to support@cuisinart.co.uk
UK After Sales Service
For further advice on using the appliance or should you need to return your product, please contact the Conair Customer Care Line on 03702 406 902 (09:00 to 17:00 Monday to Friday) or email your enquiry to support@cuisinart.co.uk
Return address:
Customer Care Centre
Conair Logistics
Unit 4, Revolution Park
Buckshaw Avenue
Buckshaw Village
Chorley
PR7 7DW
Please enclose your returns number, name and address details, together with a copy of proof of purchase and details of the fault.
Please note this Instruction Booklet is not the guarantee.
www.cuisinart.co.uk

- Contents
- Product Control Guide
- Measuring Cap
- Removable Grinding Containers
- On/Off Button
- Charging Base
- Grind Tray
- Charge/Ready Light
- Adjustable Grind Dial
- Grind Directional Arrows
- IMPORTANT SAFETY CAUTIONS
- BATTERY DISPOSAL
- Instructions for Use
- A ASSEMBLY
- For use with measuring cap:
- To assemble charging base for use:
- B CHARGING INSTRUCTIONS
- C ADJUSTING THE GRIND
- D OPERATION INSTRUCTIONS
- E CHARGING & BATTERY LIFE
- CONTINUOUS CHARGING
- HOLDING THE CHARGE
- SHORT RUN TIMES
- Cleaning & Maintenance
- UK Guarantee
- Exclusions
- UK After Sales Service
- www.cuisinart.co.uk
Brand : CUISINART
Model : SG6BU
Category : Pepper/Salt Mill