DragonPlus11-2.5W - Heating ElectriQ - Free user manual and instructions
Find the device manual for free DragonPlus11-2.5W ElectriQ in PDF.


| Product Type | Oil Filled Radiator |
| Brand | ElectriQ |
| Model | DragonPlus11-2.5W |
| Power (Max) | 2.5 kW |
| Power (Min) | 1.0 kW |
| Voltage | 220-240 V |
| Frequency | 50 Hz |
| Heat Settings | Low, Medium, High |
| Temperature Range | 15°C to 35°C |
| Timer | On/Off timer, set in hours |
| Control Panel | Side control panel with buttons and display |
| Remote Control | Yes, included |
| WiFi App | Tuya Smart app (2.4GHz only) |
| Digital Display | Yes (temperature and settings) |
| Castors | Yes, 4 castors included |
| Mounting Plates | 2 included for castor assembly |
| Cord Storage | Hook at rear |
| Safety Features | Overheat protection, tip-over switch (assumed), child lock via app |
| Energy Conservation | Electronic thermostat, open window detection |
| Dimensions (approx) | 650 x 500 x 280 mm (H x W x D) |
| Weight (approx) | 11 kg |
| Cord Length (approx) | 1.5 m |
| Color | Black |
| Material | Steel body and fins |
| Suitable For | Indoor domestic use, well-insulated spaces |
| Accessories | Remote control, castors, mounting plates, U-shaped bolts, butterfly screws |
Frequently Asked Questions - DragonPlus11-2.5W ElectriQ
User questions about DragonPlus11-2.5W ElectriQ
0 question about this device. Answer the ones you know or ask your own.
Ask a new question about this device
Download the instructions for your Heating in PDF format for free! Find your manual DragonPlus11-2.5W - ElectriQ and take your electronic device back in hand. On this page are published all the documents necessary for the use of your device. DragonPlus11-2.5W by ElectriQ.
USER MANUAL DragonPlus11-2.5W ElectriQ
natural_image
Black rectangular solar power heater with digital display and wheels (no visible text or symbols)OIL FILLED RADIATOR
DragonPlus7-1.5W
DragonPlus7-1.5WB
DragonPlus9-2.0W
DragonPlus9-2.0WB
DragonPlus11-2.5W
DragonPlus11-2.5WB
Thank you for choosing electriQ
Please read the manual before using this heater and keep it safe for future reference.
Visit our page www.electriQ.co.uk for our entire product range
THIS PRODUCT IS ONLY SUITABLE FOR WELL INSULATED SPACES OR OCCASIONAL USE.
CONTENTS
SAFETY INSTRUCTIONS 3
PRODUCT OVERVIEW 5
DISPLAY 6
CONTROL PANEL 7
REMOTE CONTROL 7
OPERATION 8
CONNECTING THE APPLIANCE TO WIFI 9
CONTROLLING YOUR APPLIANCE THROUGH THE APP 15
MAINTENANCE 20
TROUBLESHOOTING 20
TECHNICAL DATA 21
SUPPORT 21
PRODUCT FICHE 22
SAFETY INSTRUCTIONS IMPORTANT
- Carefully read the instructions before operating the unit
- This appliance is for indoor use only.
- Rating: This unit must be only connected to a 220-240 V / 50 Hz earthed outlet.
- Installation must be in accordance with regulations of the country where the unit is used.
- If you are in any doubt about the suitability of your electrical supply have it checked and, if necessary, modified by a qualified electrician.
- This heater has been tested and is safe to use. However, as with any electrical appliance use it with care.
- Disconnect the power from the unit before dismantling, assembling or cleaning.
- Avoid touching any moving parts within the appliance.
- Never insert fingers, pencils or any other objects though the guard.
- This appliance can be used by Children aged from 8 years and above and persons with reduced physical, sensory or mental capabilities or lack of experience and knowledge if they have been given supervision or instruction concerning use of the appliance in a safe way and understand the hazards involved.
• Children shall not play with the appliance.
- Cleaning and user maintenance shall not be carried out by children.
- Children aged from 3 years and less than 8 years shall only switch on/off the appliance provided that it has been placed or installed in its intended normal operating position and they have been given supervision or instruction concerning use of the appliance in a safe way and understand the hazards involved.
- Children aged from 3 years and less than 8 years shall not plug in, regulate, or clean the appliance or perform user maintenance.
- Children under 3 years should be kept away unless continuously supervised.
- Some parts of this product can become very hot and cause burns. Particular attention has to be given where children and vulnerable people are present.
- Do not clean the unit by spraying it or immersing it in water.
- Never connect the unit to an electrical outlet using an extension cord. If an outlet is not available, one should be installed by a qualified electrician.
- Never operate this appliance if the unit, cord or plug is damaged. Ensure the power cord is not stretched, exposed to sharp object/edges, or routed under the unit.
- Any service other than regular cleaning should be performed by an authorised service representative. Failure to comply could result in a voided warranty.
- Never use the plug as a switch to start and turn off the heater. Use the provided power button located on the control panel.
- Do not use an external timer.
- Do not cover the appliance, or place items close to the unit which may restrict airflow, as this may present a fire risk.
- The heater must not be located immediately below a socket outlet.
- Always place the unit on a dry and stable surface. Do not move or tilt the unit.
- Avoid keeping the unit in direct sunlight for a long period of time.
- The heater is designed to be used at temperatures above -20^ . If it is exposed to temperatures below this, it must be allowed to warm above this level before operation.
- Do not attempt to repair, disassemble or modify the appliance. This unit contains no user-serviceable parts.
- Always unplug or disconnect the appliance from the mains power supply when not in use, or when moving or cleaning it. Do not pull the cord to unplug the heater.
- Keep the heater clean. Do not allow any object to enter the ventilation or exhaust opening as this may cause electric shock, fire, or damage to the heater.
- Do not use the appliance for anything other than its intended use. It is designed for domestic indoor use only.
- There may be a trace of odour during the first few minutes of initial use, or after a period of storage. This is normal and will quickly disappear.
- This appliance has hot and arching or sparking parts inside. Do not use it in areas where gasoline, paint, or any flammable liquids are used or stored.
- This appliance is not intended for use in bathrooms, laundry areas and similar humid locations. Never locate this appliance where it may fall into a bathtub or otherwise become exposed to water.
- The remote contains a lithium battery, keep out of reach of small children. Seek Medical advice if swallowed.
- To prevent battery leakage: Remove the battery from the remote if exhausted or before long periods of storage.
- WARNING: To reduce the risk of fire or electrical shock, DO NOT use this appliance with any solid-state Speed Control Device or any variable speed controllers.
ENERGY SAVING AND UNIT SAFETY PROTECTION TIPS
- Do not cover or restrict the airflow. Do not use in dusty environment.
- For safety and maximum performance, the minimum distance from a wall or objects should be 50cm.
PRODUCT OVERVIEW
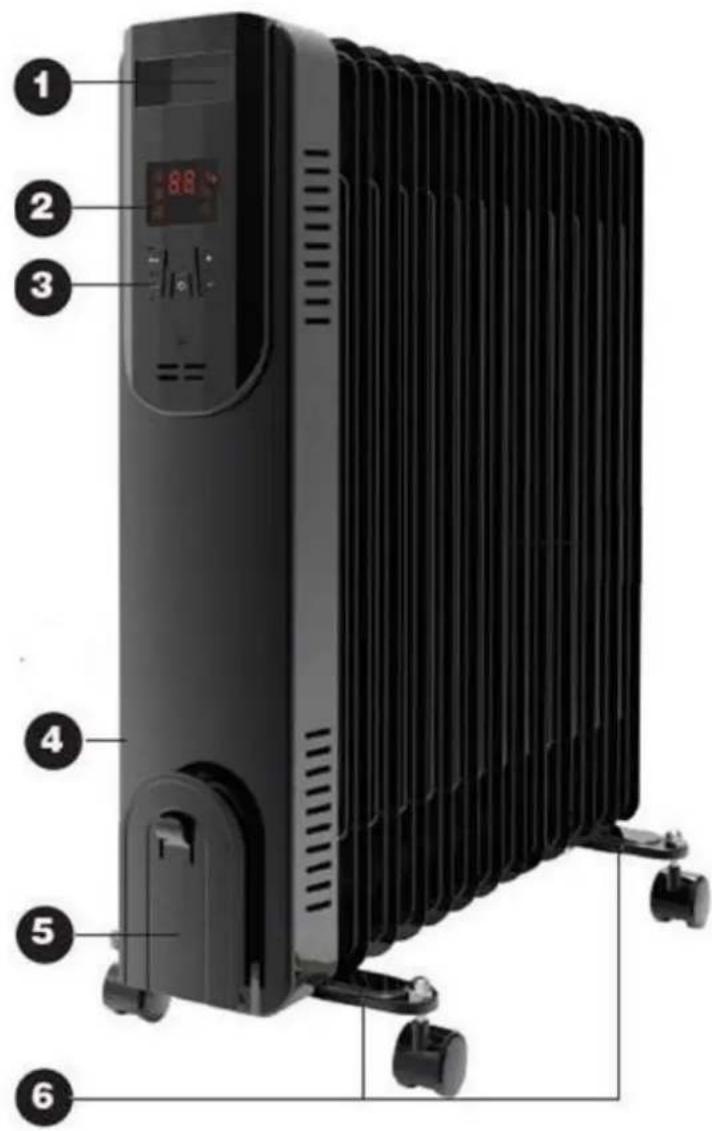
- Handle
- Digital display screen
- Control panel
- Power switch
- Cord storage with hook
- 2 x mounting plates
ACCESSORIES
| Remote Control | x1 |
| Mounting Plates | x2 |
| Castors | x4 |
| U-Shaped Bolts | x2 |
| Butterfly Screws | x4 |
ASSEMBLY INSTRUCTIONS
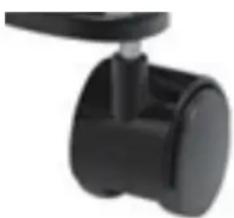
- The castors must be attached before the heater is operated.
- Castors are supplied with the device. You must mount them on the supplied mounting plates and then attach these to the unit before use.
WARNING: Do not operate without the castors. Only operate the heater in an upright position.
natural_image
Close-up of a black mechanical component with a curved handle and circular base (no visible text or symbols)POSITIONING THE HEATER
- Place the unit in an upright position on a flat, stable and heat-resistant surface.
- Ensure that there are no flammable or heat-sensitive materials or substances within one metre of the front and 50 cm of the rear and sides of the unit.
- Do not cover the heater.
CONNECTING THE HEATER
- Before inserting the plug into a suitable socket, make sure that the unit is intact, properly assembled and that there is no signs of damage to the appliance or its power cable.
- To avoid overloading a circuit, connect the unit only to a circuit where no other equipment is connected.
- When the power switch is in the OFF position, insert the plug into an earthed socket and turn on the power.
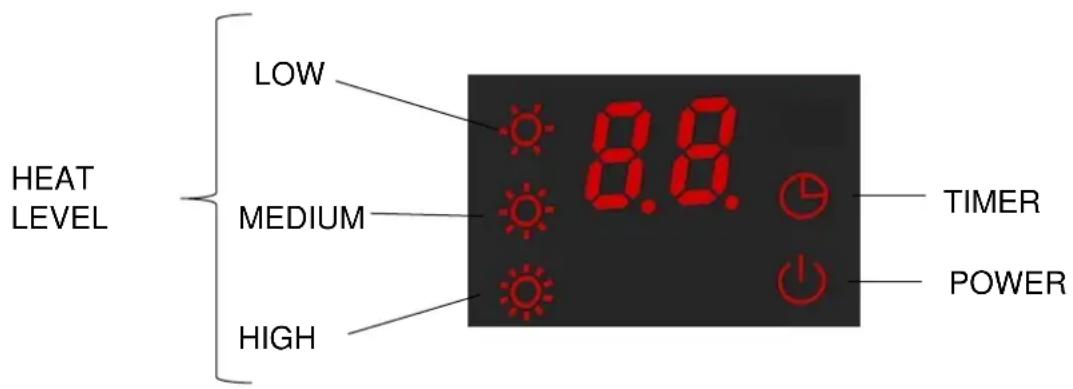
DISPLAY SCREEN
CONTROL PANEL
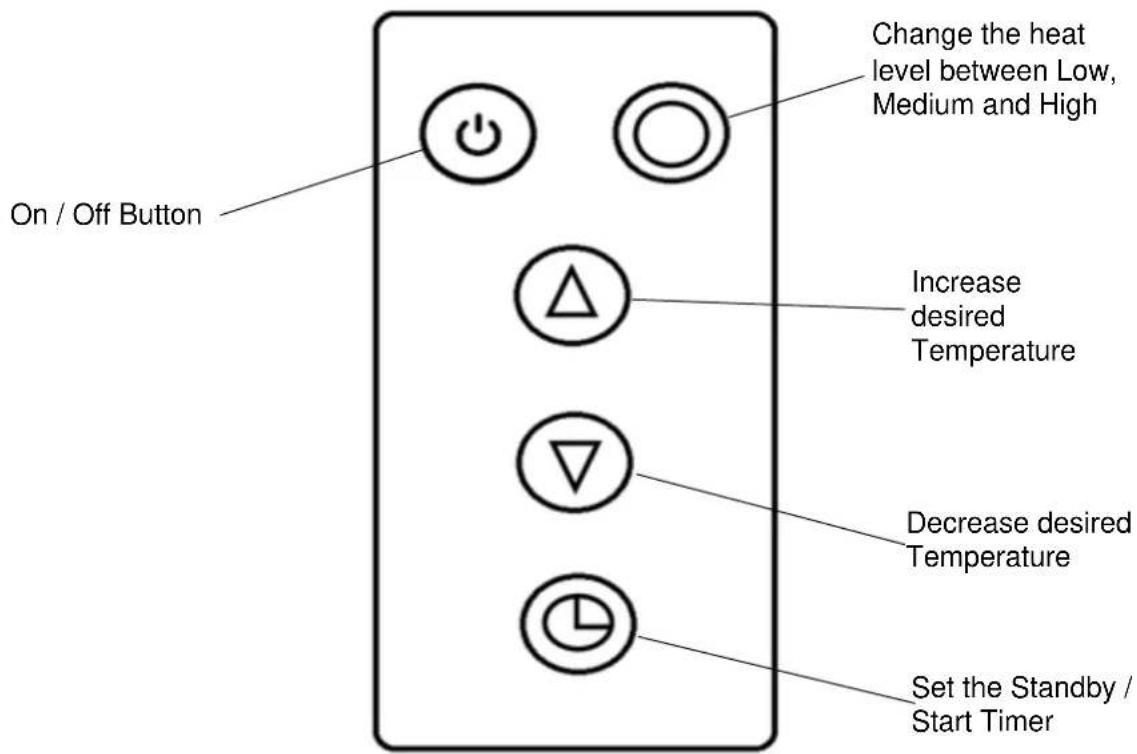
The unit can be operated using the remote control or the control panel on the side of the unit.
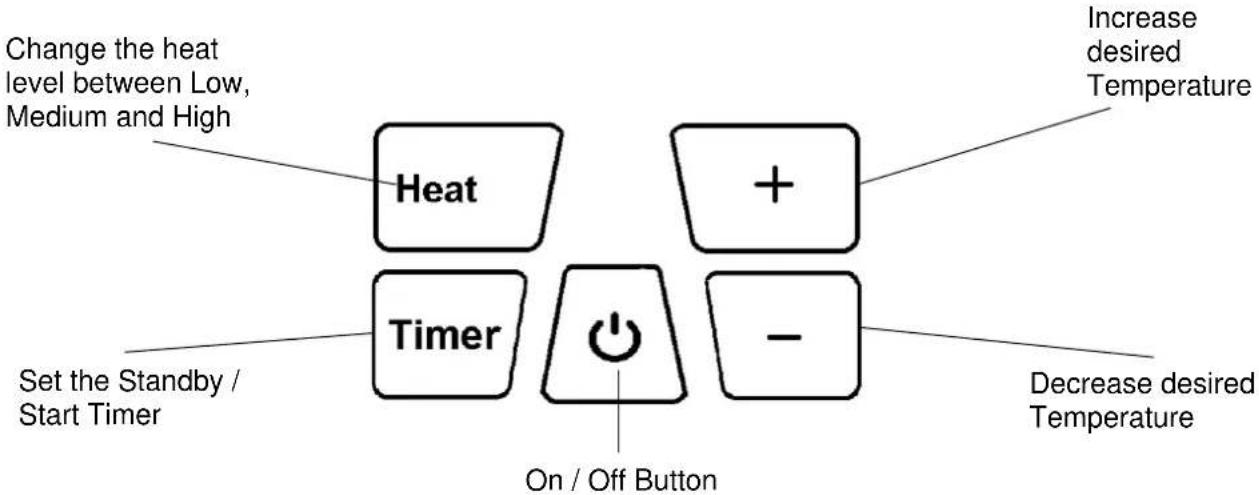
Please note the unit must be turned on using the power switch before use
REMOTE CONTROL
The buttons on the remote allow the access to the same settings as the main control panel.
OPERATION
Turning ON/OFF
- Press the power switch on the side of the unit to the "ON" position to power the unit. The power symbol will illuminate on the display.
- Press the "ON/OFF" button on the control panel or remote control. The unit will start to operate at the High heat setting.
- Press the "ON/OFF" button to stop operation and put the unit into standby mode.
- Press the power switch to the OFF position to turn off the power to the appliance.
SELECTING A POWER LEVEL
Press the "HEAT" button repeatedly to select a Heat level between Low, Medium and High. The display will show the currently selected Heat level
SETTING THE TEMPERATURE
The desired temperature can be set between 15^ C and 35^ C. Once the desired temperature has been reached the unit will stop the heating function.
With the unit operating at the desired heat level use the + and - buttons to set the desired temperature.
While the unit is heating, the thermometer symbol will flash.
When the room temperature is above the desired temperature the thermometer symbol will be illuminated constantly.
TIMER BUTTON
The in-built timer will allow you to set the unit to turn on or turn off after a set period of time, Please note only one timer can be used at any time.
ON TIMER – The timer will turn on the unit automatically after the time set has elapsed.
- With the unit turned off, press the TIMER button, then set the number of hours' time you desire the unit to start by repeatedly pressing the TIMER button.
- Once the set time has elapsed, the unit will turn on automatically.
- Press the POWER button before the time has elapsed and the unit will turn on as normal and the timer will be cancelled
OFF TIMER – The timer will turn off the unit automatically after the time set has elapsed.
- While the unit is operating, press the TIMER button then set the number of hours' time you desire the unit to stop by repeatedly pressing the TIMER button.
- Once the set time has elapsed, the unit will enter standby automatically.
- Press the POWER button before the time has elapsed, the timer will be cancelled and the unit will turn off.
MODES AVAILABLE FOR SETUP
The heater has two different setup modes, Quick Connection and AP (Access Point). The quick connection is a quick and simple way to set the unit up. The AP connection uses a direct local Wi-Fi connection between your phone and the heater to upload the network details.
When first turned on using the switch on the rear of the unit, the power indicator will flash rapidly, showing that the unit is in Quick connection mode, and ready to set up.
Please ensure your device is in the correct Wi-Fi connection mode for the connection type you are attempting, the flashing of the power indicator on your heater will indicate this.
| Connection Type | Frequency of Flashes |
| Quick Connection | Flashes twice per second |
| AP (Access Point) | Flashes once per second |
CHANGING BETWEEN CONNECTION TYPES
To change the unit into AP mode, with the appliance in standby (Power switch on and unit turned off), press and hold the HEAT button for 5 Seconds.
To change back to Quick connection mode, turn the appliance off using the switch on the rear. Leave turned off for 10 seconds before returning the switch to the on position. After a few seconds the Power indicator will start to quickly flash to indicate the unit is in Quick connection mode.
TURNING WIFI OFF
With the appliance in standby mode (Power switch on, but turned off), Press and hold the On Off Button for 3 seconds. The unit will bleep and the Light button will go out.
TURNING WIFI ON
Turn the appliance off using the switch. Leave turned off for 10 seconds before returning the switch to the on position. After a few seconds the Power indicator will start to quickly flash to indicate the unit is in Quick connection mode.
CONNECTING THE APPLIANCE TO WIFI
DOWNLOAD THE APP TO YOUR PHONE
Download the" TUYA SMART" app, from your chosen app store, using the QR codes below, or by searching for the app in your chosen store.

Android

REGISTER THE APP
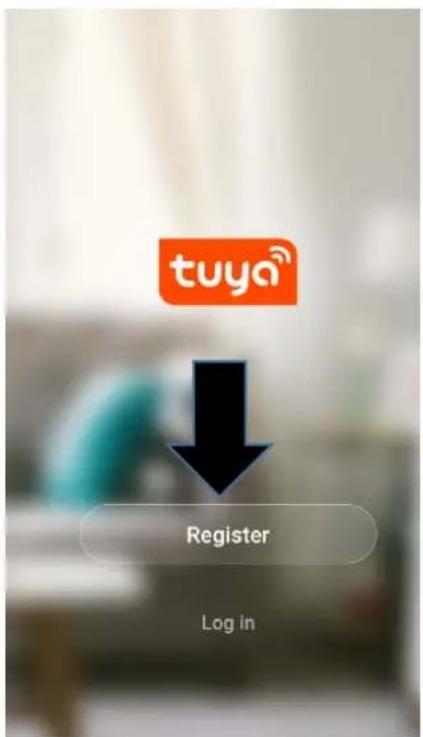
- Press on the register button at the bottom of the screen.
- Read the Privacy policy and press the Agree Button.

Privacy Policy
Privacy Policy of Tuya Smart Platform
Update date: 2018.4
Come into force date: 2018.5
So you have purchased our TuyaSmart device hardware and are starting to use the TuyaSmart device software and all its functionalities! Any information you share with us (e.g. for creating a Tuya Account) will help us to provide you with services related to TuyaSmart device and to improve them to make them even better. We explain here our ways of collecting and using information, and
how we protect your privacy. In the policy, "personal data" means inf that can be used to identify an in either from that information and that information and other inform
Disagree

Agree
- Enter your email address or phone number and press continue to register.

Register
United Kingdom +44
Mobile number/Email
Continue
- A verification code will be sent by the method selected in step 3. Enter the code into the app.

Verification Code
Verification code has been sent to Resend(57s)
1
4
7
.
2
5
8
0
3
6
9
-
,
×

- Type in the password you would like to create. This needs to be 6-20 characters, with letters and numbers.

Set Password
Password must contain 6-20 letters and numbers
5.018
- The app is now registered. It will automatically log you in following registration.

natural_image
Illustration of a person sitting on a blue cushion with a potted plant nearby (no text or symbols)Enjoy your smart life
Add Home
Log out
SETTING UP YOUR HOME WITHIN THE APP
TUYA is designed so it can work with a large number of compatible smart devices within your home. It can also be set up to work with multiple devices within different houses as such during the setup process, the app requires that different areas are created and named to allow easy management of all your devices. When new devices are added, they are assigned to one of the rooms you have created.
CREATING ROOMS
- Press on the ADD HOME button.

Verification Code
Verification code has been sent to. Resend(57s)
1
2
3

4
5
6

7
8
9

- Type in a name for your home,
- Press on the location button to select the location of your home. (See SETTING YOUR LOCATION below)
- New rooms can be added by pressing the ADD ANOTHER ROOM option at the bottom. (See ADD ANOTHER ROOM below)
- Untick any rooms that are not required on the app.
- Press DONE in the top right corner.

Add Home
Done
Name
Enter your home name
Location
Set geographic location

Smart devices in:
Living Room

Bedroom

Second Bedroom

Dining Room

Kitchen

Study Room

Add another room
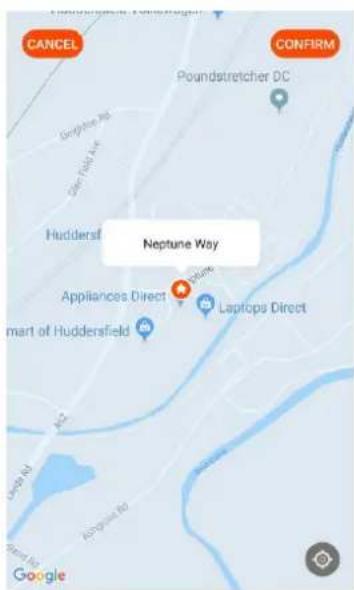
Use your finger to move the orange HOME symbol.
When the symbol is in the approximate location of your home, press the confirm button in the top right corner.
Location details allows the app to be set up later to respond to weather conditions in your area.
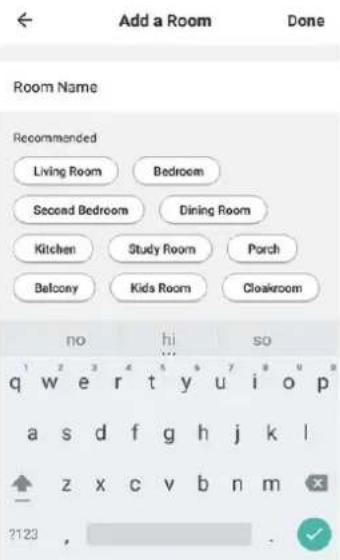
ADD ANOTHER ROOM
Type in the name of the room, and press Done in the top right corner
CONNECTING USING THE QUICK CONNECTION METHOD
Before initiating the connection, make sure the unit is in standby mode (Power switch ON, but unit turned off), with the power indicator flashing twice per second. If not follow the instructions for changing the connection mode. Also ensure your phone is connected to the Wi-Fi network. (We advise turning mobile data off during setup)
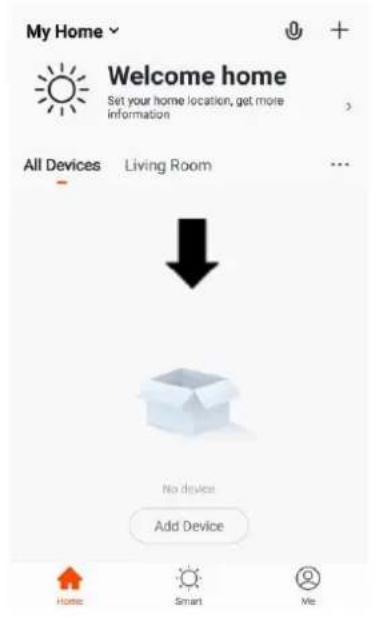
- Open app and press "+" to add device, or use the add device button
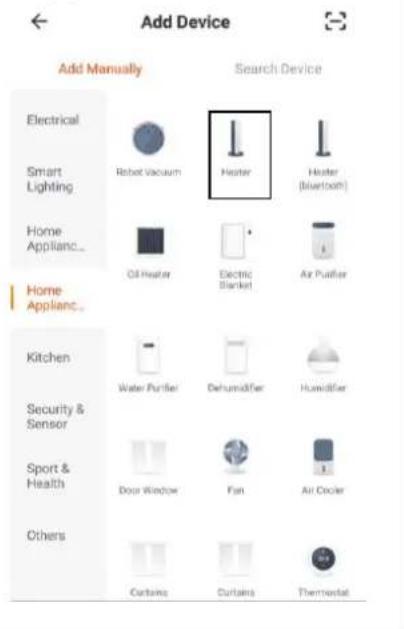
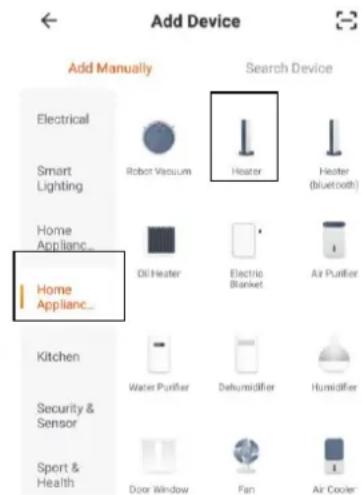
- Select the type of device as "Heater" within the Home Appliance tab.
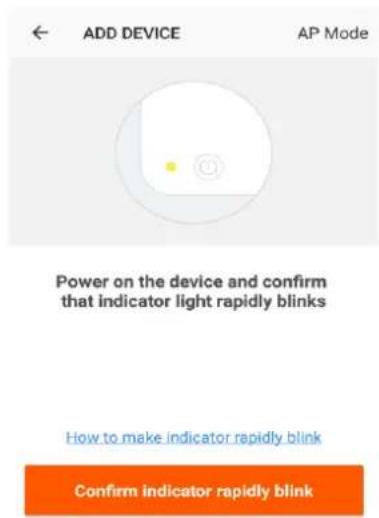
- Ensure the Ambient Light indicator on the heater is flashing twice per second then press on the orange button at the bottom of the screen.
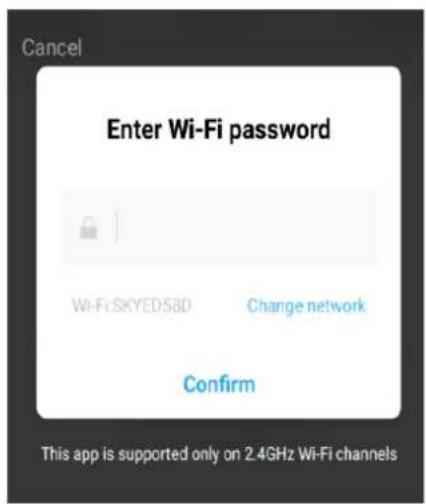
- Enter your Wi-Fi password and press confirm.
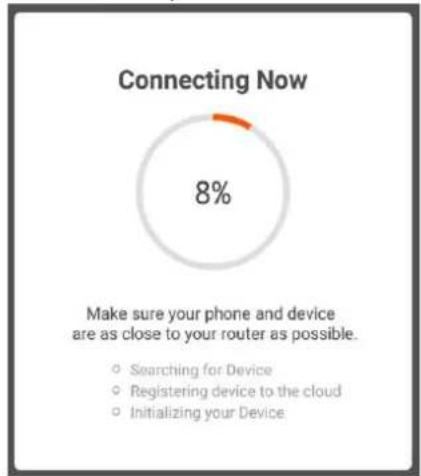
- This will then transfer the settings to the heater. Wait for this to complete. If this fails, retry. If still unsuccessful please review the troubleshooting section for further help.
pie
Connecting Now | Category | Value (%) | |---|---| | Searching for Device | 0 | | Registering device to the cloud | 0 | | Initializing your Device | 0 | Make sure your phone and device are as close to your router as possible.CONNECTING USING APP MODE ALTERNATIVE METHOD
Before initiating the connection, make sure the unit is in standby mode, with the power Indicator flashing once per second. If not follow the instructions for changing the Wi-Fi connection mode. Also ensure your phone is connected to the Wi-Fi network. (We advise turning mobile data off during setup)
- Open app and press “+” to add device, or use the add device button
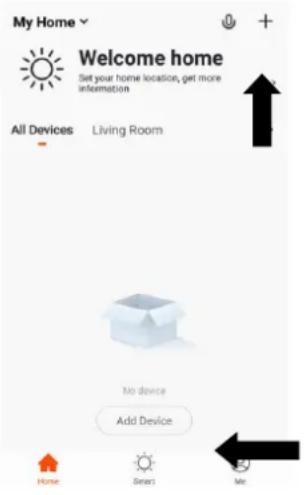
- Select the type of device as "Heater" within the Home Appliance tab.
- Press on the AP mode button in the top right of the screen.
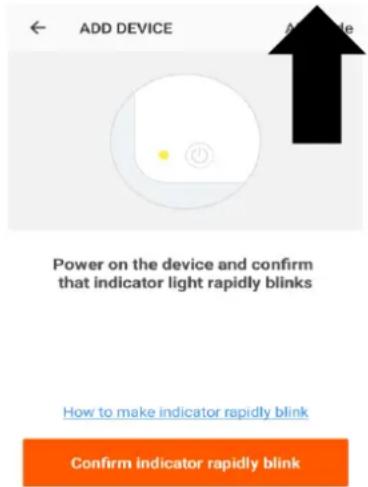
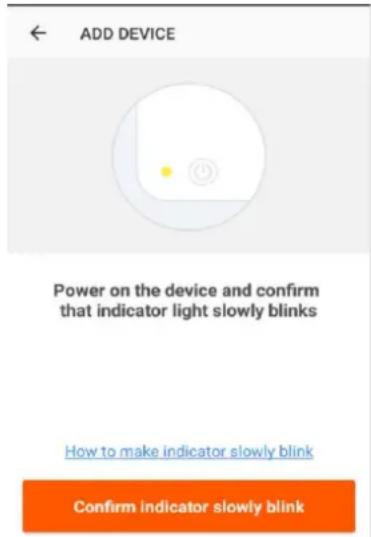
- Ensure the Ambient Light indicator on the heater is slowly flashing (once per second), then press on the orange button at the bottom of the screen to confirm
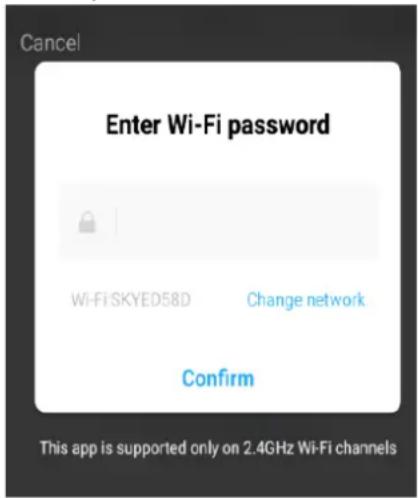
- Enter your Wi-Fi password and press confirm.
- Go to network settings in your phone and connect to the "SmartLife xxx" connection. There is no password to enter. Then return back to the app to complete setup.
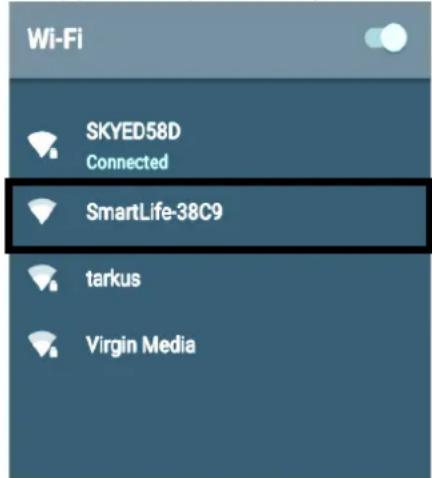
This will then transfer the settings to the heater.
Once the connection process has completed, go back to the network settings on your phone to ensure your phone has reconnected to your Wi-Fi router.
CONTROLLING YOUR APPLIANCE THROUGH THE APP THE HOME SCREEN
Each device has its own entry on the home screen to allow the user to either quickly turn the unit on or off, or to enter the device screen to make other changes.
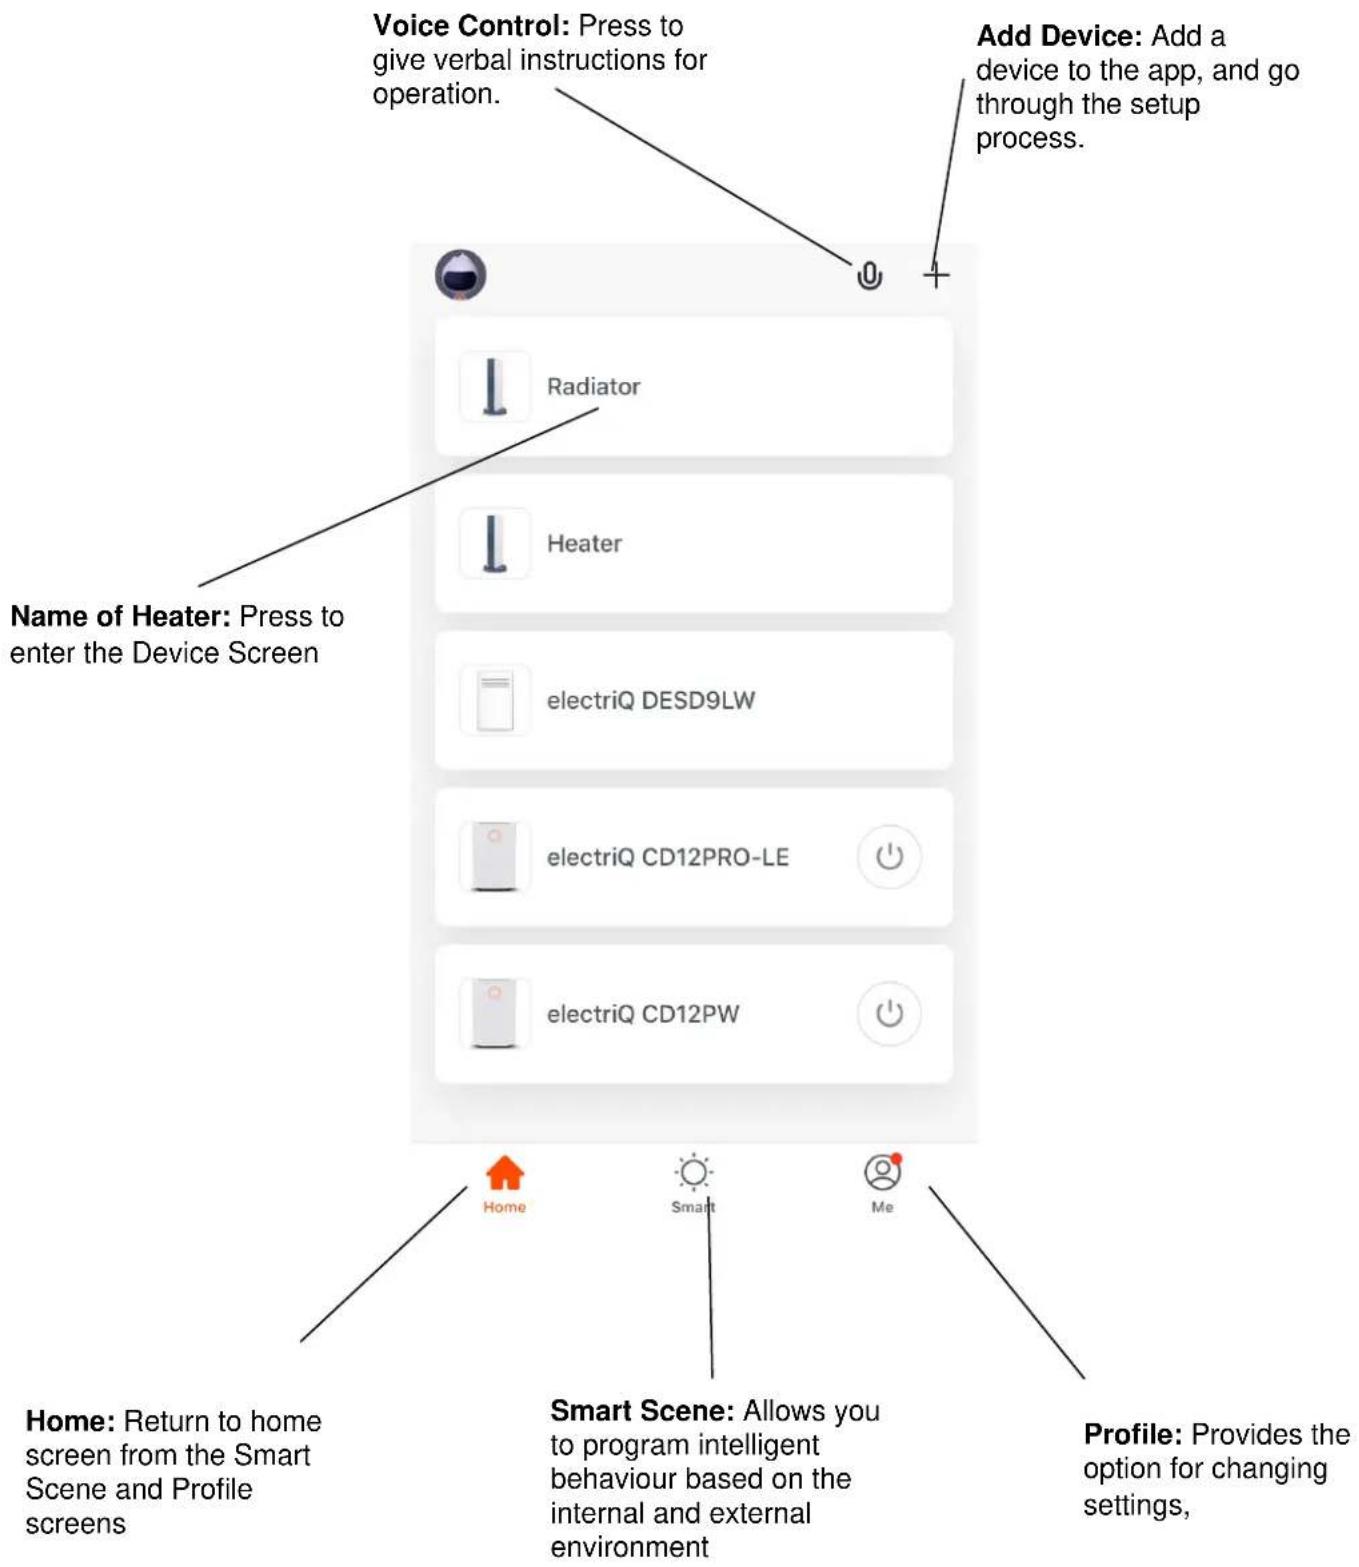
DEVICE SCREEN
The device screen is the main control screen for the heater, providing access to the controls to amend the functions and settings.
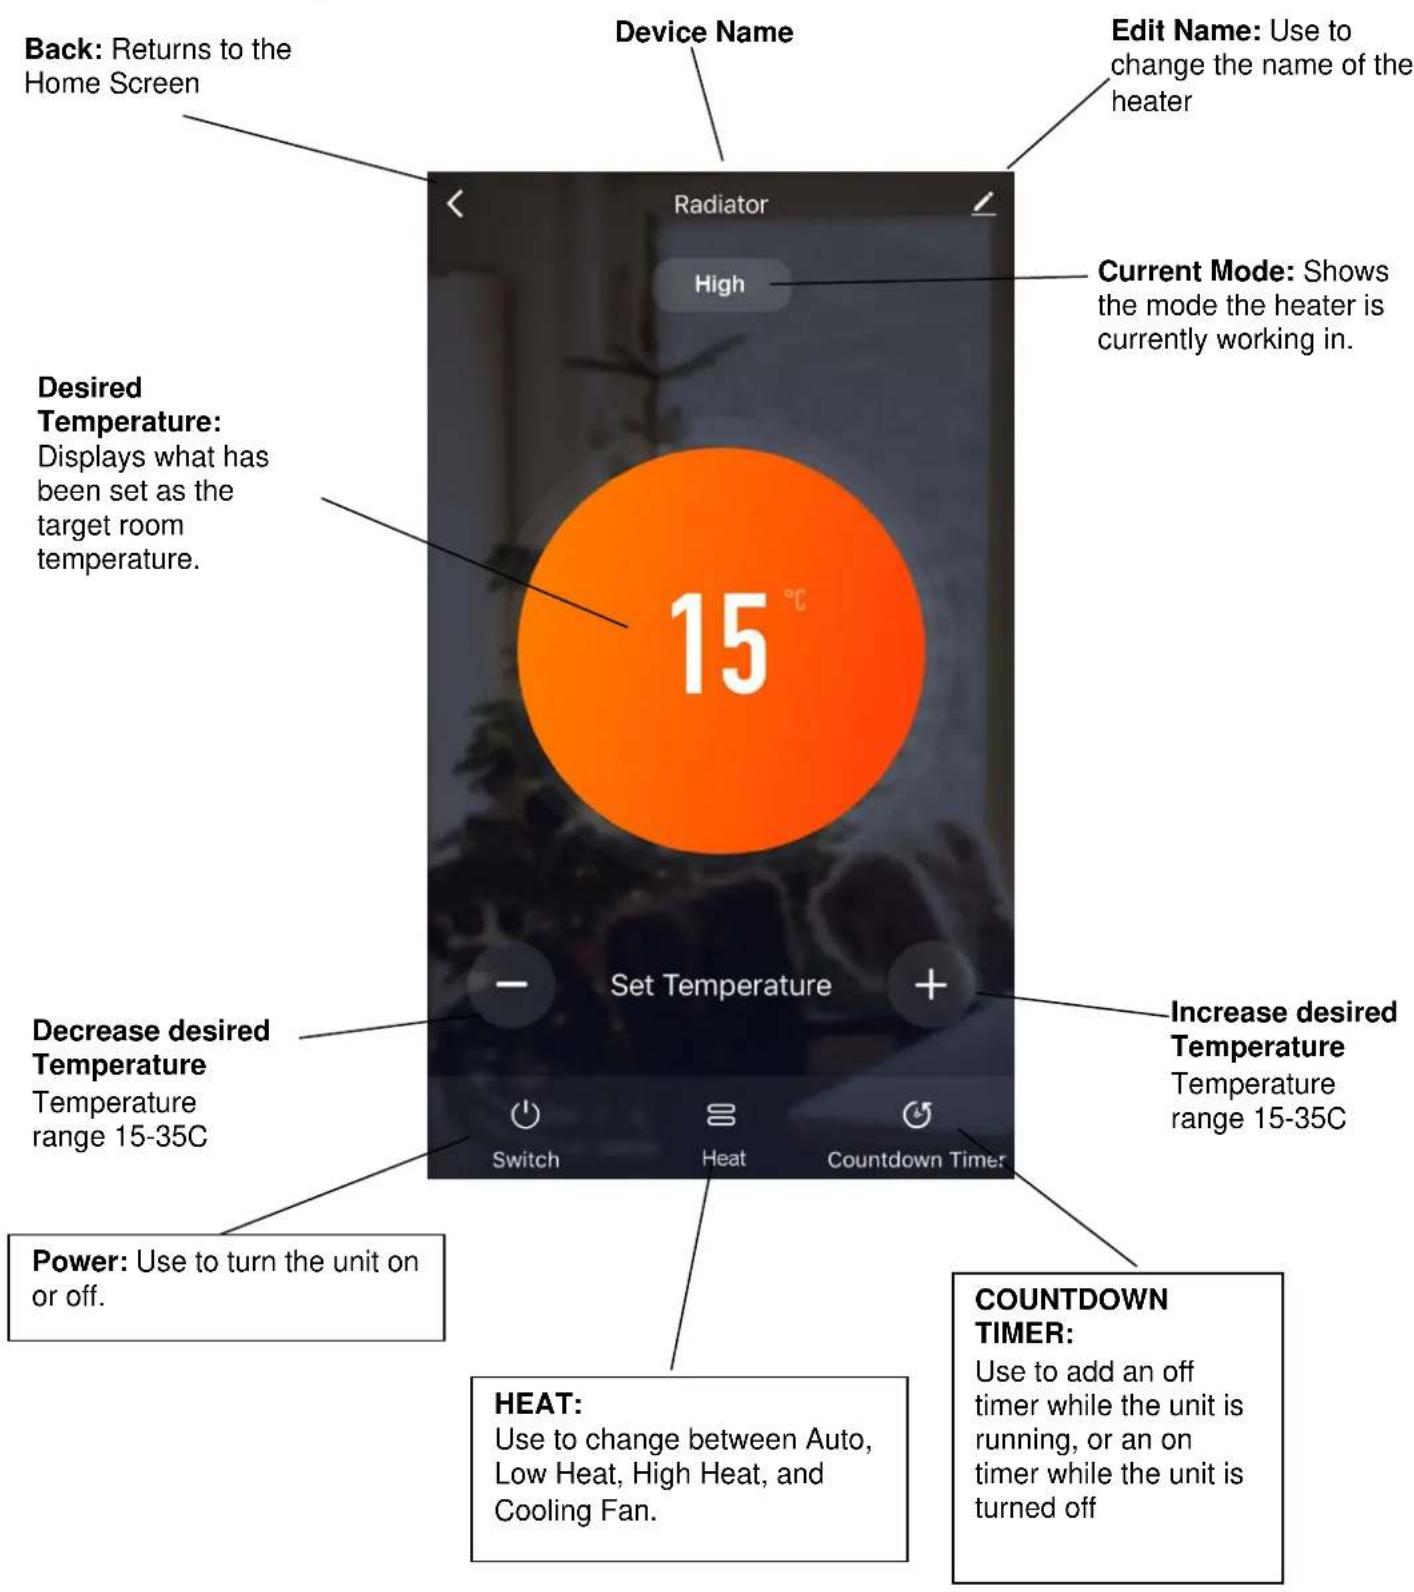
NOTE: Due to continuous development of the app, the layout and available features may be subject to change.
SMART SCENES
Smart Scenes is a powerful tool providing the option to customize the operation of the air heater based both on conditions within the room and outside influences. This gives the user the option of specifying much more intelligent actions. These are split into two categories Scene and Automation.
SCENE
Scene allows for a one touch button to be added to the Home Screen. The button can be used to change a number of settings in one go, and can change all the settings within the unit. A number of scenes can easily be setup, allowing the user to easily change between a number of preset configurations.
Below is an example of how to set up a scene:
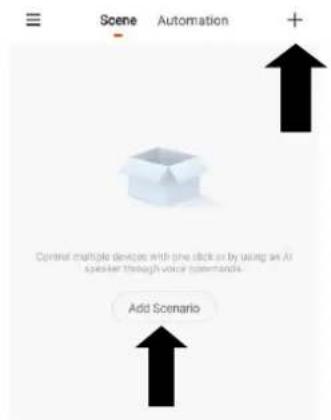
- Press on the Smart tab at the bottom of the Home screen
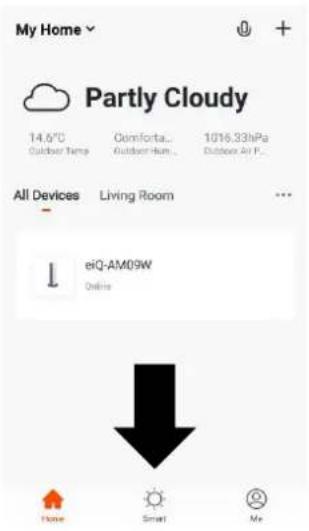
- Press on the Plus in the top right corner or on Add Scenario to add a smart scene.
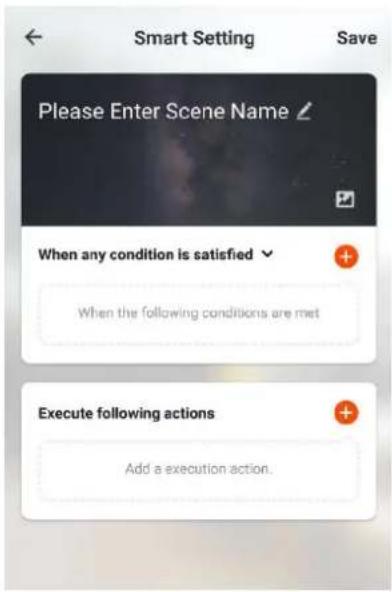
-
Press the Pen next to "Please Enter Scene Name" to input the name for your Scene Show on Dashboard: Leave this on if you require the scene to be displayed as a button on the Home Screen Press the Red Plus to add the action required. Then select the heater from the list of devices.
-
Chose the function, set the value for the function, and then press the back button in the top right corner, to return to the previous screen.
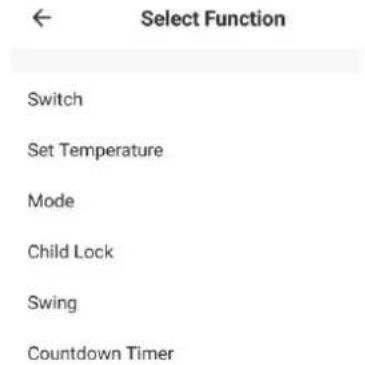
- Once all the functions required have been added, press the Save button in the top right corner to finalize and save your new Scene. It will then be saved to the home screen
AUTOMATION
Automation allows an automatic action to be set up for the device. This can be triggered by the Time, and a range of other influences, depending what other TUYA enabled devices you have on the network.
1. Press on the Scene tab at the bottom of the Home screen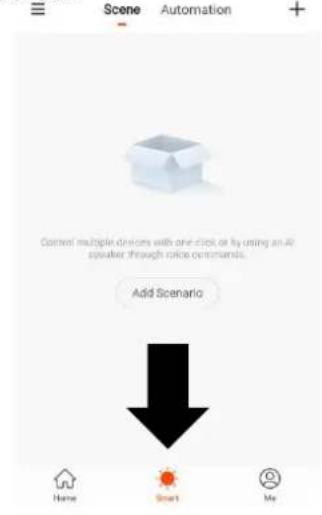 | 2. Press on the Automation tab at the top of the screen.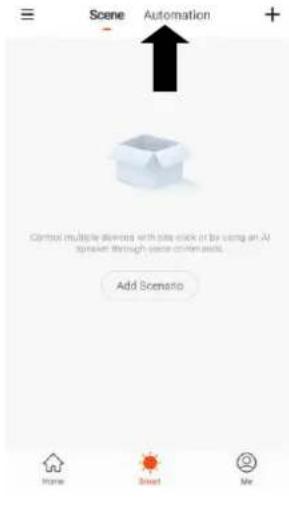 | 3. Press on the + at the top of the screen or press on Add Automatic Action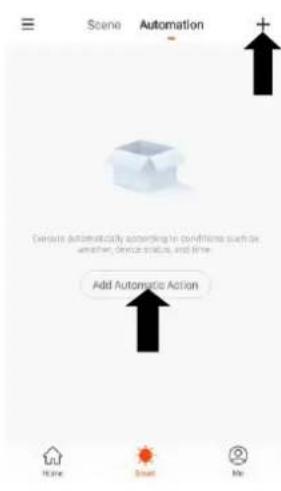 |
| ← Select FunctionSwitch >Set Temperature >Mode >Child Lock >Swing > | 4. Setup is very similar to the scene setup on the previous page, and includes an extra section for specifying a trigger for the scene to start.Press the Pen next to “Please Enter Scene Name” to input the name for your ScenePress the Red Plus next to “When any condition is satisfied” to add the triggerPress the Red Plus next to “Execute following actions” to add the action required. Then select the heater from the list of devices. | 5. Select the condition when the automation should start. A number of triggers can be combined.← Select FunctionSwitch >Set Temperature >Mode >Child Lock >Swing >Countdown Timer > |
| 6. Chose the function, set the value for the function, and then press the back button in the top right corner, to return to the previous screen. | ← Select FunctionSet Humidity >Wind Speed >Lock >Shake > | 7. Once all the functions required have been added, press the Save button in the top right corner to finalize and save your new scene.The automation is now set up, it can be turned on and off using the toggle on the home page. |
3
PROFILE TAB
The profile tab gives you the option to edit both your detail, and use the added features of the unit.

Click here to set ni...
HOME MANAGEMENT

Home Management
Home Management proves options for managing your TUYA account, giving options such as adding a home, adding and removing rooms, and sharing devices with family.

Message Center
MESSAGE CENTRE

Help Center
View notifications from devices, if alarms are set up (dependent on device)

More Services
HELP CENTRE

Settings
Provides assistance using the features provided within the app

Home

Smart

Me
MORE SERVICES
This allows the unit to be integrated with your favorite home automation hardware such as Google Home and the Amazon Echo.
CONNECTION TROUBLESHOOTING
- Check whether the device is powered on and is in the correct Wi-Fi connection mode, if not please refer to the CHANGING BETWEEN CONNECTION MODES section.
- Ensure the Wi-Fi password has been entered into the app correctly (Case sensitive)
- Check that the phone is connected to the Wi-Fi you are connecting the device to.
- Ensure the network you are connecting it to is 2.4Ghz (5Ghz Wi-Fi networks are not supported), and that there is a strong Wi-Fi signal to the item.
- If your router is dual band, ensure that the 2.4ghz network has a different network name (SSID). Further advice on changing router settings will be available from your Internet service provider / Router manufacturer.
- Check the settings on the router. Encryption should be WPA2-PSK and authorisation type should be set to AES
- Try using the alternative connection method. i.e. If connection is failing when attempting to connect through CF mode, try AP mode.
MAINTENANCE
CLEANING AND STORAGE
ATTENTION: Please shut off the unit and unplug from the mains before cleaning or performing any maintenance.
CLEANING THE SURFACE
- Clean the heater with a duster or a soft wet cloth.
Do not use chemical solvents (such as benzene, alcohol or gasoline) as they may cause irreversible damage. Make sure no water enters the control panel or gaps in the casing. - Do not run the unit until completely dry.
- Place the heater in its original box or cover to protect it from dust when not in use.
- Store it in a cool dry place.
TROUBLESHOOTING
Do not repair or disassemble the unit by yourself, unauthorized repair attempts will invalidate the warranty and may cause bodily harm.
| Issue | Possible Reason | Solution |
| No power | Power cord is unconnectedThere is no power from socketThe power switch on the rear of the unit is turned off. | Connect the power cordCheck socket is turned onEnsure the power switch on the rear of the unit is in the on position |
| Odour emission from unit | New unit. When the unit is used for the first time the fan motor may produce and odour which will dissipate within a week of use | No action required |
| Strong vibrations and noise | Unit is not placed on a flat surfaceUnit may be damaged | Place on a flat surface. May put an anti-vibration mat underneathIf the heater is damaged discontinue use and contact the service centre. |
If the above solutions do not resolve the problem please contact the service centre.
Disposal: Do not dispose this product as unsorted municipal waste. Collection of such waste must be handled separately as special treatment is necessary.

Recycling facilities are now available for all customers at which you can deposit your old electrical products. Customers will be able to take any old electrical equipment to participating civic amenity sites run by their local councils. Please remember that this equipment will be further handled during the recycling process, so please be considerate when depositing your equipment. Please contact the local council for details of your local household waste recycling centres.
TECHNICAL SPECIFICATION
| Model | DragonPlus7-1.5W(B) | DragonPlus9-2.0W(B) | DragonPlus11-2.5W(B) |
| Voltage | 220V-240V | 220V-240V | 220V-240V |
| Frequency | 50Hz | 50Hz | 50Hz |
| Minimum heating capacity (indicative) | 0.6kW | 0.8kW | 1.0kW |
| Maximum continuous thermal power | 1.5 kW | 2.0kW | 2.5kW |
DECLARATION OF CONFORMITY
Hereby, electriQ declares that this heater is in compliance with Directive 2014/53/EU. The full text of the EU declaration of conformity is available at the following internet address:
https://www.electriQ.co.uk/content/declaration-of-conformity
electriQ UK SUPPORT
www.electriQ.co.uk/support
Please, for your own convenience, make these simple checks before calling the service line.
If the unit still fails to operate call: 0871 620 1057 or complete the online form
- Is the unit plugged into the mains?
- Is the fuse OK?
- Switch the unit off and wait three minutes to see if the issue is resolved. Restart the unit.
Office hours: 9AM - 5PM Monday to Friday
www.electriQ.co.uk
Unit J6, Lowfields Business Park
Lowfields Way, Elland West Yorkshire, HX5 9DA
PRODUCT FICHE
| Model Identifier: DragonPlus7-1.5W / DragonPlus7-1.5WB | ||||||
| Item | Symbol | Value | Unit | Item | Unit | |
| Heat Output | Type of heat input, for electric storage local space heaters only (select one) | |||||
| Nominal heat output | P_nom | 1.5 | kW | manual heat charge control, with integrated thermostat | No | |
| Minimal heat output | P_min | 0.6 | kW | manual heat charge control with room and/or outdoor temperature feedback | No | |
| Maximum continuous heat output | P_max | 1.5 | kW | electronic heat charge control with room and/or outdoor temperature feedback | No | |
| Auxiliary electricity consumption | fan assisted heat output | No | ||||
| At nominal heat output | el_max | N/A | kW | Type of heat output/room temperature control (select one) | ||
| At minimum heat output | el_min | N/A | kW | single stage heat output and no room temperature control | No | |
| In standby mode | el_SB | 0 | W | two or more manual stages, no room temperature control | No | |
| with mechanical thermostat room temperature control | No | |||||
| with electronic room temperature control | Yes | |||||
| with electronic room temperature control plus day timer | No | |||||
| with electronic room temperature control plus week timer | No | |||||
| Other control options (multiple selections possible) | ||||||
| room temperature control with presence detection | No | |||||
| room temperature control, with open window detection | Yes | |||||
| with distance control option | No | |||||
| with adaptive start control | No | |||||
| with working time limitation | No | |||||
| with black bulb sensor | No | |||||
| Contact Details | electriQ, Unit J6, Lowfields Business Park, Lowfields Way, Elland, West Yorkshire, HX5 9DA | |||||
| Model Identifier: DragonPlus9-2.0W / DragonPlus9-2.0WB | ||||||
| Item | Symbol | Value | Unit | Item | Unit | |
| Heat Output | Type of heat input, for electric storage local space heaters only (select one) | |||||
| Nominal heat output | P_nom | 2.0 | kW | manual heat charge control, with integrated thermostat | No | |
| Minimal heat output | P_min | 0.8 | kW | manual heat charge control with room and/or outdoor temperature feedback | No | |
| Maximum continuous heat output | P_max | 2.0 | kW | electronic heat charge control with room and/or outdoor temperature feedback | No | |
| Auxiliary electricity consumption | fan assisted heat output | No | ||||
| At nominal heat output | el_max | N/A | kW | Type of heat output/room temperature control (select one) | ||
| At minimum heat output | el_min | N/A | kW | single stage heat output and no room temperature control | No | |
| In standby mode | els_B | 0 | W | two or more manual stages, no room temperature control | No | |
| with mechanical thermostat room temperature control | No | |||||
| with electronic room temperature control | Yes | |||||
| with electronic room temperature control plus day timer | No | |||||
| with electronic room temperature control plus week timer | No | |||||
| Other control options (multiple selections possible) | ||||||
| room temperature control with presence detection | No | |||||
| room temperature control, with open window detection | Yes | |||||
| with distance control option | No | |||||
| with adaptive start control | No | |||||
| with working time limitation | No | |||||
| with black bulb sensor | No | |||||
| Contact Details | electriQ, Unit J6, Lowfields Business Park, Lowfields Way, Elland, West Yorkshire, HX5 9DA | |||||
| Model Identifier: DragonPlus11-2.5W / DragonPlus11-2.5WB | ||||||
| Item | Symbol | Value | Unit | Item | Unit | |
| Heat Output | Type of heat input, for electric storage local space heaters only (select one) | |||||
| Nominal heat output | P_nom | 2.5 | kW | manual heat charge control, with integrated thermostat | No | |
| Minimal heat output | P_min | 1.0 | kW | manual heat charge control with room and/or outdoor temperature feedback | No | |
| Maximum continuous heat output | P_max | 2.5 | kW | electronic heat charge control with room and/or outdoor temperature feedback | No | |
| Auxiliary electricity consumption | fan assisted heat output | No | ||||
| At nominal heat output | el_max | N/A | kW | Type of heat output/room temperature control (select one) | ||
| At minimum heat output | el_min | N/A | kW | single stage heat output and no room temperature control | No | |
| In standby mode | elsB | 0 | W | two or more manual stages, no room temperature control | No | |
| with mechanical thermostat room temperature control | No | |||||
| with electronic room temperature control | Yes | |||||
| with electronic room temperature control plus day timer | No | |||||
| with electronic room temperature control plus week timer | No | |||||
| Other control options (multiple selections possible) | ||||||
| room temperature control with presence detection | No | |||||
| room temperature control, with open window detection | Yes | |||||
| with distance control option | No | |||||
| with adaptive start control | No | |||||
| with working time limitation | No | |||||
| with black bulb sensor | No | |||||
| Contact Details | electriQ, Unit J6, Lowfields Business Park, Lowfields Way, Elland, West Yorkshire, HX5 9DA | |||||
- OIL FILLED RADIATOR
- CONTENTS
- SAFETY INSTRUCTIONS IMPORTANT
- ENERGY SAVING AND UNIT SAFETY PROTECTION TIPS
- PRODUCT OVERVIEW
- ACCESSORIES
- ASSEMBLY INSTRUCTIONS
- POSITIONING THE HEATER
- CONNECTING THE HEATER
- DISPLAY SCREEN
- CONTROL PANEL
- REMOTE CONTROL
- OPERATION
- Turning ON/OFF
- SELECTING A POWER LEVEL
- SETTING THE TEMPERATURE
- TIMER BUTTON
- MODES AVAILABLE FOR SETUP
- CHANGING BETWEEN CONNECTION TYPES
- TURNING WIFI OFF
- TURNING WIFI ON
- CONNECTING THE APPLIANCE TO WIFI
- DOWNLOAD THE APP TO YOUR PHONE
- REGISTER THE APP
- Privacy Policy of Tuya Smart Platform
- Verification Code
- Set Password
- SETTING UP YOUR HOME WITHIN THE APP
- CREATING ROOMS
- ADD ANOTHER ROOM
- CONNECTING USING THE QUICK CONNECTION METHOD
- CONNECTING USING APP MODE ALTERNATIVE METHOD
- CONTROLLING YOUR APPLIANCE THROUGH THE APP THE HOME SCREEN
- DEVICE SCREEN
- SMART SCENES
- SCENE
- AUTOMATION
- PROFILE TAB
- Click here to set ni...
- HOME MANAGEMENT
- MESSAGE CENTRE
- HELP CENTRE
- MORE SERVICES
- CONNECTION TROUBLESHOOTING
- MAINTENANCE
- CLEANING AND STORAGE
- CLEANING THE SURFACE
- TROUBLESHOOTING
- TECHNICAL SPECIFICATION
- DECLARATION OF CONFORMITY
- electriQ UK SUPPORT
- PRODUCT FICHE
Brand : ElectriQ
Model : DragonPlus11-2.5W
Category : Heating