
CRUX006 - Coffee maker CRUX - Free user manual and instructions
Find the device manual for free CRUX006 CRUX in PDF.


| Product Type | 15 Bar Pump Espresso Maker |
| Brand | CRUX |
| Model | CRUX006 |
| Power Supply | 120V AC, 60Hz, ~1100W |
| Pump Pressure | 15 bar |
| Water Tank Capacity | Removable, approx. 1.2 L (fill to MAX line) |
| Warming Plate | Yes, on top of unit |
| Steam Wand | Swivel, with removable frothing tip |
| Drip Tray | Removable with cover |
| Filter Holder | 2-spout brew head, lockable |
| Included Filter Baskets | 1 cup and 2 cup baskets |
| Measuring Spoon/Tamp | Included, dual-purpose |
| Controls | ON/OFF button, ESPRESSO/STEAM button, Function Control Knob (OFF/ESPRESSO/STEAM) |
| Indicator Lights | Red HEATING, White READY |
| Safety Features | Auto shut-off, grounded 3-prong plug, overheat protection |
| Material | Stainless steel and plastic |
| Color | Silver/Black |
| Warranty | Limited 2 years (mechanical parts), 90 days (non-mechanical) |
| Descaling Frequency | Monthly; every 2 weeks in hard water areas |
| Recommended Coffee Grind | Medium to fine (espresso) |
Frequently Asked Questions - CRUX006 CRUX
User questions about CRUX006 CRUX
0 question about this device. Answer the ones you know or ask your own.
Ask a new question about this device
Download the instructions for your Coffee maker in PDF format for free! Find your manual CRUX006 - CRUX and take your electronic device back in hand. On this page are published all the documents necessary for the use of your device. CRUX006 by CRUX.
USER MANUAL CRUX006 CRUX
Styled for Life Designed & Engineered in New York City
Table of Contents
Important Safeguards....2
Additional Important Safeguards....4
Notes on the Cord 6
Notes on the Plug 6
Plasticizer Warning....6
Electric Power....6
Guide to the Perfect Espresso 7
Getting to Know Your CRUX 15 Bar Pump Espresso Maker ....8
Before Using for the First Time....10
Brewing Fresh Espresso....11
Frothing Milk 13
User Maintenance Instructions....15
Care & Cleaning Instructions 15
Descaling 16
Storing Instructions....17
Recipes 18
Troubleshooting....23
Warranty 24-25
IMPORTANT SAFEGUARDS
When using electrical appliances, basic safety precautions should always be followed including the following:
1. READ ALL INSTRUCTIONS.
- Do not touch hot surface. Use handles or knobs only.
- This appliance is not intended for use by persons (including children) with reduced physical, sensory or mental capabilities, or lack of experience and knowledge, unless they have been given supervision or instruction concerning use of the appliance by a person responsible for their safety.
- Close supervision is necessary when any appliance is used by or near children.
- In order to minimize the risk of property damage, never place the Espresso Maker under cabinets. Make sure the area several feet above the Espresso Maker is clear from all furniture or cabinetry.
- Do not open the water tank top lid while coffee is brewing. Scalding may occur if the cover is lifted or removed during the brewing cycle.
- Do not use outdoors.
- Unplug unit from outlet when not in use and before cleaning. Allow unit to cool before putting on or taking off parts, and before cleaning.
-
To protect against fire, electrical shock, do not immerse cord, plugs, or appliance in water or other liquids.
-
Do not operate any appliance with a damaged cord or plug, or after the appliance malfunctions, or has been damaged in any manner. Return appliance to the nearest authorized service facility for examination, repair or adjustment.
NOTE: DO NOT ATTEMPT TO REPAIR THE UNIT YOURSELF. THIS WILL VOID THE WARRANTY.
- The use of accessory attachments not recommended by the appliance manufacturer may result in fire, electric shock or injury to persons.
- Never move the appliance by pulling the cord. Do not let the cord hang over the edge of a table or counter or touch hot surfaces.
- Stand the appliance on a table or flat surface.
- Never use your Espresso Maker without water in it.
- Do not place appliance on or near a hot gas or electric burner or in a heated oven.
- Press the ON/OFF button on the side of the unit to turn the appliance OFF. Unplug the power cord from the electrical outlet when the appliance is not in use, left unattended, or when the carafe is empty.
- Do not use this appliance for other than its intended use.
- To reduce the risk of fire, do not mount unit over or near any portion of a heating or cooking appliance.
- To reduce the risk of electric shock, do not mount over a sink.
- To reduce the risk of fire, do not store anything directly on top of the appliance surface when the appliance is in operation.
ADDITIONAL IMPORTANT SAFEGUARDS
WARNING: This appliance generates heat and escaping steam during use. Proper precautions must be taken to prevent the risk of burns, fires, or other injury to persons or damage to property.
- All users of this appliance must read and understand this Instruction Manual before operating or cleaning this appliance.
- The cord to this appliance should be plugged into a 120V AC electrical outlet only.
- Use water only in this appliance! Do not put any other liquids or food products in this appliance. Do not mix or add anything to the water placed in this appliance, except as instructed in the User Maintenance Instructions to clean the appliance.
- DO NOT attempt to move an appliance containing hot liquids. Allow appliance to cool completely before moving.
-
Keep appliance at least 4 inches away from walls or other objects during operation. Do not place any objects on top of appliance while it is operating. Place the appliance on a surface that is resistant to heat.
-
If this appliance begins to malfunction during use, immediately unplug the cord. Do not use or attempt to repair the malfunctioning appliance.
- If this appliance falls or accidentally becomes immersed in water or any other liquid, unplug it immediately. Do not reach into the water! Do not use this appliance after it has fallen into or has become immersed in water.
- The appliance must be left to cool down sufficiently before adding more water to avoid exposure to steam.
- Always use fresh, cool water in your appliance. Warm water or other liquids, except as listed in cleaning section, may cause damage to the appliance.
SAVE THESE INSTRUCTIONS
NOTES ON THE CORD
The provided short power-supply cord should be used to reduce the risk resulting from becoming entangled in or tripping over a longer cord. Do not use an extension cord with this product. Always plug directly into a wall outlet/receptacle.
NOTES ON THE PLUG
This appliance has a grounded 3-prong plug. Connect to a properly grounded outlet only. If the plug does not fit fully into the outlet, contact a qualified electrician. Do not attempt to modify the plug in any way.
PLASTICIZER WARNING
CAUTION: To prevent Plasticizers from migrating to the finish of the counter top or table top or other furniture, place NON-PLASTIC coasters or place mats between the appliance and the finish of the counter top or table top. Failure to do so may cause the finish to darken; permanent blemishes may occur or stains can appear.
ELECTRIC POWER
If the electrical circuit is overloaded with other appliances, your appliance may not operate properly. It should be operated on a separate electrical circuit from other appliances.
Guide to the Perfect Espresso
Water
- Make sure to use clean, cold water when filling the removable water tank.
Water Flow
- If you are making an espresso, ensure that the water flows through the espresso filter at the correct speed. If it is too slow, the espresso will be over extracted – too dark and bitter, with a blotchy and uneven crema on top. If it flows too quickly, the espresso will be under-extracted – the proper flavor won't have had time to develop and there may not be a crema or it will be thin and only around the edges.
- You can alter the water flow by adjusting the strength of your tamp or by changing the coarseness of your grind. If the flow is too fast, press down firmly, or choose a finer grind. If the flow is too slow, ease the pressure of your tamp or choose a coarser grind.
Coffee
- Grinding beans just before use will generate the optimum flavor. They can keep for a very long time provided they are stored in an airtight container kept out of sunlight, in a cool, dry spot.
Grind
- If using pre-ground espresso, make sure that you select a grind specifically for espresso/cappuccino machines.
- If grinding the beans at home, make sure that you select a fine espresso grind.
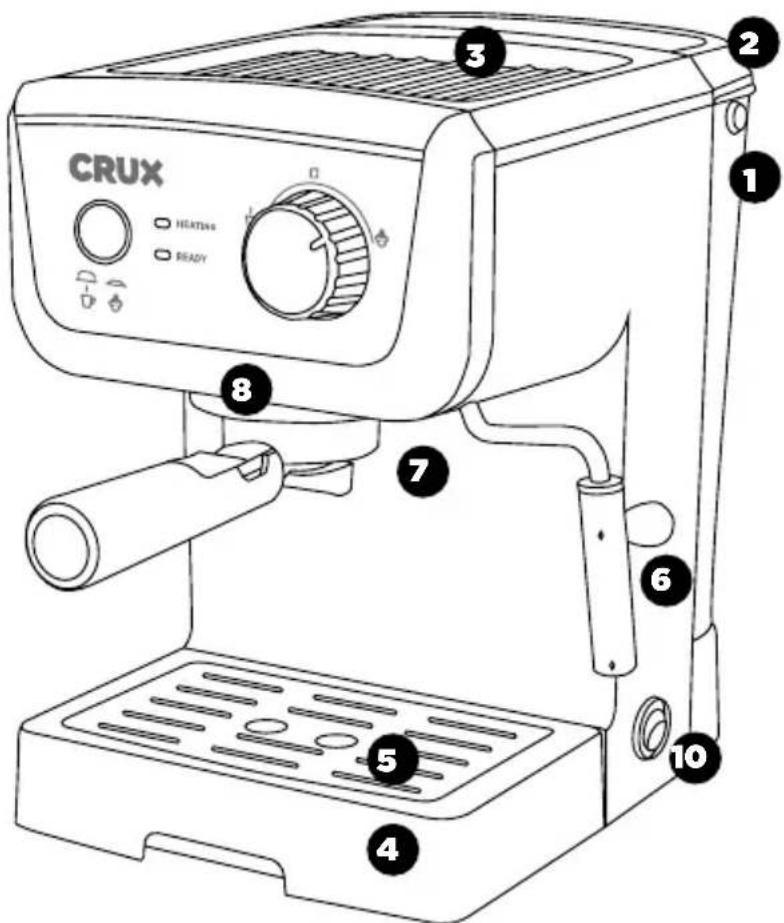
Fig. 1
Getting To Know Your 15-Bar Pump Espresso Maker
Product may vary slightly from illustration
- Removable
Water Tank - Water Tank Handle
- Warming Plate
-
Removable Drip Tray
-
Removable Drip Tray Cover
-
Steam Wand with removable Frothing Tip
-
Filter Holder
- Brew Head
- ON/OFF Button

Fig. 1a
Control Panel
- ESPRESSO/STEAM Button
-
Function Control Knob
-
STEAM position
- OFF position
-
ESPRESSO position
-
Red HEATING Indicator Light
- White READY Indicator Light
Fig. 2

natural_image
Simple line drawing of a bowl with a circular badge labeled '1' above it (no text or symbols on the bowl itself)
natural_image
Simple line drawing of a bowl with a black dot above it and 'MAX' text on the lid (no other text or symbols)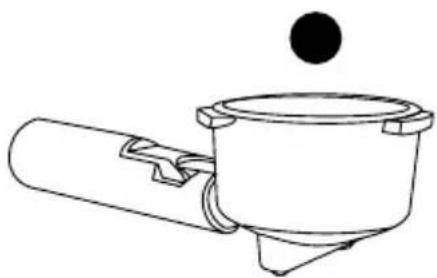
natural_image
Simple line drawing of a mechanical component with a black dot above it (no text or symbols)
Accessories
-
1 Cup Filter Basket
-
2 Cup Filter Basket
-
Filter Holder with 2-Spout Brew Head
-
Measuring Spoon/Coffee Tamp
Before Using for the First Time
- Before brewing your first cup of espresso, we suggest you pre-clean the machine and prime the pump. Place the Espresso Maker on a level surface.
- Make sure the Espresso Maker is turned to the OFF position.
- Grasp the water tank handle at the back of the Espresso Maker and lift it up and off the unit. (See Figure 3.)
- Fill the water tank to the MAX indicator line.
NOTE: Never fill the water tank past the MAX indicator line. Ensure water level is above the MIN indicator line.
WARNING: Never operate the Espresso Maker without water in the tank.
-
Replace the water tank to its original position. Fold the lid and then the handle back over the water tank.
-
Place an empty (do not add coffee) 2-cup filter basket into the filter holder. Insert and lock into the Espresso Maker following the detailed description in the section: Brewing Fresh Espresso.
-
Place a wide-mouth spouted container or cup under the 2-spout brew head.
-
Plug the unit into a 120V AC electrical outlet.
-
Brew 2 containers of water without coffee grounds, following the procedures outlined in the Brewing Fresh Espresso section of this instruction manual. This will thoroughly clean the unit.
-
Empty the container or cup and the water collected in the drip tray. You are now ready to brew a delicious cup of fresh espresso.

Pre-Warming Cups
For the optimal espresso temperature, it is recommended to warm the espresso cups. Simply place them on the warming plate on top of the unit when the machine is in use.
Brewing Fresh Espresso
- Press the ESPRESSO/STEAM button to the highest ESPRESSO position ( )
- Make sure the I/O button is in the OFF position (O) and the function control knob is in the OFF (☐) position. Plug the Espresso Maker into a 120V AC electrical outlet. All indicator lights should be OFF.
- Grasp the water tank handle at the back of the Espresso Maker and lift it up and off the unit. (See Figure 3.)
- Fill the water tank with cold water. Never fill the water tank past the MAX indicator line. Ensure water level is above the MIN indicator line.
- Replace the water tank to its original position.
- If the filter holder is locked into the Espresso Maker, grasp the handle firmly and turn it to the left until the handle faces the ▲ position to remove. The filter holder handle will drop down and out of the Espresso Maker.
- Place the 1 or 2 cup filter into the filter holder depending on how many shots of espresso you would like.

- To change or remove filter basket, line the notch in the filter holder with the indicator on the 1 or 2 cup filter basket. (See Figure 4.) Pull basket up and out of the filter holder.
- Use the measuring spoon to measure ground espresso coffee and add to the filter basket. (See Figure 5.) Use the flat side of the measuring spoon to gently tamp the coffee and pack it. Wipe any loose coffee grounds from the rim of the filter holder to assure a proper fit into the Espresso Maker.
FOR BEST RESULTS: Use freshly ground MEDIUM to FINE (espresso) coffee.
8. Place the filter holder underneath the brew head so that the filter holder handle is aligned with ▲ (See Figure 6.)
9. Turn handle to the right until the filter holder handle is facing front and lined up with the LOCK (💡) and it is securely locked. (See Figure 7.)
Fig. 6


- Place 1 or 2 espresso cups under the 2-spout brewing head.
- Press the ON/OFF (I/O) button. The red HEATING indicator light will illuminate.
- Make sure the ESPRESSO/STEAM button is in the highest ESPRESSO position (☐).
- After approximately 2 minutes, the white READY light will illuminate. Turn the function control knob to the Espresso position (☐) and 2 spouts of espresso will begin to flow into the cup or cups
NOTE: To prepare cappuccino, refer immediately to the Frothing Milk section in this instruction manual.
CAUTION: To avoid scalding or burns, do not remove the filter holder handle during the brewing process, or when either the red HEATING or white READY indicator light is illuminated.
- When the desired amount of espresso coffee has been brewed, turn the function control knob to the OFF position (☐). Coffee will cease dripping after several seconds.
- Before removing the filter holder press the ON/OFF (I/O) button to OFF (O).
CAUTION: Make sure to turn the machine OFF when not in use, as this Espresso Maker will continue to heat water under pressure until the water tank is empty
Frothing Milk
REMINDER: To avoid splattering and causing large, aerated bubbles, the frothing tip must remain just under the surface of the milk.
IMPORTANT: When frothing milk, the volume of milk will double. The top portion will be foam and the bottom portion will be milk.
- Press the ESPRESSO/STEAM button to the lowest STEAM position ( ◆).
- Make sure the water level in the water tank is above the MIN indicator line
- Fill a short, wide metal pitcher or tall cup half full with fresh, cold milk and place it next to the Espresso Maker.
- Swing the steam wand to the side of the Espresso Maker. (See Figure 8.)
- Press the ON/OFF (I/O) button if the unit is not already ON. The red HEATING indicator light will illuminate.
- Make sure the ESPRESSO/STEAM button is in the lowest STEAM position (💡).
- After approximately 2 minutes the white READY light will illuminate.
- Place the pitcher under the steam wand. The tip of the steam wand should be just below the surface of the milk. Turn the function control knob to the STEAM position (💡).
Fig. 8


natural_image
Line drawing of a CRUX washing machine with a cup holding a glass (no text or symbols)- Angle the metal pitcher or cup so that the tip of the steam wand is sitting right below the surface of the milk. This will cause the milk to begin to create a whirlpool affect.
- Then fully submerge the steam wand into the milk to continue to heat it up.
- Once the pitcher or cup has fully heated, turn the function control knob to the OFF position (☐).
- Remove the pitcher from the steam jet.
- Let the milk rest.
- Wipe the steam wand with a damp cloth to clean.
- Swing the steam wand so that it is facing towards the drip tray. Turn the function control knob to the STEAM position (💡) once more. Let the steam run until a small amount of water has run through the unit to fully clean out the steam wand of any excess milk.
NOTE: If you want to brew Espresso straight after frothing milk, make sure the ESPRESSO/STEAM button is in the highest ESPRESSO position (💡). Turn the function control knob to the Espresso position (💡) to run a small amount of water through the Brew Head for a few seconds without the Filter Holder in place until the white READY light turns off. This will prepare the system for optimal brewing temperature. Then follow the Brewing Fresh Espresso instructions.
Having the ESPRESSO/STEAM button in the lowest STEAM position (💡) when brewing Espresso could result in a burned coffee taste because of the required higher temperature for steam.
User Maintenance Instructions
This appliance requires little maintenance. It contains no user-serviceable parts. Any servicing requiring disassembly other than cleaning must be performed by a qualified appliance repair technician.
Care & Cleaning Instructions
- Always make sure Espresso Maker is unplugged and allow to cool before attempting to clean. To avoid burns on fingers or hands, always make sure the POWER light is off. NEVER touch the filter basket holder or steam wand immediately after brewing or steaming. Allow all parts to cool thoroughly before touching.
- To protect against electrical shock, do not immerse cord, plug or unit in water or other liquid.
- After every use, remove the filter holder and filter basket, discard used coffee grounds.
- Wash the filter holder and filter basket in hot, sudsy water. The stainless steel filters and filter holder should be rinsed under water immediately after use to remove all coffee particles.
- If necessary, clean the filter basket with a kitchen brush. A pin may be used to clear clogged holes of either filter basket or the steam wand. Dry thoroughly.
- The inside of the brew head should be wiped with a damp cloth to remove any coffee particles
- Remove the drip tray cover. Empty water or coffee from drip tray. Dry with a clean cloth.
- Wipe the exterior of the Espresso Maker with a damp cloth to remove superficial stains. For stubborn stains, use a nylon or plastic pad with a non-abrasive cleanser. Do not use metal scouring pads or abrasive cleansers.
- Dry and replace disassembled parts.
Descaling
Special cleaning of your Espresso Maker is recommended at least once a month, depending on frequency of use and quality of water used in the unit. If water in your area is especially hard, the following cleaning procedure should be performed every 2 weeks, since minerals in water can detract from the flavor of the coffee and possibly lengthen brew time.
- Before cleaning your Espresso Maker, make sure the function control knob is on the OFF position (☐) and the appliance has been disconnected from the wall outlet.
- Fill the water tank with 1 part white vinegar to 3 parts cold water.
- Attach empty coffee filter basket and holder.
- Place a large container under both the Group Head and the Steam Wand.
- Plug the Espresso Maker into 120V AC electrical outlet. Make sure the ESPRESSO/STEAM button is on the higher ESPRESSO position (☐).
- Press the ON/OFF (I/O) button if the unit is not already ON. The red HEATING indicator light will illuminate.
- When the white READY indicator light turns on, turn the function control knob to the ESPRESSO position (☐) and let half the mixture of white vinegar and water run through the Group Head, then turn the function control knob to the OFF position (☐).8. Press the ESPRESSO/STEAM button to the lowest STEAM position (☐). When the white READY indicator light turns on, move the function control knob to the STEAM position (☐) and allow the remaining liquid to run through the Steam Wand to clean any residue left in the tube from the milk steaming process, then turn the function control knob to the OFF position (☐).
- After decalcifying, remove the water tank and rinse thoroughly then re-fill with fresh cold water.
- Repeat above steps 2 or 3 times using cold water to rinse any residual vinegar.
- Unplug the Espresso Maker from the wall outlet.
Storing Instructions
- Unplug unit and allow to cool.
- Store Coffee Maker in its box or in a cool, dry place.
- Never store unit while it is still plugged in.
Recipes
Cappuccino
Makes 1 serving (3.5 oz)
- 2 ounces milk
- 1 measured scoop of finely ground espresso or 1 espresso pod
• Cinnamon (optional)
Make sure the I/O button is in the OFF position (O) and the function control knob is in the OFF position (☐). Plug the Espresso Maker into a 120V AC electrical outlet. All indicator lights should be OFF. Grasp the water tank handle at the back of the Espresso Maker and lift it up and off the unit. Fill the water tank with cold water and replace it to its original position. Place the 1 cup filter into the filter holder. Use the measuring spoon to measure 1 scoop of ground espresso coffee and add to the filter basket. Use the flat side of the measuring spoon to gently tamp the coffee and pack it. Wipe any loose coffee grounds from the rim of the filter holder to assure a proper fit into the Espresso Maker. Place the filter holder underneath the brew head. Turn handle into locked position.
Place an espresso cup under the brewing head. Press the ON/OFF (I/O) button to the ON (I) position. The red HEATING indicator light will illuminate. Press the ESPRESSO/STEAM button to the highest ESPRESSO position (☐).
Wait until the white READY light illuminates. Turn the function control knob to the ESPRESSO position ( ^1 ) and 2 spouts of espresso will begin to flow into the cup. When the desired amount of espresso coffee has been brewed, or if water has stopped flowing, turn the function control knob to the OFF position ( ^2 )
Fill a short, wide metal pitcher or tall cup with 2 ounces of fresh, cold milk. Swing the steam wand to the side of the Espresso Maker. Press the ESPRESSO/STEAM button to the lowest STEAM position (💡). After approximately 2 minutes the white READY light will illuminate. Place the pitcher under the steam wand. The steam wand should be submerged in the milk. Turn the function control knob to the STEAM (💡 position.
Move the pitcher in a slightly circular motion to froth the milk. After frothing, remove the pitcher from the steam jet. Spoon 2-3 tablespoons of steamed milk on top of the espresso.
Sprinkle cinnamon on top as desired.
Enjoy
Café Latte
Makes 1 serving (5.5 oz)
- 4 ounces milk
- 2 measured scoop of finely ground espresso or 1 espresso pod
Make sure the I/O button is in the OFF position (O) and the function control knob is in the OFF position (☐). Plug the Espresso Maker into a 120V AC electrical outlet. All indicator lights should be OFF. Grasp the water tank handle at the back of the Espresso Maker and lift it up and off the unit. Fill the water tank with cold water and replace it to its original position. Place the 1 cup filter into the filter holder. Use the measuring spoon to measure 1 scoop of ground espresso coffee and add to the filter basket. Use the flat side of the measuring spoon to gently tamp the coffee and pack it. Wipe any loose coffee grounds from the rim of the filter holder to assure a proper fit into the Espresso Maker. Place the filter holder underneath the brew head. Turn handle into locked position.
Place an espresso cup under the brewing head. Press the ON/OFF (I/O) button to the ON (I) position. The red HEATING indicator light will illuminate. Press the ESPRESSO/STEAM button to the highest ESPRESSO position (☐).
Wait until the white READY light illuminates. Turn the function control knob to the ESPRESSO position (☐) and 2 spouts of espresso will begin to flow into the cup. When the desired amount of espresso coffee has been brewed, or if water has stopped flowing, turn the function control knob to the OFF position (☐)
Fill a short, wide metal pitcher or tall cup with 2 ounces of fresh, cold milk. Swing the steam wand to the side of the Espresso Maker. Press the ESPRESSO/STEAM button to the lowest STEAM position (💡). After approximately 2 minutes the white READY light will illuminate. Place the pitcher under the steam wand. The steam wand should be submerged in the milk. Turn the function control knob to the STEAM (💡 position.
Move the pitcher in a slightly circular motion to froth the milk. Remove the pitcher from the steam jet.
Pour all of the steamed milk into the cup with the brewed espresso. Spoon the foam on top. Sprinkle cinnamon
Enjoy
Affogato
Makes 2 servings
- 2 measured scoops of finely ground espresso or 2 espresso pods
• 2 scoops vanilla ice cream
Make sure the I/O button is in the OFF position (O) and the function control knob is in the OFF position (☐). Plug the Espresso Maker into a 120V AC electrical outlet. All indicator lights should be OFF. Grasp the water tank handle at the back of the Espresso Maker and lift it up and off the unit. Fill the water tank with cold water and replace it to its original position. Place the 1 cup filter into the filter holder. Use the measuring spoon to measure 1 scoop of ground espresso coffee and add to the filter basket. Use the flat side of the measuring spoon to gently tamp the coffee and pack it. Wipe any loose coffee grounds from the rim of the filter holder to assure a proper fit into the Espresso Maker. Place the filter holder underneath the brew head. Turn handle into locked position.
Place an espresso cup under the brewing head. Press the ON/OFF (I/O) button to the ON (I) position. The red HEATING indicator light will illuminate. Press the ESPRESSO/STEAM button to the highest ESPRESSO position (☐).
Wait until the white READY light illuminates. Turn the function control knob to the ESPRESSO position (☐) and 2 spouts of espresso will begin to flow into the cup. When the desired amount of espresso coffee has been brewed, or if water has stopped flowing, turn the function control knob to the OFF position (☐)
Add one scoop of vanilla ice cream to 2 bowls.
Top with brewed espresso.
Enjoy
Frozen Cappuccino
Makes 1 serving
• 1.5 - 2 cups crushed ice
- 1 measured scoop of finely ground espresso or 1 espresso pod
• 1/3 cup fat free sweetened condensed milk
Make sure the I/O button is in the OFF position (O) and the function control knob is in the OFF position (☐). Plug the Espresso Maker into a 120V AC electrical outlet. All indicator lights should be OFF. Grasp the water tank handle at the back of the Espresso Maker and lift it up and off the unit. Fill the water tank with cold water and replace it to its original position. Place the 1 cup filter into the filter holder. Use the measuring spoon to measure 1 scoop of ground espresso coffee and add to the filter basket. Use the flat side of the measuring spoon to gently tamp the coffee and pack it. Wipe any loose coffee grounds from the rim of the filter holder to assure a proper fit into the Espresso Maker. Place the filter holder underneath the brew head. Turn handle into locked position.
Place an espresso cup under the brewing head. Press the ON/OFF (I/O) button to the ON (I) position. The red HEATING indicator light will illuminate. Press the ESPRESSO/STEAM button to the highest ESPRESSO position (☐).
Wait until the white READY light illuminates. Turn the function control knob to the ESPRESSO position ( ☐ ) and 2 spouts of espresso will begin to flow into the cup. When the desired amount of espresso coffee has been brewed, or if water has stopped flowing, turn the function control knob to the OFF position ( ☐ )
Place the remainder of the ingredients into a cup along with the brewed espresso. Stir to combine.
Enjoy
Mocha
Makes 1 serving
- 1 measured scoop of finely ground espresso or 1 espresso pod
- 4 ounces milk
• 1-2 tablespoons of hot chocolate mix - Whipped cream (optional)
• Cocoa powder for dusting (optional)
Make sure the I/O button is in the OFF position (O) and the function control knob is in the OFF position (☐). Plug the Espresso Maker into a 120V AC electrical outlet. All indicator lights should be OFF. Grasp the water tank handle at the back of the Espresso Maker and lift it up and off the unit. Fill the water tank with cold water and replace it to its original position. Place the 1 cup filter into the filter holder. Use the measuring spoon to measure 1 scoop of ground espresso coffee and add to the filter basket. Use the flat side of the measuring spoon to gently tamp the coffee and pack it. Wipe any loose coffee grounds from the rim of the filter holder to assure a proper fit into the Espresso Maker. Place the filter holder underneath the brew head. Turn handle into locked position.
Place an espresso cup under the brewing head. Press the ON/OFF (I/O) button to the ON (I) position. The red HEATING indicator light will illuminate. Press the ESPRESSO/STEAM button to the highest ESPRESSO position (☐).
Wait until the white READY light illuminates. Turn the function control knob to the ESPRESSO position ( ) and 2 spouts of espresso will begin to flow into the cup. When the desired amount of espresso coffee has been brewed, or if water has stopped flowing, turn the function control knob to the OFF position ( )
Fill a short, wide metal pitcher or tall cup with 2 ounces of fresh, cold milk. Swing the steam wand to the side of the Espresso Maker. Press the ESPRESSO/STEAM button to the lowest STEAM position (💡). After approximately 2 minutes the white READY light will illuminate. Place the pitcher under the steam wand. The steam wand should be submerged in the milk. Turn the function control knob to the STEAM (💡 position.
Move the pitcher in a slightly circular motion to froth the milk. After frothing, remove the pitcher from the steam jet. Pour all of the steamed milk into the cup with the brewed espresso. Add hot chocolate mix and stir to combine.
Top with whipped cream and sprinkle cocoa powder on top if desired. Enjoy
Troubleshooting
| PROBLEM | POSSIBLE CAUSES | SOLUTION |
| The machine does not turn on or coffee is brewed in drips only | · The machine is not turned On or plugged in.· Water tank is empty.· Function Control Knob is not on the ESPRESSO (☐) position.· Coffee grind is too fine or compressed too tight.· There is too much coffee in the filter.· The machine has scale build-up.· The filter in the filter holder is clogged. | · Connect the machine to the electrical network.· Refill the water tank with water.· Turn the Function Control Knob.· Use a coarser grind or do not compress too tight the coffee.· Reduce the quantity of coffee in the filter holder.· Descale the machine. (see page 16)· Clean the filter. (see page 15) |
| The pump is very noisy. | · Water tank is empty.· Water tank is not securely in place. | · Refill the water tank with water.· Press down firmly on the tank. |
| The coffee is too cold. | · The machine READY light was off while switching the selection knob to the ESPRESSO (☐) position.· The filter holder is not inserted during the preheating time.· The cups are cold. | · Wait until the READY light turns on.· Make sure the filter holder is in place during preheating time.· Preheat the cups with hot water or place them on the warming plate. |
| The coffee is brewed too fast, crema does not form. | · There is too little coffee in the Filter Holder.· The grind is too coarse.· There is not enough coffee in the filter. | · Add coffee.· Use a finer grind.· Add coffee in the filter. |
| The milk does not froth. It is not possible to prepare a cappuccino | · Not suitable milk: Powdered milk or low-fat milk has been used.· Dirty steam wand. | · Use only cold, whole milk.· Clean the steam wand by removing the cover. |
| Coffee flows out of the edges. | · The filter holder is incorrectly inserted in the brew head.· There are espresso grounds around the filter holder rim.· There is too much coffee in the filter holder. | · Insert the filter holder correctly. (see page 12)· Clean the rim of the filter holder.· Reduce the quantity of coffee using the measuring scoop. |
| The water tank leaks when it is carried | · The valve at the bottom of the tank is dirty or defective· The valve is blocked by scale. | · Wash the water tank and operate the valve at the bottom of the tank with your finger· Descale the machine (see page 16) |
Please contact the customer service for any problems not covered in the above table or when the suggested solutions do not solve the problem.
Limited Two-Year Warranty
SENSIO Inc. hereby warrants that for a period of TWO YEARS from the date of purchase, this product will be free from mechanical defects in material and workmanship, and for 90 days in respect to non-mechanical parts. At its sole discretion, SENSIO Inc. will either repair or replace the product found to be defective, or issue a refund on the product during the warranty period. The warranty is only valid for the original retail purchaser from the date of initial retail purchase and is not transferable. Keep the original sales receipt, as proof of purchase is required to obtain warranty validation. Retail stores selling this product do not have the right to alter, modify, or in any way revise the terms and conditions of the warranty.
Exclusions:
The warranty does not cover normal wear of parts or damage resulting from any of the following: negligent use of the product, use of improper voltage or current, improper routine maintenance, use contrary to the operating instructions, disassembly, repair, or alteration by anyone other than qualified SENSIO Inc. personnel. Also, the warranty does not cover Acts of God such as fire, floods, hurricanes, or tornadoes.
SENSIO Inc. shall not be liable for any incidental or consequential damages caused by the breach of any express or implied warranty.
Apart from the extent prohibited by applicable law, any implied warranty of merchantability or fitness for a particular purpose is limited in time to the duration of the warranty. Some states, provinces or jurisdictions do not allow the exclusion or limitation of incidental or consequential damages, or limitations on how long an implied warranty lasts, and therefore, the above exclusions or limitations may not apply to you. The warranty covers specific legal rights which may vary by state, province and/or jurisdiction.
How To Obtain Warranty Service:
You must contact Customer Service at our toll-free number: 1-866-832-4843. A Customer Service Representative will attempt to resolve warranty issues over the phone. If the Customer Service Representative is unable to resolve the problem, you will be provided with a case number and asked to return the product to SENSIO Inc. Attach a tag to the product that includes: your name, address, daytime contact telephone number, case number, and description of the problem.
Also, include a copy of the original sales receipt. Carefully package the tagged product with the sales receipt, and send it (with shipping and insurance prepaid) to SENSIO Inc.'s address. SENSIO Inc. shall bear no responsibility or liability for the returned product while in transit to SENSIO Inc.'s Customer Service Center.
CRUX
For customer service questions or comments
1-866-832-4843
cruxkitchen.com
crux.kitchen
CRUX is a registered trademark of Sensio Inc., Montréal, Canada H3B 3X9.

- Table of Contents
- IMPORTANT SAFEGUARDS
- READ ALL INSTRUCTIONS.
- NOTE: DO NOT ATTEMPT TO REPAIR THE UNIT YOURSELF. THIS WILL VOID THE WARRANTY.
- ADDITIONAL IMPORTANT SAFEGUARDS
- SAVE THESE INSTRUCTIONS
- NOTES ON THE CORD
- NOTES ON THE PLUG
- PLASTICIZER WARNING
- ELECTRIC POWER
- Guide to the Perfect Espresso
- Water
- Water Flow
- Coffee
- Grind
- Getting To Know Your 15-Bar Pump Espresso Maker
- Control Panel
- Accessories
- Before Using for the First Time
- Pre-Warming Cups
- Brewing Fresh Espresso
- Frothing Milk
- User Maintenance Instructions
- Care & Cleaning Instructions
- Descaling
- Storing Instructions
- Recipes
- Cappuccino
- Café Latte
- Affogato
- Frozen Cappuccino
- Mocha
- Limited Two-Year Warranty
- Exclusions:
- How To Obtain Warranty Service:
- CRUX
Brand : CRUX
Model : CRUX006
Category : Coffee maker