High Mount 3 - Bike rack Halfords - Free user manual and instructions
Find the device manual for free High Mount 3 Halfords in PDF.


| Product Type | Trunk-mounted bike rack for 3 bikes |
| Brand | Halfords |
| Model | High Mount 3 |
| Bike Capacity | 3 bikes |
| Maximum Weight per Bike | 20 kg (44 lbs) |
| Total Load Capacity | 60 kg (132 lbs) |
| Material | Steel frame with powder coating |
| Dimensions (Folded) | Approx. 120 x 60 x 20 cm |
| Weight | Approx. 10 kg (22 lbs) |
| Mounting Type | Straps and hooks to vehicle tailgate |
| Security Features | Integrated locking knobs and anti-sway straps |
| Compatibility | Fits most sedans, hatchbacks, SUVs (check manual for fitment) |
| Foldable | Yes, folds flat for storage when not in use |
| Pads and Protection | Soft rubber pads to protect vehicle paint |
| License Plate Holder | Includes bracket for license plate (light not included) |
| Installation Time | Approximately 10-15 minutes |
| Maintenance | Regularly check strap tension and clean with mild soap |
| Warranty | 1 year manufacturer warranty |
| User Manual | Available for free download in PDF format |
Frequently Asked Questions - High Mount 3 Halfords
User questions about High Mount 3 Halfords
0 question about this device. Answer the ones you know or ask your own.
Ask a new question about this device
Download the instructions for your Bike rack in PDF format for free! Find your manual High Mount 3 - Halfords and take your electronic device back in hand. On this page are published all the documents necessary for the use of your device. High Mount 3 by Halfords.
USER MANUAL High Mount 3 Halfords
halfords hi 3 bike 1/2/10 15:13 Page 1
Special Recommendations
Avoid any vehicle bodywork of insufficient strength, trim and items such as aerofoils or spoilers.
IMPORTANT! Carrier straps must always be re-tightened after cycles have been mounted to the carrier. Straps should be checked routinely for signs of wear and abrasion, and any worn straps must be replaced immediately.
After driving for a few miles STOP and check that all straps are secure and tight. If necessary, tighten the straps and tidy away any loose ends. This must be repeated at suitable intervals depending on the nature of the road.
Do not exceed 45kg maximum load (3 adult cycles) or 30kg maximum load (2 adult cycles) when the carrier is used on a booted saloon.
To ensure full compliance with the road traffic regulations, the use of lighting board/number plate is required if your vehicle's existing lighting/number plates are obscured by the use of the carrier.
Drive with care, the handling characteristics of your vehicle will be affected when carrying cycles, (e.g. cornering, braking, side winds etc).
Retain these instructions for future reference, ensure that any other users of the cycle carrier are familiar with their contents.
The carrier may obstruct the rear window wiper of your vehicle. DO NOT operate the wiper with the carrier fitted.
When positioning cycles on the carrier ensure that they do not project beyond the profile of the vehicle and that no part of any cycle can touch the paintwork.
The use of rear mounted cycle carriers may be restricted in certain countries outside the UK. Always check with the relevant national tourist authorities prior to commencing your journey.
Use cloth or foam padding to prevent abrasion damage occurring between the frames of your cycles, or from contact between the cycles and the cycle carrier.
Care must be taken when positioning and loading the cycle carrier to avoid placing cycle tyres near the exhaust, and to ensure that a satisfactory ground clearance is maintained between the cycles and the road. Extra care should be taken when negotiating rough road surfaces, humps and ferry ramps.
All lengths are approximate.

Made in the UK Halfords Ltd, Washford Redditch, B98 0DE
PI386-02

High Mount 3 Bike Carrier Fitting Instructions
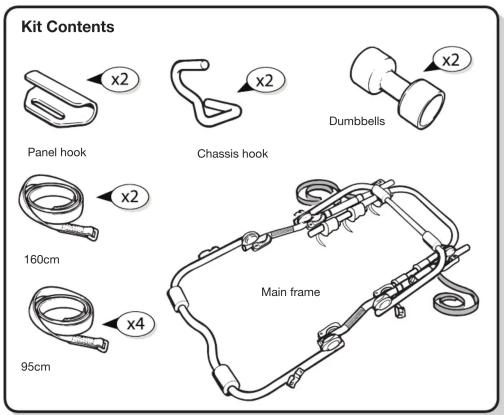
Please follow instructions carefully to ensure the safety of yourself and other road users. The initial assembly and fitting of the carrier will take approximately 15 minutes. Before you begin:
- Due to the construction of boot lids cars with this carrier.
- Make sure all parts are included in
- Ensure that the vehicle boot lid/rea
Product may differ from images shown
halfords hi 3 bike 1/2/10 15:13 Page 3
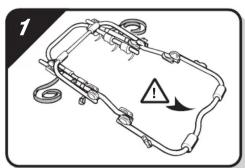
Release the bottom 2 adjuster levers and position the
carmer as illustrated.
There are indicator marks on the ratchet adjusters. Using these as a guide, lift the bottom support tube counting 5 teeth spacing, then lock in position.
The quick release action should be firm for both opening and closing. The tension may be set by releasing the handle and turning clockwise.
Note: It is important that indicator marks on the ratchet adjusters are in the same positions on both sides.

Lower strap assembly
Select 2 x 95cm straps and assemble the chassis hooks
as illustrated.
Warning: Ensure that the straps are fully tightened on the elastic hooks.
the chassis hooks.
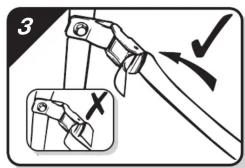
Feed the strap through the lower set of cambuckles.
WARNING: ENSURE THAT THE STRAPS ARE
INSERTED THROUGH THE CAMBUCKLES IN THE CORRECT DIRECTION.

Side strap assembly
Select 2 x 95cm straps and assemble panel hooks
as illustrated.
Note: Ensure that the straps are fully tightened on the panel hooks.
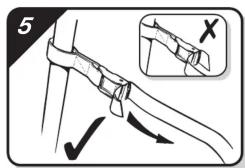
Feed the strap through the middle set of cambuckles.
WARNING: ENSURE THAT THE STRAPS ARE INSERTED THROUGH THE CAMBUCKLES IN THE
INSERTED THROUGH THE CAMBOCKLES IN THE CORRECT DIRECTION.

Top edge fittings Select 2 x 160cm straps and assemble dumbbells as illustrated. Open the tailgate, and from inside your vehicle thread the straps over the top edge leaving the dumbbells hanging free. Carefully close the tailgate then gently pull the straps until the dumbbells sit firmly against the interior trim.
NOTE: Panel hooks, as shown in step 4, should not be fitted to a glass edge. In the absence of any glass edges to the vehicle tailgate, always use the dumbbells to the top and panel hooks to the side. If your vehicle has glass edges to the side and a metal top edge the dumbbells must be fitted to the glass edge position. If your vehicle has both glass edges to the top and to the sides then dumbbells should be fitted in all positions replacing the panel hooks. Dumbbells (Also known as Glass Edge Fittings) are available separately as an accessory.
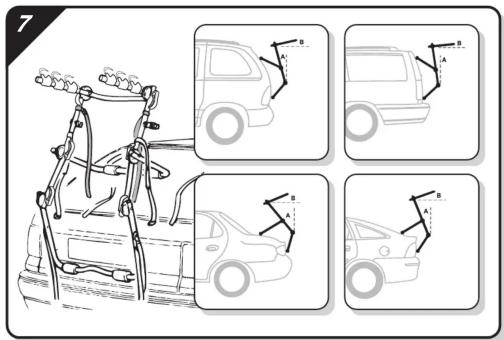
Offer the carrier to the vehicle with the lower tube approximately 50mm above the upper face of the bumper. Adjust the upper arm to sit against the tailgate of your vehicle. The carrier upper support arm should not rest in the middle of any body panel or glass panel; it should be positioned in the upper or lower third of the panel. The carrier main frame should be leaning towards
your vehicle (A) maintaining reasonable clearance, typically approximately 8cm (3 inches) from the car bodywork. This will reduce as the straps are tightened. Ensure that the cycle support arms are adjusted to be above horizontal (B). Once the carrier is set in the correct position fully tighten all quick release adjusters.
halfords hi 3 bike 1/2/10 15:13 Page 5

Feed the top straps through the top set of cambuckles. WARNING: ENSURE THAT THE STRAPS ARE INSERTED THROUGH THE CAMBUCKLES IN THE CORRECT DIRECTION.
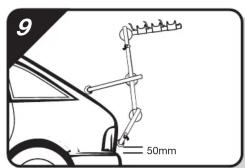
Tighten the upper straps so that the carrier is resting on the tailgate and supported approximately 50mm (2 inches) above the upper face of the bumper.

Position your cycle(s) into the saddle area of the frame locator. Pass the webbing strap over the frame of the cycle and thread through the metal loop. Pull the strap back tightly and press the hook and loop fastener to secure. Note: there must be a minimum 45mm of overlap (See Diagram). The straps supplied with this product are suitable for cycle frames up to 40mm in diameter. For larger frames, longer straps are available as an accessory. Stand back from your vehicle and check that the lights and number plate are not obscured. If the lights or number plate are still obscured, to comply with road and traffic regulations, a lighting board must be used.
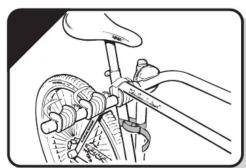
IMPORTANT: Using the fitted RED webbing straps, secure the first cycle to the carrier main frame. Failure to use these straps will result in the cycles falling off the carrier.
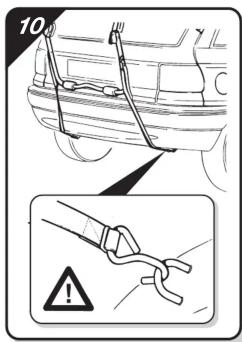
Position the lower strap chassis hooks to an appropriate location under the car for example; towing eye, steel chassis section or bumper support. Note: It is vital that you use a strong metal location to secure these chassis hooks. Ensure the webbing straps do not touch the vehicle exhaust. Progressively tighten each lower strap alternatively.
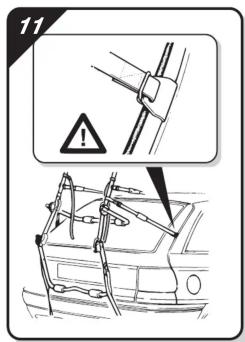
Position the side panel hooks on the edges of the tailgate/boot. Progressively tighten each side strap alternately. Re-tension all straps securing the carrier to the vehicle until the carrier is fully secure. Check that there is still sufficient clearance between the carrier frame and the vehicle bodywork, typically a minimum of 5cm (2 inches) is acceptable. It maybe necessary to readjust the angles of the carrier support tubes to increase the clearance. Note: the 50mm bumper clearance as defined in step 9 will reduce as the straps are fully tensioned. This is acceptable as long as clearance is maintained from the bumper

The cycle frame locators can be adjusted to best suit the angle of ladies', full suspension and children's etc cycle frames. A False Crossbar is available as an accessory for the easy mounting of these differing frame styles.

When carrying a second or third cycle, feed the RED straps around all cycles, and fully tighten. Failure to use these straps will result in the cycles falling off the carrier. To reduce obstruction from the handle bars alternate the direction of each cycle during loading.
IMPORTANT:
- Re - tighten all cycle cari
- Do not open your boat / ts
hooks/dumbbells in position.
• For ease of storage the
flat by loosening all six ratchet adjusters. - When re-assembling the important to fully tighten the catchet adjustment on the
important to fully tighter lower support tube first
halfords hi 3 bike 1/2/10 15:13 Page 7
Special Fitting Instructions
For use when fitting rear cycle carriers to the Renault
Laguna 5dr. Hatch 1994-2001 model
Due to the rubber moulding running around the edge of the rear window, mounting of the top straps along the top edge of the rear window can cause deformation and eventually damage to the moulding.
To eliminate this we advise mounting the
carrier top straps as detailed in this special instruction.
special instruction.


Feed the top straps through the tailgate hinges as shown (one strap each side), leaving the dumbbells hanging freely inside (Fig 15). Carefully close hatch and then pull free ends of straps trapping dumbbells against the interior trim. (Fig 16). Attach both straps to cycle carrier and refer to the cycle carrier instructions for all remaining fitting instructions.
Note: The manufacturer operates a policy of continuous
development, and reserves the right to alter
specifications without notice. In the event of fitting difficulties, telephone our helpline
on 01525 850800.
Fitment guide
NON-RECOMMENDED FITS
It is recommended that conventional rear mount carriers are not fitted to the following vehicles.
Sports cars Due to insufficient strength of lightweight or composite panels, and unsuitable body curvature.
Cabriolets Due to fixing points being impeded by hood mechanisms, and reduced space on rear of vehicle
Split tailanto Due to insufficient strength of hinges, and difficulty to fit carriers correctly
Side opening tailgate Due to insufficient strength of hinges, and difficulty to fit carriers correctly.
In most cases an alternative carrying solution can be recommended, such as a roof or tow ball mounted carriers.
Please see our website for the latest list of known non-recommended fits.
www.halfords.com
Brand : Halfords
Model : High Mount 3
Category : Bike rack