EDFD04 - Food Dehydrator ElectriQ - Free user manual and instructions
Find the device manual for free EDFD04 ElectriQ in PDF.


| Product Type | Food Dehydrator |
| Brand | ElectriQ |
| Model | EDFD04 |
| Power Consumption | 200-240 W |
| Voltage | 220-240 V, 50/60 Hz |
| Number of Trays | 6 |
| Tray Diameter | 30 cm |
| Dimensions (W x D x H) | 31.5 x 31.5 x 33.5 cm |
| Temperature Range | 35°C – 70°C (adjustable in 5°C increments) |
| Timer Range | 0 – 48 hours (adjustable in 30-minute increments) |
| Display | Digital LED |
| Air Circulation Technology | Turbo Vortex |
| Adjustable Tray Height | Yes (25 mm or 50 mm) |
| Material | Plastic trays and lid |
| Cleaning Method | Hand wash trays and lid; wipe base with damp cloth. Do not immerse base. |
| Safety Features | Auto shut-off after 48 hours; cool-down period required |
| Intended Use | Drying fruits, vegetables, herbs, meat, fish, and making fruit leather |
Frequently Asked Questions - EDFD04 ElectriQ
User questions about EDFD04 ElectriQ
0 question about this device. Answer the ones you know or ask your own.
Ask a new question about this device
Download the instructions for your Food Dehydrator in PDF format for free! Find your manual EDFD04 - ElectriQ and take your electronic device back in hand. On this page are published all the documents necessary for the use of your device. EDFD04 by ElectriQ.
USER MANUAL EDFD04 ElectriQ
Digital Dehydrator with Timer EDFD04
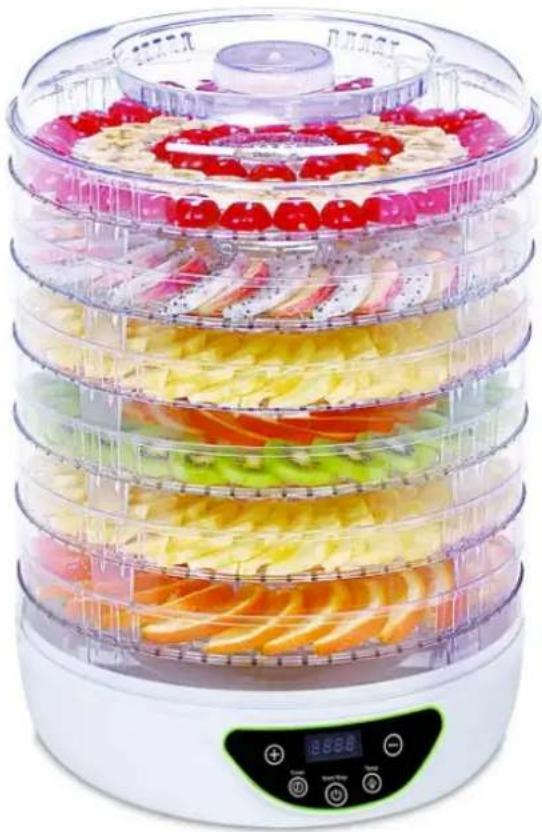
natural_image
Stacked transparent food heater with colorful fruit slices, displayed on a digital scale (no text or symbols visible)USER MANUAL
Thank you for choosing electriQ
Please read this user manual before using the dehydrator and keep it safe for future reference.
Visit our page www.electriQ.co.uk for our entire range of Intelligent Electricals
Contents
Features 3
Safety Instructions 4
Parts and Assembly 5
Operation and Dehydrating Guidelines 6
Drying Fruits 9
Drying Vegetables 12
Drying Herbs 15
Drying Meat 18
Recipes 20
Cleaning and Maintenance 22
Troubleshooting 22
FEATURES
This advanced digital dehydrator was specially designed for easy use, convenience and easy storage.
The electriQ dehydrator has adjustable trays allowing a large variety of foods to be dehydrated.
Turbo vortex technology: fan circulates the hot air producing evenly dried foods in less than half the time of standard dehydrators.
Digital Temperature control which allows accurate temperature control to match the food, providing consistent results every time. Digital Timer removes the need of manual intervention and ensure that your food will be dried according to the recommended time. Digital LED temperature and timer displays makes the operation of this appliance very easy.
Your electriQ Food dehydrator brings a new dimension to ancient food preservation processes. It allows you to enjoy a simpler and more rapid drying process in the convenience of you own home. Now you can have the satisfaction of preparing healthful and delicious treats in the comfort and convenience of your own home and save money and have fun at the same time.
Dehydrated food was always part of the human diet and is a better way to preserve food than adding chemical additives. Our ancestors sustained themselves on natural dehydrated foods and later used heat from the sun or their fires to preserve food harvested between seasons.
Why Dehydrate...?
Your dehydrator is a tool that uses relatively low temperatures and a turbo fan to dry food. It essentially removes the water from food, but it keeps the enzymes of your food intact.
You can now create foods that will have same texture as cooked or fried dishes while keeping all the goodness of raw food.
Dehydrated foods are a great way to transition to raw food, and even as a great gluten-free treat maker. Most of the dehydrated foods can replace the textures and tastes of the most addictive foods like bread, cookies, and chips. Who would not want that?
If you are dehydrating to below 50^ C your food can still be considered raw. Note that meat or fish should always be dehydrated at maximum dehydrator temperature to prevent bacterial growth.
You can also use a dehydrator to preserve excess produce. If you are lucky enough to have an abundant garden (or just a great deal of fresh local produce) then you can use a dehydrator to preserve your pick.
Simply clean and cut your fruits or vegetables and place on your dehydrator trays. Depending on water content you might need to dehydrate for a longer time.
Dehydrated fruits and veggies make great snacks, or can be used to top salads, sauces and soups.
You may also consider that many of the supermarket dried food will still contain preservatives like sulfites or other substances, so is better to dehydrate yourself knowing that nothing else was added.
Dried food is easily stored, popular with backpackers, hikers, campers, boaters, cooks, gardeners, dieters, and health food enthusiasts. Also a great way to make tasty snacks for kids.
Dehydration is one of the easiest and most efficient methods of food preservation. Food is exposed to gentle heat and circulated air in order to remove moisture. Lacking moisture, bacteria and micro-organisms are inhibited so dehydrated foods can be preserved for long periods without refrigeration and they have far less weight and bulk.
You can also use a food dehydrator to dry flowers, herbs and grains.
SAFETY INSTRUCTIONS
Important
- Carefully read the instructions before operating the unit
• This appliance is for indoor use only.
• Rating: This unit must be only connected to a 220-240 V / 50 Hz earthed outlet. Always check the rating label against your electrical supply. If you are in any doubt about the suitability of your electrical supply have it checked and, if necessary, retested by a qualified electrician.
- This dehydrator has been tested and is safe to use. However, as with any electrical appliances - use it with care.
- Disconnect the power plug from socket before dismantling, assembling or cleaning.
• Do not clean the base of unit by spraying it or immersing it in water.
- Never operate this appliance if the cord or plug is damaged. Ensure the power cord is not stretched or exposed to sharp object/edges.
- Do not pull the mains cable to disconnect the mains plug from the mains.
- Do not use the appliance if any part or any accessory is damaged or defective.
- A damaged supply cord or plug should be replaced by the manufacturer or a qualified electrician in order to avoid a hazard.
- Avoid touching any moving parts of the appliance. Avoid touching any hot parts of the appliance.
- Make sure unit is assembled correctly before use.
• Never insert fingers, or any other objects in the appliance while is in operation.
- This appliance is not intended for use by persons (including children) with reduced physical, sensory or mental capabilities. It is also not intended for use by those with a lack of experience and knowledge, unless they have been given supervision or instruction concerning the use of the appliance by a person responsible for their safety.
- Do not leave children unsupervised with this appliance.
- Any service other than regular cleaning should be only performed by an authorized service representative. Failure to comply could result in a voided warranty.
• Do not use the appliance for any other purposes than its intended use.
• Always place the unit on a dry and stable surface.
- Do not use the appliance in places with high humidity (>80%RH)
- Do not immerse the appliance in water or other liquids. If the appliance is immersed in water or other liquids by mistake, do not touch the appliance with your hands. Immediately remove the mains plug from the wall socket. If the appliance was immersed in water or other liquids, discard it.
Unit Safety Protection and Performance Tips
- Make sure the unit is correctly assembled before using it
- The maximum continuous operation of the dehydrator must not exceed 48 hours. After this period you must turn off the machine and unplug the power cord.
- Please unplug the unit before you remove the food from the dehydrator.
- Do not cover the dehydrator while in operation.
• Always clean the dehydrator immediately after use. Trays are only designed to work in your electriQ dehydrator. Never use them in any other appliance.
• Incorrect usage will damage the machine. Only use in dust free and well ventilated environment
- The Food Dehydrator should be exclusively used for drying food, herbs or plants. Do not use this food dehydrator for any other domestic or commercial drying process.
• Always unplug the power cord after use and store safely away from reach of children.
Parts and Assembly
Open the package and account for all parts before disposing packing. Safely dispose of all plastic bags and other packaging components. They may be potentially dangerous to children.
Before use please clean the lid and trays. Please clean with warm water mixed with a small quantity of mild detergent. Clean the base of the unit a wet cloth or a sponge. Never immerse the base in water.
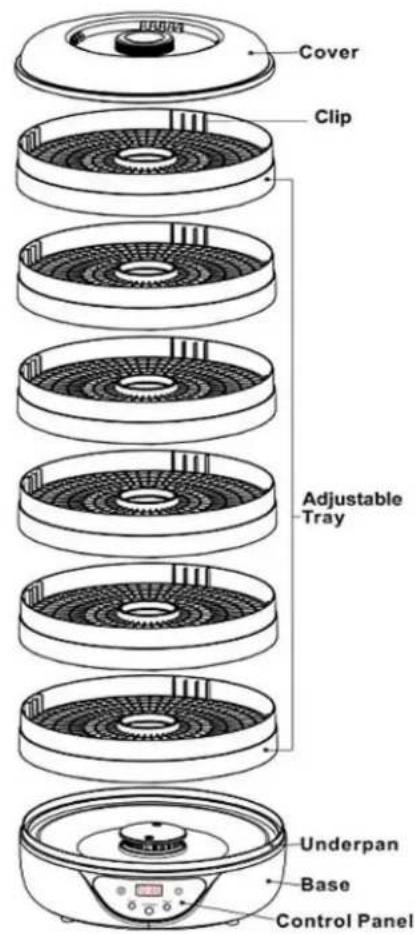
The drying trays are nested for easy storage. Please lift them and turn them to full height before use so the hot air can freely flow among each tray.
Load each tray individually and make sure they are not overloaded, allowing air to move around.
If you want to dehydrate more liquid type like fruit leather we recommend to cut parchment paper rounds or Teflon sheet (you can reuse them) and lay them on the tray or half tray.
Most of the trays must be built onto the food dehydrator when the food dehydrator is working even if some trays are empty. Always put the tray with food onto the bottom of the food dehydrator first and add empty trays above. Always have the lid on when the dehydrator is in operation.
Notes:
Never put water in the dehydrator. Size the food to match the dehydrator trays. The size and thickness of the food will influence the length of the drying process. Use the special optional mesh and solid trays for liquid or semi liquid mixtures.
Do not run the appliance for more than 48 hours in one single use. After 48 hours, press the "START/STOP" button twice. Unplug and let it cool down for at least 2 hours before operating again.
Don not run the unit with less than 3 trays even some of them are empty.
Adjustable Trays
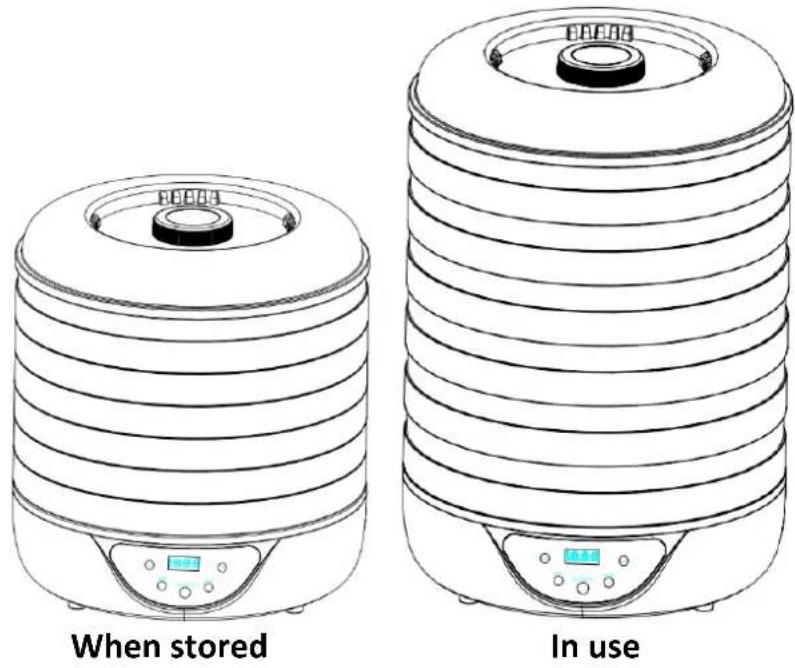
Trays are adjustable offering maximum flexibility in drying different food. For drying thick food, you can adjust trays to 50mm height. For drying fast thin food, you can adjust trays to 25mm height. Also the unit occupies less space when stored as in the pictures bellow.
OPERATION
Turn on the food dehydrator by pressing the "START/STOP" button. The unit will default to 70 °C and 10 hrs dehydrating timer. When entering standby mode the unit LED display will stop flashing.
Select the timer and the desired food temperature. Press the "TEMP" button to set the temperature. The temperature can be set from 35 °C to 70 °C in 5 °C
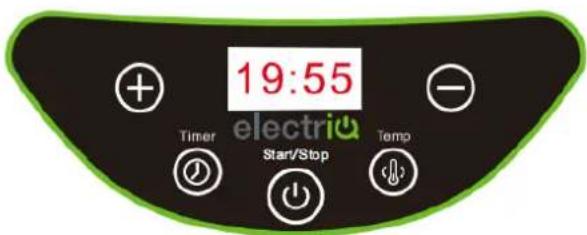
increments. Press the “TIMER” button to set the timer. The timer is selectable with 30 minute increments up to 48 hours. After the timer lapsing fan will continue to run for approximatively 10 more seconds than will go in standby.
If the food is dried and timer still working turn off the machine by pressing the "START/STOP" button twice, than unplug it and store it in a safe and dry place.
Notes: Set the temperature / timer and then press START button to start the dehydrating cycle. During operation you can increase or decrease the timer settings using +/ - keys. To change the temperature press the TEMP key first than use +/- keys. Pressing the START/STOP key twice will pause operation. Press START/STOP key once again and operation will resume on last settings selected. Keep and press START/STOP key for more than 3 seconds and all the settings are reset to default.
General Dehydrating Guidelines
Certain varieties of produce, the humidity in the air, and even methods of food handling make quite a difference in the drying time and quality of the dried product.
Experiment with different drying temperatures, thickness of produce, pre-treatment versus no pre-treatment and different re-hydration methods. You will determine what works best for your particular needs and preferences.
Loading Trays and Selecting Produce
To save nutrients and produce a quality product, it is necessary to work fast preparing foods to dry. When placed in your dehydrator, they need to dry continuously at the recommended temperatures and times. Do not turn off your dehydrator or leave partially dried food on the trays as it may spoil or develop bacterial growth.
Spread all foods evenly to dry in single layers. If slices overlap, the areas that are covert will not dry properly.
Do not add fresh produce to a partially dried batch. It will slow the rate of drying for both products. It is possible, however, to combine partially dried foods.
Select the best fresh produce at the peak of ripeness and flavour. Wash carefully to remove debris, dust and insects. Cut away bruised or damaged sections.
Lay food pieces evenly on trays. Do not overlap food pieces, as this will inhibit drying time. As each tray is loaded, place it on the dehydrator to begin drying. Please change the position of the trays during drying process if you find that certain trays are dried unevenly.
Because of the unique design of your electriQ vortex system dehydrator, you will be surprised at how quick is the drying process.
Drying Times
Drying times indicated in this user instructions are for reference only and they may vary a lot, depending on the type and amount of food, thickness and evenness of the slices, percentage of water in the food, humidity, temperature of air, altitude. Drying times may also vary greatly from one area to another and from day to day, depending on the climatic conditions. Keep records to help you predict drying times for specific foods.
Drying Temperature
Fruits, fruit rolls (fruit leather) and vegetables should be dried at 40 - 60°C. By drying foods in this temperature range you will minimize the loss of heat-sensitive vitamins A and C. All foods sweat when they begin to dry, the temperature may be set higher at 60°C or 70°C during the first couple of hours of drying. The actual temperature of the food will remain to around 50 to 60°C, lower than the air temperature for the first couple of hours.
Meats and fish should be dried on the highest temperature setting of your dehydrator at 70^ C. These temperatures also keep bacteria and other spoilage micro-organisms, common to meat and fish, to a minimum during the first stages of drying.
Nuts and seeds are high in oil, and if higher temperatures are used, they will tend to become rancid, developing unpleasant flavours. The best temperature is from 35 to 50°C.
Herbs and spices are most flavourful when they first open and should be harvested while very fresh, before they begin to blossom. Because the aromatic oils are very sensitive, temperature should be set to 35°C.
Flowers, herbs and spices used for potpourri should be dried at 35°C to maintain aroma and colour.
Take care not to load trays too heavily as this will prolong the drying time.
Packaging
Some pieces may dry in a shorter time than others. The dried food should be removed and placed in an airtight container while allowing the rest of the pieces to remain in the dehydrator until sufficiently dry.
Package all dried foods promptly to prevent contamination and to prevent stickiness and re-hydration caused by humidity. Store dried foods in airtight, moisture proof containers.
Home vacuum packaging devices are ideal for packaging dried foods as eliminating the air will extend the shelf life of dried foods 3 to 4 times.
Since most packaging materials are transparent, store packaged dried foods in a plastic or metal container that will not allow the light to penetrate. Do not store fruits and vegetables together in the same storage container because flavour and moisture may transfer.
Fruit rolls are best if removed while still warm. Wrap in plastic wrap and place in airtight moisture-proof containers for storage.
Onions and tomatoes are especially prone to absorb moisture from the air and should be packaged immediately after removing from the dehydrator.
Testing for Dryness
Food must be monitored during the final stages of dehydrating to prevent over-drying. Over-dried foods lose quality in texture, nutrition and taste. To test for dryness, remove a piece of food, let it cool and feel with your fingers for dryness.
- Fruits are pliable and leathery with no spots of moisture. Tear in half, pinch and watch for moisture drops along tear. If no moisture then it is sufficiently dry for long term storage.
- Fruit rolls should be leathery with no sticky spots.
- Jerky should be tough, but not brittle.
- Dried fish should be tough, but not brittle. If the fish is high in fat it may appear moist due to the high oil content.
• Vegetables should be tough or crisp.
If foods are insufficiently dried, or are exposed to moisture from faulty packaging, they can lose quality, nutrition value and can even develop mould during storage.
Storage
The storage area should be cool, dry and as dark as possible. The darker and cooler the storage area, the longer the dried foods will last with good quality and nutritive value.
Drying Fruits
Fruits picked at their prime have the highest natural sugar content and the best nutritional value. For the best quality product, choose only fresh and ripe.
Wash fruit thoroughly and remove any blemishes. Remove skins (if desired), stems and seeds. Halve or slice in 1/4" to 1/2" circles or slices (a food processor or slicer will speed the slicing and ensure uniform slices, which will allow fruits to dry at the same rate.) Some fruits have a natural protective wax coating such as figs, prunes, grapes, blueberries, cranberries, etc. If you want to dry these fruits whole, dip into boiling water for 1 to 2 minutes (the amount of time needed depends on the thickness and toughness of the skin) to speed dehydration. This makes the skin more porous by removing the natural wax coating and thereby speeds up the drying time. Small lines appear on the fruit skin allowing moisture to escape but may be too fine to be visible.
Many fruits can be dried in halves with the pits removed. If they are dried with the skins on, be sure to place them skin-side down to prevent fruit and pulp from dripping down through the trays. Check frequently near the end of the drying process and remove pieces as they become dry. To peel or not to peel is a decision only you can make (if the fruit has been artificially waxed, it should definitely be peeled to remove the wax). The skin has nutritional value, but skins tend to be very tough when dried and fruits take longer to dry with the skins on. Try fruits both ways – peeled and unpeeled – then decide for yourself what works best for you.
Pre-treat if desired and place the fruit into the dehydrator to dry at 45-55°C.
Pre-Treatment
Pre-treatment minimizes oxidation, and gives you a superior quality, better tasting product with less vitamin loss. Apples, pears, peaches and apricots are better when pre-treated. They are more appetizing, have a longer shelf life and higher nutritional value. Place cut fruits that tend to brown in a holding solution of ascorbic acid to reduce browning during preparation. Do not keep cut fruit in a holding solution for more than one hour.
Pre-treatment can vary from soaking in fruit juice, ascorbic acid mixtures, syrup blanching, steaming. The results of these methods also vary. Experiment and decide for yourself which one you like best.
Use one of the following methods of pre-treatment:
Natural Pre-Treatment
Fruit juices containing ascorbic acid may be used as a natural pre-treatment to reduce browning. Although if there will be some loss of colour, pineapple, orange, lemon, or lime juice can be used. Ascorbic acid mixtures, available from your supermarket, can also be used. Follow the directions on the package. Slice fruit directly into juice or ascorbic acid mixture. Soak 5 minutes and place on trays. Fruits can also be dipped in honey or a honey / juice mixture.
Hints and Suggestions
- Place a cup of dried apple slices in the blender with a cup of water for instant apple sauce.
- Strawberries are perfect for malts, shakes and sundaes.
- Cantaloupe and watermelon slices become candy-like when dried.
- Dehydrate lemon and orange slices and powder for use in recipes for grated rind.
- Dehydrate grapes to make raisins that taste better and plump up in recipes better than store-bought raisins.
- Dry bananas 1/4" thick and dip into a glaze of 1/2 cup honey mixed with 1/4 cup water. Drain. Place on trays and dry. For variety add 1/8 teaspoon cinnamon to the glaze before dipping bananas.
Drying Fruit Rolls (Fruit Leather)
Fruit leathers are a favourite kids snack. It is a chewy fruit product made from puréed fresh fruit, which has been dried and rolled into snack sized pieces. Fruit rolls are easy to make and cost less than those bought at the store. Any fruit high in pectin will make an excellent fruit roll. Most fruits can also be combined. Some fruits, such as apples, are high in pectin and fibre, and have an excellent texture when dried. The combinations are limitless, use your imagination.
Certain fruits, such as citrus, should be used in combination with other fruits because they have so much liquid and very little pulp. If you find that a fruit is too runny, combine it with apple, applesauce or a similar fruit that will give it texture.
When fresh fruits are not available, canned fruits (either sweetened or un-sweetened) can be used. Simply drain the liquid, and pour the fruit into the blender. Applesauce can be taken directly from the container for wonderful fruit rolls. Frozen fruits can also be used, although they tend to be a bit runnier. Simply thaw and follow directions for using fresh fruits.
Wash fruits and cut away any blemished portions. Purée fruit in a blender until it is very smooth. In some blenders with some fruits, you may want to add a little juice or water to start the blending process. You can also add fruit pulp left from juicing.
Fruits generally need no added sweetening, but if fruits are under ripe or particularly tart, you may add light corn syrup or honey. Add one or more tablespoons sweetening for each quart of purée, depending on your preference.
Drying
Place a trimmed baking parchment or Teflon sheet on the dehydrator tray and wipe lightly with a vegetable oil to prevent sticking. Purée should be about 1/4" to 3/8" thick and evenly spread. Dry at 60°C until fruit feels leather-like and is pliable, about 4 to 8 hours.
Storage
Remove the fruit roll while it is still warm, roll, cut into smaller size pieces (if desired) and wrap in plastic wrap. Individually wrapped pieces of fruit leather should be stored in larger airtight and moisture proof containers.
Fruit Drying Chart
Expect a variance in the time needed to dry different fruits. Drying times are affected by the size of the load, fruit thickness and the moisture content of the food itself. The guidelines are general. For more accurate drying times, keep records of your own drying experiences.
| Food | Preparation | Average Drying Time | Drying Temp. | Uses |
| Apples | Pare, core, cut in 3/8" or slicesPre-treat | 4-10 hrs | 45 - 55°C | Applesauce, pies, cobblers, rings, snacks, breads and cookies |
| Apricots | Cut in half, remove pit and cut in quarters. Pre-treat | 8-16 hrs | 45 - 55°C | Desserts, muesli, meat dishes, pies and sauces |
| Bananas | Peel, cut in 3/8" slicesor divide lengthwise | 6-12 hrs | 45 - 55°C | Snacks, baby food, granola, cookies, and banana bread |
| Blueberries | Wash and remove stems.Dip in boiling water until skins crack. | 10-18 hrs | 45 - 55°C | Breads, baked goods, snacks, ice cream, yogurt |
| CannedFruit | Drain well. If small, place on mesh screen. | 6-12 hrs | 45 - 55°C | Snacks, breads, granola |
| Cherries | Wash, remove stems and pit | 18-26 hrs | 45 - 55°C | Breads, baked goods and snacks |
| CitrusFruits | Peel, if desired.Slice 3/8" thick | 6-12 hrs | 45 - 55°C | Flavourings when Powdered |
| Cranberries | Wash and remove stems.Dip in boiling water until skins crack. | 10-18 hrs | 45 - 55°C | Breads, baked goods, snacks ice cream, yogurt |
| Coconut | Remove dark outer skin, slice 3/8" thick | 3-8 hrs | 45 - 55°C | Cakes, cookies, desserts and granola |
| Figs | Remove stems and Halve | 8-15 hrs | 45 - 55°C | Fillings, cakes, puddings, breads and cookies |
| Grapes | Leave whole, remove stems(if blanched) | 10-36 hrs6-10 hrs | 45 - 55°C | Raisins; use in baked goods, cereals and Snacks |
| Kiwi | Peel, slice 3/8" to 1/2" thick | 5-12 hrs | 45 - 55°C | Snacks |
| Lemon Powder | Zest of Rind | 8-12 hrs | 45 - 55°C | Seasoning rubs, marinade |
| Mangos | Skinned, slice 3/8" thick from seed | 6-16 hrs | 45 - 55°C | Snacks, cereals and baked goods |
| Melons | Remove skin and seeds.Slice 1/2" thick | 8-20 hrs | 45 - 55°C | Snacks |
| Nectarines | Quarter or slice 3/8" to 1/2" thick. Pre-treat | 6-16 hrs | 45 - 55°C | Snacks, desserts and baked goods |
| Oranges, limes, lemons | Slice 1/4" thick | 2-12 hrs | 45 - 55°C | Crafts, snacks, baking |
| Peaches | Peel if desired.Halve or quarter.Pre-treat. | 6-16 hrs | 45 - 55°C | Snacks, breads,cobblers, cookies and Granola |
| Pears | Peel, core, and slice3/8" thick. Pre-treat | 6-16 hrs | 45 - 55°C | Snacks, breads,cookies, fritters and granola |
| Pineapple | Peel, core, slice 3/8" to 1/2" thick | 6-12 hrs | 45 - 55°C | Snacks, baked goods, baked granola |
| PlumsPrunes | Halve or quarterand remove pit | 8-16 hrs | 45 - 55°C | Snacks, cookies,muffins, bread and granola |
| Rhubarb | Slice in 1" lengths.Steam until slightly tender | 6-14 hrs | 45 - 55°C | Pies, tarts and otherDesserts |
| Strawberries | Halve or slice 1/2" thick | 6-12 hrs | 45 - 55°C | Snacks, cereals, and baked goods |
Drying Vegetables
Some vegetables are quite good dried. Others lose their appeal and are better frozen or fresh. Some vegetables are far better frozen than dried, if you must preserve them. Vegetables have a low acid and sugar content that makes them more subject to spoilage, and tend to have far shorter shelf life than dried fruits.
Choose fresh, crisp vegetables for a high quality dehydrated product. Just like fruits, vegetables should be picked ripe and dried as soon as possible to minimize loss. Wash vegetables thoroughly and remove any blemishes. Peel, trim, core, slice or grate.
Most vegetables must be blanched, either steaming over boiling water or in the microwave oven to slow the enzyme action which will continue during drying and conditions are key elements to producing dried vegetables which will taste as good in winter as the summer product.
There is no need to blanch onions, garlic, peppers, and mushrooms. Herbs also are not to be blanched.
Blanching
Bring about 1 inch of water to a brisk boil and drop in sliced or grated vegetables. Cover. Steam until vegetables are heated completely through, but not cooked. This is usually about 1/3 of the time required to cook the vegetable. Vegetables should still be crunchy. Drain and then dip them in cold or iced water for 3-5 minutes. Start dehydrating immediately after blanching.
Microwave Blanching
A microwave oven is ideal for blanching vegetables. Prepare them in the same manner as for steam blanching. Place them in a microwave-safe dish with 3 table spoons of water at the bottom, cover and cook on high for about 1/2 of the time required to completely cook the fresh vegetable. Depending on the age and design of your microwave, you may want to stop the cooking half-way through and stir the
vegetable to achieve a more even blanching. Dip the vegetables in cold or iced water for 3-5 minutes. Start dehydrating immediately after blanching.
Drying
Load blanched vegetables onto drying trays, making sure that air can move freely between the pieces. For vegetables, such as corn or peas, that tend to clump together, stir occasionally to allow air to reach all of the pieces.
Vegetables are dried until they are crisp, tough or brittle. Package immediately after drying to prevent absorption of moisture from the air. Usual drying temperature for vegetables is 55^ C - 70^ C.
Hints and Suggestions
Mix dried grated carrots, parsnips, onion, celery, chives, sweet peppers with turmeric powder, sea salt to make delicious vegan stock. Makes delicious base for soups. You can create your own soup mixture and store it for later use.
CARROTS to save time grating, dry carrots and parsnips for salads, carrot cake or coleslaw.
GREEN PEPPER, ONION, CELERY, CHIVES, ETC. chop and dry in a one-day effort for use instantly all year!
GREEN BEANS, WAX BEANS & GREEN PEAS best when used in soups, stews or casseroles.
ONION POWDER dry the whole vegetable slice until crisp, then either powder or chop in blender for chopped onions.
TOMATO SLICES use for colour and crunch when crumbled over a tossed salad. They rehydrate well in soups, stews and casseroles. Tomato leathers can be powdered and used as instant soup, sauces and paste.
Add different amounts of water to your powder mixture to make:
Tomato paste = 1 tsp. powder, 1 tsp. water
Tomato sauce = 1 tsp. powder, 3 tsp. water
Tomato soup = 1 tsp. powder, 1 tsp water, 2 tsp. cream
Tomato juice = 1 tsp. powder, 1/2 c. water
Adjust amount of water to taste for soup and juice.
Vegetable Drying Guidelines
Vegetables will also vary in their drying times. Blanching decreases drying times, but not all vegetables are to be blanched. Again, the average drying times in the following table are general and depend on different variables. For more accurate times, keep records of your own specific experiences.
| Food | Preparation | Average Drying Time | Drying Temp. | Uses |
| Artichoke | Cut hearts into 1/8" strips Blanch. | 6-12 hrs | 55 - 70°C | Marinate or dip in batter and fry |
| Asparagus | Wash and cut into 1" pieces. Blanch. | 3-10 hrs | 55 - 70°C | Rehydrate, serve in cream sauce |
| Beans Green/Wax | Remove ends, cut into 1" pieces. Blanch. | 6-12 hrs | 55 - 70°C | Stews, soups and Casseroles |
| Beets | Steam until tender.Cool and peel.Cut into 1/2" pieces | 3-10 hrs | 55 - 70°C | Soups and stews |
| Broccoli | Wash, cut as for serving. Blanch.. | 4-10 hrs | 55 - 70°C | Soups, quiche or soufflés, cream or cheese sauce |
| Carrots | Peel, cut ends, slice in 3/8" thick or shred. Blanch. | 6-12 hrs | 55 - 70°C | Salads, soups, stews and carrot cake |
| Cauliflower | Wash, cut as for serving. Blanch. | 6-14 hrs | 55 - 70°C | Soups and stews |
| Celery | Trim, wash and cut 1/2" slices. Blanch in solution of 1/2 t baking soda to 1 cup water. | 3-10 hrs | 55 - 70°C | Soups, stews, powder for celery salt (add equal parts celery and salt) |
| Corn | Husk, remove silk and blanch. Remove from cob | 6-12 hrs | 55 - 70°C | Fritters, soups, stews or grind for cornmeal |
| Aubergines | Peel, slice 1/4" thick. Blanch. | 4-14 hrs | 55 - 70°C | Cream sauces, casseroles, dip in batter and fry |
| Garlic | Separate and peel cloves. | 6-12 hrs | 55 - 70°C | Powder for seasoning. |
| Mushrooms* | Clean with soft brush, don't wash. | 4-10 hrs | 55 - 70°C | Rehydrate for soups, meat dishes, omelettes or frying. |
| Onions | Remove skins, tops, and root ends.Slice 3/8" thick. | 6-12 hrs | 55 - 70°C | Soups, stews and sauces.Powder for seasoning salt.Package immediately. |
| Peas | Shell, wash and blanch. | 5-14 hrs | 55 - 70°C | Soups, stews and mixed vegetables. |
| Peppers | Remove stem & seeds.Cut into 1/2" pieces. | 5-12 hrs | 55 - 70°C | Soups, stews, pizza, meat dishes and seasoning. |
| Peppers (hot) | Wash, slice or cut in | 3-20 hrs | 55 - 70°C | Soups, stews, pizza, |
| half. Remove seeds if you desire a milder pepper. | and seasoning. | |||
| Potatoes** | Use white potatoes. | 6-12 hrs | 55 - 70°C | Stews, soups and |
| Peel and slice 3/8" thick. Blanch. | casseroles. | |||
| Rinse and dry. | ||||
| Tomatoes | Wash and slice 3/8" | 6-12 hrs | 55 - 70°C | Soups and stews. Powder |
| circles or dip in | in blender and add water | |||
| boiling water to loosen | for paste or sauce. | |||
| skins, halve or quarter. | Dry in roll-up form for pizza sauce. | |||
| Zucchini or | Wash, remove ends | 5-10 hrs | 55 - 70°C | Breads, chips with |
| Squash | and slice 3/8" thick or | dip, soups and casserole. | ||
| grate. Steam if you plan to rehydrate | (1 week shelf life) |
* Dry at 40^ C for 2 to 3 hrs, then increase temperature to 60^ C and dry for remaining time.
** Blanch for 5 minutes or until translucent. If not steamed long enough, they will turn black during drying and storage.
Drying Herbs
Fresh herbs and spices have a stronger aroma and flavours than commercial dried herbs and spices. They are prized by food lovers and gourmet cooks. Dried herbs and spices are used more often than fresh because they are more readily available and convenient to use. Although some flavours are lost when they are dried, they become more concentrated because so much moisture is removed. Most herbs contain from 70 to 85 percent water. Eight ounces of fresh herbs will yield about one ounce dried.
The flower, seeds, leaves and stems of herbs can all be used for seasoning. Leaves and stems should be gathered early in the morning before the heat of the sun dissipates the flavouring oils.
Leaves should be harvested before plant begins to flower and while still tender. Snip stems at base, taking care to leave sufficient foliage for the plant to continue growing. The new leaves at the tip of the plant have the most concentrated flavours.
Plants usually survive three or four major harvests and, depending on climate, may produce all year round. Cold frames extend growing season and a sunny kitchen window will allow potted herbs to produce all year long.
When plants have begun to flower, a bitter taste develops and leaves are not as aromatic because the energy has gone into producing buds.
The flowers of some herbs may be used for seasoning. They should be harvested when they first open and while still very fresh. Seeds, such as caraway or mustard, are harvested when they are fully mature and have changed from brown to grey.
Leaves and stems should be lightly washed under cold running water to remove any dust or insects. Remove any dead or discoloured portions.
To dry large-leafed herbs, such as basil and sage, strip leaves from stem, cut in half across the leaf and place on a tray. Cutting allows dry air to get inside the stem and will shorten drying time.
To dry small-leafed herbs, like thyme, place on a lined tray. This helps keep dried herbs from falling through tray. As small herbs dry, they may fly around inside dehydrator. If this happens, place a screen over drying herbs to keep them in place.
If flowers are to be used in teas, dry them whole. Wash and separate petals, and remove any tough or discoloured parts. When seedpods have dried, their outer covering may be removed. Rub seeds between palms of your hands while blowing to remove husks. Place larger seeds on a trimmed baking parchment or Teflon sheet. Dehydrate until there is no moisture evident. If seeds are to be used for planting, dry at room temperature to maintain germination ability.
Testing for Dryness
Herbs are dry when they snap and crumble easily. Stems should be brittle and break when bent. Seeds should be brittle and usually need additional drying after they are removed from the seed pods.
To be certain that herbs are sufficiently dry, place in an airtight container for several days. If condensation appears on the inside of the container, they need further drying.
Packaging
Dark colour jars with airtight lids are ideal for storing herbs. They do not allow light in, which tends to fade and weaken herbs. You can use other containers as long as they exclude air, light and moisture. Air and light result in flavour loss; moisture results in caking and colour loss or insect infestation.
Storage
As with other dried foods, dried herbs and seeds should be stored in the coolest place available, to maintain best flavour. Do not crush or grind until ready to use. Crushing exposes more surfaces to the air, resulting in flavour loss. With proper packaging and good storage conditions, dried herbs, seeds and spices should keep well for 12-18 months.
Using Dried Herbs & Spices
Since herbs and spices are usually 3 to 4 times stronger than their fresh counterparts, use conservatively. Their taste should be subtle and not overpowering. The zest of dried herbs is dependent upon storage condition and length of time stored. Sharpness of flavour deteriorates with age. Some herbs, such as mint or basil, lose their flavour more rapidly than others when dried. It may take nearly an equal volume of some dried herbs to replace the amount of fresh called for in the recipe.
Herb Drying Guide
Most herbs may be dried in ElectriQ dehydrator right on the plant stalk and stem. Seeds and leaves are easily stripped from the plant when dry. Drying temperature should be 40^ C. Do not dry herbs with fruits and vegetables. Store in glass containers in a cool, dark place to reduce flavour loss. Label clearly before storage because they are difficult to recognize when dry. Do not powder until you are ready to use.
| Food | Preparation | Average Drying Time | Drying Temp. | Uses |
| Anise Leaves | Rinse in cold water, pat dry | 1-3 hrs | 40°C | Soups, stews, sauces and vegetable and fruit salads. |
| Anise Seeds | Rinse in hot water, pat dry | 2-5 hrs | 40°C | Rehydrate, serve in cream sauce |
| Basil Leaves (break veins and stems to aid drying) | Clip leaves 3 to 4 inches from top of plant just as first buds appear pat dry | 20-24 hrs | 40°C | Italian and Mediterranean dishes, tomato dishes, meat salads, soups, fish, poultry |
| Caraway | Clip entire plant. Dip in boiling water, pat dry | 2-5 hrs | 40°C | Pork, sauerkraut, rye bread, cheese, vegetables, cookies |
| Chili Peppers | Rinse and dice, pat dry | 5-12 hrs | 40°C | Powder for seasoning |
| Chives Leaves | Chop, rinse in cold water, pat dry | 20-24 hrs | 40°C | Mild onion flavor , use in moist recipes |
| Coriander Leaves | Clip with stems. Rinse in cold water, pat dry | 15-18 hrs | 40°C | Mexican, Chinese and Mediterranean dishes |
| Coriander Seeds | Clip entire plant. Dip in boiling water, pat dry | 2-5 hrs | 40°C | Sausage, pickling spices apple, and pear dishes |
| Cumin Seeds | Rinse in cold water, pat dry | 2-5 hrs | 40°C | Curries and chili dishes |
| Dill Leaves | Rinse in cold water, pat dry | 1-3 hrs | 40°C | Salads, vegetables potatoes& Fish |
| Fennel | Rinse in cold water, pat dry | 1-3 hrs | 40°C | Salads, soups or stews |
| Fennel Seeds | Rinse in cold water, pat dry | 2-5 hrs | 40°C | Cakes, cookies, breads |
| Garlic Clove | Cut in half lengthwise, pat dry | 6-12 hrs | 40°C | Salt, powder, recipes |
| Ginger Root | Rinse, slice 3/8" or grate, pat dry | 2-5 hrs | 40°C | Meat, vegetables, cookies & dessert dishes |
| Ginger Leaves | Rinse in cold water, pat dry | 1-3 hrs | 40°C | Soups |
| Marjoram Leaves | Rinse in cold water, pat dry | 1-3 hrs | 40°C | Italian, meat, fish, egg & poultry dishes |
| Mint Leaves | Rinse in cold water, pat dry | 20-24 hrs | 40°C | Sauces, mint jelly & lamb dishes |
| Mustard Seeds | Rinse in cold water, pat dry | 2-5 hrs | 40°C | Corned beef, sauerkraut, salad dressings & cabbage |
| Oregano Leaves | Rinse in cold water, pat dry | 15-18 hrs | 40°C | Italian, Greek, Mexican & tomato dishes |
| Parsley Leaves/stem | Rinse in cold water, pat dry | 20-24 hrs | 40°C | Powder, use leaves for flakes |
| Rosemary Leaves | Rinse in cold water, pat dry | 20-24 hrs | 40°C | Barbecue sauces, poultry, meats, egg dishes, lamb, & vegetables |
| Sage Leaves/stem | Rinse in cold water, pat dry | 20-24 hrs | 40°C | Poultry, pork, lamb, veal & fish dishes |
| Tarragon Leaves | Rinse in cold water, pat dry | 20-24 hrs | 40°C | Sauces, salads, fish & poultry |
| Thyme Leaves | Rinse in cold water, pat dry | 1-3 hrs | 40°C | Meat, fish, poultry dishes green beans, beets, carrots, & potatoes |
Drying Meat
Meat must be always cured or pre-cooked before dehydrating. Dehydrated meat will taste better when cured first. Meats should be always dried at 70^ C. Depending on how thick the meat is cut, how heavily the dryer is loaded, and the humidity, meat strips take from 4 to 15 hours to dry. Always use lean meat when dehydrating.
Pat meat strips with clean paper towels several times as it dries, to remove the excess oil that accumulates on the top of the meat strips. When removing meat strips from dehydrator trays, wrap it in paper towels and let it stand for a couple hours prior to packaging. Excess fat will be absorbed in the paper towels and the shelf life will be extended.
Storage
Beef meat strips that are stored un-refrigerated will start to go rancid at room temperature after 3 to 4 weeks. Refrigerate or freeze for longer storage or until ready to go on a trip or camping. If any ice crystals have formed inside bag, re-package in a dry container. If meat strips are dried thoroughly, it will last for several weeks in the outdoors or while traveling. All types of meat strips must be dried sufficiently to avoid mould. If mould is found inside a storage bag of meat strips, the whole container must be thrown away.
Drying Cooked Meats
If you are drying meats for other purposes than jerky such as for stew, sandwich spreads or stroganoff, the meat should be tender and high quality. It must be cooked so it will not be tough and chewy when reconstituted. Using the remainder of a dinner roast or leftover steak saves the step of precooking the meat. Dehydrate those leftovers for snacks, backpacking and camping meals.
The shelf life of dried, cooked meats is 2 to 3 weeks at room temperature. Store in refrigerator or freezer to maintain the best quality until ready for use for backpacking or camping. They will stay fresh and tasty for up to 6 months in the freezer.
Drying Fish
Lean fish can be easily dehydrated. You can also dry fat fish, but it will not keep at room temperature more than a week unless smoked. Fish meat strips should contain about 15% moisture when it is completely dry. It will be pliable and firm. If there is any doubt about the dryness, store in refrigerator or freezer to avoid the risk of spoilage.
Cooked fish may also be dried, although it has a different taste than fish meat strips. It still makes a nice snack. Re-hydrating cooked fish is not recommended because the resulting product isn't very good.
Selection
Choose fresh fish to dry. If you catch the fish, clean it promptly and keep on ice until you are ready to dehydrate. If you are purchasing fish, make sure it is fresh and not previously frozen. Frozen fish can still be made into meat strips, but be aware that the quality is inferior to fresh.
Preparation
Cut fish into 1/4 to 3/8 inch thick strips. Marinate in your own favourite marinade with high salt content.
When using your own recipe, be sure to include at least 1-1/2 to 2 teaspoons salt per pound of fresh fish. Salt slows the growth of surface bacteria during the initial stages of drying. Marinate for at least 4 to 8 hours in refrigerator so fish will absorb salt and seasonings.
Drying
Dry fish meat strips at 70°C until they feel firm and dry, but do not crumble. There should be no moist spots.
Packaging and Storage
Store dried fish meat strips in the freezer if it will not be consumed within 2 to 3 weeks.
RECEIPES
Your electriQ dehydrator can be used to cook complex recipes. Many vegan or raw diet people are using dehydrators as their only cooking appliance.
For more recipes visit www.food.com/recipes/dehydrator
Tastiest Kale Chips
1 bunch Curly Kale
14 cup Almond Butter
12 Onion
2 tbs Extra Virgin Olive Oil
1 Garlic Clove
1 ½ tbs Miso Paste
1 tbs Thyme
1 ts Apple Cider Vinegar or lemon juice
1 teaspoon Mirin
14 teaspoon Turmeric
Wash kale and spin (or pat) dry. Tear leaves into pieces (removing stem), and place in a large bowl. Add rest of the ingredients to food processor and blend until smooth. Pour blended mixture over kale. Toss kale with rubber spatula until evenly coated (make sure it is even). Place kale on dehydrator trays.
Dehydrate at 60^ C for 2-4 hours, or at 50^ C (for raw food) for 3-6 hours (or until crispy)
Squash Tortillas
2 Cups Diced Yellow Squash
2 Cups Ground Flax Seed
1 ½ Cups Water
1 Tsp. Sea Salt
2 Tbsp. Dried seasoning of choice (all spice mix, oregano, dill, sweet paprika or chili powder) Combine first the squash diced and the water and herbs in a blender. Blend into a vegetable stock and then add in the ground flax seeds. Blend again until a thick paste forms. Spread immediately onto a baking parchment or Teflon lined tray at 1/8-1/4 inch thickness and dehydrate for 6 hours at 50°C degrees. Gently remove from tray and cut down into 4 pieces to use for many types of wrap. Makes 4 trays. Do not allow mixture to sit before dehydrating as it will become very thick and un-spreadable. If this happens add in up to 1 additional cup of water to make spreadable but do this only 1 time.
Sprouted Chips
2 Cups Sprouts (Barley, Rye, Kamut or Beans)
1 Cup Ground Flax Seed
1 Courgette
2 Tbsp. Chili Powder or Sweet Paprika
1 Tsp. Sea Salt
2 Cups Water
In a high powered blender combine first the sprouted grains, courgette, spices and then ground flax seed. Blend on high until a thick paste that is well combined forms.
Spread immediately onto a baking parchment or Teflon lined dehydrator tray in small round shapes and dehydrate at 50^ C for 6 hours. At 3 hours flip the chips over to reduce drying time. Store in an airtight container for up to 14 days, makes 10-12 chips.
Gardener Crackers
4 Cups Ground Golden Flax Seeds
2 Cups Carrot Juice or/and Parsnips (and leftover pulp)
2 Cups Water
4 Tomatoes
1 Clove Garlic
1 Spring Onion
1 Tbsp Dried Dill or Herbes de Provence
1 Tsp Sea Salt
In a high powered blender combine the roots juice, water, tomato, garlic green onion, sea salt and dried seasonings until a puree forms. Add in ground flax seeds and blend until thick paste forms. Place the root pulp (and any others you'd like to add in up to 2 additional cups – beets, greens and celery taste great!) in medium sized bowl and pour over flax mixture. Fold the mixture together using a spatula. Spread onto a baking parchment or Teflon lined tray dehydrator tray at 1/4 inch thickness. Dehydrate at 50°C degrees for 12 hours or until crunchy. These should be dry completely through. For best results score the crackers with a knife prior to loading dehydrator to create the desired shape. (Square,
rectangle, triangle) Store in an airtight container. Makes 4 trays.
Sundried Tomatoes Crackers
4 Cups Soaked Flax Seed
1 Beef Tomato
½ Cup of Sundried Tomatoes
2 Tbsp Dried Basil
1 Clove Garlic
1 Tbsp Sea Salt
Soak flax seeds 4 hours until they are nice and sticky. Soak the sundried tomatoes for 8 hrs. In a blender blend the sundried tomatoes, sea salt, basil and garlic. Toss this mixture and the flax seeds with the sliced fresh tomato until a thick mixture of seeds and vegetables has formed. Using a spatula spread onto a baking parchment or Teflon lined tray dehydrator tray at 1/4 inch thickness. Dehydrate at 50°C degrees for 14 hours until dry all the way through. You may flip the crackers 12 way through drying to speed up drying time. Makes 4 trays of crackers which can be saved in an airtight container indefinitely.
Marinated Veggie Salad
Vegetarian food does not have to be fad. Veggies are coming quite nice out of the dehydrator. If you marinate them and dehydrate them you are in fact just coating them with a nice glaze.
Use vegetables like squash, red peppers and mushrooms etc.
Make a marinade out of high quality extra virgin olive oil, sea salt, dried spices and 2 tablespoons of aged balsamic vinegar.
Marinade the finely sliced veggies for 1-2 hours in the fridge. Use a dehydrator tray to drain them in the fridge for 15 minutes before dehydrating.
Dehydrate at 50^ C degrees for 1-2 hours. Serve straight from dehydrator.
Tasty Brownies
2 Cups Walnuts or Hazelnuts
^3/4 Cup Agave Nectar or Maple Syrup
1 Cup Cacao or grated raw cocoa liquor
1 Tsp Cinnamon
1 Tsp Sea Salt
for the Sauce
1 Cup Cacao
14 Cup Raw Agave or Raw Honey
2 Tbsp. Coconut Butter
1 Tsp. Sea Salt
To prepare the brownie:
In a food processor, process nuts to a meal being careful not to over process into a butter. Then add to the mixture the cacao and spices and pulse to combine. Add the desired sweetener from the top while processing until a dough ball forms. Remove mixture from processor and spread over onto a baking parchment or Teflon lined dehydrator tray in equal square shapes. Dehydrate at 50°C degrees for 8 hours.
For the sauce blend all ingredients until a tick uniform sauce forms. Spread the sauce over the brownies and refrigerate for at least 30 minutes.
Nutty Cookies
5 Cups Wall Nuts or Cashews
1 Cup Raw Cacao
^3/_4 Cup Raw Honey or Agave Nectar
1 Tsp. Cinnamon
1 Tsp. Sea Salt
1 Dash Nutmeg
For Garnish – Desiccated Coconut, fresh berries or decorticated hemp seeds
In a food processor add the nuts, cacao, cinnamon, nutmeg, and sea salt. Process down until a nut meal forms being careful not to process into butter at this point. It is important the mixture still has body to create cookies. Then add the sweetener from the top of the food processor while processing until a dough ball begins to form. Turn off processor and scoop out mixture into a bowl. Line a plate with topping of choice, even just additional cacao will do and form the cookies. Garnish with the coconut or berries. Dehydrate at 50°C degrees for 14 hours on a baking parchment or Teflon lined tray dehydrator tray. Makes 15-20 cookies.
CLEANING & MAINTENANCE
- Make sure the unit is unplugged before cleaning.
- Your dehydrator trays and lid are easy to clean. Simply soak them in warm water with a mild detergent for several minutes. Wash trays and lid with a non-abrasive moist sponge or cloth. A soft-bristle brush will loosen food particles that resist softening by soaking. Dry thoroughly with a non-abrasive towel.
- Do not clean any parts with scouring pads, abrasive cleaners, or sharp utensils, as they tend to damage the surface.
- Wipe the Base with a damp, non-abrasive cloth and dry thoroughly. DO NOT immerse the Base or cord in water or any other liquid.
- To prolong the life for your appliance, hand-washing of parts is advised. Dishwasher use is not recommended. Never place the base in a dishwasher. If using a dishwasher only use top dishwasher tray and do not sit anything on the top of the dehydrating trays. Remove the trays from dishwasher before the drying cycle.
- Reassemble the unit and insert the cord into the storage area under the base.
TROUBLESHOOTING
| Fault | Probable Cause | Solution |
| Machine does not turn on | the plug is not correctly inserted in the electrical outletthe machine switch is not on fuse is burnt | plug in againturn the switch on change fuse |
| Display lights are not on | The machine is not switched on | Check the electrical outlet switchturn the switch on |
| Fan is working but there is no heat | heating system is out of order | turn the machine off and contact the nearest service centre asap |
| Heater is working but the fan is not working | the fan is out of orderforeign material is stuck on the fan | turn dehydrator off and contact the nearest service centreremove the foreign material |
| Not dehydrating | too much food on the traysfood is overlapping on the tray | reduce the food quantitydistribute food evenly on trays |
| Water drops on dehydrator walls | too much food on the trayfood contains too much water | reduce the food quantityreduce the food quantity and increase the dehydration time |
| Foods are not evenly dehydrated | the thickness of food is not even too much food on the trayfoods on upper or lower tray | slice evenly the foodreduce the food on the traychoose the correct tray |
| Abnormal sound from the fan | the fan is out of order | turn the machine OFF and contact the nearest service centre |
Technical Specification:
| Voltage | 220-240V, 50/60Hz |
| Power | 200-240 W; 13 Amps |
| Tray Size | 30 cm |
| Thermostat | 35°C – 70°C |
| Timer | 0-48 hrs |
| Number of Trays | 6 |
| Unit size (wxdxh) | 31.5 x 31.5 x 33.5 cm |
Recycling facilities are now available for all customers at which you can deposit your old electrical products. Customers will be able to take any old electrical equipment to participating civic amenity sites run by their local councils. Please remember that this equipment will be further handled during the recycling process, so please be considerate when depositing your equipment. Please contact the local council for details of your local household waste recycling centres.
ElectriQ UK SUPPORT
www.ElectriQ.co.uk/support
Please, for your own convenience, check the troubleshooting guide before calling the service line.
If the unit still fails to operate call: 0871 620 1057 or complete the online form
Office hours: 9AM - 5PM Monday to Friday
www.ElectriQ.co.uk
Unit 2, The Nursery
Berristow Lane
South Normanton
Derbyshire, DE55 2FX
- Digital Dehydrator with Timer EDFD04
- USER MANUAL
- Contents
- FEATURES
- Why Dehydrate...?
- SAFETY INSTRUCTIONS
- Important
- Unit Safety Protection and Performance Tips
- Parts and Assembly
- Notes:
- Adjustable Trays
- OPERATION
- General Dehydrating Guidelines
- Loading Trays and Selecting Produce
- Drying Times
- Drying Temperature
- Packaging
- Testing for Dryness
- Storage
- Drying Fruits
- Pre-Treatment
- Natural Pre-Treatment
- Hints and Suggestions
- Drying Fruit Rolls (Fruit Leather)
- Drying
- Fruit Drying Chart
- Drying Vegetables
- Blanching
- Microwave Blanching
- Vegetable Drying Guidelines
- Drying Herbs
- Using Dried Herbs & Spices
- Herb Drying Guide
- Drying Meat
- Drying Cooked Meats
- Drying Fish
- Selection
- Preparation
- Packaging and Storage
- RECEIPES
- Tastiest Kale Chips
- Squash Tortillas
- Sprouted Chips
- Gardener Crackers
- Sundried Tomatoes Crackers
- Marinated Veggie Salad
- Tasty Brownies
- Nutty Cookies
- CLEANING & MAINTENANCE
- ElectriQ UK SUPPORT
- www.ElectriQ.co.uk/support
- Please, for your own convenience, check the troubleshooting guide before calling the service line.
- If the unit still fails to operate call: 0871 620 1057 or complete the online form
Brand : ElectriQ
Model : EDFD04
Category : Food Dehydrator