EIQSOUSVIDE - Other Kitchen Appliances ElectriQ - Free user manual and instructions
Find the device manual for free EIQSOUSVIDE ElectriQ in PDF.


| Product Type | Sous Vide Cooker |
| Brand | ElectriQ |
| Model | EIQSOUSVIDE |
| Dimensions (approx.) | 30 x 10 x 10 cm |
| Weight (approx.) | 1.2 kg |
| Power Supply | AC 220-240V, 50/60Hz |
| Power Consumption | 1000W |
| Water Bath Capacity | Up to 5 liters |
| Temperature Range | 25°C to 95°C |
| Temperature Accuracy | ±0.1°C |
| Timer Range | Up to 99 hours 59 minutes |
| Display | Digital LED |
| Water Circulation | Built-in pump |
| Key Features | Precise temperature control, timer, audible alerts |
| Cleaning & Maintenance | Wipe with damp cloth; descale periodically |
| Safety | Overheat protection, low water auto shut-off |
| Installation | Includes clamp for attaching to container |
Frequently Asked Questions - EIQSOUSVIDE ElectriQ
User questions about EIQSOUSVIDE ElectriQ
0 question about this device. Answer the ones you know or ask your own.
Ask a new question about this device
Download the instructions for your Other Kitchen Appliances in PDF format for free! Find your manual EIQSOUSVIDE - ElectriQ and take your electronic device back in hand. On this page are published all the documents necessary for the use of your device. EIQSOUSVIDE by ElectriQ.
USER MANUAL EIQSOUSVIDE ElectriQ
natural_image
Electricity water purifier with digital display and control buttons (no text or symbols on body)Thank you for choosing electriQ
Please read this user manual before using this
Sous Vide Stick and keep it safe for future reference.
Visit our page www.electriQ.co.uk for our entire product range
Safety Precautions 2
Overview 3
Controls and Features 4
Troubleshooting 5
Cooking Basics 6
Cooking Settings Table 10
Temperature and Time Guide 11
Seasoning Suggestions 12
Please read carefully and retain for future use.
Technical Specifications
Temperature Range: 40 - 90°C
Temperature Adjustment: ± 0.1 °C
Timing Control: 10 minutes to 72 hours
Power: 800W Max
Safety Precautions
- Read all instructions before using the device.
- Do not touch the hot surfaces, always allow the system to cool before emptying water from the cooking container.
- To avoid the risk of electric shock never immerse the power cord or plugs in water and do not fill the water past the 'max' fill line. Never immerse the upper section of the machine in water or other liquid.
- Never operate the device with the stainless steel element cover removed.
- Always ensure the device is securely clamped.
- This appliance may be used by children over the age of 8 years old and by persons with reduced physical, sensory or mental capabilities or by persons with a lack of experience or knowledge if they are supervised or are instructed by a person responsible for their safety how to use the appliance safely and have understood the associated hazards.
- Unplug the device from the power outlet when not in use and before cleaning to avoid contact with moving parts. Never disassemble the device for cleaning more than is described in this guide.
- Do not operate the device with a damaged power cable or plug.
- Place your cooking container on a heat protector or mat to avoid damaging work surfaces.
- Never use deionized water.
- Always put food in a sealed bag/jar before submerging it in the water of the container being used.
- Consuming raw or under cooked meats, poultry, seafood, shellfish or eggs may increase the risk of food borne illness; always cook to the minimum time guide.
Overview
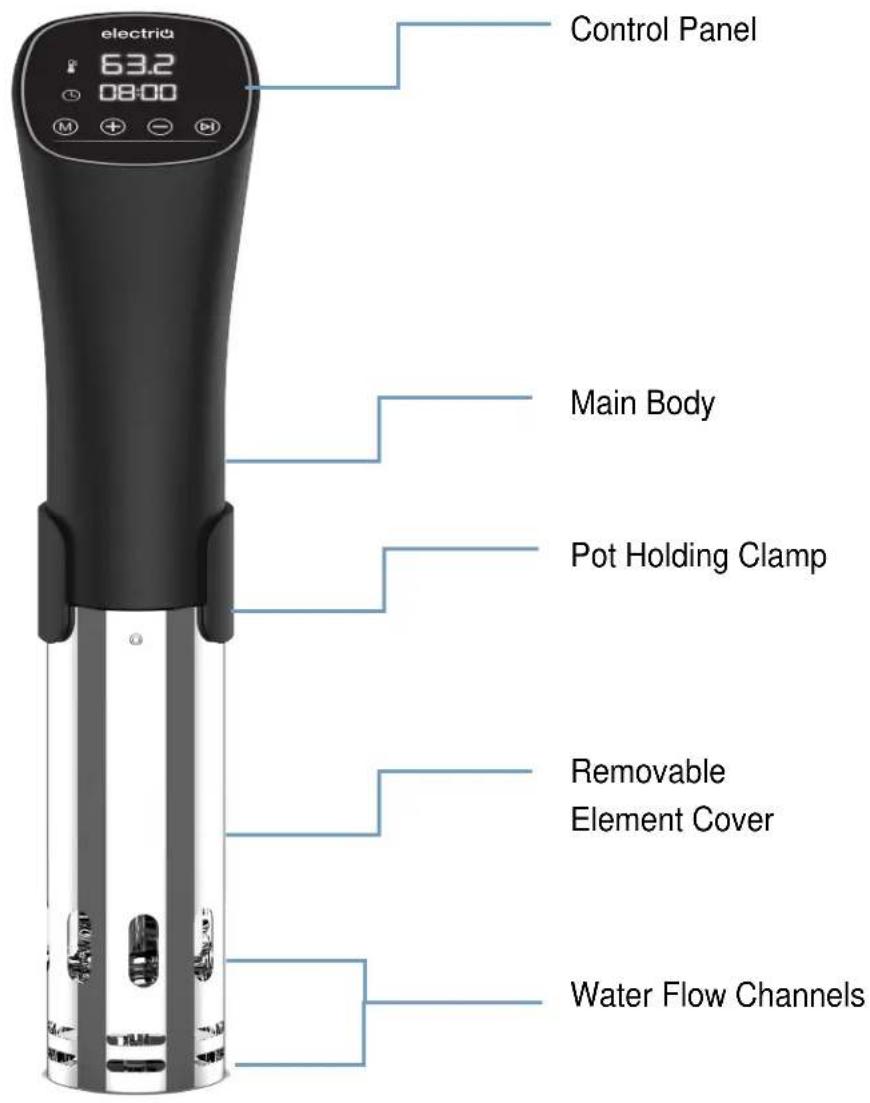
Controls and Features
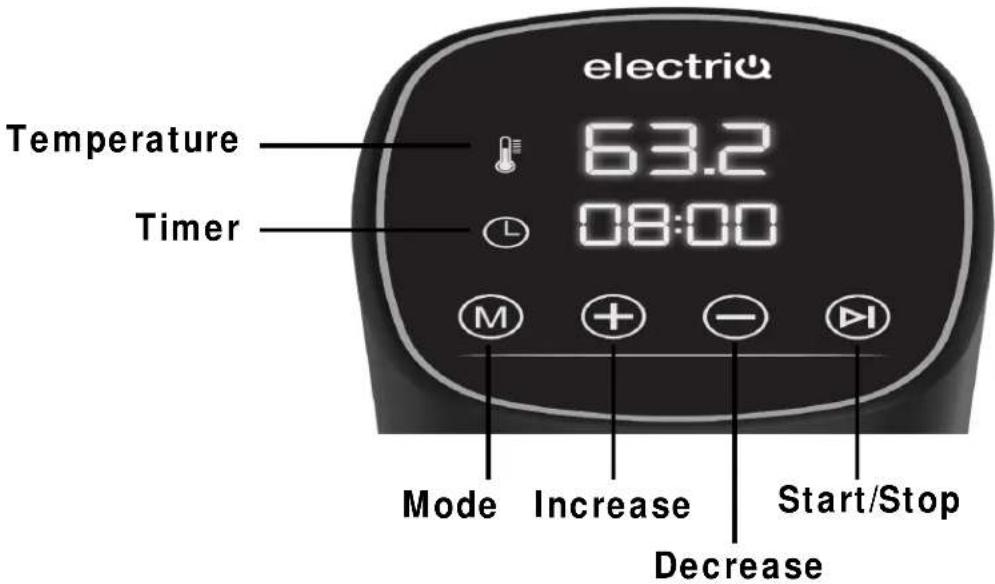
Quick Start Guide
Plug in the device and the 📋 button will begin to flash.
Place the Sous Vide stick into your chosen cooking vessel, making sure the water level is between the MIN and MAX fill levels.
Press and hold the Ⓜ button for 5 seconds to turn on the display.
The Sous Vide will default to a setting of 56°C and 08:00 hours.
To alter the settings simply press the 📂 button and the Temperature will begin to flash.
Press the ⊕ or ⊖ buttons to increase or decrease the temperature. A single press will increase/decrease the temperature by 0.1 °C, holding the button will increase/decrease the temperature by 1°C.
To alter the Timer simply press the 📄 button again and the timer will flash.
Press the ⊕ or ⬤ buttons to increase or decrease the timer. A single press will increase/decrease the timer by 1 minute (up to 2 hours) then 30 minutes up to 72 hours.
Once your desired settings are in place, press the Ⓞ button to start the unit running.
The current temperature of the water will show on the display and - - - will show in the timer. Once the desired temperature is reached the unit will beep. Place your vacuum packed food in the water to commence cooking.
Pressing the 📄 button whilst the unit is running will stop the appliance and return it to default settings.
Holding the Mutton for 5 seconds will switch the unit between °C and °F.
If the unit is lifted out of the water or the water level drops below the MIN line, the unit will stop and display the error code E1. Simply replace the unit in the vessel or top up with cold water and restart the unit.
Control Panel Features
Controls and Features
Setting Adjustment Buttons ☐ and ☑ touch the Mode icon 📋il the temperature display flashes. The Default temperature of 56 °C will flashes on the display screen, meaning that it is ready to be changed. Press and hold the increase ☐r decrease Ⓣset target temperature in increments of 1°C. Short presses will change the temperature in increment of 0.1°C.
Note: The temperature set range is 40 - 90°C.
Set cooking time: Touch the Mode icon 📂 twice until the timer display flashes. The default time of 08:00 will flash on the display screen, meaning that it is ready to be changed,
Press and hold the increase ☑r decrease ☐set timer in increments of 1 minute up to 2 hours, then 30 minutes intervals up to 72 hours.
Note: the time set range is up to 72:00 hours.
Settings Range
Default settings: temperature: 56 °C and time: 08:00 hours
Temperature setting range: From 40 °C to 90 °C
Time setting range: From 10 minutes up to 72 hours
Troubleshooting
If you experience any problem with your appliance, try these helpful tips.
Error code E1: When the water level falls below the MIN threshold mark on the circulator, it will trigger a sensor and cause the circulator to stop. Error code E1 will be featured on the display. Turn the appliance off, add sufficient water, turn it on again and the circulator will resume the cooking process.
Error code E4: When the water level falls below the MIN threshold mark on the circulator, and the water shortage sensor fails to activate, it will trigger the dry boil sensor and the circulator will stop. Error code E4 will be featured on the display. Turn the appliance off, add sufficient water and turn it on again. When the circulator has sufficiently cooled down, the circulator will resume the cooking process.
Cooking Basics
Sous Vide Cooking
Sous vide has been a popular cooking method in restaurants for several years. Sous vide is a French term which means “under vacuum” and is used to describe the process of packaging food in vacuum-sealed pouches and then cooking it in a water bath. Food slowly cooks at precise low temperatures over a long period of time to achieve succulent, delicious meals. Sealing food inside pouches allows it to cook in its own juices; you can also add any marinades or seasonings you like. Vitamins, minerals and juices are retained within the food and natural flavours are intensified. This allows the food to be healthier, more tender and tasty. Sous vide cooking is great for tougher and lower grade cuts of meat, such as chuck steak, for example, as the process tenderizes the meat. As it’s difficult to overcook using the sous vide method, you get perfectly cooked food every time, although you may notice slight alterations in texture. The ability to cook food in individual pouches makes the sous vide method perfect for families and entertaining, as you can easily cater to personal tastes and nutritional requirements and food can be prepared ahead of time.
Temperatures: The Sous Vide Stick has a temperature range of between 40^ C and 90^ C, with increment options of 0.1^ C. Different cooking temperatures are required for different types of food and you can always make adjustments for different degrees of doneness. See the Temperature and Time Guide on pages 11 for more information.
Time: The cooking time depends on the thickness rather than the weight of the food. The default cooking time of the unit is 8:00 hours. Time can be set from 10 minutes to 72 hours.
See the Temperature and Time Guide on page 11 - 12 for more Information.
Ideal Foods for Sous Vide Cooking
Meats are ideal to cook using the sous vide method as the process makes them more tender, succulent and flavourful.
Red meats: lamb, beef, pork
Poultry: chicken, turkey, duck
Seafood: fish, lobster tails, scallops
Eggs
Vegetables:
- Root vegetables - potatoes, carrots, parsnips, beets, turnips
- Tender vegetables - peas, asparagus, corn, broccoli, cauliflower, eggplant, onions, squash
Fruit:
- Firm fruits: apples, pears
- Tender fruits: mangoes, plums, apricots, peaches, nectarines, papayas, strawberries
Simple Steps to Sous Vide Cooking
Step 1. Seasoning your food
To enhance flavours, you may wish to add marinade, spices, herbs, butter or oil to your vacuum pouch prior to sealing.
Step 2. Vacuum sealing
Sous vide cooking requires food to be vacuum sealed inside pouches to remove excess air and moisture in order to lock in the food's natural taste and nutrients. Vacuum sealing also helps to relax the fibres in meat, poultry and seafood so that marinades and seasonings are more readily absorbed for greater intensity in flavour. Vacuum sealing can be easily achieved using zip-lock bags or similar. Simply fill a sink or large vessel with water and place the food and seasonings in a zip lock bag. Holding the top corners of the bag, slowly immerse in the water and the air will be pushed out. Once the bag is immersed up to the zipper, seal the bag. Take care not to immerse the bag too far before sealing as this may contaminate the food with water.
At electriQ we also offer a range of vacuum sealers and accessories that are perfect for preparing food for sous vide cooking.
Step 3. Cooking your food
When the desired sous vide water temperature has been reached, carefully place the pouches in the water. Ensure the pouches are fully submerged, and that water can easily circulate around the pouches for even cooking.
Step 4. Searing your food
After sous vide cooking, you may wish to finish off your dish by searing it to enhance the food's taste and appearance; this is particularly helpful when cooking meat. Remove the meat from the pouch and quickly sear it in a hot pan. This will enable the caramelisation of fats and proteins to bring out extra flavour.
Food Preparation
- Start with fresh, high quality ingredients.
- Ensure that all meat, seafood and poultry have been stored at below 5^ . We recommend using a digital food thermometer to check the temperature.
- Make sure that the food pouches are clean and that they've not been contaminated by dirt or other food items.
- Use detergent and warm water, or a sanitizing solution to clean the food preparation area.
- To avoid any cross-contamination, ensure that the area used for raw ingredient preparation does not come into contact with any cooked foods.
- Wash hands well before any food preparation.
Cooking
- Follow guidelines provided according to food type and thickness, as described in the Temperature and Time Guide on page 11.
- Note that smaller cuts of meat will cook faster.
- Ensure that the cooking pouch is completely sealed before starting the cooking process and check that the seal has remained sealed after cooking.
Storage
If the food you have cooked is not going to be consumed immediately, plunge the pouch into ice water to reduce temperature quickly. Keep refrigerated.
Setting Table
Cooking Settings
| The default Temp. | Temp. setting range | Hold press Interval (+/-) | Short press Interval (+/-) | The default Time | Time setting range | 10min - 2hours, Interval (+/-) | 2hours-72hours, Interval (+/-) |
| 56 °C | 40-90°C 1 °C | 0.1 °C | 8:00 | 00:10-72:00 hours | 1 min 30 | mins |
Temperature and Time
The following section provides some general guidelines to setting the temperatures and times for your sous vide cooking. You can always adjust according to your personal preferences
| FOOD | COOKING TEMPERATURE | Minimum Cooking Time | Maximum Cooking Time | THICKNESS |
| BEEF & LAMB | ||||
| Tender Cuts | ||||
| Tenderloin, cutlets, sirloin, | 49°C or higher | 1 hour | Up to 6 hours | 1-2cm |
| rib eye, rump, T-bone 49°C or higher | 2 hours | Up to 8 hours | 2-5cm | |
| Tougher Cuts | ||||
| Blade, chuck, leg of lamb, shoulder, shanks, game meats | 49°C or higher | 8 hours | Up to 10 hours | 4-6cm |
| PORK: | ||||
| Belly | 82°C | 10 hours | Up to 12 hours | 3-6cm |
| Ribs | 59°C | 10 hours | Up to 12 hours | 2-3cm |
| Pork Chops 56°C or higher | 4 hours | Up to 6 hours | 2-4cm | |
| Pork Roast 56°C or higher | 10 hours Up to 12 hours | 5-7cm | ||
| POULTRY: | ||||
| Chicken breast with bone | 82°C | 2 hours Up to 3 hours | 3-5cm | |
| Chicken breast without bone | 64°C | 1 hour | Up to 2 hours | 3-5cm |
| Chicken thigh with bone | 82°C | 11⁄2 hours | Up to 3 hours | 3-5cm |
| Chicken thigh without bone | 64°C | 1 hour | Up to 2 hours | 3-5cm |
| Chicken legs | 82°C | 2 hours Up to 3 hours | 5-7cm | |
| Duck breast | 64°C | 2 hours Up to 2 hours | 3-5cm | |
| FISH: | ||||
| Lean fish 47°C or higher | 1 hour Up to 1 hour | 3-5cm | ||
| Fatty fish 47°C or higher | 1 hour Up to 1 hour | 3-5cm | ||
| SHELLFISH: | ||||
| Shrimp | 60°C | 1 hour Up to 1 hour | 2-4cm | |
| Lobster tail | 60°C | 1 hour Up to 1 hour | 4-6cm | |
| Scallops | 60°C | 1 hour Up to 1 hour | 2-4cm | |
| VEGETABLES: | ||||
| Root vegetables 83°C or higher | 1 hour Up to 2 hours | 1-5cm | ||
| Tender vegetables 83°C or higher | 1 hour Up to 2 hours | 1-5cm | ||
Please note:
- Longer cooking times may alter food texture.
- Suggested times and temperatures are intended as guidelines; additional cooking time may be required to achieve desired result.
- All thicknesses in preceding table are measured once the food has been vacuum sealed.
- Thinner cuts of meat will cook faster.
Seasoning
Sous Vide cooking is all about the main ingredient and enhancing its natural flavor. The seasoning options with this style of cooking are endless. The Sunbeam Test Kitchen has provided suggestions for some great flavor combinations, as inspiration to get you started.
Lamb: (approximately 500g or 1 lb)
• 2 sprigs fresh rosemary and 1 teaspoon garlic powder
- 2 sprigs fresh mint
• 2 sprigs fresh thyme
• 3 anchovies, finely chopped
- 1 teaspoon ground coriander and 1 teaspoon ground cumin
• 1 tablespoon Moroccan spice rub - 2 tablespoons olive oil, 1 tablespoon of lemon zest and 1 teaspoon garlic powder
Beef: (approximately 500g or 1 lb)
- 50 g / 2 oz butter, 2 cloves crushed garlic, 2 sprigs fresh thyme
- 50 g / 2 oz butter, 2 cloves crushed garlic, 2 sprigs fresh parsley
- 50 g / 2 oz butter, 2 tablespoons fresh chives, 1 tablespoon grainy mustard
- 1 tablespoon olive oil, 2 sprigs fresh thyme, 50 g / 2 oz cooked bacon
Salmon: (approximately 500g or 1 lb)
- 1 tablespoon soy sauce, 1 tablespoon honey and 1 teaspoon grated ginger
- 2 tablespoons maple syrup, 1 tablespoon soy sauce and 1 teaspoon garlic powder
- 2 tablespoons teriyaki sauce, 1 teaspoon grated ginger, 1 teaspoon garlic powder and 1 teaspoon chili flakes
White Fish: (approximately 500g or 1 lb)
• 2 slices lemon, 2 sprigs fresh dill
- 1 stalk lemon grass, 14 cup fresh basil, 2 slices lime
- 1 tablespoon soy sauce, 1 teaspoon sesame oil and 2 sprigs fresh coriander
- 1 tablespoon fresh dill, 1 teaspoon smoked paprika, 1 teaspoon lemon rind, 1/2 teaspoon cayenne
Chicken: (approximately 500g or 1 lb)
• 2 slices lemon, 2 sprigs fresh thyme
- 50 g / 2 oz browned butter, 4 fresh sage leaves, salt and black pepper
- 20 g / 1 oz butter, 2 sprigs fresh flat leaf parsley, 2 tablespoons capers
• 1 onion, 1 clove garlic, 1/2 cup chopped tomatoes, 1/4 cup fresh basil
- Mix 1 tablespoon ricotta with 1 tablespoon lemon zest and stuff mixture into chicken breasts
Pork: (approximately 500g)
- 1 tablespoon fennel seeds, 1 teaspoon sea salt, 1 teaspoon black pepper
• 1/4 cup apple sauce, 1 teaspoon sea salt, 1 teaspoon black pepper - 1 tablespoon lemon zest, 1 tablespoon fresh thyme, 1 tablespoon fresh sage, 1 teaspoon sea salt, 1 teaspoon black pepper
- 1 tablespoon ground cumin, 1 tablespoon ground coriander, 1 teaspoon cinnamon, 1 teaspoon brown sugar, 1 teaspoon chili flakes
electriQ UK SUPPORT
Complete online support form on www.electriQ.co.uk/support
Service Line: 0871 620 1057
Office hours: 9AM - 5PM Monday to Friday
www.electriQ.co.uk
Unit 2, The Nursery
Berristow Lane South Normanton
Derbyshire, DE55 2FX

PRODUCT DISPOSAL
Do not dispose this product as unsorted municipal waste. Collection of such waste must be handled separately as special treatment is necessary.
Recycling facilities are now available for all customers at which you can deposit your old electrical products. Customers will be able to take any old electrical equipment to participating civic amenity sites run by their local councils. Please remember that this equipment will be further handled during the recycling process, so please be considerate when depositing your equipment. Please contact the local council for details of your local household waste recycling centres.
- Technical Specifications
- Safety Precautions
- Controls and Features
- Quick Start Guide
- Control Panel Features
- Settings Range
- Troubleshooting
- Cooking Basics
- Sous Vide Cooking
- Ideal Foods for Sous Vide Cooking
- Eggs
- Vegetables:
- Fruit:
- Simple Steps to Sous Vide Cooking
- Step 1. Seasoning your food
- Step 2. Vacuum sealing
- Step 3. Cooking your food
- Step 4. Searing your food
- Food Preparation
- Cooking
- Storage
- Setting Table
- Cooking Settings
- Temperature and Time
- Please note:
- Seasoning
- Beef: (approximately 500g or 1 lb)
- Salmon: (approximately 500g or 1 lb)
- White Fish: (approximately 500g or 1 lb)
- Chicken: (approximately 500g or 1 lb)
- Pork: (approximately 500g)
- electriQ UK SUPPORT
- PRODUCT DISPOSAL
Brand : ElectriQ
Model : EIQSOUSVIDE
Category : Other Kitchen Appliances