USER MANUAL WMB 10 W BEKO
Automatic washing machine
installation & operating instructions and washing guidance
WMB 10 W
get the best from your
new washer
Dear customer
Congratulations on your choice of a Beko quality washing machine which has been designed to give you lasting service.
Please read these instructions thoroughly before installing or using - and keep for handy reference. Make sure you understand the controls prior to using your appliance. The washer must only be used for its intended purpose, ie the washing of clothes in the home. Failure to observe these instructions may invalidate your right to free service during the guarantee period.
If you have any questions, or if you are not sure about any information contained in this booklet please contact us - details are on the back cover.
Beko Customer Service
Notes
Due to the quality control processes during production, there may be some water left in your machine. This does not cause any damage.
Note that temperatures in this book are for guidance only. Always check the clothing labels before selecting your wash program
Introduction
Welcome 2
Installation
Know your washing machine/specification 4
Location 5
Installation 5
Electrical connection 7
Operating
How to use 8
Programme descriptions 10
Function buttons 11
ITCL fabric care symbols 11
Machine care
Care & maintenance 12
Before calling service/trouble shooting 14
Guarantee 15
Service 15
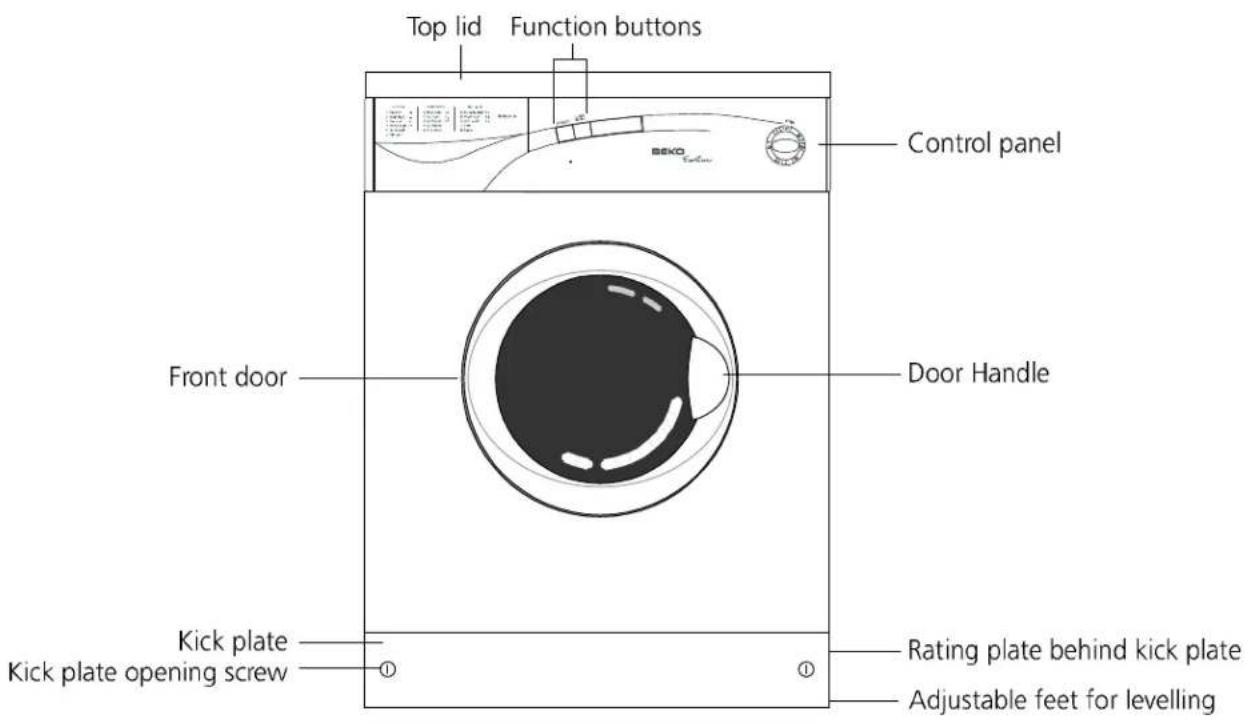
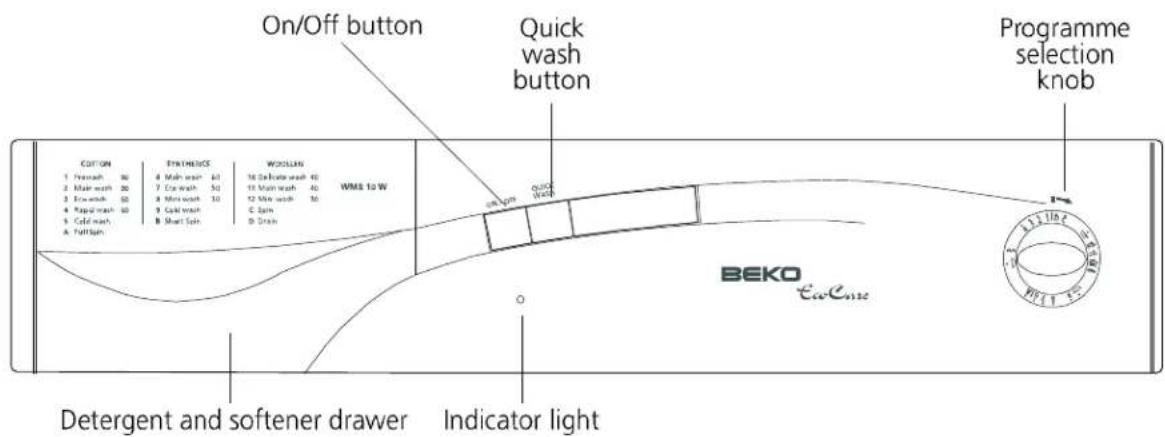
Know your washing machine
Specification
| Capacity (dry fabric) | 5 kg |
| Dimensions width x depth x height60cm x 54cm x 85cm |
| Net weight | 60kg |
| Supply voltage | 230V~ 50Hz |
| Nominal current | 10A |
| Motor power | 350 watts |
| Heater power | 2100 watts |
| Washing speed | 52 rpm |
| Spin speed | 1000 rpm |
Because we continually strive to improve our products, we may change our specifications and designs without prior notice.
You can locate the washing machine anywhere (except bathrooms, showers and away from rain, damp places and water) as long as you have hot and cold water supply, drainage and electrical connection alongside.
Ensure there is clearance each side of the machine to allow slight sideways movement during washing and spin drying.
Attention!
Never place your machine on a carpet. This prevents air circulation. The electrical components of the machine may overheat and may cause damage.
Please ensure the power, water supplies and waste are suitable, if in doubt, consult a qualified plumber or electrician.
Installation
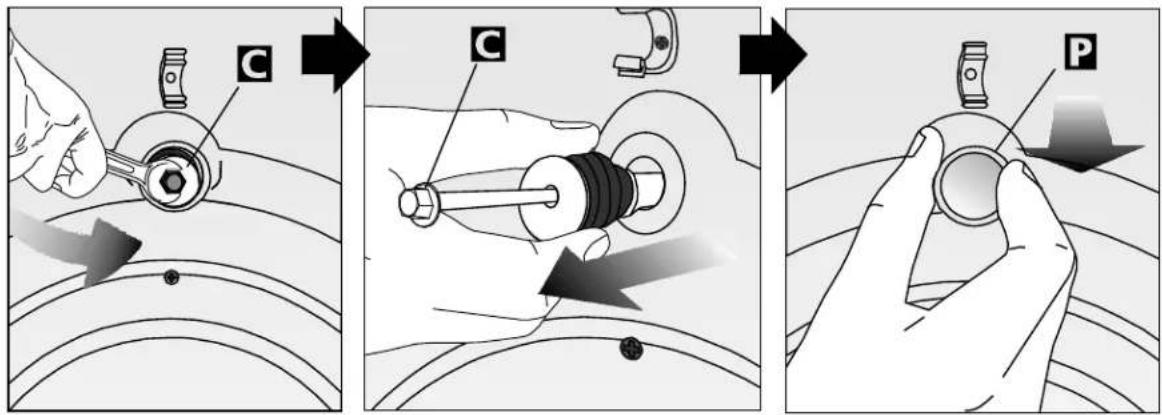
Removing transport safety bolts
The transport safety bolts must be removed before any operation of the machine.
1 Turn the bolt heads C anti-clockwise until the bolt can be partially withdrawn.
2 Remove them and the rubber bushes by pulling outwards. An up/down action and a small squirt of washing up liquid will ease removal.
3 Plastic plugs, supplied inside the protective bag, designated P should be placed in the safety bolt holes as shown.
Attention!
Keep the safety bolts for future transportation and reinstate them before transporting your machine. Never transport your machine without the transport bolts in position. Any resultant damage is not covered by the warranty.
Feet adjustment
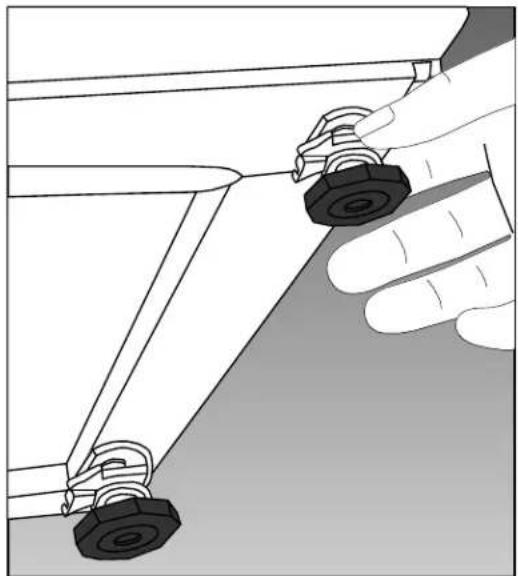
To ensure quiet and stable operation, the machine should be positioned correctly and on the level. If the machine is unstable, adjust one of the front feet by loosening the plastic lock nut and screwing or unscrewing the foot until the machine is level. After positioning, tighten the lock nut.
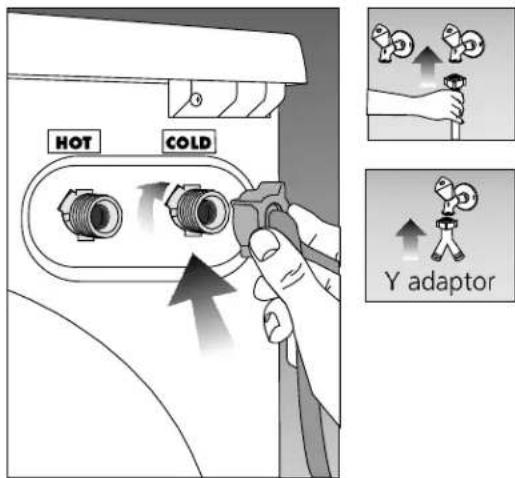
Water inlet connections
Your machine comes with both cold and hot water connections.
Connect the cold water using the hose with blue printing and connect the hot water using the hose with red printing. If you have only a cold water feed a Y adaptor will be required (available from most D.I.Y. stores).
Cold water supply
For proper operation, the pressure of cold water should be between 1 and 10 bars. (1 bar corresponds to more than 8 litres per minute flow rate with a fully open tap.)
Hot water supply
Pressure: 1-10 bar Temperature: 60°C max.
A hot water supply fed from a separate cold water tank will normally be suitable. Open outlet gas or electric water heaters must not be used. Multipoint water heaters or combination boilers may be suitable if they are designed to supply washing machines. (Check your boilers operation instructions or supplier.)
If the hot water supply is unsuitable, connect both hoses to the cold water supply using a Y connection. The only disadvantage of this is the machine will use more electricity to heat the water and take longer to wash on some programs.
To prevent water leaks, four sealing washers are supplied with the water inlet hoses inside the machine. Place these on each of the hose ends and tighten both ends fully.

In order to prevent any water leakage and damage, turn off the water taps when not in use. Connect the cornered end of the hose to the machine water inlet.
Drain hose
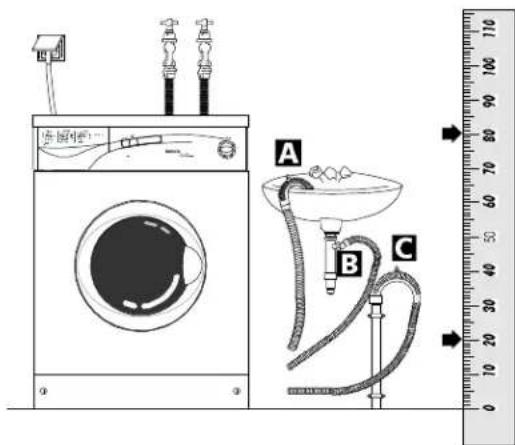
The drain hose should be placed and secured either at the side of the sink (A), directly to the drain (B), or directly to the waste water inlet (C).
• The hose should not be bent. - Using method A, the drain hose should be secured with the elbow so that it cannot be dislodged. - The waste pipe must only be connected into the foul drains and not surface water drainage system. - The hose should be placed between 20 and 80 cm from the floor level and must not be extended, otherwise the machine may not empty the waste water. - The minimum diameter of any external pipe must be 32 mm.
Make sure that you have an earthed power outlet socket rated at 13 amps (minimum).
Attention!
If you use your machine as built-in, the socket must be reachable after installation, or a separate switch (which can disconnect the two poles) must be used in the installation.
Connect the power cord to the appropriate electrical socket with an equivalent current rating indicated on the rating plate at the front of the machine behind the kick plate.
Electrical requirements
Before you insert the plug into the wall socket, make sure that the voltage and the frequency shown in the rating label correspond to your electricity supply.
We recommend that this appliance be connected to the mains supply via a suitable switched and fused socket in a readily accessible position.
Should the mains lead of the appliance become damaged or need replacing at any time, it must be replaced by a special purpose made mains lead which can only be obtained from a Beko Authorised Service Agent.

Warning
This appliance must be earthed.
If the fitted moulded plug is not suitable for your socket, then the plug should be cut off and an appropriate plug fitted.
Destroy the old plug, which is cut off, as a plug with a bared cord could cause a shock hazard if inserted into a socket elsewhere in the house.
The moulded plug on this appliance incorporates a 13A fuse. Should the fuse need to be replaced, an ASTA approved BS1362 fuse of the same rating must be used. Do not forget to refit the fuse cover. In the event of losing the fuse cover, the plug must not be used until a replacement fuse cover has been fitted. Colour of the replacement fuse cover must be the same colour as that visible on the pin face of the plug. Fuse covers are available from any good electrical store.

Important
Fitting a different plug
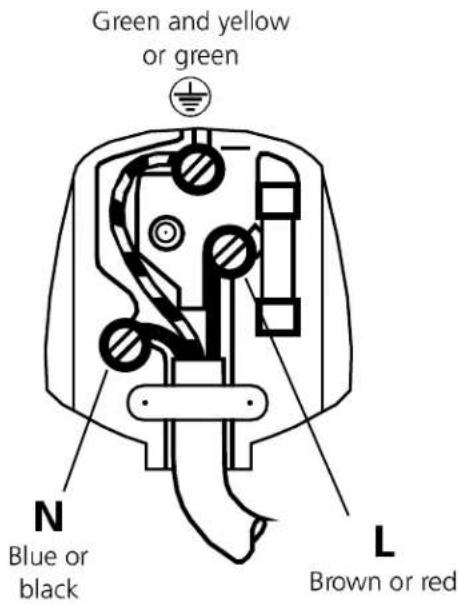
As the colors of the wires in the mains lead of this appliance may not correspond with the colored markings identifying the terminals on your plug, proceed as follows:
1. Connect the green-yellow or green (earth) wire to the terminal in the plug marked 'E' or with the symbol ⏻ or colored green and yellow or green. 2. Connect the blue (neutral) wire to the terminal in the plug marked 'N' or colored black. 3. Connect the brown (live) wire to the terminal in the plug marked 'L' or colored red.
With alternative plugs, a 13A fuse must be fitted either in the plug or adaptor or in the main fuse box. If in doubt, contact a qualified electrician.
Sorting laundry
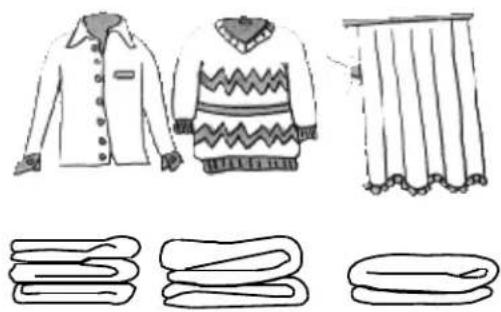
Sort the laundry according to the following groups and wash them separately:
• White and colorfast fabrics • Non-fast, colored fabrics • Delicate fabrics (silk, rayon, etc.) - Woollens - Hand knits should be placed inside out in the machine.
Be sure to empty pockets and remove any belts, buckles, pins, etc. from the clothing.
Loading the machine
Make sure the power button is off.
1. Pull the door open handle. 2. Place the fabrics uniformly inside the machine. Make sure that there is no clothing obstructing the door. 3. Close the door by pushing lightly.
If the door does not close completely, the machine will not start. This is a safety precaution. The front door is locked until the end of the washing programme and it cannot be opened for about 2 minutes following the end of the programme.
Programme selection
Select the programme after referring to the programme descriptions and table on page 10.
Warning! Always switch off the machine before selecting your wash programme.
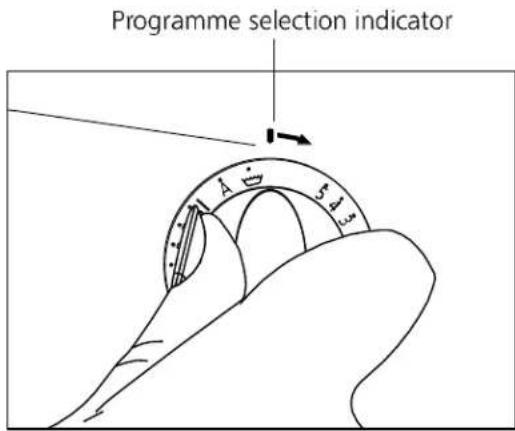
1 Press in the middle of the knob to release the child-safe programme selection knob. 2 Turn the programme selection knob clockwise and bring the programme number required in line with the programme selection indicator. You have selected both the washing programme and the washing temperature at the same time. 3 Push in to prevent children tampering with it.
Function selection
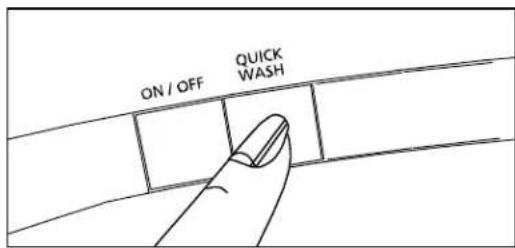
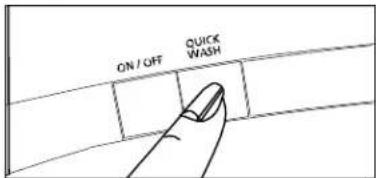
Quick wash function button can be selected now if needed, see page 11, for suitable programmes.

Detergent and softener dispenser
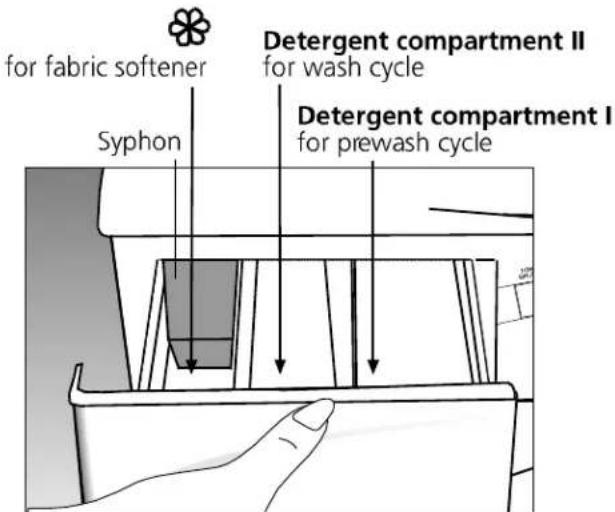
1 Open the drawer. 2 Put powder detergent and the fabric softener in the compartments as shown. 3 Close the detergent and softener drawer.
Powders and liquids
The performance of the washing machine depends on the effectiveness of the detergent. Stains can remain if low quality detergents are used.
- Only use powders specific for automatic washers, otherwise over foaming and poor washing performance will be experienced.
- Do not use liquid detergent in your detergent drawer. Only use liquid detergents with a dosing ball.
- Do not attempt to use detergents and bleaching agents that contain chlorine and sulphur.
- Concentrated softener may clog the syphon, in this case add some water to the softener liquid.
Amounts
Follow the manufacturer's recommended amount of detergent given on the packaging.
Adjust the amount according to the dirt level, the amount of fabric and the softness of the water. For example, if a small amount of clothing is washed, put in half the amount of detergent normally required.
- Do not fill the fabric softener above the max mark as any excess amount will mix into the wash water and you will have to re-fill the compartment.
Starting
Attention!
Before any operation of the machine check the following:
• Have you closed the front door? - Are the taps open? - Is the drain hose placed and secured properly? • Is power connected?
To start the programme, press the On/Off button. The indicator will light and the closed door will be locked in a few seconds. The programmer knob will rotate and advance to the correct point to commence washing. This is a normal function of the programmer.
Programme operation
During the machine's operation, the programme selection knob turns clockwise and follows the programme steps.
1, 2, 3, 4, 5 and A programmes end on the line after A. 6, 7, 8, 9 and B programmes end on the line after B. 10, 11, 12 and C programmes end on the line after C. If fabric softener is added in the softener compartment, it will be used in the last rinse cycle.
Unloading
The machine stops automatically after programmes are completed.
1 Press the On/Off knob to turn off your machine. 2 The door can be opened by gently pulling the door open handle 1-2 minutes after the washing cycle is completed. Turn off the taps. 3 Unload the machine, and leave the door open to air the interior.
| No. | Wash Temperture | Fabric Type | Max. Load (kg) | Programme Description | Detergent Compartment | Programme Duration (~min) | Water Consumption (l) | Energy Consumption (kWh) |
| | | | | | | | |
| 1 | 90 | Heavy soiled fabrics made from cotton or linen, heat resistant | 5 | Pre-wash / Main wash /3 rinses /3 intermediate spins / Final Spin | I+II | 140 | 65 | 2.10 |
| 2 | 90 | Heavy soiled fabrics made from cotton or linen, heat resistant | 5 | Main wash /3 rinses /3 intermediate spins / Final Spin | II | 130 | 56 | 1.90 |
| 3 | 60* | Normal soiled fabrics made from cotton or linen, heat resistant | 5 | Main wash /3 rinses /3 intermediate spins / Final Spin | II | 130 | 56 | 0.95 |
| 4 | 40 | Lightly soiled fabrics made from cotton linen non-colour fast | 5 | Main wash /3 rinses /3 intermediate spins / Final Spin | II | 120 | 60 | 0.52 |
| 5 | cold | Lightly soiled fabrics made from cotton linen non-colour fast | 5 | Main wash /3 rinses /3 intermediate spins / Final Spin | II | 90 | 56 | 0.15 |
| A | - | Final Spin | 5 | Final spin profile for cotton | - | 10 | - | - |
| | | | | | | | |
| 6 | 60 | Normal Soiled Easy care fabrics made from cotton, synthetics or blended fabrics | 2.5 | Main wash /3 rinses /3 intermediate spins/ Final Spin | II | 110 | 50 | 0.85 |
| 7 | 50 | Lightly Soiled Easy care fabrics made from cotton, synthetics or blended fabrics (non-colour fast) | 2.5 | Main wash /3 rinses /3 intermediate spins/ Final Spin | II | 100 | 50 | 0.73 |
| 8 | 30 | Lightly Soiled Easy care fabrics made from cotton, synthetics or blended fabrics (non-colour fast) | 2.5 | Main wash /3 rinses /3 intermediate spins/ Final Spin | II | 95 | 50 | 0.45 |
| 9 | cold | Lightly Soiled Easy care fabrics made from cotton, synthetics or blended fabrics (non-colour fast) | 2.5 | Main wash /3 rinses /3 intermediate spins/ Final Spin | II | 70 | 50 | 0.10 |
| B | - | Final Spin | 2.5 | Final spin profile for easy care | -I | 10 | - | - |
| | | | | | | | |
| 10 | 40 | Sensitive, easy care fabrics made from cotton, synthetics or blended fabrics | 2 | Main wash /3 rinses / Final Spin (no intermediate spin) | II | 55 | 50 | 0.30 |
| 11 | 40 | Washable wool and wool mixtures | 1.5 | Main wash /3 rinses / Final Spin (sensitive wash action / no intermediate spin) | II | 45 | 45 | 0.55 |
| 12 | 30 | Washable wool and wool mixtures | 1.5 | Main wash /3 rinses / Final Spin (sensitive wash action / no intermediate spin) | II | 35 | 45 | 0.30 |
| C | - | Spin | - | Final spin profile for Delicate | - | 2.5 | - | - |
| D | - | Discharging | - | Drainage | - | - | - | - |
*:Energy Labelling program acc. to EN 60456:1999 ve IEC 60456 Ed.4 2001
Depending on water, textile and ambient conditions the actual values given on or with the machine can deviate from the declared standard values, as they are tested according to the laboratory conditions.
Quick wash
This function should be used for lightly soiled fabrics. If you press this button, the washing time will be reduced. You can use this function only on cotton (programs 1, 2, 3, 4, and 5) and synthetic (programs 6, 7, 8, and 9).
ITCL fabric care symbols
Descriptions of the international textile care label (ITCL) symbols.
Washing temperature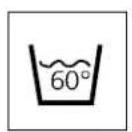
Bleach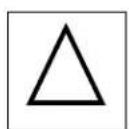
Do not use bleach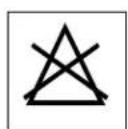
Do not machine wash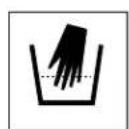
Dry on horizontal surface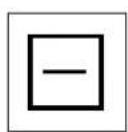
Do not wash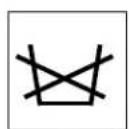
Dry clean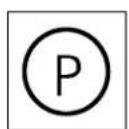
Chemicals can be used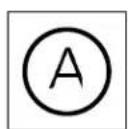
No dry cleaning
No spin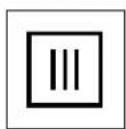
Can be washed in centrifugal machine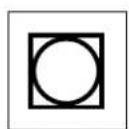
Do not wash in centrifugal machine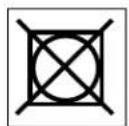
Line dry
Iron permitted
Do not iron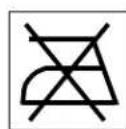
Warm iron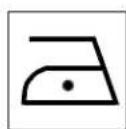
Detergent dispenser
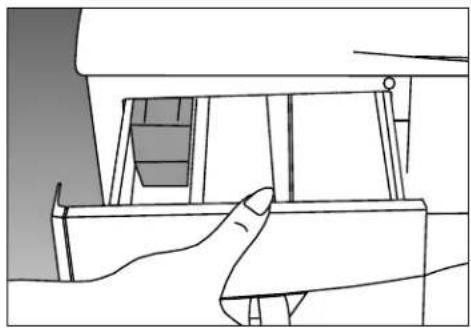
It is necessary to remove the detergent dispenser drawer from time to time to clean away residue and ensure correct operation.
To remove
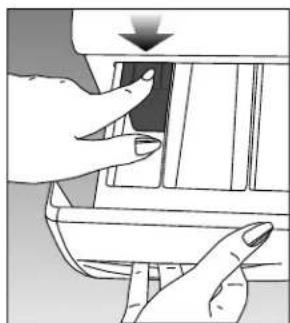
Pull out the drawer and press down on the coloured insert to release it fully from its housing. Wash the drawer in warm water to remove detergent residue and before replacing wipe out the housing.
Syphon
The syphon (coloured insert in the dispenser) must be cleaned every 30-40 washes. Remove the dispenser drawer and lift out the syphon and wash in warm water to remove any softener residue. Refit ensuring that the syphon is correctly fitted before use.
Maintenance wash
If you regularly use low temperature programs, certain detergents cause build up of greasy deposits over time. We recommend a hot maintenance wash once every 6 months to clear such accumulation of residue.
Simply run the wash programme "2" without laundry using the usual amount of detergent.
Water intake filter
At the end of the water intake connection and water inlet hose-tap side there are filters. These filters prevent any dirt and objects passing into the machine. It is advisable that these filters should be cleaned every 30-40 washes. To clean these filters, first turn the tap off. Then, disconnect the hose and clean the filter with a thin brush. If the filter is very dirty, you may clean it by pulling out with pliers. To clean the filter at the tap side of the hose, pull it out by hand and clean the filter under tap water. Ensure that the sealing rings are in place before reassembly.


Pump filter warning
When the appliance is in use and depending on the programme selected there can be hot water in the filter. Never remove the filter during a wash cycle, always wait until the appliance has finished the cycle, and is empty. When replacing the filter, ensure it is securely retightened so as to stop leaks and young children being able to remove it.
Hoses
To prevent any leakage, check the hoses every two years. If the machine is placed in cold ambient temperatures, the water remaining inside the pump and hoses should be drained to prevent freezing, empty the water intake hoses by disconnecting from taps.
Drum
Do not leave any metal objects (pins, needles, etc.) inside the drum. These objects may cause rust on the drum surface and stain clothing. Do not clean the drum with abrasive materials.
Cleaning the pump filter
Warning
When the appliance is in use and depending on the programme selected there can be hot water in the filter. Never remove the filter during a wash cycle, always wait until the appliance has finished the cycle, and is empty. When replacing the filter, ensure it is securely retightened so as to stop leaks and young children being able to remove it.
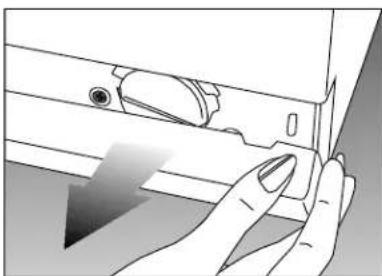
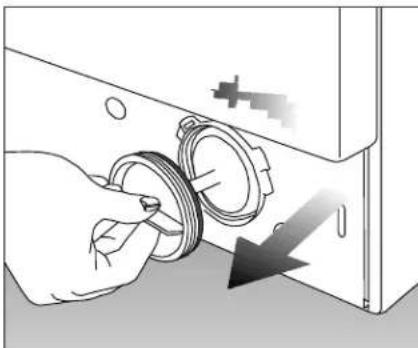
To prevent objects entering the pump and causing damage, your machine employs a filter system that extends the pump life. It is advisable to clean the filter every 30-40 washes. Before opening the filter door, disconnect the power. Turn the opening of kick plate screws 90° with the help of a screw driver or a coin. Place a little pan in front of the filter door to catch the small amount of water spilling from the machine. Remove the filter by turning in an anti clockwise direction. After cleaning the filter, replace it by turning clockwise making sure that it is closed firmly. Replace the kick plate and secure it by the locking screws.
Attention!
Ensure the machine is empty of water before removing the filter. If the filter has not been replaced correctly water will leak out from the filter.

Before calling service/trouble shooting
You turned the machine on, but the indicator light is not lit
Have you plugged in and switched on at the socket? Check the power cable, or for a blown fuse. Check the front door is properly closed.

Machine does not take in water
- Check the door for proper closure. Either taps are closed or water inlet filters are clogged.
- Turn the program selector clockwise until a clicking action is present. Set to the program required.

Water is syphoned / discharged
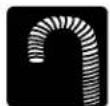
Check if the discharge hose is positioned as described on page 6.
If the machine vibrates or is too noisy
- Have all the transit bolts and packing been removed? • Is the machine touching something? • Are all the feet resting firmly on the ground? • Have the lock nuts been secured?
- Has the recommended wash load been exceeded? (Max 5 kg dry weight)
Water coming from beneath the machine
Check the water inlet and drain hoses. Tighten the connections. The washers of the hoses may be worn out or the pump filter may not be closed properly.
Foam coming out of the detergent dispenser
Check whether your detergent is suitable for automatic machines. Next time use less detergent.
Pump does not drain water
Clean the pump filter. Do not attempt to remove the filter if the machine is full of water. Check whether the drain hose is bent or not. If there is a need to clean the pump filter, refer to the pump filter cleaning section on page 13.
Your Beko washing machine is guaranteed for twelve months from the date of the original purchase. Any defect that arises due to faulty materials or workmanship will be repaired free of charge during this period. The guarantee is subject to the following provisions.
- The guarantee does not cover accidental or transit damage, misuse, cabinet parts, knobs or consumable items.
- The guarantee does not cover repairs or service calls required as a result of inexpert or faulty installation.
- The product must be correctly installed and operated in accordance with the instructions contained in the operating instruction booklet.
- The product is designed for domestic use only. The installation of this product on business premises for commercial use will invalidate the guarantee.
- The guarantee is only valid within the boundaries of the United Kingdom and the Republic of Ireland.
- The guarantee will be rendered invalid if the product is resold or has been affected by inexpert repair.
- Beko (UK) Ltd. disclaims any liability for incidental or consequential damages.
- The guarantee is in addition to and does not diminish your statutory or legal rights.
Service
Service under manufacturer's guarantee
Please keep your purchase receipt in a safe place as you will need to produce it should the product require attention whilst under guarantee. Please also complete the details below, you will need it when requesting service. Model and Serial Numbers can be found on the rating label, which is located behind the kick plate.
In the event of breakdown, please refer to your operating instructions and check all plugs, fuses and electricity supply.
Before requesting service please also check the trouble-shooting section as a charge may be levied where no fault is found even though the appliance may still be under guarantee.
Please call the appropriate number below for service, advising the name of the retailer.
Service out of manufacturer's guarantee
If you have purchased an extended guarantee from the retailer, please contact your insurance company or retailer. Otherwise please call the numbers below where service can be obtained at a charge.
Please complete for your records
| Model number |
| Serial number |
| Date of purchase |
| Purchased from |
| Location | Please call for service |
| UK | 0870 241 0357 |
| Northern Ireland | Refer to service instructions from retailer, if none supplied call 0870 241 0357 |
| Republic of Ireland | 01 862 3411 |
BEKO
Beko (UK) Ltd. Beko House, Caxton Way, Watford Hertfordshire, WD18 8UF
Tel: 01923 654650 Fax
: 01923 819653
Email: service@beko.co.uk www
.beko.co.uk