
DVD-System Tablet - DVD player BMW - Free user manual and instructions
Find the device manual for free DVD-System Tablet BMW in PDF.


| Product Type | DVD player system with dual monitors for car |
| Brand | BMW |
| Model | DVD-System Tablet |
| Category | DVD player |
| Power Supply | 12 V DC via cigarette lighter or optional power pack (min. 1.5 A) |
| Playable Discs | DVD video, Audio CD, MP3, JPEG, WMA, DivX |
| Supported Formats | MP3, WMA, JPEG, DAT, VOB, MPEG2, MPEG4 (AVI, DIV) |
| Screen Size | Approx. 7-9 inches per monitor (typical for headrest monitors) |
| Number of Monitors | 2 (one with integrated DVD player, one without) |
| Remote Control | Included, uses CR2025 battery |
| Accessories Included | Storage bag, remote control, feet (2x), monitors (2x), mounts (2x), connecting/power cable (12 V), Allen key, operating instructions |
| Audio Output | Headphone jack, infrared headphone (optional) |
| Connections | DC IN 12 V, headphone jack, iX port (for accessories), USB, card slot (SD/MMC/MS) |
| Setup Options | Language, display (brightness/color/screen format), TV system (NTSC/PAL/Auto), password, rating, audio output (analogue/SPDIF) |
| Safety Features | Laser class, password protection for age rating, automatic shutdown of infrared headphone |
| Cleaning Instructions | Soft dry cloth; for stubborn dirt, use neutral cleaner diluted with water |
| Repair Policy | Do not attempt self-repair; only qualified professionals authorized by BMW |
| Spare Parts/Accessories | Optional: power pack, infrared headphone, AV box, TV box, FM docking |
| Weight (Approx.) | Each monitor approx. 0.5 kg (typical for headrest monitors) |
| Operating Temperature Range | -10 °C to 60 °C |
Frequently Asked Questions - DVD-System Tablet BMW
User questions about DVD-System Tablet BMW
0 question about this device. Answer the ones you know or ask your own.
Ask a new question about this device
Download the instructions for your DVD player in PDF format for free! Find your manual DVD-System Tablet - BMW and take your electronic device back in hand. On this page are published all the documents necessary for the use of your device. DVD-System Tablet by BMW.
USER MANUAL DVD-System Tablet BMW
DVD systems tablet
Operating instructions
Contents
General information 34
Remarks on the operating instructions
Symbols used
Safety instructions 34
Cleaning and care
Using at home with optional power pack
playable media
Accessories and supplied package 37
Operating elements and connections 38
Operating elements
Connections
First steps 41
Using the DVD systems tablet in the car
Using the DVD systems tablet at home
Remote control
Playing a disc
Setup 48
Infrared headphone
Displays
System Setup
Language Setup
Audio Setup
Digital Setup
Choosing a playback medium 54
Modes
Reading USB sticks and memory cards
Playing a disc in MP3 or JPEG format
Operation with external devices 57
Infrared headphone (optional)
Troubleshooting 60
General information Safety instructions
BMW recommends that you only use parts and accessory products that have been tested and approved by BMW in terms of their safety, function and suitability.
Should you have any questions during installation or operation, please call the BMW service team from whom you purchased this product. They will be happy to help you.
Remarks on the operating instructions
Please read these operating instructions carefully before using the DVD systems tablet.
These operating instructions are intended to ensure that using the DVD systems tablet is easy and safe for you.
Symbols used

Denotes instructions or warnings that you must observe.

Denotes instructions that draw your attention to special features.

Relates to measures that help protect the environment.
Denotes the end of the instruction.

The inside of the device contains high voltages. There is a risk of electric
shock.
Do not under any circumstances attempt to repair the device yourself. Maintenance and repair must be carried out only by qualified professionals.
In order to avoid the risk of fire or electric shock, the device must be carefully protected from rain, moisture, spray or drips. Do not place any flower vases or other vessels containing liquid on the device.
This device contains a laser.
If the device is opened, visible and invisible laser radiation will be released. In view of the risk of possible eye injuries, only qualified service personnel should remove the cover or maintain the device.
During playback, the disc will rotate at high speed. Do not move or lift the monitor with the integrated DVD player, since doing so may damage the disc.
Before transporting the monitor with integrated DVD player, remove the disc, switch the device off and disconnect the power plug.
Do not store the DVD systems tablet in locations that are subject to extremely low ( ≤ -10\ °C ) or extremely high ( ≥ 60\ °C ) temperatures, such as the passenger space or luggage compartment. The casing may warp or the performance and quality of the battery may be impaired.
Do not touch the laser unit, since this can damage the monitor with integrated DVD player.
Any unauthorised reproduction, broadcasting, public presentation or lending of CDs and DVDs is prohibited by law.
The use of headphones at high volume can cause permanent damage to your hearing. To avoid hearing damage, set the volume of the infrared headphone to low before using it.

Macrovision: This product features copyright protection technology that is protected by US patents and other commercial protection and copyright laws. The use of this copyright protection must be approved by Macrovision. If it is not, the technology may only be used in private households and for restricted other applications. Replication or uninstallation are prohibited.
Dolby: Manufactured under licence from Dolby Laboratories. Dolby and the double D symbol are trademarks of Dolby Laboratories.
DivX: This device contains copyright protection technology protected by DivX, Inc. DivX certified and associated brand names are trademarks of DivX, Inc. and may only be used under licence.
The model number of the monitor with integrated DVD player is printed on the underside of the device. To view the model number, unlock the devices foot.

Dispose of electrical equipment in accordance with local regulations.
| Laser | |
| Construction type | Semiconductor laser GaAlAs |
| Wavelength 650 nm / 780 nm | |
| Output power 5 mW | |
| Laser beam divergence | 60° |
Cleaning and care
Clean the player with a soft, dry cloth. For stubborn dirt deposits, use a neutral cleaning agent diluted with water on a soft cloth and wring out well. Wipe off the dirt and finish with a dry cloth. Please note that alcohol, thinners, benzene, insecticides and so on may cause the paint or surface of the device to come off.
Do not allow rubber or plastic objects to come into contact with the player for long periods, since this may damage the casing. If using chemically-treated cleaning cloths, please consult their instructions for use carefully. Always disconnect the power plug before cleaning the device.
Using at home with optional power pack
Choose a secure place close to the TV or stereo system to which the DVD systems tablet is to be connected. Do not place the device on top of a TV or colour monitor. Do not place the device near equipment that is sensitive to magnetic fields, e.g. cassette recorders.
If the DVD systems tablet is connected to a TV but is not in use, switch the device off. Otherwise the regular TV picture may be affected. If the device is operated near a radio, interference problems may occur.
playable media
playable discs
The following table shows the types of disc that can be played on the player without the need for an adapter. The designations in the table are printed on the discs and/or their packaging/sleeve.
| Sign/medium | Playback time(MPEG 2 format) |
DVD video  | 12 cm/single-sided:1 Layer - 133 minutes (4.7 GB)2 Layer - 242 minutes (8.5 GB)12 cm/double-sided:1 Layer - 266 minutes (9.4 GB)2 Layer - 484 minutes (17 GB)8 cm/single-sided:1 Layer - 41 minutes2 Layer - 75 minutes8 cm/double-sided:1 Layer - 82 minutes2 Layer - 150 minutes |
Audio CD  | 12 cm/single-sided:74 minutes8 cm/double-sided:20 minutes |
playable formats
Most audio/video files can be played on the device, e.g.:
- Pictures: JPEG
- Audio: MP3, WMA
• Video: DAT, VOB, MPEG2, MPEG4 (AVI, DIV)
Accessories and supplied package
After unpacking the device, first check the contents of the DVD systems tablet.
1 Storage bag
2 Remote control
3 Foot (2 x)
4 Monitor (2 x)
5 Mount (2 x)
6 Connecting-/power cable (12 V)
7 Allen key
8 Operating instructions

The parts supplied may vary slightly from the illustrations shown.
The two feet can be slotted into the rear of the monitors.
Operating elements and connections
Operating elements
Front
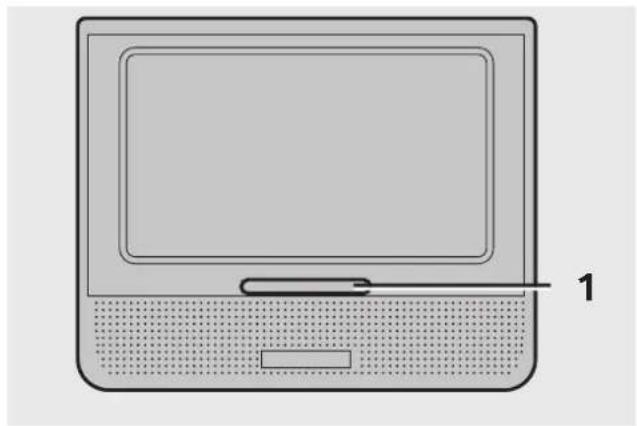
1 Remote control sensor and IR receiver
Left side
001 0394 Z
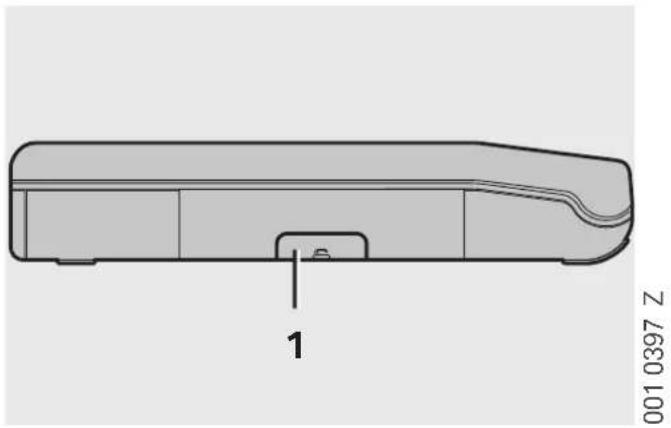
1 Lock
To unlock and lock the foot or mount (for attaching to the headrests).
Back
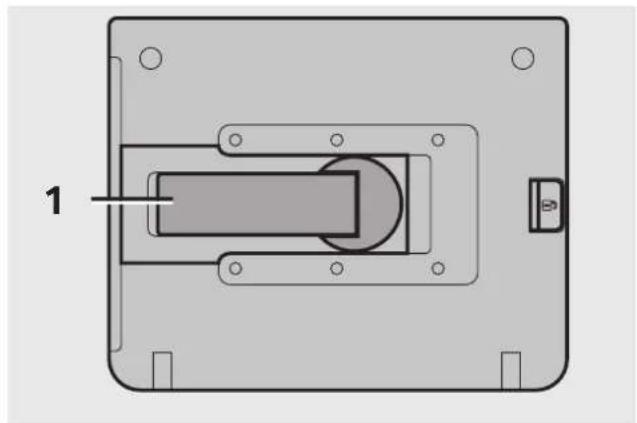
1 Foot
To set up the monitor.
001 0398 Z
Connections
Monitor with integrated DVD player

1 DC IN 12 V
- Socket for a 12 V power pack
2 Headphone jack
- Connect the headphone or speaker
3 iX (DV connection)
- Connect other accessory parts such as AV box, TV box or FM docking
4 USB connection
5 Card slot
- Supports SD, MMC and MS memory cards
001 0396 Z
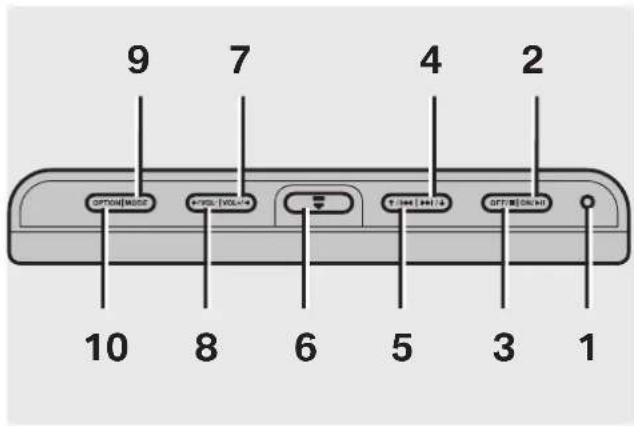
001 0395 Z
1 LED
- Displays whether the device is switched on or not
2 ON / ▶
- Switch on the device (press for around 2 seconds)
- Start/pause playback
- Confirm the selection in the menu
3 OFF /
- Switch off the device (press for around 2 seconds)
- Stop playback
- Exit the current selection
4 ▶▶1/↓
- Jump to the next track/chapter
- Fast forward (press for around 2 seconds)
- Navigate down
5 ↑/↓
- Jump to the previous track/chapter
– Rapid rewind (press for around 2 seconds) - Navigate up
6
- Open the DVD drawer
7 VOL+ /
- Increase the volume
- Navigate right
8/VOL-
- Reduce the volume
- Navigate left
9 MODE
- Open the MODE menu
10 OPTION
- Open the OPTION menu
Monitor without integrated DVD player

1 DC IN 12 V
- Socket for a 12 V power pack
2 Headphone jack
- Connect the headphone or speaker
3 AUDIO
- Sound signal input
4 VIDEO
- Picture signal input

A games console or a digital camera, for instance, can be connected to the
AUDIO and VIDEO inputs.
001 0447 Z
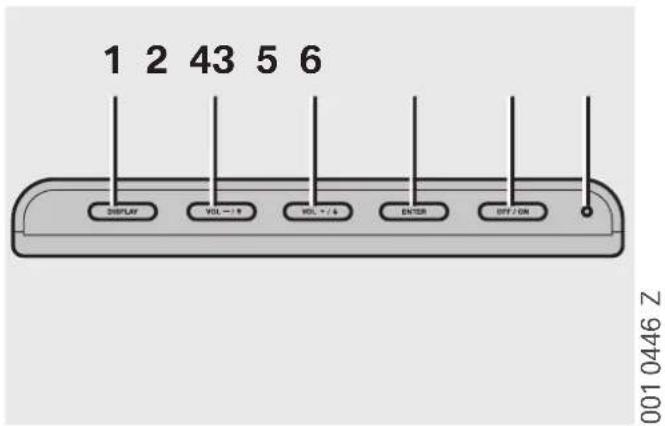
1 DISPLAY
- Open/close the DISPLAY menu
2 VOL-/↑
- Reduce the volume
- Navigate up
3 VOL+ / ↓
- Increase the volume
- Navigate down
4 ENTER
- Confirm the selection in the menu
5 OFF / ON
- Switch the device on or off (press for around 2 seconds)
6 LED
- Lights up when the device is switched on
First steps
Using the DVD systems tablet in the car

When leaving the vehicle, remove the monitors and press the plate back into a mount.
the mount.

To change the CD/DVD in the car, remove the monitor with the integrated
DVD player from the mount.

001 0391 Z
Using the Allen key included, remove the screws from clamps (1) and (2).
Fold the clamps (1) and (2) forwards until they stop.
Push the mount through between the spars on the headrests.
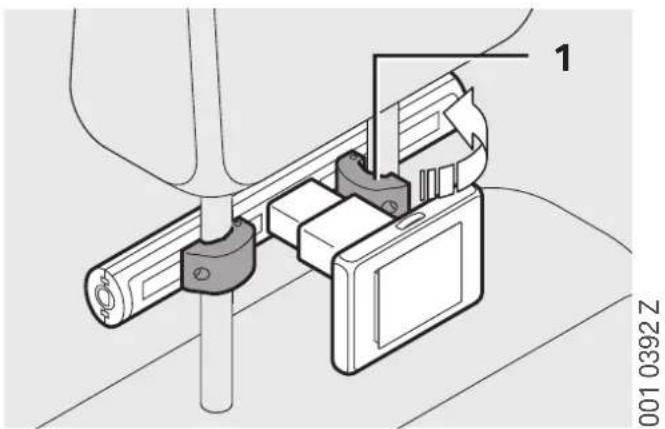

With electrical headrests, note that these can no longer be fully retracted.
Consequently, you must release the operating lever for the headrest adjustment in good time. Adapt the setting for the headrests in the seat memory accordingly.

Position the mount as far up as possible on the spars on the headrests.
Close the clamps (1).
Screw in and tighten the screws using the included Allen key.

Unlock and remove the stand from the locking button (1).


Only push monitors onto the mounts when in use.
Unlock the plate (2) by pressing the button on the mount.
Push and engage the monitor (1) onto the mount until it locks into position.
Proceed in a similar fashion for the second monitor.
Remove the dummy cover on the insides of the mounts.
Connect monitors (1) with the connecting-/power cable (12 V) and plug into the cigarette lighter.
Switching on
Switch on the ignition.
Press the ON / ▶ or OFF / ON button for around 2 seconds.
Language Setup
When the player is switched on for the first time, the following menu appears to allow you to choose a language:
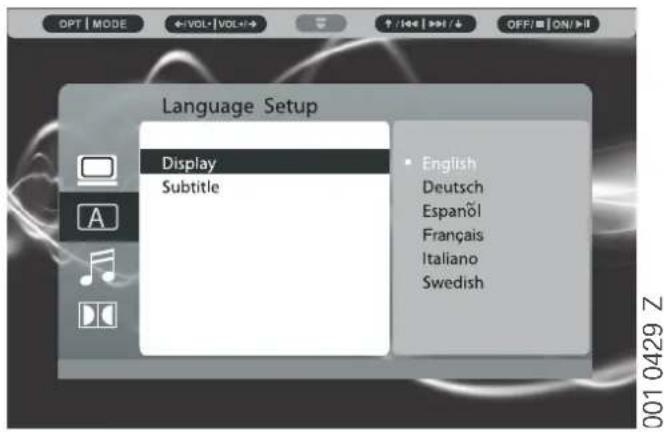
The menu offers English, German, Spanish, French, Italian and Swedish.
Select a language and confirm your choice on the remote control with ▶
Switching off

Park the car and switch off the ignition.
Press the OFF / ■ or OFF / ON button for around 2 seconds.
Disconnect the connecting-/power cable (12 V) from the cigarette lighter.
Using the DVD systems tablet at home
Switching off
OFF
1
Unfold the foot (1) and rotate it to the correct position.
Lean the monitor back.
Switching on
001 0400 Z
Press the OFF / or OFF / ON button for around 2 seconds.
Disconnect the 12 V power pack from the power socket.
Disconnect the connecting plug from the DC IN 12 V socket on the device.
001 0404 Z
Connect the 12 V power pack (not included in the supplied package) to a power socket.
Connect the connecting plug to the
DC IN 12 V socket on the device.
The player switches on automatically.
A conventional 12 V power pack
(min. 1.5 A) can be used.
Remote control

Do not drop the remote control, do not stand on it and do not subject it to
shocks.
Please note that the remote control will not function if there are obstacles between the remote control sensor on the monitor and the remote control handset.
When using the remote control, point it directly at the remote control sensor.
Do not subject the remote control sensor to strong light. This can impair its operation.
Use the remote control within the operating range specified.
Inserting the battery
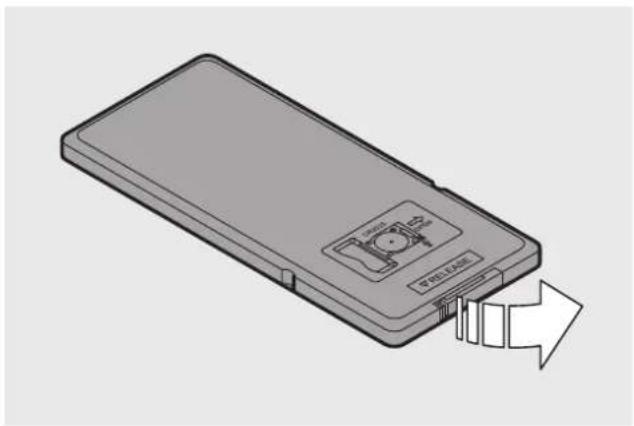
Open the battery compartment as shown on the remote control's casing.
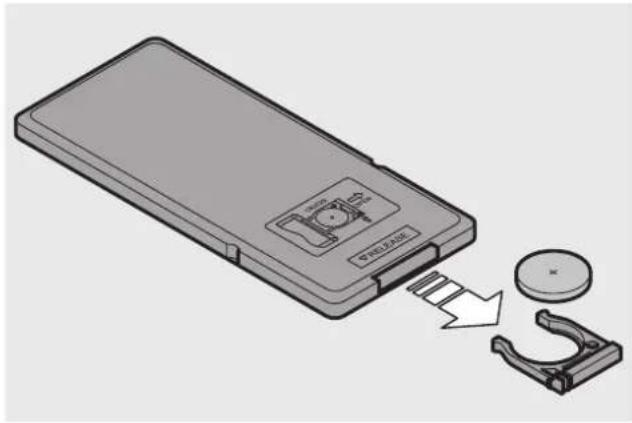
001 0440 Z
Insert the battery (CR2025) into the compartment with the plus sign pointing upwards.

Always replace the battery with a battery of the same type.
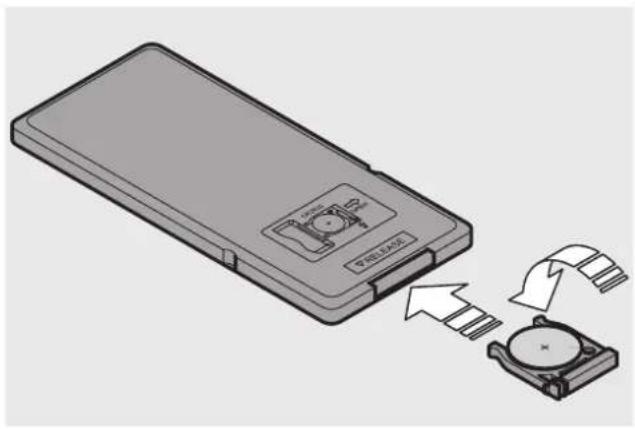
001 0441 Z
Close the battery compartment.

Remove the battery when it is flat or if the remote control is not going to be or some time.
Since batteries contain chemical substances, they must be kept out of the reach of children.

There is a risk of fire if batteries are not handled correctly. Do not recharge bat-destroy them or burn them.

Dispose of spent batteries at appropriate collection points.
Key assignment
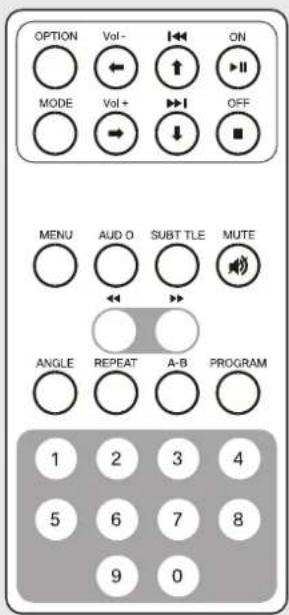
001 0443 Z
| Key Function | Function |
| ON • Start/pause playback▶II | Confirm your selectionWake up the device from standby mode (press for around 3 seconds) |
| OFF • Stop playback■ | Exit the current selectionPut the device in standby mode (press for around 3 seconds) |
| ◀◀↑ | Jump to the previous track/chapterNavigate up |
| ▶▶↓ | Jump to the next track/chapterNavigate down |
| Vol- • Reduce the volume← | Navigate left |
| Vol+ • Increase the volume→ | Navigate right |
| OPTION Open/ close the OPTION menu | |
| MODE Open/ close the MODE menu | |
| MENU Open/ close the DVD menu | |
| MUTE Sound on/off | |
| AUDIO Change the audio language | |
| SUBTITLE Change the subtitle language | |
| ◀◀ | Rapid rewind |
| ▶▶ | Fast forward |
| ANGLE | Change the camera angle |
| REPEAT | Repeat your entry |
| A-B | Repeat a passage |
| PROGRAM | Define the playback sequence of tracks |
| 0 to 9 | Numerical keypad |
If the player has been switched off using the OFF key on the device (LED display is off), the player cannot be switched on by pressing the ON key on the remote control.
The standby function is not possible if the player is being operated via an external battery. In this case, Invalid Key appears at the top left-hand corner of the screen.
Playing a disc
Inserting a disc

Press the button (1) on the monitor with integrated DVD player to open the disc drawer.
Insert the disc (2) with the labelling facing upwards and push it carefully in the centre downwards until the disc (2) engages.
Close the disc drawer.

Ensure that the disc is correctly inserted. Incorrectly-inserted discs can cause damage.
Do not use any warped or kinked discs.
Starting playback
- Switch on the device.
- Insert the disc.
- Close the disc drawer.
The player automatically loads the disc and starts playback.
If playback does not start automatically, press ▶
Ending playback
During playback, press ■
The system keeps a record of the point at which playback was interrupted.
To continue playback, press ▶II

The stored playback point will be deleted if ■ is pressed again or a different DVD is inserted.
Fast forward/Rapid rewind
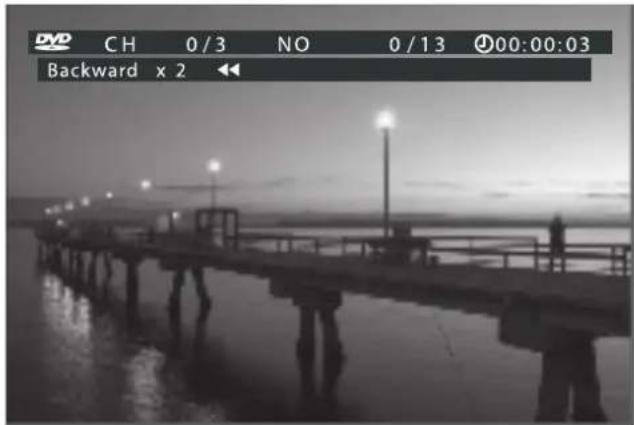
During playback, press the ◀or button on the remote control.
The playback speed changes with each press of the ◄or key to 2 x, 4 x, 8 x or 20 x and ultimately back to 1x the regular playback speed.

If a disc (not a CD or MP3 CD) is played back at a faster speed, the sound is
A-B playback

If the A-B key on the remote control is pressed once during playback, the start point (current position) is stored and Repeat A- appears on the screen.
Playback continues.
Pressing the A-B key again stores the end point (current position) and the passage between the start and end points is repeated over and over again.
Pressing the A-B key a third time cancels the repeat function and normal playback resumes.
Setup
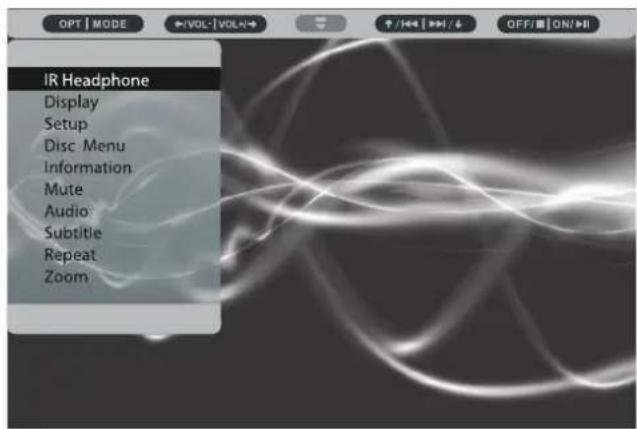
Pressing the OPTION key calls up the following menu items:
IR Headphone, Display, Setup, Disc Menu, Information, Mute, Audio, Subtitle, Repeat and Zoom.
Infrared headphone
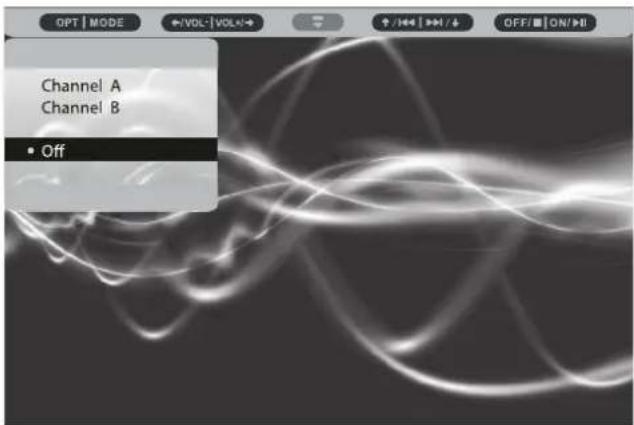

If you connect an infrared headphone to the device, you can select your pre-
ferred channel.
In the OPTION menu, navigate to IR Headphone and confirm your selection with ▶The IR Headphone menu appears.
Select channel A, channel B or Off and confirm your selection with ▶
Select Off if no infrared headphone is connected or if it is to be switched off.
001 0412 Z
Display
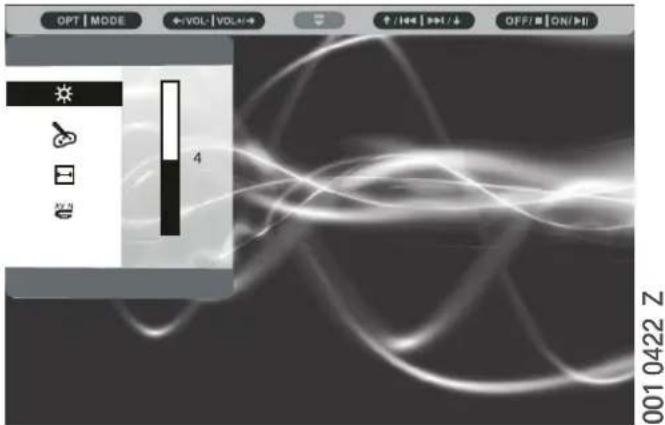
In the OPTION menu, navigate to Display and confirm your selection with ▶I
Brightness
Navigate to Brightness ☀ press and adjust the brightness with the arrow keys and . ↓ Confirm the setting with ▶
Colour
Navigate to Colour ▶press and adjust the colour temperature with the arrow keys
↑ and ↓
Confirm the setting with ▶
Screen format
Navigate to Screen format □press and choose between formats 16:9 and 4:3 using arrow keys ↑and .↓ Confirm the setting with ▶I
AV-IN
Navigate to AV-IN press and using the arrow keys and choose between CVBS and S-VIDEO. Confirm the setting with ▶
System Setup
TV System

With some DVDs, the TV standard may differ from the one set on the DVD systems tablet.
You should therefore check the DVDsTV-standard before playing it and set the same standard on the monitor system:
In the OPTION menu, navigate to Setup and confirm your selection with ▶I
Navigate to System Setup and then to TV System and confirm your choice with ▶II
Select NTSC, PAL or Auto and confirm your choice with ▶I

The default setting for the TV standard is Auto.
If the picture appears in black and white, the wrong TV standard has been chosen.
Screen Saver
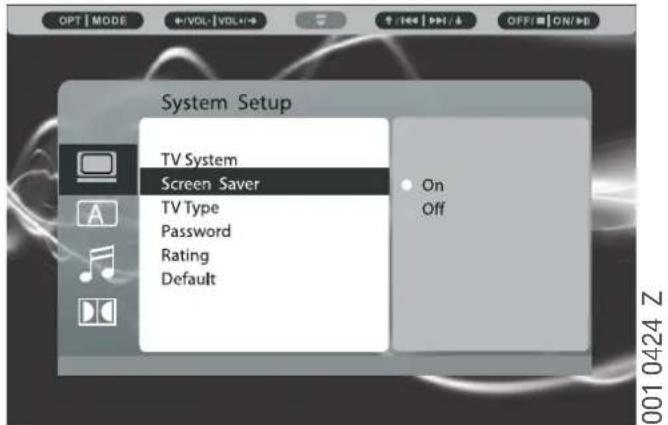
In the OPTION menu, navigate to Setup and confirm your selection with ▶I
Navigate to System Setup and then to Screen Saver and confirm your choice with ▶I
Select On or Off and confirm your choice with ▶
If the player is in STOP or NO DISC status, or there is no activity on the screen for a long period of time, the screen saver is activated in order to prevent damage occurring to the screen. In the default setting, the screen saver is enabled.
Picture format
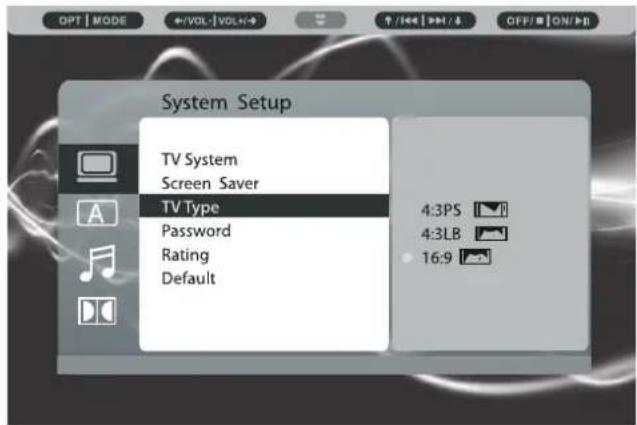
In the OPTION menu, navigate to Setup and confirm your selection with ▶I
Navigate to System Setup and then to TV Type and confirm your choice with ▶
Select 4:3 PS (4:3 Pan Scan), 4:3 LB (Letterbox) or 16:9 and confirm your choice with ▶
Password
001 0425 Z
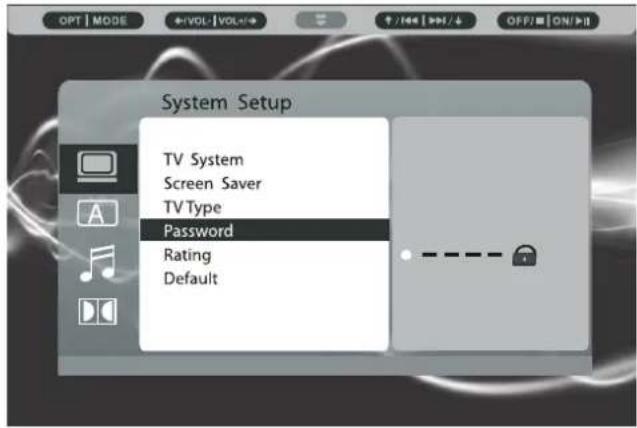
001 0426 Z
The Password function enables parents to stop their children from accessing certain DVD films.
In the OPTION menu, navigate to Setup and confirm your selection with ▶I
Navigate to System Setup and then to Password and confirm your choice with
The first time you use this function, enter 0000 or the assigned password in order to enable access control.
Enter a new password (comprising four digits) to lock the access control.

Only when access control is enabled can the age rating for a DVD film be set Rating menu.
If you have forgotten the assigned password, entering 0000 will re-enable the Rating function.
Rating
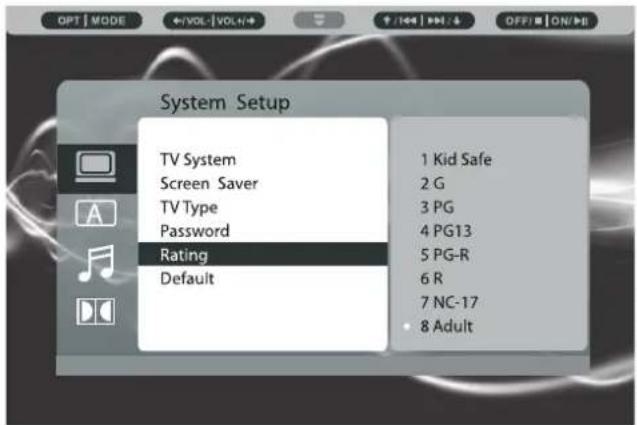
This menu enables you to assign an age rating to a DVD.
In the OPTION menu, navigate to Setup and confirm your selection with ▶
Navigate to System Setup and then to Rating and confirm your choice with ▶I
The function comes with eight options:
1 Kids OK
2G
3 PG
4 PG13
5 PG-R
6R
7 NC-17
8 Adult
Select the relevant age rating and confirm your choice with ▶

The default setting is Adult.
If the password function is blocked, the rating cannot be changed.
This function is only available for suitably-coded DVDs.
Default

In the Default menu, all settings can be reset to the factory settings.
In the OPTION menu, navigate to Setup and confirm your selection with ▶I
Navigate to System Setup and then to Default and confirm your choice with ▶
Select Reset and confirm your choice with ▶I
Language Setup
Display

In the OPTION menu, navigate to Setup and confirm your selection with ▶
Navigate to Language Setup and then to Display and confirm your choice with ▶
The menu offers English, German, Spanish, French, Italian and Swedish.
Select a language and confirm your choice with ▶

The default setting is English.
Audio Setup
Audio Setup

In the OPTION menu, navigate to Setup and confirm your selection with ▶I
Navigate to Audio Setup and then to Screen Output and confirm your choice with ▶
Three modes for audio output are available: Analogue, SPDIF/RAW and SPDIF/PCM.
Select an audio output mode and confirm your choice with ▶II
Analogue: Analogue output signal. SPDIF/RAW: Digital output signal for decoders/amplifiers. SPDIF/PCM: Digital output signal for use with a digital stereo amplifier.
Digital Setup
Digital Setup
![Digital Setup Sound Effect Dynamic Range DivX[R] VOD](/content/2026/05/970641/images/c61fc86e67af0cfbf723699fccebd15a46a26459e483a7211b11a16403503fb9.jpg)
DivX(R) VOD (Video on Demand) are digital video files and can be downloaded from the Internet for a rental fee.
Before a DivX(R) VOD file can be downloaded, the registration number of the DVD player must be entered into the order form on the providers website.
To display the registration number, using the OPTION menu, navigate to Setup and confirm your choice with ▶
Navigate to Digital Setup and then to DivX(R) VOD and confirm your choice with N1
001 0431 Z
![-DIVX •• R •• VIDEO ON DEMAND- YOUR REGISTRATION CODE IS: FAG6G36 5 TO LEARN MORE VISIT WWW.DIVX.COM D/VO [DONE]](/content/2026/05/970641/images/b1bea56b2443389eca53991f385bf7d6a7b37c91018bc4f2789ecdd92de81fca.jpg)
The registration code appears on the screen (here: FAG8G365).
The registration code changes with each download of a DivX(R) file. Consequently, a new code must be used for each download.
If you are unable to play a downloaded DivX(R) VOD file that has been recorded on a CD-R disc, it may be that the time window allocated to the purchase has expired. It is also possible that the recorded file is not compatible with your player, due to different versions or incorrect download parameters. The parameters used when copying to CD-R may also be the reason.
Since it is not possible at this juncture to provide all the information and parameters on how to use DivX(R) VOD files, we recommend that you visit the relevant websites, such as WWW.DIVX.COM/VOD.
Choosing a playback medium
Modes
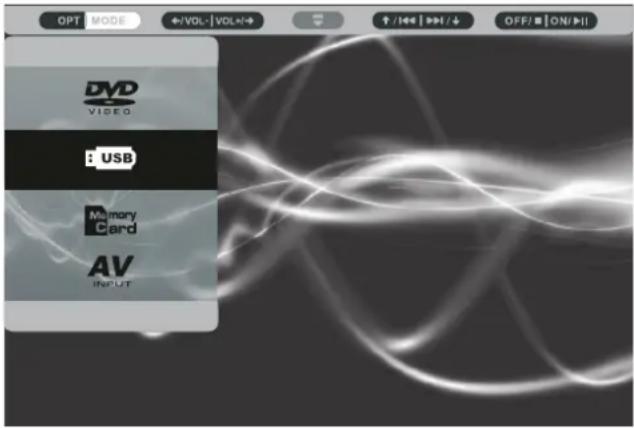
Press the MODE key on the remote control or on the monitor.
The selection list appears for DVD Video, USB, Memory Card and AV Input.

The default setting is DVD.
DVD
Select DVD to play a DVD. Navigate to 📋 and press ➤ to start playback.
USB
Select USB if you wish to load/play files from a USB stick.
Navigate to 📊 and press 📊 to load the USB stick and call up the menu listing the files on the USB stick.
Memory Card
Select Memory Card if you wish to load/lay files from a memory card.
Navigate to and press to load the card and call up the menu listing the files on the memory card.
AV Input
Select AV Input if a device has been connected to the player via the iX port.
Navigate to AV and press load the content to the ATV/DVB box.
Reading USB sticks and memory cards
If a USB stick and memory card are inserted in the device at the same time, the player will play back the content of the storage medium that was last used with the player.
If a storage medium is inserted in the player while another storage medium is running, playback will stop and the player will then display the content of the newly-inserted storage medium.
Playing a disc in MP3 or JPEG format
If a disc containing MP3 files is inserted, the player will automatically start playback as follows:

Press OFF/ ■to access the folder directory.
![[BLUES] BLUES01.MP3 01.BLUES 02.ROCK AND ROLL 001.BLUES01 002.BLUES02 003.BLUES03 004.BLUES04](/content/2026/05/970641/images/d7250b668a33213bb0c1e59eb4e81b457a1223e54943ae1a645a171d213641cb.jpg)
001 0435 Z
Listening to music
Navigate to 📂 and press to access the folder directory.
Select a folder and press ▶to open it.
Select a music track and press ▶to start play-back.
To repeat the music playback, press the REPEAT key on the remote control.
The following repeat modes can be selected:
- Repeat: [ Repeat 1 ]
Repeats the music track currently playing - Repeat: [ Repeat Dir ]
Repeats the entire folder - Repeat: [ Repeat All ]
Repeats the disc - Repeat: [ Repeat Off ]
Switches repeat off
If the disc is a DVD, the options are:
- Repeat: [Off]
- Repeat: [Chapter]
- Repeat: [Title]
With other discs, the options are:
- Repeat: [Repeat 1]
- Repeat: [ Repeat Dir ]
- Repeat: [ Repeat All ]
- Repeat: [ Repeat Off ]
Press the ■key to end playback and press ■ again to return to the folder directory.
Displaying JPEG files
![[BEST FRIENDS] FRIENDS01.JPG 01.BEST FRIENDS 02.BIRTHDAY 03.CEREMONY 04.PARTY 001. FRIENDS01 002. FRIENDS01 003. FRIENDS01 004. FRIENDS01](/content/2026/05/970641/images/9f12235ea35af26c64ef0c1aaafadd28c233bb14a8b0997db421a770d3c47cc7.jpg)
Navigate to and press to access the folder directory.
Select a folder and press ▶to open it.
If you are navigating in the folder, the JPEG file with a dark background is displayed as a thumbnail (miniature picture).
Select a JPEG file and press ▶no view it as a full-sized picture.
Press the ■key to end full picture display and press ■again to return to the folder directory.
Playing video files
![[DAD] DADSWIMS01.AVI 01.DAD 02.GRADUATION 03.SWEET HOME 04.ZOO 01.DADSWIMS01 02.DADSWIMS02 03.DADSWIMS03 04.DADSWIMS04 001 0438 Z](/content/2026/05/970641/images/8c0e336c413994c53e6ba77188bd1a8999842c3e7bd5ee6a2d1f5faeea73ae32.jpg)
Navigate to and press to access the folder directory.
Select a folder and press ▶to open it.
Select a video file and press ▶to start play-back.
To repeat the playback, press the REPEAT key on the remote control.
The following repeat modes can be selected:
- Repeat: [Repeat 1]
Repeats the video file currently playing - Repeat: [ Repeat Dir ]
Repeats the entire folder - Repeat: [ Repeat All ]
Repeats the disc - Repeat: [ Repeat Off ]
Switches repeat off
Press the ■key to end playback and press again to return to the folder directory.
Operation with external devices
Connect the headphone or speaker
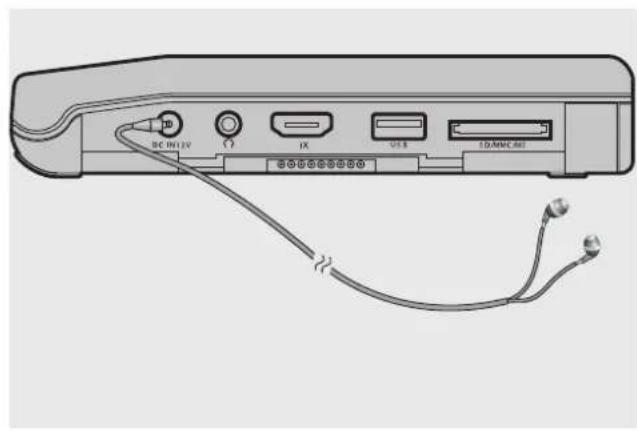
Set the volume to the lowest level.
Connect the headphone or speaker to the headphone jack.
Adjust the volume as desired.
Connect devices to the iX port

Connect additional devices to the iX port.

Devices such as AV receivers, TV tuners and FM transmitters can be
connected to the iX port.

Do not connect a HDMI cable to the iX port, since this can cause damage.
Memory cards

Slide the memory card into the card slot.
Since memory cards come in different sizes, it may be that your card cannot be read.
In this event, check that the memory card you have inserted has been inserted correctly.
The player cannot recognise Mini and Micro SD adapters or dual-voltage SD cards. Do not use MS-PRO adapters with peel-off surface coating. This could cause damage.
Infrared headphone (optional)
Inserting the battery
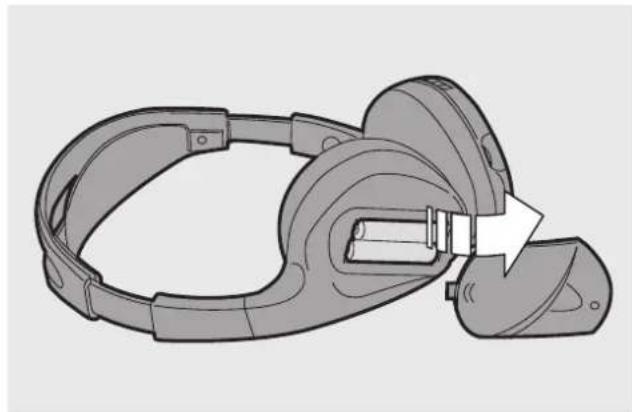
- Open the battery compartment by sliding the cover for the battery compartment cover downwards.
- Insert the batteries, observing the polarity.
- Close the battery compartment.

Volume-dependent interference indicates tired batteries. In such an event, the batteries.

Remove the battery when it is flat or if the infrared headphone is not going to d for some time.
Since batteries contain chemical substances, they must be kept out of the reach of children.

Dispose of spent batteries at appropriate collection points.
Overview

1 On/Off switch
2 Volume regulator
3 Headphone shell (foldable)
4 Channel selector switch (A/B)
5 Headphone head strap (width adjustable)
Switching On/Off
Press the On/Off switch (1).

The red indicator light on the infrared headphone lights up when it is switched on.
If no signal is received after around 3 minutes or after around 3.5 hours of continuous use, the infrared headphone automatically switches off.
Channel selection
To ensure that the appropriate sound is played back for the image, the sound channel of the infrared headphone must be assigned to the relevant screen.
To do this, slide the channel selector switch (4) to the relevant position A or B.
Volume

Audio playback that is too loud can damage your hearing.
To avoid hearing damage, set the volume of the infrared headphone to low before using it.
Turn the volume regulator (2) until the desired volume is reached.
Troubleshooting

Do not attempt to maintain or repair the device yourself!
| Fault Possible cause | Remedy | |
| Disc cannot be played. | The disc is not inserted correctly. | Insert the disc with the printed side facing upwards and press in the centre hole. |
| The disc is scratched or dirty. Ensure that the disc does not have any scratches or fingerprints. | ||
| No picture Incorrect setting or connection with the player. | Check the settings and connections with the player. | |
| Incorrect mode setting. Select the correct mode. | ||
| No sound The AV cable is loose. Check that the cable is correctly connected. | ||
- DVD SYSTEMS TABLET
- OPERATING INSTRUCTIONS
- CONTENTS
- GENERAL INFORMATION SAFETY INSTRUCTIONS
- REMARKS ON THE OPERATING INSTRUCTIONS
- SYMBOLS USED
- CLEANING AND CARE
- USING AT HOME WITH OPTIONAL POWER PACK
- PLAYABLE MEDIA
- PLAYABLE DISCS
- PLAYABLE FORMATS
- ACCESSORIES AND SUPPLIED PACKAGE
- OPERATING ELEMENTS AND CONNECTIONS
- OPERATING ELEMENTS
- CONNECTIONS
- MONITOR WITHOUT INTEGRATED DVD PLAYER
- FIRST STEPS
- USING THE DVD SYSTEMS TABLET IN THE CAR
- SWITCHING ON
- LANGUAGE SETUP
- SWITCHING OFF
- USING THE DVD SYSTEMS TABLET AT HOME
- OFF
- 1
- REMOTE CONTROL
- KEY ASSIGNMENT
- PLAYING A DISC
- INSERTING A DISC
- STARTING PLAYBACK
- ENDING PLAYBACK
- FAST FORWARD/RAPID REWIND
- A-B PLAYBACK
- SETUP
- BRIGHTNESS
- COLOUR
- SCREEN FORMAT
- AV-IN
- SYSTEM SETUP
- TV SYSTEM
- SCREEN SAVER
- PICTURE FORMAT
- PASSWORD
- RATING
- DEFAULT
- AUDIO SETUP
- DIGITAL SETUP
- CHOOSING A PLAYBACK MEDIUM
- MODES
- DVD
- USB
- MEMORY CARD
- AV INPUT
- READING USB STICKS AND MEMORY CARDS
- PLAYING A DISC IN MP3 OR JPEG FORMAT
- LISTENING TO MUSIC
- DISPLAYING JPEG FILES
- PLAYING VIDEO FILES
- OPERATION WITH EXTERNAL DEVICES
- INFRARED HEADPHONE (OPTIONAL)
- INSERTING THE BATTERY
- OVERVIEW
- SWITCHING ON/OFF
- CHANNEL SELECTION
- VOLUME
- TROUBLESHOOTING
Brand : BMW
Model : DVD-System Tablet
Category : DVD player