
DLED40265T2S - Television BUSH - Free user manual and instructions
Find the device manual for free DLED40265T2S BUSH in PDF.


| Product Type | LED Television |
| Brand | Bush |
| Model | DLED40265T2S |
| Screen Size | 40 inches (102 cm diagonal) |
| Display Resolution | 1920 x 1080 (Full HD) |
| Refresh Rate | 60 Hz |
| Dimensions (without stand) | 90.2 x 52.1 x 8.4 cm |
| Dimensions (with stand) | 90.2 x 56.8 x 20.2 cm |
| Weight (without stand) | 6.9 kg |
| Weight (with stand) | 7.2 kg |
| Power Supply | AC 100-240V, 50/60Hz |
| Power Consumption (typical) | 70 W |
| Power Consumption (standby) | < 0.5 W |
| Connectivity | 2x HDMI, 1x USB, 1x VGA, 1x RF (DVB-T/C/S2), 1x CI+ slot, 1x AV input, 1x Headphone out |
| Sound Output | 2 x 8 W |
| Smart TV | No (Non-Smart) |
| Remote Control | Included (Bush remote) |
| VESA Wall Mount | 200 x 200 mm |
| Cleaning Instructions | Use a soft, dry cloth. Avoid chemicals or abrasive cleaners. |
| Safety Information | Place on a stable surface. Ensure proper ventilation. Do not block vents. For wall mounting, use qualified installer. |
| Spare Parts | Remote control, power cord, stand screws, user manual |
| Repairability | Designed for professional repair. Do not disassemble yourself. |
Frequently Asked Questions - DLED40265T2S BUSH
User questions about DLED40265T2S BUSH
0 question about this device. Answer the ones you know or ask your own.
Ask a new question about this device
Download the instructions for your Television in PDF format for free! Find your manual DLED40265T2S - BUSH and take your electronic device back in hand. On this page are published all the documents necessary for the use of your device. DLED40265T2S by BUSH.
USER MANUAL DLED40265T2S BUSH
natural_image
Digital TV displaying three smiling children watching a movie, with a 'BUSH' logo on the screen (no readable text or symbols beyond branding)Contents
Contents
Contents 1

Safety Information 3
Support 6
Getting Started 7
Features & Accessories 7
Standby Notifications 8
Viewing remote control 9
Attaching the Stand 10
Aerial & Cable connection 12
Power connection 12
Wall Mounting 12
Remote control - Inserting batteries 12
Switching the TV On and Off 12
To Switch the TV On 12
To Switch the TV Off 12
First Time Installation 13
Information Banner 14
Connections 15
General TV Operation 21
Electronic programme guide (EPG) 21
Basic Operations 22
Displaying Subtitles 22
Zoom Modes 22
Using Main Menu Screen 22
Configuring Date/Time Settings 22
Source Settings 22
Current Language 22
Channel Management 23
Moving a Channel 23
Deleting a Channel 23
Renaming a Channel 23
Locking a Channel 23
Button Functions 23
Sorting Channel List 23
Favourite Mode & Timers 24
Favourite Mode 24
Conditional Access 24
Setting Sleep Timer 24
Setting Programme Timers 24
Editing a Timer 25
Deleting a Timer 25
Power Save Mode 25
Repair Information 25
Picture Controls 26
Configuring Picture Settings 26
Picture Settings Menu Items 26
PC Picture Controls 27
PC Picture Settings Operation 27
Sound & Source Controls 29
Other Controls 30
Language Settings 31
Language Settings 31
Media Browser 32
Starting Media Browser 32
Media Browser Configuration 32
Viewing Videos via USB 33
Video Playback Screen 33
Subtitle Time Correction 33
Viewing Photos via USB 33
Displaying Photos in Slideshow Mode 33
Playing Music via USB 33
Using MENU button in Media Browser Mode 34
Installation Controls 35
Accessing Installation Menu 35
Automatic Channel Scan (Retune) 35
Manual Channel Scan 35
Analogue Fine Tune 35
First Time Installation 35
Clear Service List 35
Parental Control 36
Teletext 37
Product Support 38
General Specifications 39
Plug replacement - UK and Ireland only40
Supported File Formats for USB Media
Browser 42
AV and HDMI Signal Compatibility &
Contents
Typical PC Resolutions 43
Supported DVI Resolutions 44
Software Upgrade 46
Disposal information 47
Guarantee 48
Model number
BUSH DVB-T DLED40265T2S

IMPORTANT - Please read these instructions fully before installing or operating


The lightning flash with arrowhead symbol, within an equilateral triangle, is intended to alert the user to the presence of uninsulated “dangerous voltage” within the product’s enclosure that may be of sufficient magnitude to constitute a risk of electric shock of persons.
The exclamation point within an equilateral triangle is intended to alert the user to the presence of important operating and maintenance (servicing) instructions in the literature accompanying the appliance.
Preparation
Place the device on a solid even surface. For ventilation, leave a free space of at least 10 cm all around the set. To prevent any fault and unsafe situations, do not place any objects on top of the set. Use this device in moderate climates.
Operation temperature and operation humidity: 0^ C up to 40^ C, 85% rel. humidity max. (not blocking ventilation openings).
Intended Use
This device is used to receive and display TV programmes. The different connection options make an additional expansion of the reception and display sources possible (various external devices). This device is only suitable for the operation in dry interiors. This appliance is intended solely for private domestic use and may not be used for industrial and commercial purposes. We exclude liability in principle, if the device is not used as intended, or unauthorized modifications have been made. To operate your LCD TV in extreme ambient conditions may cause the damage of the device.

WARNING: Never let people (including children) with physical, sensory or mental abilities or lack of experience and / or knowledge unsupervised use electrical device!
Children may not recognize dangers right! The swallowing of batteries can be fatal. Keep batteries always out of reach of small children. If a battery is swallowed, immediately seek medical attention. Keep the packaging films out of reach of children. Risk of suffocation.
Power source
- The TV should be operated only from a 220-240 V AC, 50 Hz outlet.
- Warning: Do not leave your TV in standby or operating mode when you leave your house.
Positioning the TV
- For ventilation, please leave a clear space of at least 10cm all around the TV.
- Do not block the ventilation openings.
- Do not place the TV on sloping or unstable surfaces, the TV may tip over.
• To prevent damage to the TV, do not place any objects on top of the TV. - Only use the TV in moderate climates.
Power cord and plug
- The power cord plug should be easily accessible. In case of storms and lightning, when going on holiday, or when the TV is not used for a long period of time disconnect the power cord from the mains power socket.
- The mains plug is used to disconnect TV set from the mains and therefore it must remain readily operable.
- Do not place the TV, furniture, etc. on the power cord or pinch the cord.
- Handle the power cord by the plug, do not unplug the TV by pulling the power cord.

IMPORTANT - Please read these instructions fully before installing or operating
- Never touch the power cord/plug with wet hands as this could cause a short circuit or electric shock.
- Never make a knot in the power cord or tie it with other cords.
- Power cords should be placed in such a way that they are not likely to be stepped on or driven over.
- A damaged power cord/plug can cause fire or give you an electric shock. When damaged it must be replaced, this should only be done by qualified personnel.
Moisture and Water
- Do not use this TV in a humid or damp place (avoid bathrooms, the sink in the kitchen, and near the washing machine).
- Do not expose this TV to rain or water, as this may be dangerous.
- Do not place objects filled with liquids, such as flower vases, on top of the TV. Avoid from dripping or splashing.
- If any solid object or liquid falls into the cabinet, unplug the TV and have it checked by qualified personnel before operating it any further.
Ventilation
- The slots and openings on the TV set are intended for ventilation and to ensure reliable operation.
- To prevent overheating, these openings must not be blocked or covered in anyway.
Heat sources and Flames
- Do not expose the TV to direct sunlight or other heat sources.
- The TV should not be placed near to open flames and sources of intense heat such as an electric heater.
- Ensure that no open flame sources, such as lighted candles, are placed on top of the TV.

Headphone Volume
- Excessive sound pressure from earphones and headphones can cause hearing loss, please take care.


Wall Mounting (optional)
- To prevent injury, this TV must be securely attached to the wall in accordance with the installation instructions (if the option is available).
LCD Screen
- Occasionally, a few non-active pixels may appear on the screen as a fixed blue, green or red point. Please note that this does not affect the performance of your product. - Take care not to scratch the screen with fingernails or other hard objects.
Cleaning
- Before cleaning, unplug the TV from the wall socket.
- Do not use liquid or aerosol cleaners. Only use a soft, dry cloth.

IMPORTANT - Please read these instructions fully before installing or operating
Batteries
• Warning: Incorrect installation of batteries may cause battery leakage and corrosion, resulting in damage to the remote control.

- Do not mix old and new batteries, or batteries of different types.
- Do not dispose of batteries in a fire.
- Do not dispose of batteries with normal household waste, take to a local recycling centre.
CAUTION: Insert the batteries / rechargeable batteries in the correct polarity. Don't try to recharge non rechargeable batteries and under no circumstances throw them into fire. Danger of explosion. Do not use unequal batteries (old and new, Alkaline and carbon, etc.) simultaneously. If you will not use the device for a long time, remove the batteries and store the device in a dry and dust free place. Improper use of batteries may cause an explosion or leakage. If the batteries have leaked, use gloves and clean the appliance thoroughly with a dry cloth! Batteries should not be exposed to heat, such as sunshine, fire or the like.
Replacement Parts
When replacement parts are required, make sure that the service technician has used replacement parts, which are specified by the manufacturer or have the same specifications as the original one. Unauthorised substitutions may result in fire, electrical shock or other hazards.
Taking out of service and storing
Unplug the TV from the mains and pack the TV in an appropriate cardboard box. Remove the batteries from the remote control and pack the remote control to the TV set.

NOTE: The TV set should be stored in a dry dust-free room.
Connection to a Television Distribution System (Cable TV etc.) from Tuner
Device connected to the protective earthing of the building installation through the mains connection or through other apparatus with a connection to protective earthing-and to a television distribution system using coaxial cable, may in some circumstances create a fire hazard.
Connection to a cable distribution system has therefore to be provided through a device providing electrical isolation below a certain frequency range (galvanic isolator, see EN 60728-11).
Symbols in this Instruction Book
The following symbols are used in the Instruction Book as a marker for restrictions and precautions and safety instructions. Note such information for security reasons.

WARNING
If you do not pay attention to such a marked warning, it can cause serious injury or death. Note these warnings strictly, in order to ensure a safe operation.

CAUTION
Such a precaution is marked, you should take up or note, to avoid injury or property damage. Note these instructions strictly, in order to ensure a safe operation.

IMPORTANT
Warnings on the appliance and restrictions are displayed like this. Read this information strictly in order to operate the system correctly and avoid damage.

NOTE: Information about the operation and tional explanations are marked like this. To ware of such information is recommended to ure that the functions can be used optimally.
The illustrations and the OSD in this operation manual are for explanation purposes and may vary slightly from the actual operations.
Technical experts are available 7 days a week
- Simple help and advice on setting up your digital equipment (image).
• Guidance on connecting other devices to your television such as a DVD player, Sky, home cinema system or a games console. - Order spare parts, including that lost remote control.
- Any other technical issues you may need assistance with.
Call us today: 0345 604 0105
Local call rates applies*
Lines open 9am-8pm Monday to Saturday and 10am-4pm Sunday.
*Calls to Argos enquiry lines may attract a charge and set up fee from residential lines depending on your call plan/tariff. Mobile and other providers costs may vary, see www.bt.com/pricing for details.
For Security and training purposes, telephone calls to and from customer service centres maybe recorded and monitored. Calls from Republic of Ireland will attract international call charges.
Getting Started
Features & Accessories
TV - Features
- Remote controlled colour TV.
• Fully integrated digital TV (DVB-T). - HDMI connectors for digital video and audio. This connection is also designed to accept high definition signals.
- USB input.
• 1000 programmes. - OSD menu system.
- Scart socket for external devices (such as video, video games, audio set, etc.).
- Stereo sound system.
- Teletext, fastext, TOP text.
• Headphone connection.
• Automatic programming system. - Forward or backward manual tuning.
• Automatic power down after up to six hours. - Sleep timer.
- Child lock.
• Automatic sound mute when no transmission. - NTSC playback.
• AVL (Automatic Volume Limiting). - PLL (Frequency Search).
- PC input.
- Plug&Play for Windows 98, ME, 2000, XP, Vista, Windows 7.
- Game Mode (optional).
- Picture Off function
Accessories included
Remote Control
Batteries: 2 x AAA
Instruction Book
Quick Start Guide
Side AV Connection Cable
NOTE: You should check the accessories after purchasing. Make sure that each accessory is included.
Getting Started
Standby Notifications
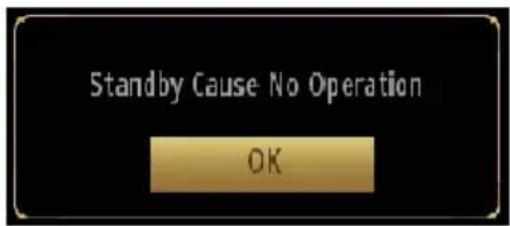
If the TV switches off while in No Signal mode, the following on-screen message will be displayed on the next switch-on:

When the Auto Tv Off timeout is reached, the following message will be displayed on the screen. Select YES to shut down the TV. Select NO to cancel. The TV will switch off as well, if you do not make a selection on this screen.

If the TV switches off owing to the auto power down feature, the following on-screen message will be displayed on the next switch-on:
Getting Started
Viewing remote control
- Standby: Switches On / Off the TV
- Numeric buttons: Switches the channel, enters a number or a letter in the text box on the screen.
- TV: Displays channel list / Switches among broadcast types / Switches to TV Source
-
Mute: Completely turns off the volume of the TV
-
Volume +/-
-
Menu: Displays TV menu
-
Navigation buttons: Helps navigate menus, content etc. and displays the subpages in TXT mode when pressed Right or Left
-
OK: Confirms user selections, holds the page (in TXT mode), views channel list (DTV mode)
-
Back/Return: Returns to previous screen, opens index page (in TXT mode)
-
Media browser: Opens the media browsing screen
-
Info: Displays information about on-screen content, shows hidden information (reveal - in TXT mode)
-
My button 1 (*)
-
Coloured Buttons: Follow the on-screen instructions for coloured button functions
-
Language: Switches between sound modes (analogue TV), displays and changes audio/subtitle language (digital TV, where available)
-
Subtitles: Turns subtitles on and off (where available)
-
Rapid reverse: Moves frames backwards in media such as movies
-
No function
-
Play: Starts to play selected media
-
Stop: Stops the media being played
-
Rapid advance: Moves frames forward in media such as movies
-
Pause: Pauses the media being played
-
Screen: Changes the aspect ratio of the screen
-
Text: Displays teletext (where available), press again to superimpose the teletext over a normal broadcast picture (mix)
-
My button 2 (*)
-
EPG (Electronic programme guide): Displays the electronic programme guide
-
Exit: Closes and exits from displayed menus or returns to previous screen
-
Quick Menu: Displays a list of menus for quick access
-
No function
-
Programme +/-
-
Swap: Quickly cycles between previous and current channels or sources
-
Source: Shows all available broadcast and content sources

Using My button 1 (\*)
Press MY BUTTON 1 for five seconds when on a desired source or channel, until the "MY BUTTON IS SET" message is displayed on the screen. This confirms that the selected MY BUTTON is now associated with the selected function.
Using My button 2 (\*\*)
Press MY BUTTON 2 for five seconds when on a desired source or channel, until the "MY BUTTON IS SET" message is displayed on the screen. This confirms that the selected MY BUTTON is now associated with the selected function.
Getting Started
Attaching the Stand
-
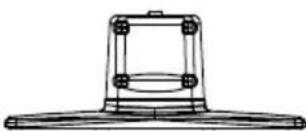
Stand is placed on a flat surface (fig.1).
-
To install the TV on the wall, first of all, foot assembly should be removed. Unscrew the 4 screws that attach the foot assembly to the panel and remove the foot assembly from the panel (fig.2).

natural_image
Technical line drawing of a mechanical component with mounting base and central oval feature (no text or symbols)fig.1

natural_image
Top-down schematic of a device layout with labeled components (no text or symbols)
natural_image
Technical line drawing of a mechanical component with mounting flange (no text or symbols)fig.2
Getting Started
TV Control Switch & Operation
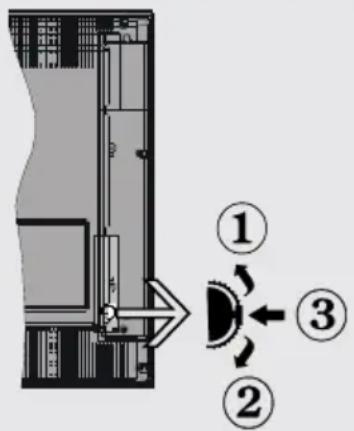
- Up direction
- Down direction
- Programme/Volume / AV / Standby-On selection switch
The Control button allows you to control the Volume/ Programme/ Source and Standby-On functions of the TV.
To change volume: Increase the volume by pushing the button up. Decrease the volume by pushing the button down.
To change channel: Press the middle of the button, the channel information banner will appear on screen. Scroll through the stored channels by pushing the button up or down
To change source: Press the middle of the button twice, the source list will appear on screen. Scroll through the available sources by pushing the button up or down.
To turn the TV off: Press the middle of the button down and hold it down for a few seconds, the TV will turn into standby mode.
Operation with the Remote Control Volume Setting
Press V + button to increase the volume. Press V - button to decrease the volume. A volume level scale (slider) will be displayed on the screen.
Programme Selection (Previous or Next Programme)
Press P - button to select the previous programme. Press P + button to select the next programme.
Programme Selection (Direct Access)
Press number buttons on the remote control to select programmes between 0 and 9. The TV will switch to the selected programme. To select programmes between 10-10000, press the number buttons consecutively.
Getting Started
Aerial & Cable connection
Connect the "aerial" or "cable TV" plug to AERIAL INPUT (ANT.) socket located on the back of the TV (fig.1).
Power connection

IMPORTANT :The TV set is designed to date on 220-240V AC, 50 Hz.
Please note: After unpacking, allow the TV to reach ambient room temperature before connecting the TV to the mains power socket.
Connect the power cord plug to the mains power socket.
The LED on the front of the TV then lights up, this indicates that the TV is in 'Standby' mode.
Wall Mounting
When wall mounting please ensure you use a compatible wall mount (not supplied). This TV conforms to the VESA mounting specifications and is 200 x 200mm.
Remote control - Inserting batteries
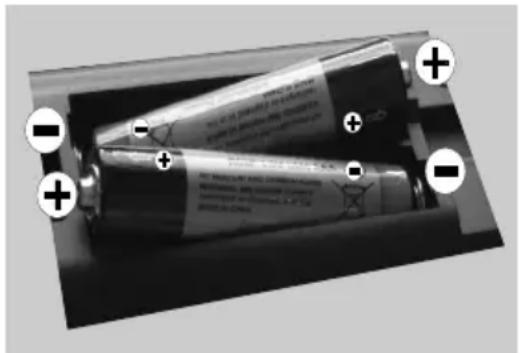
Remove the battery cover on the back of the remote control, gently push down and pull backwards at the same time as shown.
Insert two AAA/R3 or equivalent type batteries. Ensure the batteries are inserted the correct way and replace the battery cover (fig.2).

NOTE: When the remote control is not going to be used for long periods of time, the batteries should be removed. Otherwise the remote control may be damaged, caused by battery leakage and corrosion.

(fig.1)
natural_image
Two cylindrical batteries with visible charging wires and polarity markers (no text or symbols on the battery itself)AAA/R3 x 2 Batteries
(fig.2)
Switching the TV On and Off
To Switch the TV On
Connect the power cord to the 220-240V AC, 50 Hz.
To switch on the TV from standby mode either:
Press the “” button, P+ / P- or a numeric button on the remote control.
Press the side function until the TV comes on from standby.
To Switch the TV Off
Press the “ ^1 ” button on the remote control or press and hold the control switch on the TV, so the TV switches to the standby mode.
To power down the TV completely, unplug the power cord from the mains socket.
Note: When the TV is switched to standby mode, standby LED can blink to indicate that features such as Standby Search, Over Air Download or Timer is active. The LED can also blink when you switch on the TV from standby mode.
Getting Started
First Time Installation
When turned on for the first time, the "language selection" menu appears. The message "Welcome please select your language!" is displayed in all language options listed alphabetically.

Press the “” or “” button to highlight the required language, press OK button to select. “First Time Installation” appears. Use “<” or “>” button to set the required country, and press “” button to select Search Type. Use <” or “>” to set the desired search type. Available search types are Digital and analog, digital only and analog only. When set, press “” to select Teletext Language. Use “<” or “>” button to set the “Teletext Language” and select “Scan Encrypted” using “^” or “^” button. You can set Scan Encrypted as Yes if you want to scan coded stations.

Press OK button on the remote control to continue and the following message will be displayed on the screen.

You can activate Store mode option by using “<” or “>” button. If Store Mode (optional) is selected, Store mode option will be available in other settings menu and your TV's settings will be optimized for
best display quality. A confirmation screen will be displayed after selecting the Store Mode. Select YES to proceed.

If Home Mode is selected, Store mode will not be available after the First Time Installation. Press OK button on the remote control to continue and the following message will be displayed on the screen.

Select Yes and the television will search for digital terrestrial TV broadcasts.

NOTE: You can press MENU button to cancel.
After all the available stations are stored, the Channel List will be displayed on the screen. If you are satisfied with the order of channels, press the OK button to quit the channel list and watch TV.
Getting Started
Information Banner
Whenever you change channel using the P-/P+ buttons or the numeric buttons, the TV displays the broadcast picture along with an information banner at the bottom of the screen.
The information banner can be displayed at any time while watching TV by pressing the INFO button on the remote control (fig.8).
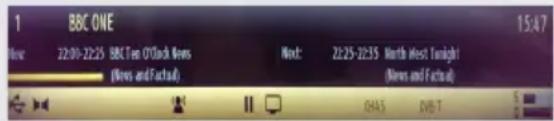
Hint: Not all channels broadcast the programme data. If the name and time of the programme are not available, then information banner will be displayed with blanks.
If the selected channel is locked, you must enter the correct four-digit numeric code to view the channel (default code is 0000, except for the France). "Enter PIN" will be displayed on the screen in such a case.
Connections
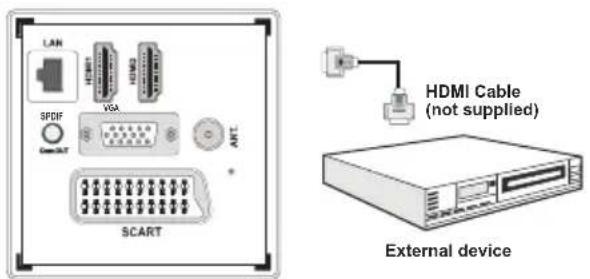
Back connections explained
1. Ethernet (LAN) Input (for service)
2. HDMI Input
Connects a device that has an HDMI socket. The TV can display High Definition pictures from devices such as a High Definition Satellite Receiver or DVD Player. These devices must be connected via the HDMI sockets or Component Socket. No sound connection is needed for an HDMI to HDMI connection.
3. S/PDIF Out
Outputs audio signals of the currently watched source. Use an SPDIF audio cable to trasfer audio signals to a device that has S/PDIF input.
4. PC Input (VGA)
Connects a personal computer to the TV. Connect the PC cable between the PC INPUT on the TV and the PC output on the PC. You can use the PC input to allow YPbPr signal connection with a device that has component output. Connect the YPbPr to PC cable between the PC INPUT on the TV and the component video outputs of the device.
5. SCART socket
Inputs or outputs for external devices. Connect the SCART cable between the SCART socket on the TV and the SCART socket on the external device (decoder, VCR or DVD player).

NOTE: If an external device is connected
via the SCART sockets, the TV will automatically switch to AV mode. When receiving DTV channels (Mpeg4 H.264) or while in Media Browser mode, output will not be available via the scart sockets.
6. RF Input (ANT.)
Connects to aerial (antenna) or cable TV. If you use a decoder or a media recorder, you should connect the aerial cable through the device to the TV with an appropriate aerial cable.

NOTE: When using the wall mounting kit
(optional), we recommend that you plug all your cables into the back of the TV before mounting on the wall.

Connections
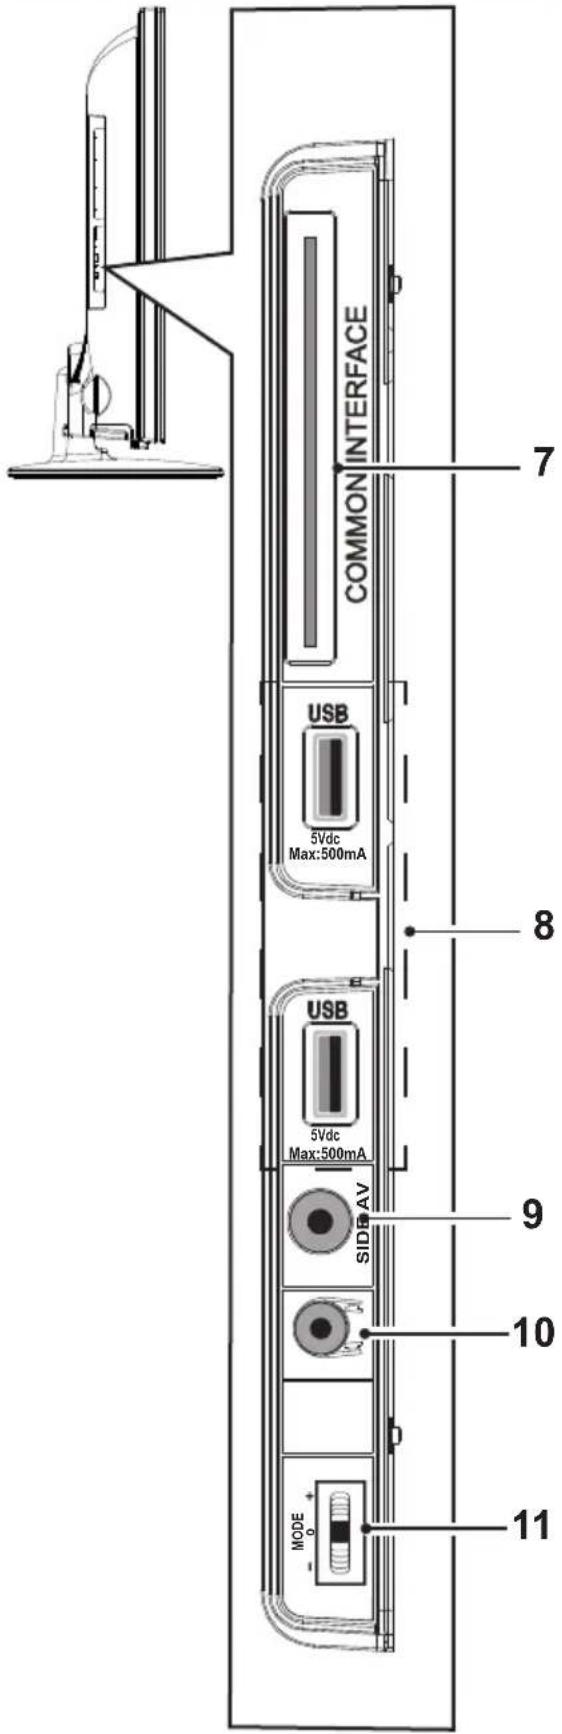
Left side connections explained
7. CI Slot
Used to insert a CI card. A CI card allows you to view all the channels that you subscribe to. For more information, see "Conditional Access" section.
8. USB Input
To connect USB disks to the TV, providing fast data exchange.
9. Side audio-video input
This input is used for connecting video and audio signals of external devices. To make a video connection, you must use the supplied AV connection cable for enabling connection. First, plug singular jack of the cable to the TV's Side AV socket. Afterwards, insert your video cable (not supplied) connector into the YELLOW input (located on the side with several connectors) of the supplied AV connection cable. Colours of the connected jacks should match. To enable audio connection, you must use RED and WHITE inputs of the side AV connection cable. Afterwards, insert your device's audio cable connectors into the RED and WHITE jack of the supplied side AV connection cable. Colours of the connected jacks should match.
10. Headphone
Headphone jack is used for connecting an external headphone to the system. Connect to the HEADPHONE jack to listen to the TV from headphones.
11. Magic Button
Volume/ Programme/ Source and Standby-On switch.
Connections
HDMI Connections
HDMI lets you enjoy high definition digital images and high quality sound by connecting the TV to external devices such as DVD players, set top boxes or gaming equipment (fig.1).
Power off both the TV and the device before making any connections. For more information, refer to your device's own instruction book. After making the connection, switch to HDMI 1, HDMI 2 as a source, depending on which HDMI connector the external equipment is connected. See, Input Selection section for more information on changing sources.

NOTE: HDMI cable is not supplied.
SCART Connections
Most devices support SCART connection. You can connect a; DVD recorder, VCR or decoder to the TV using the SCART socket (fig.2).
Power off both the TV and the device before making any connections. For more information, refer to your device's own instruction book. The Scart cable is not supplied.

NOTE:If your external device has a S-Video output, it is possible to connect your external device with a SCART-S-video adapter (not included) to the scart input of the TV. First plug the SCART S-Video adapter to the SCART connector on your TV set. Then, connect a S-video cable to the SCART socket (via the Scart S-Video adapter) to the S-video output of your external device.
VGA Connections
You can connect a computer (PC) to the TV to display your computer's screen image on the TV. Power up both computer and TV before making any connections. Use a 15-pin D-sub display cable to connect a PC to the TV. You must use audio inputs of side AV connection cable (RED & WHITE) to enable sound connection when connecting a device to your TV by using the PC input. (fig.3). When the connection is made, switch "Source" to "PC-VGA". Set the resolution that suits your viewing requirements. Resolution information can be found in the "Appendix parts".

NOTE: The cable is not supplied.
(fig.1)

(fig. 2)

flowchart
graph TD
    A["PC VGA Cable (not supplied)"] --> B["PC Input (back)"]
    C["Side Audio/Video Connection Cable (supplied)"] --> D["Side AV Input"]
    E["PC Audio Cable (not supplied)"] --> F["PC Computer"]
(fig. 3)
Connections
Side AV Connections
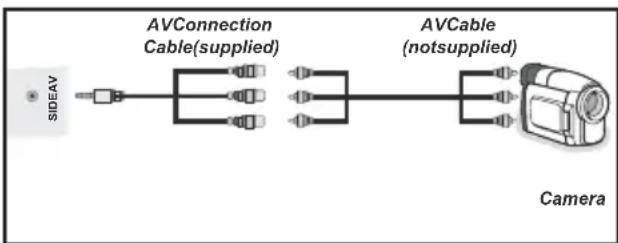
You must use the supplied SIDE AV connection cable for enabling SIDE AV connection.
- Plug single jack of the cable to the TV's SIDE AV socket.
- Insert your AV cable's (not supplied) connectors into the plural part of the SIDE AV connection cable (see illustration below). Colours of the connected jacks should match.
- To enable audio connection, use an audio cable. Insert your device's audio cable's connectors into the plural part of the SIDE AV connection cable. Colours of the connected jacks should match (fig.1).
- When the connection is made, switch to FAV source.
Using a Conditional Access Module

IMPORTANT: Insert or remove the CI module when the TV is SWITCHED OFF.
In order to watch certain digital channels, a conditional access module (CAM) can be necessary. This module must be inserted in the CI slot of your TV (fig. 2).
- Obtain the Conditional Access Module (CAM) and the viewing card by subscribing to a pay channel company, then insert those to the TV using the following procedure.
- Insert the CAM and then the viewing card to the slot that is located in the terminal cover at the rear side of the TV.
- The CAM should be correctly inserted, it is impossible to insert fully if reversed. The CAM or the TV terminal may be damaged if the CAM is forcefully inserted.
- Connect the TV to the mains supply, switch on and then wait for few moments until the card is activated.
- When no module is inserted, "No Common Interface module detected" message appears on the screen.
You can refer to the module instruction manual for details of the settings.
flowchart
graph LR
    A["SIDEAV"] --> B["AVConnection Cable(supplied)"]
    B --> C["AVCable (notsupplied)"]
    C --> D["Camera"]
(fig.1)
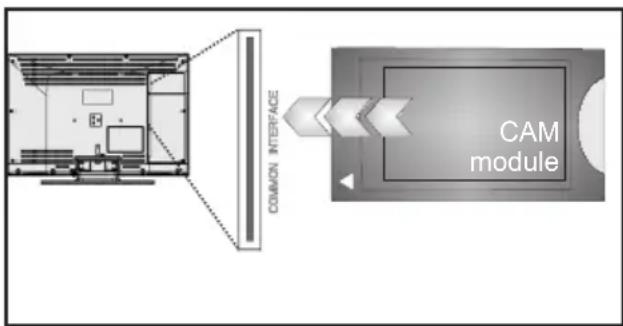
flowchart
graph TD
    A["Room Layout"] --> B["Common Interface"]
    B --> C["CAM module"]
    style A fill:#f9f,stroke:#333
    style C fill:#bbf,stroke:#333
(fig.2)
Connections
USB Connections
2.5" and 3.5" inch (hdd with external power supply) external hard disk drives are supported.

IMPORTANT
You should back up your files before making any connections to the TV set in order to avoid any possible data loss. Note that manufacturer will not be responsible for any file damage or dataloss.
It is possible that certain types of USB devices (e.g. MP3 Players) or USB hard disk drives/memory sticks may not be compatible with this TV.
USB Disk Connection
Plug your USB device to the USB input of the TV.
NOTE:
Plug or unplug your USB disk while the TV is switched off.
If you are going to connect a USB hard disk drive to the TV set, USB connection cable used between the disk drive and the TV should have a USB logo and should be as short as possible. While formatting a USB hard disk that has 1TB (Tera Byte) or more file capacity, you can experience problems with the formatting process. In such a case, you should format the disk with your personal computer and the formatted disk type should be FAT32.
CAUTION:
Quickly plugging and unplugging USB devices, is a very hazardous operation. Especially, do not repeatedly quickly plug and unplug the drive. This may cause physical damage to the USB player and especially the USB device itself. Do not pull out USB module while playing or recording a file.
Connections
Selecting source
Once you have connected external devices to the TV, you can select and change the input source required.
To change Input Selection, use one of the following options:
Option a: Press the SOURCE button on the remote control to directly select required source.
Option b: Select "SOURCES" from the "Settings" menu using the "or "button.
Use the “” or “” button to highlight the required input and press the “>” button to select.

General TV Operation
Electronic programme guide (EPG)
Some, but not all channels send information about the current and next programmes. Press the EPG button to view the EPG menu.
Info bar commands:
RED button - Prev day: Displays previous day.
GREEN button - Next Day: Displays next day.
YELLOW button - Prev. day: Zooms to programmes.
INFO button - Details: displays, in detail information on programme selected.
SWAP button - Now: jumps to the current broadcast (when viewing previous "Prev. day" or future "Next day" programmes).
SUBT.: Selects genre.
Numeric buttons: Jump. Go to preferred channel directly using number buttons.
OK button : Displays programme options.
TELETEXT button - Search: to view "Guide Search" menu. Using this feature, you can search the programme guide database in line with the genre selected or with name match and on the day/s selected.

EPG screen in regular mode
Basic Operations
Displaying Subtitles
With digital terrestrial broadcasting (DVB-T), some programmes are broadcasted with subtitles.
- Press MENU button to display main menu, highlight "Settings" then "Language Settings" menu using "<" or "> " or "^" or "-" button, press OK button to display "Language settings" menu.
- Highlight "Subtitle" in "Language settings" menu using "^" or "√" button. Use "<" or "> " button to set Subtitles to the desired language.

NOTE: You can directly press SUBTITLE button to enable or disable subtitles. If "Subtitle" is On, pressing the "Button" causes a warning message to be displayed on the screen (** for UK only).
Zoom Modes
Programmes can be watched in different picture formats, depending on the transmission received.
You can change the aspect ratio (image size) of the TV for viewing the picture in different zoom modes.
Press SCREEN button repeatedly to change the image size. Available zoom modes are; 16:9, Subtitle, 14:9, 14:9 Zoom, 4:3, Panoramic and Cinema.

NOTE: You can shift the screen up or down by pressing “▼” / “▲buttons while picture zoom is selected as panaromic, 14:9 Zoom, Cinema or Subtitle. This is only possible as long as the display of the screen format is displayed.
Using Main Menu Screen
- Press MENU button to display main menu, highlight the desired control icon using “<” or “>” or “^” or “▼” button, press OK button to display menu contents.
- Highlight an option inside a menu screen by using “” or “” button.
- Use " <" or " > button to set an option.
- If "OK" box is displayed next to a menu setting, press "OK" to display sub-menu screen.
Changes are automatically stored. Press
"MENU" to exit.

NOTE: See Picture, Sound, Settings and Installation Control sections for learning the functions of menu items.
Configuring Date/Time Settings
- Select Date/Time in the Settings menu to configure Date/Time settings.
- Press OK button.
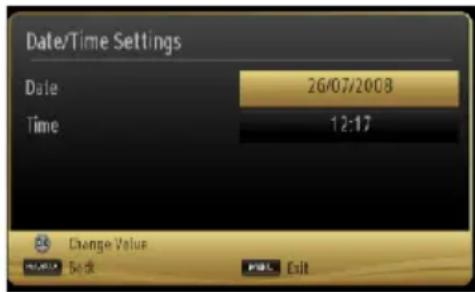
- Use “”, “” and “”, “” buttons to set the options. Some items might be available to be set due to the selected modes.
Source Settings
You can enable or disable selected source options. When set, the TV will not switch to the disabled source options when "SOURCE" button is pressed.
- Select "Sources" in the "Settings" menu and press "OK" button.
- Press “^”, “√” buttons to select a source.
- Use “<”, “>” button to enable or disable the selected source.
Current Language
(*) For digital broadcasts.
If there is a programme that is broadcasted with multi-channel sound or subtitles and offers different languages for these, you can choose the language. Press LANG. button to select between available options.

NOTE: If the background is transparent, on screen texts will be slightly transparent as well.
General TV Operation
Channel Management
The TV sorts all stored stations in the Channel List. You can edit this channel list, set favourites or set active stations to be listed by using the Channel List options. Press MENU button to view main menu. Select Channel List item by using “<” or “” button. Press OK to view menu contents.

Select Edit Channel List to manage all stored channels. Use “^” or “∨” and OK buttons to select “Edit Channel List”.
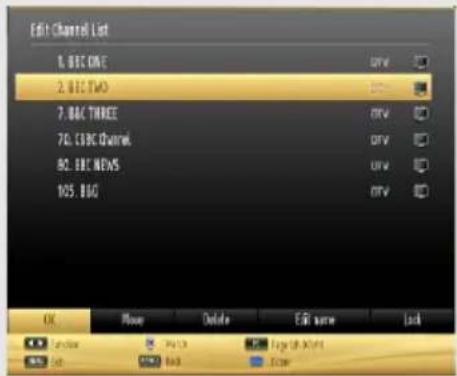
Note: The channels listed are mixed at the channel list. Channel types can be differentiated by the icons next to them: DTV (digital tv), HD (HD TV), ATV (Analogue TV), TV (TV), RD (Radio), encrypted, lock, and at the favourite list.
Navigating Channel List
- Press “^” or “√” button to select previous or next channel. Press P+ or P- button to move up or down the page.
- To watch a specific channel, highlight the "OK" box on Channel List menu using "<" or "> " button.
Moving a Channel
- Select the desired channel.
-
Select Move box in the channel list and press OK button.
-
Edit Number screen will be displayed. Enter the desired channel number by using the numeric buttons on the remote control.
NOTE: If there is a previously stored channel on that number, a warning screen will be displayed. - Select Yes if you want to move the channel and press OK.
Deleting a Channel
- Select the channel that you want to delete and select Delete box.
- Press OK button to continue. A warning screen will appear. Select YES to delete, select No to cancel. Press OK button to continue.
Renaming a Channel
- Select the channel that you want to rename and select Edit Name box. Press OK button to continue.
- Use navigation buttons to toggle between the current character, i.e., 'b' character becomes 'a' by "▼ and 'c' by " ".▲
- When finished, press OK button to save. Press MENU to cancel.
Locking a Channel
- Select the channel that you want to lock and select Lock option. Press OK button to continue.
- You will be asked to enter parental control PIN. Default PIN is set as 0000. Enter the PIN number.
- The desired channel is locked (Lock symbol is displayed next to the selected channel) or unlocked.
Button Functions
OK: Add/remove a station.
YELLOW: Tag/untag a channel.
GREEN: Tag/untag all channels.
BLUE: Displays filtering options.
Sorting Channel List
You can select broadcasts to be listed in the channel list. To display specific types of broadcast, you should use Active channel list setting.
Select Active channel list from the Channel list menu by using "or" button. Press OK button to continue.
You can select a network type option from the list by using “<” or “>” and OK buttons.
General TV Operation
Favourite Mode & Timers
Favourite Mode
You can create a list of favourite programmes using the favourites feature. In such a case, only the favourite channels are navigated.
-
Press "MENU" button to view main menu.
-
Select Channel List item by using “<” or “>” button.
-
Press "OK" to view menu contents.
-
Use " ^ or " and " OK" buttons to select "Favourites".

-
Select a channel by using “^” or “√” button.
-
Press "OK" button to add selected channel to favourites list. Press "OK" button again to remove.
Button Functions
OK: Add/remove a station.
YELLOW: Tag/untag a channel.
GREEN: Tag/untag all channels.
MENU: Exit.
Conditional Access
If you have inserted a conditional access module and viewing card to your TV, you can use Conditional Access menu. Note that these menu settings may change depending on the service provider.
-
Press "MENU" button and select the "Settings" icon by using "<" or "> " button.
-
Press "OK" button to view Settings menu.
-
Use “^” or “√” button to highlight Conditional Access and press “OK” to view menu items.
Setting Sleep Timer
This setting is used for setting the TV to turn off after a certain time.
- Press "MENU" button and select the "Settings" icon by using "<" or "> " button.
- Press "OK" button to view Timers menu.
- Highlight Sleep Timer by using “^” or “√” button.
- Use “<” or “>” button to set. The timer can be programmed between Off and 2.00 hours (120 minutes) in steps of 30 minutes.
Setting Programme Timers
You can set programme timers for a particular programme using this feature.
- While in Timers menu, press “√” button to activate timers functions.
- Programme timer function buttons will be displayed on the screen.
- Press YELLOW button on the remote control to add a timer. Timer options and definitions are as the following:
Network Type: This feature is unavailable to be set.
Timer Type: You can select timer type as Record or Timer.
Channel: Changes channel by using “<” or “>”.
Record Type: This item is unavailable to be set.
Date: Enter a date using the numeric buttons.
Start: Enter a starting time using the numeric buttons.
End: Enter an ending time using the numeric buttons.
Duration: Displays duration between the starting and ending time.
Repeat: Sets a timer to be repeated as Once, Daily or Weekly. Use “<” or “>” buttons to select an option.
Change/Delete: Sets the change/delete permission.
General TV Operation
Timers - continued & Power Save Mode
Playback: Sets the playback permission and parental settings.
4. Press GREEN button to save the timer. Press RED button to cancel.
Editing a Timer
- Select the timer you want to edit by pressing "or" button.
- Press "GREEN" button. Edit Timer menu screen will be displayed.
- When finished with editing, press "OK" button to save. You can press "RET/BACK" button to cancel.
Deleting a Timer
- Select the timer you want to delete by pressing "or" button.
- Press RED button.
- Select YES by using "◀ or "▶buttons to delete the timer. Select NO to cancel.
Power Save Mode
This television is designed to consume less energy to save environment. You not only help to save the environment but also you can save money by reducing electricity bills thanks to the energy efficiency feature of this TV. To reduce energy consumption, you should take the following steps:
You can use Power Save Mode setting, located in the Picture Settings menu. If you set Power Save Mode as Eco, the TV will switch to energy-saving mode and luminance level of TV set will be decreased to optimum level. Note that some picture settings will be unavailable to be changed when the TV is in Power Save Mode.
Power Save Mode

If Picture Off is selected, "Screen will be off in 15 seconds." message will be displayed on the screen. Select PROCEED and press OK to continue. The screen will be off in 15 seconds. If you disable Power Save Mode, Picture mode will be automatically set to Dynamic.
When the TV is not in use, please switch off or disconnect the TV from the mains plug. This will also reduce energy consumption.
Disconnect power when going away for longer time.
It is highly recommended to activate Power Save Mode setting to reduce your annual power consumption. Also it is recommended to disconnect the TV from the mains plug to save energy more when you do not use.
Please helps us to save environment by following these steps.
Repair Information
Please refer all servicing to qualified personnel. Only qualified personnel must repair the TV. Please contact your local dealer, where you have purchased this TV for further information.
Picture Controls
Configuring Picture Settings
You can use different picture settings in detail.
Press "MENU" button and select the Picture icon by using "<" or "> " button. Press OK button to view Picture Settings menu.

Operating Picture Settings Menu Items
Press “^” or “▼” button to highlight a menu item.
Use “◀” or “>” button to set an item.
Press "MENU" button to exit.
Picture Settings Menu Items
Mode: For your viewing requirements, you can set the related mode option. Picture mode can be set to one of these options: Cinema, Game, Dynamic, Sport and Natural.
Contrast: Sets the lightness and darkness values of the screen.
Brightness: Sets the brightness value for the screen.
Sharpness: Sets the sharpness value for the objects displayed on the screen.
Colour: Sets the colour value for the screen.
Power Save Mode : Press “<” or “>” button to set Power Save Mode.
If Picture Off is selected, "Screen will be off in 15 seconds." message will be displayed on the screen. Select PROCEED and press OK to continue. The screen will be off in 15 seconds. If you disable Power Save Mode, Picture mode will be automatically set to Dynamic.
NOTE: The backlight function will be inactive if Power Save Mode is set to Eco.
Backlight : This setting controls the backlight level and it can be set to Auto, Maximum, Minimum or Medium.
NOTE: Backlight can not be activate in VGA or Media Browser mode or while picture mode is set as Game.
Noise Reduction: If the broadcast signal is weak and the picture is noisy, use Noise Reduction setting to reduce the noise amount. Noise Reduction can be set to one of these options: Low, Medium, High or Off.
Advanced Settings
- Dynamic Contrast: Sets the dynamic contrast rate.
• Colour Temp: Sets the desired colour tone.
Setting Cool option gives white colours a slight blue stress.
For normal colours, select Normal option.
Setting Warm option gives white colours a slight red stress.
- Picture Zoom: Sets the picture size to Auto, 16:9, Subtitle, 14:9, 14:9 Zoom, 4:3, Panoramic or Cinema.
- HDMI True Black: While watching from HDMI source, this feature will be visible in the Picture Settings menu. You can use this feature to enhance blackness in the picture. You can set this feature as "On" for activating HDMI True Black mode.
-
Film Mode (optional): Films are recorded at a different number of frames per second to normal television programmes. Press “<” or “” buttons to set this feature Auto or Off. Turn this feature to Auto when you are watching films to see the fast motion scenes clearly.
-
Skin Tone: Sets the skin tone level of your TV.
• Colour Shift: Adjust the desired colour tone. - RGB Gain: You can configure the colour temperature values using the RGB Gain feature.
Reset: Resets the picture settings to factory default settings.
While in VGA (PC) mode, some items in Picture menu will be unavailable. Instead, VGA mode settings will be added to the Picture Settings while in PC mode.
General TV Operation
PC Picture Controls
PC Picture Settings Operation
For adjusting PC picture items, do the following:
Press “<” or “>” button to select Picture icon. Picture menu appears on the screen.
Contrast, Brightness, Colour, Colour Temp and Picture Zoom, Reset settings in this menu are identical to settings defined in TV picture settings menu. Sound, Settings and Source settings are identical to the settings explained in the main menu system.
PC Position: Select this to display PC position menu items.

Autoposition: Automatically optimizes the display. Press OK to optimize.
H Position: This item shifts the image horizontally to right hand side or left hand side of the screen.
V Position: This item shifts the image vertically towards the top or bottom of the screen.
Dot Clock: Dot Clock adjustments correct the interference that appear as vertical banding in dot intensive presentations like spreadsheets or paragraphs or text in smaller fonts.
Phase: Depending on the resolution and scan frequency that you input to the TV set, you may see a hazy or noisy picture on the screen. In such a case you can use this item to get a clear picture by trial and error method.
Quick Menu
The Quick Settings menu allows you to access some options quickly. This menu includes Power Save Mode, Picture Mode, Favourites, Sleep Timer, CEC RC Passthrough and Information booklet options. Press Q.MENU button on the remote control to view the quick menu. See the following chapters for details of the listed features.
E-Manual (optional)
You can find instructions for your TV's features in the E-Manual.
To use E-Manual, press to the Info button while main menu is displayed on the screen.
By using the navigation buttons select a desired category. Every category includes a different topics. Select a topic and press OK to read instructions.
To close the E-Manual screen press the Exit button.
Note: The contents of the E-Manual may vary according to model.
CEC and CEC RC Passthrough
This function allows to control the CEC-enabled devices, that are connected through HDMI ports by using the remote control of the TV.
The CEC option in the Other Settings menu under Settings menu should be set as Enabled at first. Press the Source button and select the HDMI input of the connected CEC device from the Source List menu. When new CEC source device is connected, it will be listed in source menu with its own name instead of the connected HDMI ports name(DVD Player, Recorder 1 etc.). The TV remote is automatically able to perform the main functions after the connected HDMI source has been selected.
To terminate this operation and control the TV via the remote again, press and hold the "0-Zero" button on the remote control for 3 seconds. Or press Q.Menu button on the remote, highlight the CEC RC Passthrough and set as Off by pressing Left or Right button. This feature can also be enabled or disabled under the Settings/Other Settings menu.
General TV Operation
The TV supports also ARC(Audio Return Channel) feature. This feature is an audio link meant to replace other cables between the TV and the audio system (A/V receiver or speaker system).
When ARC is active, TV does not mute its other audio outputs automatically. So you need to decrease TV volume to zero manually, if you want to hear audio from connected audio device only (same as other optical or co-axial digital audio outputs). If you want to change connected device's volume level, you should select that device from the source list. In that case volume control keys are directed to connected audio device.
General TV Operation
Sound & Source Controls
Configuring Sound Settings
Sound settings can be configured according to your personal preferences.
Press "MENU" button and select the first icon by using "<" or "> " button. Press OK button to view Sound Settings menu.

Operating Sound Settings Menu Items
Press “^” or “√” button to highlight a menu item.
Use “<” or “>” button to set an item.
Press "MENU" button to exit.
Sound Settings Menu Items
Volume: Adjusts volume level.
Equalizer: Press OK button to view equalizer submenu.

In the equalizer menu, the preset can be changed to Music, Movie, Speech, Flat, Classic and User. Press the "MENU" button to return to the previous menu.

NOTE: Equalizer menu settings can be changed ually only when the Equalizer Mode is in User.
Balance: This setting is used for emphasizing left or right speaker balance.
Headphone: Sets headphone volume.
Sound Mode: You can select Mono, Stereo, Dual I or Dual II mode, only if the selected channel supports that mode.
AVL: Automatic Volume Limiting (AVL) function sets the sound to obtain fixed output level between programmes (For instance, volume level of advertisements tend to be louder than programmes).
Headphone/Lineout (optional): When you connect an external amplifier to your TV using the headphone jack, you can select this option as Lineout. If you have connected headphones to the TV, set this option as Headphone.
Dynamic Bass: Enables or disables the Dynamic Bass.
Surround Sound: Surround sound mode can be changed as On or Off.
Digital Out: Sets digital out audio type.
Configuring Source Settings
You can enable or disable selected source options. The TV will not switch to the disabled source options when "SOURCE" button is pressed.
Press "MENU" button and select Settings icon by using "<" or "> " button. Press OK button to view Settings menu. Select Source and press OK button.
Select Sources in the Settings menu and press OK button.

Press “<” or “>” buttons to select a source.
Use “<” or “>” button to enable or disable the selected source. Changes are automatically stored.
Press RED button to edit the name of the selected source.
To view general configuration preferences, select Other Settings in the Settings menu and press OK button.
General TV Operation
Other Controls

Operation
Press " " or " " buttons to select an item.
Use “” or “” button to set an option.
Press OK button to view a sub-menu.
Other Settings Menu Items
Menu Timeout: Changes timeout duration for menu screens.
Active Antenna (optional): This feature enables or disables the use of active antennas. When antenna power option is set as On, +5V will be transmitted to the antenna output.

IMPORTANT: Antenna power should be Off when
standard antenna is used instead of the active antenna.
Scan Encrypted Channels: When this setting is set as YES, search process will locate the encrypted channels as well. If it is set as NO, encrypted channels will not be located in automatic search or manual search.
Blue Background: Activates or deactivates blue background system when the signal is weak or absent.
Software Upgrade: To ensure that your TV always has the most update information, you can use this setting. In order for the proper operation, please ensure that the TV is set to standby mode.

You can enable or disable automatic upgrade by setting Automatic Scanning option.
You can manually search for new software by selecting Scan for upgrade.
Application version: Displays the current application version.
Hard of Hearing: If the broadcaster enables any special signal concerning the audio, you can set this setting as On to receive such signals.
Audio Description: Audio description refers to an additional narration track for blind and visually impaired viewers of visual media, including television and movies. The description narrator talks through the presentation, describing what is happening on the screen during the natural pauses in the audio (and sometimes during dialogue, if deemed necessary). You can use this feature, only if the broadcaster supports that additional narration track.
Auto TV Off: You can set the timeout value of auto off feature. After the timeout value is reached and the TV is not operated for selected time, the TV will go off.
Standby Search (optional): Use “” or “” button to select Standby Search and then press “” or “” button to set this setting as On or Off. If you change Standby Search to Off, this function will be unavailable. To use Standby search please make sure that you select Standby Search as On.
Store Mode: You can activate Store mode option by using “” or “” button. If you are displaying the TV in a store, you can activate this mode. While Store Mode is enabled, some items in the TV menu may not be available to be set.
Power Up Mode: This setting configures the power up mode preference. Use “” or “” button to set.
Always On: The TV always switches on when main on/off button is pressed.
Standby: The TV always powers up in Standby mode.
Last State: The TV always switches on with the last selected channel/source.
General TV Operation
Language Settings
You can operate the TV's language settings using this menu.
Press "MENU" button and select the Settings icon by using "<" or "> "button. Press OK button to view Settings menu. Use "^" or "√" button to highlight Language and press OK to continue:

Use “^” or “√” button to set an item. Settings are stored automatically.
Menu: displays the system language.
Preferred
These settings will be used if available. Otherwise the current settings will be used.
Audio: Sets the preferred audio language.
Subtitle: Sets the subtitle language. Selected language will be seen in subtitles.
Teletext: Sets teletext language.
Guide: Sets the preferred Guide language.
Current (\*)
(*) These settings can be changed if only the broadcaster supports. Otherwise, settings will not be available to be changed.
Audio: Changes the audio language for the current channel.
Subtitle: Sets the subtitle language for the current channel.
NOTE: If the Country option is set to Denmark, Sweden, Norway or Finland, the Language Settings menu will function as described below:
Language Settings

In the configuration menu, highlight the Language Settings item by pressing “^” or “▼” buttons. Press OK and Language Settings submenu will be displayed on the screen:
Use “^” or “√” buttons to highlight the menu item that will be adjusted and then press “<” or “>” button to set.
NOTE:
System Language determines the on-screen menu language.
Audio Language is used for selecting the soundtrack of a channels.
Primary settings are the first priority when multiple choices are available on a broadcast. Secondary settings are the alternatives when the first options are not available.
General TV Operation
Media Browser
Only available when a USB device is plugged into the TV.
Starting Media Browser
- Press MENU button on the remote control and select "Media Browser" pressing "<" or "> " button.
- Press OK button to continue.
You can plug in two USB devices at the same time to your TV. If both USB devices include music, images and video, the USB Selection screen appears.
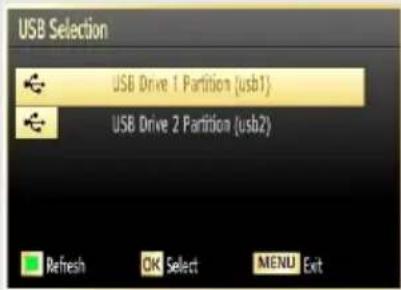
The USB device which is connected first to the TV set will known as a USB Drive 1.
- Use the "or " button to select a device and press OK. Media Browser menu contents (depending on the contents of your USB drive) will be displayed. You can play music, picture and video files from the connected USB memory stick.

Media Browser Configuration
Select Settings icon from the main media browser page to view the current preferences.
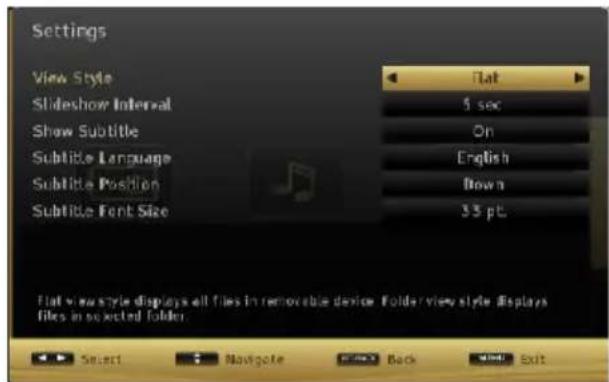
You can set your Media Browser preferences by using the Settings dialogue.
Operation
Press "or" button to highlight an item.
Use “<” or “” button to configure an item.
View Style
Sets default browsing mode. Sets default browsing mode as folder or flat. Select "Directory" to display files in a folder or "Normal" to view files directly. If you select the view style "Directory" the menu point "All" will appear in the media browser (See the section: Media playback using media browser). The option "All" gives you an overview of the directories images, music, videos.
Slide Show Interval
Sets slide show interval time.
Show Subtitle
Sets subtitle enabling preference.
Subtitle Language
Sets supported subtitle language.
Subtitle Position
Sets subtitle position as up or down.
Subtitle Font Size
Sets subtitle font size (max. 54pt).
General TV Operation
Media Browser - continued
Viewing Videos via USB

- Select Videos from the Media Browser screen and press OK button.
- All video files will be filtered and listed.
- Use “^” or “∨” button to select a video file and press OK button to play a video. Follow the information on the operations bar for using other commands.
Video Playback Screen
The following screen will be displayed while playing a video file.

Subtitle Time Correction
Press YELLOW button during the video playback for activating Subtitle Time Correction screen.

- Enter an offset value using “<” or “>” button.
- Press YELLOW button to confirm or press RETURN button to switch back to previous menu.
Viewing Photos via USB
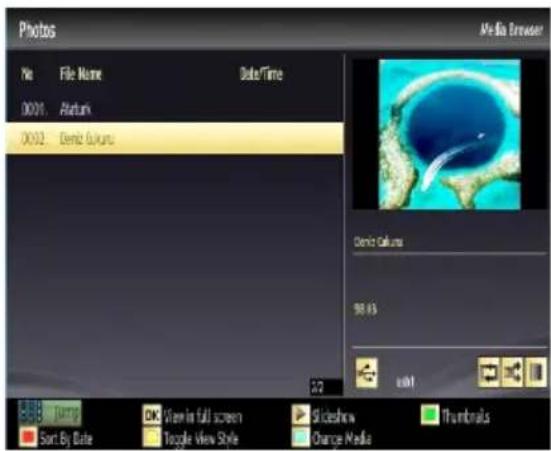
- Select Photos from the Media Browser screen and press OK button. All photo files will be filtered and listed.
- Use “^” or “√” button to select a photo file and press OK button to play a video. Follow the information on the operations bar for using other commands.
Displaying Photos in Slideshow Mode
- Press ▶(PLAY) button when viewing photo files to activate slideshow mode.

- Press RETURN to go back to Photos screen. Follow the information on the operations bar for using other commands.
Playing Music via USB

- Select Music from the Media Browser screen and press OK button. All music files will be filtered and listed.
General TV Operation
Media Browser - continued
- Use “^” or “√” button to select a music file and press OK button to play. Follow the information on the operations bar for using other commands.
Using MENU button in Media Browser Mode
Pressing MENU button in Media Browser mode displays the following menu screen:
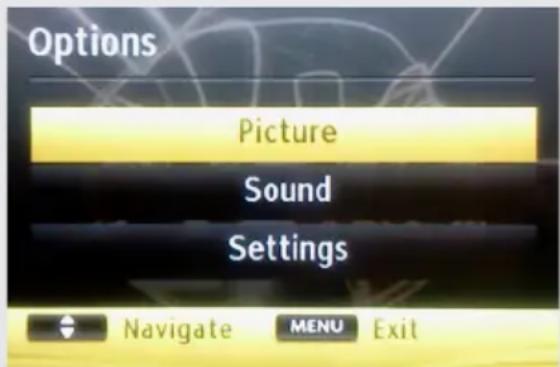
You can access Picture, Sound and Settings menu options using this screen. Press MENU again to exit from this screen.
General TV Operation
Installation Controls
Accessing Installation Menu
- Press "MENU" button on the remote control and select Installation by using "〈” or “〉" button.
- Press "OK" button and the Installation screen will be displayed.

Automatic Channel Scan (Retune)
- In the Installation menu, select "Automatic Channel Scan (Retune)" by using "^" or "∨" button and press OK button.
- Options will be displayed. You can select options by using “” or “” and OK buttons.
Menu Operations
Digital Aerial: Searches and stores aerial DVB stations.
Analogue: Searches and stores analogue stations
Digital Aerial & Analogue: Searches and stores aerial DVB and analogue stations.
- Whenever you select an automatic search type and press OK button, a confirmation screen will appear on the screen. To start installation process, select Yes, to cancel select No by using “<” or “>” and “OK” button.
- After auto channel scan type is set and selected and confirmed, installation process will start and progress bar will move along. If desired, press "MENU" button to cancel process. In such a case, located channels are not stored.
Manual Channel Scan
- In the Installation menu, select "Manual Channel Scan" by using "^" or "√" button and press OK button.
- Manual Scan options screen will be displayed. Select the desired "Search Type" using "<" or ">button. Manual search options will change accordingly.
- Enter the multiplex (for digital manual search), frequency, polarization, symbol rate, network channel scan, satellite options (for satellite manual search) or frequency number (for
analogue manual search) using the numeric buttons and press OK button to start search.
Analogue Fine Tune
- Select "Analogue Fine Tune" from the Installation menu by using "^" or "√" and OK buttons. Analogue fine tune screen will be displayed.
NOTE: Analogue Fine Tune feature will not be available if there are no analogue channels, digital channels and external sources stored. - Press OK button to proceed. Use “<” or “>” button to set Fine Tune. When finished, press OK button again.
First Time Installation
Deletes all stored channels and settings, resets TV to factory settings and starts first time installation.
- Select First Time Installation option and press OK button if you would like to reset the TV.
- A warning screen will be displayed. Select YES and press OK to continue. All prestored channels and settings will be deleted in such a case.
- The TV will reset after a short time and language selection menu will be displayed.
- Follow the steps in the Initial set up section. Clear Service List
(*) This setting is visible only when the Country option is set to Denmark, Sweden, Norway or Finland.
- Use this setting to clear channels stored. Press "or" button to select Clear Service List and then press OK.
- An OSD message will be displayed on the screen. Press OK to cancel or select Yes to delete all of the stored channels.
General TV Operation
Parental Control
To prohibit viewing of certain programmes, channels and menus can be locked by using the parental control system. This function enables or disables the menu protection system and allows the PIN code to be changed.
- Press "MENU" button and select the Settings icon by using "<" or ">button.
- Press OK button to view Settings menu. Use “^” or “√” button to highlight Parental and press “OK” to continue:

- To display parental lock menu options, PIN number must be entered. Factory default PIN number is 0000. After coding the correct PIN number, parental settings menu will be displayed:
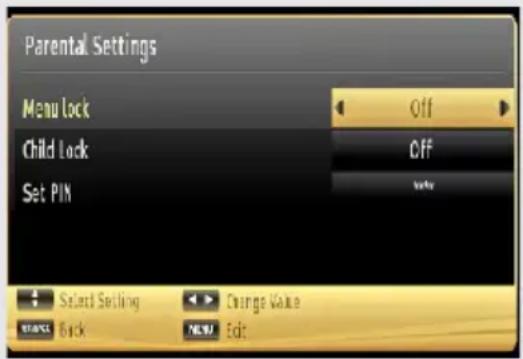
Parental Settings Menu Operation & Items
Select an item by using “^” or “√” button. Use “<” or “>” button to set an item. Press OK button to view more options.
Menu Lock: Menu lock setting enables or disables the menu access. You can disable access to the installation menu or the whole menu system.
Child Lock: When Child Lock is set, the TV can only be controlled by the remote control. In this case the control panel buttons will not work, except for the Standby Off/On button. When Child Lock is activated you are able to switch the TV into Standby mode with the Standby Off/On button. To switch the TV on again, you need the remote control. Hence, if one of those buttons is pressed, Child Lock Is On will be displayed on the screen when the menu screen is not visible.
Set PIN: Defines a new PIN number. Use numeric buttons to enter a new pin number. You will need to code your new pin a second time for verification purposes.

IMPORTANT: The factory default pin number is 0000 (except for the France), if you change the pin number make sure you write it down and keep it safe.
General TV Operation
Teletext
Digital Teletext (for the UK only)
- Press the "Button. The digital teletext information appears on screen.
- Operate using the coloured buttons, cursor buttons and OK button.
The operation method may differ depending on the contents of the digital teletext. - Follow the instructions displayed on digital teletext screen.
When "Press OK button" or similar message appears on the screen, press OK button.
When the “button is pressed, the TV returns to television broadcasting.
When you press the "Button again, the digital teletext screen will be displayed
Product Support
TV Operation Troubleshooting
Image persistence - ghosting
Please note that ghosting may occur while displaying a persistent image (still or paused image). LCD TVs' image persistence may disappear after a short time. Try turning off the TV for a while. To avoid this, do not leave the screen in still picture mode for extended periods.
No power
If your TV has no power, please check the power cord plug is connect to the mains power socket.
Poor picture
- Have you selected the correct TV system?
- Is your TV or house aerial located too close to a non-earthed audio equipment or neon lights, etc.?
- Mountains or high buildings can cause double pictures or ghost images. Sometimes you can improve the picture quality by changing the direction of the aerial. Is the picture or teletext unrecognisable?
- Check if you have entered the correct frequency.
- Please retune the channels.
- The picture quality may degrade when two devices are connected to the TV at the same time. In such a case, disconnect one of the devices.
No picture
- No Picture means that your TV is not receiving a transmission. Have you selected the correct button on the remote control? Try once more. Also make sure the correct input source has been selected.
- Is the aerial connected properly?
- Are the plugs connected tightly to the aerial socket?
- Is the aerial cable damaged?
- Are suitable plugs used to connect the aerial?
- If you are in doubt, consult your dealer.
No sound
- Has the TV been set to mute? To cancel mute, press the "button, or increase the volume level.
- Sound is coming from only one speaker. Is the balance set to one extreme? See Sound Menu section.
- If there is no digital amplifier, the option PCM in the SPDIF OUTPUT menu should be activated. Otherwise there will be no sound output from the speakers.
Remote control - does not operate
Your TV no longer responds to the remote control. The batteries may be exhausted, if so you can still use the control buttons on the left side of the TV. (* Is only possible if they are not blocked by parental control.)
Input sources - can not be selected
- If you cannot select an input source, it is possible that no device is connected.
- Check the AV cables and connections if you have tried to connect a device.
No channels for this type have been found.
-
Selected Network Type does not include any stored channels.
-
Check the signal cables.
If nothing works..
If you have tried the above solutions and none seem to work, try switching your TV off and on again. If this does not work, contact your supplier or TV repair technician. Never attempt to repair a defective TV yourself.
Product Support
General Specifications
| TV Broadcasting PAL/SECAM B/G D/K | K' I/I' L/L' |
| Receiving Channels VHF (BAND I/III) - | UHF (BAND U) - HYPERBAND |
| Number of Preset Channels 1000 | |
| Channel Indicator On Screen Display | |
| RF Aerial Input 75 Ohm (unbalanced) | |
| Operating Voltage 220-240V AC, 50Hz. | |
| Audio Stereo sound system | |
| Audio Output Power (WRMS.) (10% THD) | 2 x 8 |
| Power Consumption 75 W | |
| Weight 12,50 kg (with foot) / 9,85 kg (without foot) | |
| TV Dimensions DxLxH (with foot) 220 x 923 x 588 | |
| TV Dimensions DxLxH (without foot) 79/98 x 923 x 544 | |
| VESA 200 x 200 mm / M6 | |
| Display 16:9 display, 102 cm / 40" Screen Size |
Manufactured under license from Dolby Laboratories.
TRADEMARK ACKNOWLEDGMENT
"Dolby" and the double-D symbol are trademarks of Dolby Laboratories.

DOLBY.
DIGITAL PLUS
"HDMI, the HDMI logo and High-Definition Multimedia Interface are trademarks or registered trademarks of HDMI Licensing LLC."

HIGH-DEFINITION MULTIMEDIA INTERFACE
Product Support
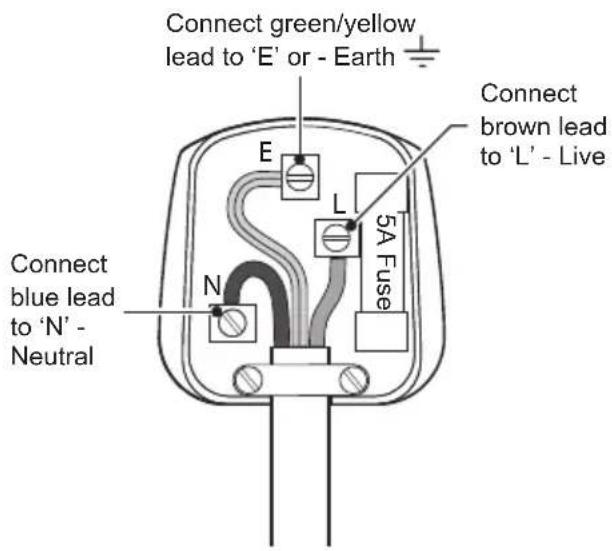
Plug replacement - UK and Ireland only
Should you need to replace the plug; the wires in the power cable are coloured in the following way:
Blue - Neutral 'N'
Brown – Live 'L'
Green & Yellow – Earth 'E'
As the colours of the wires in the power cable may not correspond with the coloured markings identifying the terminals in your plug, and proceed as follows:
The green & yellow wire must be connected to the terminal in the plug that is marked with the letter E or by the earth symbol.
The blue wire must be connected to the terminal that is marked with the letter N.
The brown wire must be connected to the terminal that is marked with the letter L.
If the power lead is damaged, it must be replaced by a qualified electrician.
Technical experts are available 7 days a week
- Simple help and advice on setting up your digital equipment (image).
• Guidance on connecting other devices to your television such as a DVD player, Sky, home cinema system or a games console. - Order spare parts, including that lost remote control.
- Any other technical issues you may need assistance with.
Call us today: 0345 604 0105
Local call rates applies*
Lines open 9am-8pm Monday to Saturday and 10am-4pm Sunday.
*Calls to Argos enquiry lines may attract a charge and set up fee from residential lines depending on your call plan/tariff. Mobile and other providers costs may vary, see www.bt.com/pricing for details.
For Security and training purposes, telephone calls to and from customer service centres maybe recorded and monitored. Calls from Republic of Ireland will attract international call charges.
Product Support
Supported File Formats for USB Media Browser
| Media Extension Format Notes | ||||
| Movie | mpg, mpeg | Mpeg1,2 MPEG1/2 Layer 1/2/3, AAC/HEAAC, AC3/EAC3, LPCM/ADPCM | 1080P@ 30fps50Mbit/sec | |
| dat, mpg, mpeg | MPEG2 ,H.264, VC1, AVS, MVC | MPEG1/2 Layer 1/2/3, AAC/HEAAC, AC3/EAC3, LPCM/ADPCM | H.264:1080Px2@25fps1080P@ 50fps MVC:1080P@ 24fps Other:1080P@ 30fps"50Mbit/sec | |
| .vob MPEG2 | MPEG1/2 Layer 1/2/3, AC3, | LPCM | 1080P@ 30fps 50Mbit/sec | |
| .mkv MPEG | 1,2,4, XviD, H.264,VC1,WMV3, Motion JPEG | MPEG1/2 Layer 1/2/3, AAC/HEAAC,AC3/EAC3, LPCM | H.264:1080Px2@25fps1080P@ 50fpsOther:1080P@ 30fps50Mbit/sec | |
| .mp4 .mov | MPEG1/2 Layer 3, AAC/HEAAC, | AC3/EAC3, LPCM/ADPCM | H.264:1080Px2@25fps1080P@ 50fpsOther: 1080P@ 30fps50Mbit/sec | |
| RMVB, RM | rv30, rv40 LBR(cook), AAC/HEAAC | 1080P@ 30fps50Mbit/sec | ||
| avi MPEG1,2 | 4 , Xvid H.264,VC1,WMV3, Sorenson H.263Motion JPEG | MPEG1/2 Layer 1/2/3, AAC/HEAAC, AC3/EAC3, LPCM/ADPCM, WMA | H.264:1080Px2@25fps1080P@ 50fps Other:1080P@ 30fps"50Mbit/sec | |
| flv | H.264,Sorenson H.263 | MPEG1/2 Layer 3, AAC/HEAAC,LPCM/ADPCM | H.264:1080Px2@25fps1080P@ 50fps Other:1080P@ 30fps 50Mbit/sec | |
| 3gp,3g2 MPEG4, H.264 | 1920x1080 @ 30P20Mbit/sec | |||
| asf, wmv | MPEG2,4, XviD, H.264,VC1,WMV3 | MPEG1/2 Layer 1/2/3, AAC/HEAAC, AC3/EAC3, LPCM, WMA | 1080P@ 30fps50Mbit/sec | |
| Music | 3 | WMA, WMA Pro-AC, HEAAC | MPEG1 Layer 1/2/3 (MP3) | |
| .wav | LPCM | |||
| WMA/ASF W | ||||
| .m4a/.aac A | ||||
| Photo | .jpeg | Baseline JPEG | MAX WxH =14592x12288Up to 8 MegaByte | |
| .png | Progressive JPEG | |||
| .bmp | non-interlace | |||
| .png | interlace | |||
| Subtitle | sub | - | - | |
| srt | - | - | ||
Product Support
AV and HDMI Signal Compatibility & Typical PC Resolutions
| Source | Supported Signals | Available | |
| EXT-1(SCART1) | PAL O | ||
| NTSC 60 O | |||
| RGB 50/60 O | |||
| SECAM O | |||
| Side AV | PAL 50/60 O | ||
| NTSC 60 O | |||
| SECAM O | |||
| YPbPr | 480I 60Hz O | ||
| 480P 60Hz O | |||
| 576I 50Hz O | |||
| 576P 50Hz O | |||
| 720P 50Hz O | |||
| 720P 60Hz O | |||
| 1080I 50Hz O | |||
| 1080I 60Hz O | |||
| 480I 60Hz O | |||
| 480P 60Hz O | |||
| HDMI1HDMI2 | 576I 50Hz O | ||
| 576P 50Hz O | |||
| 720P 50Hz O | |||
| 720P 60Hz O | |||
| 1080I 50Hz O | |||
| 1080I 60Hz O | |||
| 1080P | 24Hz25Hz30Hz50Hz60Hz | O | |
| Index Resolution Frequency | 30 | 1280x768 85Hz | ||
| 1 | 0x400 70Hz | 31 | 1280x960 60Hz | |
| 2 | 0x350 85Hz | 32 | 1280x960 75Hz | |
| 3 | 0x400 85Hz | 33 | 1280x960 85Hz | |
| 4 | 0x480 60Hz | 34 | 1280x1024 60Hz | |
| 5 | 0x480 66Hz | 35 | 1280x1024 75Hz | |
| 6 | 0x480 72Hz | 36 | 1280x1024 85Hz | |
| 7 | 0x480 75Hz | 37 | 1400x1050 60Hz | |
| 8 | 40x480 85Hz | 38 | 1400x1050 75Hz | |
| 9 | 0x600 56Hz | 39 | 1400x1050 85Hz | |
| 10 | 800x600 60Hz | 40 | 1440x900 60Hz | |
| 11 | 800x600 70Hz | 41 | 1440x900 75Hz | |
| 12 | 800x600 72Hz | 42 | 1600x1200 60Hz | |
| 13 | 800x600 75Hz | 43 | 1680x1050 60Hz | |
| 14 | 800x600 85Hz | 44 | 1920x1080 60Hz | |
| 15 | 832x624 75Hz | 45 | 1920x1200 60Hz | |
| 16 | 1024x768 | 60Hz | ||
| 17 | 1024x768 | 66Hz | ||
| 18 | 1024x768 | 70Hz | ||
| 19 | 1024x768 | 72Hz | ||
| 20 | 1024x768 | 75Hz | ||
| 21 | 1024x768 | 85Hz | ||
| 22 | 1152x864 | 60Hz | ||
| 23 | 1152x864 | 70Hz | ||
| 24 | 1152x864 | 75Hz | ||
| 25 | 1152x864 | 85Hz | ||
| 26 | 1152x870 | 75Hz | ||
| 27 | 1280x768 | 60Hz | ||
| 28 | 1360x768 | 60Hz | ||
| 29 | 1280x768 | 75Hz | ||
(X: Not Available, O: Available)
In some cases a signal on the LCD TV may not be displayed properly. The problem may be an inconsistency with standards from the source equipment (DVD, Set-top box, etc.). If you do experience such a problem please contact your dealer and also the manufacturer of the source equipment.
The display has a maximum resolution of 1920 x 1200. The table is an illustration of some of the typical video display modes. Your TV may not support different resolutions. Supported resolution modes are listed above. If you switch your PC to an unsupported mode, a warning OSD will appear on the screen.
Product Support
Supported DVI Resolutions
When connecting devices to your TV's connectors by using DVI converter cables (not supplied), you can refer to the following resolution information.
| 56Hz 60Hz 66Hz 70Hz 72Hz 75Hz | |||||||
| 640x400 | ☑ | ||||||
| 640x480 | ☑ ☑ | ☑ ☑ | |||||
| 800x600 | ☑ ☑ | ☑ ☑ ☑ | |||||
| 832x624 | ☑ | ||||||
| 1024x768 | ☑ ☑ | ☑ ☑ ☑ | |||||
| 1152x864 | ☑ ☑ | ☑ | |||||
| 1152x870 | ☑ | ||||||
| 1280x768 | ☑ | ||||||
| 1360x768 | ☑ | ☑ | |||||
| 1280x960 | ☑ | ☑ | |||||
| 1280x1024 | ☑ | ☑ | |||||
| 1400x1050 | ☑ | ☑ | |||||
| 1440x900 | ☑ | ☑ | |||||
| 1600x1200 | ☑ | ||||||
| 1680x1050 | ☑ | ||||||
| 1920x1080 | ☑ | ||||||
| 1920x1200 | ☑ | ||||||
Product Support
| Digital Reception (DVB-T) |
| MHEG-5 ENGINE compliant with ISO/IEC 13522-5 UK engine Profile 1 - for UK |
| Object carousel support compliant with ISO/IEC 135818-6 and UK DTT profile - for UK |
| Frequency range: 474-850 MHz for UK models |
| 170-862 MHz for EU models |
| Transmission standard: DVB-T. MPEG-2, MPEG-4. |
| Demodulation: COFDM with 2K/8K FFT mode |
| FEC: all DVB models |
| Video: MP@ML, PAL, 4:3/16:9 |
| Audio: MPEG Layer I&II 32/44.148kHz. |
Product Support
Software Upgrade
Your TV is capable of finding and updating new software upgrades over broadcast channels.
For broadcast channels search, TV looks the available channels stored in your settings. So before software upgrade search, it is advised to auto search and update all available channels.
1) Software upgrade search via user interface
It is possible manually to check if there is a new software upgrade for your TV set.
Simply navigate on your main menu. Choose Settings and select Other Settings menu. In Other Settings menu navigate on to the Software Upgrade item and press OK button to open Upgrade Options menu.
In Upgrade Options menu select Scan for upgrade and press OK button.

You can enable or disable automatic upgrade by setting Automatic Scanning option.
If a new upgrade is found, it starts to download the upgrade. A progress bar indicates the remaining download progress. When download completes with success a message is displayed for reboot to activate new software. Press OK to continue with the reboot operation.
2) 3.AM search and upgrade mode
If Automatic scanning in Upgrade Options menu is enabled, TV wakes up at 03:00 and searches broadcast channels for new software upgrade. If new software is found and downloaded successfully, with next power up TV opens with new software version.
Note on reboot operation: Reboot is the last step in software upgrade operation if download of new software is finished successfully. During reboot TV makes final initializations. In reboot sequence panel power is closed and front led indicates the activity with blinking. Around 5 minutes later TV restarts with new software activated.
If your TV fails to restart in 10 minutes, unplug power for 10 minutes and re-plug again. TV should open with new software safely. If you still can not get TV working, please kindly repeat unplug and plug sequence a few times more. If your set still can not operate, please call the service personnel to fix the problem for you.
CAUTION: While led is blinking during reboot do not unplug your TV's power. Doing this may cause your TV not to re-open again and can only be fixed by service personnel.
NOTE: A software update is dependent on whether the TV stations of each country support it.
Product Support
Disposal information
Instructions for waste disposal:
Packaging and packaging aids are recyclable and should principally be recycled. Packaging materials, such as foil bag, must be kept away from children.
The cold cathode fluorescent lamp in LCD PANEL contains a small amount of mercury; please follow the local laws or regulations for disposal.
Information for Users on Disposal of old Equipment and Batteries (European Union only)
These symbols indicate that equipment with these symbols should not be disposed of as general household waste. If you want to dispose of the product or battery, please consider the collection systems or facilities for appropriate recycling.
Notice: The sign Pb below the symbol for batteries indicates that this battery contains lead.
For more information, please contact the local authority or the dealer where you purchased the product.

natural_image
Symbol of a trash bin crossed with two crossed lines, no text or labels presentProducts

Battery

Product Guarantee
This product is guaranteed against manufacturing defects for a period of

Year
This product is guaranteed for twelve months from the date of original purchase. Any defect that arises due to faulty materials or workmanship will either be replaced, refunded or repaired free of charge where possible during this period by the dealer from whom you purchased the unit.
The guarantee is subject to the following provisions:
- The guarantee does not cover accidental damage, misuse, cabinet parts, knobs or consumable items.
- The product must be correctly installed and operated in accordance with the instructions contained in this manual.
- It must be used solely for domestic purpose.
- The guarantee will be rendered invalid if the product is re-sold or has been damaged by inexpert repair.
- Specifications are subject to change without notice.
- The manufacturer disclaims any liability for the incidental or consequential damages.
- The guarantee is in addition to, and does not diminish your statutory or legal rights.
• In the event of a problem with the product with in the guarantee period call the
Customer Helpline: 0345 604 0105
Guarantor: Argos Ltd
489 - 499 Avebury Boulevard
Central Milton Keynes
MK9 2NW
| Product Fiche | ||
| Commercial Brand:BUSH | ||
| Product No. 10097975 | ||
| Model No. DLED40265T2S | ||
| Energy efficiency class A | ||
| Visible screen size (diagonal,approx.) (inch/cm) | 40 inches 102 cm | |
| On mode average power consumption (Watt) | 63 | |
| Annual energy consumption (kWh/annum) | 91 | |
| Standby power consumption (Watt) | 0,5 | |
| Off mode power consumption (Watt) | 0 | |
| Display resolution (px) 1920x1080 | ||
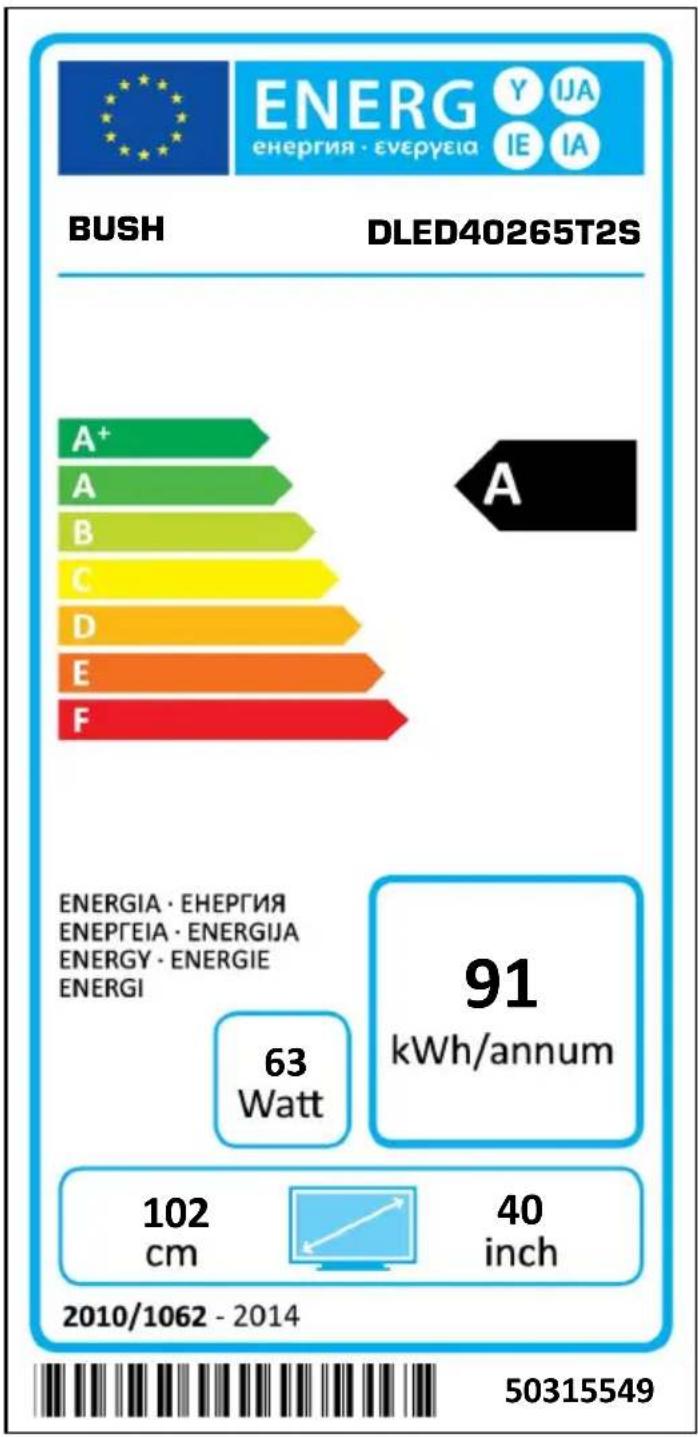
bar
| Label | Value | |-------|-----------| | A | 63 Watt | | A+ | 63 Watt | | A | 63 Watt | | B | 63 Watt | | C | 63 Watt | | D | 63 Watt | | E | 63 Watt | | F | 63 Watt | | 91 kWh/annum | 63 Watt | | 102 cm | 40 inch | | 2010/1062 - 2014 | 50315549 |Home Retail Group
489-499 Avebury Boulevard
Saxon Gate West
Central Milton Keynes
MK9 2NW

- Contents
- IMPORTANT - Please read these instructions fully before installing or operating
- Preparation
- Intended Use
- Power source
- Positioning the TV
- Power cord and plug
- Moisture and Water
- Ventilation
- Heat sources and Flames
- Headphone Volume
- Wall Mounting (optional)
- LCD Screen
- Cleaning
- Batteries
- Replacement Parts
- Taking out of service and storing
- Connection to a Television Distribution System (Cable TV etc.) from Tuner
- Symbols in this Instruction Book
- WARNING
- CAUTION
- IMPORTANT
- Technical experts are available 7 days a week
- Call us today: 0345 604 0105
- Lines open 9am-8pm Monday to Saturday and 10am-4pm Sunday.
- Getting Started
- Features & Accessories
- TV - Features
- Accessories included
- Standby Notifications
- Viewing remote control
- Using My button 1 (\*)
- Using My button 2 (\*\*)
- Attaching the Stand
- TV Control Switch & Operation
- Operation with the Remote Control Volume Setting
- Programme Selection (Previous or Next Programme)
- Programme Selection (Direct Access)
- Aerial & Cable connection
- Power connection
- Wall Mounting
- Remote control - Inserting batteries
- Switching the TV On and Off
- To Switch the TV On
- To Switch the TV Off
- First Time Installation
- Information Banner
- Connections
- Back connections explained
- Ethernet (LAN) Input (for service)
- HDMI Input
- S/PDIF Out
- PC Input (VGA)
- SCART socket
- RF Input (ANT.)
- Left side connections explained
- CI Slot
- USB Input
- Side audio-video input
- Headphone
- Magic Button
- HDMI Connections
- SCART Connections
- VGA Connections
- Side AV Connections
- Using a Conditional Access Module
- IMPORTANT: Insert or remove the CI module when the TV is SWITCHED OFF.
- USB Connections
- USB Disk Connection
- NOTE:
- CAUTION:
- Selecting source
- General TV Operation
- Electronic programme guide (EPG)
- Basic Operations
- Displaying Subtitles
- Zoom Modes
- Using Main Menu Screen
- Configuring Date/Time Settings
- Source Settings
- Current Language
- Channel Management
- Navigating Channel List
- Moving a Channel
- Deleting a Channel
- Renaming a Channel
- Locking a Channel
- Button Functions
- Sorting Channel List
- Favourite Mode & Timers
- Favourite Mode
- Conditional Access
- Setting Sleep Timer
- Setting Programme Timers
- Timers - continued & Power Save Mode
- Editing a Timer
- Deleting a Timer
- Power Save Mode
- Repair Information
- Picture Controls
- Configuring Picture Settings
- Operating Picture Settings Menu Items
- Picture Settings Menu Items
- Advanced Settings
- PC Picture Controls
- PC Picture Settings Operation
- Quick Menu
- E-Manual (optional)
- CEC and CEC RC Passthrough
- Sound & Source Controls
- Configuring Sound Settings
- Operating Sound Settings Menu Items
- Sound Settings Menu Items
- Configuring Source Settings
- Other Controls
- Operation
- Other Settings Menu Items
- Language Settings
- Current (\*)
- Media Browser
- Starting Media Browser
- Media Browser Configuration
- View Style
- Slide Show Interval
- Show Subtitle
- Subtitle Language
- Subtitle Position
- Subtitle Font Size
- Media Browser - continued
- Video Playback Screen
- Subtitle Time Correction
- Displaying Photos in Slideshow Mode
- Using MENU button in Media Browser Mode
- Installation Controls
- Accessing Installation Menu
- Automatic Channel Scan (Retune)
- Menu Operations
- Manual Channel Scan
- Analogue Fine Tune
- Parental Control
- Parental Settings Menu Operation & Items
- Teletext
- Digital Teletext (for the UK only)
- Product Support
- TV Operation Troubleshooting
- Image persistence - ghosting
- No power
- No picture
- No sound
- Remote control - does not operate
- Input sources - can not be selected
- No channels for this type have been found.
- If nothing works..
- General Specifications
- TRADEMARK ACKNOWLEDGMENT
- Plug replacement - UK and Ireland only
- AV and HDMI Signal Compatibility & Typical PC Resolutions
- (X: Not Available, O: Available)
- Supported DVI Resolutions
- Software Upgrade
- 1) Software upgrade search via user interface
- 2) 3.AM search and upgrade mode
- Disposal information
- Information for Users on Disposal of old Equipment and Batteries (European Union only)
- Product Guarantee
- Year
Brand : BUSH
Model : DLED40265T2S
Category : Television