
40/233F - Television BUSH - Free user manual and instructions
Find the device manual for free 40/233F BUSH in PDF.


| Type | 40-inch Full HD LED TV |
| Model | Bush 40/233F (also available as 40/233FDVD with built-in DVD player) |
| Screen Resolution | 1920 x 1080 pixels (Full HD) |
| Energy Efficiency Class | A+ |
| On Mode Power Consumption | 45.0 W |
| Standby Power Consumption | < 0.50 W |
| Annual Energy Consumption | 66 kWh (based on 4 hours/day for 365 days) |
| Dimensions (with stand) | 906 x 582 x 210 mm (W x H x D) |
| Weight (with stand) | 8.7 kg |
| VESA Mounting | 200 x 100 mm |
| Video Inputs | 3 x HDMI, 1 x USB, 1 x Composite (AV), 1 x Component (YPbPr), 1 x VGA/PC |
| Audio Inputs | 1 x 3.5mm PC audio (shared with Component/Composite audio), RF (aerial) |
| Audio Outputs | 1 x Coax digital audio, 1 x 3.5mm headphone jack |
| Speaker Output | 2 x 10W RMS (amplifier), 2 x 8W (speaker) |
| Tuner | Integrated Freeview HD (DVB-T/T2) with 7-day TV Guide |
| USB Record | Yes, pause live TV and record to USB (requires high-speed USB stick, min. read 20 MB/s, write 6 MB/s) |
| Media Playback (USB) | Supports video (MPEG, AVI, MKV, etc.), music (MP3, WMA, AAC), photo (JPEG, BMP, PNG) |
| Sound Enhancement | DTS TruSurround HD, multiple sound modes (Standard, Music, Movie, Sports) |
| Parental Controls | Parental guidance, channel lock, source lock, max volume, password (default 0000, master 4711) |
| Special Modes | Home Mode (power saving, ~25% less consumption), Economy Mode, dynamic picture settings |
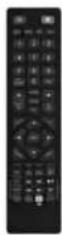
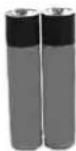
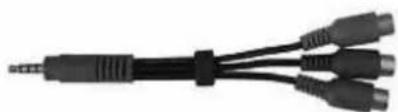
| Accessories Included | Remote control (with 2xAAA batteries), RF cable, Mini Component/YPbPr cable, Mini Composite/AV cable, stand installation pack, user guide, quick start guide |
| Safety | Anti-tip strap compatible, ventilation clearance 5cm when wall-mounted, weight over 20kg requires 2 persons to lift |
| Standby Timeout (Auto Standby) | Can be set to 3, 4, or 5 hours; can be disabled by switching out of Home Mode |
Frequently Asked Questions - 40/233F BUSH
User questions about 40/233F BUSH
0 question about this device. Answer the ones you know or ask your own.
Ask a new question about this device
Download the instructions for your Television in PDF format for free! Find your manual 40/233F - BUSH and take your electronic device back in hand. On this page are published all the documents necessary for the use of your device. 40/233F by BUSH.
USER MANUAL 40/233F BUSH
Full HD LED TV with Freeview & USB Media Player
User Guide
natural_image
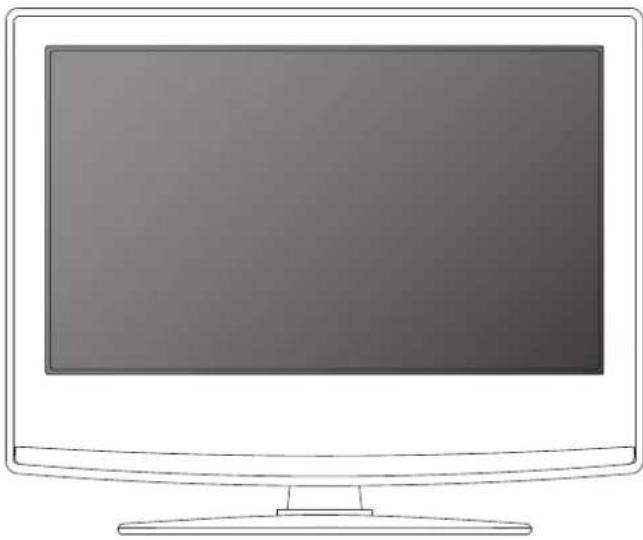
Line drawing of a flat-screen computer monitor with no text or symbolsModel No
40/233F
40/233FDVD
Important Safety Instructions
IMPORTANT - Please read these instructions. All the safety and operating instructions should be read before the appliance is operated.


Warnings
- Television sets which weigh 20kg or more must be lifted and carried by at least 2 people.
- This television does not contain any parts that are serviceable by the user. In case of a fault, contact the manufacturer or authorised service department. Exposing the internal parts inside the TV may endanger your life. The manufacturers guarantee does not extend to faults caused by repairs carried out by unauthorised third parties.
To prevent the spread of fi re, keep candles or other open fi ames away from this product at all times

- To reduce the risk of fire, electric shock or damage to the TV, do not expose it to dust, rain or moisture. Never expose the TV to dripping or splashing and do not place objects filled with liquids on or near the TV.
- Do not connect any external devices (DVD player, games console etc) when the TV is switched on. Disconnect both the TV and device from the mains before connecting. Only switch appliances on when the connection process is complete.
- Do not place the television in a confined space and do not obstruct the ventilation openings at the rear of the television.
- When installing on a wall, ensure the TV is at least 5cm from the wall for ventilation.
- Always ensure that the TV's ventilation openings are not covered with items such as newspapers, table-cloths, curtains, etc.
- Ensure this TV is used in moderate climates only.
Safety
- Dispose of this television and any components including batteries in an environmentally friendly manner. If in doubt, please contact your local authority for details of recycling.
- For your safety, this appliance is fitted with a fused 3 pin mains plug. Should the fuse need to be replaced, ensure that any replacement is of the same amperage and approved with the BSI mark.
-
Never try and replace the mains plug unless you have adequate qualifications and are legally authorised to do so. In the event that a replacement mains cable is required, contact the manufacturer for a suitable replacement.
-
Never use the television if it is damaged in any way.
- Always place the television on a fl at level surface avoiding anywhere which may be subject to strong vibration.
- The ideal distance to watch the television is approximately five times the length of the diagonal measurements of the TV screen. Ensure the television is not placed on top of the power cable as the weight of the television may damage the cable and cause a safety hazard.
- Never place mobile phones, speakers or any other device which may cause magnetic or radio interference, near the television. If interference is apparent, move the device causing the interference away from the television.
- To Isolate the TV from the mains power, please use the power switch located on the side, underside or rear of the TV set.
- Ensure that the power switch on the unit and the mains plug are always easily accessible.
WARNING: Excessive noise when using earphones and headphones can cause loss of hearing.
- To clean your TV, wipe with a soft, dry cloth. If the surfaces are extremely dirty, use a soft cloth dipped in a soap and water solution or a weak detergent solution.
- Never use alcohol, paint thinner or benzene to clean this unit.
- Before using a chemically treated cloth, read the instructions that came with the cloth carefully.

CAUTION: If water or other liquid enters the television through the display panel surface, a malfunction may occur.
Packaging
- The safest way to transport your item is in the original box/packaging - please save your packaging for this.
- You will need the original box/packaging in the event of warranty/service repair or support. We are unable to carry out warranty/service if you are unable to package the item correctly.
Important Safety Instructions
IMPORTANT - Please read these instructions. All the safety and operating instructions should be read before the appliance is operated.

Important information regarding use of video games, computers, captions or other fixed image displays
The extended use of fixed image program material can cause a permanent "shadow image" on the LCD/LED panel, also known as "screen burn".
This “shadow image” can appear in the background during normal viewing. This type of irreversible LCD/LED panel deterioration can be limited by observing the following steps:
- Reduce the brightness/contrast setting to a minimum suitable viewing level.
- Do not display the fixed image for extended periods of time.
- Turn the power off when not in use.
Examples of images that are more likely to cause "screen burn" are as follows (this is not an exhaustive list):
- TV channel logos: e.g. shopping channel logos and pricing displays - especially if they are bright and stationary. Moving or low-contrast graphics are less likely to cause ageing of the screen.
- Time displays.
- Teletext: Do not view a stationary page for a long period of time
• TV/DVD menus: e.g. listings of DVD disc content. - Pause mode: Do not leave the TV in pause mode for long periods of time, e.g. when watching DVDs or videos.
Important - Once 'shadow image/screen burn' occurs, it will never disappear and is not repairable under warranty.
UK: Waste electrical products should not be disposed of with household waste. Please dispose of the product at a designated collection point for recycling of WEEE. For your nearest facilities, please
How do I dispose of this product?
see www.recycle-more.co.uk or in store for details.
ROI: Waste electrical products should not be disposed of with household waste. Separate disposal facilities exist. Check with your local authority or retailer for recycling advice.
Batteries
- Do not expose batteries to high temperatures,
excessive heat, prolonged sunshine or fire as this may cause leakage, explosion or ignition.
Observe the correct polarity when inserting batteries.

- Do not use different types of batteries together or mix old and new batteries.
- Dispose of batteries in an environmentally friendly way.
- Certain regions may regulate the disposal of batteries. Please consult your local authority.
TV Models with built in DVD players
CAUTION:

This unit is a class 1 laser product. This unit uses a visible laser beam which could cause hazardous radiation exposure if directed. Be sure to operate the player correctly as instructed.
When this unit is plugged into the wall outlet, do not place your eyes close to the openings to look into the inside of this unit.
Use of controls or adjustments or performance of procedures other than those specified herein may result in hazardous radiation exposure.
Do not open covers and do not repair yourself. refer servicing to qualified personnel.
Trademarks
- HDMI, the HDMI logo and High-Definition Multimedia Interface are trademarks or registered trademarks of HDMI Licensing LLC.
- The "HD TV" Logo is a trademark of DIGITALEUROPE.
- The "HD TV 1080p" Logo is a trademark of DIGITALEUROPE.
- The DVB logo is the registered trademark of the Digital Video Broadcasting - DVB – project.
- Manufactured under license from Dolby Laboratories.
- Dolby and the double-D symbol are trademarks of Dolby Laboratories.
- Manufactured under license under U.S. Patent Nos: 5,956,674; 5,974,380; 6,487,535 & other U.S. and worldwide patents issued & pending. DTS, the Symbol, & DTS and the Symbol together are registered trademarks & DTS 2.0+Digital Out is a trademark of DTS, Inc. Product includes software. © DTS, Inc. All Rights Reserved.
- FREEVIEW The FREEVIEW words and logos are trade marks of DTV Services LTD. © DTV Services Ltd.
Contents
Manufacturers Guarantee Information 3
Important Safety Instructions 4-5
Trademarks 6
What is included in the box 8
Attaching the stand 9
Detaching the stand and securing the TV to a wall 10
Wall mounting 11
Getting Started - Initial Set Up 12
TV Buttons and Input Source Menu 13
Remote Control 14
Connections 15-17
TV Menu Operation 18-25
Channel Menu 18
Picture Menu 19-20
Sound Menu 21
Time Menu 22
System/Hotel Lock Menu 23
Setup Menu 24
DVD Setup 25
7 Day TV Guide 26
USB Record Digital / Freeview 27
USB Mode / Media Player 28
General Information 29-32
Using your TV with a Sky digital set top box 29
Frequently Asked Questions 30-31
Technical Specifications 32

dts®
TruSurround
For DTS patents, see http://patents.dts.com. Manufactured under license from DTS Licensing Limited. DTS, the Symbol, & DTS and the Symbol together are registered trademarks, and DTS TruSurround is a trademark of DTS, Inc. © DTS, Inc. All Rights Reserved.
What Is Included In The Box
Accessories
Included with this TV are the following accessories:
1 x User Guide

1 x Quick Start Guide
1 x TV

natural_image
Illustration of a flat-screen computer monitor with no visible text or symbols on the screen.1 x RF Cable

1 x Remote Control
2 x AAA Batteries
1 x Mini Component / YPbPr Cable

natural_image
Close-up of a black USB cable with multiple connectors (no text or symbols visible)1 x Mini Composite / AV Cable
natural_image
Close-up of a black audio jack cable with multiple connectors (no text or symbols visible)1 x Stand Installation Pack

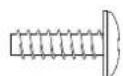
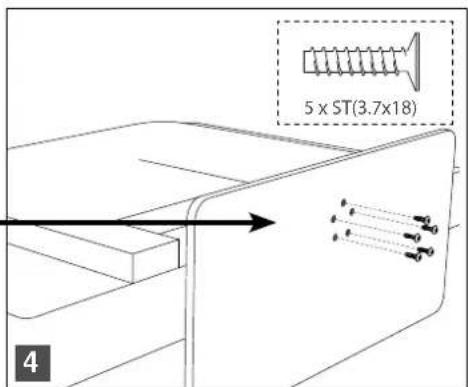
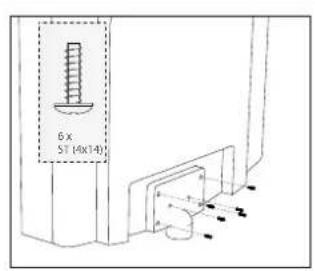
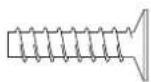
(A) 6 x ST (4x14)
Used for attaching the stand neck to the TV
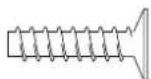
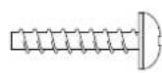
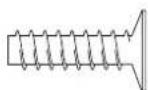
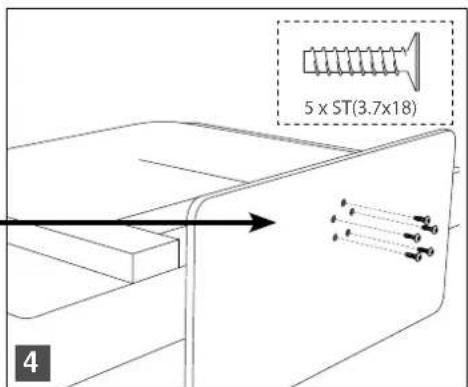
(B) 5 x ST (3.7x18)
Counter Sunk
Used for attaching the stand base to the stand neck
Please save your box/packaging as you will need this in the event of warranty/service repair or support. We are unable to carry out warranty/service if you are unable to package it correctly. The safest way to package your item in the event of warranty/service repair is in its original box/packaging.
Attaching The Stand
To complete the stand installation you will require a cross head screw driver.
The Stand Installation pack comes with 2 sets of screws.
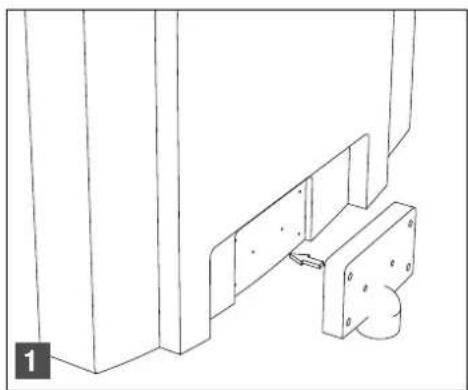
fi g 1) Attach the stand neck to the rear of the TV set.
fi g 2) Secure the neck to the TV using the (A) 6 x ST (4x14) screws provided.
fig 3) Attach the stand base to the neck.
fi g 4) Secure the base to the neck using the (B) 5 x ST (3.7x18) counter sunk screws provided.
HELPFUL ADVICE FOR FIRST TIME STAND INSTALLATION
When securing the self-tapping screw/s into the base of the TV (on first installation) the screw/s will be naturally tight as they create a thread in the plastic.
a) Ensure the cross head screw driver tip fits correctly into the head of the screw and that it is not too big or small.
b) Screw in all screws individually and partially before tightening all of the screws fully.
c) If the screws become very tight try loosening and re-tightening, this will continue the process of creating the thread.
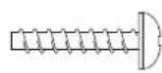
(A) 6 × ST(4 × 14)
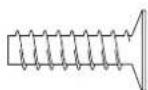
(B) 5 x ST(3.7x18)
Counter Sunk

natural_image
Technical line drawing of a mechanical assembly with mounting bracket and housing (no text or symbols)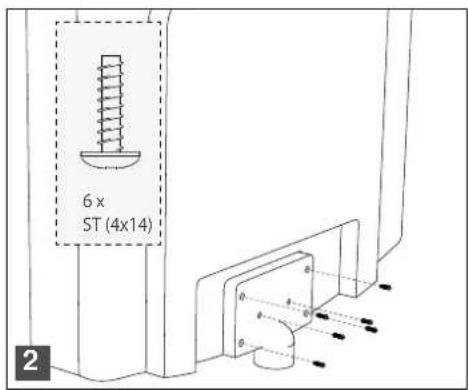

Detaching The Stand And Securing The TV To A Wall
Detaching the Stand
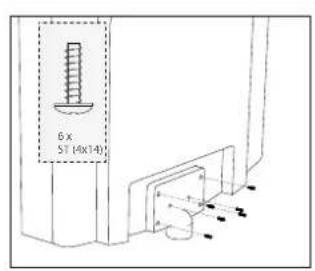
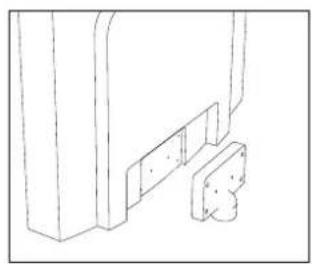
To detach the stand please remove the 6 screws highlighted then remove the stand neck and base from the rear of the TV set.

natural_image
Pure technical line drawing of a mechanical bracket or mounting detail without any text, numbers, or symbolsSecuring the TV to a Wall
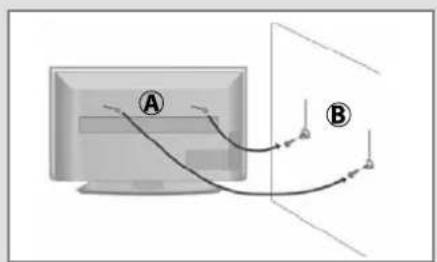
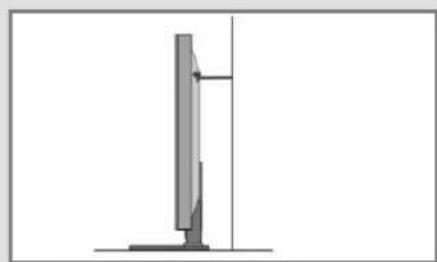
For maximum security in the home, when using a TV with its stand, anti-tip straps should be fitted. These are available from supermarket websites and other websites and are an easy, inexpensive and effective way of ensuring your TV stays safely upright. Straps are designed to be attached to the rear of the TV and then tethered to the wall or the furniture the TV is stood on, these are fitted as follows.
Note - Please ensure that children do not climb on the TV set.
A) Using one or both of the top wall-mounting holes and screws fasten one end of the fastening cord/s to the TV. (the screws are already supplied in the wall mounting holes)
B) Secure the other end of the fastening cord/s to your wall. (you will need screws/fi xings suitable for your wall type - available separately from most DIY stores).

natural_image
Simple line drawing of a vertical monitor or stand with a horizontal line extending from its top (no text or symbols)The Royal Society for the Prevention of Accidents is urging people to take care with flat-screen televisions.
RoSPA stated in 2010 that “Toddlers are particularly at risk of pulling flat-screen televisions on to themselves. They are unsteady on their feet and are attracted by colourful television images.”
The risk is increased as televisions become lighter.
Wall Mounting
IMPORTANT - Before drilling any holes in the wall ensure you are not drilling where there could be any electric wires, water or gas pipes.

natural_image
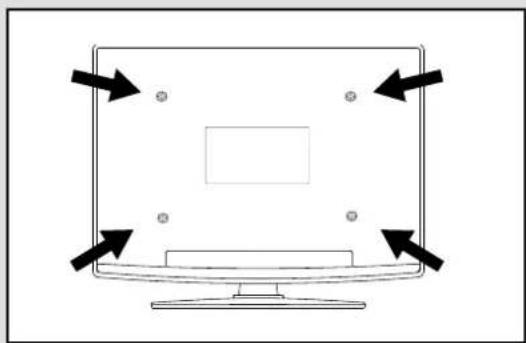
Diagram of a computer monitor with directional arrows indicating orientation (no text or symbols)1) Remove the four screws located at the back of the TV set.
2) The wall mount can now be easily attached to the mounting holes, located on the back of the TV, using the same four screws removed.
IMPORTANT – If wall mounting this TV, only use the screws already provided in the wall mounting holes. Using other screws which are longer could cause irreparable damage to internal parts.
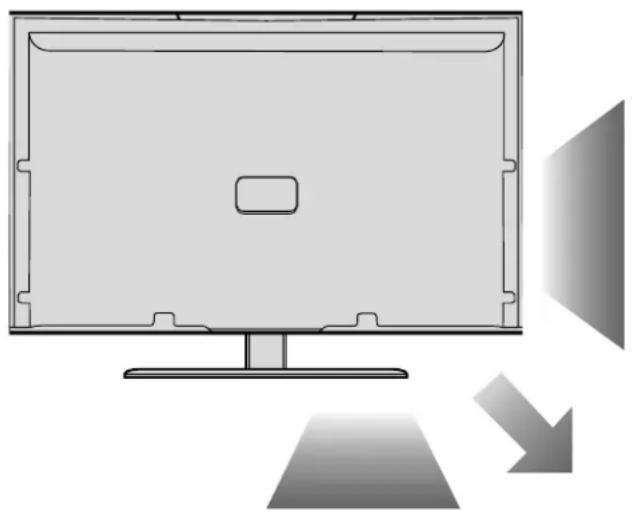
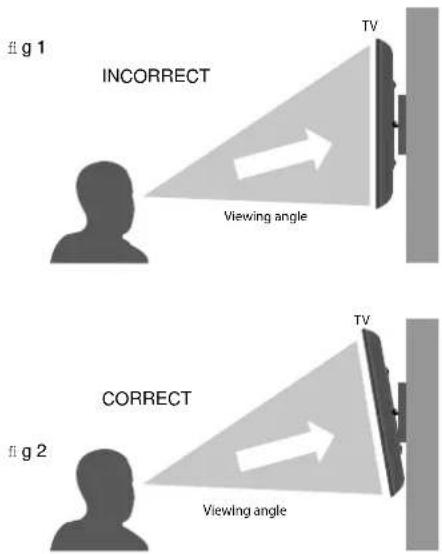
For optimum viewing, if wall mounting the TV higher than eye level, the TV should be tilted downwards so that the TV's screen is 'face on'. See fig 1 and 2 below.

For VESA wall mounting information please refer to the Technical Specification page.
Getting Started - Initial Set Up
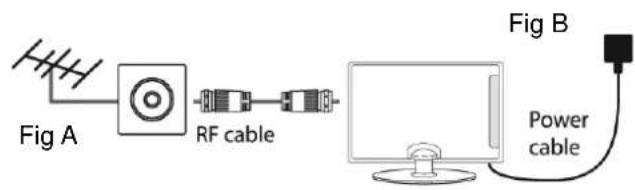
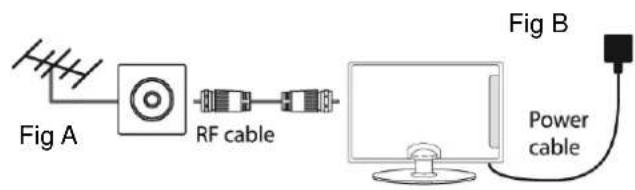
1) Using the RF cable supplied, connect the TV to the TV Aerial wall socket (Fig A).
Connect the power cable to the Electrical outlet (Fig B).
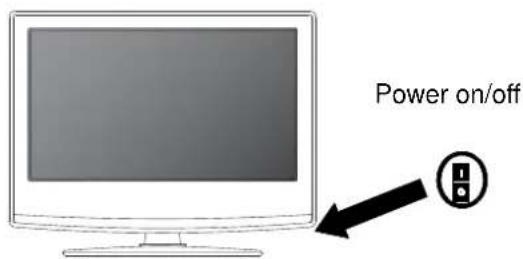
2) Switch on the television using the power on/off switch located on the side, underside or rear of the TV set.
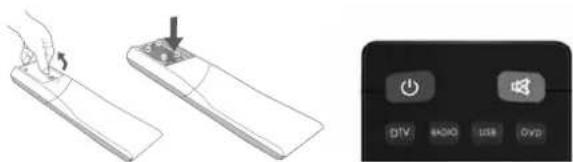
3) Insert the batteries supplied into the Remote control and press the Standby button to power on the TV.
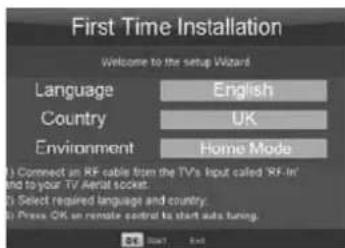
4) You will now be welcomed with the initial set-up screen. If it does not appear, on the remote control, please press [MENU] then 8-8-8-8 and the menu will appear. Press OK on the remote control and tuning will start.*
5) After tuning the following screen will appear.*
If you are missing channels, the reason for this is likely to be signal strength, you should consider connecting a signal booster and re-tuning the TV.
Important
As part of our ongoing development to reduce power consumption, we have added an extra function to this Television called 'Home Mode' (you will see this during the first time installation set up). Power consumption using the Home Mode function is approximately 25% lower than some other modes. The picture brightness is reduced using the Home Mode function. If this function is not suitable for your viewing environment, you can select other modes as necessary. (Please note, 'Store mode' is for optimum default picture settings, however, power consumption is approximately 25% higher than 'Home Mode').
Please refer to the user guide section 'Picture settings' in order to change the mode to one that maybe more suitable for your environment. There is also a shortcut button on the remote control called 'P-Mode' should you wish to change to another mode.
1
2
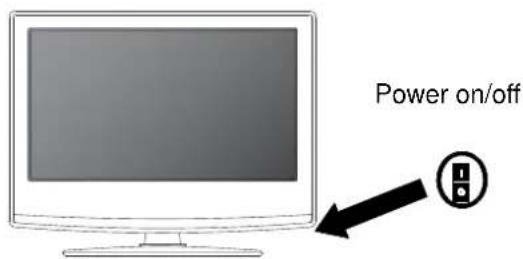
3
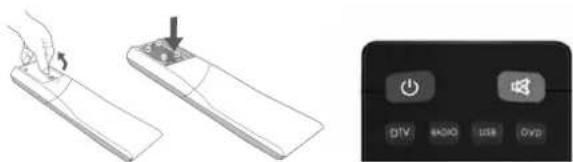
natural_image
Illustration showing a hand holding a remote control panel and a digital display with icons (no text or symbols on the main components)4

5
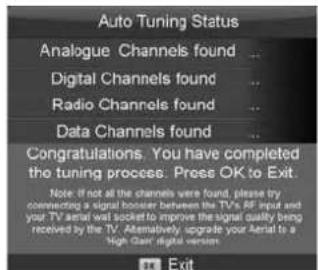

flowchart
graph LR
    A["Antenna"] --> B["Signal Booster"]
    B --> C["Computer"]
    C --> D["Output"]
*Screen shots/images are shown for illustration purposes only and may change dependent on model/region.
TV Buttons & Source Menu
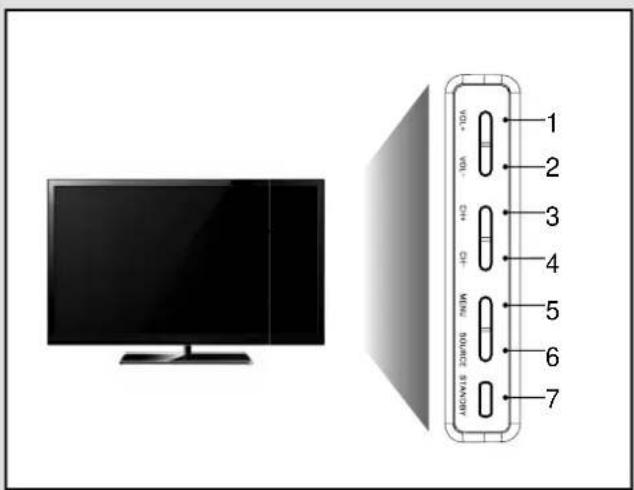
- Volume up and menu right
- Volume down and menu left
- Programme/Channel up and menu up
- Programme/Channel down and menu down
- Displays Menu/OSD
- Displays the input source menu
- Standby Power On/Off

- Stop/Eject DVD
- Play/Pause DVD
- Volume up and menu right
- Volume down and menu left
- Programme/Channel up and menu up
- Programme/Channel down and menu down
- Displays Menu/OSD
- Displays the input source menu
- Standby Power On/Off
Choosing Mode Input/Source
To switch between the different input/connections.
A) Using the buttons on the remote control:
1) Press [SOURCE] - The source menu will appear.
2) Press [V] or [A] to select the input you require.
3) Press [OK].
B) Using the buttons on the Television:
1) Press [SOURCE].
2) Scroll up / down using CH+/CH- buttons to the input/source you require.
3) Press Vol+ to change input/source to the one selected.
For further information on input/connections please view 'Connections' pages.
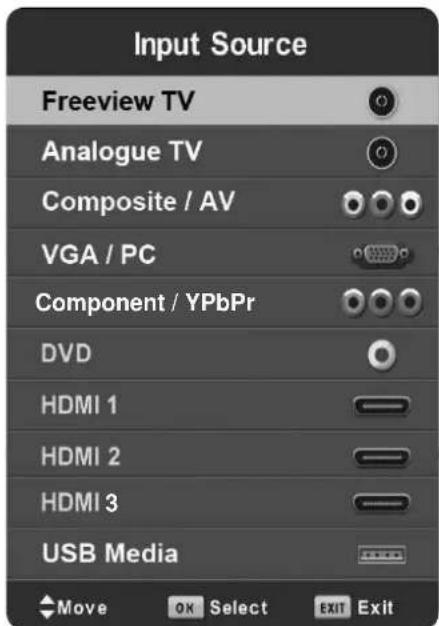
An example of the 'Input Source' menu (will vary by model)
Remote Control
Viewing remote control - TV
- STANDBY
- MUTE
- DTV
- RADIO
- DVD
- USB
- NUMBER BUTTONS
- TV GUIDE
- To return to the previous channel viewed
- P.MODE - Scrolls through picture mode options
- VOL▲/▼
- CH ▲/▼
- S.MODE - Scrolls through sound mode options
- FAV - To display favourites menu
- MENU
- EXIT
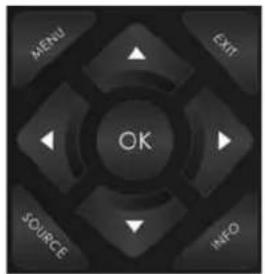
- (▲/▼/◄/►/OK) - Allows you to navigate the on-screen menus and adjust the system settings to your preference
- SOURCE/AV
- INFO - Press once for now/next channel information. Press twice for programme information about current programme
- ASPECT
- SLEEP
- SUBTITLE
- AUDIO
- TEXT
- TEXT HOLD
- DISPLAY
- TEXTZOOM/DVD ZOOM
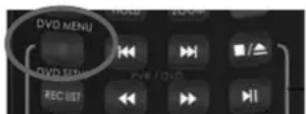
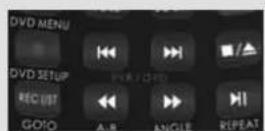
- DVD Menu/Record


- To restart the current chapter
- To advance forward to the next chapter
- To stop/eject Disc (hold for 4 seconds to eject disc)
- To play in fast rewind mode
- To play in fast forward mode
- To play/pause
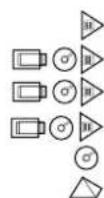
-
REC LIST
-
GOTO
-
A-B
-
REPEAT
-
ANGLE/ 3D - Change to 3D mode

For Models with Integrated DVD players
For Models with PVR Function
For Models with USB Playback
For Models with 3D Feature

Connections
natural_image
Illustration of a computer monitor with a blank screen and a gray arrow pointing to it (no text or symbols)1 EARPHONE Earphone socket
2 COAX in Digital Coax output
3 HDMI 1 HDMI input
4 HDMI 2 HDMI input
5 VGA/PC VGA/PC input
6 VGA/PC AUDIO IN 3.5mm PC audio input
7 COMPONENT (HD) Component input (YPbPr)
8 AV IN Video input
9 RF IN RF / TV Aerial Input
10 HDMI 3 HDMI input
11 USB USB input
12 CI CARD IN Common Interface module

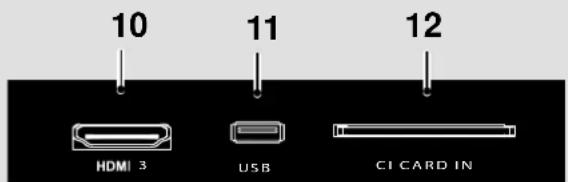
Connections
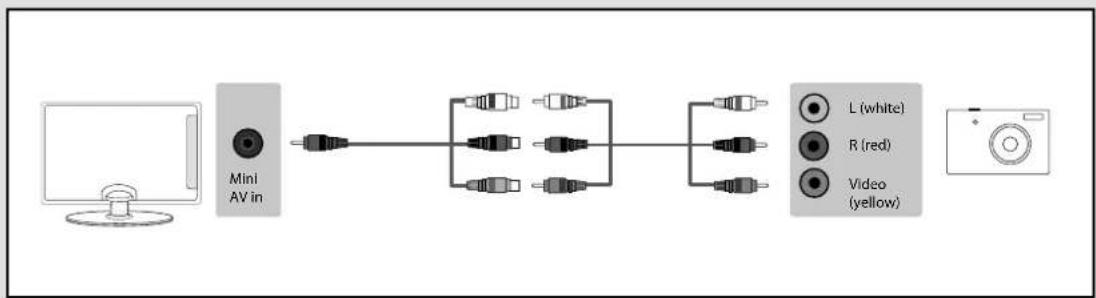
Connecting a Camcorder, Camera or Games Console
Source should be set to Composite/AV
flowchart
graph LR
    A["Computer"] --> B["Mini AV in"]
    B --> C["Audio Link"]
    C --> D["Audio Link"]
    D --> E["L (white)"]
    D --> F["R (red)"]
    D --> G["Video (yellow)"]
    G --> H["Camera"]
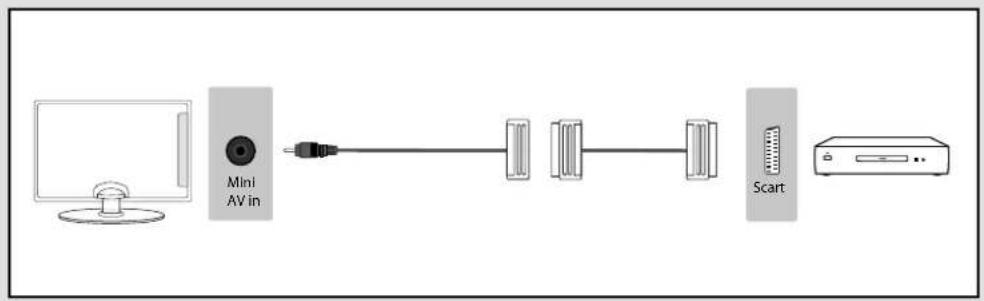
Connecting a DVD Player/Recorder, Video Recorder or Cable/Satellite Box
Source should be set to Composite/Video
flowchart
graph LR
    A["Computer"] --> B["Mini AV in"]
    B --> C["Switch"]
    C --> D["Server"]
    D --> E["Scart"]
Connecting a High Definition (HD) Device
Option 1 - via HDMI to HDMI cable
A HDMI cable can output both video and audio and enables you to enjoy digital-quality video and audio with minimal loss of quality.
TVs Source should be set to the corresponding HDMI Port (HDMI 1, HDMI 2, etc)

Connections
Connecting a High Definition (HD) Device
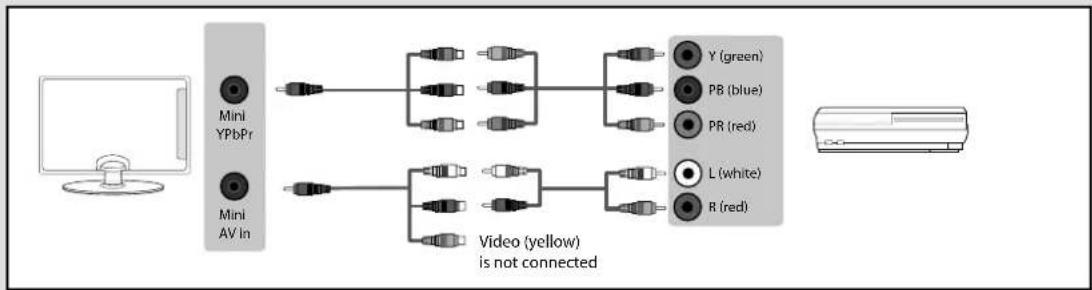
Option 2 - via Component cable
If you are supplied with a cable from the device which has RED, GREEN, BLUE, RED & WHITE connectors you must connect via Component (for picture) and by phono cable (for sound).
TV Source should be set to Component/YPbPr.
flowchart
graph LR
    A["Computer"] --> B["Mini YPbPr"]
    A --> C["Mini AV In"]
    B --> D["Video (yellow) is not connected"]
    C --> D
    D --> E["Y (green)"]
    D --> F["PB (blue)"]
    D --> G["PR (red)"]
    D --> H["L (white)"]
    D --> I["R (red)"]
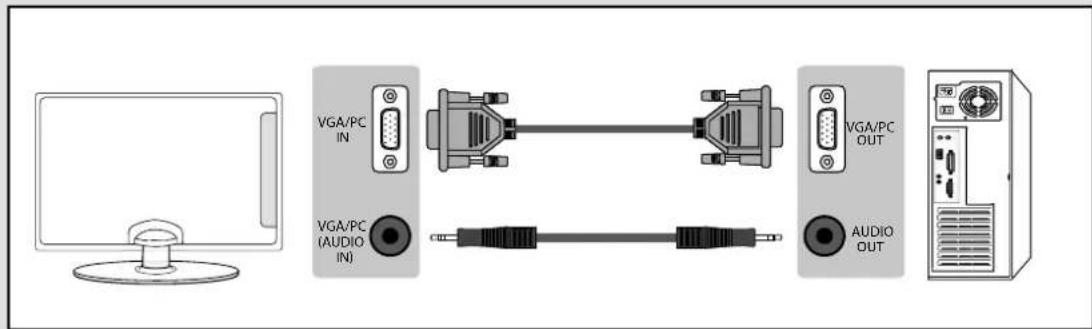
Connecting to a device with VGA/PC output (Laptop or Desktop Computer)
Source should be set to VGA/PC
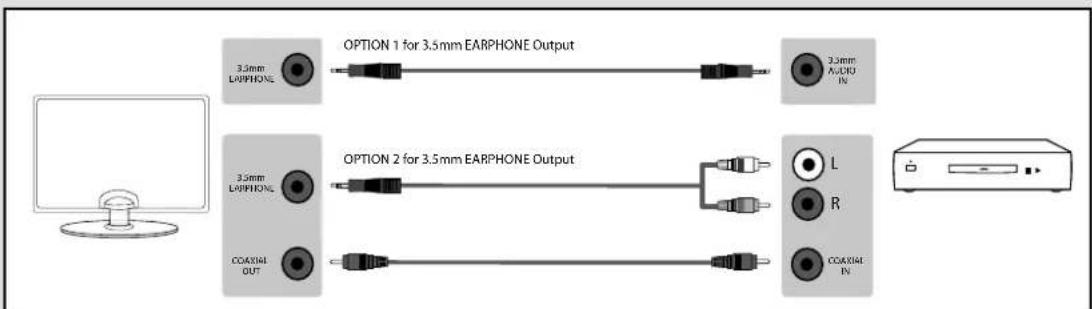
Connecting to an external audio device (Amplifiers, Surround Sound, Sound Bars etc)
When connecting via the TV's 3.5mm Earphone output, this will disable the TV speakers.
There are two options to connect a device via the 3.5mm Earphone Output.
flowchart
graph LR
    A["Computer monitor"] --> B["3.5mm LOPHONE"]
    B --> C["OPTION 1 for 3.5mm EARNPHONE OUTPUT"]
    B --> D["OPTION 2 for 3.5mm EARNPHONE OUTPUT"]
    B --> E["3.5mm Audio IN"]
    D --> F["L"]
    D --> G["R"]
    D --> H["COX/RIN"]
Note: Connecting cables are shown for example only and may not be included. Please check 'What Is Included In The Box' page.
Channel Menu
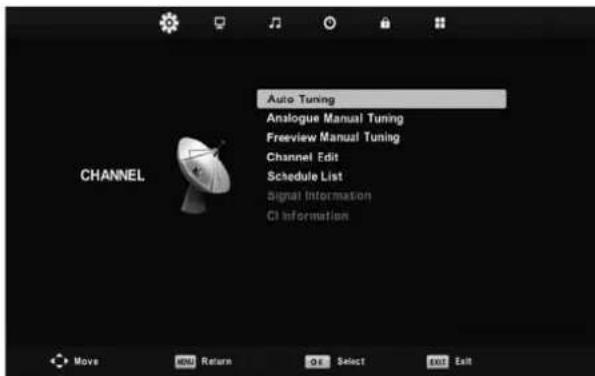
Auto Tuning
Allows you to retune the television for all digital channels, digital radio stations and analogue channels.
Analogue Manual Tuning
Allows you to manually tune your analogue signal
Freeview Manual Tuning
Allows you to manually tune your digital signal
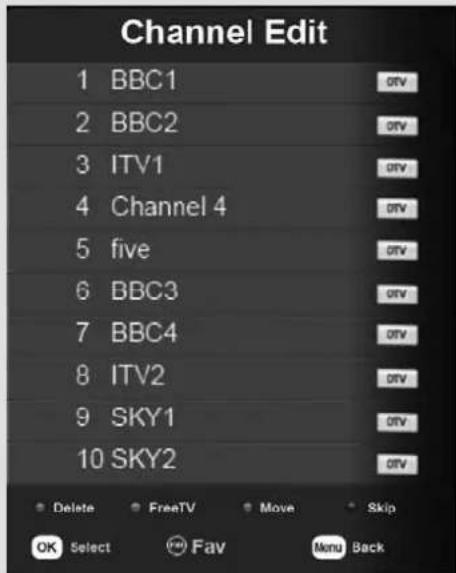
Channel Edit
Allows you to delete, move, skip and add favourite channels.
Schedule List
Lists your programme reminders
Signal Information
Displays signal strength information
CI Information
Pay per view services require a "smartcard" to be inserted into the TV. If you subscribe to a pay per view service the provider will issue you with a 'CAM' and a "smartcard". The CAM can then be inserted into the COMMON INTERFACE PORT (CI Card In).
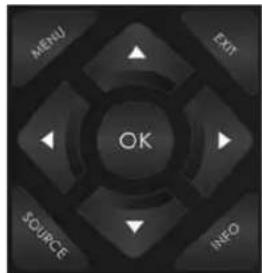
To access this menu, press [MENU] button on the remote control. To enter a menu press [OK]
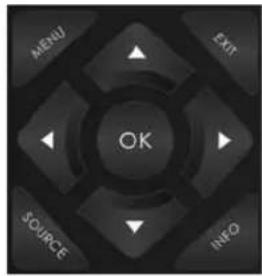
If you wish to make changes to any of the default settings, use the scroll ▲▼▶◀ buttons. To confirm any settings press [OK] button.
To exit this menu at anytime, press [EXIT] button.
Tip: If you do not press any buttons for 30 seconds, the menu will automatically exit. You can change the length of time before the menu exits automatically - see 'Menu Duration' section.
Picture Menu
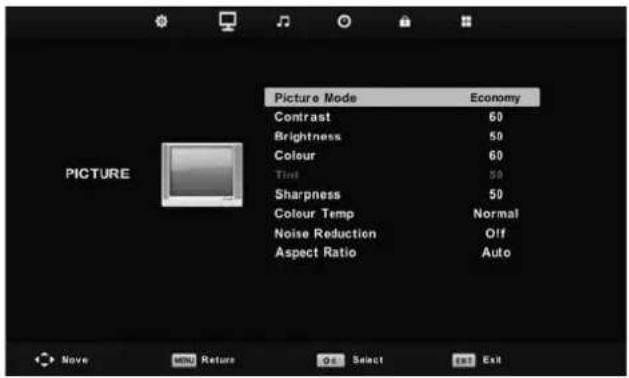
Picture Mode
- Dynamic - Recommended settings for fast moving pictures
- Standard - Default settings
- Mild - Set to be lighter in colour and less bright
- Personal - Lets you manually alter all the settings
- Economy - Power saving mode which reduces the energy used by up to 25% (by reducing the power to the LED/LCD panel). In Economy mode, the TV will switch itself to Standby mode after 3-5 hours in the event that the TV buttons or remote control buttons are not pressed (change the picture mode to another setting to de-activate this function)
Contrast
Switch the balance between black and white
Brightness
Increase or decrease the brightness of the picture
Colour
Increases the colour from black and white
Tint
Lets you increase or decrease the level of tint within the picture
Sharpness
Increase or decrease the sharpness of the picture
Colour Temperature
• Normal - Default settings
- Warm - Increases red within the picture
• Cool - Increases blue within the picture
Noise Reduction
- Off - Turns noise reduction off
- Low - Minor system adjustment
• Middle - Medium system adjustments
• High - Maximum system adjustments - Default - Default settings

To access this menu, press [MENU] button on the remote control and scroll right.
To enter a menu press [OK]
If you wish to make changes to any of the default settings, use the scroll ▲▼▶◀ buttons. To confirm any settings press [OK] button.
To exit this menu at anytime, press [EXIT] button.
Picture Menu
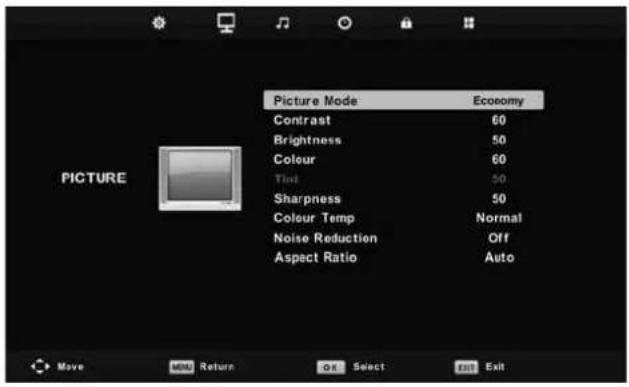
Aspect Ratio
Within the UK the picture format varies depending on the channel/broadcast. There are a number of different options to best meet your needs
- Auto - Automatically displays the best picture format. So the picture is in the correct position. May have black lines at the top/bottom and/or sides.
- Original - Will display the picture from the broadcaster without any change
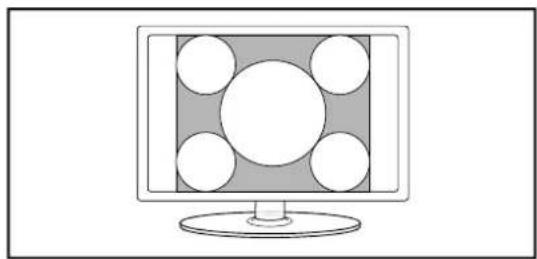
• 4:3 - Displays the 4:3 picture in its original size. Side bars are shown to fill the 16:9 screen
natural_image
Illustration of a computer monitor with a grid of circles on the screen (no text or symbols)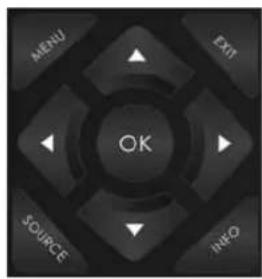
• 16:9 - Fills the screen with a regular 16:9 signal and 4:3 will stretch to fill the screen
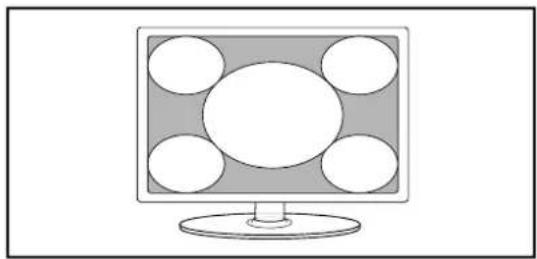
natural_image
Simple line drawing of a computer monitor with five circular windows on the screen (no text or symbols)- Zoom - The picture is the correct proportion but zoomed in to fill the screen
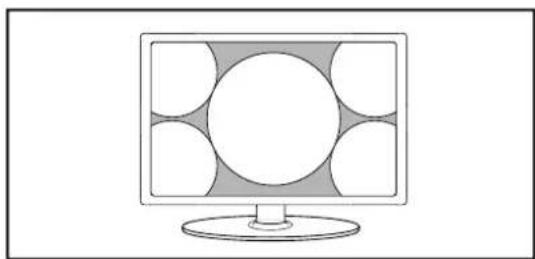
natural_image
Line drawing of a computer monitor with a circular screen and six square buttons on the front panel (no text or symbols)Sound Menu
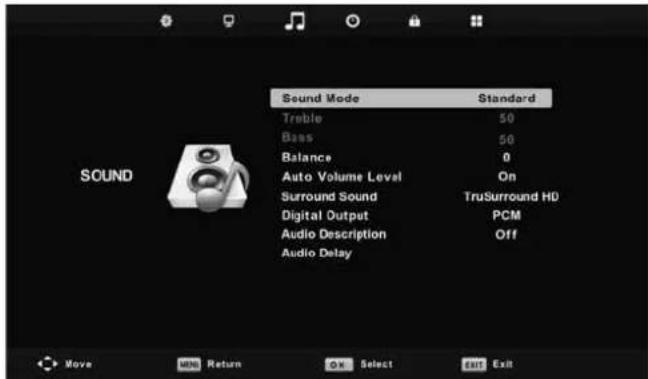
Sound Mode
- Standard - Default settings
• Music - Emphasises music over voices - Movie - Provides live and full sound for movies
• Sports - Emphasises sound for sports
• Personal - Selects your personal sound settings
Treble
To adjust the amount of high frequency within the sound
Bass
To adjust the amount of low frequency within the sound
Balance
To switch the so und between the left and right speakers
Auto Volume Level (AVL)
When 'on' is selected, the volume will stay at a constant level regardless of input/source
Surround Sound
- Off - Off
- TruSurround HD - TruSurround HD™ creates an immersive, feature-rich surround sound experience from two speakers, complete with rich bass, high frequency detail and clear dialog

Digital Output
- Off - Off
• Auto - Selects the best settings automatically - PCM - Select this option if you are connecting to a Stereo Hi-fi via coax cable (Pulse-code modulation (PCM) is a digital representation of an analogue signal)
Audio Description
This allows the user to increase and decrease the AD (Audio Description) volume level.
(Audio Description is a service available on certain programmes. It provides a description of what is happening during the selected programme for a person who is visually impaired)
Audio Delay
Enables the user to adjust setting to sync picture and audio
Tip: Treble and bass levels can only be adjusted when the sound mode 'Personal' is selected.

dts®
TruSurround
For DTS patents, see http://patents.dts.com. Manufactured under license from DTS Licensing Limited. DTS, the Symbol, & DTS and the Symbol together are registered trademarks, and DTS TruSurround is a trademark of DTS, Inc. © DTS, Inc. All Rights Reserved.
Time Menu

Clock
Shows the date and time
Off Time
Allows you to set a specific time for your TV to turn off
On Time
Allows you to set a specific time for your TV to turn on, the channel it will then display, the source it will be on and also the volume. This function can then be toggled to repeat every day or a certain day.
Time Zone
Change your current time zone
Sleep Timer
Lets you set the sleep timer so the television automatically switches off after a set amount of time. Off -> 10min -> 20min -> 30min -> 60min -> 90min -> 120min -> 180min -> 240min
Auto standby
Set Auto standby between 3 hours, 4 hours and 5 hours (to turn off this function you must exit Home Mode in the Picture Menu)
OSD Timer
Lets you adjust the amount of time the On Screen Menu stays on the screen before disappearing
To access this menu, press [MENU] button on the remote control and scroll right. To enter a menu press [OK]
If you wish to make changes to any of the default settings, use the scroll ▲▼▶◀ buttons. To confirm any settings press [OK] button.
To exit this menu at anytime, press [EXIT] button.
System/Hotel Lock Menu
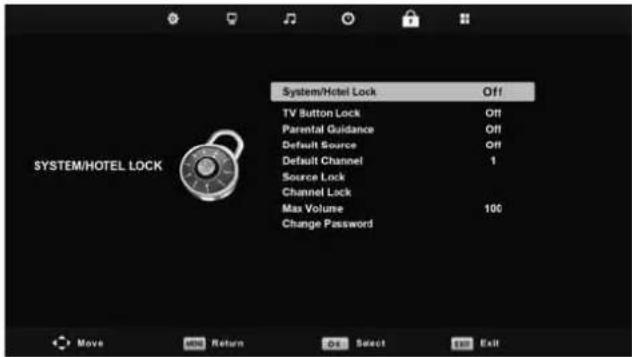
System/Hotel Lock
Allows you to lock or unlock the menu. You will be asked to enter a 4 digit password use the ▶ button to quit the password input. Use the ▶ button to clear. Default password is 0000
TV Button Lock
Allows you to lock the buttons on the side of the TV set
Parental Guidance
Allows you to set the rating to block certain content based on age information
Default Source
Allows the user to set the default source. The default source is the source the TV starts on when first switched on
Default Channel
Allows the user to set a channel as the default channel on the Digital source. The default channel is the channel the TV starts on when first switched on
Source Lock
Allows you to lock the source menu
Channel Lock
Allows you to lock certain channels manually
Max Volume
Allows you to adjust and set the maximum volume
Change Password
Allows you to change the password
To access this menu, press [MENU] button on the remote control and scroll right. To enter a menu press [OK]
If you wish to make changes to any of the default settings, use the scroll ▲▼▶◀ buttons. To confirm any settings press [OK] button.
To exit this menu at anytime, press [EXIT] button.
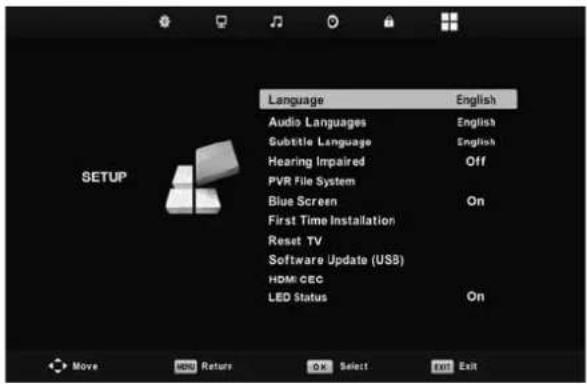
Setup Menu
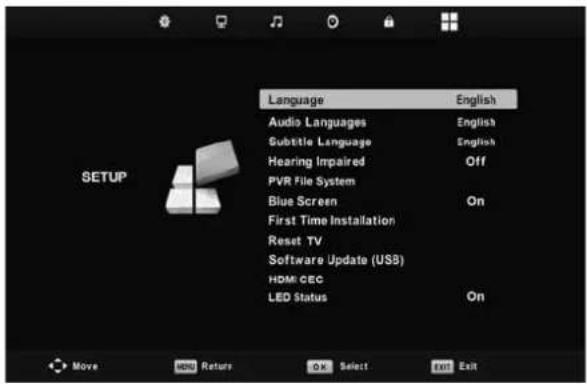
Language
Allows you to change the language of the menu
Audio language
Allows the user to change the audio language
Subtitle Language
Allows the user to change the subtitle language
Hearing Impaired
This allows the user to turn on the Hearing Impaired function, this produces subtitles on the screen which provide a description of what is happening during the selected program.
PVR File System
Allows you to view the format and performance of a USB key
Blue Screen
Changes the background when there is no input between clear and a blue background (Only available on some sources)
First Time Installation
Allows you to retune the television for all digital channels, digital radio stations and analogue channels
Reset TV
This resets the menus to factory settings and will erase all TV channels stored on the television
Software Update (USB)
This menu lets you install the new software/fi rmware onto the television. Further details of how to do this will be issued with the fi rmware. Contact the helpline or refer to the 'product support' section of the website
HDMI CEC (Consumer Electronic Control)
Allows HDMI devices to control each other and allows the user to operate multiple devices with one remote control. (only available with compatible devices)
LED Status
Allows the user to switch the LED Power indicator light ON or OFF, when the TV is being operated. (When this option is set to OFF the LED Power indicator light will ash when the remote control is used)
DVD Setup
Applies to models with built in DVD players
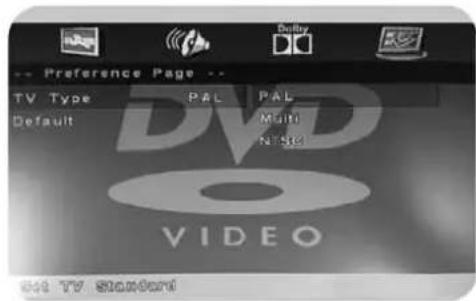
TV Display - Choose from the following options
| 4:3 Pan Scan | PS Traditional picture format, often used on old film |
| 4:3 Letter Box LB Traditional picture which has been adapted for widescreen | |
| Wide 16:9 Widescreen picture format | |
Speaker Setup - Choose from the following options
| LT/RT Converts from | multi-channel sound to mono |
| Stereo Converts from | multi-channel sound to Stereo |
Dual Mono - Choose from the following options
| Stereo Outputs 2 channels of sound both left and right | |
| Mono L Outputs left side sound | |
| Mono R Outputs right side sound | |
| Mix Mono Outputs a single channel of sound but mix between right and left |
Dynamic Range - This is the difference between the quietest and loudest sounds. This setting works only with DVD discs recorded in Dolby digital.
| Full | Set this to listen with the range recorded on the disc |
| 3/4 | Set this to listen with a range equivalent to a normal television |
| 1/2 | Set this to listen with a smaller difference between the maximum and minimum volume |
| 1/4 | Set this to listen with a smaller difference between the maximum and minimum volume |
| Off | Set dynamic range to off |
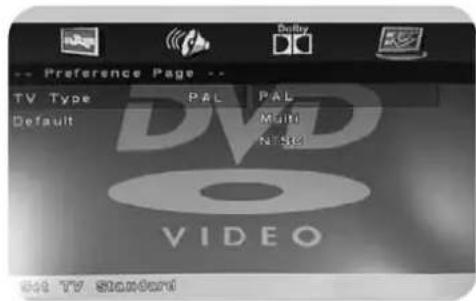
TV Type - Choose from the following options
| PAL For discs from UK | K/Europe, Asia, Australia etc |
| Multi For both NTSC | and PAL |
| NTSC For discs from | North America, Japan etc |
Default - Choose from the following options
| Reset Resets all options in the ‘DVD setup’ menu back to the default settings |
Tip: This TV/DVD player is pre-set to play Region 2 DVDs. In the event you wish to use the TV/DVD in another country that uses different region discs, please visit www.umc-uk.co.uk. Select 'Product Support', 'Changing Region'.
7 Day TV Guide
TV Guide is available in Digital TV mode. It provides information about forthcoming programmes (where supported by the freeview channel). You can view the start and end time of all programmes and on all channels for the next 7 days and set reminders.
1) Press [TV GUIDE]. The following 7 Day TV Guide will appear.
![7 Day TV GUIDE 3 ITV - The Jeremy Kyle Show Entertainment 09:25 - 10:30 10 Dec 2014 Jeremy Kyle deals with more dilemmas, fiery confrontations and topical issues all in front of a studio audience. [S] 10 Dec 2014 09:46:20 10 Dec 2014 Now 10:15 10:45 11:15 1 BBC ONE Oxford Fake ... Homes Under the Hammer Claimed and Sh... Oxford... 2 BBC TWO Great ... Close Calls: On... See Hear BBC News Daily ... 3 ITV The Jeremy Kyle Show This Morning ... This Morning 4 Channel 4 Frasier Kirstie's Handmade Christmas Jamie's 15 Min... Come ... 5 Channel 5 The Wright Stuff ... 6 ITV2 Royal Pains The Chase All Star Family... 7 BBC THREE This Is BBC Three Record Remind Prev Day Next Day Move View Info Details EXIT Exit OK Watch / Record / Remind](/content/2026/05/970539/images/425324f6da895c8694d865a2919591742bb2226f4cbf555728fa36689d0065ac.jpg)
2) Navigate through the menu using ▲▼▶◀ You can now: Record a programme by pressing RED (USB device must be connected) Set a reminder by pressing GREEN View a previous day by pressing YELLOW View the next day by pressing BLUE
3) Press [EXIT] to exit the 7 day TV Guide.
USB Record - Digital / Freeview Mode
USB Record – Digital/Freeview Mode
Built into this television is a USB record facility. This function is available in Digital/Freeview mode when used in conjunction with a compatible USB memory stick or USB hard drive. The benefits of this are as follows:
- Pause live TV and then playback, fast forward and rewind (up to live TV)
- One button record, if you decide you want to record the current programme
- Easy programmable recording from the 7 day TV Guide
- Record TV and watch/listen back on your computer/laptop
Due to the nature of the product, it is necessary to use a high speed USB memory stick (as the TV reads from and writes to the memory stick at the same time, some memory sticks may not be suitable)
You can purchase high speed memory sticks from some computer stores, alternatively, we have a selection of tested and compatible memory sticks available to purchase directly from the helpline/web site.
Minimum Specification - USB Memory Stick
Read Speed 20 MB/s (Mega Byte Per Second)
Write Speed 6 MB/s (Mega Byte Per Second)
If you wish to use a USB portable hard drive larger than 32GB, please refer to the FAQ section at the rear of this user guide.
Pause Live TV (Time Shift)
Pausing Live TV is very simple.
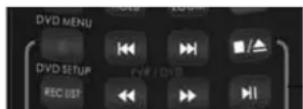
▶- Press the play/pause button and the television will pause and the live content will be recorded. To resume watching press play/pause again.
- Press fast forward to go forward in a recording (i.e. to skip adverts)
- Press fast rewind to go back in a recording (i.e. if you fast forwarded too far)
Tip: When you switch the TV to standby or change channel the Time Shift memory is wiped. To restart time shift you must press play/pause button.
One Button Record
At any point in time you may decide to record the current channel that you are watching. To do this you need to press the red button highlighted below.
Tip: This television contains one TV tuner, therefore it can only record the channel you are watching or record one channel while the television is in standby mode.
Note: USB record function is only available in Digital/Freeview TV mode. Due to copyright laws and illegal copying/recording it is not possible to record to/from any other input/output source.
USB Mode / Media Player
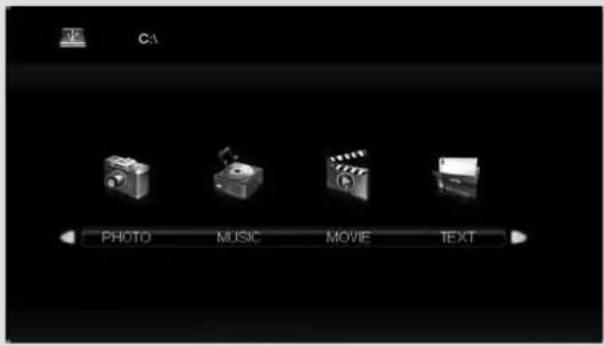
USB mode offers playback of various different types of content that you have saved on your USB Memory Stick.
On switching to USB source the menu screen will appear. The content will be divided into Photo, Music, Movie and Text based on file type.
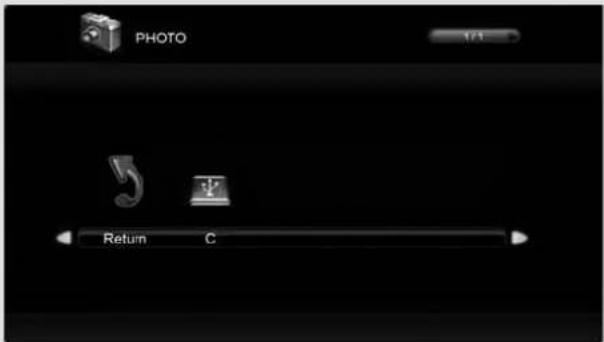
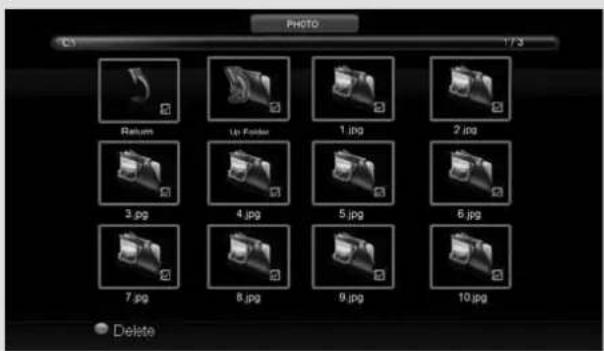
1) You can navigate through the menus using the scroll buttons. To confirm the item you wish to play/view press [OK] button.
2) Select the drive you require.
(If your drive only has 1 partition you will only see 1 item).
3) You can now access the item. Press OK to view.
4) While viewing you control the item using (Fig A) or by pressing (i) and using ▲and (OK)
Tip: If you experience a playback issue, please ensure the files being used are the correct format (example - the picture plays but no sound) See technical specification page for compatible file types
1)
2)
3)
4)
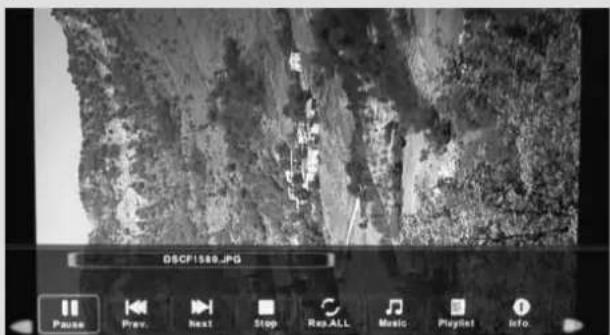
Fig A
Using Your TV With a Sky Digital Set Top Box
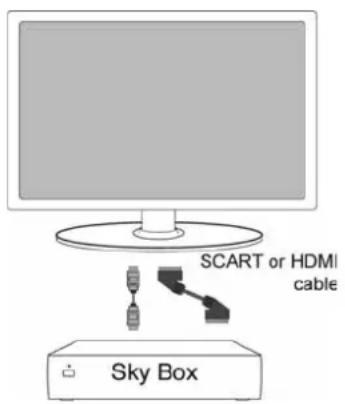
Option 1) Connecting your TV to your Sky box (when both the TV and Sky Box are located in the same room)
Depending on your Sky Box & TV model, connect either by SCART or HDMI cables (available separately)
If connecting by SCART, select the 'Input source' on the TV as SCART. If your TV model does not have SCART, please refer to the 'Connections' pages in this user guide for alternative ways to connect.
If connecting by HDMI, select the 'Input source' on the TV as HDMI (if the TV has more than 1 HDMI port, ensure you select the input source to match the HDMI numbered port on the rear of the TV)
If you wish to use your Sky remote to operate the TV's functions, you will need a Sky remote control (Revision 9 or later) and you will need to program a 4 digit code into it. See bottom of this page.
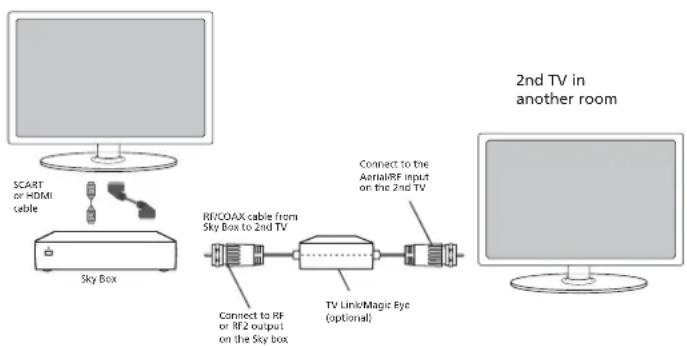
Option 2) Connecting your TV to your Sky box (when your Sky box is located in a different room to the TV)
Please note, if you are adding a 'Magic Eye/TV Link' to your system so that you can use your Sky remote control to change the Sky channel in the room where the 2nd TV is located, please refer to the instructions included with the TV link/magic eye in order to ensure the RF or RF2 output on your Sky box is powered on. (The red LED light on the TV link/magic eye will light up if the RF / RF2 output is correctly set up) If you do not have the instructions that came with the TV link/magic eye, instructions on how to do it can be found on our website.
flowchart
graph LR
    A["SCART or HDMI cable"] --> B["Sky Box"]
    B --> C["RF/COAX cable from Sky Box to 2nd TV"]
    C --> D["Connect to RF or RF2 output on the Sky box"]
    D --> E["TV Link/Magic Eye (optional)"]
    E --> F["Connect to the Aerial/RF input on the 2nd TV"]
    F --> G["2nd TV in another room"]
1) To tune the TV to the Sky box, on the 2nd TV, select the 'Analogue' input source.
2) Select the channel that you wish to store the Sky box/channel on. (If you do not use channels 1-5 because you no longer have analogue terrestrial channels after digital switchover, you may choose to select channel 1 to store the Sky box/channel, if you still have and use analogue channels 1-5, you may for example decide that channel 6 is the best option for you)
3) Press the corresponding number on the remote control to select the desired analogue channel chosen as per point 2 above.
4) On the TV remote control, press Menu. Now navigate through the menus to select Manual Tuning or Analogue Manual Tuning (refer to the Tuning/Channel menu section of this user guide if necessary)
5) Manually tune in the channel (usually, the Sky box is at a frequency between 800Mhz and 850Mhz) once the Sky box/channel is found, press 'OK' to store it. If you wish to use your Sky remote to operate the TV's functions, you will need a Sky remote control (Revision 9 or later) and you will need to program a 4 digit code into it.
If you wish to use your Sky remote to operate the TV's functions, you will need a Sky remote control (Revision 9 or later) and you will need to programme a 4 digit code into it. Please see below.
Using a Sky Remote or a Universal Remote to operate your TV
Sky Remote Control - If you wish to use your Sky remote to operate the basic functions of your TV, you need to program a 4 digit code into it. Please note - you will need a Sky Revision 9 remote control (or later). If you wish to upgrade/replace your existing Sky remote control to the latest version, you can do so on our website.
Universal Remote Control - If you wish to use a Universal remote control to operate your TV, please refer to the website for a full list of codes. (Please note we only have codes for One for All branded remote controls, if you have an alternative brand of Universal remote, please refer to the manufacturer for the code.)
Frequently Asked Questions
| General I would like to have louder sound by connecting additional speakers. | 1) Use the 3.5mm headphone output and a 3.5mm to phono cable (available separately) to connect to an amplifier/surround sound system. Please note this will deactivate the TV's built in speakers.2) Connect a COAX cable from the TV's COAX output to your amplifier/ surround systems COAX input. |
| General Why are some options in the menu unavailable and greyed out. | Some options are only available in certain sources, i.e. HDMI. They are unavailable in the other sources where they have no affect. |
| General Can I stop my TV automatically turning off after 4hrs? | Yes, in the 'Time' menu settings, scroll down to Auto standby and select OFF. |
| TV I have tuned in Digital TV but I am not receiving any or all of the channels and/or the channels I receive are breaking up. | 1) Check you are in an area that can receive Freeview/Saorview, visit www.freeview.co.uk or www.saorview.ie2) Check you are using an aerial that is able to receive a good digital signal. In most cases, you will need an outdoor digital hi-gain/wideband aerial. In areas that have excellent digital coverage, you may be able to use a loft type aerial but it is highly likely that you will also need to connect a booster between the back of the TV and the TV aerial wall socket. Unfortunately, to receive a good enough digital signal, it is not possible to use a portable/indoor type aerial. |
| TV I have re-tuned my television but when I switch it off it is not storing the channels. | If the TV does not save the channels when you power it off, it's likely the channel database has become corrupt.1) Turn off the TV.2) Remove the RF/Aerial cable from the rear of the TV and then turn the TV back on again.3) Using the remote control, press Menu followed by 8-8-8-8 to enter the initial setup/fi rst time installation menu.4) Press OK (let the TV run the full tuning process).5) Once completed, turn off the TV, reconnect the RF/Aerial cable then turn the TV back on again.6) Repeat steps 3 & 4. |
| VCR/DVD Recorder | I have connected the TV to my VCR or DVD Recorder via SCART but it is not recording. |
| Game Consoles | I have connected my Playstation/ Xbox to the TV via HDMI, but I am not receiving any pictures or sound on my Television. |
Note:
Supplier may change TV software and on screen graphics without warning
Frequently Asked Questions
| Game Consoles | I have connected my Playstation/ Xbox to the TV via Component cables (red, green & blue) but I am not receiving any sound. | Component cables only provide HD pictures. For the sound you will need to connect the red & white audio cables on the PlayStation/Xbox to the red & white phono inputs (or mini AV input where fitted) on the rear of the TV. Please refer to the ‘Connections’ pages. |
| System Lock | I have changed the password on the television and now forgotten it. | There is a master password of 4711, to gain access to the TV menu and reset the normal password. |
| USB Mode I have inserted a USB Memory Key, but the TV does not recognise it. | Ensure the USB Memory Key is formatted to type FAT32. | |
| USB Mode Using a USB portable hard drive / larger than 32GB. | If you wish to use a portable hard drive larger than 32GB, please note that it must be formatted to the FAT32 file system in order to operate on this TV. Windows XP/Vista computers are only capable of formatting up to 32GB, therefore, you will need a software programme/utility to format larger hard drives.Please refer to the website, www.umc-uk.co.uk, for more information. | |
| DVD (For TV models with DVD only) | I have inserted a disc but it is not playing. | 1) Ensure you have inserted the disc facing the correct way.2) Ensure the disc is clean and is not scratched.3) Some copied discs will not play.4) Check the DVD is a region 2 disc – to change the region of the DVD player, refer to www.umc-uk.co.uk, select ‘Changing DVD Region’ in the ‘Product Support’ section |
| DVD (For TV models with DVD only) | I have pressed the eject button but the disc is not coming out. | To eject the disc hold the stop/eject button for 4 seconds. |
| USB Record | I cannot change the channel, access the menu or use the red button. | During time shift you cannot change the channel, access the menu or use the red button. |
| USB Record | When using the USB to record the picture ‘breaks up’ or experience loss of sound. | Check the USB memory stick meets the minimum read speed requirements. Standard definition channels require a read speed of 20 MB/s (Mega Byte per second) and a write Speed of 6 MB/s (Mega Byte per second) HD channels require the read speed of 80 MB/s (Mega Byte per second) and a write speed of 40 MB/s (Mega Byte per second). USB 3.0 sticks should be used where possible. |
Technical Specification
Product Fiche
| Trademark | Bush | |
| Model ID | 40/233F 40/233FDVD | |
| Energy efficiency class A + | ||
| Visible screen size (diagonal) 102 cm / 40 inches | ||
| On mode power consumption 45.0 W | ||
| Annual energy consumption *1 66 kWh | ||
| Standby power consumption *2 <0.50 W | ||
| Off mode power consumption 0 W | ||
| Screen resolution | 1920 (H) x 1080 (V) | |
| *1: Energy consumption XYZ kWh per year, based on the power consumption of the television operating 4 hours per day for 365 days. The actual energy consumption will depend on how the television is used.*2: When the TV is turned off with the remote control/standby button and no function is active. | ||
| Additional Technical Information | ||
| RF | 75 ohm Antenna / Analog / DVB | |
| Video Inputs 3 x HDMI, 1 x USB, 1 x Mini Composite/Video,1 x Mini Component/YPbPr, 1 x VGA/PC, | ||
| Sound Inputs | 1 x shared audio for Composite/Video & Component/YPbPr,1 x 3.5mm jack for PC audio input | |
| Sound Outputs 1 x Coax Audio output, 1 x 3.5mm Headphone | ||
| Speaker / Amplifier Watts (RMS) | 2 x 10W / 2 x 8W | |
| Dimensions including stand (mm) | 906 W x 582 H x 210 D | |
| Net weight | 8.7 kgs 8.9 kgs | |
| Energy Consumption Info | ||
| Voltage and power consumption | 110-240v 50 / 60Hz45 / 65 / 80W (ecomode/standard/max)EEI - A+ (Energy Rating) | 110-240v 50 / 60Hz45 / 65 / 90W ((ecomode/standard/max)EEI - A+ (Energy Rating) |
| Wallmounting VESA | 200 x 100 (mm) | |
Technical Specification
Compatible files in USB Mode
| Media File Ext. | Codec | Remark | ||
| Video Audio | ||||
| Movie | .mpg MPEG-1, MPEG-2 | MP3, WMA, AAC | Max Resolution: 1920x1080 Max Data rate: 40 Mbps | |
| .avi | Xvid, MJPEG, MPEG-4 SP/ASP, H.264 | Max Resolution: 1920x1080 Max Data rate: 20 Mbps | ||
| .ts MPEG-2, H.264 | ||||
| .mov/.mkv | MPEG-4 SP/ASP, H.264 | |||
| .dat MPEG-1 | ||||
| .mp4 | MPEG-4 SP/ASP, H.264 | |||
| MPEG-1, MPEG-2 | Max Resolution: 720x576 Max Data rate: 40 Mbps | |||
| .vob MPEG-2 | ||||
| Music | .mp3 - MP3 | Sample Rate 8K-48KHz Bit rate: 32K - 320Kbps Channel: Mono/Stereo | ||
| .wma - WMA | ||||
| .m4a/.aac | - AAC | Sample Rate 16K-48KHz Bit rate: 32K - 442Kbps Channel: Mono/Stereo | ||
| Photo | .jpg/.jpeg | Progressive JPEG Max Resolution | 1024x768 | |
| Baseline JPEG Max Resolution | 8192x8192 | |||
| .bmp BMP | Max Resolution: 6500x6500 Pixel Depth 1/4/8/16/24/32 bpp | |||
| .png | Non-Interlaced Max Resolution | 3000x3000 | ||
| Interlaced | Max Resolution: 1500x1500 | |||
Contents
Manufacturers Guarantee Information 3
Important Safety Instructions 4-5
Trademarks 6
What is included in the box 8
Attaching the stand 9
Detaching the stand and securing the TV to a wall 10
Wall mounting 11
Getting Started - Initial Set Up 12
TV Buttons and Input Source Menu 13
Remote Control 14
Connections 15-17
TV Menu Operation 18-25
Channel Menu 18
Picture Menu 19-20
Sound Menu 21
Time Menu 22
System/Hotel Lock Menu 23
Setup Menu 24
DVD Setup 25
7 Day TV Guide 26
USB Record Digital / Freeview 27
USB Mode / Media Player 28
General Information 29-32
Using your TV with a Sky digital set top box 29
Frequently Asked Questions 30-31
Technical Specifications 32

dts®
TruSurround
For DTS patents, see http://patents.dts.com. Manufactured under license from DTS Licensing Limited. DTS, the Symbol, & DTS and the Symbol together are registered trademarks, and DTS TruSurround is a trademark of DTS, Inc. © DTS, Inc. All Rights Reserved.
What Is Included In The Box
Accessories
Included with this TV are the following accessories:
1 x User Guide

1 x Remote Control & 2 x AAA Batteries

natural_image
Two black-and-white batteries, one with a remote control and the other with two charging cells (no visible text or symbols)1 x Quick Start Guide
1 x SCART to AV cable
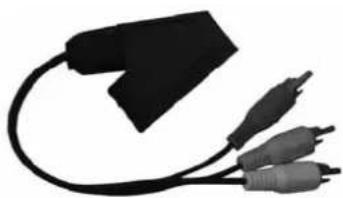
natural_image
Black and gray electronic device with two connected cables (no visible text or symbols)1 x TV
natural_image
Illustration of a flat-screen computer monitor with blank screen (no text or symbols)1 x Mini Component / YPbPr Cable

natural_image
Close-up of a black cable with multiple connectors (no text or symbols visible)1 x RF Cable
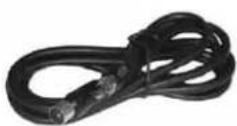
1 x Stand Installation Pack

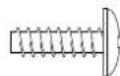
(A) 6 x ST (4x14)
Used for attaching the stand neck to the TV
(B) 5 x ST (3.7x18)
Counter Sunk
Used for attaching the stand base to the stand neck
Please save your box/packaging as you will need this in the event of warranty/service repair or support. We are unable to carry out warranty/service if you are unable to package it correctly. The safest way to package your item in the event of warranty/service repair is in its original box/packaging.
Attaching The Stand
To complete the stand installation you will require a cross head screw driver.
The Stand Installation pack comes with 2 sets of screws.
fi g 1) Attach the stand neck to the rear of the TV set.
fi g 2) Secure the neck to the TV using the (A) 6 x ST (4x14) screws provided.
fig 3) Attach the stand base to the neck.
fi g 4) Secure the base to the neck using the (B) 5 x ST (3.7x18) counter sunk screws provided.
HELPFUL ADVICE FOR FIRST TIME STAND INSTALLATION
When securing the self-tapping screw/s into the base of the TV (on first installation) the screw/s will be naturally tight as they create a thread in the plastic.
a) Ensure the cross head screw driver tip fits correctly into the head of the screw and that it is not too big or small.
b) Screw in all screws individually and partially before tightening all of the screws fully.
c) If the screws become very tight try loosening and re-tightening, this will continue the process of creating the thread.
(A) 6 × ST(4 × 14)
(B) 5 x ST(3.7x18)
Counter Sunk
natural_image
Technical line drawing of a mechanical bracket assembly (no text or symbols)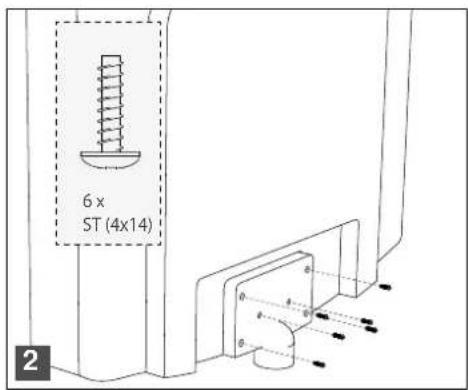

Detaching The Stand And Securing The TV To A Wall
Detaching the Stand
To detach the stand please remove the 6 screws highlighted then remove the stand neck and base from the rear of the TV set.
natural_image
Pure technical line drawing of a mechanical bracket or mounting detail without any text, numbers, or symbolsSecuring the TV to a Wall
For maximum security in the home, when using a TV with its stand, anti-tip straps should be fitted. These are available from supermarket websites and other websites and are an easy, inexpensive and effective way of ensuring your TV stays safely upright. Straps are designed to be attached to the rear of the TV and then tethered to the wall or the furniture the TV is stood on, these are fitted as follows.
Note - Please ensure that children do not climb on the TV set.
A) Using one or both of the top wall-mounting holes and screws fasten one end of the fastening cord/s to the TV. (the screws are already supplied in the wall mounting holes)
B) Secure the other end of the fastening cord/s to your wall. (you will need screws/fi xings suitable for your wall type - available separately from most DIY stores).

natural_image
Simple line drawing of a vertical monitor or stand with a horizontal line extending from its top (no text or symbols)The Royal Society for the Prevention of Accidents is urging people to take care with flat-screen televisions.
RoSPA stated in 2010 that “Toddlers are particularly at risk of pulling flat-screen televisions on to themselves. They are unsteady on their feet and are attracted by colourful television images.”
The risk is increased as televisions become lighter.
Wall Mounting
IMPORTANT - Before drilling any holes in the wall ensure you are not drilling where there could be any electric wires, water or gas pipes.
natural_image
Line drawing of a computer monitor with directional arrows indicating orientation (no text or symbols)1) Remove the four screws located at the back of the TV set.
2) The wall mount can now be easily attached to the mounting holes, located on the back of the TV, using the same four screws removed.
IMPORTANT – If wall mounting this TV, only use the screws already provided in the wall mounting holes. Using other screws which are longer could cause irreparable damage to internal parts.
For optimum viewing, if wall mounting the TV higher than eye level, the TV should be tilted downwards so that the TV's screen is 'face on'. See fig 1 and 2 below.
For VESA wall mounting information please refer to the Technical Specification page.
Getting Started - Initial Set Up
1) Using the RF cable supplied, connect the TV to the TV Aerial wall socket (Fig A).
Connect the power cable to the Electrical outlet (Fig B).
2) Switch on the television using the power on/off switch located on the side, underside or rear of the TV set.
3) Insert the batteries supplied into the Remote control and press the Standby button to power on the TV.
4) You will now be welcomed with the initial set-up screen. If it does not appear, on the remote control, please press [MENU] then 8-8-8-8 and the menu will appear. Press OK on the remote control and tuning will start.*
5) After tuning the following screen will appear.*
If you are missing channels, the reason for this is likely to be signal strength, you should consider connecting a signal booster and re-tuning the TV.
Important
As part of our ongoing development to reduce power consumption, we have added an extra function to this Television called 'Home Mode' (you will see this during the first time installation set up). Power consumption using the Home Mode function is approximately 25% lower than some other modes. The picture brightness is reduced using the Home Mode function. If this function is not suitable for your viewing environment, you can select other modes as necessary. (Please note, 'Store mode' is for optimum default picture settings, however, power consumption is approximately 25% higher than 'Home Mode').
Please refer to the user guide section 'Picture settings' in order to change the mode to one that maybe more suitable for your environment. There is also a shortcut button on the remote control called 'P-Mode' should you wish to change to another mode.
1
2
3
natural_image
Illustration showing a hand holding a remote control panel and a digital display with icons (no text or symbols on the device itself)4
5


flowchart
graph LR
    A["Antenna"] --> B["Signal Booster"]
    B --> C["Computer"]
    C --> D["Output"]
*Screen shots/images are shown for illustration purposes only and may change dependent on model/region.
TV Buttons & Source Menu
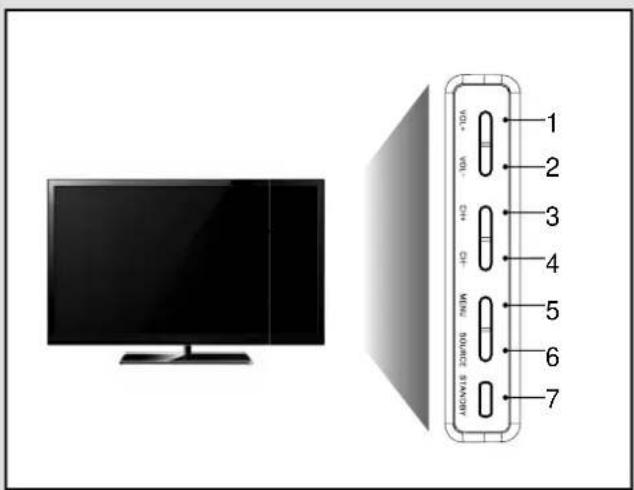
- Volume up and menu right
- Volume down and menu left
- Programme/Channel up and menu up
- Programme/Channel down and menu down
- Displays Menu/OSD
- Displays the input source menu
- Standby Power On/Off

- Stop/Eject DVD
- Play/Pause DVD
- Volume up and menu right
- Volume down and menu left
- Programme/Channel up and menu up
- Programme/Channel down and menu down
- Displays Menu/OSD
- Displays the input source menu
- Standby Power On/Off
Choosing Mode Input/Source
To switch between the different input/connections.
A) Using the buttons on the remote control:
1) Press [SOURCE] - The source menu will appear.
2) Press [V] or [A] to select the input you require.
3) Press [OK].
B) Using the buttons on the Television:
1) Press [SOURCE].
2) Scroll up / down using CH+/CH- buttons to the input/source you require.
3) Press Vol+ to change input/source to the one selected.
For further information on input/connections please view 'Connections' pages.
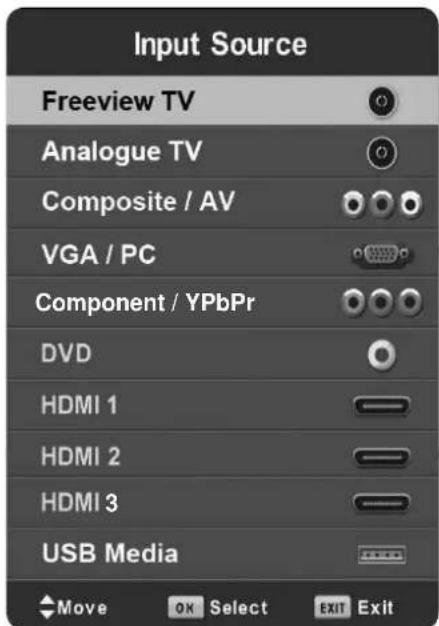
An example of the 'Input Source' menu (will vary by model)
Remote Control
Viewing remote control - TV
- STANDBY
- MUTE
- DTV
- RADIO
- DVD
- USB
- NUMBER BUTTONS
- TV GUIDE
- To return to the previous channel viewed
- P.MODE - Scrolls through picture mode options
- VOL▲/▼
- CH ▲/▼
- S.MODE - Scrolls through sound mode options
- FAV - To display favourites menu
- MENU
- EXIT
- (▲/▼/◄/►/OK) - Allows you to navigate the on-screen menus and adjust the system settings to your preference
- SOURCE/AV
- INFO - Press once for now/next channel information. Press twice for programme information about current programme
- ASPECT
- SLEEP
- SUBTITLE
- AUDIO
- TEXT
- TEXT HOLD
- DISPLAY
- TEXTZOOM/DVD ZOOM
- DVD Menu/Record


- To restart the current chapter
- To advance forward to the next chapter
- To stop/eject Disc (hold for 4 seconds to eject disc)
- To play in fast rewind mode
- To play in fast forward mode
- To play/pause
-
REC LIST
-
GOTO
-
A-B
-
REPEAT
-
ANGLE/ 3D - Change to 3D mode

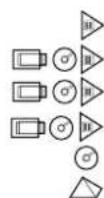
For Models with Integrated DVD players
For Models with PVR Function
For Models with USB Playback
For Models with 3D Feature

Connections
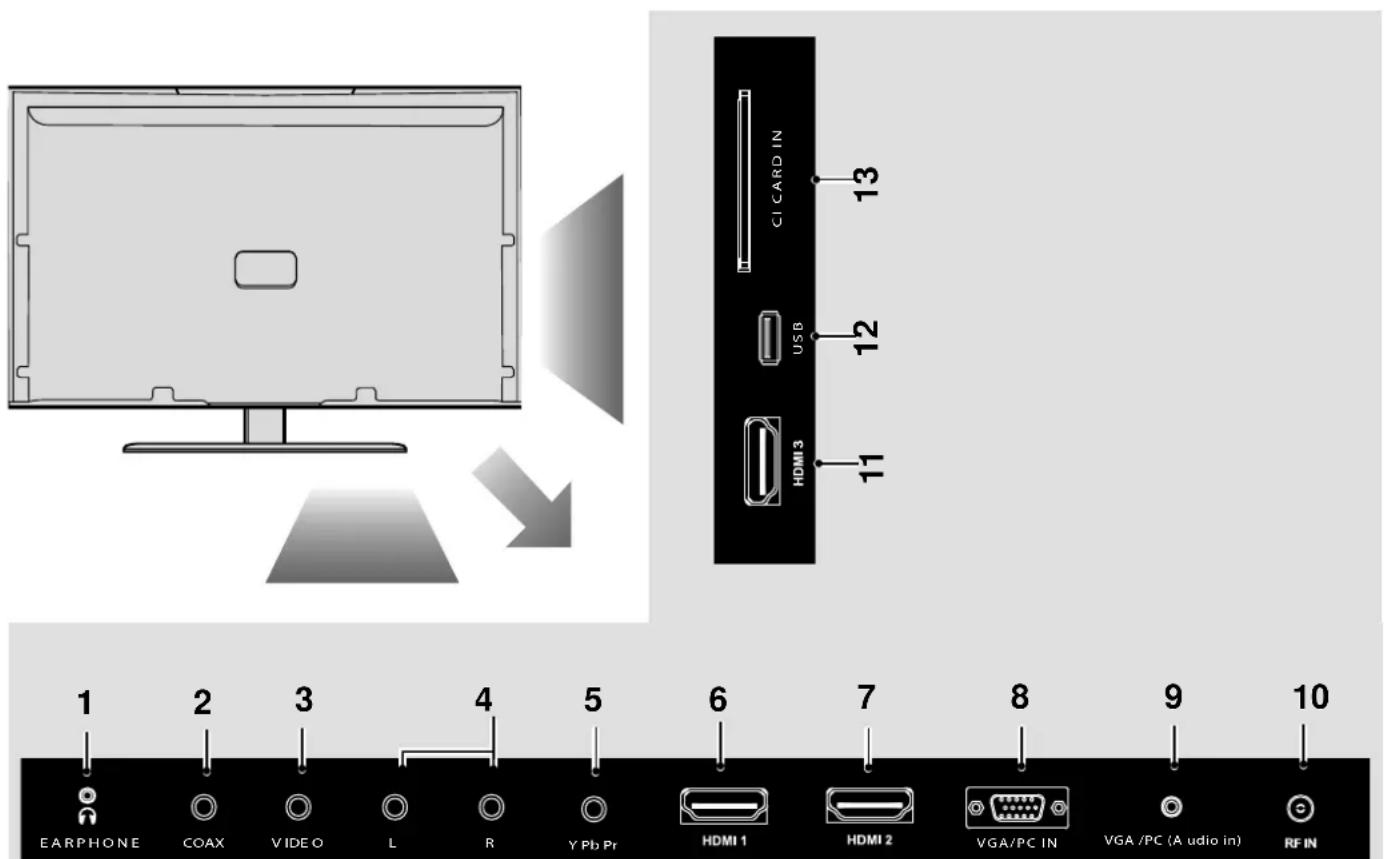
1 EARPHONE Earphone Socket
2 COAX Audio Out Digital Coax output
3 Video Video Input
4 L/R Audio in Component Audio input
5 COMPONENT (HD) Component input (YPbPr)
6 HDMI 1 HDMI input
7 HDMI 2 HDMI input
8 VGA PC VGA-PC input
9 VGA PC Audio In 3.5mm PC audio input
10 RF IN RF / TV Aerial Input
11 HDMI 3 HDMI input
12 USB USB Input
13 CI CARD IN Common Interface module
Connections
Connecting a Camcorder, Camera or Games Console
Source should be set to Composite/AV
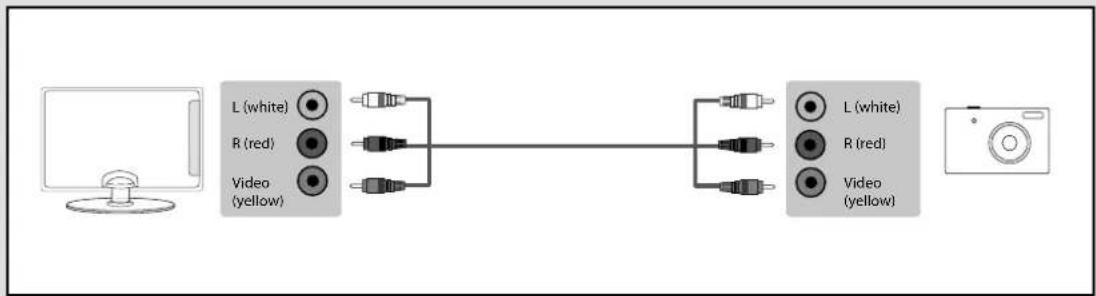
flowchart
graph LR
    A["Computer monitor"] --> B["L (white)"]
    A --> C["R (red)"]
    A --> D["Video (yellow)"]
    B --> E["Audio"]
    C --> F["Audio"]
    D --> G["Audio"]
    E --> H["L (white)"]
    E --> I["R (red)"]
    E --> J["Video (yellow)"]
    F --> K["L (white)"]
    F --> L["R (red)"]
    F --> M["Video (yellow)"]
    G --> N["L (white)"]
    G --> O["R (red)"]
    G --> P["Video (yellow)"]
Connecting a DVD Player/Recorder, Video Recorder or Cable/Satellite Box
TVs Source should be set to Composite/AV
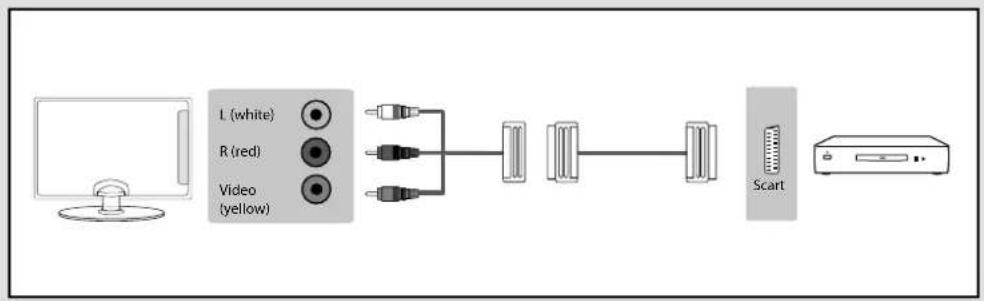
flowchart
graph LR
    A["Computer"] --> B["L (white)"]
    A --> C["R (red)"]
    A --> D["Video (yellow)"]
    B --> E["Switch"]
    C --> E
    D --> E
    E --> F["Scart"]
Connecting a High Definition (HD) Device
Option 1 - via HDMI to HDMI cable
A HDMI cable can output both video and audio and enables you to enjoy digital-quality video and audio with minimal loss of quality.
TVs Source should be set to the corresponding HDMI Port (HDMI 1, HDMI 2, etc)

Note: This model TV can not be used as a PC/laptop monitor via HDMI input. The HDMI Input is provided to view digital content with compatible external devices.
Connections
Connecting a High Definition (HD) Device
Option 2 - via Component cable
If you are supplied with a cable from the device which has RED, GREEN, BLUE, RED & WHITE connectors you must connect via Component (for picture) and by phono cable (for sound).
TV Source should be set to Component/YPbPr.
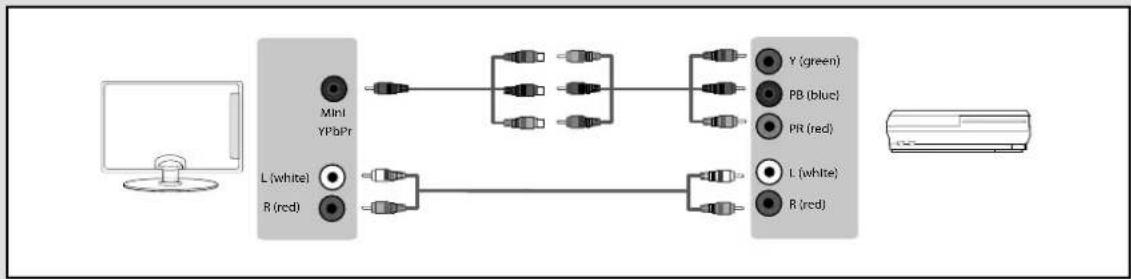
flowchart
graph LR
    A["Computer"] --> B["Mini YPbPr"]
    B --> C["L (white)"]
    B --> D["R (red)"]
    C --> E["Sensor 1"]
    C --> F["Sensor 2"]
    C --> G["Sensor 3"]
    D --> H["Sensor 4"]
    D --> I["Sensor 5"]
    E --> J["Y (green)"]
    F --> K["PB (blue)"]
    G --> L["PR (red)"]
    H --> M["L (white)"]
    I --> N["R (red)"]
    J --> O["Sensor 6"]
    K --> P["Sensor 7"]
    L --> Q["Sensor 8"]
    M --> R["Sensor 9"]
    N --> S["Sensor 10"]
Connecting to a device with VGA/PC output (Laptop or Desktop Computer)
Source should be set to VGA/PC
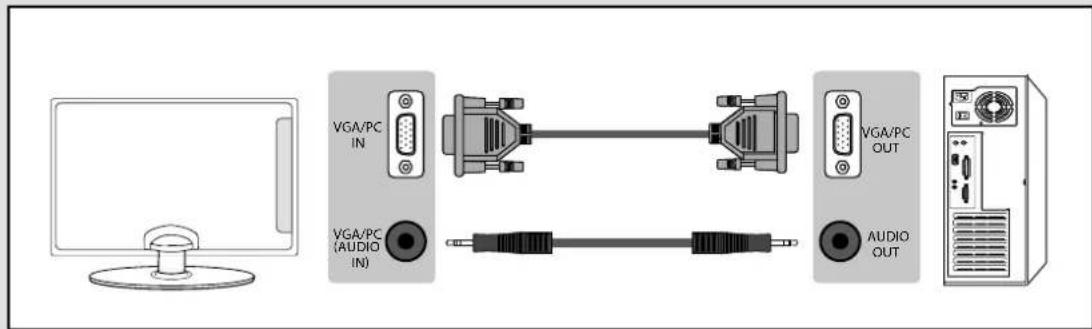
Connecting to an external audio device (Amplifiers, Surround Sound, Sound Bars etc)
When connecting via the TV's 3.5mm Earphone output, this will disable the TV speakers.
There are two options to connect a device via the 3.5mm Earphone Output.

Note: Connecting cables are shown for example only and may not be included. Please check 'What Is Included In The Box' page.
Channel Menu
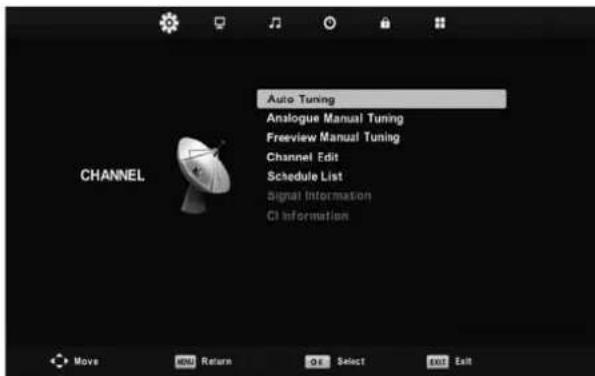
Auto Tuning
Allows you to retune the television for all digital channels, digital radio stations and analogue channels.
Analogue Manual Tuning
Allows you to manually tune your analogue signal
Freeview Manual Tuning
Allows you to manually tune your digital signal
Channel Edit
Allows you to delete, move, skip and add favourite channels.
Schedule List
Lists your programme reminders
Signal Information
Displays signal strength information
CI Information
Pay per view services require a "smartcard" to be inserted into the TV. If you subscribe to a pay per view service the provider will issue you with a 'CAM' and a "smartcard". The CAM can then be inserted into the COMMON INTERFACE PORT (CI Card In).
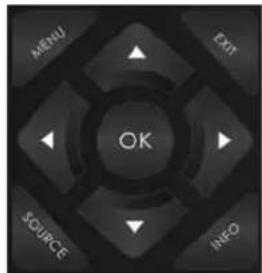
To access this menu, press [MENU] button on the remote control. To enter a menu press [OK]
If you wish to make changes to any of the default settings, use the scroll ▲▼▶◀ buttons. To confirm any settings press [OK] button.
To exit this menu at anytime, press [EXIT] button.

Tip: If you do not press any buttons for 30 seconds, the menu will automatically exit. You can change the length of time before the menu exits automatically - see 'Menu Duration' section.
Picture Menu
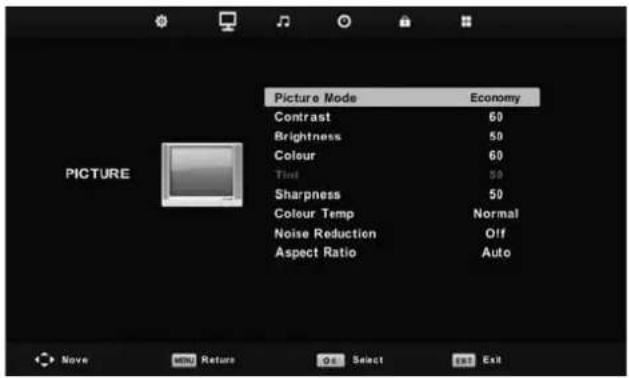
Picture Mode
- Dynamic - Recommended settings for fast moving pictures
- Standard - Default settings
- Mild - Set to be lighter in colour and less bright
- Personal - Lets you manually alter all the settings
- Economy - Power saving mode which reduces the energy used by up to 25% (by reducing the power to the LED/LCD panel). In Economy mode, the TV will switch itself to Standby mode after 3-5 hours in the event that the TV buttons or remote control buttons are not pressed (change the picture mode to another setting to de-activate this function)
Contrast
Switch the balance between black and white
Brightness
Increase or decrease the brightness of the picture
Colour
Increases the colour from black and white
Tint
Lets you increase or decrease the level of tint within the picture
Sharpness
Increase or decrease the sharpness of the picture
Colour Temperature
• Normal - Default settings
- Warm - Increases red within the picture
• Cool - Increases blue within the picture
Noise Reduction
- Off - Turns noise reduction off
- Low - Minor system adjustment
• Middle - Medium system adjustments
• High - Maximum system adjustments - Default - Default settings
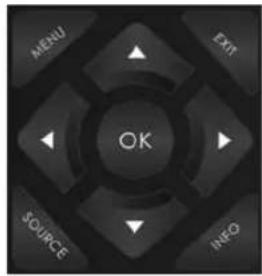
To access this menu, press [MENU] button on the remote control and scroll right.
To enter a menu press [OK]
If you wish to make changes to any of the default settings, use the scroll ▲▼▶◀ buttons. To confirm any settings press [OK] button.
To exit this menu at anytime, press [EXIT] button.
Picture Menu
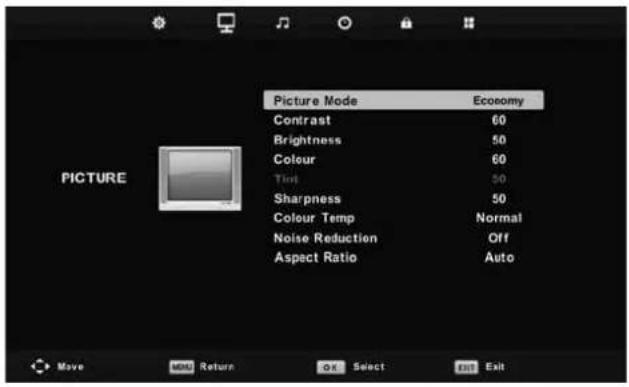
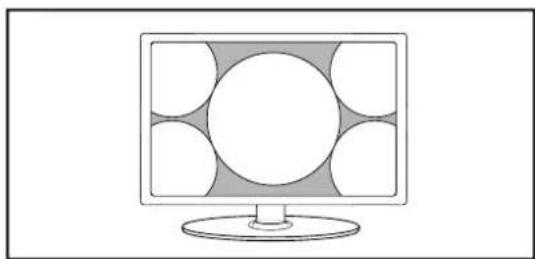
Aspect Ratio
Within the UK the picture format varies depending on the channel/broadcast. There are a number of different options to best meet your needs
- Auto - Automatically displays the best picture format. So the picture is in the correct position. May have black lines at the top/bottom and/or sides.
- Original - Will display the picture from the broadcaster without any change
• 4:3 - Displays the 4:3 picture in its original size. Side bars are shown to fill the 16:9 screen
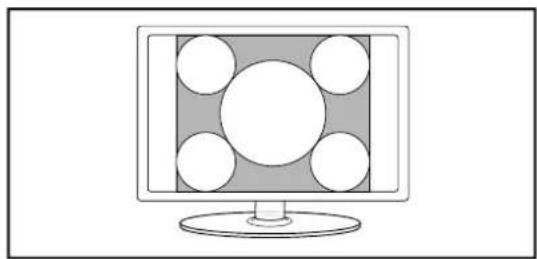
natural_image
Illustration of a computer monitor with a grid of circles on the screen (no text or symbols)• 16:9 - Fills the screen with a regular 16:9 signal and 4:3 will stretch to fill the screen
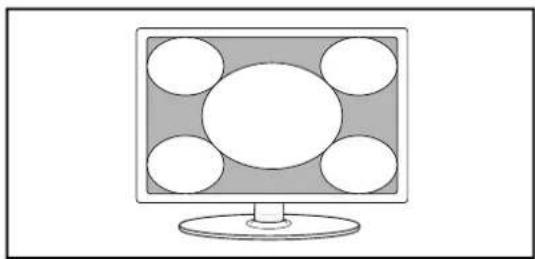
natural_image
Simple line drawing of a computer monitor with five circular windows on the screen (no text or symbols)
- 14:9 - Displays the 14:9 picture in the correct proportion. As a result side bars are shown on the screen
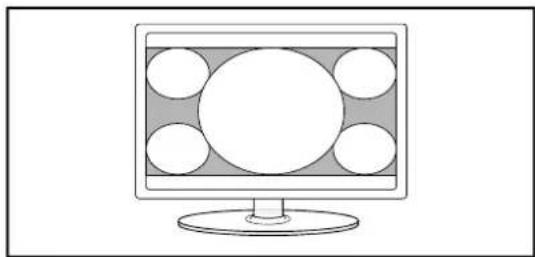
natural_image
Simple line drawing of a computer monitor with a circular grid on the screen (no text or symbols)- Zoom - The picture is the correct proportion but zoomed in to fill the screen
natural_image
Line drawing of a computer monitor with a circular screen and six square buttons on the front panel (no text or symbols)Sound Menu

Sound Mode
- Standard - Default settings
• Music - Emphasises music over voices - Movie - Provides live and full sound for movies
• Sports - Emphasises sound for sports
• Personal - Selects your personal sound settings
Treble
To adjust the amount of high frequency within the sound
Bass
To adjust the amount of low frequency within the sound
Balance
To switch the so und between the left and right speakers
Auto Volume Level (AVL)
When 'on' is selected, the volume will stay at a constant level regardless of input/source
Surround Sound
- Off - Off
- TruSurround HD - TruSurround HD™ creates an immersive, feature-rich surround sound experience from two speakers, complete with rich bass, high frequency detail and clear dialog
Digital Output
- Off - Off
• Auto - Selects the best settings automatically - PCM - Select this option if you are connecting to a Stereo Hi-fi via coax cable (Pulse-code modulation (PCM) is a digital representation of an analogue signal)
Audio Description
This allows the user to increase and decrease the AD (Audio Description) volume level.
(Audio Description is a service available on certain programmes. It provides a description of what is happening during the selected programme for a person who is visually impaired)
Audio Delay
Enables the user to adjust setting to sync picture and audio
Tip: Treble and bass levels can only be adjusted when the sound mode 'Personal' is selected.

dts®
TruSurround
For DTS patents, see http://patents.dts.com. Manufactured under license from DTS Licensing Limited. DTS, the Symbol, & DTS and the Symbol together are registered trademarks, and DTS TruSurround is a trademark of DTS, Inc. © DTS, Inc. All Rights Reserved.
Time Menu

Clock
Shows the date and time
Off Time
Allows you to set a specific time for your TV to turn off
On Time
Allows you to set a specific time for your TV to turn on, the channel it will then display, the source it will be on and also the volume. This function can then be toggled to repeat every day or a certain day.
Time Zone
Change your current time zone
Sleep Timer
Lets you set the sleep timer so the television automatically switches off after a set amount of time. Off -> 10min -> 20min -> 30min -> 60min -> 90min -> 120min -> 180min -> 240min
Auto standby
Set Auto standby between 3 hours, 4 hours and 5 hours (to turn off this function you must exit Home Mode in the Picture Menu)
OSD Timer
Lets you adjust the amount of time the On Screen Menu stays on the screen before disappearing

To access this menu, press [MENU] button on the remote control and scroll right. To enter a menu press [OK]
If you wish to make changes to any of the default settings, use the scroll ▲▼▶◀ buttons. To confirm any settings press [OK] button.
To exit this menu at anytime, press [EXIT] button.
System/Hotel Lock Menu
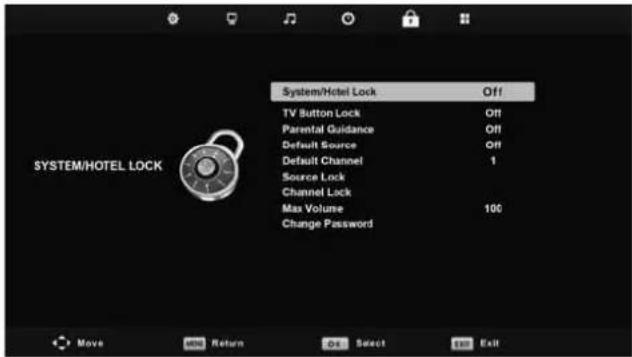
System/Hotel Lock
Allows you to lock or unlock the menu. You will be asked to enter a 4 digit password use the ▶ button to quit the password input. Use the ▶ button to clear. Default password is 0000
TV Button Lock
Allows you to lock the buttons on the side of the TV set
Parental Guidance
Allows you to set the rating to block certain content based on age information
Default Source
Allows the user to set the default source. The default source is the source the TV starts on when first switched on
Default Channel
Allows the user to set a channel as the default channel on the Digital source. The default channel is the channel the TV starts on when first switched on
Source Lock
Allows you to lock the source menu
Channel Lock
Allows you to lock certain channels manually
Max Volume
Allows you to adjust and set the maximum volume
Change Password
Allows you to change the password
To access this menu, press [MENU] button on the remote control and scroll right. To enter a menu press [OK]
If you wish to make changes to any of the default settings, use the scroll ▲▼▶◀ buttons. To confirm any settings press [OK] button.
To exit this menu at anytime, press [EXIT] button.
Setup Menu
Language
Allows you to change the language of the menu
Audio language
Allows the user to change the audio language
Subtitle Language
Allows the user to change the subtitle language
Hearing Impaired
This allows the user to turn on the Hearing Impaired function, this produces subtitles on the screen which provide a description of what is happening during the selected program.
PVR File System
Allows you to view the format and performance of a USB key
Blue Screen
Changes the background when there is no input between clear and a blue background (Only available on some sources)
First Time Installation
Allows you to retune the television for all digital channels, digital radio stations and analogue channels
Reset TV
This resets the menus to factory settings and will erase all TV channels stored on the television
Software Update (USB)
This menu lets you install the new software/fi rmware onto the television. Further details of how to do this will be issued with the fi rmware. Contact the helpline or refer to the 'product support' section of the website
HDMI CEC (Consumer Electronic Control)
Allows HDMI devices to control each other and allows the user to operate multiple devices with one remote control. (only available with compatible devices)
LED Status
Allows the user to switch the LED Power indicator light ON or OFF, when the TV is being operated. (When this option is set to OFF the LED Power indicator light will ash when the remote control is used)
DVD Setup
Applies to models with built in DVD players

TV Display - Choose from the following options
| 4:3 Pan Scan | PS Traditional picture format, often used on old film |
| 4:3 Letter Box LB Traditional picture which has been adapted for widescreen | |
| Wide 16:9 Widescreen picture format | |
Speaker Setup - Choose from the following options
| LT/RT Converts from | multi-channel sound to mono |
| Stereo Converts from | multi-channel sound to Stereo |
Dual Mono - Choose from the following options
| Stereo Outputs 2 channels of sound both left and right | |
| Mono L Outputs left side sound | |
| Mono R Outputs right side sound | |
| Mix Mono Outputs a single channel of sound but mix between right and left |
Dynamic Range - This is the difference between the quietest and loudest sounds. This setting works only with DVD discs recorded in Dolby digital.
| Full | Set this to listen with the range recorded on the disc |
| 3/4 | Set this to listen with a range equivalent to a normal television |
| 1/2 | Set this to listen with a smaller difference between the maximum and minimum volume |
| 1/4 | Set this to listen with a smaller difference between the maximum and minimum volume |
| Off | Set dynamic range to off |
TV Type - Choose from the following options
| PAL For discs from UK | K/Europe, Asia, Australia etc |
| Multi For both NTSC | and PAL |
| NTSC For discs from | North America, Japan etc |
Default - Choose from the following options
| Reset Resets all options in the ‘DVD setup’ menu back to the default settings |
Tip: This TV/DVD player is pre-set to play Region 2 DVDs. In the event you wish to use the TV/DVD in another country that uses different region discs, please visit www.umc-uk.co.uk. Select 'Product Support', 'Changing Region'.
7 Day TV Guide
TV Guide is available in Digital TV mode. It provides information about forthcoming programmes (where supported by the freeview channel). You can view the start and end time of all programmes and on all channels for the next 7 days and set reminders.
1) Press [TV GUIDE]. The following 7 Day TV Guide will appear.
![7 Day TV GUIDE 3 ITV - The Jeremy Kyle Show Entertainment 09:25 - 10:30 10 Dec 2014 Jeremy Kyle deals with more dilemmas, fiery confrontations and topical issues all in front of a studio audience. [S] 10 Dec 2014 09:46:20 10 Dec 2014 Now 10:15 10:45 11:15 1 BBC ONE Oxford Fake ... Homes Under the Hammer Claimed and Sh... Oxford... 2 BBC TWO Great ... Close Calls: On... See Hear BBC News Daily ... 3 ITV The Jeremy Kyle Show This Morning ... This Morning 4 Channel 4 Frasier Kirstie's Handmade Christmas Jamie's 15 Min... Come ... 5 Channel 5 The Wright Stuff ... 6 ITV2 Royal Pains The Chase All Star Family... 7 BBC THREE This Is BBC Three Record Remind Prev Day Next Day Move View Info Details EXIT Exit OK Watch / Record / Remind](/content/2026/05/970539/images/6025437381a8345306414ef1190fc58f3c2c274b0140053be35ce34669596c9f.jpg)
2) Navigate through the menu using ▲▼▶◀
You can now:
Record a programme by pressing RED (USB device must be connected)
Set a reminder by pressing GREEN
View a previous day by pressing YELLOW
View the next day by pressing BLUE
3) Press [EXIT] to exit the 7 day TV Guide.
USB Record - Digital / Freeview Mode
USB Record – Digital/Freeview Mode
Built into this television is a USB record facility. This function is available in Digital/Freeview mode when used in conjunction with a compatible USB memory stick or USB hard drive. The benefits of this are as follows:
- Pause live TV and then playback, fast forward and rewind (up to live TV)
- One button record, if you decide you want to record the current programme
- Easy programmable recording from the 7 day TV Guide
- Record TV and watch/listen back on your computer/laptop
Due to the nature of the product, it is necessary to use a high speed USB memory stick (as the TV reads from and writes to the memory stick at the same time, some memory sticks may not be suitable)
You can purchase high speed memory sticks from some computer stores, alternatively, we have a selection of tested and compatible memory sticks available to purchase directly from the helpline/web site.
Minimum Specification - USB Memory Stick
Read Speed 20 MB/s (Mega Byte Per Second)
Write Speed 6 MB/s (Mega Byte Per Second)
If you wish to use a USB portable hard drive larger than 32GB, please refer to the FAQ section at the rear of this user guide.
Pause Live TV (Time Shift)
Pausing Live TV is very simple.
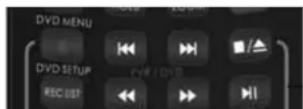
▶- Press the play/pause button and the television will pause and the live content will be recorded. To resume watching press play/pause again.
▶ - Press fast forward to go forward in a recording (i.e. to skip adverts)
- Press fast rewind to go back in a recording (i.e. if you fast forwarded too far)
Tip: When you switch the TV to standby or change channel the Time Shift memory is wiped. To restart time shift you must press play/pause button.
One Button Record
At any point in time you may decide to record the current channel that you are watching. To do this you need to press the red button highlighted below.
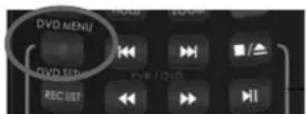
Tip: This television contains one TV tuner, therefore it can only record the channel you are watching or record one channel while the television is in standby mode.
Note: USB record function is only available in Digital/Freeview TV mode. Due to copyright laws and illegal copying/recording it is not possible to record to/from any other input/output source.
USB Mode / Media Player
USB mode offers playback of various different types of content that you have saved on your USB Memory Stick.
On switching to USB source the menu screen will appear. The content will be divided into Photo, Music, Movie and Text based on file type.
1) You can navigate through the menus using the scroll ▲buttons. To confirm the item you wish to play/view press [OK] button.
2) Select the drive you require.
(If your drive only has 1 partition you will only see 1 item).
3) You can now access the item. Press OK to view.
4) While viewing you control the item using (Fig A) or by pressing (i) and using ▲and (OK)
Tip: If you experience a playback issue, please ensure the files being used are the correct format (example - the picture plays but no sound) See technical specification page for compatible file types
1)
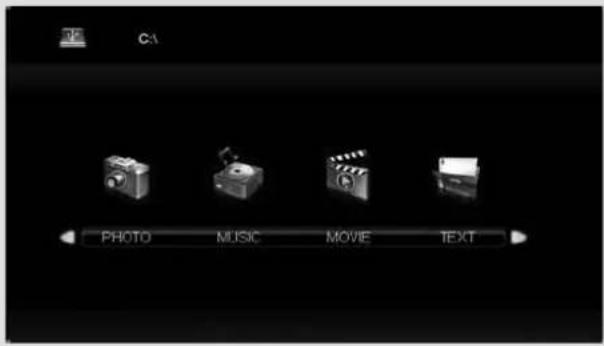
2)
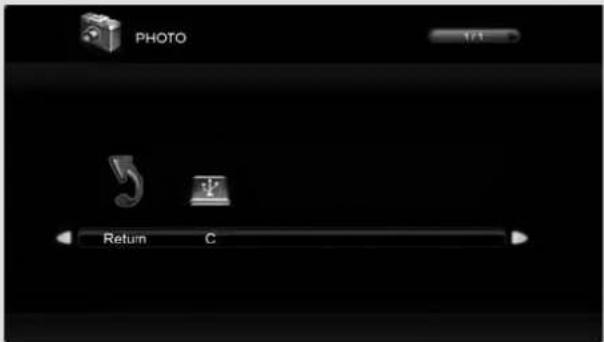
3)

4)
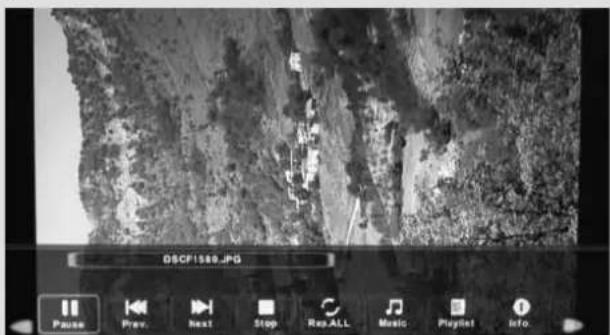
Fig A

Using Your TV With a Sky Digital Set Top Box
Option 1) Connecting your TV to your Sky box (when both the TV and Sky Box are located in the same room)
Depending on your Sky Box & TV model, connect either by SCART or HDMI cables (available separately)
If connecting by SCART, select the 'Input source' on the TV as SCART. If your TV model does not have SCART, please refer to the 'Connections' pages in this user guide for alternative ways to connect.
If connecting by HDMI, select the 'Input source' on the TV as HDMI (if the TV has more than 1 HDMI port, ensure you select the input source to match the HDMI numbered port on the rear of the TV)
If you wish to use your Sky remote to operate the TV's functions, you will need a Sky remote control (Revision 9 or later) and you will need to program a 4 digit code into it. See bottom of this page.
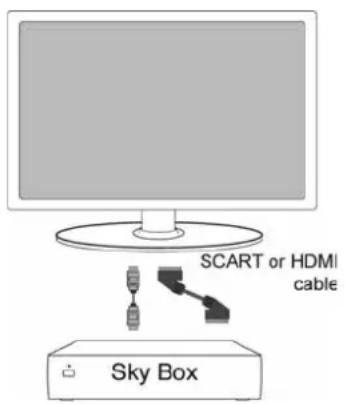
Option 2) Connecting your TV to your Sky box (when your Sky box is located in a different room to the TV)
Please note, if you are adding a 'Magic Eye/TV Link' to your system so that you can use your Sky remote control to change the Sky channel in the room where the 2nd TV is located, please refer to the instructions included with the TV link/magic eye in order to ensure the RF or RF2 output on your Sky box is powered on. (The red LED light on the TV link/magic eye will light up if the RF / RF2 output is correctly set up) If you do not have the instructions that came with the TV link/magic eye, instructions on how to do it can be found on our website.
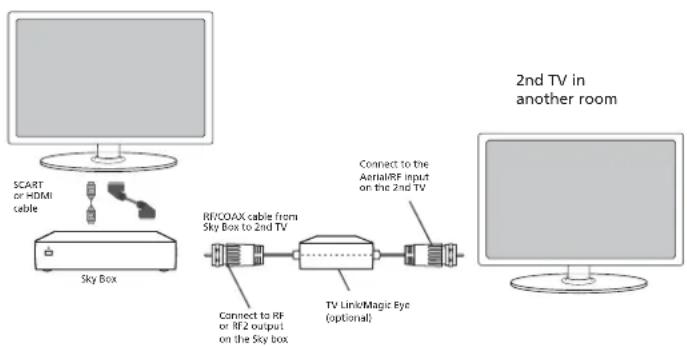
flowchart
graph LR
    A["SCART or HDMI cable"] --> B["Sky Box"]
    B --> C["RF/COAX cable from Sky Box to 2nd TV"]
    C --> D["Connect to RF or RF2 output on the Sky box"]
    D --> E["TV Link/Magic Eye (optional)"]
    E --> F["Connect to the Aerial/RF input on the 2nd TV"]
    F --> G["2nd TV in another room"]
1) To tune the TV to the Sky box, on the 2nd TV, select the 'Analogue' input source.
2) Select the channel that you wish to store the Sky box/channel on. (If you do not use channels 1-5 because you no longer have analogue terrestrial channels after digital switchover, you may choose to select channel 1 to store the Sky box/channel, if you still have and use analogue channels 1-5, you may for example decide that channel 6 is the best option for you)
3) Press the corresponding number on the remote control to select the desired analogue channel chosen as per point 2 above.
4) On the TV remote control, press Menu. Now navigate through the menus to select Manual Tuning or Analogue Manual Tuning (refer to the Tuning/Channel menu section of this user guide if necessary)
5) Manually tune in the channel (usually, the Sky box is at a frequency between 800Mhz and 850Mhz) once the Sky box/channel is found, press 'OK' to store it. If you wish to use your Sky remote to operate the TV's functions, you will need a Sky remote control (Revision 9 or later) and you will need to program a 4 digit code into it.
If you wish to use your Sky remote to operate the TV's functions, you will need a Sky remote control (Revision 9 or later) and you will need to programme a 4 digit code into it. Please see below.
Using a Sky Remote or a Universal Remote to operate your TV
Sky Remote Control - If you wish to use your Sky remote to operate the basic functions of your TV, you need to program a 4 digit code into it. Please note - you will need a Sky Revision 9 remote control (or later). If you wish to upgrade/replace your existing Sky remote control to the latest version, you can do so on our website.
Universal Remote Control - If you wish to use a Universal remote control to operate your TV, please refer to the website for a full list of codes. (Please note we only have codes for One for All branded remote controls, if you have an alternative brand of Universal remote, please refer to the manufacturer for the code.)
Frequently Asked Questions
| General I would like to have louder sound by connecting additional speakers. | 1) Use the 3.5mm headphone output and a 3.5mm to phono cable (available separately) to connect to an amplifier/surround sound system. Please note this will deactivate the TV's built in speakers.2) Connect a COAX cable from the TV's COAX output to your amplifier/ surround systems COAX input. |
| General Why are some options in the menu unavailable and greyed out. | Some options are only available in certain sources, i.e. HDMI. They are unavailable in the other sources where they have no affect. |
| General Can I stop my TV automatically turning off after 4hrs? | Yes, in the 'Time' menu settings, scroll down to Auto standby and select OFF. |
| TV I have tuned in Digital TV but I am not receiving any or all of the channels and/or the channels I receive are breaking up. | 1) Check you are in an area that can receive Freeview/Saorview, visit www.freeview.co.uk or www.saorview.ie2) Check you are using an aerial that is able to receive a good digital signal. In most cases, you will need an outdoor digital hi-gain/wideband aerial. In areas that have excellent digital coverage, you may be able to use a loft type aerial but it is highly likely that you will also need to connect a booster between the back of the TV and the TV aerial wall socket. Unfortunately, to receive a good enough digital signal, it is not possible to use a portable/indoor type aerial. |
| TV I have re-tuned my television but when I switch it off it is not storing the channels. | If the TV does not save the channels when you power it off, it's likely the channel database has become corrupt.1) Turn off the TV.2) Remove the RF/Aerial cable from the rear of the TV and then turn the TV back on again.3) Using the remote control, press Menu followed by 8-8-8-8 to enter the initial setup/fi rst time installation menu.4) Press OK (let the TV run the full tuning process).5) Once completed, turn off the TV, reconnect the RF/Aerial cable then turn the TV back on again.6) Repeat steps 3 & 4. |
| VCR/DVD Recorder | I have connected the TV to my VCR or DVD Recorder via SCART but it is not recording. |
| Game Consoles | I have connected my Playstation/ Xbox to the TV via HDMI, but I am not receiving any pictures or sound on my Television. |
Note:
Supplier may change TV software and on screen graphics without warning
Frequently Asked Questions
| Game Consoles | I have connected my Playstation/ Xbox to the TV via Component cables (red, green & blue) but I am not receiving any sound. | Component cables only provide HD pictures. For the sound you will need to connect the red & white audio cables on the PlayStation/Xbox to the red & white phono inputs (or mini AV input where fitted) on the rear of the TV. Please refer to the ‘Connections’ pages. |
| System Lock | I have changed the password on the television and now forgotten it. | There is a master password of 4711, to gain access to the TV menu and reset the normal password. |
| USB Mode I have inserted a USB Memory Key, but the TV does not recognise it. | Ensure the USB Memory Key is formatted to type FAT32. | |
| USB Mode Using a USB portable hard drive / larger than 32GB. | If you wish to use a portable hard drive larger than 32GB, please note that it must be formatted to the FAT32 file system in order to operate on this TV. Windows XP/Vista computers are only capable of formatting up to 32GB, therefore, you will need a software programme/utility to format larger hard drives.Please refer to the website, www.umc-uk.co.uk, for more information. | |
| DVD (For TV models with DVD only) | I have inserted a disc but it is not playing. | 1) Ensure you have inserted the disc facing the correct way.2) Ensure the disc is clean and is not scratched.3) Some copied discs will not play.4) Check the DVD is a region 2 disc – to change the region of the DVD player, refer to www.umc-uk.co.uk, select ‘Changing DVD Region’ in the ‘Product Support’ section |
| DVD (For TV models with DVD only) | I have pressed the eject button but the disc is not coming out. | To eject the disc hold the stop/eject button for 4 seconds. |
| USB Record | I cannot change the channel, access the menu or use the red button. | During time shift you cannot change the channel, access the menu or use the red button. |
| USB Record | When using the USB to record the picture ‘breaks up’ or experience loss of sound. | Check the USB memory stick meets the minimum read speed requirements. Standard definition channels require a read speed of 20 MB/s (Mega Byte per second) and a write Speed of 6 MB/s (Mega Byte per second) HD channels require the read speed of 80 MB/s (Mega Byte per second) and a write speed of 40 MB/s (Mega Byte per second). USB 3.0 sticks should be used where possible. |
Technical Specification
Product Fiche
| Supplier | Bush | |
| Model ID | 40/233F 40/233FDVD | |
| Energy efficiency class A + | ||
| Visible screen size (diagonal) 102 cm / 40 inches | ||
| On mode average power consumption 45.0 W | ||
| Annual energy consumption *1 66 kWh | ||
| Standby power consumption *2 <0.50 W | ||
| Off mode power consumption 0 W | ||
| Screen resolution | 1920 (H) x 1080 (V) | |
| *1: Energy consumption XYZ kWh per year, based on the power consumption of the television operating 4 hours per day for 365 days. The actual energy consumption will depend on how the television is used.*2: When the TV is turned off with the remote control/standby button and no function is active. | ||
| Additional Technical Information | ||
| RF | 75 ohm Antenna / Analog / DVB | |
| Video Inputs 3 x HDMI, 1 x USB, 1 x Composite/Video,1 x Mini Component/YPbPr, 1 x VGA/PC, | ||
| Sound Inputs | 1 x shared audio for Composite/Video & Component/YPbPr,1 x 3.5mm jack for PC audio input | |
| Sound Outputs 1 x Coax Audio output, 1 x 3.5mm Headphone | ||
| Speaker / Amplifier Watts (RMS) | 2 x 10W / 2 x 8W | |
| Dimensions including stand (mm) | 906 W x 582 H x 210 D | |
| Net weight | 8.7 kgs 8.9 kgs | |
| Energy Consumption Info | ||
| Voltage and power consumption | 110-240v 50 / 60Hz45 / 65 / 80W (ecomode/standard/max)EEI - A+ (Energy Rating) | 110-240v 50 / 60Hz45 / 65 / 90W ((ecomode/standard/max)EEI - A+ (Energy Rating) |
| Wallmounting VESA | 200 x 200 (mm) | |
Technical Specification
Compatible files in USB Mode
| Media File Ext. | Codec | Remark | ||
| Video Audio | ||||
| Movie | .mpg MPEG-1, MPEG-2 | MP3, WMA, AAC | Max Resolution: 1920x1080 Max Data rate: 40 Mbps | |
| .avi | Xvid, MJPEG, MPEG-4 SP/ASP, H.264 | Max Resolution: 1920x1080 Max Data rate: 20 Mbps | ||
| .ts MPEG-2, H.264 | ||||
| .mov/.mkv | MPEG-4 SP/ASP, H.264 | |||
| .dat MPEG-1 | ||||
| .mp4 | MPEG-4 SP/ASP, H.264 | |||
| MPEG-1, MPEG-2 | Max Resolution: 720x576 Max Data rate: 40 Mbps | |||
| .vob MPEG-2 | ||||
| Music | .mp3 - MP3 | Sample Rate 8K-48KHz Bit rate: 32K - 320Kbps Channel: Mono/Stereo | ||
| .wma - WMA | ||||
| .m4a/.aac | - AAC | Sample Rate 16K-48KHz Bit rate: 32K - 442Kbps Channel: Mono/Stereo | ||
| Photo | .jpg/.jpeg | Progressive JPEG Max Resolution | 1024x768 | |
| Baseline JPEG Max Resolution | 8192x8192 | |||
| .bmp BMP | Max Resolution: 6500x6500 Pixel Depth 1/4/8/16/24/32 bpp | |||
| .png | Non-Interlaced Max Resolution | 3000x3000 | ||
| Interlaced | Max Resolution: 1500x1500 | |||
- Important Safety Instructions
- Warnings
- Safety
- Packaging
- Batteries
- TV Models with built in DVD players
- CAUTION:
- Trademarks
- Contents
- Manufacturers Guarantee Information 3
- Important Safety Instructions 4-5
- What is included in the box 8
- Attaching the stand 9
- Detaching the stand and securing the TV to a wall 10
- Wall mounting 11
- Getting Started - Initial Set Up 12
- TV Buttons and Input Source Menu 13
- Remote Control 14
- TV Menu Operation 18-25
- What Is Included In The Box
- Attaching The Stand
- To complete the stand installation you will require a cross head screw driver.
- HELPFUL ADVICE FOR FIRST TIME STAND INSTALLATION
- Detaching The Stand And Securing The TV To A Wall
- Detaching the Stand
- Securing the TV to a Wall
- Wall Mounting
- Getting Started - Initial Set Up
- Important
- TV Buttons & Source Menu
- Choosing Mode Input/Source
- Remote Control
- Viewing remote control - TV
- Connections
- Connecting a Camcorder, Camera or Games Console
- Connecting a DVD Player/Recorder, Video Recorder or Cable/Satellite Box
- Connecting a High Definition (HD) Device
- Option 2 - via Component cable
- Connecting to a device with VGA/PC output (Laptop or Desktop Computer)
- Connecting to an external audio device (Amplifiers, Surround Sound, Sound Bars etc)
- Channel Menu
- Auto Tuning
- Analogue Manual Tuning
- Freeview Manual Tuning
- Channel Edit
- Schedule List
- Signal Information
- CI Information
- Picture Menu
- Picture Mode
- Contrast
- Brightness
- Colour
- Tint
- Sharpness
- Colour Temperature
- Noise Reduction
- Aspect Ratio
- Sound Menu
- Sound Mode
- Treble
- Bass
- Balance
- Auto Volume Level (AVL)
- Surround Sound
- Digital Output
- Audio Description
- Audio Delay
- Time Menu
- Clock
- Off Time
- On Time
- Time Zone
- Sleep Timer
- Auto standby
- OSD Timer
- System/Hotel Lock Menu
- System/Hotel Lock
- TV Button Lock
- Parental Guidance
- Default Source
- Default Channel
- Source Lock
- Channel Lock
- Max Volume
- Change Password
- Setup Menu
- Language
- Audio language
- Subtitle Language
- Hearing Impaired
- PVR File System
- Blue Screen
- First Time Installation
- Reset TV
- Software Update (USB)
- HDMI CEC (Consumer Electronic Control)
- LED Status
- DVD Setup
- Applies to models with built in DVD players
- Day TV Guide
- USB Record - Digital / Freeview Mode
- USB Record – Digital/Freeview Mode
- Pause Live TV (Time Shift)
- One Button Record
- USB Mode / Media Player
- Using Your TV With a Sky Digital Set Top Box
- Option 1) Connecting your TV to your Sky box (when both the TV and Sky Box are located in the same room)
- Option 2) Connecting your TV to your Sky box (when your Sky box is located in a different room to the TV)
- Using a Sky Remote or a Universal Remote to operate your TV
- Frequently Asked Questions
- Technical Specification
- Option 1 - via HDMI to HDMI cable
Brand : BUSH
Model : 40/233F
Category : Television