
LED-320 ASMT - Television Grunkel - Free user manual and instructions
Find the device manual for free LED-320 ASMT Grunkel in PDF.


| Product Type | LED Television |
| Model | LED-320 ASMT |
| Brand | Grunkel |
| Screen Size | 32 inches (approx.) |
| Resolution | 1366 x 768 pixels |
| Input Voltage | 100-240V~50/60Hz |
| Standby Power Consumption | < 0.5W |
| Audio Output (RMS) | 2 x 7W |
| Operating Temperature | 5°C to 45°C |
| Operating Humidity | 20% to 80% |
| Storage Temperature | -15°C to 45°C |
| Storage Humidity | 10% to 80% |
| Connectivity | RF, AV, VGA, PC Audio, HDMI, USB, COAX, RJ45, CI, Earphone |
| Operating System | Android 7.1.1 |
| Processor | ARM Cortex A53 Quad-Core |
| GPU | Dual-Core |
| RAM | 1.0 GB |
| ROM | 8.0 GB |
| Weight (approx.) | 4.5 kg |
| Dimensions (approx. without stand) | 730 x 435 x 80 mm |
| Safety Class | Class II (double insulated) |
| Energy Efficiency | Standby < 0.5W |
| Mounting | Stand (included) or wall-mount (not included) |
| Warranty | Refer to manufacturer |
Frequently Asked Questions - LED-320 ASMT Grunkel
User questions about LED-320 ASMT Grunkel
0 question about this device. Answer the ones you know or ask your own.
Ask a new question about this device
Download the instructions for your Television in PDF format for free! Find your manual LED-320 ASMT - Grunkel and take your electronic device back in hand. On this page are published all the documents necessary for the use of your device. LED-320 ASMT by Grunkel.
USER MANUAL LED-320 ASMT Grunkel
natural_image
Line drawing of a flat-screen TV with blank screen and stand (no text or symbols)Contents
| Stand Installation | 1 |
| Important Safety Instructions | 2 |
| Supplied Accessories | 2 |
| Functional Overview | 3 |
| Remote Control | 4 |
| Setting | 8 |
| Media Play | 10 |
| Main Menu | 12 |
| Specification | 22 |
| Troubleshooting | 22 |
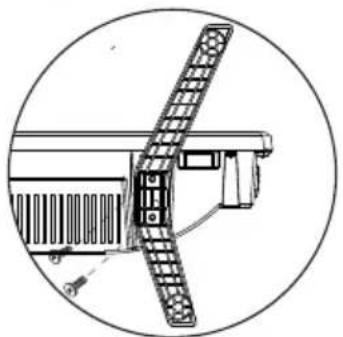
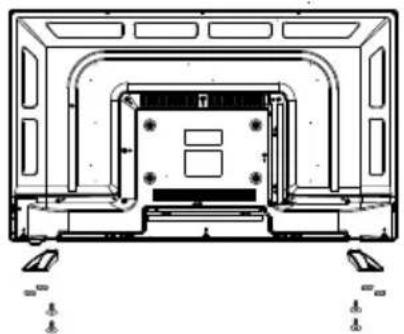
Stand Installation
Tighten the supplied screws to fix the TV stand securely in place.
natural_image
Technical line drawing of a mechanical assembly with no visible text or symbols4 Screws M4 (Provided with TV unit)
natural_image
Technical line drawing of a mechanical or electronic component with mounting holes and internal structure (no text or symbols)Wall-mounting the device
If you are mounting the device, please consult a qualified installer for further insturctions on bracket support and wall support.
WARNING
The TV stand may not be securely fixed in place after repeated tightening and loosening the screws.
During assembling and disassembling the TV stand, please use your hand to support it. Failing to do so may cause the TV stand to fall and result in personal injury.
After installing the TV stand, please ensure that the screws are tightened firmly. Failure to do so may cause the TV set to tip over or become damaged.
Important Safety Instructions
★ WARNING: To prevent injury, this apparatus must be securely attached to the floor/wall in accordance with the installation instruction.
★ WARNING: To reduce the risk of fire or electric shock, do not expose this apparatus to rain or moisture. The apparatus shall not be exposed to dripping or splashing and that objects filled with liquids, such as vases, shall not be placed on apparatus.
★ WARNING: The mains plug/appliance coupler is used as disconnect device, the disconnect device shall remain readily operable.
★ WARNING: The mains plug is used as disconnect device, the disconnect device shall remain readily operable.
★ WARNING: The mains plug is used as disconnect device, the disconnect device shall remain readily operable.
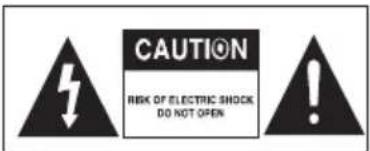
- This lightning flash with arrowhead symbol within an equilateral triangle is intended to alert the user to the presence of non-insulated "dangerous voltage" within the product's enclosure that may be of sufficient magnitude to constitute a risk of electric shock.
WARNING: To reduce the risk of electric shock, do not remove cover (or back) as there are no user-serviceable parts inside. Refer servicing to qualified personnel.
- The exclamation point within an equilateral triangle is intended to alert the user to the presence of important operating and maintenance instructions in the literature accompanying the appliance.
★ No naked flame sources, such as lighted candles, should be placed on the apparatus.
★ WARNING: The battery (battery or batteries or battery pack) shall not be exposed to excessive heat such as sunshine, fire or the like.
★ WARNING: To prevent the spread of fire, keep candles or other open flames away from this product at all times.
★ Do not install this equipment in a confined or building-in space such as a book case or similar unit, and remain a well ventilation conditions at open site. The ventilation should not be impeded by covering the ventilation openings with items such as newspaper, table-cloths, curtains etc.
★ The instructions for installation or use provided with non-floor standing televisions likely to be used in the home and weighing over 7 kg shall contain the following information or equivalent:
WARNING
Never place a television set in an unstable location. A television set may fall, causing serious personal injury or death. Many injuries, particularly to children, can be avoided by taking simple precautions such as:
- Using cabinets or stands recommended by the manufacturer of the television set.
- Only using furniture that can safely support the television set.
- Ensuring the television set is not overhanging the edge of the supporting furniture.
- Not placing the television set on tall furniture (for example, cupboards or bookcases) without anchoring both the furniture and the television set to a suitable support.
- Not placing the television set on cloth or other materials that may be located between the television set and supporting furniture.
- Educating children about the dangers of climbing on furniture to reach the television set or its controls.
Supplied Accessories
Check the supplied accessories before installation.
In case of missing or damaged, please contact the dealer immediately.
Remote Control x1 AAA Batteries x2 User Manual x1

- The type of power plug provided may be different from the above picture for some countries.
- Please store the screws that are not used.
Functional Overview
Buttons On The TV Panel
| Button | Description |
| POWER | Press to turn TV on or turn to standby mode. |
| CH+, CH - | Press to select desired channels, or press to select or adjust a menu item. |
| VOL+, VOL- | Press to adjust the volume level, or press to select or adjust a menu item. |
| MENU | Press to display the setup menu on the TV screen. |
| SOURCE | Press to select TV or all video input modes. |
Rear Panel
| Connector | Function | Description |
 | COAX | Connection for Digital Coaxial input for Audio Amplifier. |
 | HDMI | Connect to equipment with HDMI output. |
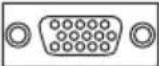 | VGA | VGA(PC IN) Input terminalConnect to PC. |
 | PC AUDIO | PC /HDMI Analog Audio Input terminalConnect to equipment using HDMI-DVI connection or PC with audio output. |
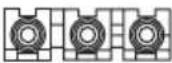 | AV IN | Video and Audio(L/R)input Terminal, Audio(L/R) |
 | USB | Insert USB. |
 | EARPHONE | Connects audio amplifier or other device with that audio input. |
 | DVB T2 | Connect to equipment with antenna output or wall antenna socket. |
 | RJ45 | Connect to the Internet. |
 | CI | Slot for Common Interface device(Decoder). |
Remote Control
Definition of the buttons on remote control:
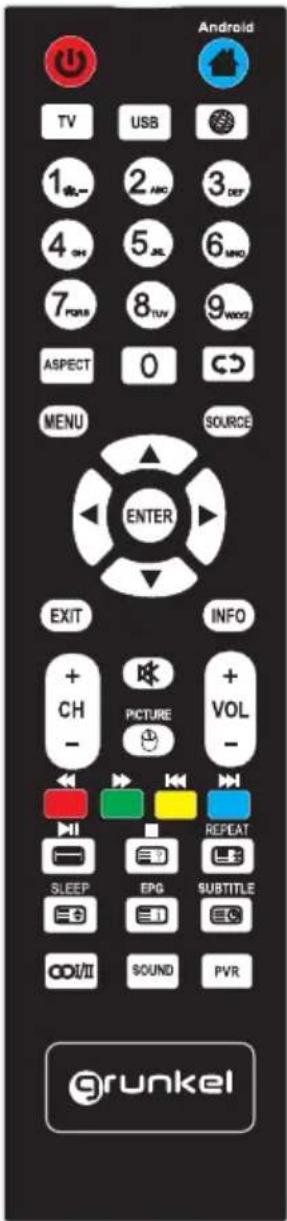
| Button | Description |
| Press this button to turn the TV on or off. | |
| Press to home mode. | |
| TV | Press to the TV mode. |
| USB | Press to the USB mode. |
| Press this button to browser. | |
| 0-9 | Select and switch to a channel using 0 - 9. |
| ASPECT | Press to adjust picture ratio. |
| Switch back and front between the current and previous channels Repeat the program in MEDIA | |
| MENU | Press this button to enter the main menu for various optional adjustable setting. |
| SOURCE | Press to change signal source. |
| ENTER | Enter /OK the selected option or execute the selected operation, and press this button to display “Channel list” in TV mode. |
| ▲▼◄► | Press to select or adjust the desired item on the TV menu. |
| EXIT | Press to quit the current interface |
| INFO | Press button to display current source and channel Information. |
| CH+/- | Change the channel up and down. |
| VOL+/- | Adjust the volume. |
| Press this button to mute or restore sound. | |
| PICTURE | Select picture mode. Select mouse |
| USB Mode: Press to fast backward play. | |
| USB Mode: Press to fast forward play. | |
| USB Mode: Press to select next file or chepter. | |
| USB Mode: Press to select previous file or chepter. | |
| USB Mode: Press to play/pause file reproduction. | |
| USB Mode: Press to stop USB file reproduction. | |
| REPEAT | USB Mode: Press to select the repeat play mode. |
| Color Buttons | Correspond to the different colored subjects. |
Remote Control
Teletext Function:
INDEX ☐: Go to the index page.
NUMBER BUTTONS: Key in the alphanumeric digits to go to the designated page directly.
REVEAL ☐: Reveal or conceal hidden ext for quizzes etc.
▲/▼: Press▲/▼ to scroll to the next/ previous page.
COLOR BUTTONS: Teletext Button.
HOLD ☐: Retain the current teletext page and again to cancel the function.
TEXT ☐: Switch between teletext on, mix and teletext off.
SIZE ☐: Switch between zooming to he upper half, lower half and in full.
SUBTITLE ☐: Switch between secondary pages by entering the four digit number.
NOTE:
◆ All pictures in this manual are examples, only for reference, actual product may differ from the pictures.
◆ The buttons not mentioned here are not used.
◆ Teletext Function/Nicam(options)
Home Page
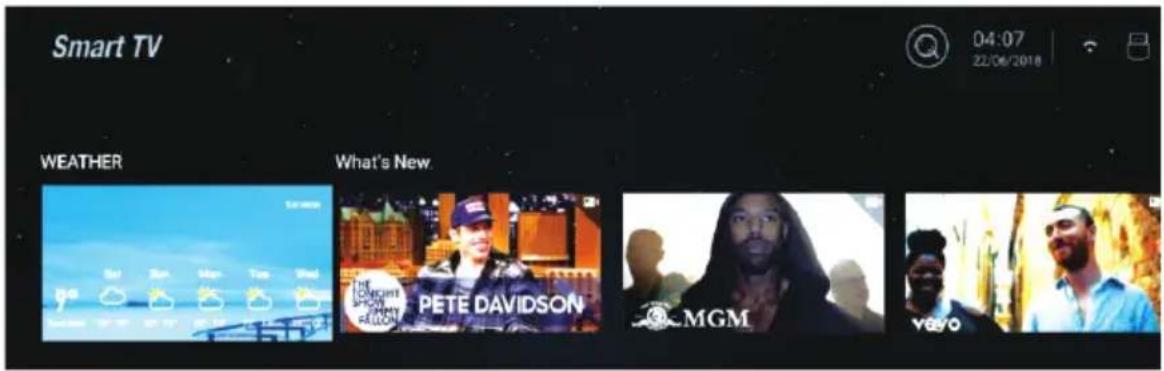
What's New
This is the video of recommend and video will be updated in a few days.
Press ◀/▶ button to select the video, and then press ENTER key to play video you want
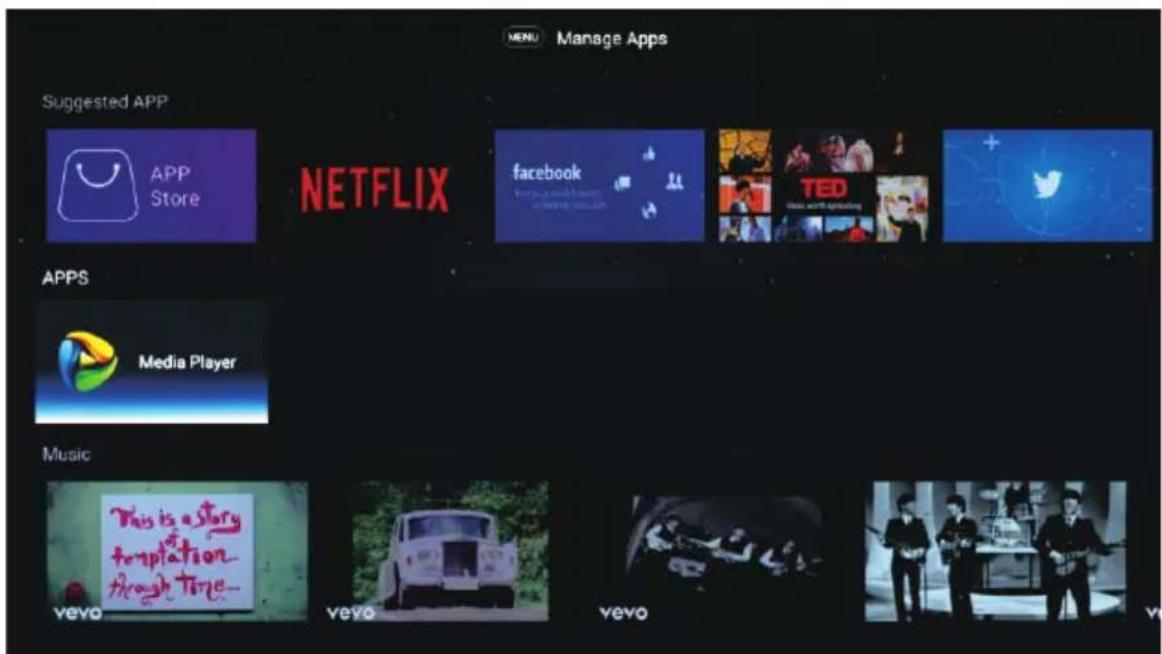
APPS
This is part of the system preset and user installation applications.
Press ◀/▶ button to select APP, and then press ENTER key to run it.
User can access to the internet by Browser APP.
Home Page
Sports&Music
This part is a sports and music column.
Press ◀/▶ button to select the video, and then press ENTER key to play it.
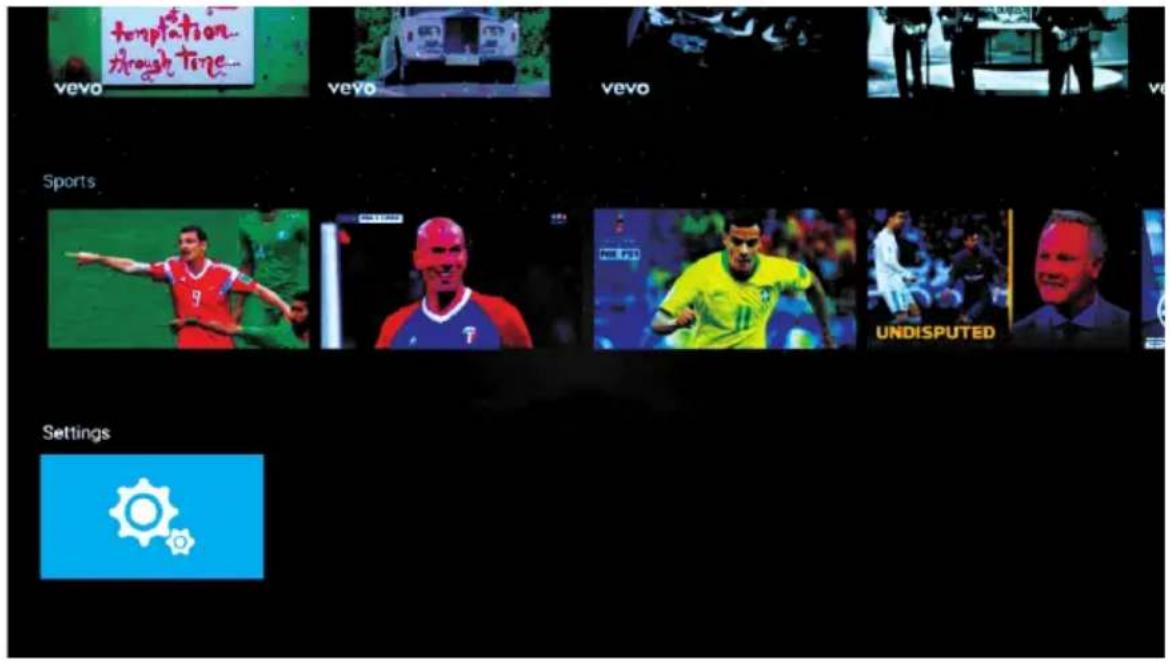
Setting
Press ENTER key to do system setting.
Settings
Time Setting

Common

About TV
Network Setting
Press ▲/▼button to select the Network that you want to use.
Time Setting
Press ▲/▼ key to select the items, and then press ENTER key to modify it.
Common
Common

Language Setting
English

Application Manage


OTA Update


System Recovery

Setting
Language Setting
Press ▲/▼key to select the system Language that you want, and press Enter key to confirm As the figure shows.
Application Manage
Press Enter key to select that you can know how many apps you have downloaded. You can Uninstall the apps that have downloaded with Uninstalled Applications item. As the figure shows.
OTA Update
Click the "CHECK FOR UPGRADE" button to check the software update.
System Recovery
Click the "FACTORY DATA RESET" button to do system Recovery, and all apps you have download will be deleted.
About TV
This part is show the system information As the figure shows.
About TV
| System Info | Android 7.1.1 |
| CPU | ARM Cortex A53(Quad C) |
| GPU | Dual-Core |
| RAM | 1.0GB |
| ROM | 8.0GB |
Media Player
Note: Before operation MEDIA menu, Plug in USB device or memory card
Press ▲/▼ button to select Media Player in the Home Page, and then press ENTER to access.
Press ◀/▶ key to select and press ENTER key to enter
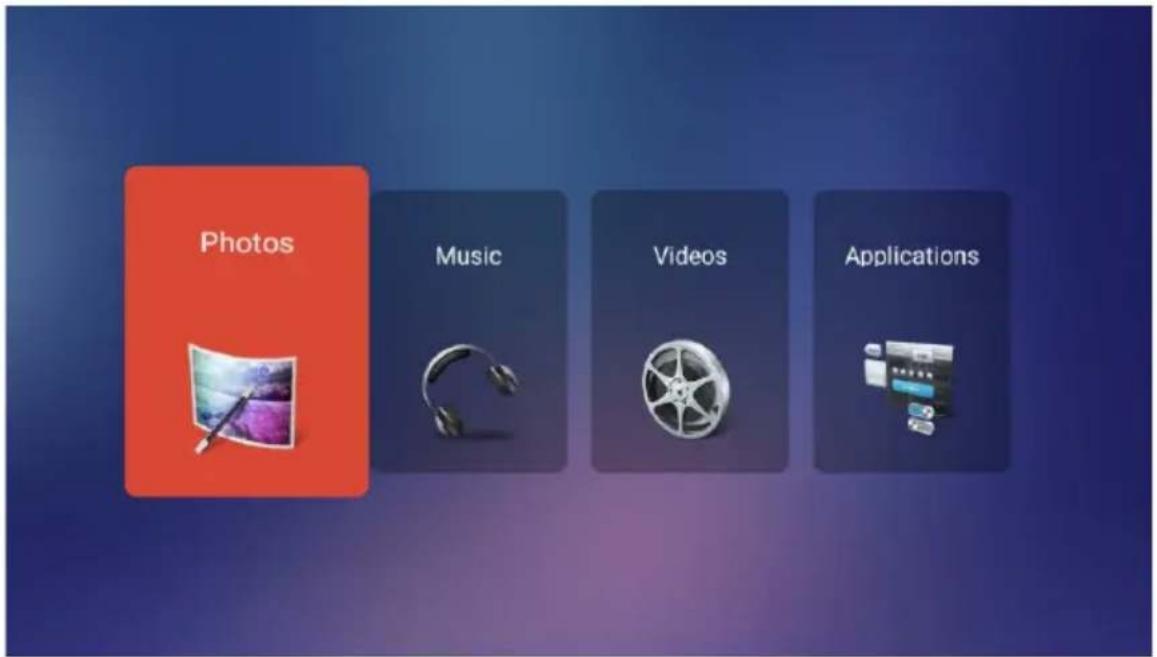
Photo
The picture is for a reference only; the actual item is the standard.
Press ◀/▶ button to select Photo in the main menu, and then press ENTER button to enter.
Press EXIT button to return back to the previous menu.
You can see the information of the current playing photo after press INFO button, then press ▶ || button to play or pause, you can see the playing state in the right.
Then press ▲/▼ or ◀/► button to ratite the picture.
Notes: Other menu and description are the same as that for Movie menu.
Music
The picture is for a reference only; the actual item is the standard.
Press ◀/▶ button to select Music in the main menu, and then press ENTER button to enter.
Press EXIT button to return back to the previous menu.
Press ▲/▼button to select the song you want to listen, and then press ENTER or ▶ || or ▶ button to play.
Press ◀ button to return back to the previous menu.
You can see the information of the current playing song at the left of the menu.
Media Player
Video
The picture is for a reference only; the actual item is the standard.
Press ◀/▶ button to select Video in the main menu, then press ENTER button to enter.
Press EXIT button to return back to the previous menu.
Press ◀/▶ and ▲/▼ button to select the folder that you want to view.
Press ENTER button to select the sub folder.
Press ENTER button or ▶ || button to play,
Press ■ button or EXIT button to stop playing.
Press the ◀ button to return back to previous page.
You can see the information of the current playing media at the first flew second or after press INFO button.
Applications
The picture is for a reference only; the actual item is the standard.
Press ◀/▶ button to select Application in the main menu, then press ENTER button to enter, you can install applications by this selection.
Press EXIT button to return back to the previous menu.
TV Apps
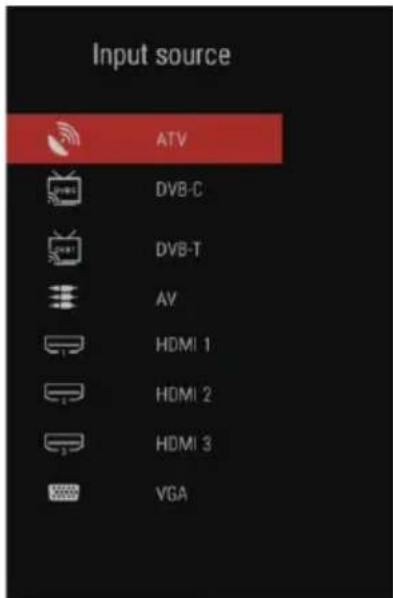
INPUT SOURCE
- Press SOURCE button to display the input source list;
- Press ▲/▼ button to select the input source you want to watch;
- Press ENTER button to enter the input source;
Main Menu
Main Menu
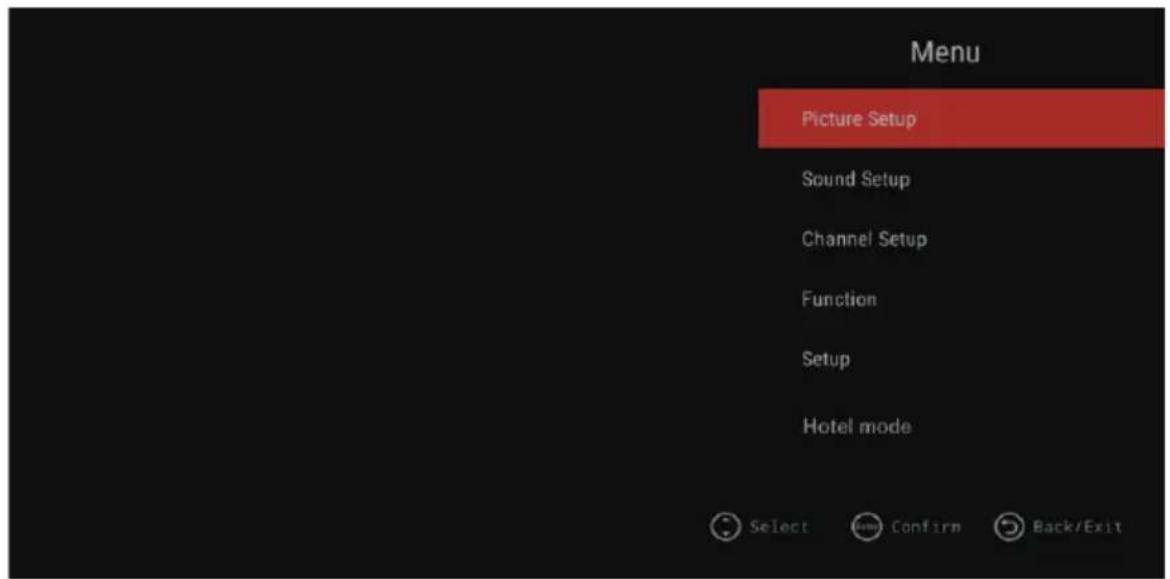
- Press MENU button to display the MAIN OSD MENU;
- Press ▲/▼ button to select the MENU you want;
- Press ENTER button or ▶ button to enter the sub menu, and press ◀ button to return back to the previous menu.
- Press ▲/▼ button to select the option and then press ENTER button or ▶ button to enter the submenu, press ◀/▶ button to adjust the value or press ◀/▶ button to select in the sub menu;
- You can press EXIT button to save and return back to the previous menu, and press EXIT button to exit the entire menu.
● You also can press SOURCE button plus enter 4711 to display the Hotel mode.
Picture Setup
Main Menu
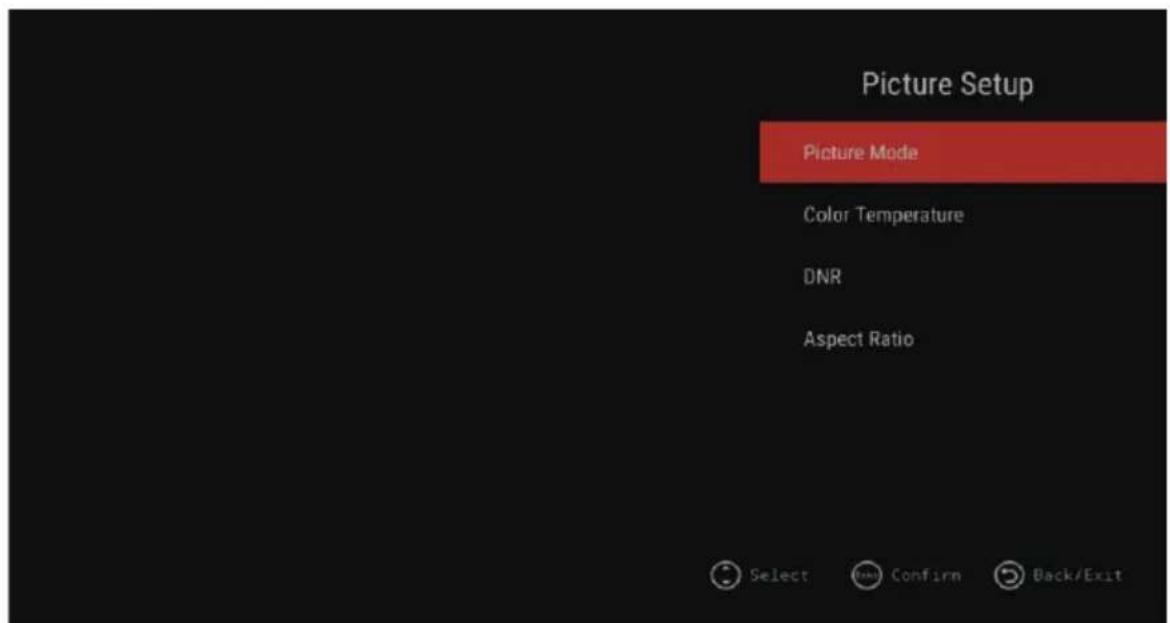
Picture Mode
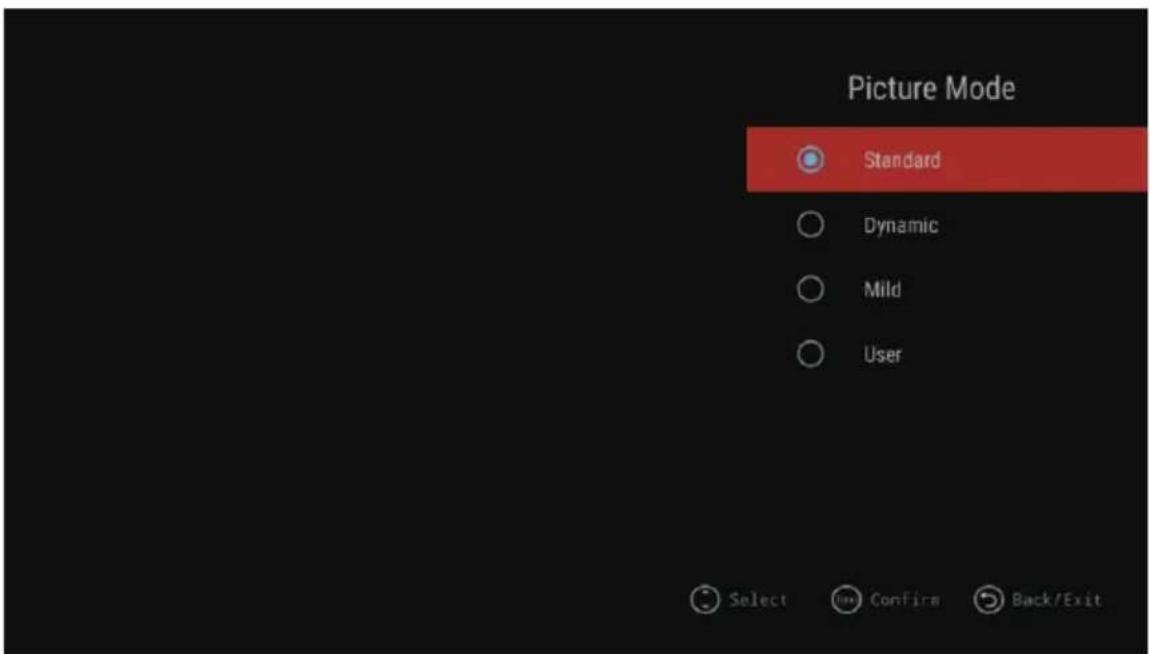
Press ▲/▼ button to select Picture Mode, then press ENTER button to enter. (Available Picture Mode:, Standard, Dynamic, Mild, User)
You only can adjust the value of brightness, contrast, sharpness, color, when the picture is in User mode.
Colour Temperature
Press ▲/▼ button to select Colour Temperature, then press ENTER button to enter and ◀/▶ button to select Standard, Cool, Warm.
DNR
Press ▲/▼ button to select DNR, and then press ENTER button to enter and ◀/▶ button to select Off, Low, Middle, High.
Aspect Ratio
Press ▲/▼ button to select Aspect Ratio, then press ENTER button to enter and press ◀/▶ button to adjust. Then press EXIT button to return back the previous menu directly.
Main Menu
Sound Setup
- Press ▲/▼ button to select the option that you want to adjust in the Sound menu, then press ENTER button to enter.
- press ◀/▶ button to adjust or press ▲/▼ to select, and press ENTER button to select submenu.
- After finishing your adjustment, Press MENU button to save and return back to the previous menu, or press EXIT button to exit the entire menu.
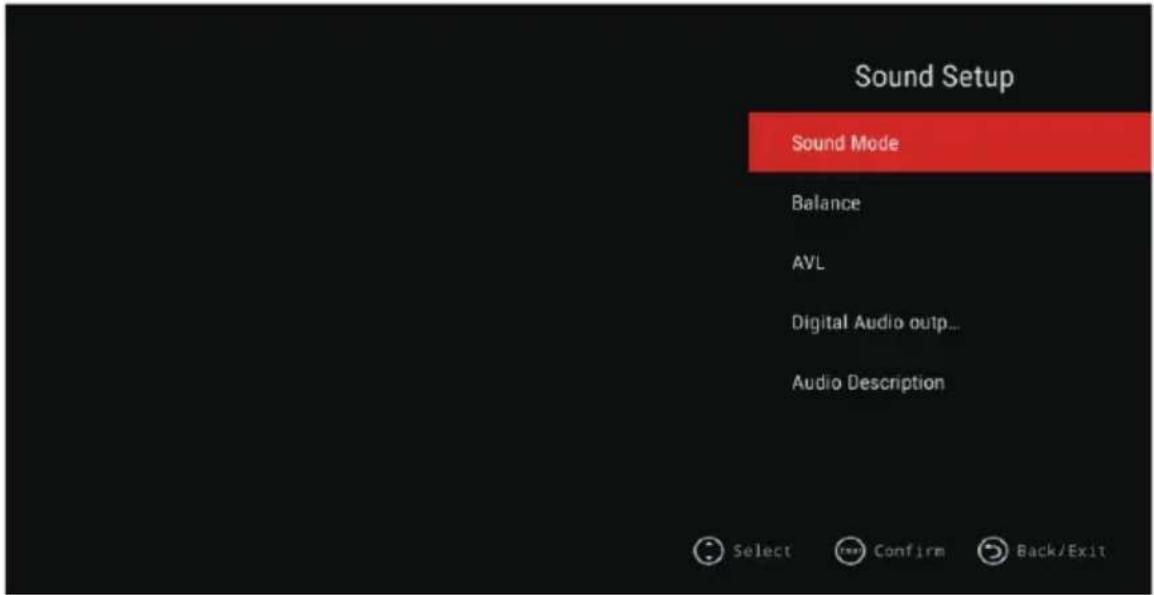
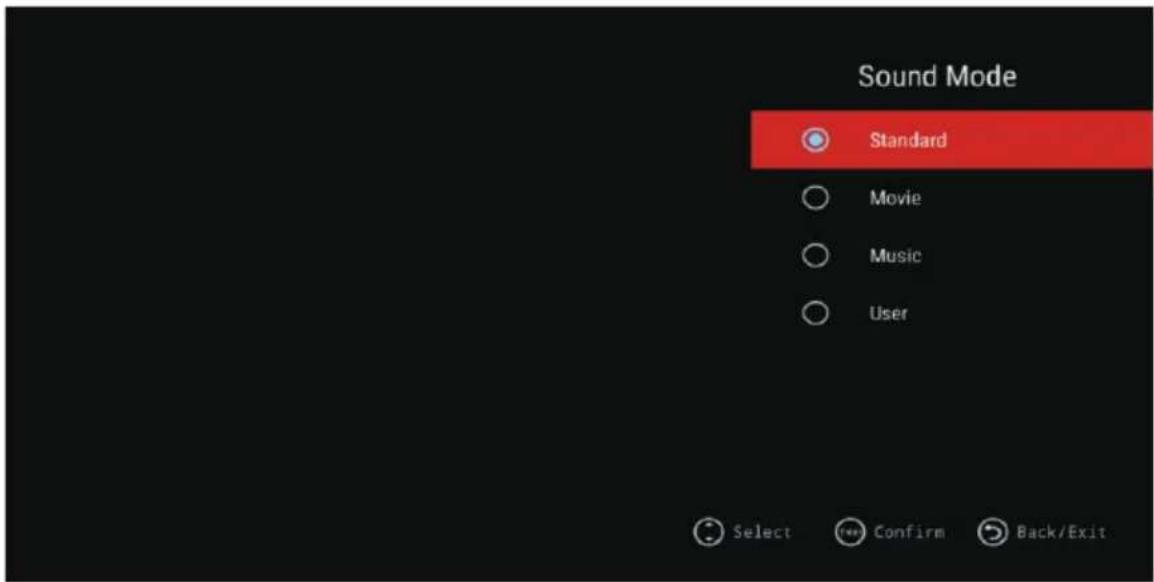
Sound mode
Press ▲/▼ button to select Sound mode, and then press ENTER button to confirm. (Available Sound mode: Standard, Movie, Music, User).
You can adjust the value of bass and treble, when the sound is in User mode.
Main Menu
Balance
Press ▲/▼ button to select Balance, then press ◀/▶ button to adjust. Then press EXIT button to return back the previous menu directly.
AVL
Press ▲/▼ button to select AVL, then press ENTER button to adjust. Then press EXIT button to return back the previous menu directly.
Digital Audio output
Press ▲/▼ button to select SPDIF Output, then press ENTER button to confirm(Available SPDIF mode: AUTO, PCM, OFF)
Then press ENTER button or ▶ button to enter and press ◀/▶ button to adjust, then press EXIT button to return back the previous menu directly.
Audio Description
Press ▲/▼ button to select Audio Description then press ENTER button to adjust(Available AD ON/OFF)
When you select AD ON, you can press ◀/▶ button to adjust Mixing Level.
Channel Setup
Press MENU button to display the main menu.
Press ▲/▼ button to select Channel Setup in the main menu, then press ENTER to enter.
Country
Press ▲/▼ button to select Country, and then press ENTER button to confirm
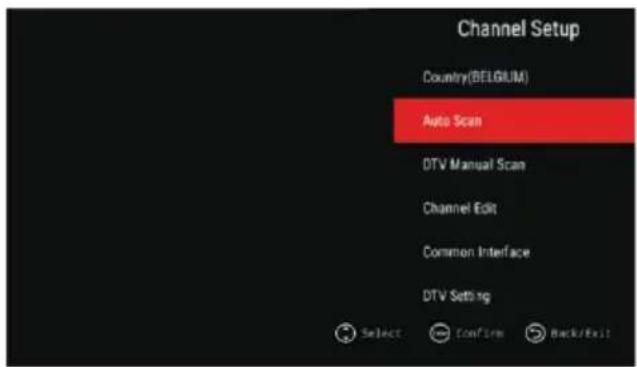
Auto Search
Press ▲/▼ button to select Auto Search, and then press ENTER button to do auto search
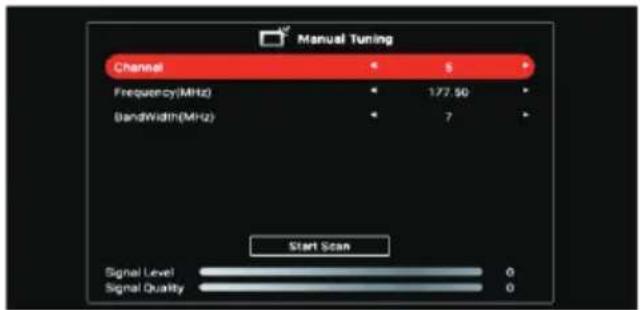
DTV Manual Scan
Press ▲/▼ button to select ,press ◀/▶ button to adjust, and then press EXIT button to return pre.menu ,The menu will appear as follows:
Main Menu
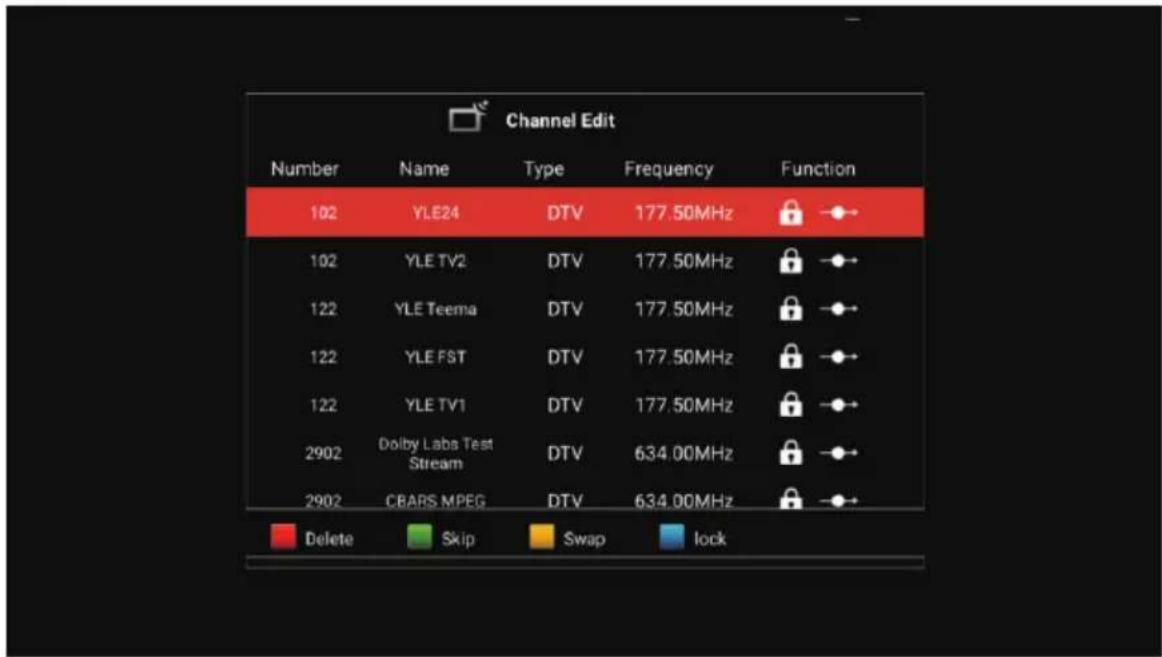
channel Edit
Press ▲/▼ button to select channel Edit, and then press ENTER button to enter, you can use the Four Color keys to do Delete/Skip/Swap/Lock function, The menu will appear as follows:
Common Interface
Press ▲/▼ button to select Common Interface, and then press ENTER button to enter. You can check the CAM/CI card information by this menu.
CAM/CI card (options)
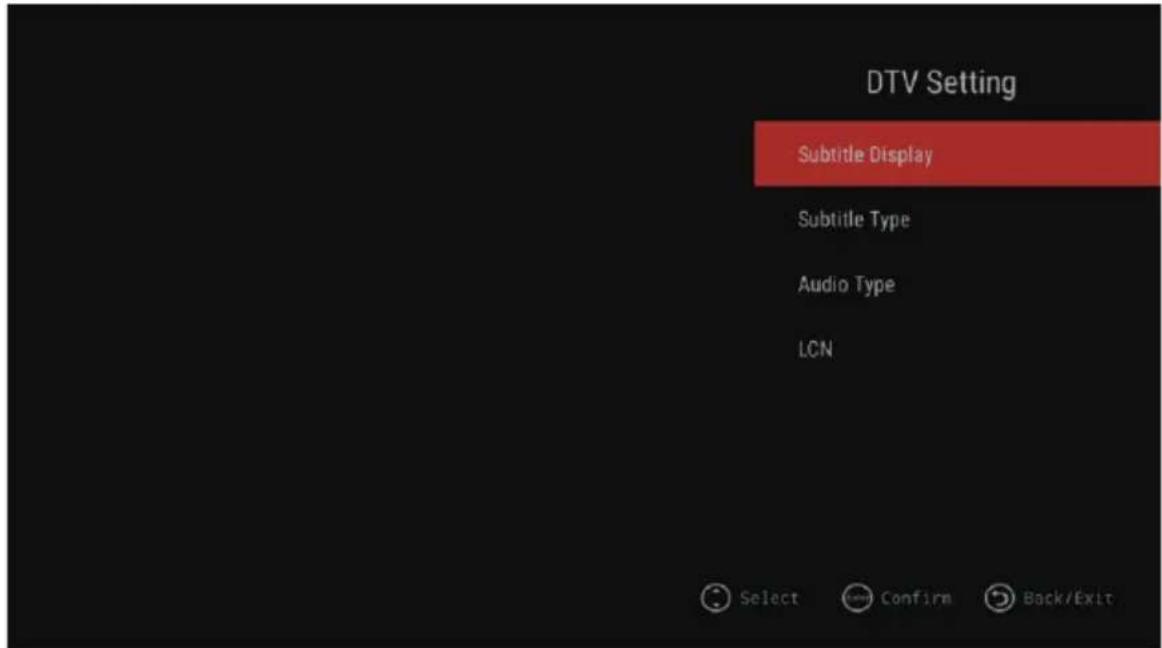
DTV Setting
Press ▲/▼ button to select DTV Setting, and then press ENTER button to enter, The menu will appear as follows:
Main Menu
Subtitle Lang
Press ENTER key to enter the sub-menu, you can Press ENTER Key to select Subtitle ON/OFF,
When the subtitle set to ON, you can select subtitle language by Subtitle language item Press EXIT button to return pre.menu
Subtitle Type
Press ENTER key to enter the sub-menu, you can Press ENTER Key to select Normal subtitle or the subtitle for Hard of Hearing
Press ENTER key to select Prefer Subtitles 1/Prefer Subtitles 2
Press EXIT button to return pre.menu
Audio Type
Press ENTER key to enter the sub-menu, you can Press ENTER Key to select Normal Audio or the Audio for Hard of Hearing
Press ENTER key to select Prefer Audio 1/Prefer Audio 2
Press EXIT button to return pre.menu
LCN
Press ENTER key to enter the sub-menu, you can Press ENTER Key to select LCN ON/OFF Press EXIT button to return pre.menu
Main Menu
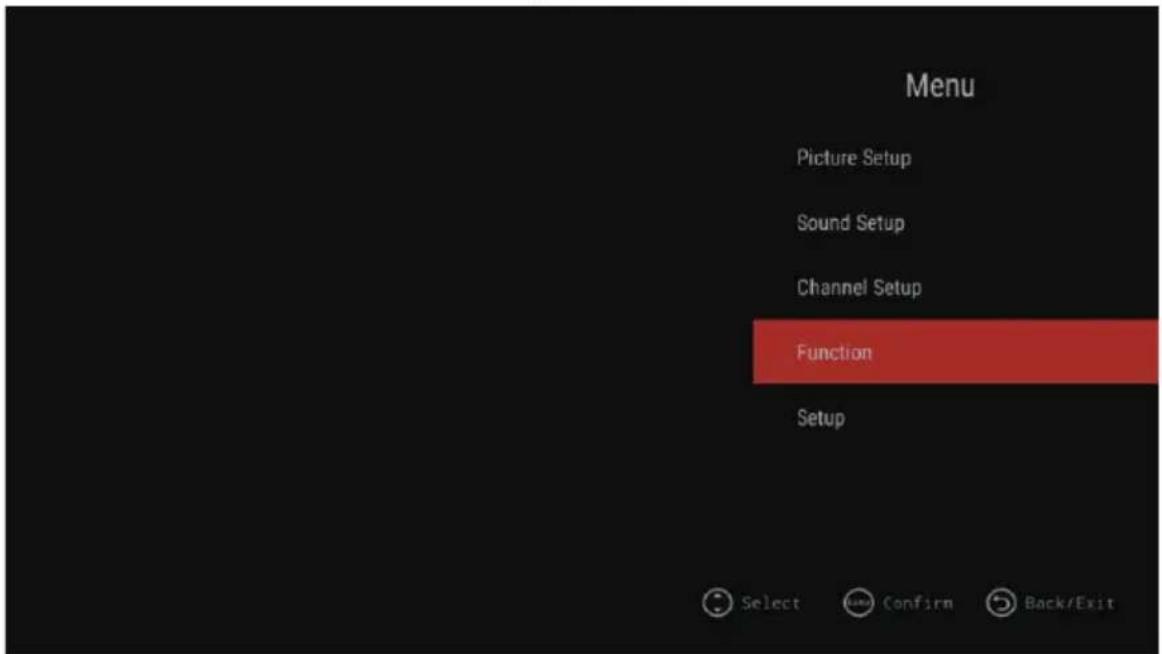
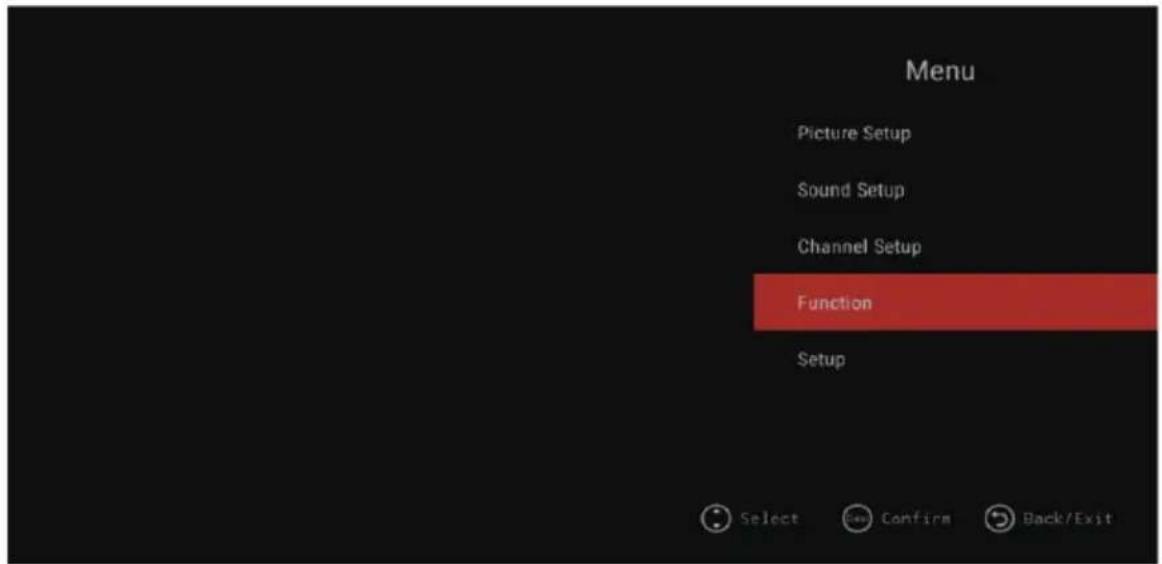
Function
Press ▲/▼ button to select Function and then press ENTER button to enter
Teletext Language
Press ENTER key to enter the sub-menu, you can Press ENTER Key to select the Teletext Language(West Europe/East Europe/Russian/Arabic) Press EXIT button to return pre.menu.
Main Menu
System Lock
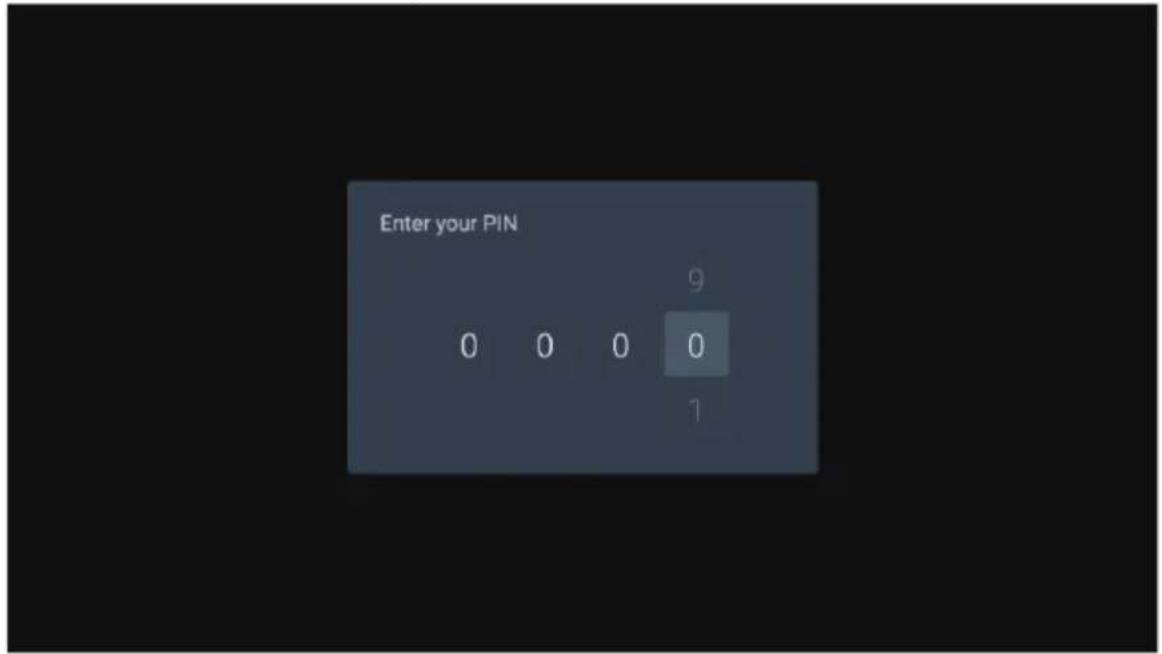
Press ENTER key to enter the sub-menu, you will see a graphic as follows:
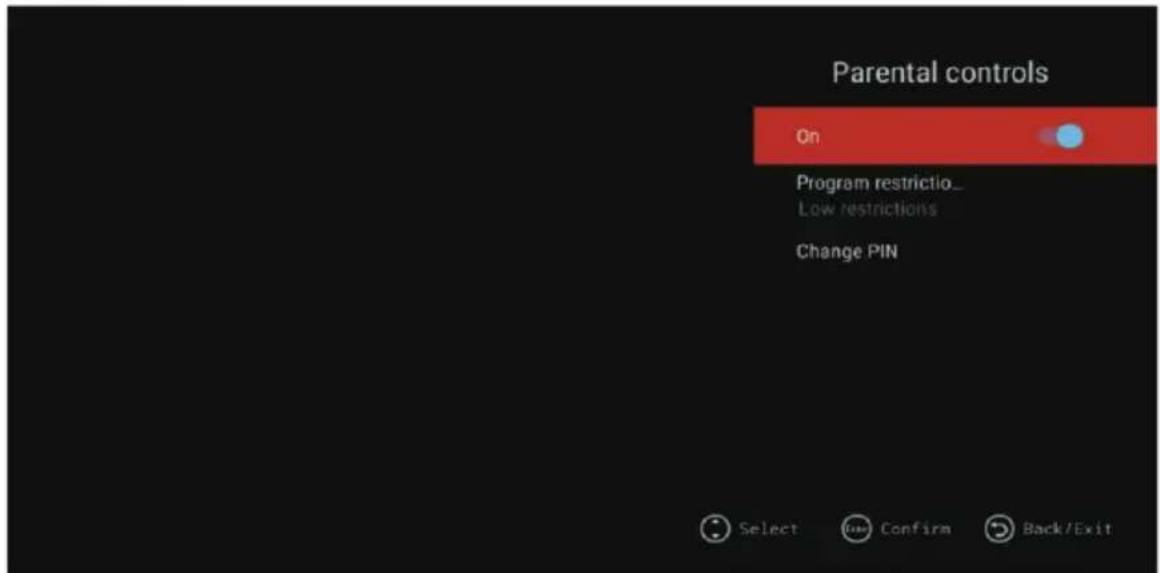
Enter the default PIN "0000", will enter the Parental controls menu.
Press EXIT button to return pre.menu.
Parental controls
Press ▲/▼ button to select the ON/OFF,RATING/Change PIN item and Press ENTER button to confirm
Auto Power Down
Press ENTER key to enter the sub-menu,
Press ▲/▼ button to select Off/1 hour/2 hour/3 hour/4 hour item and then press ENTER button to confirm
Press EXIT button to return pre.menu.
Main Menu
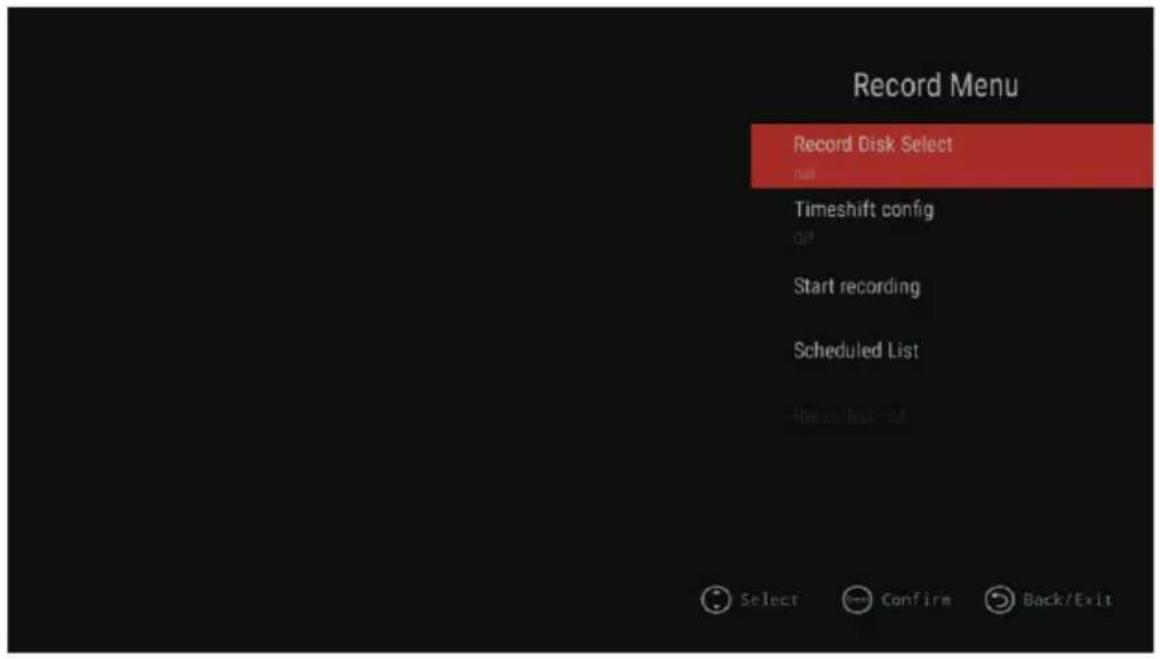
Record Menu(DTV Source only)
Press ENTER key to enter the sub-menu, you will see a graphic as follows:
Press ▲/▼ button to select the items and then press ENTER button to set.
Setup
Main Menu
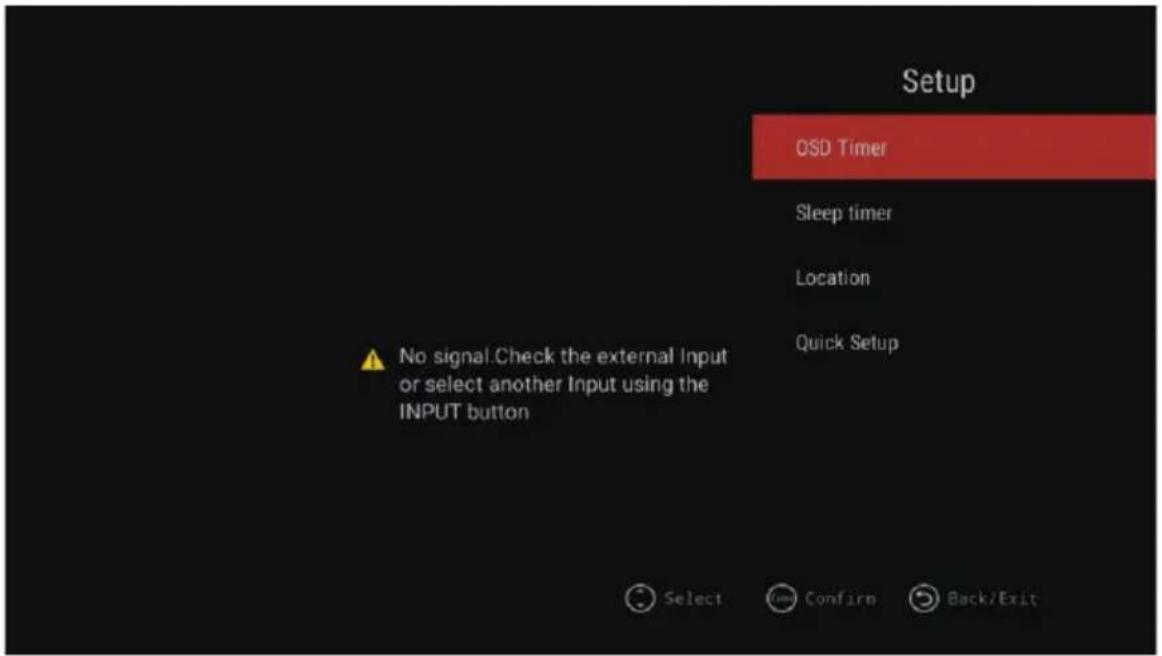
OSD Timer (OSD display time)
Press ▲/▼ button to select OSD Timer
Press ENTER button to enter
Press ▲/▼ to select Off/10s/20s/30s/40s/50s/60s items and then press ENTER button to confirm
Press EXIT button to return pre.menu.
Sleep Timer(power off time)
Press ▲/▼ button to select Sleep Timer
Press ENTER button to enter
Press ▲/▼ to select Off/00:15/00:30/01:00/01:30/02:00/03:00 items and then press ENTER button to confirm
Press EXIT button to return pre.menu.
Location
Press ▲/▼ button to select Location
Press ENTER button to enter and then press ENTER button to change the Home/Store selection
Press EXIT button to return pre.menu.
Quick Setup
Press ◀/▶ button to select
Press ENTER button to Next
Press EXIT button to return pre.menu.
Specification
| Model NO | LED-320 ASMT |
| Resolution | 1366x768 |
| Input Voltage | 100-240V~50/60Hz |
| Standby power consumption | < 0.5W |
| RF | Yes |
| AV | Yes |
| VGA | Yes |
| PC AUDIO | Yes |
| HDMI | Yes |
| USB | Yes |
| COAX | Yes |
| RJ45 | Yes |
| CI | Yes |
| EARPHONE | Yes |
| Audio Output(RMS) | 2x7W |
| Work Temperature | 5°C~45°C |
| Work Humidity | 20%~80% |
| Storage Temperature | -15°C~45°C |
| Storage Humidity | 10%~80% |
Troubleshooting
Before calling service personnel, please check the following troubleshooting guide. If any problem still persists, unplug the TV set and call for servicing.
| Symptom | Check List |
| No picture, no sound | Check if the main power of the TV is turned on.Check the connection of the power cord and/or other cables. |
| Normal picture, no sound | Check the volume level.Check if the button has been pressed or not.Check the connection of the external equipment. |
| Poor color or no color, normal sound | Check the value level of "Brightness" and "Contrast" in PICTURE menu. |
| Multiple images, normal sound | Check the antenna connection and direction.Fine tuning the TV.Check the connection of the external equipment.The TV station may have broadcast difficulties. Try another channel. |
| Intermittent interference | Check if the source of interference is shield well.Remove those kinds of electrical devices away from the TV. |
| Remote control does not work | Check if the batteries are installed correctly.The batteries may be exhausted. Replace them with new ones.Remove all obstruction between the remote control and the remote control sensor.Ensure there is no strong light shining on the remote control sensor. |
| "No Signal" or "Unsupported Signal"appears on the screen (RGB mode only) | Check if the display resolution and frequency from your PC is a valid mode for the TV. Refer to the recommended RGB input signal chart |
| Image not centered (PC mode only) | Adjust the "H Position" and "V Position" in the SETUP menu. |
WARNING
To prevent the spread of fire, keep candles or other open flames away from this product at all times.


This equipment is a Class II or double insulated electrical appliance. It has been designed in such a way that it does not require a safety connection to electrical earth.
If at any time in the future you should need to dispose of this product please note that: Waste electrical products should not be disposed of with household waste. Please recycle where facilities exist. Check with your Local Authority or retailer for recycling advice. (Waste Electrical and Electronic Equipment Directive)
- Contents
- Stand Installation
- Wall-mounting the device
- WARNING
- Important Safety Instructions
- Supplied Accessories
- Functional Overview
- Remote Control
- Teletext Function:
- NOTE:
- Home Page
- What's New
- APPS
- Sports&Music
- Setting
- Settings
- Network Setting
- Time Setting
- Common
- Language Setting
- Application Manage
- OTA Update
- System Recovery
- About TV
- Media Player
- Photo
- Music
- Video
- Applications
- TV Apps
- INPUT SOURCE
- Main Menu
- Picture Mode
- Colour Temperature
- DNR
- Aspect Ratio
- Sound Setup
- Sound mode
- Balance
- AVL
- Digital Audio output
- Audio Description
- Channel Setup
- Country
- Auto Search
- DTV Manual Scan
- channel Edit
- Common Interface
- DTV Setting
- Subtitle Lang
- Subtitle Type
- Audio Type
- LCN
- Function
- Teletext Language
- System Lock
- Parental controls
- Auto Power Down
- Record Menu(DTV Source only)
- Setup
- OSD Timer (OSD display time)
- Sleep Timer(power off time)
- Location
- Quick Setup
- Troubleshooting
Brand : Grunkel
Model : LED-320 ASMT
Category : Television