
M-Patch 2 - Audio accessory JBL - Free user manual and instructions
Find the device manual for free M-Patch 2 JBL in PDF.


| Product Type | Audio Patchbay / Accessory |
| Brand | JBL |
| Model | M-Patch 2 |
| Connectors | 1/4" TRS jacks (balanced) |
| Number of Channels | 2 (Stereo) |
| Signal Routing | Normalled, half-normalled, or thru |
| Dimensions (W x D x H) | 10 cm x 8 cm x 4 cm (approx.) |
| Weight | 150 g (approx.) |
| Power Supply | Passive (no power required) |
| Chassis Material | Aluminum alloy |
| Frequency Response | 20 Hz – 20 kHz |
| Signal-to-Noise Ratio | > 100 dB |
| Total Harmonic Distortion | < 0.005% |
| Crosstalk Isolation | > 80 dB |
| Maximum Input Level | +20 dBu |
| Maximum Output Level | +20 dBu |
| Input Impedance | 10 kΩ |
| Output Impedance | 100 Ω |
| Operating Temperature | 0°C to 40°C |
| Recommended Maintenance | Clean with dry cloth; avoid liquids |
| Safety Compliance | CE, FCC, RoHS |
| Replacement Parts | None user-serviceable; contact JBL support |
| Warranty | 2 years (limited) |
Frequently Asked Questions - M-Patch 2 JBL
User questions about M-Patch 2 JBL
0 question about this device. Answer the ones you know or ask your own.
Ask a new question about this device
Download the instructions for your Audio accessory in PDF format for free! Find your manual M-Patch 2 - JBL and take your electronic device back in hand. On this page are published all the documents necessary for the use of your device. M-Patch 2 by JBL.
USER MANUAL M-Patch 2 JBL
Passive Stereo Controller / Switcher
Owners Manual

PROFESSIONAL
HARMAN

Important Safety Instructions
CAUTION: To reduce the risk of electrical shock, do not remove the cover or rear panel of this unit. No user serviceable parts inside. Please refer servicing to qualified personnel only. WARNING: To reduce the risk of fire or electrical shock, do not expose this appliance to rain or moisture.
DETAILED SAFETY INSTRUCTIONS:
All safety and operation instructions of this manual should be read and adhered to before operation.
Retain Instructions:
Please retain all safety and operating instructions for future reference.
Follow Instructions:
All operation and user instructions should be followed.
Water, Liquid and Moisture:
The appliance should not be used near water, rain or other liquids. Make sure that no liquid can leak, spill or otherwise seep into the appliance.
Ventilation:
Please place the appliance so no obstacles interfere or impede the flow of air through the ventilation openings.
Heat:
The appliance should be situated away from other heat sources such as heaters, radiators, ovens, or other appliances that produce heat.
Power Source:
Make sure your appliance is set to the correct voltage for the country in which it will be use before switching the device ON.
Grounding and Polarization:
Precautions should be taken so that the grounding or polarization means of an appliance is not defeated.
Power-Cord Protection:
Power supply cords should be routed so that they are not likely to be walked on, pinched, damaged, worn, or rubbed by any other device or obstacle.
Cleaning:
The appliance should be cleaned only with a light soft cloth. Do not use any damaging or corrosive products on the unit.
Periods of inactivity:
The power cord of the appliance should be unplugged from the outlet when left unused for a long period of time or in case a lightning storm occurs.
Damage Requiring Service:
The appliance should be serviced by qualified service personnel when:
• The power supply cord or the plug has been damaged; or
- Objects have fallen, or liquid has been spilled into the appliance; or
• The appliance has been exposed to rain; or
- The appliance does not appear to operate normally or exhibits a marked change in performance; or
- The appliance has been dropped, or the enclosure damaged.
Servicing:
The user should not attempt to service the appliance beyond that is described in the Operating Instructions.
All other servicing should be referred to qualified service personnel.
MAINS VOLTAGE
The M-Patch 2 can be used with voltages ranging from 100V AC to 250V AC, please make sure that you have selected the correct voltage range on the supplied power supply before switching the unit ON. Any damage occurring as a result of incorrect voltage.
INTRODUCTION
Thank you for selecting the JBL The M-Patch 2. This product was designed to deliver optimal performance, functionality and years of reliable operation. To enjoy all the benefits of the M-Patch 2, please take a moment to read this document.
The M-Patch 2 is a versatile, high quality unit designed for a broad range of professional audio applications. With a compliment of professional connections and controls, the M-Patch 2 serves as the master volume control and audio switch in rack-mount, desk-top and portable recording, broadcast, video post production, and sound reinforcement systems. Installed in desktop computer audio production systems, the M-Patch 2 provides essential capabilities often missing from those systems.
The M-Patch 2 is essentially a multi-channel stereo attenuator using passive circuitry that maintains the integrity of the signal path sending pure-clean audio to your speakers and connected receiving devices. Housed in a rugged metal enclosure, the M-Patch 2 is designed to provide years of reliable performance in professional audio facilities where ever its versatile features are needed. Desktop media suites, mixer-less DAW and MIDI systems, professional multi-channel installations, distributed sound systems, or any other audio and video post production environments, the M-Patch 2 adds high quality zone and/or channel control wherever it's needed.
NOTE: The sound pressure level (SPL) produced by the audio system is dependent on the specific speakers or headphones and the power amplifier in the system. Listening at high volumes can cause damage to your ears and sound reproduction equipment. Therefore, exercise caution when adjusting M-Patch 2 volume controls.
THE DESIGN CONCEPT
To deliver a high level of performance and long-term reliability the M-Patch 2 design leverages superior components and layout.
All inputs and outputs are secured firmly to the exterior chassis housing. This ensures robust quality and confidence in performance under all conditions.
M-Patch 2 Main Features
• High quality, passive volume attenuator
- 2 x Input channels, 2 x Output channels
- Combination XLR/1/4-inch (6.5mm) TRS, RCA, & 3.5mm input connectors
• XLR outputs (balanced or unbalanced)
• Mono/Stereo summing switch
• System mute function
• Built in headphone amplifier
• Quality components and rugged construction
- Desktop or Rack-mountable installation with included rack-mount hardware.
- External power supply (Only required for operation of headphone amplifier)
INSTALLATION
The M-Patch 2 packaging was designed to product the product from shipping damage. Nevertheless, we recommend that you carefully examine the packaging and its contents for any signs of physical damage, which may have occurred in transit. If, upon arrival, the units exhibits damage, please notify your dealer and the shipping company immediately.
Desktop or Rack-mount installation
The M-Patch 2's compact size enables it to sit comfortably on your desktop. We also include mounting hardware which enable stand mounting and mounting in standard 19" professional equipment racks.
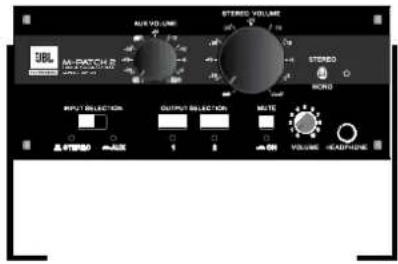
Desktop mount configuration
For desktop angled mounting simply connect the included rack/stand mounting brackets in an upright manner to each side of the M-Patch 2 using the included screws. Multiple screw positions are available on each side of the M-patch 2 which allow a selection of up to six (6) different angled positions. To provide stability and protect your desk top, the included rubber feet should be attached to the mounting brackets as shown.
* Note: Please take into consideration your particular setup and cable arrangement when deciding on mounting your M-Patch with the highest degree of angle in relation to your desktop surface. You will need to ensure that you have enough space to connect your cables!
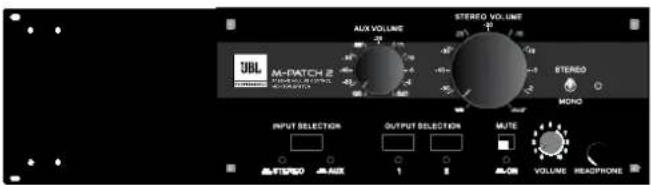
Rack-mount configuration
If you would like to rack-mount the M-Patch 2, simply connect the supplied rack/ stand ears to each side of the M-Patch 2 using the included screws. This allows you to rack-mount the unit in a standard 19" professional rack.
PLACEMENT
The JBL M-Patch 2 has an electronic circuitry inside as well as isolation transformers. Be sure that there is enough air space around the unit for cooling. To avoid overheating, please do not place the units on top of high temperature devices such as power amplifiers or in close proximity to devices that transmit or receive radio frequencies.

M-Patch 2 Rear Panel
CONNECTIONS
The M-Patch 2 features two (2) separate input channels named "Aux" & "Stereo". The connections are found on the rear panel. (Input section on rear panel of M-Patch 2).
* Note: The M-Patch 2 accepts mic or line level input signals. Do not connect your power amplifier outputs to the M-Patch 2 inputs!
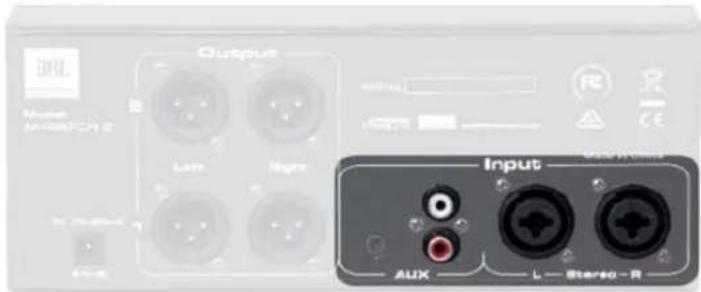
Stereo Inputs
The Stereo main inputs feature XLR bal/unbalanced combo connectors for Left &Right input signal. This input is perfect for connection to your main audio interface device (example; MBox 2, etc). Simply connect your cables directly to the unit with either XLR or 1/4" (6.5mm) TS/TRS cables.
Aux Inputs
The Aux input channel features 2 x RCA (L&R) and a stereo 1/8-inch (3.5 mm) mini-jack input. These connections are perfect for devices such as a CD players line output or an 1/8-inch (3.5mm) stereo mini-jack connection from a computer headphone jack or standard soundcard.
* Note: You can connect up to three different devices to the three physical connector sets simultaneously. The input selector on the front panel allows selection of the desired inputs!
Analog Audio Outputs
The M-Patch 2 features two (2) pairs (Left and Right) of XLR balanced analog output connectors on the rear panel. These are labeled "1" & "2".
Connect these outputs to your destination device (active monitors, digital recorder, or wherever you need the attenuated output signal sent).
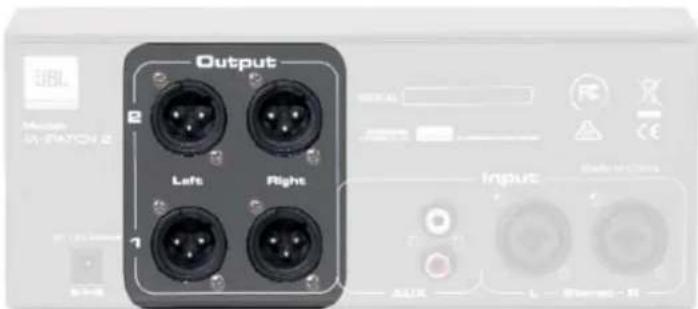
* Note: It is possible to activate or deactivate each desired output pair using the output selector switches on the front panel. It is possible to have both 1&2 outputs active at the same time. This is very useful when simultaneously connecting the outputs to a recording device and a monitoring system.

Power Connection
Power to the M-Patch 2 is required only if you wish to use the headphone amplifier, or view the illuminated led indicator lamps.
The included power supply can be connected from mains power to the power connector socket located on the rear panel of the M-Patch 2.
The Blue led on the front panel (next to the mono/stereo control switch) will illuminate when the external power supply is connected and mains power is present.
* Note: All passive attenuation functions operate fully without the connection of the power supply. This enables portable use of the M-Patch 2 without restriction.
FRONT PANEL CONTROLS

Stereo/Aux Input Selection Control
The input selection controls on the front panel of the M-Patch 2 allow selection of either Stereo or Aux input source material to be routed to the output pairs for immediate listening and attenuation control.
Select the "stereo" position to activate the main stereo input source connected to the Combination XLR/1/4-inch (6.5mm) TRS inputs, or select "Aux" position to activate the RCA and 1/8-inch (3.5mm) stereo mini-jack input source. NOTE: Do not connect signal sources to the RCA and 3.5 mm stereo mini jack simultaneously.
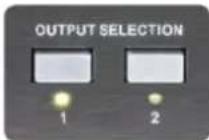
1&2 Output Selector Switch
The 1/2 output switch on the front panel determines the balanced XLR output pair, either 1 or 2, that will be used to monitor the input signal currently selected using the STEREO/AUX switch.
Press the desired switch to toggle between output destinations.
* Note: If you have more than one pair of monitor speakers you could create a perfect switching facility for toggling between near-eld and lager format active room monitors.
Input Volume Rotary Attenuator Controls
The Aux input volume rotary attenuator control on the front panel of the M-Patch 2 adjusts the level of monitored output signal for devices connected to the Aux inputs (either the RCA or 1/8-inch, 3.5mm stereo min-jack) of the M-Patch 2.
The stereo input volume attenuator on the front panel of the M-Patch 2 adjusts the level of monitored output signal for devices connected to the stereo inputs (Combination XLR/1/4-inch, 6.5mm TRS connectors) of the M-Patch 2.

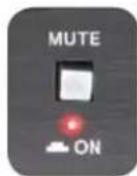
On/Off Mute Switch
The on/off mute switch on the front panel enables and disables the M-Patch 2 built in mute function. Audio signal output is disabled when the mute switch is in a depressed position.
The mute led will illuminate when the mute function is active.
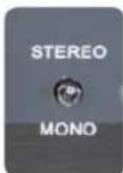
Mono/Stereo Summing Switch
The mono/stereo summing switch on the front panel of the M-Patch 2 allows you combine the Left and Righ channels of a stereo signal and listen to them in Mono. This can be very handy when testing your audio for certain issues such as phase cancellation, or mixing
program for AM radio, etc.
Select the desired mode of operation by positioning the mono/stereo switch in the up or down position.
Headphone Amplifier Volume Control and Output Connector
A headphone amplifier is provided to allow monitoring of the audio signal selected by the 'Input Selection' control switches.
Simply connect a pair of headphones to the 1/4" (6.5mm) TRS headphone connector socket and use the rotary headphone volume control knob to achieve the desired setting.
* Note: Use of the headphone amplifier requires connection of the included external power supply.

APPLICATIONS
Using the M-Patch 2
You can use M-Patch 2 to reduce the volume of analog audio signals in a range of applications. With its high-quality potentiometer, the M-Patch 2 passes signal more accurately, and sounds better than most built-in volume controls. Use the M-Patch 2 to attenuate the output of line level devices such the stereo outputs of a mixer or the outputs of a microphone preamplifier or equalizer. Inserted in a 5.1 surround sound system, the M-Patch 2 can be used to attenuate the left and right surround channels, and use three M-Patch 2 units to achieve a desired balance of all six channels. Another use might be to trim the levels of a 5.1 or greater multi-channel monitor system -- either one pair of channels, or two, or all of them. Attenuate high level signals to prevent clipping of A/D converters, and reduce the output of a D/A converter to prevent overload of down-stream devices in the signal path. It is also useful as a local volume control for distributed audio systems. The possibilities are endless!
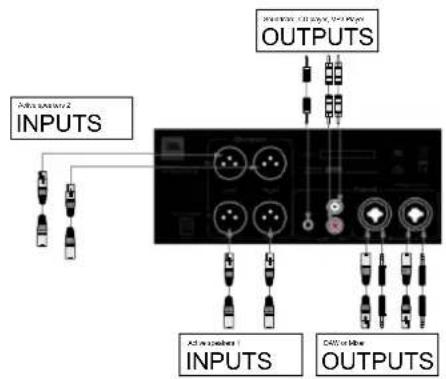
How to connect the M-Patch 2
Computer Audio production systems...
M-Patch 2 provides essential monitor volume controls and switches missing from computer audio systems.
Simple steps for your home workstation...
- Perform the following steps with your speaker system turned off and the Volume controls of the M-Patch 2 set to full attenuation - the full counter clockwise positoin. Typically you should connect the output of your computer soundcard or audio interface to one set of the M-Patch 2 input connectors, for example the L&R Stereo combination XLR/1/4-inch (6.5mm) connectors. You could also connect multiple connections at the same time if required. Then, connect and monitor an additional device such as a CD or personal music player using the remaining set of connectors - RCA or 1/8-inch (3.5mm) mini. This enables you to selectively monitor your computer output and your music player and adjust the volume of each to achieve a good balance.
- Connect XLR cables from the XLR L&R 1 outputs of the M-Patch 2 to your active monitors or the amplifier that powers the monitors. If you have two different monitor pairs you can connect the second pair to L&R Output 2.
- Advance the volume controls of your monitors or amplifier, set your software & software volume control panel to Zero dB (full gain). Restore power to your speaker system. With program material playing, slowly advance the M-Patch 2 Volume controls to produce the desired volume, and use the M-Patch 2 on your desktop to control your monitor level.
Simple, effective, transparent!
Audio Inputs: Input Connectors 1 2 x Combination XLR / 1/4-inch (6.5mm)
Maximum Input Level > +26dB
Input Connectors 2 1 x stereo RCA pair (L&R)
Input Connectors 3 1 x stereo 1/8 inch (3.5mm) jack
Audio Outputs: Output Connectors 1 2 x XLR output pairs (1-L&R, 2-/L&R)
Headphone Output: Output Connectors 1 x 1/4" TRS stereo output
Output Level >+26dB
Impedance 0-5K ohms
Headphone Output 1 x 1/4 in (6.5mm) TRS stereo output
Headphone Output Level 320mW into 32 Ω
Performance: Frequency Response 20Hz - 20Hz +/- 0.5dB
Signal-To-Noise better than -120dB
Channel Cross Talk better than - 80dB
Distortion <0.0004%
Power Requirements: Included Power Supply DC12-16V, 200 ma
Physical: Dimensions (W x D x H) 8.7 in x 4.7 in x 3.4 in (220 mm x 120 mm x 86 mm)
Weight 2.2 lbs (1.0 kg)

flowchart
graph TD
    subgraph "BALANCED STEREO"
        direction TB
        A1["RIGHT COMBO INPUT"] --> B1["3"]
        B1 --> C1["AUX VOLUME"]
        C1 --> D1["STEREO VOLUME"]
        D1 --> E1["STEREO/AUX SELECT"]
        E1 --> F1["STEREO/MONO"]
    end

    subgraph "AUX MONO INPUT"
        direction TB
        A2["RIGHT STEREO INPUT"] --> B2["3"]
        B2 --> C2["AUX VOLUME"]
        C2 --> D2["STEREO/VOLUME"]
        D2 --> E2["STEREO/AUX SELECT"]
        E2 --> F2["STEREO/MONO"]
    end

    subgraph "BALANCED STEREO"
        direction TB
        A3["LEFT COMBO INPUT"] --> B3["3"]
        B3 --> C3["AUX VOLUME"]
        C3 --> D3["STEREO/VOLUME"]
        D3 --> E3["STEREO/AUX SELECT"]
        E3 --> F3["STEREO/MONO"]
    end

    subgraph "MUTE"
        direction TB
        A4["OUTPUT 2"] --> B4["3"]
        B4 --> C4["OUTPUT 2"]
        C4 --> D4["OUTPUT 2"]
        D4 --> E4["OUTPUT 2"]
        E4 --> F4["OUTPUT 2"]
        F4 --> G4["OUTPUT 1"]
        G4 --> H4["OUTPUT 1"]
    end

    I1["HEADPHONE"] --> J1["3"]
    J1 --> K1["OUTPUT 2"]
    K1 --> L1["OUTPUT 2"]
    L1 --> M1["OUTPUT 2"]
    M1 --> N1["OUTPUT 2"]
    N1 --> O1["OUTPUT 1"]
    O1 --> P1["OUTPUT 1"]

PROFESSIONAL
HARMAN
TECHNICAL SUPPORT
If you have technical questions about your product or are experiencing difficulties we are happy to help. You can contact JBL Pro support by sending an email to: support@jblpro.com or by calling 1 (800) 8JBLPRO (800.853.5776) between the hours of 8:00 am and 5:00 pm Pacific Standard Time.
REPAIRS
JBL Professional has an extensive network of authorized repair facilities in the US. To view service locations listed by state, visit the Harman Professional Service Website at http://www.harmanpro.com/service_centers. For factory repair options you must obtain a service return authorization before returning your product for repair. Please send an email request to: service.us@jblpro.com.
PRODUCT REGISTRATION:
Register your product online at www.jblpro.com/registration
On The World Wide Web:
www.jblpro.com
PROFESSIONAL CONTACTS, OUTSIDE THE USA:
Contact the JBL Professional Distributor in your area. A complete list of JBL Professional international distributors is provided at our U.S.A. website: www.jblpro.com
EN DEHORS DES ETATS-UNIS:
Product Warranty Information
The JBL Limited Warranty on professional loudspeaker products (except for enclosures) remains in effect for five years from the date of the first consumer purchase. JBL amplifiers are warranted for three years from the date of original purchase. Enclosures and all other JBL products are warranted for two years from the date of original purchase.
WHO IS PROTECTED BY THIS WARRANTY?
Your JBL Warranty protects the original owner and all subsequent owners so long as: A.) Your JBL product has been purchased in the Continental United States, Hawaii or Alaska. (This Warranty does not apply to JBL products purchased elsewhere except for purchases by military outlets. Other purchasers should contact the local JBL distributor for warranty information.); and B.) The original dated bill of sale is presented whenever warranty service is required.
WHAT DOES THE JBL WARRANTY COVER?
Except as specified below, your JBL Warranty covers all defects in material and workmanship. The following are not covered: Damage caused by accident, misuse, abuse, product modification or neglect; damage occurring during shipment; damage resulting from failure to follow instructions contained in your Instruction Manual; damage resulting from the performance of repairs by someone not authorized by JBL; claims based upon any misrepresentations by the seller; any JBL product on which the serial number has been defaced, modified or removed.
WHO PAYS FOR WHAT?
JBL will pay all labor and material expenses for all repairs covered by this warranty. Please be sure to save the original shipping cartons because a charge will be made if replacement cartons are requested. Payment of shipping charges is discussed in the next section of this warranty.
HOW TO OBTAIN WARRANTY PERFORMANCE
If your JBL product ever needs service, write or telephone us at JBL Incorporated (Attn: Customer Service Department), 8500 Balboa Boulevard, PO. Box 2200, Northridge, CA 91329 (818/893-8411). We may direct you to an authorized JBL Service Agency or ask you to send your unit to the factory for repair. Either way, you'll need to present the original bill of sale to establish the date of purchase. Please do not ship your JBL product to the factory without prior authorization. If transportation of your JBL product presents any unusual difficulties, please advise us and we may make special arrangements with you. Otherwise, you are responsible for transporting your product for repair or arranging for its transportation and for payment of any initial shipping charges. However, we will pay the return shipping charges if repairs are covered by the warranty.
LIMITATION OF IMPLIED WARRANTIES
ALL IMPLIED WARRANTIES, INCLUDING WARRANTIES OF MERCHANTABILITY AND FITNESS FOR PARTICULAR PURPOSE, ARE LIMITED IN DURATION TO THE LENGTH OF THIS WARRANTY.
EXCLUSION OF CERTAIN DAMAGES
JBL'S LIABILITY IS LIMITED TO THE REPAIR OR REPLACEMENT, AT OUR OPTION, OF ANY DEFECTIVE PRODUCT AND SHALL NOT INCLUDE INCIDENTAL OR CONSEQUENTIAL DAMAGES OF ANY KIND. SOME STATES DO NOT ALLOW LIMITATIONS ON HOW LONG AN IMPLIED WARRANTY LASTS AND/OR DO NOT ALLOW THE EXCLUSION OF INCIDENTAL OR CONSEQUENTIAL DAMAGES, SO THE ABOVE LIMITATIONS AND EXCLUSIONS MAY NOT APPLY TO YOU. THIS WARRANTY GIVES YOU SPECIFIC LEGAL RIGHTS, AND YOU MAY ALSO HAVE OTHER RIGHTS, WHICH VARY, FROM STATE TO STATE.
JBL Professional
8500 Balboa Boulevard
Northridge, CA 91329 USA
Visit us online at www.jblpro.com
Hear the truth.

Part Number: 5062310
- Important Safety Instructions
- DETAILED SAFETY INSTRUCTIONS:
- Retain Instructions:
- Follow Instructions:
- Water, Liquid and Moisture:
- Ventilation:
- Heat:
- Power Source:
- Grounding and Polarization:
- Power-Cord Protection:
- Cleaning:
- Periods of inactivity:
- Damage Requiring Service:
- Servicing:
- MAINS VOLTAGE
- INTRODUCTION
- THE DESIGN CONCEPT
- M-Patch 2 Main Features
- INSTALLATION
- Desktop or Rack-mount installation
- PLACEMENT
- CONNECTIONS
- Stereo Inputs
- Aux Inputs
- Analog Audio Outputs
- Power Connection
- FRONT PANEL CONTROLS
- Stereo/Aux Input Selection Control
- 1&2 Output Selector Switch
- Input Volume Rotary Attenuator Controls
- On/Off Mute Switch
- Mono/Stereo Summing Switch
- Headphone Amplifier Volume Control and Output Connector
- APPLICATIONS
- Using the M-Patch 2
- Computer Audio production systems...
- Simple steps for your home workstation...
- Simple, effective, transparent!
- TECHNICAL SUPPORT
- REPAIRS
- PRODUCT REGISTRATION:
- On The World Wide Web:
- PROFESSIONAL CONTACTS, OUTSIDE THE USA:
- EN DEHORS DES ETATS-UNIS:
- Product Warranty Information
- WHO IS PROTECTED BY THIS WARRANTY?
- WHAT DOES THE JBL WARRANTY COVER?
- WHO PAYS FOR WHAT?
- HOW TO OBTAIN WARRANTY PERFORMANCE
- LIMITATION OF IMPLIED WARRANTIES
- EXCLUSION OF CERTAIN DAMAGES
- JBL Professional
Brand : JBL
Model : M-Patch 2
Category : Audio accessory