Cube KA5654DW - Clock Karlsson - Free user manual and instructions
Find the device manual for free Cube KA5654DW Karlsson in PDF.


| Product Type | Clock |
| Model | Cube KA5654DW |
| Brand | Karlsson |
| Design | Cube-shaped, minimalist modern |
| Dimensions (approx.) | 10 x 10 x 10 cm (3.9 x 3.9 x 3.9 inches) |
| Weight | ~300 g (0.66 lbs) |
| Power Source | 1 x AA battery (not included) |
| Movement | Quartz, precise and silent sweep |
| Display | Analog clock face with hour and minute hands |
| Face Design | White dial with black numerals and hands |
| Case Material | Plastic or resin |
| Mounting Type | Tabletop or wall-mountable (keyhole on back) |
| Color | White (DW = white) |
| Features | Silent tick, easy time-setting knob on back |
| Accuracy | +/- 1 minute per month |
| Battery Life | Approximately 12 months with quality battery |
| Maintenance | Clean with dry soft cloth; avoid liquids and abrasives |
| Safety Warning | Keep away from water and extreme temperatures |
| Spare Parts / Repairability | Not user-serviceable; replacement recommended |
| Warranty | 2 years (EU typical) |
Frequently Asked Questions - Cube KA5654DW Karlsson
User questions about Cube KA5654DW Karlsson
0 question about this device. Answer the ones you know or ask your own.
Ask a new question about this device
Download the instructions for your Clock in PDF format for free! Find your manual Cube KA5654DW - Karlsson and take your electronic device back in hand. On this page are published all the documents necessary for the use of your device. Cube KA5654DW by Karlsson.
USER MANUAL Cube KA5654DW Karlsson
- Time Display Mode: 12 or 24 hour time display
- Calendar Mode: Display month and date
- Alarm Mode: Triple alarm time setting
- Temperature Mode: Range from 0°C - 50 °C (32 °F - 122 °F)
- 3 Display Modes: dp-1, dp-2 and dp-3
- Power saving mode: Activate LED display by sound or touch
- Power supply: 3xAAA Batteries or USB Cable 3Vbuilt-in battery to keep time memory
FULL Screen Display
Operating Instructions:
After power on, LED turns on with a beeping sound and will enter the time setting mode.
Under time display mode, press the SET button to check below in sequence
Time --> Calendar --> A1 (Alarm 1), A2 (Alarm 2), A3 (Alarm 3).
Time Setting:
- Under the Time Mode, press and hold the SET button for 2 seconds to set the clock.
- Press the SET button repeatedly to set the time in the following sequence :
12/24hr switch over --> Hour --> Minute --> Exit - Press the UP / DOWN buttons to adjust the hour and minute digits. Press and hold the UP / DOWN buttons to speed up the scanning of the digits.
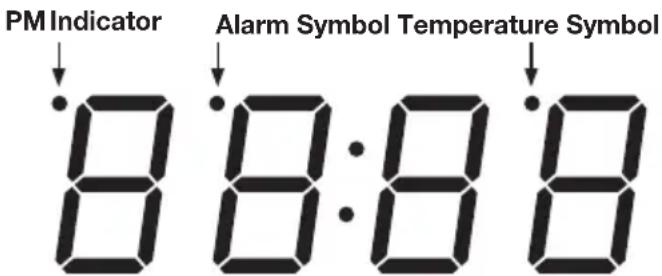
- When the 12 hour format is set, the PM indicator on the top left corner will appear in the afternoon
- The setting mode will return to time display mode if there is no operation for 15 seconds.
Date Setting:
- Under the Calendar Mode, press and hold the SET button for 2 seconds to set the date.
- Press the SET button repeatedly to set the date as the following sequence:
Year --> month --> day --> Exit - Press the UP / DOWN buttons to adjust the year, month and date. Press and hold the UP / DOWN buttons to speed the scanning of the digits.
- The setting mode will return to time display mode if there is no operation for 15 seconds
Alarm Setting:
3 alarm time settings are possible, you can store 3 different alarm times in the memory.
1. Under the Alarm Mode A1, press the UP button to turn on the alarm and press again to turn off.
2. When A1 is activated, 'oN A1' will appear on the display, quickly then it will enter to alarm time display.
3. Press the SET button for 2 seconds and the display will flash now you can set the alarm time.
4. Press UP/DOWN buttons to adjust the alarm time. Press and hold the UP/DOWN button to speed up the scanning of the digits.
5. When the Alarm is activated, the Alarm Symbol will turn on.
6. The setting mode will exit if there is no operation for 15 seconds.
*A2 and A3 alarm can be set in the same way as A1.
*Alarm will ring for 1 minute at the set time, press any button to stop the alarm.
*Please note the alarm symbol will stay on and will ring the next day at the same time unless deactivated in the alarm settings.
Temperature Display
*After the power is turned on, the clock will automatically detect the current room temperature and update the temperature every 60 seconds.
*Press the DOWN button for 2 seconds to switch between Celsius(°C) and Fahrenheit(°F)
Other Functions
Display Modes
Under clock, calendar or temperature mode, press the UP button to switch between Dp-1, Dp-2 and dP-3 display modes.
dp-1 mode: LED alternately displays time and date. Time will display for 10 seconds, date will display for 2 seconds.
For example: press the UP button to enter the dp-1 Mode, after setting it return back to time display.
Under display mode, the LED display will alternate in the following sequence :
--> time(10 seconds) --> date(2 seconds).
dp-2 mode: Press the UP button to enter the dp-2 mode, set your desired mode(Time, Date or Alarm) to keep this mode on the screen.
For example: press the UP button to enter to the dp-2 mode, after settings are finished it return back to time display.
If you always want to keep Time display showing, press the SET button to enter Time mode, the screen will keep Time display.
If you always want to keep Date display showing, press the SET button to enter Date mode, the screen will keep the Date display.
If you always want to keep Alarm display showing, press the SET button to enter Alarm mode, the screen will keep the Alarm display.
dp-3 mode: Press the UP button to enter the dp-3 mode, under this mode, the screen default Time will always display after 15 seconds
For example: press the SET button to check Time-->Date-->Alarm as sequence, it will automatically return back to Time display after 15 seconds if there is no operation.
Power saving and Touch control mode
*The default mode is Sd (power saving off). Under Time Mode press the DOWN key to turn on the Power Saving Mode. The clock will then display ‘oN Sd’, press DOWN again to turn off the Power Saving Mode.
*Under Power Saving Mode, without any operation for 10 seconds, the LED display will automatically turn off..
*Under Power Saving Mode touch the LED clock or touch the table to turn on the LED display.
*Under Power Saving Mode when alarm is ringing the LED display will automatically turn on.
Built in Time Memory
Built-in 1PC x CR2032 battery to keep the time running when power is off, but other functions cannot be used. If time memory doesn't work anymore, please replace the built-in battery behind the battery compartment.
FR NOTICE
KA5653BK - KA5653DW - KA5654BK - KA5654DW - KA5655BK - KA5655DW
Brand : Karlsson
Model : Cube KA5654DW
Category : Clock