62387 - Soup Maker Lakeland - Free user manual and instructions
Find the device manual for free 62387 Lakeland in PDF.


| Product Type | Soup Maker |
| Brand | Lakeland |
| Model | 62387 |
| Capacity | 1.5 Liters |
| Power Consumption | 800 Watts |
| Voltage | 220-240 V, 50/60 Hz |
| Dimensions (H x W x D) | 30 cm x 20 cm x 25 cm |
| Weight | 2.0 kg |
| Material | Stainless steel and BPA-free plastic |
| Blade Material | Stainless steel |
| Functions | Blending, heating, pre-programmed soup and smoothie settings |
| Temperature Control | Automatic with preset cooking cycles |
| Timer | Up to 30 minutes |
| Dishwasher Safe Parts | Jug and lid are top-rack dishwasher safe |
| Non-Stick Coating | Yes, inside jug for easy cleaning |
| Safety Features | Auto shut-off, cool-touch handles, safety lock lid |
| Spare Parts Available | Blade assembly, lid gasket, measuring cup |
| Repairability | User-replaceable parts; professional service for motor issues |
| Warranty | 1 year |
| Manual Languages | English and others via translation |
Frequently Asked Questions - 62387 Lakeland
User questions about 62387 Lakeland
0 question about this device. Answer the ones you know or ask your own.
Ask a new question about this device
Download the instructions for your Soup Maker in PDF format for free! Find your manual 62387 - Lakeland and take your electronic device back in hand. On this page are published all the documents necessary for the use of your device. 62387 by Lakeland.
USER MANUAL 62387 Lakeland
natural_image
Black and white photo of a modern electric water fryer with digital display and control buttons (no visible text or symbols on the device itself)Model: 62387
Thank you for choosing the Lakeland Jug Soup Maker.
Please take a little time to read this booklet before getting started and keep it in a safe place for future reference.
This Jug Soup Maker makes smooth and chunky soups, sauce based dishes i.e. bolognese and chilli, and steams – vegetables, fish and eggs. The Jug Soup Maker cooks, simmers and stirs your soup from start to finished perfection, all in one jug. It has four automatic settings that allow you to choose from a smooth, creamy soup right through to a chunky hearty broth. It also cooks and blends up sauce.
You can manually set the Jug Soup Maker so you can still cook your favourite recipes, it will blend your ingredients in short, gentle bursts and its stainless steel cooking jug is quick and easy to clean.
Here at Lakeland, our award-winning family-owned business still offers the same excellent quality, value for money and exceptional customer service as when we founded the company back in the 1960s.
Our products are hand-picked and thoroughly tested so you can be sure that everything you purchase will be a pleasure to use for many years to come.
CONTENTS
Product features 4-5
Control panel....6
Safety cautions 7-8
Before using the Jug Soup Maker for the first time 9-10
Instructions for use 11
Using the automatic settings.... 11
Smooth soup, chunky soup, mixing and steaming.... 11
Auto function 12
Menu function....13
Pulse function....13
Recipes 14-18
Hints and tips....19
Frequently asked questions 20
Error codes 21
Care and cleaning 22
Electrical connections 23
Recycling your electricals 23
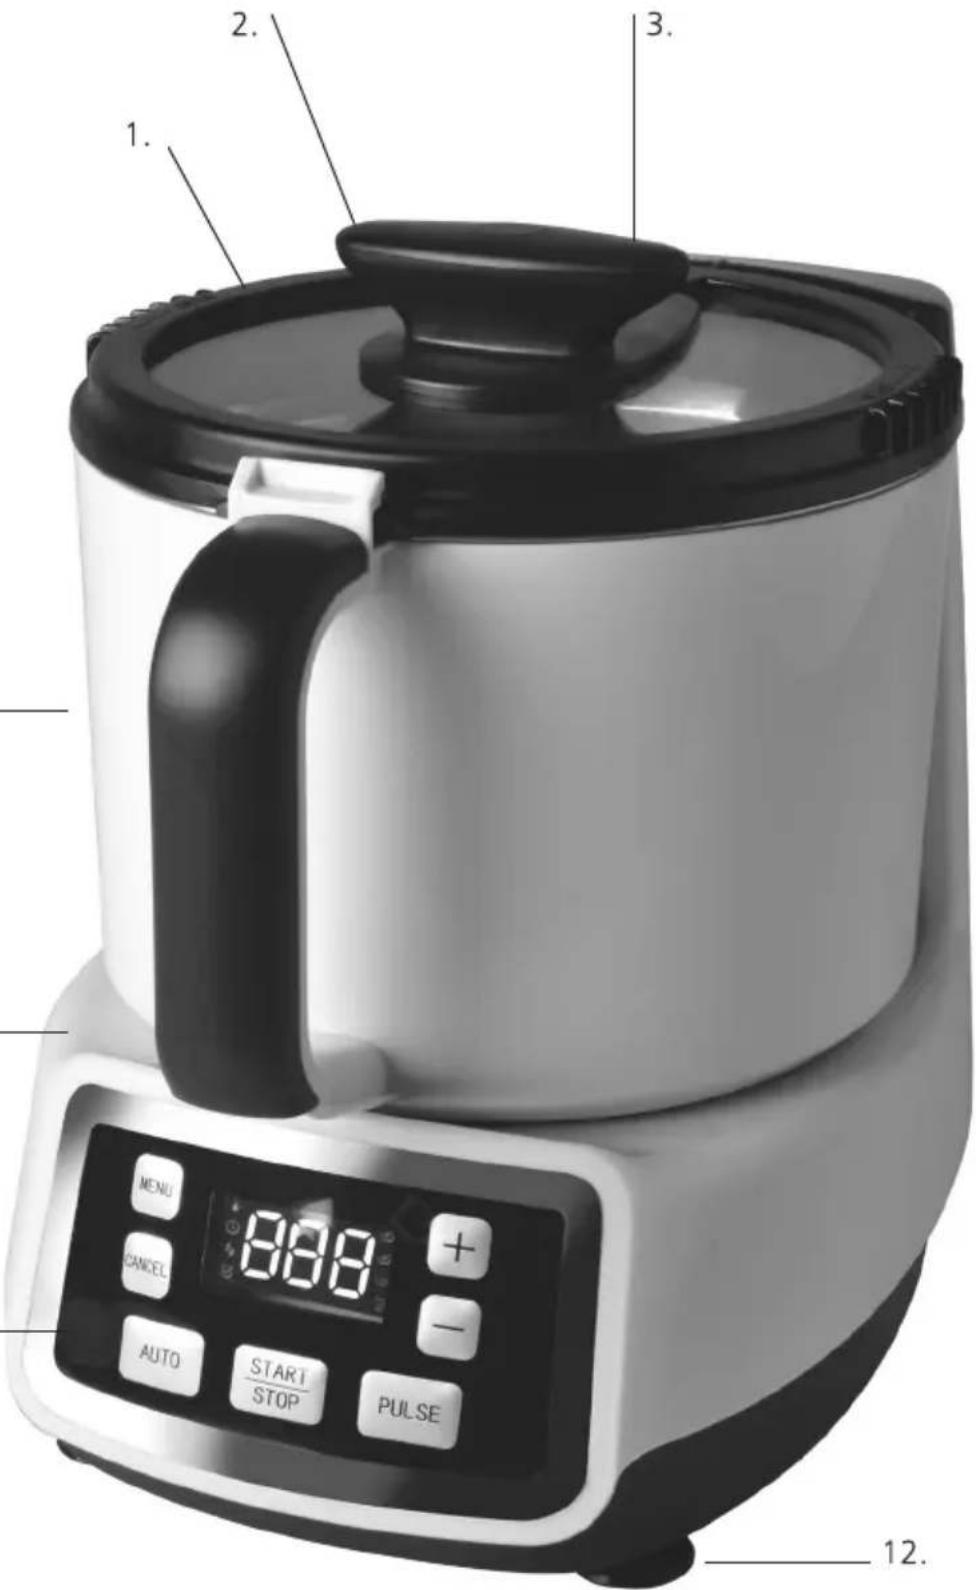
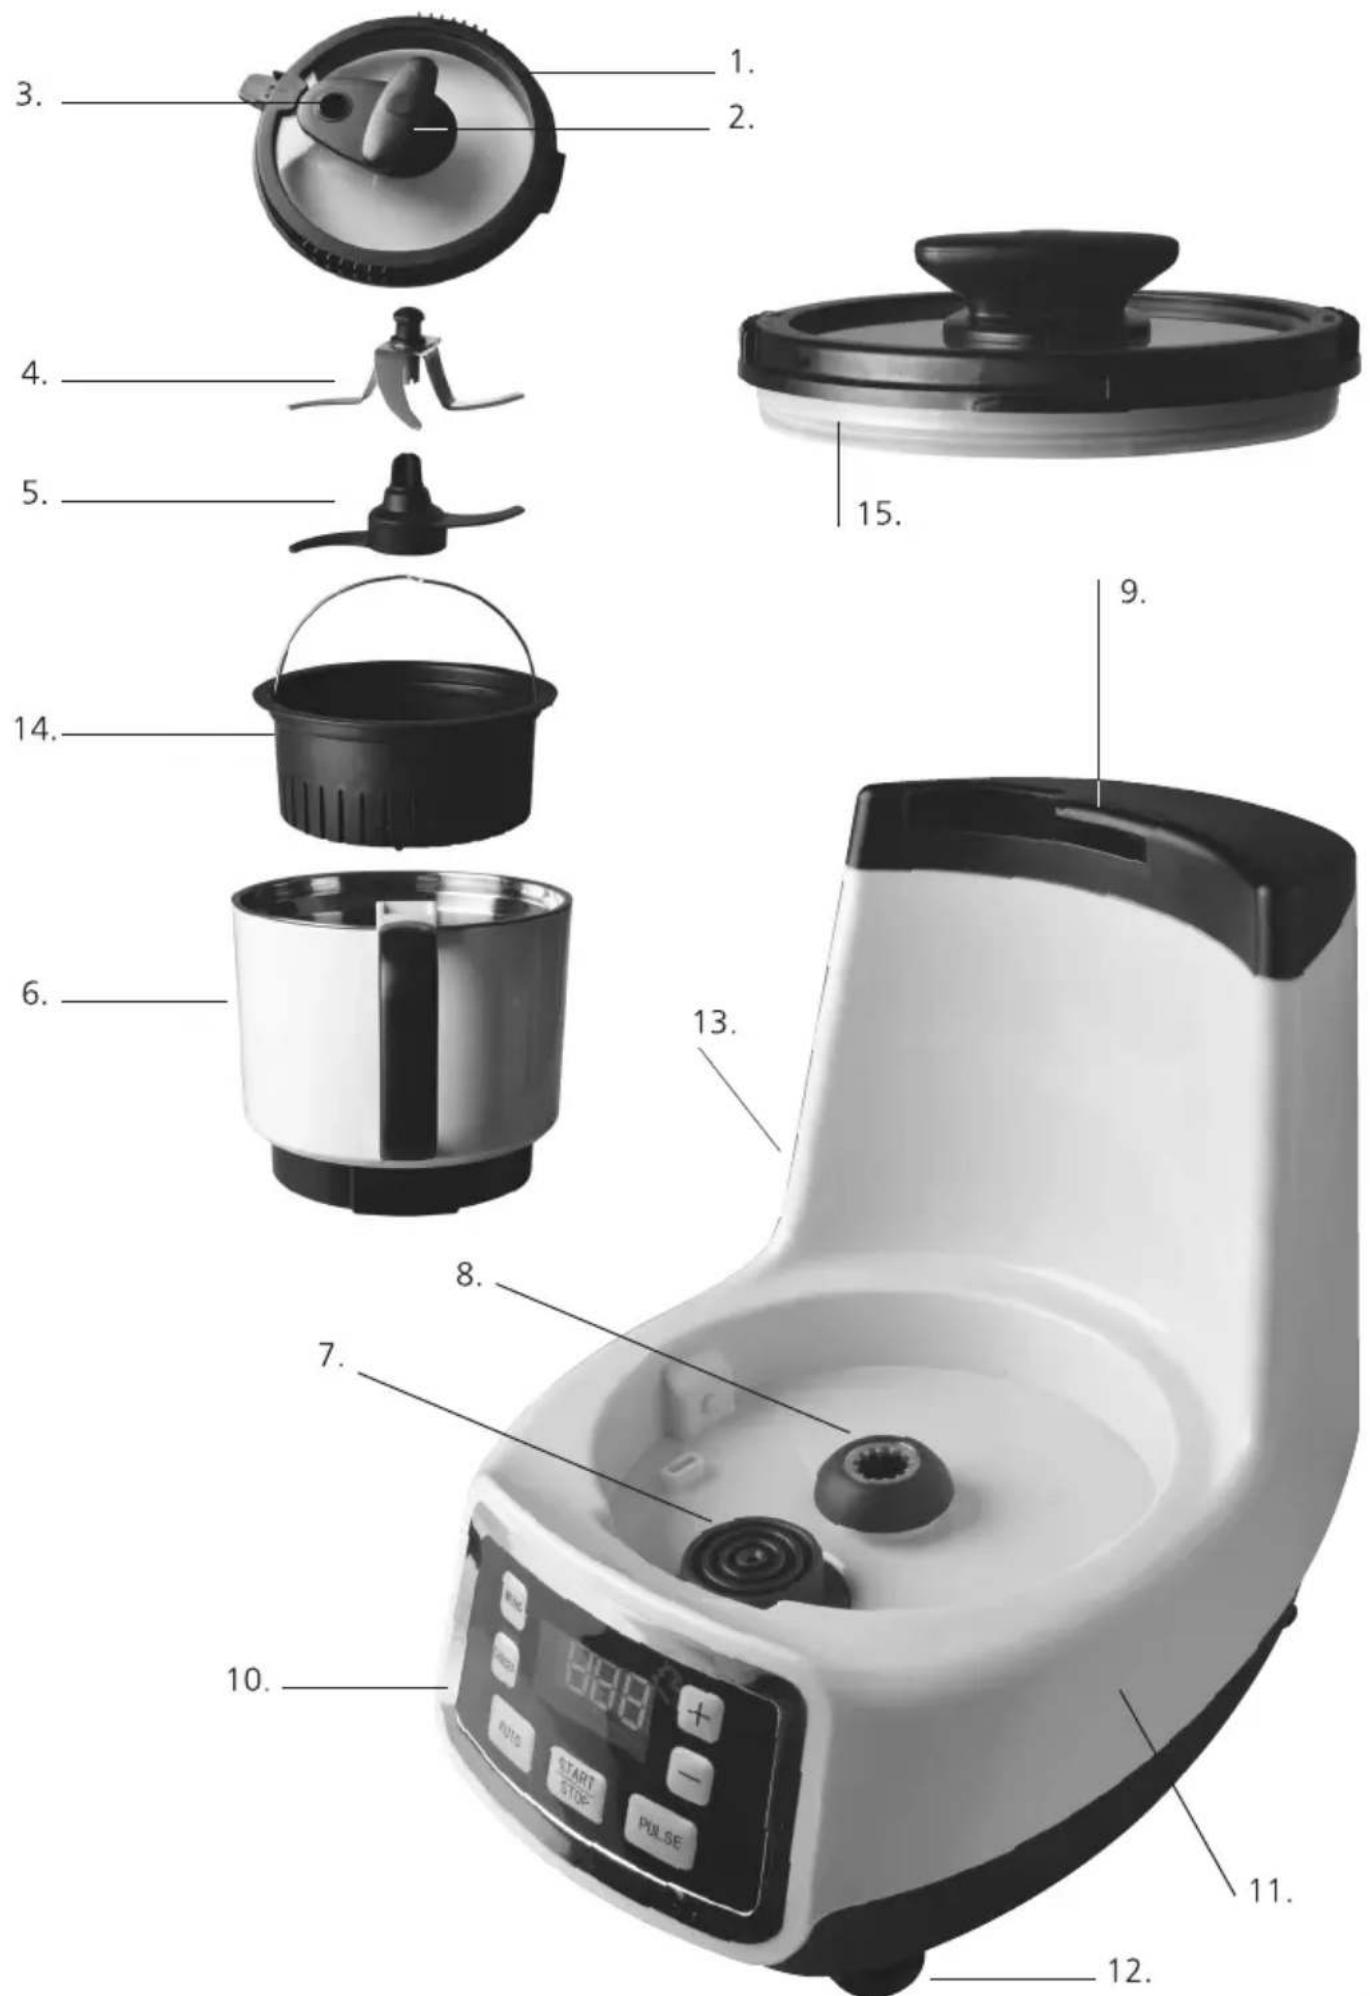
PRODUCT FEATURES
- Lid
- Lid handle
- Steam vent
- Chopping blade (stainless steel)
- Mixing blade (plastic)
- Cooking jug
- Coupler
- Driver shaft
- Safety switches
- Control panel
- Base unit
- Non-slip feet
- Cord and plug
- Steamer basket
-
Seal
- 10.
CONTROL PANEL
MENU: Press to select between temperature/time/speed
+/-: Press it to increase/decrease the settings of temperature/time/speed
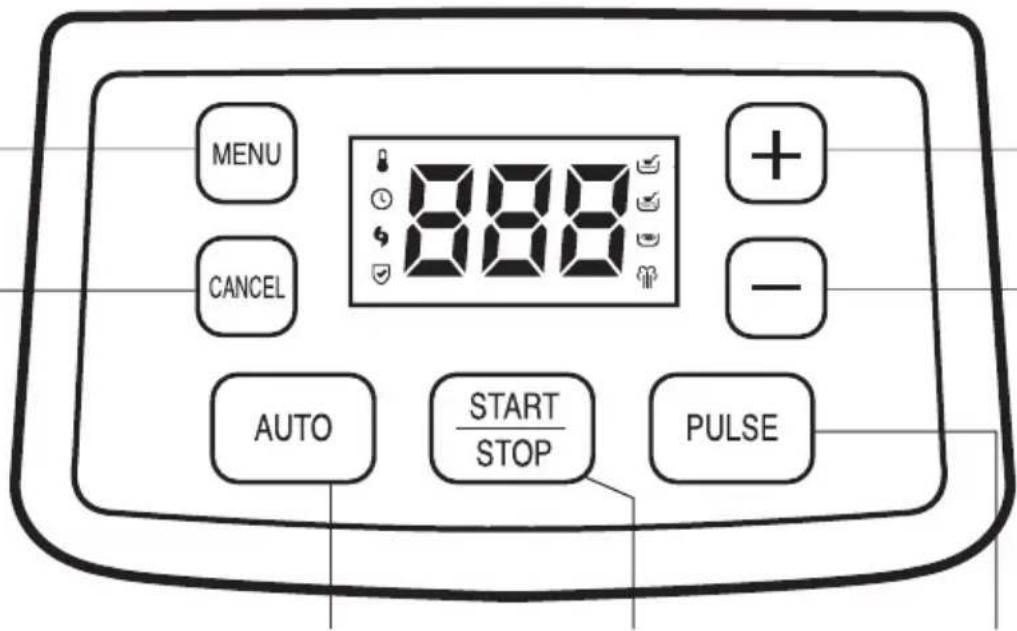
CANCEL: Press it to cancel the manual settings back to defaults
AUTO: Button is for selecting the preprograms
START/STOP: Press it to start or stop the machine
PULSE: Press it for chopping at maximum
SAFETY CAUTIONS
Carefully read all the instructions before using the appliance and keep in a safe place for future reference. Always follow these safety cautions when using the appliance to avoid personal injury or damage to the appliance. This appliance should be used only as described in this instruction book.
- This appliance can be used by children aged from 8 years and above and persons with reduced physical, sensory or mental capabilities or lack of experience and knowledge if they have been given supervision or instruction concerning use of the appliance in a safe way and understand the hazards involved. Children shall not play with the appliance. Cleaning and user maintenance shall not be done by children unless they are older than 8 and supervised.
• Make sure your electricity supply matches the voltage shown on the appliance.
- Ensure all packaging materials and any promotional labels or stickers are removed from the appliance before the first use.
- Always inspect the appliance before use for noticeable signs of damage. Do not use if damaged or has been dropped. In the event of damage, or if the appliance develops a fault contact the Lakeland customer care team on 015394 88100.
- Do not use this appliance if the lead is damaged. If the lead is damaged it must be replaced with a special lead. Contact the Lakeland customer care team on 015394 88100.
• Always use the appliance on a dry, level, heat resistant surface.
- Unplug from the mains when not in use and before cleaning. To disconnect, turn the socket to "off" and remove the plug from the mains socket.
- Do not use any accessories or attachments with this appliance other than those recommended by Lakeland.
- To protect against fire, electric shock or personal injury, do not immerse cord, plug or lid in water or other liquids.
- Do not leave the lead hanging over the edge of a kitchen table or worktop. Avoid contact between the lead and hot surfaces.
- For indoor use only.
- For domestic use only.
- This appliance should be used for preparation of food and drinks as described within the instructions for use that accompany it.
- Always ensure that your hands are dry before removing the plug from the mains socket. Never pull the plug out of the mains socket by its lead.
• To avoid injury or possible fire, do not cover the appliance when in use.
- Do not connect this appliance to an external timer or remote control system.
- An extension cable may be used with care. The electrical rating of the cable should be at least as great as the appliance. Do not allow the cable to hang over the edge of the worktop or touch any hot surfaces.
- This appliance complies with the basic requirements of Directives 2014/30/EU (Electromagnetic Compatibility) and 2014/35/EU (Low Voltage Directive).
- WARNING: A cut off plug inserted into a 13 amp socket is a serious safety (shock) hazard. Ensure the cut off plug is disposed of safely.
• CAUTION: The plastic bags used to wrap this appliance or the packaging may be dangerous. To avoid risk of suffocation, keep these bags out of reach of babies and children. These bags are not toys.
- CAUTION: The blades are very sharp, do not touch. Care must be taken when emptying the jug and during cleaning.
• DO NOT immerse the base unit or cooking jug in water.
- Keep the appliance, plug and lead away from hot ovens, electric and gas burners, flames and hot surfaces.
- The Jug Soup Maker should only be used at least 20cm away from walls and other surfaces, to allow sufficient airflow.
- DO NOT operate the Jug Soup Maker empty and never fill the jug beyond the MAX mark, 1 litre on the side of the jug.
- DO NOT open the lid until all movable parts stop running.
- WARNING: Avoid spillage on the electrical coupler.
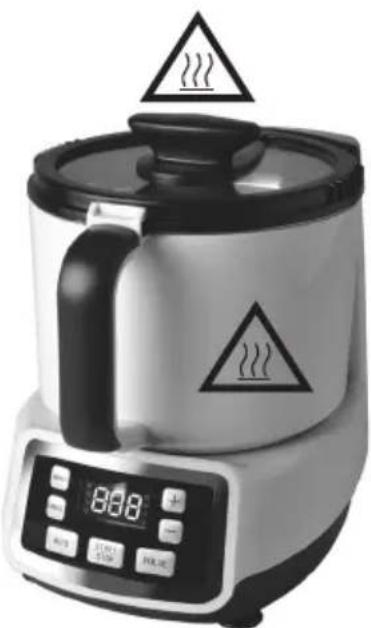
WARNING – HOT SURFACES
- The jug and base unit, and surfaces marked with this symbol will get very hot during use.
• DO NOT TOUCH as possible injury could occur.
- Wear oven gloves when removing the jug from the base unit. Allow the appliance to cool completely before touching these surfaces, handling, moving or storing this appliance.
- DO NOT touch the lid during operation to avoid injury caused by heat or steam.
- Be careful when removing the lid.
- Wearing oven gloves, remove the lid slowly by twisting it anti-clockwise and open it away from you. Be careful as hot steam will escape and can burn.
natural_image
Modern kitchen electric cooker with digital display and warning symbols (no readable text or labels)BEFORE USING THE JUG SOUP MAKER FOR THE FIRST TIME
- WARNING: Do not insert the plug into an electrical outlet, or turn on the Jug Soup Maker before you have fully assembled it.
- Unpack the Jug Soup Maker, remove all the packaging materials.
- Before first use, wipe the base unit and outside of the jug with a clean damp cloth.
- Wash attachments in warm soapy water and dry thoroughly. Rinse out the inside of the cooking jug with warm soapy water and dry thorough.
- DO NOT let water come into contact with the electrical coupler on the base of the cooking jug.
• Make sure that all parts are clean and dry before assembling the product. - Place the base unit on a flat, dry heat resistant surface near a socket, at least 20cm away from walls and other surfaces, to allow sufficient airflow.
- With both hands, lift the jug back onto the base unit. Lining up the notch on the front of the jug under the handle with the groove located above the LCD control panel.
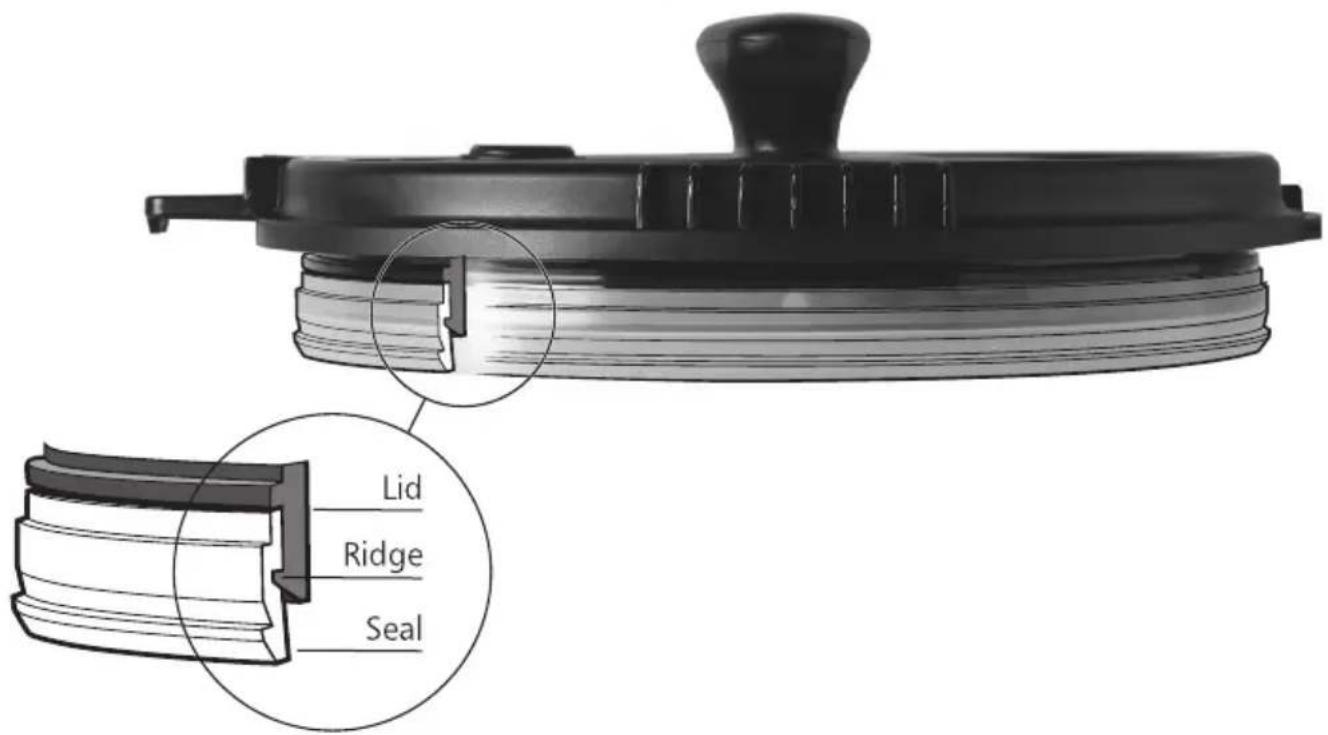
REAPPLYING THE SEAL TO THE LID
- To reapply the seal, make sure the seal has the 3 graduating steps on the outside.
- The thicker step should be at the bottom and hang off the edge of the lid along with half of the middle step.
- The seal should slot into place using the groove on the inside of the seal and the bottom ridge of the lid.
- Make sure the seal is secure before using the appliance.
ASSEMBLE THE JUG SOUP MAKER WITH A BLADE (CHOPPING OR MIXING)
natural_image
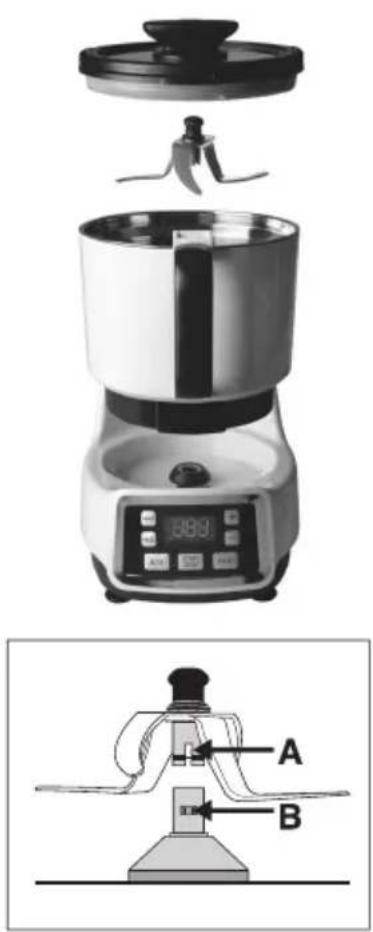
Exploded view of a digital coffee maker with labeled parts (A and B), no visible text or symbols beyond labels.- Place the cooking jug onto base unit, lining up the notch under the handle with the groove above the LCD control panel, press firmly down into place.
- Then take your chosen blade and locate firmly on the spinal inside the cooking jug, lining up the groove in the blade shaft (A) with the notch on the spinal (B) and press down firmly to correctly locate in place.
- Stainless steel chopping blade for smooth soups.
- Place your ingredients into cooking jug.
- Please note: Nuts and bones must not be placed inside the cooking jug.
- Then add some water, oil, milk, or liquid according to your recipe. DO NOT exceed the MAX mark level of 1 litre.
- Place the lid onto cooking jug turn it in a clockwise direction to lock properly in place. The appliance will not work unless the lid is in place, this is a safety feature.
ASSEMBLE THE JUG SOUP MAKER WITH THE STEAMER BASKET
natural_image
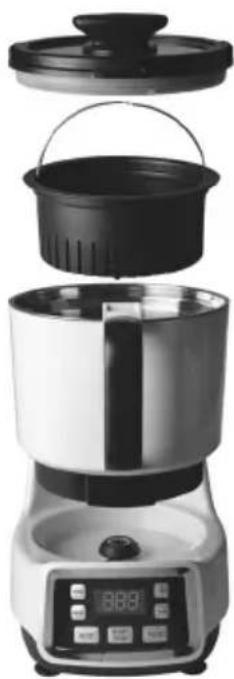
Stacked digital kitchen appliance with a digital display and lid, showing internal components (no visible text or symbols)- Place the cooking jug onto the base unit, lining up the notch under the handle with the groove above the LCD control panel, press firmly down into place.
- Add water up to the top of the spindle.
- Then place the steamer basket inside the cooking jug.
- Place your ingredients into the steamer basket.
- Place the lid onto cooking jug turn it in a clockwise direction to lock properly in place. The appliance will not work unless the lid is in place, this is a safety feature.
INSTRUCTIONS FOR USE
- When the appliance is fully assembled, plugged in and switched on for the first time it will beep and the control panel will illuminate. After 1 minute the control panel will go off if no buttons are pressed.
- When you use the Jug Soup Maker for the first time there may be a slight burning smell, this is normal for a new appliance and will stop after a few uses.
- PLEASE NOTE: To press the START STOP button when the appliance has finished its program.
USING THE AUTOMATIC SETTINGS
| Functions | Main working time in minutes | Blade speed | Total working time in minutes | Functional description (blade rotation etc.) |
| Smooth soup | 30 | 3 and 2 | 38 | Stirs for 6 seconds every minute, speed 2.The main heating process lasts 30 minutes. |
| Chunky soup | 30 | 2 and 1 | 38 | Stirs for 3 seconds every 2 minutes, speed 1.The main heating process lasts 30 minutes. |
| Mixing (liquid soup) | 30 | 2 and 1 | 38 | Stirs for 5 seconds every 1 minute, speed 1.The main heating process lasts 30 minutes. |
| Steam | 25 | 0 | 25 | Without blade, no rotation. |
SMOOTH SOUP, CHUNKY SOUP, MIXING AND STEAMING
- Place your chopped vegetables, ingredients and liquid for your recipe into the cooking jug. It is best to cut ingredients small, even pieces about 2cm in size before placing in the Jug Soup Maker.
• Always use cooked meat in the recipes.
• These settings heat the ingredients.
• DO NOT fill the cooking jug beyond the MAX mark 1000ml. - Place the lid on the cooking jug and lock into place. The appliance will not work properly unless the lid is on correctly and locked, this is a safety feature.
AUTO FUNCTION
-
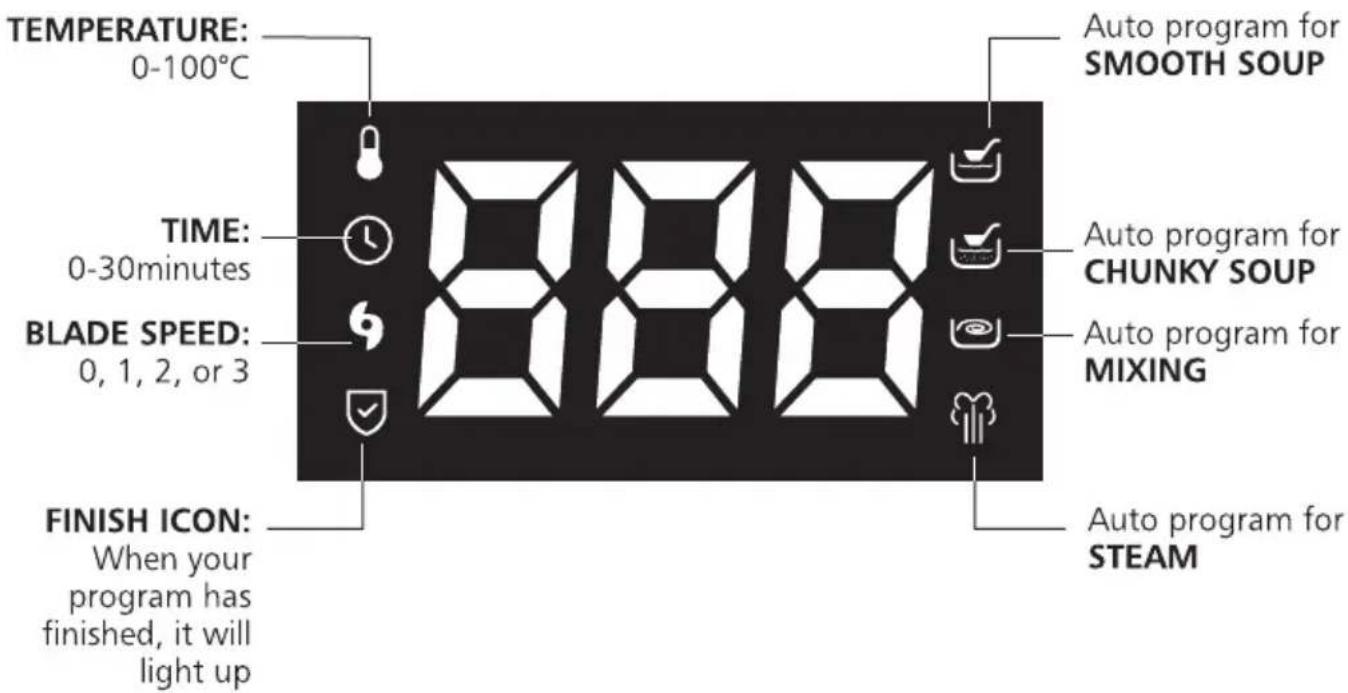
Press the AUTO button and the appliance will 'beep', the SMOOTH SOUP icon will light up and flash on the control panel.
-
Press the AUTO button again to move through the programs, CHUNKY SOUP 📋, MIXING 🔒 and STEAM 🔘, the icons will light up and flash as you cycle through them.
-
Press START STOP button to confirm your setting. The icon of the selected program will illuminate and remain on, the program has started working.
-
The control panel show the temperature, time in minutes of how far through the program and the speed of the blade for the program cycle select, it will alternate through these whilst the program is running.
-
When the AUTO program has finished, the appliance will 'beep' and the FINISH icon will illuminate.
-
Press START STOP button to stop the machine before removing the lid.
-
If you DO NOT press the START STOP button after the program has finished, the appliance will go into a keep warm function for 1 hour. After 30 seconds there will be a 'beep', the FINISH icon √ will illuminate until the 1 hour keep warm function has finished, then the appliance will turn off automatically.
To stop the keep warm function, press the START STOP button then remove the lid.
-
When the soup programs have finished, always let the ingredients cool down for 3-5 minutes before opening the lid. Open the lid away from you as hot liquid and steam will escape.
-
The appliance is equipped with an over-heating protection device, the motor will stop automatically with abnormal usage or over-heating. Turn off at the socket and unplug, let the appliance cool down for 30 minutes before using again.
MENU FUNCTION
- Press the ⏚ button, the temperature icon ⏻ will illuminate on the control panel and flash.
- Press the + or - buttons to set the temperature between 0 and 100°C.
- Press the MENU button again, the time icon Ⓒ will illuminate on the control panel and flash.
- Press the + or - buttons to set the time between 0 and 30 minutes.
- Press the Ⓞ button again, the blade icon ⬆ will illuminate on the control panel and flash.
- Press the + or - buttons to set the speed of the blade between 0 and 3.
- If your setting is not suitable, you can press the CANCEL button to default the values.
- When you have set all the functions – temperature, time and blade speed, press the START/STOP button to confirm your settings. The program will start working and the control panel will show the values of temperature, remaining time in minutes (counting down) and blade speed.
- When the program has finished, the appliance will shut down accordingly. The appliance will 'beep' for 30 seconds and all icons on the control panel will illuminate.
- Press the START STOP button before removing the lid.
- When the programs have finished, always let the ingredients cool down for 3-5 minutes before opening the lid. Open the lid away from you as hot liquid and steam will escape.
- The appliance is equipped with an over-heating protection device, the motor will stop automatically with abnormal usage or over-heating. Turn off at the socket and unplug, let the appliance cool down for 30 minutes before using again.
PULSE FUNCTION
- Press the PULSE button, the blade will blend at its highest speed, when you release the button the blade will stop.
- Maximum continuous working time for the 'Pulse' function is 20 seconds.
RECIPES
Please note that all spoon measurements are standard metric, so 1 tsp is 5ml and 1 tbsp is 15ml. We recommend using a set of measuring spoons for accurate results.
CHUNKY SOUPS
CHICKEN AND MUSHROOM SOUP - Serves 4
| Ingredients | Quantity |
| Chicken | 300g without bones |
| Mushrooms | 100g chopped |
| Potato | 50g cut into small cubes |
| Water | 350ml |
| Salt and ground white pepper | To taste |
WHAT YOU DO
Put chicken, mushroom, potato and water into the jug.
Cook using the 'Chunky Soup' setting, see 'Instructions for Use'.
When the cooking cycle has finished, taste, season and serve.
LEEK AND POTATO SOUP - Serves 4
| Ingredients | Quantity |
| Small leeks | 2, trimmed, chopped and thoroughly washed |
| New potatoes, skins on | 350g, cleaned and chopped into small cubes |
| Chicken or vegetable stock | 700ml |
| Salt and ground black pepper | To taste |
WHAT YOU DO
Put all the ingredients into the jug.
Cook using the 'Chunky Soup' setting, see 'Instructions for Use'.
When the cooking cycle has finished, taste, season and serve.
SMOOTH SOUPS
PUMPKIN - Serves 4
| Ingredients | Quantity |
| Raw cashew nuts | 50g |
| Olive oil | 10ml |
| Onion | 30g |
| Pumpkin | 200g cut into small cubes |
| Potato | 50g cut into small cubes |
| Water | 350ml |
| Salt and ground black pepper | To taste |
WHAT YOU DO
Put the ingredients into the jug.
Cook using the 'Smooth Soup' setting, see 'Instructions for Use'.
When the cooking cycle has finished, taste, season to serve.
TOMATO SOUP - Serves 4
| Ingredients | Quantity |
| Ripe tomatoes | 700g |
| Olive oil | 4 tbsp |
| Pinch of sugar | |
| Medium onion | 1, peeled and cut into 5-6 pieces |
| Garlic cloves | 2, peeled |
| Chicken or vegetable stock | 500ml |
| Salt and ground black pepper | To taste |
| Crème fraiche (optional) | 2 tbsp |
WHAT YOU DO
Put the ingredients into the jug, except the crème fraîche.
Cook using the 'Smooth Soup' setting, see 'Instructions for Use'.
When the cooking cycle has finished, taste, season, add crème fraîche to serve.
GREEN PEA SOUP - Serves 4
| Ingredients | Quantity |
| Spring onions | 3, roots removed and cut into 2-3 pieces |
| Butter | 50g |
| Frozen peas | 350g |
| Chicken or vegetable stock | 700ml |
| Salt and ground black pepper | To taste |
| Mint leaves (optional) | 6-8 |
WHAT YOU DO
Put the ingredients into the jug, except the mint leaves.
Cook using the 'Smooth Soup' setting, see 'Instructions for Use'.
When the cooking cycle has finished, taste, season, add mint leaves to serve.
BUTTERNUT SQUASH SOUP - Serves 4
| Ingredients | Quantity |
| Butternut squash, medium cut | 1 (about 600g) peeled, deseeded and into large chunks |
| Olive oil | 1 tbsp |
| Onion | 1, peeled and cut into 6 pieces |
| Garlic cloves | 3, peeled |
| Ground coriander | 12 tsp |
| Turmeric | 14 tsp |
| Chicken or vegetable stock | 600ml |
| Salt | To taste |
| Coriander leaves | A few sprigs, to garnish |
WHAT YOU DO
Put the ingredients into the jug, except the coriander leaves.
Cook using the 'Smooth Soup' setting, see 'Instructions for Use'.
When the cooking cycle has finished, taste, season, garnish with coriander leaves to serve.
MIXING
CHILLI CON CARNE - Serves 4
| Ingredients | Quantity |
| Minced beef | 300g, cooked |
| Red chilli | Remove seeds and roughly chop |
| Olive oil | 1 tbsp |
| Onion | 1, peeled and cut into 6 pieces |
| Ground cumin | 2 tsp |
| Ground coriander | 2 tsp |
| Chilli powder | 1 tsp |
| Canned Red kidney beans | 400g, drained, rinsed |
| Canned chickpeas | 400g, drained, rinsed |
| Canned chopped tomatoes | 400g |
| Coriander leaves | A few sprigs, to garnish |
WHAT YOU DO
To cook the minced beef, either fry separately, or cook in the soup maker before adding other ingredients.
Cook minced beef using the 'Menu' setting, set temperature to 100^ C, time to 10 minutes and blade speed to 1.
Once the meat is thoroughly cooked, put the rest of the ingredients into the jug, except the coriander leaves.
Cook using the 'Mixing' setting, see 'Instructions for use'.
When the cooking cycle has finished, taste, season, garnish with coriander leaves to serve.
TOMATO SAUCE Makes 1 bowl to serve as a dip or accompaniment
| Ingredients | Quantity |
| Onion | 1 medium, peeled and quartered |
| Cloves garlic | 2, peeled |
| Dried thyme | 1/4 tsp |
| Olive oil | 100ml |
| Sugar | 2 tsp |
| Salt and pepper | |
| Water | 218ml |
| Ripe tomatoes | 600g |
| Basil leaves | 2 |
WHAT YOU DO
Put all the ingredients in the jug.
Cook using the 'Mixing' setting, see 'Instructions for Use'.
When the cooking cycle has finished, taste, season and serve.
HINTS AND TIPS
- If cooking raw meat, always cook through thoroughly using the MENU function before adding any other ingredients or starting an AUTO function.
- Cut meat into 2cm size pieces or smaller.
- Always remember to press the START STOP button when the appliance has finished its program.
- Nuts and bones should be removed to avoid any damage to the blades.
- DO NOT use the machine for heating or steaming without water. When steaming always fill the jug with water up to the top of the spindle.
- The Jug Soup Maker has a memory function should you wish to pause the appliance to add ingredients etc. Simply open the lid temporarily to add some food ingredients. Do not open the lid when the blades are spinning. There is a safety cut off, if the lid is opened when the blades are spinning. The blades will stop immediately.
Be careful when opening the lid and always open it away from you using an oven glove, as hot steam will escape. Close the lid and the appliance will continue to work according to the original program.
The interval of memory function is less than 4 minutes, more than 4 minutes without power and without closing the lid you have to set reset the functions.
FREQUENTLY ASKED QUESTIONS
Question: Why is the Soup Maker not working?
Answer: Check that the Soup Maker is plugged in and switched on at the socket.
Then check that the jug is sitting correctly on the base unit.
The lid must be fitted correctly and firmly twisted into place, otherwise the appliance will not work because the lid has not come into contact with the safety switch.
Always remember to press the START STOP button when the appliance has finished its program.
Question: Why is there no display of the LCD?
Answer: Check that the appliance is correctly assembled
Question: Why has the appliance stopped working suddenly?
Answer: Check to see if the lid has become loose during operation.
Question: Why have the ingredients inside my Soup Maker not blended very well?
Answer: Check that the ingredients have not exceeded the MAX mark on the inside of the cooking jug. It may be overfilled, remove some of the ingredients. There may not be enough water or cooking liquid inside the jug to help blend the ingredients.
Press and hold the PULSE button to blend and stir the ingredients for longer.
Question: Why is my soup burnt?
Answer: You may have selected the wrong program by accident. There may not be enough liquid in the jug, so your ingredients have come into direct contact with the base of the cooking jug, add more liquid.
Question: Why is the lid stiff to twist onto the cooking jug?
Answer: The seal is a little stiff on first use. Wash thoroughly in warm soapy water and replace securely.
The seal is a safety feature and needs to be sufficiently tight to ensure steam and hot liquid doesn't escape when cooking and blending the contents of the jug.
Always use oven gloves when handling the lid and cooking jug.
ERROR CODES
| ERROR CODE | PROBLEM |
| ‘Beep’ alarm sound and error code ‘EE0’ shows on the LCD display | Make sure you have correctly assembled the cooking jug and lid. The temperature sensor may have become damaged, please return to Lakeland customer care for professional maintenance/service. |
| ‘Beep’ alarm sound and error code ‘EE1’ shows on the LCD display | The temperature sensor has created a short circuit, please DO NOT immerse the cooking jug into water, please dry the inside of the cooking jug if there is any water inside, please return to Lakeland customer care for professional maintenance if the problem is not resolved. |
| ‘Beep’ alarm sound and error code ‘EE2’ shows on the LCD display | There is no water added and bottom temperature of the cooking jug has exceeded its upper most temperature of 108 degrees. The appliance alarm will sound.Note: The appliance has a heating function. When using the appliance, make sure there is enough liquid in the cooking jug for all functions. |
CARE AND CLEANING
- Unplug the Jug Soup Maker and let it cool completely before cleaning.
- Clean thoroughly before using for the first time and after every use.
- Check the parts for wear or damage after every few uses.
- Do not use abrasive cleaners, or steel wool.
- Always use plastic, wooden or silicone spatulas, as metal utensils will damage the wall of the cooking jug.
- Never immerse the base unit, jug, cord or plug in water or any other liquid.
- To clean the outer surfaces of the base unit and jug, wipe with a clean damp cloth and dry thoroughly before storing.
• After you have made soup, use a cleaning brush to remove any residue stuck inside the jug. Rinse out the inside of the cooking jug with warm soapy water and dry thorough.
- Do not let water come into contact with the electrical coupler on the base of the cooking jug.
- Wash the attachments in warm soapy water, rinse and dry thoroughly.
• No parts are dishwasher safe.
- Do not reach into the jug and touch the blades with your hands.
- CAUTION: The blades are very sharp, do not touch. Care must be taken when emptying the jug and during cleaning.
- Store the Jug Soup Maker with the power cable loosely coiled. Never wrap it tightly around the product.
ELECTRICAL CONNECTIONS
THIS APPLIANCE MUST BE EARTHED
The appliance is fitted with a fused three-pin plug to BS1363 which is suitable for use in all homes fitted with sockets to current specifications.
CHANGING THE 10 AMP FUSE
Use a 10 amp BS1362 fuse. Only BSI or ASTA approved fuses should be used. If you are unsure which plug or fuse to use, always refer to a qualified electrician.
Note: After replacing or changing a fuse on a moulded plug which has a fuse cover, the cover must be refitted to the plug; the appliance must not be used without a fuse cover. If lost, replacement fuse covers can be obtained from an electrical shop. This appliance complies with the following EU Directives: 2014/35/EU (Low Voltage Directive) and 2014/30/EU (EMC Directive).
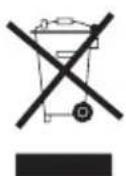
RECYCLING YOUR ELECTRICALS
Along with many other high street retailers, Lakeland has joined a scheme whereby customers can take their unwanted electricals to recycling points set up around the country.
Visit www.recycle-more.co.uk to find your nearest recycling point.
- CONTENTS
- PRODUCT FEATURES
- CONTROL PANEL
- SAFETY CAUTIONS
- WARNING – HOT SURFACES
- BEFORE USING THE JUG SOUP MAKER FOR THE FIRST TIME
- REAPPLYING THE SEAL TO THE LID
- ASSEMBLE THE JUG SOUP MAKER WITH A BLADE (CHOPPING OR MIXING)
- ASSEMBLE THE JUG SOUP MAKER WITH THE STEAMER BASKET
- INSTRUCTIONS FOR USE
- SMOOTH SOUP, CHUNKY SOUP, MIXING AND STEAMING
- AUTO FUNCTION
- MENU FUNCTION
- PULSE FUNCTION
- RECIPES
- CHUNKY SOUPS
- WHAT YOU DO
- SMOOTH SOUPS
- MIXING
- HINTS AND TIPS
- FREQUENTLY ASKED QUESTIONS
- ERROR CODES
- CARE AND CLEANING
- ELECTRICAL CONNECTIONS
- THIS APPLIANCE MUST BE EARTHED
- CHANGING THE 10 AMP FUSE
- RECYCLING YOUR ELECTRICALS
Brand : Lakeland
Model : 62387
Category : Soup Maker