L7W5D18 - Washing machine Logik - Free user manual and instructions
Find the device manual for free L7W5D18 Logik in PDF.
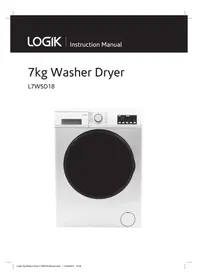


| Brand | Logik |
| Model | L7W5D18 |
| Product Type | Washer Dryer |
| Energy Efficiency Class | B |
| Rated Voltage | 220-240 V~ |
| Rated Frequency | 50 Hz |
| Rated Power Input | 2200 W |
| Dimensions (W x D x H) | 597 mm x 582 mm x 845 mm (minimum) |
| Weight | 77.6 kg |
| Maximum Wash Capacity | 7 kg (Cotton programmes only) |
| Maximum Drying Capacity | 5 kg |
| Maximum Spin Speed | 1400 rpm |
| Noise Level (Wash) | 58 dB(A) |
| Noise Level (Spin) | 77 dB(A) |
| Noise Level (Drying) | 64 dB(A) |
| Water Pressure Range | 0.1 - 1 MPa |
| Water Consumption (Wash & Dry) | 132 L per cycle |
| Water Consumption (Wash only) | 50 L per cycle |
| Programmes | Cotton, Cotton Eco, Eco 20°C, Synthetics, Wool, Curtain, Rinse, Allergy Safe, Spin, Super Rapid 15', Daily Fast 60 Min, Gentle Dry, Cotton Dry, Quick Wash & Dry, Cotton Wash & Dry |
| Additional Features | Half-load detection, Child Lock, Delay Timer (up to 23 hours), Drying Options, Temperature selection, Spin speed adjustment |
| Maintenance | Clean drum with chlorine-free detergent; clean exterior with soft cloth and mild detergent; clean detergent drawer and siphon plug; clean drain filter regularly; wipe door seal and window after each wash |
| Safety Features | Child lock, door lock during operation, auto-off after programme, transit bolts must be removed before use |
| Spare Parts & Repairability | Spare parts available from Partmaster (UK only, tel: 0344 800 3456). Repairs must be carried out by authorised service personnel. |
| Accessories Included | Transit bolt cover caps (4), water supply hose, U-shape drain hose holder, liquid detergent guide |
| Installation Requirements | Flat stable surface, ventilation openings not obstructed, ambient temperature 10-35°C, cold water supply only, mains socket rated 13A 220-240V |
Frequently Asked Questions - L7W5D18 Logik
User questions about L7W5D18 Logik
0 question about this device. Answer the ones you know or ask your own.
Ask a new question about this device
Download the instructions for your Washing machine in PDF format for free! Find your manual L7W5D18 - Logik and take your electronic device back in hand. On this page are published all the documents necessary for the use of your device. L7W5D18 by Logik.
USER MANUAL L7W5D18 Logik
Contents
Safety Warnings....4
Unpacking 8
Removing the Transit Bolts....9
Installing Your Washer dryer....10
Choosing the Right Location for Your Washer dryer 10
Hose and Cable Lengths....11
Levelling the Washer dryer 11
Water Supply Hose....11
Connecting to the Mains Supply 12
First time use....12
Product Overview....13
The unit....13
Control Panel 14
Preparation 15
Preparing Laundry....15
Amount of laundry per wash or drying programme....15
Some Laundry Weights....15
Selecting the Programme ....17
Drying Option/Duration Table....18
Which Detergent to Use 19
Wash Setting 19
First washing operation 19
Standard Washing 19
Half-load detection system (Wash Cycle only) 20
Washing Water Temperature Selection 20
Spin Speed....20
Manual Soaking 20
Manual Drying Options....21
How to Set the Child Lock ....21
Selecting a Delay Timer....22
Removing Laundry 22
Maintenance - Cleaning the Washer dryer 23
Cleaning the Drum 23
Cleaning the Exterior of your Washer dryer....23
Cleaning the Detergent Drawer and Siphon Plug....23
Cleaning the Door Seal and Window....23
Cleaning the Drain Filter 24
Troubleshooting 25
Error Codes....27
Product Fiche 28
Energy Label 29
Specification 30
IMPORTANT SAFETY INSTRUCTIONS READ CAREFULLY AND KEEP FOR FUTURE REFERENCE
WARNING!
- If you will not be using the washer dryer for a while, such as when you go on holiday, turn off the water supply to the washer dryer. This is particularly important if there is no drainage around the washer dryer. If the water is left on, water pressure may build up and cause a leak.
General Use
- Read all instructions carefully before using the washer dryer and keep them for future reference.
- Retain the manual. If you pass the washer dryer onto a third party, make sure to include this manual. Keep the document bag out of the reach of children to prevent the risk of suffocation.
- The packaging of the machine could be hazardous to children. Do not allow children to play with the packaging or small parts from the washer dryer.
- This washer dryer is for household (domestic) use only. Your unit is not tested to be used in a commercial environment, use in such places may invalidate your warranty.
- The washer dryer is designed to operate in an ambient temperature of 10-35°C. The ideal ambient operating temperature for your washer dryer is between 15-25°C.
- Do not install your washer dryer anywhere that is damp or exposed to the weather. If you do, it may cause an electric shock, fire, failure or deterioration.
- Keep flammable substances well away from the washer dryer. They may cause an explosion or a fire.
- Before you start using the washer dryer, turn the tap on to check that the hose is properly connected. If it's not, there may be a water leak.
- Do not put too much laundry or detergent into the washer dryer. It may cause issues with the washer dryer or laundry.
- Fabric softeners, or similar products, should be used as specified by the fabric softener instructions.
- Only use detergent balls that are designed to be used with washer dryers.
- Please ensure that garments loaded into your washer dryer are free of
foreign objects such as nails, needles, lighters, matches and coins.
- Do not exceed the maximum load for the washing or drying programme you have chosen (check the Programme Table).
- Do not stop your washer dryer before the drying phase of a programme has been completed. If you have to do so, quickly remove the laundry and immediately spread the items on an appropriate surface to allow them to cool.
- Do not place heavy or wet items on top of the product.
- Do not spill any liquid on the appliance, it may cause damage. Clean up any accidental spillages immediately.
Power Source and Cable
- Make sure your home voltage matches the voltage displayed on the washer dryer. If you are not sure, contact an electrician.
- Make sure the mains plug is pushed firmly into the socket. A loose connection may overheat and cause electrical shock or a fire.
- Do not use a mains plug adaptor or extension cable. It may overheat and cause a fire. Use an independent household dedicated mains socket, rated at 13 Amp 220V to 240V AC
- The mains plug must remain accessible to allow disconnection or an all pole switch must be incorporated in the fixed wiring in accordance with the wiring rules.
- Check the mains lead and mains plug for any damage. If the mains cable is damaged, it must be replaced by the manufacturer, its service agent or similarly qualified persons in order to avoid a hazard.
- Unplug the mains lead when cleaning the washer dryer.
- Do not touch the mains lead or mains plug with wet hands. It may cause an electric shock.
- Check the mains plug regularly for dirt. If dirt accumulates on the mains plug, it could cause a fire. To prevent this, unplug the cable and clean the mains plug with a dry cloth.
- If you disconnect the mains plug, hold onto the mains plug not the cable. Pulling the cable may cause an electric shock or a fire.
- Make sure hoses and cables do not cause a trip hazard.
To Prevent Injury / Damage
- When opening and closing the door, ensure you keep fingers away from the door hinge.
- Never force the door open when your washer dryer is running.
- The final part of a tumble dryer cycle occurs without heat (cool down
cycle) to ensure that the items are left at a temperature that ensures that the items will not be damaged.
- Do not wash, rinse or spin water-proof sheets or clothing. These may cause vibration or washer dryer failure during spin-drying, which could lead to injury, damage to the washer dryer or damage due to water leaking.
- Be careful when draining hot water or any detergent from the washer dryer.
- The glass window can become very hot when using some wash cycles, take care when touching the window. Do not allow children to touch the window when in use. Open the door fully after a drying process.
- Do not dismantle, repair or modify the washer dryer. The washer dryer could malfunction and cause a fire or injury.
- This appliance can be used by children aged from 8 years and above and persons with reduced physical, sensory or mental capabilities or lack of experience and knowledge if they have been given supervision or instruction concerning use of the appliance in a safe way and understand the hazards involved. Children shall not play with the appliance. Cleaning and user maintenance shall not be made by children without supervision.
- Children of less than 3 years should be kept away unless continually supervised.
- The mains water pressure must be 0.1MPa - 1MPa.
- The appliance is to be connected to the water mains using the new hose-set supplied. Old hose-sets should not be reused.
- Do not connect to the hot water supply.
- The ventilation openings in the base of the washer dryer must not be obstructed by a carpet.
- Ensure the transit bolts are removed before installation.
- Thoroughly rinse off any chemicals, such as stain remover, from your garments before beginning a washing and drying programme. Failure to do so may cause a risk of explosion when the drying function is used.
- Do not keep flammable or explosive liquids near your machine.
- Materials stained with food oil, acetone, alcohol, petrol, kerosene, stain remover, turpentine, beeswax and beeswax remover must first be washed with an extra amount of detergent and hot water before being put through the drying process. Failure to do so may cause a risk of fire when you run your machine with the drying function.
- Do not dry your laundry under the conditions specified below as they present a fire risk.
- If the laundry is not washed.
- If oil based stains are not pre-treated before beginning a washing or drying programme.
- Laundry which has been cleaned with industrial chemicals.
- Laundry that has a high amount of sponge, foam, rubber or rubber-like parts and accessories.
- Rubber, sponge, latex, shower bonnets, watertight textile products and clothes or pillows filled with rubber sponge must not be dried in your Washer Dryer.
- Stuffed or damaged items (such as pillows or jackets). The rubber sponge presents a fire risk during the drying process.
- Never use products that contain solvents in your machine.

IT IS HAZARDOUS FOR ANYONE OTHER THAN AUTHORISED SERVICE PERSONNEL TO CARRY OUT SERVICING OF REPAIRS WHICH INVOLVE THE REMOVAL OF COVERS.

TO AVOID THE RISK OF AN ELECTRICAL SHOCK DO NOT ATTEMPT REPAIRS YOURSELF.
Unpacking
Remove all packaging from the unit. Retain the packaging. If you dispose of it, please do so according to local regulations.
The following items are included:
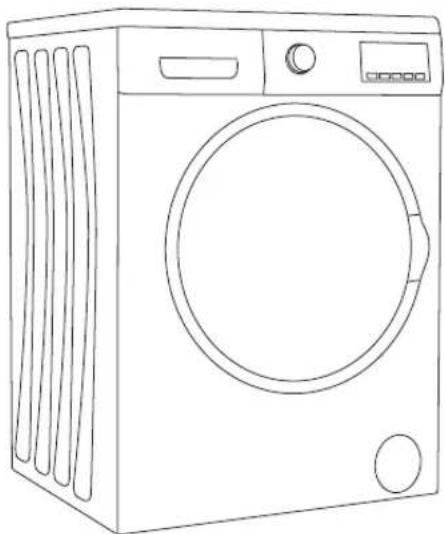
The Main Unit


Transit Bolt Cover Cap x 4
Water Supply Hose x 1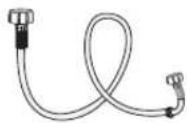
U-Shape Drain Hose Holder x 1 (for fixing the water drain hose)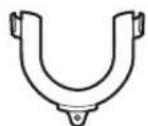
Liquid detergent guide x1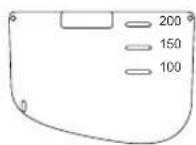

If items are missing or damaged, please contact Partmaster (UK only). Tel: 0344 800 3456 for assistance.
INSTALLATION
Removing the Transit Bolts
Four transit bolts keep the interior of the washer dryer in place while it's being moved.
They need to be removed before installation. Use a spanner (not supplied) and follow the instructions detailed below.

Don't run the washer dryer without removing the transit bolts, as this can cause excessive vibrations and may damage your machine.
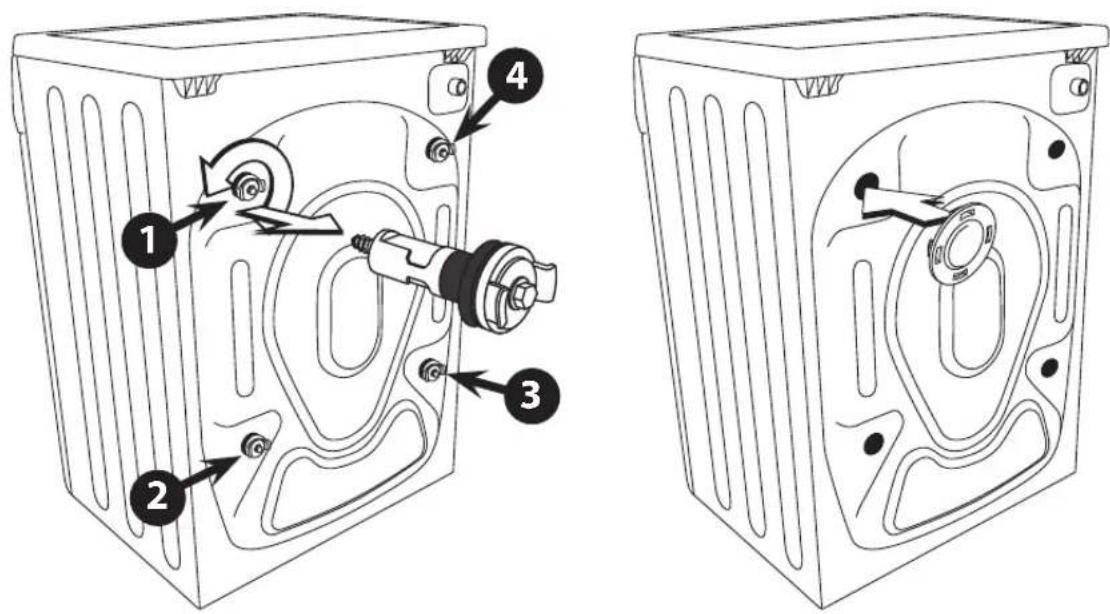
To remove the transit bolts:
- Ensure the unit is fully disconnected from the mains power by unplugging it from the mains.
- Unscrew the four (4) transit bolts.
- They are located at the rear side of the washer dryer. Use a spanner (not included) to loosen the four (4) transit bolts, then pull out the bolts horizontally. Ensure the plastic bolt guides (if any) are also removed.
- Snap in the plastic caps to cover the transit bolt holes.

Keep the four (4) transit bolts in a safe place, in case you need to move the washer dryer.
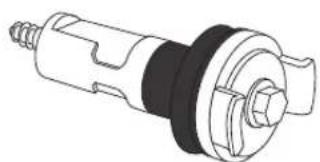
* All images are for indication only; please refer to your individual unit for actual item.
Installing Your Washer dryer
Please read and follow the instructions carefully.
- In addition to the instructions mentioned here, special regulations of the relevant water and power supply companies may apply. If in doubt, have the washer dryer connected by a qualified technician.
- The washer dryer is heavy - caution when lifting it. Do not lift by projecting components (e.g. washer dryer door).
- Warning: Frozen hoses may tear/burst. Do not install washer dryer in outdoor areas or where there is a risk of frost.
- Lay hoses and cables in such a way that there is no risk of trapping or kinking.

Additional space (approximately 60mm) is required for the rear of the washer dryer. This is to allow enough space for the water hose and drain hose connections.
Choosing the Right Location for Your Washer dryer
- Make sure there's enough space for your washer dryer. • Install your washer dryer on a flat, stable surface to avoid excessive vibration and noise. • The ventilation openings in the base of the washer dryer must not be obstructed by carpet.
- Exhaust air must not be discharged into a flue which is used for exhausting fumes from appliances burning gas or other fuels.

Two or more people are required to move the washing machine.
- Start by tilting the washer dryer backwards. • One person should stand behind it, holding the rear of the top panel. The other person should grip the bottom feet at the front. • We recommend that you entrust the installation of the washer dryer to a qualified technician.
INSTALLATION
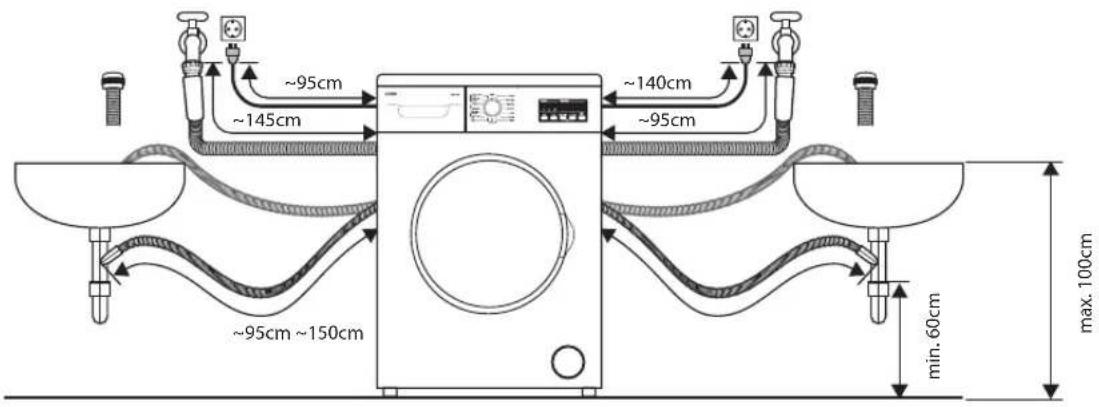
Hose and Cable Lengths
How to connect from the left side
How to connect from the right side
There are 4 levelling feet on the underside. They MUST be adjusted to make sure the washer dryer is level.
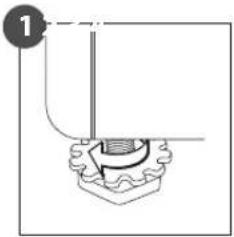
On each foot, loosen the lock ring by turning clockwise.
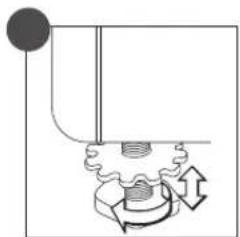
Adjust all four feet by rotating each upwards or downwards.
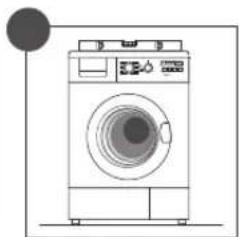
Use a spirit level to ensure the washer dryer is level.
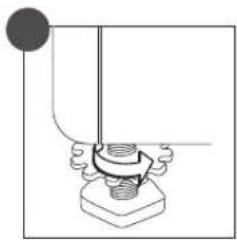
Tighten each lock ring by turning them anti-clockwise (towards the washer dryer body).
Ensure all four lock rings are tightened securely. Check the feet are still bolted to the washer dryer - if they're unbolted, the washer dryer will move around.
Water Supply Hose
Points to remember
- Follow the instructions in this section to avoid water leaks.
- Don't connect the hose to a combination tap.
- Don't twist, squash, modify or cut the hose.
- This machine is designed to connect to the cold water supply. Do not connect to the hot water supply.
- Use only the new water supply hose supplied. Old hose sets should not be reused.
• The mains water pressure must be 0.1MPa - 1MPa.
- If your washer dryer is delivered in freezing weather conditions, leave it at room temperature for 24 hours after you've set it up before using it. This ensures there's no ice blocking the water supply hose. If your water supply hose freezes, add 2 or 3 litres of warm water to the drum. Then run a "Spin" only programme.
* All images are for indication only; please refer to your individual unit for actual item.
INSTALLATION
Connecting the Water Supply Hose
- To prevent leakage from the connection joints, ensure the rubber washer seals are fitted to each end of the water supply hose. Do not use without the seals in place.
- Fit the straight end of the water supply hose to the cold water tap.
- Connect the angled end of the white headed hose to the water inlet valve on the machine. Hand tighten the plastic parts of the connections. If you are unsure, please call a qualified plumber.
- Open the tap slowly and check that there are no leaks around the connection joints.
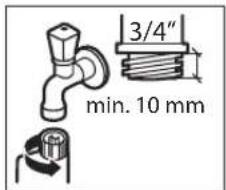
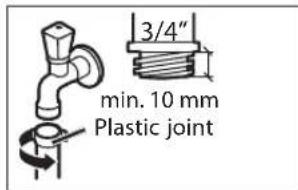
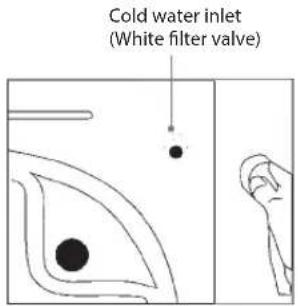
Draining to a sink or wash-basin
- Secure the drain hose in position, so it can't drop out of the basin.
- Don't block the basin's drain outlet, and make sure that the drainage through is sufficient to prevent overflowing.
- Don't let the tip of the drain hose dip into the drained water, as this can cause the water to flow back into the washer dryer.
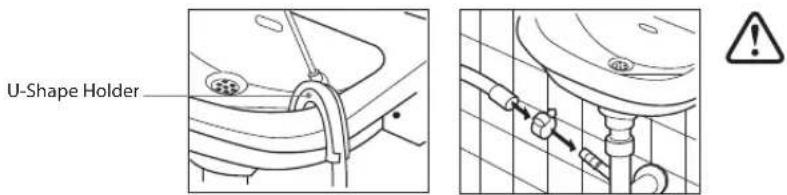
When connecting to the drain ensure the blanking plate has been removed.
Draining to a wash-basin Draining to a drain hose
Connecting to the Mains Supply
For your safety:
- Do not use a mains plug adapter or extension cable.
- If the mains cable or mains plug are damaged, disconnect from the main, stop using them and call a qualified technician for assistance.
- Mains cord of your washer dryer is equipped with an Earthed plug. This plug must always be inserted to an earthed socket capable of supplying 13 Amps. If you don't have such a socket and fuses in your house, please call a qualified electrician.
First time use
Some water may be left in your machine due to tests carried out during production. To dispose of this water, it is recommended to perform the first washing operation with the programme (Cotton 90°C) and without laundry by inserting 1/2 portion of detergent in the main detergent (II) compartment of the detergent drawer.

During initial start-up and use of the unit, there may be a slight smell while the motor is settling in. This is not a fault; this is normal operation.
* All images are for indication only; please refer to your individual unit for actual item.
Product Overview
The unit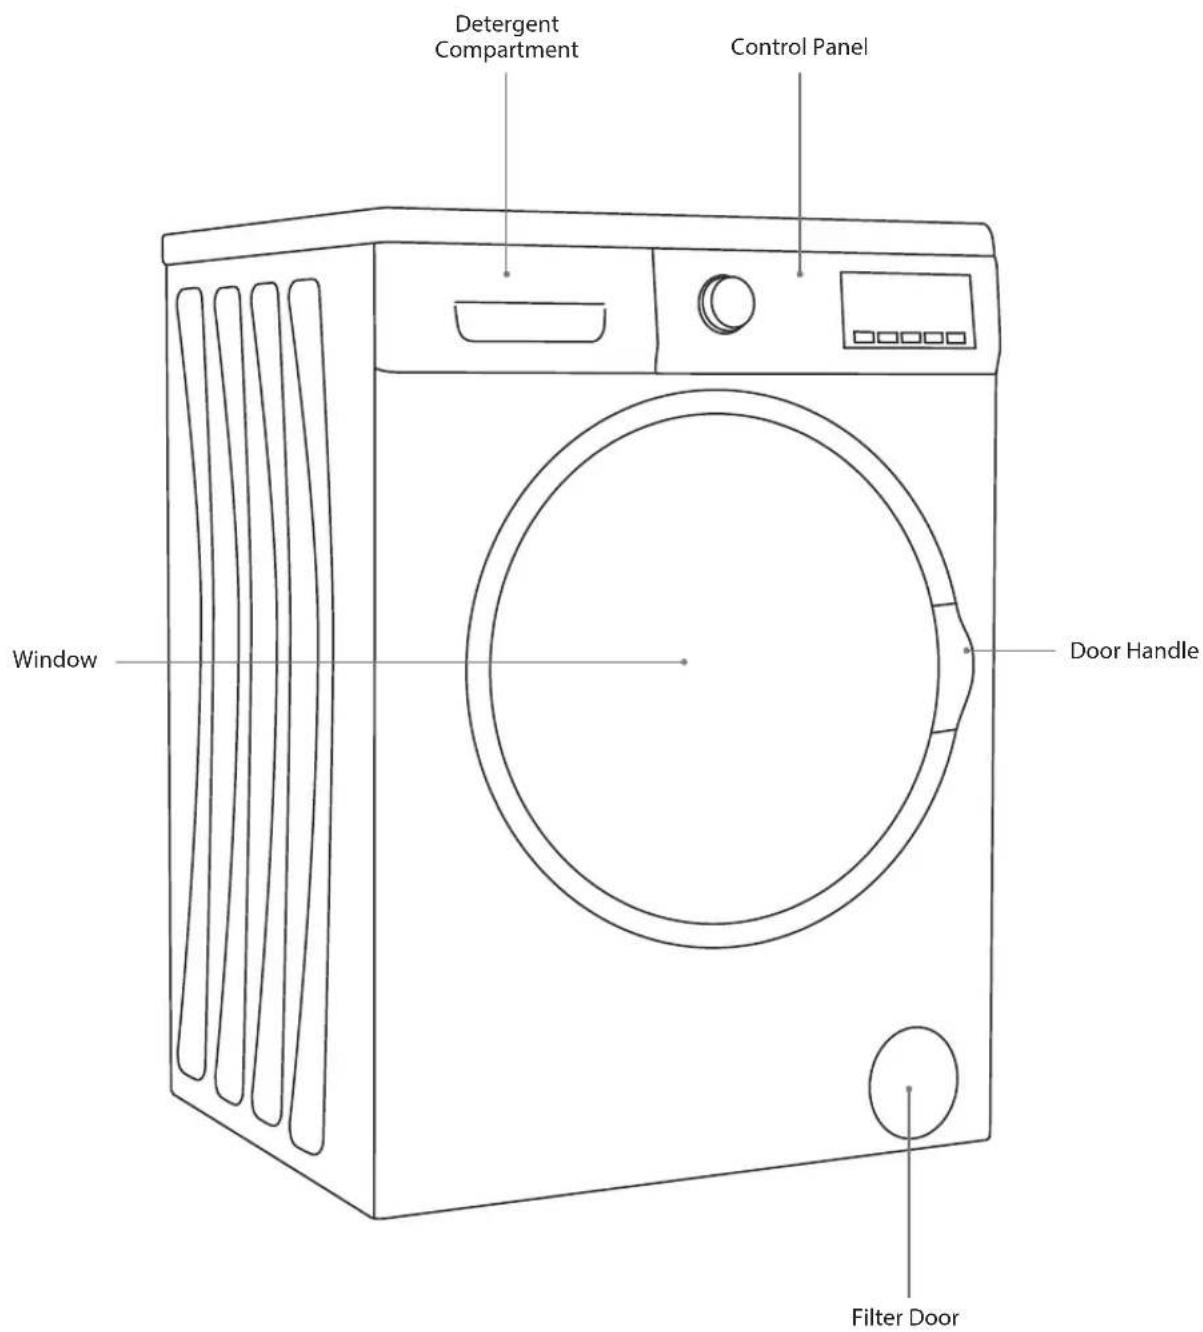
Control Panel![graph TD A["Power and Programme Selection Dial"] --> B["Different wash/dry programmes can be selected according to your requirements."] B --> C["Cotton Wash & Dry"] B --> D["QuickWash & Dry"] B --> E["Cotton Dry"] B --> F["Gently Dry"] B --> G["Daily Fast 60°/60°"] B --> H["Super Rapid 15°"] B --> I…](/content/2026/05/968458/images/f2847ce674663ae39eee57fa3fa088cef6fe6066ec980859907827f003766273.jpg)

If you want to cancel any programme running:
- Switch the programme knob to OFF position.
- Your machine will stop the washing operation and the programme will be cancelled. (Ensure the Child Lock is off, otherwise the original programme will continue.)
- To empty the water accumulated in the machine switch the programme knob to any programme.
- Your machine will perform the necessary discharge operation and cancel the programme.
- You can then select a new programme.
Preparation
Read the following to understand how best to prepare your laundry for washing.
Preparing Laundry
- Check that pockets do not contain any objects which may damage your clothes and the washer dryer such as coins, lighter or matches.
- To prevent any large, heavy objects (e.g., buckles, large buttons, etc.) from hitting the glass door, turn your clothing inside out, or remove the heavy objects. These could damage your laundry or the washer dryer.
- For small items use a washing net.
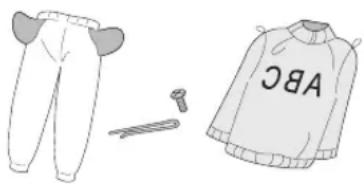
Amount of laundry per wash or drying programme
Your washer dryer has a maximum capacity of 7kg of laundry that can be washed and a maximum capacity of 5kg of laundry that can be dried. All the wash and wash/dry programmes have different laundry loads so it's very important that you know the load capacity of each programme to get the best out of your washer dryer.

Remember if you fill your washer dryer with 7kg of laundry and you want to run a drying programme after the wash programme you will have to remove 2kg of the laundry.
Some Laundry Weights
Below is a table showing some laundry weights to help you gauge what your laundry weight is.
| Laundry Dry Weight (g) | |
| Bedsheet (double) 725 | |
| Pillowcase 240 | |
| Bath Towel 700 | |
| Hand Towel 225 | |
| Shirt 190 | |
| Cotton Shirt 200 | |
| Jeans 650 | |
| Trousers 400 | |
| T-shirt 120 |
Adding Detergent and Softener
- Add detergent into the appropriate dispenser.
- Apply softener before you start washing.
- Apply detergent and softener according to the washing amount, the soiling level, the water hardness in your area and the manufacturer's instructions of these products.
- For slightly dirty clothes, do not pre-wash and put a small amount of detergent in compartment 2 (II) of the detergent drawer.
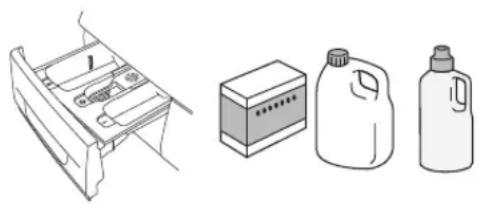
If you are using liquid detergent insert the guide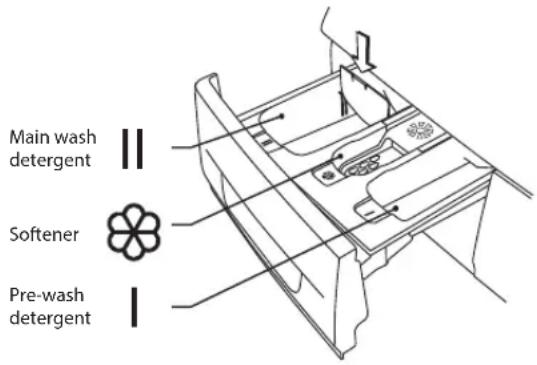

Dilute viscous fabric softener and fabric conditioner with water. Prevent blockage of the overflow. Maximum level is 40ml.
- Do not use washer dryer when the detergent drawer is removed. It may cause a water leak or it may not work normally.
- If you forget to add detergent, you can drain the washer dryer by running a spin-only programme. Then you can add detergent and start the programme again. Detergent only reaches the drum when water flushes through the detergent drawer.
- To prevent powdered detergent from staying in the drawer, dry the inside of the drawer with a cloth. Make sure the powder isn't lumpy when you add it to the drawer.
- If the rinse cycle isn't removing all the detergent from your wash, use less detergent.
- Softener should not exceed the MAX level in the compartment.
- Wash out unused softener with a splash of water or a damp cloth after the programme has finished.
- You can use your liquid detergents in all programmes without prewashing. For this, fit the liquid detergent level plate from the accessories bag into the 2nd compartment of the detergent drawer and set the amount of liquid detergent according to the levels on this plate. Remember to detach the liquid detergent plate when done.
- Do not put too much laundry or detergent into the washer dryer. It may cause issues with the washer dryer or laundry.

Do not use detergent balls when using any drying cycle.
Selecting the Programme
Here are the available programmes, additional functions, and option settings. Spin speed can be selected separately for certain programmes.
| Program Description | Description Prewash | Function1 | ### | Max Temperature | Max Load Washing/ Drying (kg) | Preset Setting | ||
| Default Spin (rpm) | Approximate Time (Min) | |||||||
| Cotton | 90°C | Heat resistant, cotton and linen textiles. (Underwear, bed sheets, tablecloths). | X | ✓ | 90°C 7.0 / 5 | 0* 1400 190 | ||
| 60°C Eco | X | ✓ | 60°C 7.0 / 5 | 0* 1400 205 | ||||
| Eco 20°C | X | ✓ | 20°C 3.5 / 3 | 5** 1400 103 | ||||
| Synthetics | Synthetics and synthetic blended textiles (synthetic blended shirts, blouses, socks etc.) | X | ✓ | 60°C 3.5 / 3 | 5 800 110 | |||
| Woolens | Woollen and wool blended textiles with a machine washable label. | X | ✓ | 30°C | 2.5 Wash Only | 600 44 | ||
| Curtains | Use this programme to wash curtains only. | X | ✓ | 30°C | 2.5 Wash Only | 600 112 | ||
| Rinse | Provides an additional rinse to any type of laundry after the washing cycle. | X | X | Water temp 7.0 / 5.0 1400 46 | ||||
| Allergy Safe | Baby clothes with a machine washable label. | X | ✓ | 60°C 3.5 / 3 | 5 800 228 | |||
| Spin | Separate spin procedure | X | X | - | 7.0 / 5.0 14 | 00 21 | ||
| Super Rapid 15' | Lightly soiled, cotton, coloured and linen textiles. Due to the short washing time of this programme, we recommend that less detergent is used than with other programmes. The programme may last longer than 15 minutes if your Washer dryer detects an uneven load. | X | ✓ | 30°C 2.0 / 2 | 0 800 15 | |||
| Daily Fast 60 Min | Soiled, cotton, coloured and linen textiles. | X | ✓ | 60°C 3.0 / 3 | 0 1400 60 | |||
| Gentle Dry | Delicate laundry bearing the suitable for machine dry label. | X | X | NA | 3.5 Dry Only | NA | 100 | |
| Cotton Dry | Cotton laundry bearing the "suitable for machine dry" label. | X | X | NA | 5.0 Dry Only | NA | 156 | |
| Quick Wash & Dry | Cotton, coloured and linen laundry bearing "suitable for machine dry" label. Note: Your machine determines the programme duration based on the amount of laundry loaded. | X | ✓ | 30°C | Up to 3 cotton shirts only | NA | 33 | |
| Cotton Wash & Dry | Cotton and linen textiles (Underwear, bed sheets, tablecloth). | X | ✓ | 60°C | 5.0 / 5.0 Max 3kg towels | NA | 285 | |
* Maximum of 3.5kg of towelling material. ** Maximum of 2kg of towelling material. *** If 2kg or less of laundry is inserted, the wash time will be reduced to 30 mins.

- Standard washing cycle programs are the Standard 60°C Cotton Program and the Standard 40°C Cotton Program. These cycles are suitable for cleaning naturally-soiled laundry and are the most efficient washing cycles in terms of combined energy and water consumption.
- For all washing programs, please follow the detergent recommendations on the garment label or on the detergent's packaging.
- Washing times depend on the program type, ambient water temperature, and wash load (weight and type).
- Energy and water consumption will vary according to wash load and type, extra functions, tap water, and ambient temperatures. • The actual water temperature may differ from the declared cycle temperature.
- Your washer dryer will automatically detect if you have only inserted half a load or less of laundry, and it will automatically reduce the washing time, water consumption, and energy in some programs.
- Your washer dryer has an Auto Balance feature. Washing times will be longer if the laundry in the drum needs to be balanced.
Drying Option/Duration Table
The table below shows the drying options and times that can be selected per program. Wool and Curtains programs do not have a drying cycle.
| Program | Drying Profile | Selectable Options (1-14-15) | Selectable Drying Duration (1-14-15) | ||||
| Cotton Cotton Dry Option 1 | Option 2 Option 3 30 60 120 | ||||||
| Cotton Eco Cotton Dry Option | Option 2 Option 3 30 60 120 | ||||||
| Eco 20°C | Cotton Dry | Option 1 | Option 2 | 30 | 60 | - | |
| Synthetics | Gentle Dry | Option 1 Option 2 Option 3 Option 3 30 60 120 | |||||
| Rinse | Cotton Dry Option 1 Option 2 | Option 3 30 60 120 | |||||
| Allergy Safe | Cotton Dry | Option 1 | Option 2 | 30 | 60 | - | |
| Spin | Cotton Dry Option 1 Option 2 | Option 3 30 60 120 | |||||
| Super Rapid 15' | Cotton Dry Option 1 | - | 30 60 120 | ||||
| Daily Fast 60 Min | Cotton Dry Option 1 Option 2 | 30 60 120 | |||||
| Gentle Dry | Gentle Dry | Option 1 | Option 2(Default) | Option 3 30 60 120 | |||
| Cotton Dry Cotton Dry Option | 1 | Option 2(Default) | Option 3 30 60 120 | ||||
| Quick Wash & Dry | Cotton Dry | Option 1(Default) | - | - | - | - | |
| Cotton Wash & Dry | Cotton Dry Option 1 | Option 2(Default) | Option 3 30 60 120 | ||||
Which Detergent to Use
The care label is crucial to ensure correct detergent selection, temperature, and laundry treatment.
| Washing and type of textile Washing temperature Detergent | ||
| Boil washable white washing made of linen or cotton | 30°C - 90°C (Max) | Standard detergent containing bleach and optical brighteners |
| Coloured washing made of linen or cotton | 30°C - 60°C (Max) | Colour detergent without bleach and optical brighteners |
| Coloured washing made of easy-care fibres, synthetic materials | 30°C - 60°C (Max) | Colour/mild detergent without optical brighteners |
| Delicate fine textiles, silk or viscose | 30°C - 40°C (Max) Mild detergent | |
| Wool 30°C - 40°C (Max) | Detergent for woollens | |
Wash Setting
First washing operation
Some water may be left in your machine due to tests carried out during production. To dispose of this water, it is recommended to perform the first washing operation with the Cotton 90°C program and without laundry, by inserting 1/2 portion of detergent in the 2nd compartment of the detergent drawer.

During initial start-up and use of the unit, there may be a slight smell while the motor is settling in. This is not a fault; this is normal operation.
Standard Washing
- Pull the door handle and put the laundry in the drum. Make sure no laundry gets caught in the door.
- Close the door and turn the Programme Dial to select your wash program and water temperature.
- Adjust the temperature (if required). The temperature cannot be set higher than the program's set temperature.
- Adjust the Spin Speed (if required). The spin speed cannot be set higher than the programme's set speed.
- Select any Optional Functions.
- Add detergent into the detergent drawer. The quantity of detergent will depend on the amount of laundry, the degree of soiling, and the water hardness. Use the amount of detergent suggested on the packaging of the detergent.

To pause the programme you have selected, press the Start / Pause button. The electronic display will blink when the machine is in pause mode.
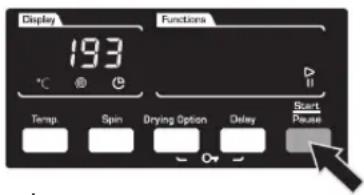
- Press the Start / Pause button to start the washing.
- The washer dryers with display End when the programme is complete.

- If the door is locked and you switched the washer dryer off - or if there's a power cut - it will stay locked for 2 minutes.
- If the machine is full of water, do not open the door.
Manual Soaking
To manually soak your laundry, press the Start / Pause button a few minutes after the wash programme has started when the drum is full of water. The washer dryer will suspend the laundry to soak it in the water. After your desired soaking time, press the Start / Pause button, the machine will continue the previous wash.
Half-load detection system (Wash Cycle only)
Your machine features a half-load detection system. In case you load machine to approximately half or less than the maximum laundry capacity, your machine will run so as to save washing time, water consumption and energy in some programmes. When half load function is active, the machine can complete the programme you have set in a shorter time.
Washing Water Temperature Selection
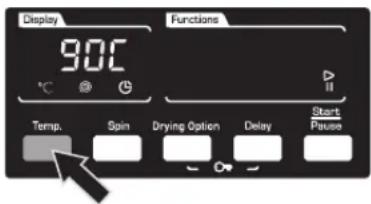
You can select the washing water temperature with the Temp button.
You can gradually decrease the washing water temperature between the maximum temperature of the selected programme and cold washing by repeatedly pressing the Temp button.
If you have missed the washing water temperature you want, continue and the temperature selection will loop back around.
Temperature Cycle
90°-80°-70°-60°-50°-40°-30°- and -- (cold)
Spin Speed
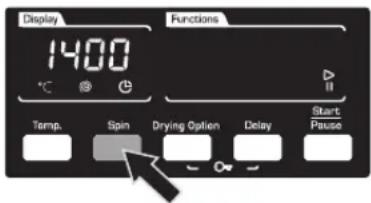
You can adjust the spin speed by pressing the Spin button. Only a lower spin speed than the one of the selected program can be selected.
Spin speeds selectable are:
1400 - 1200 - 1000 - 800 - 600 - 400 - or -- (no spin)
Manual Drying Options
If you haven't selected a Wash & Dry programme you can manually select a drying option to follow on from your wash cycle. Time will be added to the total programme time. Remember to check the drying load capacity in the programme table.
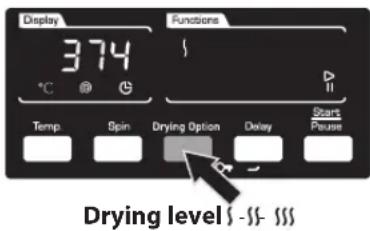
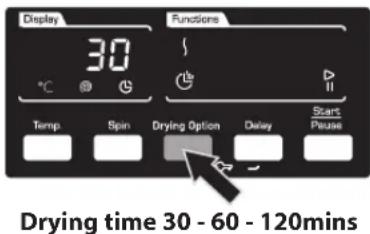
You have two types of drying option, Drying option or Drying time.
- Press the Drying Option button to cycle through the options.
Drying Option load table
| Option Recommended 1 - 2 kg 3 - 4 kg 5 kg | ||||
| 1 - § | For laundry that will be ironed before use. | √ √ | × | |
| 2 - §§ | For laundry that requires hanging. | × √ | √ | |
| 3 - +++ | For laundry that will be folded and put away | × √ | √ | |
Drying time table
| Time Recommended Load level | ||
| 30 | For laundry that will be ironed before use. | 1/2 to 2/3 full |
| 60 | For laundry that requires hanging. | 1/2 to 2/3 full |
| 120 | For laundry that will be folded and put away | 1/2 to 2/3 full |
How to Set the Child Lock
The Child Lock prevents children from stopping programmes accidentally. It locks the control buttons and the Programme Dial. However, you can still select OFF on the programme dial and the cycle will stop.
Switch the washer dryer on.
- When the washer dryer is operating, press and hold Easy Delay Timer and Prewash button for 3 seconds. The letters 'CL' will be displayed for a few seconds showing the child lock is active. If any button is pressed or the Programme Dial is turned the letters 'CL' will flash in the display. Press the buttons in the same way to unlock.
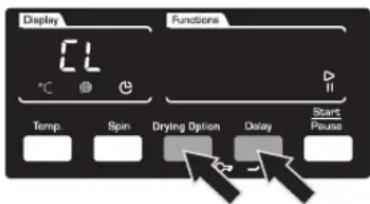

The child lock will switch off automatically at the end of the wash programme.
Selecting a Delay Timer
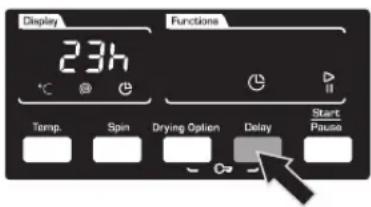
You can set your Washer Dryer to start up to 23 hours after pressing the START button.
- Select your programme then press the Delay button. If you continually press the Delay button the delay time will increase by 1 hour per press.
Finishing programme
- Your machine will stop by itself as soon as the programme you have selected finishes. • The door lock will release and the End show in the display.
- Turn the Programme Dial back to OFF.

If you stop the programme yourself by turning the Programme dial to OFF, the door will take 2 minutes to unlock.
Removing Laundry
- Open the washer dryer door and remove your laundry.
- Remove any foreign objects to avoid risk of rusting.
- Leave the door and detergent drawer open so that residual water can evaporate.
- If you have finished using the washer dryer, turn off the water and mains supply.
Maintenance - Cleaning the Washer Dryer

Always unplug the washer dryer before cleaning.
Cleaning the Drum
Rust left inside the drum by metal articles should be removed immediately with chlorine-free detergent. Never use steel wool.

Don't put laundry in the washer dryer during the drum cleaning.
Cleaning the Exterior of your Washer Dryer
• Clean the outside of your washer dryer with a soft cloth and mild detergent such as kitchen detergent. - Don't splash water over the washer dryer. - Do not use cream cleansers, thinners or products containing alcohol or kerosene.
Cleaning the Detergent Drawer and Siphon Plug
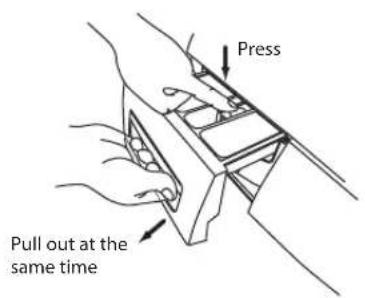
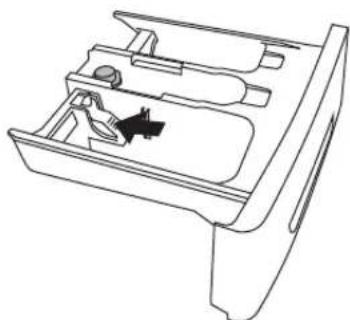
- Remove the detergent drawer by pulling and pressing gently on the rear centre part of the softener compartment.
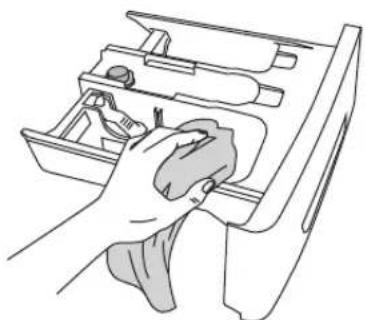
- Wash out old detergent from the drawer with water. (Use a cloth to clean the washer dryer.) Residue detergent soon builds up if you don't clean the drawer regularly, and can develop mould.
- Return drawer to original position.
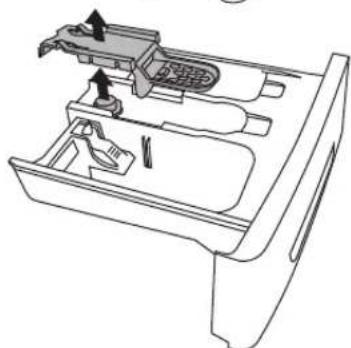
- Disassemble the detergent drawer. Remove the siphon
plug and clean the any residual softener thoroughly. Replace the cleaned siphon plug and check that it is fitted properly.
Cleaning the Door Seal and Window
• Wipe the window and seal after each wash to remove lint and stains. If lint builds up, it can cause leaks - Remove any coins, buttons and other objects from the door seal after each wash.
* All images are for indication only; please refer to your individual unit for actual item.
Cleaning the Drain Filter

Be careful not to burn yourself as water in the pump may be hot after a high temperature wash.
Before cleaning the drain filter, first start the spin programme, then switch off and unplug the washer dryer.
- Gently Open the Service Flap. Place a suitable container under the service flap to catch the water.
- Carefully loosen the drain filter. Turn anti-clockwise until the water gently begins to run out, this is normal.
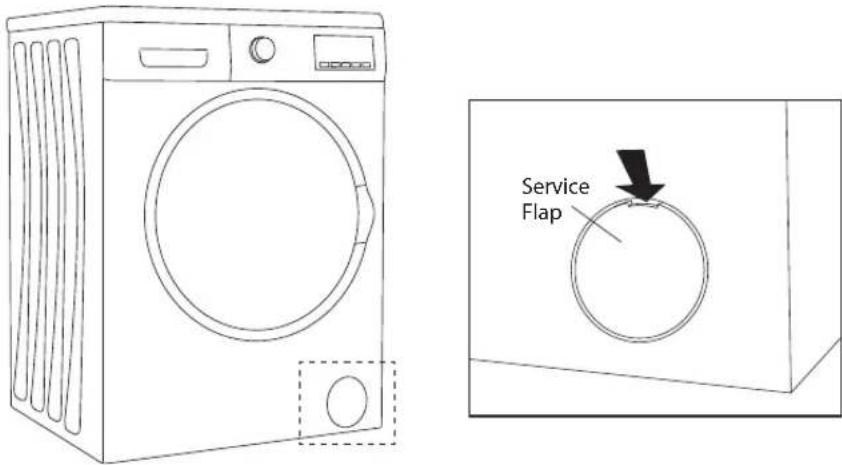
- Remove the filter once the water has stopped.
- Remove any lint and debris before carefully replacing the filter.
- Turn the filter clockwise and screw the filter back into place.
- Close the service flap.
![graph LR A["Circle with internal structure"] --> B["Roller with arrow indicating rotation"] B --> C["Curved part with curved arrow indicating rotation"]](/content/2026/05/968458/images/5331c9619e6f4873fef356e5f17cc3ec7055879637838c81b57e5db3ce68e682.jpg)
* All images are for indication only; please refer to your individual unit for actual item.
Troubleshooting
| Problem Possible Causes Remedy | ||
| Your machine does not start. | It is not plugged in. | Plug it in and switch on at the mains. |
| Fuse blown. Replace the fuse. | ||
| Power cut. Check mains power. | ||
| Start/Pause button not pressed. Press on Start/Pause button. | ||
| The door is not closed properly. | Close the door. | |
| Programme dial is in the 'OFF' position. | Turn the programme dial to the desired position. | |
| The door is not closed properly. Close the door of your machine. | ||
| Your machine does not intake water. | Water tap is turned off. Turn your water tap on. | |
| Water inlet hose may be twisted. | Check water inlet hose and untwist. | |
| Water inlet hose clogged. Clean water inlet hose filters. | ||
| Valve inlet filter clogged. Clean the valve inlet filters. | ||
| The door is not closed properly. | Close the door. | |
| Your machine does not discharge water. | Discharging hose is clogged or twisted. | Check the discharging hose, then either clean or untwist it. |
| Pump filter clogged. Clean the pump filter. | ||
| Your machine vibrates. | The machine is not level. | Adjust the feet and level the machine. |
| The transit bolts are still it place. | Remove the transit bolts. | |
| You have only loaded a very small load so the drum is unbalanced. | Add more laundry. | |
| Your machine is overloaded or not loaded correctly. | Remove some laundry and load the drum correctly. | |
| Excessive foam is formed in the detergent drawer. | Excessive amount of detergent used. | Press on Start/Pause button. To eliminate foam formation, mix a spoon of softener with half a litre of water, and pour the mixture in the detergent drawer. After 5-10 minutes, press on Start/ Pause button again. In your next washing operation, adjust the detergent dose accordingly. |
| Wrong detergent used. | Use detergents produced only for automatic washing machines in your machine. | |
| Unsatisfactory washing result. | Your laundry is too soiled for the wash programme you have chosen. | Choose a programme that is suitable. |
| Amount of detergent used is insufficient. | Adjust the amount of detergent based on the amount the laundry is soiled.Check your detergent instructions, make sure you are adding the correct amount for the weight of your load. | |
| You're machine is overloaded. | Load the correct weight of laundry. Check the programme table. Not all programmes allow 7kgs of laundry. | |
| The water in your area may be very hard. | Check the detergent guidelines, you may need to increase the amount of detergent used. | |
| You may not have loaded your laundry evenly. | Load your laundry correctly. | |
| You can't see water in the drum during washing. | No fault. Water is in the unseen part of the drum. | - |
| The laundry has detergent residue after washing. | Non-dissolving particles of some detergents may stick to your laundry and show as white spots. | Perform an extra rinse by setting your machine to "Rinse" programme, or clean the spots using a brush after your laundry is dry. |
| Grey spots appear on the laundry. | The reason for such spots may be oil, cream or ointment. | Apply the maximum amount of detergent instructed by the detergent manufacturer in the next washing operation. |
| Spinning operation is not performed or runs late. | No fault. Unbalanced load control system has been activated. | Unbalanced load control system will try to spread your laundry by tumbling for a while. Spinning operation will begin after your laundry is spread. Place the laundry in the machine in a balanced fashion the next time. |
| You may have under loaded your machine. | If you only have one item of laundry in the machine try adding a little more so the drum can balance and spin. | |
| Laundry remains damp after the drying operation. | Appropriate drying programme is not selected. The maximum load capacity for the selected programme might be exceeded. | See the Programme table for drying load capacities. |
Error Codes
Your washer dryer has some built-in error codes. If it stops working properly, the table below shows you which lights will be illuminated and what the possible fault is.
| Problem Possible Fault What to do | ||
| E01 | The door of your machine is not shut properly. | Shut the door properly until you hear a click. If your machine persists to indicate the fault, turn off your machine, unplug it and contact the nearest authorised service agent immediately. |
| E02 | The water pressure or the water level inside the machine is low. | Check the tap is fully turned on. Mains water may be cut-off. If the problem still continues, your machine will stop after a while automatically. Unplug the machine, turn off your tap and contact the nearest authorised service agent. |
| E03 | The pump is faulty or pump filter is clogged or electrical connection of the pump is faulty. | Clean the pump filter. If the problem persists, contact the nearest authorised service. |
| E04 | Your machine has excessive amount of water. | Your machine should automatically pump excess water out, if it doesn’t contact the nearest authorised service. |
Product Fiche
Brand: Logik
Model: L7W5D18
Energy efficiency class: B
Energy consumption (washing, spinning, drying) (kWh/cycle): 5.67
Energy consumption (washing and spinning only) (kWh/cycle): 1.23
Washing performance class: A
Water remaining after spin (%) (as a proportion of dry weight wash): 53
Max spin speed (rpm): 1400
Washing capacity (Cotton 60° full load) (kg): 7
Drying capacity (kg): 5
Water consumption (washing, spinning, drying) (L/cycle): 132
Water consumption (washing and spinning only) (L/cycle): 50
Washing and drying time (min): 525
Energy consumption (washing, spinning, drying) (kWh/annum)*: 1134
Water consumption (washing, spinning, drying) (L/annum)*: 26400
Energy consumption (washing and spinning only) (kWh/annum)**: 246
Water consumption (washing and spinning only) (L/annum)**: 10000
Noise during washing using standard 60°C cotton washing cycle according with Directive 86/594/EEC: 58
Noise during spinning using standard 60°C cotton washing cycle according with Directive 86/594/EEC: 77
Noise during drying using "cotton dry" drying cycle according with Directive 86/594/EEC: 64
- The actual water temperature may differ from the declared cycle temperature.
- Program duration, energy consumption and water consumption values may vary according to wash load weight and type, selected extra functions, tap water and ambient temperature.
*Estimated annual consumption for four-person household, always using drier (200 cycles).
**Estimated annual consumption for four-person household, never using drier (200 cycles).
| Energy | Washer-Dryer | |
| Manufacturer |  | |
| Model | L7W5D18 | |
| More efficient |  | |
| A | ||
| B | ||
| C | ||
| D | ||
| E | ||
| F | ||
| G | ||
| Less efficient | ||
| Energy consumption kWh(to wash and dry a full capacitywash load at 60°C) | 5.67 | |
| Washing (only) kWhActual energy consumption will dependon how the appliance is used | 1.23 | |
| Washing performance | A B C D E F G | |
| A: higher G: lowerSpin speed (rpm) | 1400 | |
| Capacity Washing(cotton) kg Drying | 7.05.0 | |
| Water consumption (total)e | 132 | |
| Noise Washing(dB(A)re 1 pW) SpinningDrying | 587764 | |
| Further information is containedin product brochures. |  | |
| Norm EN 50229Washer-drier Label Directive No 98/60/EC | ||
Specification
| Brand Logik | |
| Model L7W5D18 | |
| Energy Efficiency Class B | |
| Product Type Washer Dryer | |
| Rated Voltage 220 - 240V~ | |
| Rated Frequency 50 Hz | |
| Rated Power Input 2200 W | |
| Dimensions of the Product | 597mm (W) x 582mm (D) (excluding controls and door) x 845mm (minimum) (H) |
| Weight of the Product 77.6 kg | |
| Maximum Mass of Dry Laundry 7 kg (Cotton programmes only) | |
| Maximum Mass of Laundry for Drying 5 kg | |
| Pressure of Tap Water 0.1 MPa - 1 MPa |
Features and specifications are subject to change without prior notice.

Team Knowhow
Help with all life's kit*
For general information about this appliance and handy hints and tips, please visit
teamknowhow.com or call 0344 5611234.
Partmaster
.co.uk
Visit Partmaster.co.uk today for the easiest way to buy electrical spares and accessories. With over 1 million spares and accessories available we can deliver direct to your door the very next day.
Visit www.partmaster.co.uk or call 0344 800 3456 (UK customers only) Calls charged at National Rate.
The symbol on the product or its packaging indicates that this product must not be disposed of with your other household waste. Instead, it is your responsibility to dispose of your waste equipment by handing it over to a designated collection point for the recycling of waste electrical and electronic equipment. The separate collection and recycling of your waste equipment at the time of disposal will help conserve natural resources and ensure that it is recycled in a manner that protects human health and the environment.
For more information about where you can drop off your waste for recycling, please contact your local authority, or where you purchased your product.
DSG Retail Ltd. (co. no. 504877)
1 Portal Way, London, W3 6RS, UK
IB-L7W5D18-190212V2

- CONTENTS
- SAFETY WARNINGS
- UNPACKING
- REMOVING THE TRANSIT BOLTS
- INSTALLING YOUR WASHER DRYER
- PRODUCT OVERVIEW
- PREPARATION
- WASH SETTING
- MAINTENANCE - CLEANING THE WASHER DRYER
- TROUBLESHOOTING
- ERROR CODES
- PRODUCT FICHE
- ENERGY LABEL
- SPECIFICATION
- IMPORTANT SAFETY INSTRUCTIONS READ CAREFULLY AND KEEP FOR FUTURE REFERENCE
- WARNING
- GENERAL USE
- POWER SOURCE AND CABLE
- TO PREVENT INJURY / DAMAGE
- INSTALLATION
- TO REMOVE THE TRANSIT BOLTS
- PLEASE READ AND FOLLOW THE INSTRUCTIONS CAREFULLY
- CHOOSING THE RIGHT LOCATION FOR YOUR WASHER DRYER
- HOSE AND CABLE LENGTHS
- WATER SUPPLY HOSE
- POINTS TO REMEMBER
- CONNECTING THE WATER SUPPLY HOSE
- DRAINING TO A SINK OR WASH-BASIN
- CONNECTING TO THE MAINS SUPPLY
- FOR YOUR SAFETY
- FIRST TIME USE
- PREPARING LAUNDRY
- AMOUNT OF LAUNDRY PER WASH OR DRYING PROGRAMME
- SOME LAUNDRY WEIGHTS
- ADDING DETERGENT AND SOFTENER
- SELECTING THE PROGRAMME
- DRYING OPTION/DURATION TABLE
- WHICH DETERGENT TO USE
- FIRST WASHING OPERATION
- STANDARD WASHING
- MANUAL SOAKING
- HALF-LOAD DETECTION SYSTEM (WASH CYCLE ONLY)
- WASHING WATER TEMPERATURE SELECTION
- SPIN SPEED
- MANUAL DRYING OPTIONS
- HOW TO SET THE CHILD LOCK
- SELECTING A DELAY TIMER
- FINISHING PROGRAMME
- REMOVING LAUNDRY
- CLEANING THE DRUM
- CLEANING THE EXTERIOR OF YOUR WASHER DRYER
- CLEANING THE DETERGENT DRAWER AND SIPHON PLUG
- CLEANING THE DOOR SEAL AND WINDOW
- CLEANING THE DRAIN FILTER
- TEAM KNOWHOW
- PARTMASTER
Brand : Logik
Model : L7W5D18
Category : Washing machine