
Expresso Pro EX1040 - Coffee maker Salton - Free user manual and instructions
Find the device manual for free Expresso Pro EX1040 Salton in PDF.


| Brand | Salton |
| Model | Expresso Pro EX1040 |
| Product Type | Espresso and Cappuccino Maker |
| Power Supply | 120 V AC, 60 Hz |
| Power Consumption | Approximately 1000 W (estimated) |
| Water Tank Capacity | Approximately 1 L (between MIN and MAX marks) |
| Pump Pressure | Steam pressure (not pump, but steam-driven) |
| Functions | Espresso, Cappuccino, Latte, Hot Water, Steam |
| Filter Types | Single cup and double cup filters |
| Steam Nozzle | Rotatable frothing nozzle with removable tip |
| Clock | Digital clock with hour and minute setting |
| Indicator Lights | Power, Ready, Steam |
| Safety Features | Polarized plug, automatic shut-off, pressure safety |
| Housing Material | Stainless steel and plastic |
| Drip Tray | Removable with cover |
| Warranty | 1 year limited |
| Cleaning | Hand wash parts; descale every 6 months with vinegar solution |
| Recommended Coffee Grind | Fine drip grind (not powdery) |
| Included Accessories | Measuring spoon/presser, single and double cup filters, frothing tip |
Frequently Asked Questions - Expresso Pro EX1040 Salton
User questions about Expresso Pro EX1040 Salton
0 question about this device. Answer the ones you know or ask your own.
Ask a new question about this device
Download the instructions for your Coffee maker in PDF format for free! Find your manual Expresso Pro EX1040 - Salton and take your electronic device back in hand. On this page are published all the documents necessary for the use of your device. Expresso Pro EX1040 by Salton.
USER MANUAL Expresso Pro EX1040 Salton
natural_image
Exterior view of a stainless steel sallon milk swast machine (no text or symbols visible on the device body)Instruction Booklet
Model: EX-1040
IMPORTANT SAFEGUARDS
When using electrical appliances, basic safety precautions should always be followed including the following:
- Read all instructions.
- DO NOT touch hot surfaces. Use handles or knobs.
- To protect against electrical hazards, do not immerse cord, plugs, or the appliance in water or other liquid.
- Close supervision is necessary when any appliance is used by or near children.
- Unplug from outlet when not in use and before cleaning. Allow to cool before putting on or taking off parts, and before cleaning the appliance.
- DO NOT operate any appliance with a damaged cord or plug or after the appliance malfunctions, or has been damaged in any manner. Return appliance to SALTON for examination, repair or adjustment. See Warranty.
- The use of accessories or attachments not recommended by SALTON may result in fire, electric shock or injury.
- DO NOT use outdoors.
- DO NOT let cord hang over edge of table or counter, or touch hot surfaces.
- DO NOT place on or near a hot gas or electric burner, or in a heated oven.
- Always attach plug to appliance first, then plug cord into the wall outlet. To disconnect from wall outlet, turn any control to 'OFF', then remove plug from wall outlet.
- DO NOT use appliance for other than intended use.
- DO NOT leave unit unattended while in use.
- Extreme caution must be used when moving an appliance containing hot liquids.
- Metallic parts become extremely hot. During use, touch only plastic handles.
- Ensure that during operation the Filter Holder is correctly installed and locked, as the machine works under pressure.
- Fill the tank only with water. DO NOT use any other liquids.
- Empty the drip tray regularly (see section on 'Cleaning').
- Never point the steam jet at yourself or others. Always place a vessel under the steam nozzle when using.
- Any maintenance other than cleaning should be performed by an authorized service facility.
SAVE THESE INSTRUCTIONS
HOUSEHOLD USE ONLY
POLARIZED PLUG
This appliance has a polarized plug (one blade is wider than the other). To reduce the risk of electric shock, this plug will fit in a polarized outlet only one way. If the plug does not fit fully in the outlet, reverse the plug. If it still does not fit, contact a qualified electrician. DO NOT modify the plug in any way.
INTRODUCTION
It was about 100 years ago when the Italians introduced the first machine that would extract the rich and robust flavour of coffee through a rapid brewing process, aptly called "espress".
Espresso Coffee is made by rapidly forcing hot water by means of steam pressure through the ground coffee, thus extracting the flavour. Now that you are the proud owner of the SALTON Espresso Pro, you can experience the taste of a delicious cup of espresso or cappuccino, time and time again, in the comfort of your own home.
The SALTON Espresso Pro retains the authenticity of the traditional steam-activated brewing process, but simplifies the operation. A perfect cup of espresso is assured every time. Cappuccino is a combination of half espresso coffee and half frothy, heated (steamed) milk. Frothy milk is easily obtained using the special Frothing Nozzle on the SALTON Espresso Pro.
Espresso has no match as an after-dinner drink. It complements any meal. When liqueurs are added to freshly brewed espresso, an altogether new taste is obtained.
- The flavour of your coffee depends on the characteristics of the beans from which it is made, the type of bean, how and where it was grown, harvested and processed. Espresso is not a variety of coffee bean; it describes the brewing process.
The flavour of a coffee bean is determined by many factors, but its taste and aroma are the result of the roasting process. Most coffees purchased from the supermarket shelf are roasted to a moderate degree. Their beans are light in colour and have a dry, rather than an oily surface. This is known as the American roast. Coffee beans that are roasted for a longer period of time and at higher temperatures will be much darker in colour. A darker roasted bean tends to have an oily surface and creates more caramelization of the sugar and starches within the bean. The darker beans will produce a more flavourful cup of coffee than the lightly-roasted beans. 3
- A fine drip grind coffee must be used. A powdery grind is too fine for the SALTON Espresso Pro. A powdery grind will cake in the basket and block the water from flowing through.
- You may prefer to add chicory to obtain a unique flavour. Remember do not use chicory separately from the roasted ground coffee. Have the chicory ground together with your roasted coffee.
- Cappuccino is simply a combination of espresso and hot, frothy milk. Equal amounts of espresso and milk are recommended. Cappuccino is usually topped with nutmeg, cinnamon or chocolate shavings.
- Espresso coffee should be served immediately after it is made.
- Espresso is served in demitasse cups (2 to 2 1/2 oz.). A 4 or 6 oz. cup or glass is used for cappuccino. A 12 oz. glass is used for latte.
- Ideally, coffee beans should be ground immediately before using.
- To continue to preserve the rich flavour, it is best to store your ground coffee or beans in an airtight container in the freezer of your refrigerator. Ground coffee readily picks up other food flavours.
Know Your Salton Espresso Pro
Before using your SALTON Espresso Pro, you should become familiar with all of its parts. Identify all parts of your SALTON Espresso Pro according to the 'Description of Parts' so that you have no doubt when reading the instructions that follow.
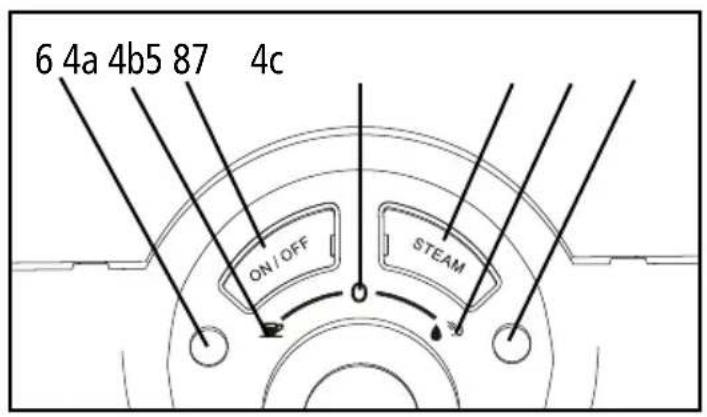
DESCRIPTION OF PARTS
- Water Tank Lid
- Water Tank
- Clock
- Function Selector
a) Coffee preparation -
b) Heating position - O
c) Water/Steam function ♠ /
- On/Off Switch
- Power Indicator Light
- Steam Switch
- Ready Indicator Light
- Drip Tray Cover
- Drip Tray
- Filter Holder
- Filter Retaining Device
- Large Filter (2 cups)
- Small Filter (1 cup)
- Steam Nozzle/Frothing Tip
- Coffee Measuring Spoon/Coffee Presser



Before First Use
- Wash the Filter Holder, Filter Baskets, Frothing Nozzle/Tip, the Removable Drip Tray and Cover and the Water Tank in warm, soapy water. Rinse thoroughly and dry.
- Wipe the machine with a damp cloth.
- Run water only (without coffee) through your SALTON Espresso Pro. Follow the instructions below in the "Making Espresso Coffee" section, numbers 1 through 16.
Setting the Time
- Place the machine on a flat, dry, heat resistant surface. Make sure the On/Off Switch is in the 'Off' position (Button is up). Plug into a 120 volt AC outlet. The display lights up in blue and the indicators flash at 12 o'clock.
- In order to set the hours, please keep the left-hand H (Hour) button pressed down until the time is reached. Alternatively, if you press the button repeatedly the hour indicator jumps forward one hour at a time.
- In order to set the minutes, please keep the right-hand M (Minute) button pressed down until the time is reached. Alternatively, if you press the button repeatedly the minute indicator jumps forward one minute at a time.
- After you have set the time it is stored after approximately 5 seconds and the display stops flashing.
- The clock display normally shuts off after approximately 3 minutes. To display the blue light clock again simply press the H or M button or the On/Off Switch. The clock continues to work when the machine is switched off. If there has been a power failure or the plug has been removed from the socket, the clock has to be reset.
Making Espresso Coffee
Tip: Serve espresso, latte or cappuccino in pre-heated cups because the heat helps to retain the flavour and aroma.
- Ensure the Drip Tray is empty. Replace the Tray Cover on the Drip Tray and install on machine.
- Open the Tank Lid and pull the Water Tank out using the built-in handle.
-
Fill with fresh cold water. The water level must be between the 'MIN' and 'MAX'. Install the water tank ensuring that it locks onto the hook at the back of the machine. Press down lightly to open the valve.
-
Release the Filter holder by turning the handle to the left in the direction.
-
Place the desired Filter into the Filter Holder. Add one to two level measuring spoons of coffee. Distribute the coffee evenly and press the coffee lightly with the coffee presser. The aim of pressing the ground coffee is to distribute it evenly in the Filter rather than compress it. Carefully remove any excess coffee from the edge of the Filter.
-
Place the Filter Holder on the brewing head (the Filter Retaining Device is pointing backward) and slide it toward the locked position ' 🔒
-
Ensure that the Filter Holder is firmly secured in the brewing head.
-
Press the push button On/Off Switch so that the Power Indicator Light comes on and the Ready Indicator Light flashes.
- When the water has reached the proper temperature the Ready Indicator Light goes off.
- Place 1 or 2 cups under the brewing head.
- Turn the Function Selector to the symbol ' on the left side. The Ready Indicator Light lights up and espresso coffee begin to flow. NOTE: The flow will stop briefly and then restart again. This is normal.
- Stop the brewing process when desired by turning the Function Selector back to the Heating Position 'Q The machine is now in standby mode.
- Turn the handle of the Filter Holder in the direction ' and remove the Filter Holder from the machine.
- Hold the Filter containing the ground coffee in position by pressing the Filter Retaining Device against the Filter rim. Turn the Filter Holder over and knock out the used coffee while retaining the Filter in the Holder.
- Remove the Filter Holder from the machine between uses. This will extend the life of the rubber gasket in the brewing head.
- To make more espresso, ensure there is sufficient water in the Tank and then repeat steps 3 to 14 above.
Making Cappuccino
Cappuccino is prepared by topping Espresso coffee with frothy steamed milk. Low fat or skimmed milk works best. To make a cappuccino, you must first make an espresso. Follow steps 1 to 12 in 'Making Espresso'.
To froth the milk, proceed as follows:
- Make sure that the Function Selector is in the '' position.
- Swing the Steam Nozzle out so that you can position a narrow heat resistant pitcher comfortably under the Nozzle.
- Fill the pitcher with a maximum of 56ml (2 oz) of cold milk (warm, hot or old milk does not foam).
- Press the Steam Switch ('Steam') to on (the down position). The Ready Indicator Light flashes. Wait until the Ready Light goes off. The device is now ready for foaming.
-
Turn the Function Selector to the right / ♠ Immerse the Steam Nozzle in the pitcher just under the surface of the milk and move it gently up and down.
-
Once the milk reaches the desired volume, you can warm the milk more by lowering the Steam Nozzle to the bottom of the pitcher. Do not make the milk boil or the froth will be ruined.
- Turn the Function Selector back to the '' position so that the machine is in standby mode.
- Scoop out the froth onto the espresso. Add hot milk to fill the cup. A cappuccino is usually composed of 1/3 coffee, 1/3 hot milk and 1/3 frothed milk.
- Your cappuccino is now ready. Sprinkle with cinnamon, nutmeg or chocolate to taste.
Note: During the steam function, a few drops of hot water may come out of the steam nozzle. This is completely normal. Nevertheless, you should be careful in order to avoid scalding.
Making Latte
Latte is prepared by pouring Espresso coffee over steamed milk and froth mixture. Low fat or skimmed milk works best. To make a Latte you must first make an espresso. Follow steps 1 to 12 in 'Making Espresso'.
The milk is prepared in two parts:
- Froth 56ml (2 oz) of skim milk in a small pitcher following steps 1 to 7 in the 'Making Cappuccino' section.
- Steam 280ml (10 oz) of milk by plunging the Nozzle deep into a larger pitcher as in step 5 above.
Fill a 336 ml (12 oz) glass 1/2 full with the steamed milk then scoop the foam onto the milk. Pour the espresso coffee gently over top of the foam in the center of the glass. Spoon a little more foam on top and dust with chocolate, cinnamon or nutmeg to taste.
Producing Hot Water
You can also use the Espresso Pro to prepare water for tea, hot chocolate or other hot beverages or broths.
- Make sure there is sufficient fresh cold water in the Tank.
- Turn the Function Selector to the '' position.
-
Turn the machine on by pushing the 'On/Off' Switch to the down position. The Power Indicator Light comes on and the Ready Light begins flashing.
-
When the Ready Light goes off the water has reached the correct temperature.
- Swing the Steam Nozzle to the outside and place a heat-resistant pitcher under the Steam Nozzle.
- Turn the Function Selector to the right to the steam position ' / ♦
- Hot water now flows into your pitcher.
- Stop the brewing process as soon as the pitcher is full. Turn the Function Selector back to the 'Oposition and turn the machine off by pushing the On/Off Switch to the up position.
CARE AND CLEANING
Unplug the appliance from the electrical outlet and allow it to cool completely before cleaning.
- In order to empty the Drip Tray, remove it completely from the machine and lift the Cover. The Drip Tray should be emptied regularly.
- The Water Tank, Drip Tray, Drip Tray Cover, Filters, Filter Holder and Frothing Tip can be cleaned by hand in warm soapy water. Rinse the parts in clear water and dry thoroughly.
- Never wash any components in a dishwasher.
- If the holes in the Filters become clogged, clean the Filter with a fine brush.
- Milk residue will build up on the Steam Nozzle and Frothing Tip. It is very important to wipe them with a damp cloth after each use. This will prevent clogging and ensure perfect results. The frothing tip may be removed for easy cleaning. However, if clogging does occur pull the Frothing Tip off the Steam Nozzle tube and use a paper clip or needle to loosen any milk remnants in the Nozzle. Rinse the Frothing Tip under a faucet and replace on the Steam Tube.
- Wipe the outside of the unit with a damp cloth. Never immerse the appliance in water or in any other liquid. DO NOT use abrasive cleaners.
Gasket
The gasket on the brewing head should be checked regularly. If the Filter Holder can be moved too easily in the brewing head, the gasket is worn and needs replacing.
WARNING: If the Gasket is worn, the Filter Holder can become loose when under pressure. Do not operate the machine until you have replaced the gasket in the brewing head. Release the screw below the brewing head with a screwdriver. Remove the stainless steel shower plate and silicone gasket. Replace the gasket making sure it is installed with the shower plate in exactly the same manner.
De-scaling
Over a period of time, minerals and calcium found in water will accumulate in your Espresso Pro and affect its operation. The appliance should be cleaned approximately every six months, depending on the frequency of use and water conditions. Use a cleaning solution made from 2 tablespoons of distilled vinegar or citric acid in half a litre of lukewarm water in the following manner to remove the mineral deposits.
- Make sure the appliance is cold and has been disconnected from the wall outlet, the On/Off Switch is in the Off position and the Function Selector is on 'Q
- Pour the solution described above into the Water Tank.
- Use the machine as described in the 'Making Espresso' section but without the Filter Holder or Filters.
- Run half the solution through the brewing head into a container and the discard.
- Switch the machine off but leave the Function Selector in the Espresso (left) position to de-scale the internal thermoblock for about 10 to 15 minutes.
- Run the remaining solution through the Steam Nozzle using the directions in the 'Making Hot Water' section.
-
If necessary, follow the directions above and repeat the cleaning process.
-
To remove the vinegar residue, rinse the Tank and refill it with fresh cold water. Run 2 – 3 tanks of water through the system as was done in steps 1 to 6 above to clear the machine of any de-scaling solution.
- Let the machine cool.
- Once the machine has cooled completely, turn the machine over and remove the screw in the center of the shower plate. Remove the shower plate and silicone gasket.
- Soak the shower plate in vinegar for 1-2 hours. If there is any scale build-up, brush the shower plate with a small brush.
- Wash the gasket in warm soapy water and rinse.
- Replace the shower plate and silicone gasket.
HELPFUL HINTS
The use of filtered water or bottled water is highly recommended to enhance the taste of the espresso and to avoid the calcification of the machine.
Distilled water should be avoided as it is dull and tasteless.
The secret for frothing the milk is the use right technique, which can be acquired only with practice.
If the brewing time of the coffee is longer than usual (i.e. if it takes too long for the coffee to flow out of the brewing head), then it is likely that the coffee grind is too fine, that too much coffee has been used or that the coffee has been pressed too tightly.
If the preparation time for the coffee is too short and the resulting flavour is weak (i.e. if the coffee flows quickly out of the brewing head), then it is possible that the coffee grind is too coarse, the amount of coffee used was too small or the coffee was not pressed down firmly enough.
If you prefer to have thicker “foam” for your milk, allow the foamed milk to stand for 30 to 60 seconds before you put it in the espresso.
If there is a significant increase in the brewing time and/or frequent clogging of the Steam Nozzle, the machine is calcified and needs de-scaling.
TROUBLESHOOTING
| MALFUNCTION POSSIBLE | CAUSES REMEDY | |
| When the On/Off Switch is pressed but the machine does not turn on. | ·The device has no power supply. | ·Check the outlet with another device. |
| Coffee stops flowing. ·The | Water Tank is empty.·The Tank is not correctly inserted, the valve is not open.·The holes in the Filter and the shower plate on the brewing head are blocked.·Air has entered the thermoblock heating element.·Coffee is too fine or pressed too tightly.·Scale has accumulated in the espresso machine. | ·Switch off the machine and fill the Water Tank.·Ensure that the Tank is positioned on the hook at the back of the machine. Press the Tank down slightly so that the valve opens.·Clean the Filter Holder, the Filter and the shower plate on the brewing head.·Run steam through the steam nozzle (see the section on 'Making Cappuccino').·Loosen the coffee grinds.·The appliance needs to be de-scaled. |
| The pump makes loud noises. | ·The Filter Holder is in the wrong position or is not closed firmly enough.·Too much coffee in the Filter. | ·Switch off the machine and tighten the Filter Holder·Remove any excess coffee. |
| The espresso comes out of the edge of the Filter Holder. | ·The Filter Holder is in the wrong position or is not closed firmly enough.·Too much coffee in the Filter. | ·Switch off the machine and tighten the Filter Holder.·Remove any excess coffee. |
| The espresso coffee is too cold. | ·The cups were not warmed beforehand.·The pre-heating cycle had not been completed.·Machine was run before the Ready Light went off. | ·Rinse out the cups with hot water.·Wait for the pre-heating cycle to finish.·Wait until the Ready Light goes off. |
| The coffee has a slightly acidic taste. | · The espresso coffee was not fresh. | · Use fresh coffee. |
| The coffee is light in colour and flows too quickly. | · Coffee too coarse or not pressed firmly enough.· There is not enough coffee in the filter. | · Use the coffee presser.· Put more coffee in the filter. |
| The coffee foam is dark or the coffee flows slowly. | · Coffee too fine or pressed too tightly.· Too much coffee in the filter. | · Switch off the machine and tighten the Filter Holder· Remove any excess coffee. |
| The coffee is not creamy enough. | · The adapter inside the Filter Holder is not correctly inserted.· Wrong coffee was used. | · Insert the adapter correctly.· Change the brand if necessary. |
| The milk does not foam enough. | · The milk used is not suitable.· The milk is not cold enough.· The steam nozzle is dirty or blocked. | · Check the fat content. Very cold skim milk makes the best foam.· Use cold milk.· Clean the steam nozzle. |
| The Ready Light flashes during the brewing process or while steam is being produced. | · The water temperature is no longer high enough. | · Turn the Function Selector to 'O' and wait until the Light goes off again. |
RECIPES THAT YOU'LL LOVE!
Café Chocolate
Combine equal parts of espresso with hot chocolate. Top with sweetened whipped cream. Garnish generously with chocolate shavings and sprinkle with cinnamon.
Café Tia Maria
Place 1 tablespoon of Tia Maria liqueur into demitasse cup, fill with espresso, garnish with hot, frothy milk.
Café Anisette
Place 1 tablespoon Anisette liqueur into a demitasse cup, fill with espresso, garnish with a twist of lemon peel.
Café Grand Marnier
Place 1 tablespoon of Grand Marnier into a demitasse cup, fill with espresso, garnish with whipped cream and sprinkle with orange peel.
Café Galliano
Place 1 tablespoon of Galliano liqueur into demitasse cup, fill with espresso, garnish with twist of lemon peel.
Iced Espresso
Brew a large quantity of espresso and freeze it into ice cubes. Make another large quantity of espresso and chill it. In very tall glasses, place several espresso cubes and a scoop of coffee ice cream. Pour in chilled espresso. Dust with nutmeg.
Irish Coffee
A standard size coffee mug should be used. Fill coffee mug 2/3 full with espresso. To each cup, add 2 tablespoons sugar and 2 tablespoons Irish Whisky. Generously top with whipped cream.
Espresso Rum
Place 1 tablespoon of rum into a demitasse cup, fill with espresso, top with whipped cream and stir with a cinnamon stick.
Café Cognac
Place 1 tablespoon of cognac into a demitasse cup, fill with espresso, add 1 tablespoon of heavy cream.
Espresso Alexander
In a standard-sized cup, combine 1 tablespoon creme de cacao and 1 tablespoon brandy. Add 2 tablespoons heavy cream and fill with espresso. Garnish with a heaping dollop of whipped cream and chocolate shavings.
Café Español
This is best served in a tall, long-stemmed glass, but tastes wonderful in any glass. Rub lemon around rim of glass to moisten and then dip into a dish filled with sugar. Using an alcohol burner or Sterno, rotate the glass over flame so the sugar caramelises. Place spoon in glass to prevent cracking. Add 1 generous tablespoon of brandy and 1 tablespoon of Kahlua liqueur. Pour in espresso, stopping about 1 1/2 inches from top. Add whipped cream to top of glass. Serve on a dessert plate with spoon.
Café Israel
Follow procedure for Café Español, substituting 2 tablespoons of Sabra liqueur for Kahlua and brandy.
A short supply cord is provided to reduce the hazards of becoming entangled in or tripping over a long cord. Extension cords may be used if care is exercised in their use. If an extension cord is used, the marked electrical rating of the detachable power-supply cord or extension cord should be at least as great as the electrical rating of the appliance. If the appliance is of the grounded type, the extension cord should be a grounded 3-wire cord. The extension cord should be arranged so that it will not drape over the counter top or table top, where it can be pulled on by children or tripped over.
LIMITED WARRANTY
Salton Canada warrants that this appliance shall be free from defects in material and workmanship for a period of one year from the date of purchase. During this 'in-warranty' period, defective products will be repaired or replaced at the discretion of the retailer and/or Salton Canada. This warranty covers normal domestic usage and does not cover damage which occurs in shipment or failure which results from alteration, accident, misuse, abuse, glass breakage, neglect, commercial use or improper maintenance.
A defective product should be returned to the original place of purchase within the retailer's stipulated return/exchange period*. If you are unable to have a defective product replaced under warranty by the retailer, please check our website at "www.salton.com" for the service centre nearest you. You may also contact us for assistance by mail, e-mail, fax or telephone as listed below.
To ensure prompt 'in-warranty' service securely package and return the product to us prepaid. Be sure to include the original proof of purchase and a description of the defect along with your address and postal code.
For repairs not covered by the warranty, please contact us for assistance.
salton®
Customer Service Department
81A Brunswick
Dollard-des-Ormeaux
Quebec, Canada H9B 2J5
Website: www.salton.com
E-mail: service@salton.com
Fax: 514-685-8300
Tel: 514-685-3660
- IMPORTANT SAFEGUARDS
- SAVE THESE INSTRUCTIONS
- POLARIZED PLUG
- INTRODUCTION
- Know Your Salton Espresso Pro
- DESCRIPTION OF PARTS
- Before First Use
- Setting the Time
- Making Espresso Coffee
- Making Cappuccino
- Making Latte
- Producing Hot Water
- CARE AND CLEANING
- Gasket
- De-scaling
- HELPFUL HINTS
- TROUBLESHOOTING
- RECIPES THAT YOU'LL LOVE!
- Café Chocolate
- Café Tia Maria
- Café Anisette
- Café Grand Marnier
- Café Galliano
- Iced Espresso
- Irish Coffee
- Espresso Rum
- Café Cognac
- Espresso Alexander
- Café Español
- Café Israel
- LIMITED WARRANTY
- salton®
Brand : Salton
Model : Expresso Pro EX1040
Category : Coffee maker