
EX1091 - Coffee maker Salton - Free user manual and instructions
Find the device manual for free EX1091 Salton in PDF.


| Product Type | 3-in-1 Coffee Center (Filter Coffee, Espresso, Cappuccino) |
| Brand | Salton |
| Model | EX-1091 |
| Power Supply | 120 V ~, 60 Hz |
| Filter Coffee Capacity | Up to 12 cups (approx. 1.5 L) |
| Espresso Capacity | 2 or 4 cups |
| Water Reservoir | Separate for filter coffee; boiler for espresso |
| Control Type | Buttons and dials |
| Indicator Lights | Filter Coffee On/Off, Espresso/Cappuccino/Steam On/Off |
| Filter Coffee Features | Pause & Serve, Keep Warm Plate, Permanent Filter |
| Espresso Features | Steam Control Dial, Frothing Nozzle for cappuccino, Filter Lock |
| Safety Features | Polarized plug, Boiler cap safety, Pressure relief via steam control knob |
| Cleaning | Removable parts wash in warm soapy water; not dishwasher safe; descale every 6 months with vinegar |
| Maintenance | Descaling both filter coffee and espresso systems; clean steam nozzle with pin |
| Warranty | 1 year limited warranty (Salton Canada) |
Frequently Asked Questions - EX1091 Salton
User questions about EX1091 Salton
0 question about this device. Answer the ones you know or ask your own.
Ask a new question about this device
Download the instructions for your Coffee maker in PDF format for free! Find your manual EX1091 - Salton and take your electronic device back in hand. On this page are published all the documents necessary for the use of your device. EX1091 by Salton.
USER MANUAL EX1091 Salton
3-in-1 coffee centre

natural_image
Black salton coffee maker with glass and black casing, no visible text or symbols on the device itselfInstruction Booklet
Model: EX-1091
IMPORTANT SAFEGUARDS
When using electrical appliances, basic safety precautions should always be followed including the following:
- Read all instructions.
- DO NOT touch hot surfaces. Use handles or knobs.
- To protect against electrical hazards, do not immerse cord, plugs, or the appliance in water or other liquid.
- Close supervision is necessary when any appliance is used by or near children.
- Unplug from outlet when not in use and before cleaning. Allow to cool before putting on or taking off parts, and before cleaning the appliance.
- DO NOT operate any appliance with a damaged cord or plug or after the appliance malfunctions, or has been damaged in any manner. Return appliance to Salton for examination, repair or adjustment. See "Warranty" section.
- The use of accessories or attachments not recommended by Salton may result in fire, electric shock or personal injury.
- DO NOT use outdoors.
- DO NOT let cord hang over edge of table or counter, or touch hot surfaces.
- DO NOT place on or near a hot gas or electric burner, or in a heated oven.
- Always attach plug to appliance first, then plug cord into the wall outlet. To disconnect, turn any control to 'OFF', then remove plug from wall outlet.
- DO NOT use appliance for other than intended use.
- DO NOT leave unit unattended while in use.
- Extreme caution must be used when moving an appliance containing hot liquids.
- The carafe is designed for use with this appliance. It must never be used on a range top.
- DO NOT place the carafe on a wet or cold surface or in a microwave oven.
- DO NOT use the carafe if it is cracked or has a loose or weakened handle.
-
DO NOT clean the carafe with cleansers, steel wool pads or other abrasive material.
-
Scalding may occur if the Boiler Cap or Espresso Filter Holder are unscrewed or removed during the brewing cycle. Wait until the brewing cycle is complete and all water and steam have been used by the coffee maker. Open the steam control knob to be sure that there is no longer steam in the water chamber.
- Any maintenance other than cleaning should be performed by an authorized service facility.
- Do not open the Boiler Cap or remove the Filter Holder while machine is on, or as long as there is pressure in the boiler. To release the remaining steam, slowly turn the Steam Control Knob counterclockwise in order to release the pressure in pitcher of cold water. CAUTION: The steam is very hot.
SAVE THESE INSTRUCTIONS
HOUSEHOLD USE ONLY
POLARIZED PLUG
This appliance has a polarized plug (one blade is wider than the other). To reduce the risk of electric shock, this plug will fit in a polarized outlet only one way. If the plug does not fit fully in the outlet, reverse the plug. If it still does not fit, contact a qualified electrician. Do not modify the plug in any way.
BEFORE FIRST USE
Before using your 3-in-1 Coffee Center for the first time wash all removable parts in warm, soapy water, rinse thoroughly and dry. Run water through both sides of the machine, the filter coffee side and the espresso side. Follow the directions as described in each section, leaving out the coffee.
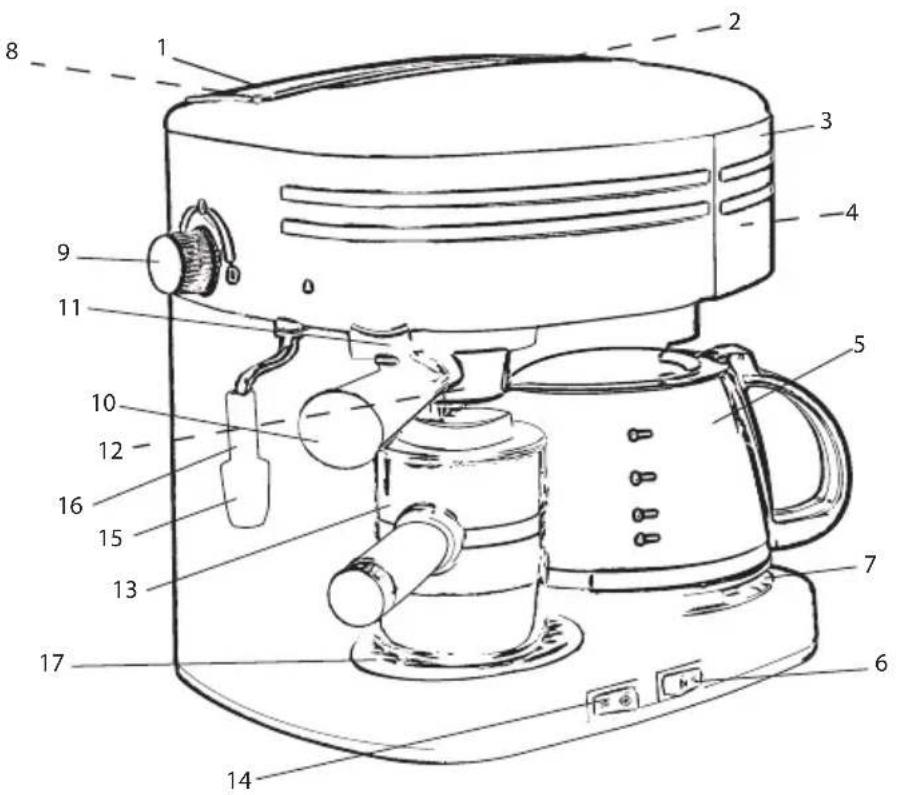
DESCRIPTION OF PARTS (See III. 1)
- Top Cover
- Water Reservoir for Filter Coffee (Under Top Cover)
- Swing-out Filter Holder
- Permanent Filter (Inside #3)
- Filter Coffee Carafe
- Filter Coffee On/Off Button and Indicator Light
- Keep Warm Plate
- Boiler Cap (Under Top Cover)
- Espresso/Steam Control Dial
- Espresso Filter Holder
- Filter Lock
- Metal Espresso Filter
- Espresso Coffee Carafe
- Espresso/Cappuccino/Steam On/Off Button and Indicator Light
- Frothing Nozzle
- Metal Steam Tube
- Drip Tray Cover
MAKING FILTER COFFEE
Plug into a 120 Volt AC outlet. Ensure the "Coffee" light is off.
- Lift the Top Cover and pour in the water from the Carafe to the desired amount indicated on the graduated Coffee Carafe markings.
- Swing out the Filter Holder. Lift out the Permanent Filter and fill with the desired amount of ground coffee. Place the Removable Filter back into the Filter Holder and swing the Filter Holder back into the closed position.
- Place the Coffee Carafe on the Keep Warm Plate. Make sure that it is securely in position.
- Turn the machine on by pressing on the Filter Coffee On/Off Button. The light will go on and the brewing cycle will begin.
- The Keep Warm Plate will keep the coffee hot until the Coffee On/Off Switch is turned off.
PAUSE & SERVE FEATURE
The Pause & Serve feature allows you to pour a cup of coffee before the brew cycle has finished. Remove the Carafe slowly to temporarily stop the flow of coffee. Quickly pour a cup of coffee and reposition the Carafe securely on the Keep Warm Plate. NOTE: Do not remove the Carafe for more than 30 seconds.
MAKING ESPRESSO COFFEE
- Plug into a 120 volt AC outlet. Make sure the Espresso/Cappuccino/Steam Indicator Light is Off and the Espresso/Steam Control Knob is positioned to the 'Off' (O) position.
- Lift the Top Cover.
- Unscrew the Boiler Cap by turning it counterclockwise.
- Fill the Espresso Carafe with 2 or 4 cups of cold water using the carafe markings for reference. Pour into the Boiler. NOTE: If steaming will be required fill the carafe to the 'dot' between the 2 and 4 cup marking for 2 cups or to the bottom of the metal rim for 4 cups so you have enough water for steaming.
-
Screw the Boiler Cap securely in place by turning clockwise.
-
Place the Metal Filter into Filter Holder and fill to the desired level with Espresso coffee.
NOTE: Markings inside the Filter indicate coffee level for 2 to 4 cups. Lightly tape down the coffee with the end of the measuring spoon. Never fill the Filter above the 4 cup marking.
-
Brush away excess coffee from the edge of the Filter.
-
To insert the Metal Filter/Filter Holder, push upward into the machine with the handle of the Filter Holder pointing to the left (see arrow printed on unit). Then turn the handle to the right (Lock position) until locked securely.
-
Place the Lid on the Carafe and position under the Filter Holder.
-
Turn the Espresso/Steam Control Dial clockwise to the Espresso (cup symbol). Press the Espresso/Cappuccino/Steam On/Off Button to the On position and the Indicator Light will go on. The Espresso will soon start to flow into the Carafe.
Warning: Do not attempt to remove either the Boiler Cap or Filter Holder during the brewing process. Scalding may occur.
-
When the Espresso has stopped flowing, turn off the Coffee Maker by pressing the Espresso/Cappuccino/Steam On/Off Button. The Indicator Light will go Off.
-
Remove the Carafe and pour Espresso into demitasse cups.
-
IMPORTANT: Turn the Espresso/Steam Control Knob to the steam position (steam cloud symbol) to relieve the pressure before removing the Filter Holder or the Boiler Cap.
-
To remove the Filter Holder move the handle towards the arrow on the left and lower. Hold the Metal Filter in place by pushing the Filter Holder Lock onto the rim of the Metal Filter. Coffee can now be tapped out while the Metal Filter is held in place.
-
Follow the instructions above for additional servings.
MAKING CAPPUCCINO
Cappuccino is prepared by topping Espresso coffee with frothy steamed milk.
- Fill a narrow pitcher half full with fresh, cold milk (the colder the better). Low fat or skim milk works best.
- Follow steps above for making Espresso.
- As soon as the Espresso starts to flow into the Carafe, slowly turn the Espresso/ Steam Control Dial to the Steam setting.
- Place the tip of the Frothing Nozzle just below the surface of the milk to produce the best froth and avoid splattering.
- Once the milk has been frothed, turn the Espresso/Steam Control Knob clockwise back to the Espresso (cup symbol) and the Espresso will continue to flow into the carafe. IMPORTANT: After the Espresso has stopped flowing into the carafe, turn the Espresso/Steam Control Knob back to the steam position for a few seconds to expel any milk remnants from the Steam Tube.
- Turn the appliance Off by pressing the Espresso/Cappuccino On/Off Button.
- Pour espresso into cups. Spoon frothed milk onto the Espresso and add hot milk to fill the cup. Sprinkle with cinnamon, nutmeg or chocolate.
- IMPORTANT: Before removing the Boiler Cap or Filter Holder slowly open the Steam Control Knob to relieve any pressure left in the Boiler. To remove the Filter Holder move the handle to the left and lower. Hold the Metal Filter in place by pushing the Filter Holder Lock onto the rim of the Metal Filter. Coffee can now be tapped out while the Metal Filter is held in place.
CARE AND MAINTENANCE
- Unplug the appliance from the electrical outlet and allow to cool completely before cleaning.
- Wash the Swing-out filter Holder, Permanent Filter, Filter Coffee Carafe and Lid, Espresso Carafe and Lid, Espresso Filter, Espresso Filter Holder, and Drip Tray Cover in warm, soapy water.
NOTE: To remove the Swing-Out Filter Holder, lift the Top Cover then swing out the Filter Holder and lift up. Rinse in clear water and dry thoroughly.
Never wash any components in a dishwasher.
- If the Steam Tube becomes blocked you may remove the Frothing Nozzle and clean it in hot soapy water. Use a pin in the hole of the Steam Tube to loosen any milk remnants. Replace the Nozzle after cleaning.
NOTE: Never you a toothpick or anything that could break off and block the Steam Tube hole.
- Wipe the outside with a damp cloth.
IMPORTANT: Never immerse the appliance in water or in any other liquid. Do not use abrasive cleaners.
DESCALING
Over a period of time, minerals and calcium found in water will accumulate in your 3-in 1 Coffee Centre and affect its operation. The appliance should be cleaned approximately every six months, depending on water conditions. Use distilled vinegar in the following manner to remove the mineral deposits.
Espresso Boiler
- Make sure the appliance has cooled completely and both switches are in the "Off" position.
- Unscrew the Boiler Cap.
- Fill the Espresso Carafe to the 4 level marking with white vinegar and pour into the Boiler.
- Close the Boiler Cap securely by turning it clockwise.
-
The Espresso Filter and the Filter Holder should be inserted until securely locked into position.
-
Place the Espresso Carafe on the Drip Tray.
- Plug into a wall outlet and press the Espresso/Cappuccino 'On/Off' Button.
- Let the whole quantity of vinegar run through the machine, then turn the appliance off.
- IMPORTANT: Turn the Espresso/Steam Control Knob to the steam position (steam cloud symbol) to relieve the pressure before removing the Filter Holder or the Boiler Cap.
- Repeat the above steps twice using cold water to rinse away any residual vinegar.
Filter Coffee System
- Fill the Filter Coffee Carafe with equal parts of white vinegar and cold water.
- Open the Lid of the Water Reservoir and pour in the vinegar/water solution. Close the Lid. Swing the Basket into the closed position.
- Place the Carafe on the Keep Warm Plate, making sure it is securely in position.
- Press the Filter Coffee 'On/Off' Switch to the On position.
- Let the whole quantity of the vinegar/water solution run through the machine, then turn the appliance off.
- Repeat the above steps twice using cold water to rinse away any residual vinegar.
TROUBLESHOOTING
| PROBLEM SOLUTION | |
| 1. Filter coffee does not flow. | Remember to fill Reservoir or Boiler with water before machine is switched On.Check if Switch is On.Use a coarser grind of coffee.Reduce the amount of coffee in the Espresso Filter. Do not compact coffee in the Filter. |
| 2. Filter coffee is too weak or flows too quickly. | Use a finer grind of coffee.Increase the amount of coffee in the Filter |
| 3. Filter coffee flows too slowly or is too strong. | Use coarser grind.Reduce the amount of coffee in the Filter.Follow the Descaling instructions in this booklet. |
| 4. Espresso coffee flows from the edge of the Filter Holder. | NOTE: Allow machine to cool completely.Wipe excess grinds from the Filter Holder.Make sure the Filter Holder is installed securely in the 'Lock' position. |
| 5. No steam from the Steam Tube or steam stops before frothing is complete. | NOTE: Allow machine to cool completely.Remember to fill the Boiler.Check if the switch is On.Make sure that the Espresso/Steam Control Knob is in the Steam position (steam cloud symbol).Close the Steam Control Knob, remove and wash the Steam Nozzle. Unblock the Steam Tube and using a straight pin. Then try again. |
| 6. Steam escapes from the Boiler Cap area. | This is the normal functioning of the pressure regulating device. |
A short supply cord is provided to reduce the hazards of becoming entangled in or tripping over a long cord. Extension cords may be used if care is exercised in their use. If an extension cord is used, the marked electrical rating of the detachable power-supply cord or extension cord should be at least as great as the electrical rating of the appliance. If the appliance is of the grounded type, the extension cord should be a grounded 3-wire cord. The extension cord should be arranged so that it will not drape over the counter top or table top, where it can be pulled on by children or tripped over.
LIMITED WARRANTY
Salton Canada warrants that this appliance shall be free from defects in material and workmanship for a period of one year from the date of purchase. During this 'in-warranty' period, defective products will be repaired or replaced at the discretion of the retailer and/or Salton Canada. This warranty covers normal domestic usage and does not cover damage which occurs in shipment or failure which results from alteration, accident, misuse, abuse, glass breakage, neglect, commercial use or improper maintenance.
A defective product should be returned to the original place of purchase within the retailer's stipulated return/exchange period*. If you are unable to have a defective product replaced under warranty by the retailer, please check our website at "www.salton.com" for the service centre nearest you. You may also contact us for assistance by mail, e-mail, fax or telephone as listed below.
To ensure prompt 'in-warranty' service securely package and return the product to us prepaid. Be sure to include the original proof of purchase and a description of the defect along with your address and postal code.
For repairs not covered by the warranty, please contact us for assistance.
SALTON CANADA
Customer Service Department
81A Brunswick,
Dollard-des-Ormeaux,
Quebec, Canada H9B 2J5
website: www.salton.com
E-mail: service@salton.com
Fax: 514-685-8300
Tel: 514-685-3660
- 3-in-1 coffee centre
- IMPORTANT SAFEGUARDS
- SAVE THESE INSTRUCTIONS
- HOUSEHOLD USE ONLY
- POLARIZED PLUG
- BEFORE FIRST USE
- DESCRIPTION OF PARTS (See III. 1)
- MAKING FILTER COFFEE
- PAUSE & SERVE FEATURE
- MAKING ESPRESSO COFFEE
- MAKING CAPPUCCINO
- CARE AND MAINTENANCE
- DESCALING
- Espresso Boiler
- Filter Coffee System
- TROUBLESHOOTING
- LIMITED WARRANTY
- SALTON CANADA
Brand : Salton
Model : EX1091
Category : Coffee maker