Sterling Deluxe S1000G - Cooker STOVES - Free user manual and instructions
Find the device manual for free Sterling Deluxe S1000G STOVES in PDF.


| Product Type | Freestanding Range Cooker |
| Brand | Stoves |
| Model | Sterling Deluxe S1000G |
| Overall Width | 1000 mm (approx. 39.4 inches) |
| Overall Depth | 600 mm (approx. 23.6 inches) |
| Overall Height | 900 mm (approx. 35.4 inches) |
| Weight | Approximately 90 kg |
| Energy Source | Gas (Natural Gas or LPG convertible) |
| Gas Supply Connection | 1/2 inch BSP rear left |
| Number of Gas Burners | 5 (including 1 wok burner) |
| Oven Type | Electric fan-assisted oven |
| Oven Capacity | 79 liters |
| Grill | Electric grill with variable setting |
| Storage Drawer | Yes, with removable inner tray |
| Control Type | Rotary knobs with electronic oven timer |
| Safety Features | Flame failure device on all gas burners; child lock on oven door |
| Cleaning & Maintenance | Enamel surfaces wipe clean; removable oven door for easy cleaning |
| Spare Parts Availability | Available via Stoves authorized dealers or website |
| Warranty | 2 years parts and labor (subject to registration) |
Frequently Asked Questions - Sterling Deluxe S1000G STOVES
User questions about Sterling Deluxe S1000G STOVES
0 question about this device. Answer the ones you know or ask your own.
Ask a new question about this device
Download the instructions for your Cooker in PDF format for free! Find your manual Sterling Deluxe S1000G - STOVES and take your electronic device back in hand. On this page are published all the documents necessary for the use of your device. Sterling Deluxe S1000G by STOVES.
USER MANUAL Sterling Deluxe S1000G STOVES
Countries of destination:
GB - Great Britain ☑
IE - Ireland ☑
DE - Germany
ES - Spain
FR - France
IT - Italy
PL - Poland
NL - Netherlands
SE - Sweden
CN - China
NZ - New Zealand
AU - Australia
To contact Stoves about your appliance, please call:

Customer Care Helpline
0344 815 3740
In case of difficulty within the UK

Warranty Registration
0800 952 1065
*Please call our Customer Care team for extended warranty

Spares Store
0344 815 3745

To register your appliance online:
www.stoves.co.uk

To contact us by email:
gdhainfo@gdha.com

To register your appliance by mail:
Please complete the warranty card and return to the address supplied

Alternatively general, spares and service information is available from our website at: www.stoves.co.uk
Calls are charged at the basic rate, please check with your telephone service provider for exact charges
Your new appliance comes with our 12-month guarantee, protecting you against electrical and mechanical breakdown. To register, please complete the registration form included, register online or by phone. For full terms & conditions of the manufacturer's guarantee, please refer to the website above. In addition, you may wish to purchase an extended warranty. A leaflet explaining how to do this is included with your appliance.
Our policy is one of constant development and improvement, therefore we cannot guarantee the strict accuracy of all of our illustrations and specifications. Changes may have been made subsequent to publishing.
Thank you for buying this British-built appliance from us.
This user guide book is designed to help you through each step of owning your new product.
Please read it carefully before you start using your appliance, as we have endeavored to answer as many questions as possible, and provide you with as much support as we can.
General information, spares and service information is available from our website.
If you should find something missing from your product or have any questions that are not covered in this user guide, please contact us (see contact information inside the front cover).
European Directives

As a producer and a supplier of cooking appliances we are committed to the protection of the environment and are in the compliance with the WEEE directive. All our electric products are labelled accordingly with the crossed out wheeled bin symbol. This indicates, for disposal purposes at end of life, that these products must be taken to a recognized collection points, such as local authority sites/local recycling centres.
This appliance Complies with European Community Directives (CE) for household and similar electrical appliances and Gas appliances where applicable.
This appliance conforms to European Directive regarding Eco design requirements for energy-related products. Our policy is one of constant development and improvement, therefore we cannot guarantee the strict accuracy of all of our illustrations and specifications - changes may have been made subsequent to publishing.
Hereby, Glen Dimplex Home Appliances Ltd. declares that the radio equipment types as shown in the table below, are in compliance with Directive 2014/53/EU. The full text of the EU declaration of conformity is available at the following internet address: www.stoves.co.uk in the online user manual for this appliance.
| ST RICH DX S900G ST R | CH DX S1000G ST RICH DX S1 | 100G |
| ST STER DX S900G ST S | TER DX S1000G ST STER DX S | 1100G |
| ST PREC DX S900G ST P | REC DX S1000G ST PREC DX S | 1100G |
Disposal of Packaging Material
The packaging materials used with this appliance can be recycled. Please dispose of the packaging materials in the appropriate container at your local waste disposal facilities.
WARNING
- During use the appliance becomes hot. Care should be taken to avoid touching heating elements.
- Children less than 8 years of age shall be kept away unless continuously supervised. This appliance can be used by children aged from 8 years and above and persons with reduced physical sensory or mental capabilities or lack of experience and knowledge if they have been given supervision or instruction concerning the use of the appliance in a safe way and understand the hazards involved. Children shall not play with the appliance. Cleaning and user maintenance shall not be made by children without supervision.
- Do not use harsh abrasive cleaners or sharp metal scrapers to clean the oven door glass or the hob, since they can scratch the surface, which may result in shattering of the glass.
- Do not use a steam cleaner on any cooking range, hob or oven appliance.
- If your appliance is fitted with a lid, any spillage should be removed from the lid before opening. The hob surface should be allowed to cool before closing the lid (if fitted).
- Ensure that the appliance is switched off before replacing the bulb to avoid electric shock.
- The appliance is not intended to be operated by means of an external timer or separate control system.
- Unattended cooking on a hob with fat or oil can be dangerous and may result in fire. NEVER try to extinguish a fire with water, but switch off the appliance and then cover the flame with a lid or damp cloth.
- Danger of fire: Do not store items on the cooking surfaces.
- Only use hob guards designed by the manufacturer of the cooking appliance or indicated by the manufacturer of the appliance in the instructions for use as suitable or hob guards incorporated in the appliance. The use of inappropriate hob guards can cause accidents.
- If the cooker is placed on a base, measures have to be taken to prevent the appliance slipping from the base.
- Never put items directly on the base of the oven or cover the oven with foil, as this can cause the base element to overheat.
- Accessible parts may become hot when the grill is in use. Children should be kept away.
- Do not place articles on or against the appliance.
- Always switch off your appliance and allow it to cool down before you clean any part of it.
- Although every care has been taken to ensure this appliance has no sharp edges, we recommend that you wear protective gloves when installing and moving this appliance. This will prevent injury.
- This appliance must be fitted to a switch providing all pole disconnection with a minimum contact separation of 3mm.
- Connection should be made with a suitable flexible cable with a minimum temperature of 70°C.
CAUTION
- This appliance must not be installed behind a decorative door in order to avoid overheating.
- The cooking process has to be supervised. A short term cooking process has to be supervised continuously.
- The use of a gas cooking appliance results in the production of heat, moisture and products of combustion in the room in which it is installed. Ensure that the kitchen is well ventilated especially when the appliance is in use: keep natural ventilation holes open or install a mechanical ventilation device (mechanical extractor hood). Prolonged intensive use of the appliance may call for additional ventilation, for example opening of a window, or more effective ventilation, for example increasing the level of mechanical ventilation where present.
- This appliance is for cooking purposes only. It must not be used for other purposes, for example room heating.
- (Gas through glass models only) In case of hotplate glass breakage, immediately shut off all burners and any electrical heating element and isolate the appliance from the power supply,
do not touch the appliance surface, do not use the appliance.
- Ensure shelving is correctly installed. See the sections on the shelf runners and shelf location within this book.
- Fire Safety Advice
If you do have a fire in the kitchen, don't take any risks - get everyone out of your home and call the Fire Service.
If you have an electrical fire in the kitchen and you consider it safe to do so:
- Pull the plug out, or switch off the power at the fuse box - this may be enough to stop the fire immediately
- Smother the fire with a fire blanket, or use a dry powder or carbon dioxide extinguisher.
- Remember: never use water on an electrical or cooking oil fire.
Other Safety Advice
- Servicing should be carried out only by authorized personnel.
- Do not operate the appliance without the glass panel correctly fitted.
- There is a risk of electric shock, so always make sure you have turned off and unplugged your appliance before starting. Always allow the product to cool down before you change a bulb.
- Do not modify the outer panels of this appliance in any way. This appliance must be earthed.
- The appliance must never be disconnected from the mains supply during use, as this will seriously affect the safety and performance, particularly in relation to surface temperatures becoming hot and gas operated parts not working efficiently. The cooling fan (if fitted) is designed to run on after the control knob has been switched off.
- GAS WARNING! - If you smell gas: Do not try to light any appliance, Do not touch any electrical switch. Contact your local gas supplier immediately.
Getting to know your product
Note: Your appliance layout may differ depending on the model.
Note: All numbers refer to the nominal power rating in Kilowatts (kW)
Gas Hob 90cm![graph TD A["①"] --> B["④"] C["②"] --> B D["③"] --> B E["④"] --> F["Wok"] style B fill:#f9f,stroke:#333 style F fill:#ccf,stroke:#333](/content/2026/05/968042/images/faef67cf60e136546c51f4b77fd9d4fefe5b4ecb5c44c0f64db8e4cbd189dc77.jpg)
Gas Hob 100/110cm![graph TD A["1"] --> B["2"] C["2"] --> D["1"] E["3"] --> F["2"] G["4"] --> H["Wok"] style A fill:#f9f,stroke:#333 style C fill:#f9f,stroke:#333 style E fill:#f9f,stroke:#333 style G fill:#f9f,stroke:#333 style B fill:#ccf,stroke:#333 style D fill:#ccf,stroke:#333 style F fill:#ccf,stroke:#333 style H…](/content/2026/05/968042/images/21337630bfc44321db96e586ecf95c8ae10c7f289c62f3275b42b7e569d8a3e8.jpg)
90cm
| Fascia | |
| Top Grill | Fanned Oven |
| Main Oven | |
90cm Deluxe 100/110cm
| Fascia Fascia | |
| Top Grill | Fanned Oven with Splitter |
| Main Oven | |
| Top Oven and Grill | Main Oven |
| Main Oven | Slow Cook |
Note: Please refer to the shaded cavity diagrams throughout this book for its use.
Control Panel 90cm
Control Panel 90cm Deluxe
Control Panel 100/110cm
Appliance functions
Note: Your oven may not have all of the functions shown here. We recommend for best cooking results, please preheat your oven for 15 minutes and 3-5 minutes for grilling.
Only slow cook using the dedicated function. When using the multifunction oven, firstly select the fanned oven feature.
 | Intense Baking Defrost |  | ||
 | Base Heat with Fan Conventional |  | ||
 | Slow Cook Fanned Oven |  | ||
 | Fanned Grill Low Grill |  | ||
 | Oven Selector Control Single Grill |  | ||
 | Conventional Grill Dual Grill |  | ||
| Top Heat Base Heat | ||||
 | Lights Only Pizza Function |  | ||
 | Bread Proving Keep Warm |  |
Gas Oven
Electric oven (90cm only)
Gas Grill/Hob
Electric Grill (100/110cm only)
Ovens and Gas Grill
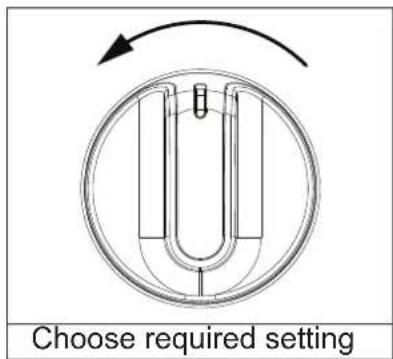
Press and turn the control knob anti-clockwise to the gas mark 9 position or the large flame symbol. The gas will ignite. Hold the control knob in for 15 seconds after the flame has lit before releasing.

When the Top oven/grill or grill is switched on, the cooling fans come on to keep the fascia and control knobs cool during cooking/grilling. The cooling fans may operate when the main ovens are in use, depending on the temperature setting. The fans may continue to operate for a period after the oven/grill has been switched off. During use the fan may cycle on and off, this is normal.
Important: Never put items directly on top of the base of the oven, or cover the oven base with foil, as this may cause the element to overheat. Always position items on the shelf.
The left hand main oven will not operate if the programmer is set to Auto, see clock/programmer section.
Top Oven - Grill
THE DOOR MUST BE OPEN WHEN THE GRILL IS USED.
Main Oven - Grill - Tall Oven Grill (90cm Only)
THE DOOR MUST BE OPEN WHEN THE GRILL IS USED FOR CONVENTIONAL GRILLING.
Grill pan and trivet
The grill trivet (inside the grill pan) can be inverted to give a high or low position, or it may be removed. The speed of grilling can be controlled by selecting a higher or lower shelf position, or adjusting the grill setting.

Hob
- Press and turn the control knob anti-clockwise to the large flame symbol. The gas will ignite. Hold the control knob in for 15 seconds after the flame has lit before releasing.
- Once lit, turn the control knob to the required setting.
If the burner fails to ignite within this time, release the control knob and wait 1 minute before attempting to re-ignite.

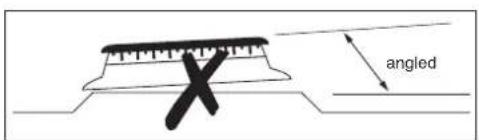
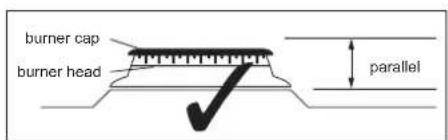
Fitting burner caps and heads


Pan placement
Always make sure that your pans are placed centrally and do not allow the flame to extend over the base of the pan. Do not place pans directly onto the burners.


Pan sizes required
| Hob Cook Zones Minimum Pan Sizes (mm) Maximum Pan Sizes (mm) | ||
| Rapid & Wok | 100 | 260 |
| All other cook zones 250 | ||
Warning: Do not allow cooking vessels to overlap cooking zones.
Caution: Accessible parts may be hot when the grill is used - young children should be kept away.
If cleaning the grill pan when it is hot, use oven gloves to move it.
Food for grilling should be positioned centrally on the trivet.
Using the grill
Important: The grill door must be fully open when the grill is used.
Open the grill door. Push in and turn the control knob to the 'FULL ON' position. Hold the knob in for 15 seconds and press the ignition switch (if fitted) or hold a lit match or taper to the burner, until it lights. If the burner fails to light within this time, release the knob and wait for 1 minute before attempting further ignition.
The speed of grilling can be controlled by selecting a higher or lower shelf position. For toasting, and for grilling foods such as bacon, sausages or steaks, use a higher shelf position. For thicker foods such as chops or chicken joint pieces, use a middle to low shelf position.
The grill trivet, inside the grill pan, can be inverted to give a high or low position, or it may be removed.
Variation in grilling can be achieved by setting the control between the small and large flame symbols.
Important: Never operate the grill between the large flame and the 'OFF' position.
To switch off, turn the control knob to the off position.
Using aluminium foil
Using aluminium foil to cover the grill pan, or putting items wrapped in foil under the grill creates a fire hazard.
The cooling fan
When the grill is switched on, the cooling fan comes on to keep the fascia and control knobs cool during grilling. The fan may continue to operate for a period after the grill has been switched off.
During use the fan may cycle on and off, this is normal.
Caution: Accessible parts may be hot when the grill is used - young children should be kept away.
If cleaning the grill pan when it is hot, use oven gloves to move it.
Food for grilling should be positioned centrally on the trivet.
Using the grill
Important: The grill door must be fully open when the grill is used.
The top oven must be turned off to enable the grill to be used.
Open the door then use the regulator switch to select the required grill heat output; 1 is the lowest heat output and 5 is the highest heat output. Turning the regulator clockwise brings on the full width of the grill element; turning the regulator anti-clockwise brings on the inner part of the grill element only. For best cooking results, we recommend that you preheat the grill for about 3 minutes.
The speed of grilling can be controlled by selecting a higher or lower shelf position. For toasting, and for grilling foods such as bacon, sausages or steaks, use a higher shelf position. For thicker foods such as chops or chicken joint pieces, use a middle to low shelf position.
The grill trivet, inside the grill pan, can be inverted to give a high or low position, or it may be removed. The HIGH trivet position is suitable for toasting bread. The LOW trivet position is suitable for grilling all types of meat & fish.
With the grill trivet removed the food is placed directly on the base of the grill pan - eg: when cooking whole fish or browning dishes such as cauliflower cheese.
To switch off, turn the control knob to the off position.
Aluminium foil
Using aluminium foil to cover the grill pan, or putting items wrapped in foil under the grill creates a fire hazard.
The cooling fan
When the grill is switched on, after a short delay, the cooling fan comes on to keep the fascia and control knobs cool during grilling. The fan may continue to operate for a period after the grill has been switched off.
During use the fan may cycle on and off, this is normal.
USING THE TOP OVEN
Using the top oven
The top oven can be used in the same way as the main oven, to cook the full range of dishes, but it is a SECONDARY oven and there are some differences.
Larger dishes, or food which may rise during cooking, should be cooked in the main oven.
Large items, wide tins and tall items such as rich fruit cakes should be cooked in the main oven to obtain optimum results.
Notes:
As part of the cooking process, hot air is expelled through a vent at the top of the oven(s). When opening the oven door, care should be taken to avoid any possible contact with potentially hot air, since this may cause discomfort to people with sensitive skin. We recommend that you hold the underneath of the oven door handle.
Preheating
Always preheat the top oven for 15 minutes. However, if the main oven is being used at the same time, then preheating may not be necessary. The cooking time may need to be shortened slightly, or the cooking temperature adjusted, to allow for heat transfer from the main oven to the top oven if both ovens are used together.
If you are not preheating the oven, the cooking times in the baking guide may need to be extended, as they are based on a preheated oven.
The oven must be preheated when reheating frozen or chilled foods, and we recommend preheating for yeast mixtures, batters, soufflés and whisked sponges.
Zones of heat
The temperature at the centre of the oven corresponds with the selected gas mark and is slightly higher towards the top of the oven and slightly lower towards the oven base.
These zones of heat can be useful as different dishes requiring different temperatures can be cooked at the same time, when more than one shelf is used.
The temperature at the oven base is suitable for cooking baked vegetables, baked fruit, milk pudding etc, and for warming bread rolls, soup, coffee, or ovenproof plates and dishes.
If you find that over a period of time, the oven becomes hotter when used at a particular gas mark, the thermostat may need to be replaced.
SLOW COOKING
Make sure that frozen foods are thoroughly thawed before cooking.
Do not slow cook joints of meat or poultry weighing more than 2 1/4 kg / 4 1/2 lb.
Always use the top half of the oven for slow cooking.
For roasting joints of meat or poultry, and for pot roasts preheat the oven to gas mark 6 and cook for 30 minutes, then adjust the oven control to the slow cook setting for the remainder of the cooking time.
Slow cooking times will be about three times as long as conventional cooking times.
TOP OVEN BAKING GUIDE
| Dish Recommended | gas mark | Suggested shelf position | Approximate cooking time (preheated oven) |
| Meringues “S” slow cook setting bottom 2 - 3 hours | |||
| CakesVictoria sandwich(2 x 180mm / 7” per shelf)Genoese Sponge(2 x 180mm / 7” per shelf) | 45 | middle(side by side)middle | 20 - 35 mins25 - 30 mins |
| PastryRough PuffFlaky / PuffShortcrustFlan | 7666 | middlemiddlemiddlemiddlemiddle | cooking time depends on recipe & type of filling |
| BiscuitsShortbread fingersNut browniesBrandy snapsFlapjacksGinger nuts | 55445 | middle - topmiddlemiddle - topmiddle - topmiddle - top | |
Baking guide hints
The gas mark settings and times given in the top baking guides are based on dishes made with block margarine. If tub margarine is used, it may be necessary to reduce the gas mark setting.
If a different gas mark setting to that shown in our guide is given in a recipe, the recipe instruction should be followed.
The cooking times given in the baking guides are based on a preheated oven. If you do not preheat the oven, cooking times should be extended.
Roast turkey
Roasting turkey involves cooking two different types of meat - the delicate light breast meat, which must not be allowed to dry out, and the darker leg meat, which takes longer to cook.
The turkey must be roasted long enough for the legs to cook, so frequent basting is necessary. The breast meat can be covered once browned.
- Always make sure that the turkey is completely thawed and that the giblets are removed before cooking.
- Turkey should be roasted at gas mark 5 for 20 minutes per lb, plus 20 minutes, unless packaging advises otherwise.
- The turkey can be open roasted, breast side down, for half of the cook time, and then turned over for the remainder of the cooking time.
- If the turkey is stuffed, add 5 minutes per lb to the cooking time.
- If roasting turkey covered with foil, add 5 minutes per 1lb to the cooking time.
To test if the turkey is cooked, push a fine skewer into the thickest part of the thigh. If the juices run clear, the turkey is cooked. If the juices are still pink, the turkey will need longer cooking.
Please note: for all other roasting guides, refer to the main oven section and see the table.
Roasting guide
The times given in the roasting guide are only approximate, because the size and age of the bird will influence cooking times, as will the shape of a joint and the proportion of the bone.
Frozen meat should be thoroughly thawed before cooking. For large joints, it is advisable to thaw overnight.
Frozen poultry should be thoroughly thawed before cooking. The time required depends on the size of the bird - e.g., a large turkey may take up to 48 hours to thaw.
Use of a trivet with a roasting tin will reduce fat splashing and will help to keep the oven interior clean. Alternatively, to help reduce fat splashing, potatoes or other vegetables can be roasted around the meat/poultry.
Notes:
- When cooking stuffed meat or poultry, calculate the cooking time from the total weight of the meat plus the stuffing.
- For joints cooked in foil or covered roasters, and for lidded casseroles, add 5 minutes per 450g (1lb) to the calculated cooking time.
- Smaller joints weighing less than 1.25kg (2½lb) may require 5 minutes per 450g (1lb) extra cooking time.
- Position the oven shelf so that the meat or poultry is in the centre of the oven.
- It is recommended that the appliance is cleaned after open roasting.
| Cook in oven at Gas Mark 5 | Approximate Cooking Time(preheated oven) | |
| Beef Rare | MediumWell done | 20 minutes per 450g (1lb), plus 20 minutes25 minutes per 450g (1lb), plus 25 minutes30 minutes per 450g (1lb), plus 30 minutes |
| Lamb Medium | Well Done | 25 minutes per 450g (1lb), plus 25 minutes30 minutes per 450g (1lb), plus 30 minutes |
| Pork 35 minutes | per 450g (1lb), | plus 35 minutes |
| Poultry 20 minutes | per 450g (1lb), plus 20 minutes | |
USING THE MAIN OVEN
Ignition
Push in and turn the main oven control knob to gas mark 9. Hold the control knob in for 15 seconds. If the burner has not lit, turn off the oven and leave the compartment door open. Wait at least one minute before a further attempt to ignite the burner.
Do not hold the control knob in for more than 15 seconds if the gas has failed to light.
Turn the control knob to the required setting.
To turn off, return the control knob to the "off" position.
Preheat the main oven for 15 minutes. If you are not preheating the oven, the cooking times in the baking guides may need to be extended, as they are based on a preheated oven.
The oven must be preheated when reheating frozen or chilled foods, and we recommend preheating for yeast mixtures, batters, soufflés and whisked sponges. Put the oven shelves in the position required before preheating the oven.
Zones of heat
The temperature at the centre of the oven corresponds with the selected gas mark and is slightly higher towards the top of the oven and slightly lower towards the oven base. These zones of heat can be useful as different dishes requiring different temperatures can be cooked at the same time, when more than one shelf is used.
The temperature at the oven base is suitable for cooking baked vegetables, baked fruit, milk pudding etc, and for warming bread rolls, soup, coffee, or ovenproof plates and dishes.
If you find that over a period of time, the oven becomes hotter when used at a particular gas mark, the thermostat may need to be replaced.
OVEN FURNITURE
Baking tray and roasting tins
For best cooked results and even browning, the maximum size baking trays and roasting tins that should be used are as follows;
Baking tray 350mm x 330mm
Roasting tin 370mm x 320mm
Position baking trays and roasting tins on the middle of the shelves, and leave one clear shelf position between shelves, to allow for circulation of heat.
Oven shelves
Extra shelves may be ordered from the customer care department.
The oven shelf must be positioned with the up-stand at the rear of the oven and facing upwards.
SLOW COOKING
Make sure that frozen foods are thoroughly thawed before cooking.
Do not slow cook joints of meat or poultry weighing more than 2 1/4 kg (4 1/2 lb).
Always use the top half of the oven for slow cooking.
For roasting joints of meat or poultry, and for pot roasts, preheat the oven to gas mark 6 and cook for 30 minutes, then adjust the oven control to the slow cook setting for the remainder of the cooking time.
Slow cooking times will be about three times as long as conventional cooking times.
MAIN OVEN BAKING GUIDE
| Dish Recommended gas | mark | Suggested shelf position | Approximate cooking time (preheated oven) |
| SconesMeringues | 7"S" slow cook setting | middle - topbottom | 8 - 15 mins2 - 3 hours |
| CakesSmall cakesWhisked spongeSwiss rollVictoria sandwich(2 x 180mm/7")Genoese spongeMadeira (180mm/7")GingerbreadSemi rich fruit cake(205mm/8")Christmas cake(205mm/8")Dundee cake (205mm/8") | 55644332 or 31 or 23 | middle - topmiddle - topmiddle - topmiddle - topmiddlemiddlemiddlemiddlemiddlemiddlemiddlemiddlemiddlemiddlemiddlemiddlemiddlemiddlemiddlemiddlemiddlemiddlemiddlemiddlemiddlemiddlemiddlemiddlemiddlemiddlemiddlemiddlemiddlemiddlemiddlemiddlemiddlemiddlemiddlemiddlemiddlemiddlemiddlemiddlemiddlemiddlemiddlemiddlemiddlemiddlemiddlemiddlemiddlemiddlemiddlemiddlemiddlemiddlemiddlemiddlemiddlemiddlemiddlemiddlemiddlemiddlemiddlemiddlemiddlemiddlemiddlemiddlemiddlemiddlemiddlemiddlemiddlemiddlemiddlemiddlemiddlemiddlemiddlemiddlemiddlemiddlemiddlemiddlemiddlemiddlemiddlemiddlemiddlemiddlemiddlemiddlemiddlemiddlemiddlemiddlemiddlemiddlemiddlemiddlemediummiddlemiddlemiddlemiddlemiddlemiddlemiddlemiddlemiddlemiddlemiddlemiddlemiddlemiddlemiddlemiddlemiddlemiddlemiddlemiddlemiddlemiddlemiddlemiddlemiddlemiddlemiddlemiddlemiddlemiddlemiddlemiddlemiddlemiddlemiddlemiddlemiddlemiddlemiddlemiddlemiddlemiddlemiddlemiddlemiddlemiddlemiddlemiddlemiddlemiddlemiddlemiddlemiddlemiddlemiddlemiddlemiddlemiddlemiddlemiddlemiddlemiddlemiddlemiddlemiddlemiddlemiddlemiddlemiddlemiddlemiddlemiddlemiddlemiddlemiddlemiddlemiddlemiddlemiddlemiddlemiddlemiddlemiddlemiddlemiddlemiddlemiddlemiddlemiddlemiddlemiddlemiddlemiddlemiddlemiddlemiddlemiddlemiddlemiddleMediummiddlemiddlemiddlemiddlemiddlemiddlemiddlemiddlemiddlemiddlemiddlemiddlemiddlemiddlemiddlemiddlemiddlemiddlemiddlemiddlemiddlemiddlemiddlemiddlemiddlemiddlemiddlemiddlemiddlemiddlemiddlemiddlemiddlemiddlemiddlemiddlemiddlemiddlemiddlemiddlemiddlemiddlemiddlemiddlemiddlemiddlemiddlemiddlemiddlemiddlemiddlemiddlemiddlemiddlemiddlemiddlemiddlemiddlemiddlemiddlemiddlemiddlemiddlemiddlemiddlemiddlemiddlemiddlemiddlemiddlemiddlemiddlemiddlemiddlemiddlemiddlemiddlemiddlemiddlemiddlemiddlemiddlemiddlemiddlemiddlemiddlemiddlemiddlemiddlemiddlemiddlemiddlemiddlemiddlemiddlemiddlemiddlemiddlemiddle/middlemiddle/middlemiddle/middlemiddle/middlemiddle/middlemiddle/middlemiddle/middlemiddle/middlemiddle/middlemiddle/middlemiddle/middlemiddle/middlemiddle/middlemiddle/middlemiddle/middlemiddle/middlemiddle/middlemiddle/middlemiddle/middlemiddle/middlemiddle/middlemiddle/middlemiddle/middlemiddle/middlemiddle/middlemiddle/middlemiddle/middlemiddle/middlemiddle/middlemiddle/middlemiddle/middlemiddle/middlemiddle/middlemiddle/middle/middlemiddle/middlemiddle/middlemiddle/middlemiddle/middlemiddle/middlemiddle/middlemiddle/middlemiddle/middlemiddle/middlemiddle/middlemiddle/middlemiddle/middlemiddle/middlemiddle/middlemiddle/middlemiddle/middlemiddle/middlemiddle/middlemiddle/middlemiddle/middlemiddle/middlemiddle/middlemiddle/middlemiddle/middlemiddle/middlemiddle/middlemiddle/middlemiddle/middlemiddle/middlemiddle/middlemiddle/middlemiddle/middlemiddle/Middlemiddle/middlemiddle/middlemiddle/middlemiddle/middlemiddle/middlemiddle/middlemiddle/middlemiddle/middlemiddle/middlemiddle/middlemiddle/middlemiddle/middlemiddle/middlemiddle/middlemiddle/middlemiddle/middlemiddle/middlemiddle/middlemiddle/middlemiddle/middlemiddle/middlemiddle/middlemiddle/middlemiddle/middlemiddle/middlemiddle/middlemiddle/middlemiddle/middlemiddle/middlemiddle/middlemiddle/middlemiddle/middlemiddle/millowulf | 15 - 25 mins20 - 25 mins10 - 12 mins20 - 30 mins20 - 30 mins1 - 1 1/4 hours1 - 1 1/4 hours2 1/2 - 3 hoursdepending on recipe2 - 2 1/2 hours |
| PastryRough PuffFlaky/PuffShortcrustFlan | 76666 | middle - topmiddle - topmiddle - topmiddle - topmiddle - top | Cooking time depends on recipe and type of filling |
| BiscuitsNut browniesBrandy snapsFlapjacksGingernuts | 54444 | middle - topmiddle - topmiddle - topmiddle - topmiddle - top | 25 - 35 mins10 - 12 mins20 - 25 mins10 - 20 mins |
Traditional fruit cakes
It should be remembered that ovens can vary over time, therefore cooking times can vary, making it difficult to be precise when baking fruit cakes.
It is necessary therefore, to test the cake before removal from the oven. Use a fine warmed skewer inserted into the centre of the cake. If the skewer comes out clean, then the cake is cooked.
- Do not attempt to make Christmas cakes larger than the oven can cope with; you should allow at least 25mm (1 inch) space between the oven walls and the tin. Always follow the temperatures recommended in the recipe.
- To protect a very rich fruit cake during cooking, tie 2 layers of brown paper around the tin.
- We recommend that the cake tin is not stood on layers of brown paper, as this can hinder effective circulation of air.
- Do not use soft tub margarine for rich fruit cakes, unless specified in the recipe.
- Always use the correct size and shape of tin for the recipe quantities.
Roast turkey
Roasting turkey involves cooking two different types of meat - the delicate light breast meat, which must not be allowed to dry out, and the darker leg meat, which takes longer to cook.
The turkey must be roasted long enough for the legs to cook, so frequent basting is necessary. The breast meat can be covered once browned.
- Always make sure that the turkey is completely thawed and that the giblets are removed before cooking.
- Turkey should be roasted at gas mark 5 for 20 minutes per lb, plus 20 minutes, unless packaging advises otherwise.
- The turkey can be open roasted, breast side down, for half of the cook time, and then turned over for the remainder of the cooking time.
- If the turkey is stuffed, add 5 minutes per lb to the cooking time.
- If roasting turkey covered with foil, add 5 minutes per 1lb to the cooking time.
To test if the turkey is cooked, push a fine skewer into the thickest part of the thigh. If the juices run clear, the turkey is cooked. If the juices are still pink, the turkey will need longer cooking.
Roasting guide
The times given in the roasting guide are only approximate, because the size and age of the bird will influence cooking times as will the shape of a joint and the proportion of the bone.
Frozen meat should be thoroughly thawed before cooking. For large joints it is advisable to thaw overnight.
Frozen poultry should be thoroughly thawed before cooking. The time required depends on the size of the bird - e.g., a large turkey may take up to 48 hours to thaw.
Use of a trivet with a roasting tin will reduce fat splashing and will help to keep the oven interior clean. Alternatively, to help reduce fat splashing, potatoes or other vegetables can be roasted around the meat/poultry.
Notes:
- When cooking stuffed meat or poultry, calculate the cooking time from the total weight of the meat plus the stuffing.
- For joints cooked in foil or covered roasters, and for lidded casseroles, add 5 minutes per 450g (1lb) to the calculated cooking time.
- Smaller joints weighing less than 1.25kg (2½lb) may require 5 minutes per 450g (1lb) extra cooking time.
- Position the oven shelf so that the meat or poultry is in the centre of the oven.
- It is recommended that the appliance is cleaned after open roasting.
| Cook in oven at Gas Mark 5 Approximate Cooking Time(pre-heated oven) | ||
| Beef Rare | MediumWell done | 20 minutes per 450g (1lb), plus 20 minutes25 minutes per 450g (1lb), plus 25 minutes30 minutes per 450g (1lb), plus 30 minutes |
| Lamb Medium | Well Done | 25 minutes per 450g (1lb), plus 25 minutes30 minutes per 450g (1lb), plus 30 minutes |
| Pork 35 minutes | per 450g (1lb), plus 35 minutes | |
| Poultry 20 minutes | per 450g (1lb), plus 20 minutes | |
Introduction
One of your oven compartments is an electric oven which provides a gentle heat suitable for slow cooking or keeping food warm. The oven is operated by a button or knob (button on Sterling and knob on Richmond) at the right hand of the fascia, and a white neon will illuminate to show that the oven is switched on. Please check which side the slow cook oven is on, by looking at the specification at the front of this handbook.
The slow cook element is positioned in the base of the lower compartment-always make sure that the prepared cooking pot is placed centrally on the base of this compartment.
Do not use either compartment to store food or canned items.
Cooking times
The cooking time varies according to the type of food being cooked, and experience will show how long foods should be cooked for, according to personal taste and preference.
In general foods should be cooked for at least 5 hours, and maybe left up to 8-10 hours without spoiling if covered. As a guide, foods cooked using the slow cook oven will take about three times longer than they would in a conventional oven.
Cookware
Any oven proof cookware maybe used for slow cooking, provided they have a close fitted lid.
To rectify a badly fitting lid a piece of cooking foil may be placed over the dish, under the lid.
For convenience and to save washing up, the most useful cookware for slow cooking are the flame proof type which can be used over direct heat and for oven cooking, and are sufficiently attractive to use as serving dishes.
Keeping food warm
Turn the oven on, and allow to pre-heat for 20 minutes before placing the food in the oven. If food is to be kept moist then it is important to cover the dish or plate to prevent food from drying out. This can be done using aluminium foil if the dish does not have a lid.
Do not use cling film to cover food as it cannot withstand the heat produced in the oven.
Some foods are best left uncovered if you wish to keep the food dry and crisp.
Do not add gravy to plated meals until serving.
Carved meat should be placed on one plate and covered, adding just one tablespoon of gravy to keep it moist. When keeping plated meals warm it is recommended that the food is placed on hot rather than cold plates.
Slow Cooking
Slow cooking has always been the best way to prepare a nutritious hot meal with the minimum of preparation and maximum time away from the kitchen. The benefits of slow cooking have been recognized by cooks for centuries, and are still appreciated by cooks today.
The advantages of slow cooking are as follows:
- Food can be left to cook unattended for several hours and will keep hot for several hours if left covered, without spoiling for a further 2-3 hours, so foods can be left to cook while you are out for the day, or overnight.
- Inexpensive cuts of meat become deliciously tender when slow cooked.
- Slow cooking will also produce moist, tender "roasts" with minimal meat shrinkage and reduced oven soiling.
- Dishes such as soups, vegetables, puddings, savory dishes and preserves are also suitable for slow cooking.
- There is no topping up of steamers, steam filled kitchens or constant checking to do.
Using the slow cook oven
Turn the oven on and preheat for 20 minutes. Always place the prepared cooking pot centrally on the base of the oven. Follow the guidelines for the best results.
- The maximum capacity of oven proof dishes should be no more than 2.5 litres (4.5 pints).
- Please note: The more you fill the dish/pot the longer it will take to cook.
- Cooking times will vary depending on the size and shape of the meat, or poultry.
- Always bring soups, casseroles and liquids to the boil before placing in a preheated oven. To give more colour to meat or poultry, fry the meat to brown and add to stock which is hot.
- All meat and poultry recipes need a minimum of 5 hours to cook.
- Make sure all frozen ingredients are well thawed out.
- Always ensure that frozen poultry has thoroughly defrosted in a refrigerator and all ice crystals have melted.
- Cut root vegetables into smaller pieces as they take longer than meat to cook.
- If possible they should be sauteed for 2-3 minutes before slow cooking.
- Ensure that root vegetables are always at the bottom of the pan immersed in the cooking liquid.
- A meat thermometer should be used when cooking pork joints and poultry. The internal temperature of the food should reach 88 °C,
- Stuffed meat or stuffed poultry should not be slow cooked. Cook any stuffing separately.
- Cover casseroles with a lid, or foil to prevent loss of moisture.
- Adjust seasonings and thickenings at the end of cooking time.
- Dried red kidney beans must be boiled for a minimum of 10 minutes following soaking before inclusion in any dish.
- Opening the door during cooking leads to heat loss and will lead to increased cooking times.
Accessible parts may be hot when the oven is used. Young children should be kept away.
The tall fanned oven fitted to your appliance is electric.
To switch on the oven
Turn the oven control knob(s) to the required setting.
The white thermostat indicator will come on until the selected temperature is reached and then go off; it will turn on and off periodically as the thermostat operates to maintain the selected temperature.
To switch off, return the control knob to the off ● position.
When using the oven
As part of the cooking process, hot air is expelled through a vent in the oven. When opening the oven door, care should be taken to avoid any possible contact with potentially hot air, since this may cause discomfort to people with sensitive skin. We recommend that you hold the underneath of the oven door handle.
PREHEATING
Fanned oven
When cooking sensitive items such as soufflé and Yorkshire puddings or, when cooking bread, we recommend that the oven is preheated until the neon switches off for the first time. For any other types of cooking, a preheat may not be required.
The cooling fan
The cooling fan may operate when the main oven is on and may continue to operate for a period after the oven has been switched off.
OVEN FURNITURE
Oven shelves
The oven shelf must be positioned with the upstand at the rear of the oven and facing upwards.
Position baking trays and roasting tins on the middle of the shelves.
Baking tray and roasting tins
For best cooked results and even browning, the recommended size baking trays and roasting tins that should be used are as follows;
Baking tray 350mm x 250mm
This size of baking tray will hold up to 12 small cakes.
Roasting tin 370mm x 320mm
We recommend that you use good quality cookware. Poor quality trays and tins may warp when heated, leading to uneven baking results.
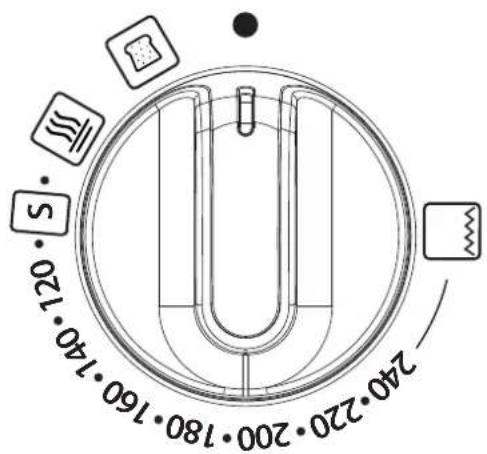
Slow cooking (S Setting or 100°C)
- Make sure that frozen foods are thoroughly thawed before cooking.
- Do not slow cook joints of meat or poultry weighing more than 2 1/4 kg/4 1/2 lb.
- Preheat the oven to 170°C and cook for 30 minutes, then adjust the oven control to S or 100°C (slow cook setting) for the remainder of the cooking time.
- Slow cooking times will be about 3 times as long as conventional cooking times.
- Do not open the oven door unnecessarily during slow cooking, as this will result in heat loss at low temperatures.
- Always use dishes with tightly fitting lids. To rectify badly fitting lids, place foil over the dish underneath the lid.
Aluminium foil
Use foil only to cover food or cooking dishes, using foil to cover the shelves or oven base creates a fire hazard.
Cooking with a fanned oven
As this is a high efficiency oven, you may notice the emission of steam from the oven when the door is opened. Please take care when opening the door.
If you are used to cooking with a conventional oven you will find a number of differences to cooking with a fan oven which will require a different approach:
There are no zones of heat in a fan oven as the convection fan at the back of the oven ensures an even temperature throughout the oven.
This makes it ideal for batch baking - eg; when planning a party as all the items will be cooked within the same length of time.
Foods are cooked at a lower temperature than a conventional oven, so conventional recipe temperature may have to be reduced. Please refer to the conversion chart.
Preheating is generally not necessary as a fan oven warms up quickly.
There is no flavour transference in a fan oven, which means you can cook strong smelling foods such as fish at the same time as mild foods - eg; milk puddings.
When batch baking foods that will rise during cooking - eg; bread - always ensure that enough space has been left between the shelves to allow for the rise.
Notes:
When 2 or more shelves are being used, it may be necessary to increase the cooking time slightly.
Because the 2 oven shelves are wider than in many ovens, it is possible to cook 2 items per shelf - e.g., 2 Victoria sandwiches or 2 casseroles.
Although you need to keep in mind the points 'To help the air circulate freely' with careful choice of dishes and tins, it is possible to cook a complete meal, and perhaps something else for the freezer, in the oven at the same time.
When roasting meats, you will notice that fat splashing is reduced, which is due in part to the lower oven temperatures, and will help keep cleaning of the oven to a minimum.
Because a fan oven has an even temperature throughout the oven, there is no need to follow the shelf positions given in the baking guide.
There is no need to interchange dishes onto different shelves part way through cooking, as with a conventional oven.
To help the air circulate freely
Position the shelves evenly within the oven and maintain a clearance from the oven roof and base.
If more than one cooking dish or baking tray is to be used on a shelf, leave a gap of at least 25mm between the items themselves and the oven interior.
Defrosting and cooling in the tall oven
Place the food in the centre of the oven and close the door.
To cool foods after cooking prior to refrigerating or freezing, turn the tall oven control to the defrost position and open the door.
Defrosting times
Small or thin pieces of frozen fish or meat - e.g., fish fillets, prawns & mince will take approximately 1 - 2 hours.
Placing the food in a single layer will reduce the thawing time.
A medium sized casserole or stew will take approximately 3 - 4 hours.
A 1½kg/3lb oven ready chicken will take approximately 5 hours, remove the giblets as soon as possible.
Be safe
Do not defrost stuffed poultry using this method.
Do not defrost larger joints of meat and poultry over 2kg/4lb using this method.
Never place uncooked food for defrosting next to cooked food which is to be cooled, as this can lead to cross contamination.
Defrosting meat, poultry, and fish can be accelerated using this method but make sure they are completely thawed before cooking thoroughly. Place meat and poultry on a trivet in a meat tin.
Note: This is a high efficiency oven, therefore some adjustment will have to be made to conventional cooking temperatures. The table below shows conventional cooking temperatures, 'A' efficiency temperatures and gas marks. For optimum results,
conventional temperatures need to be converted to 'A' efficiency temperatures.
For example, an item which would normally cook at a conventional temperature of 180 °C, will now cook at the 'A' efficiency temperature of 160 °C.
| Conventional temperature (°C) | 'A' Efficiency Oven (°C) | Gas Mark |
| 100 | 100 | 1/4 |
| 110 | 110 | 1/4 |
| 130 | 120 | 1/2 |
| 140 | 130 | 1 |
| 150 | 140 | 2 |
| 160 | 150 | 3 |
| 180-190 | 160 | 4-5 |
| 200 | 170 | 6 |
| 220 | 180 | 7 |
| 230 | 190 | 8 |
| 250 | 200 | 9 |
Traditional fruit cakes
It should be remembered that ovens can vary over time, therefore cooking times can vary, making it difficult to be precise when baking fruit cakes.
It is necessary therefore, to test the cake before removal from the oven. Use a fine warmed skewer inserted into the centre of the cake. If the skewer comes out clean, then the cake is cooked.
- Follow the temperatures suggested in the recipe and then adjust accordingly to the conversion table.
- Do not attempt to make Christmas cakes larger than the oven can cope with, you should allow at least 25mm (1") space between the oven walls and the tin.
- Always follow the temperatures recommended in the recipe.
- To protect a very rich fruit cake during cooking, tie 2 layers of brown paper around the tin.
- We recommend that the cake tin is not stood on layers of brown paper, as this can hinder effective circulation of air.
- Do not use soft tub margarine for rich fruit cakes, unless specified in the recipe. • Always use the correct size and shape of tin for the recipe quantities.
Roast turkey
Roasting turkey involves cooking two different types of meat - the delicate light breast meat, which must not be allowed to dry out, and the darker leg meat, which takes longer to cook.
The turkey must be roasted long enough for the legs to cook, so frequent basting is necessary. The breast meat can be covered once browned.
- Always make sure that the turkey is completely thawed and that the giblets are removed before cooking.
- Turkey should be roasted at 160°C - 180°C (fanned) or 180°C - 200°C (conventional) for 20 minutes per 450g (1 lb), plus 20 minutes, unless packaging advises otherwise.
- The turkey can be open roasted, breast side down, for half of the cook time, and then turned over for the remainder of the cooking time.
- If the turkey is stuffed, add 5 minutes per 450g (1 lb) to the cooking time.
- If roasting turkey covered with foil, add 5 minutes per 450g (1 lb) to the cooking time.
To test if the turkey is cooked, push a fine skewer into the thickest part of the thigh. If the juices run clear, the turkey is cooked. If the juices are still pink, the turkey will need longer cooking.
Roasting guide
The times given in the roasting guide are only approximate, because the size and age of the bird will influence cooking times as will the shape of a joint and the proportion of the bone.
Frozen meat should be thoroughly thawed before cooking. For large joints it is advisable to thaw overnight.
Frozen poultry should be thoroughly thawed before cooking. The time required depends on the size of the bird - e.g., a large turkey may take up to 48 hours to thaw.
Use of a trivet with a roasting tin will reduce fat splashing and will help to keep the oven interior clean. Alternatively, to help reduce fat splashing, potatoes or other vegetables can be roasted around the meat/poultry.
Notes:
- When cooking stuffed meat or poultry, calculate the cooking time from the total weight of the meat plus the stuffing.
- For joints cooked in foil or covered roasters, and for lidded casseroles, add 5 minutes per 450g (1lb) to the calculated cooking time.
- Smaller joints weighing less than 1.25kg (2½lb) may require 5 minutes per 450g (1lb) extra cooking time.
- Position the oven shelf so that the meat or poultry is in the centre of the oven.
- It is recommended that the appliance is cleaned after open roasting.
| Cook in main oven at:160°C - 180°C (fanned)180°C - 200°C (conventional) | Approximate Cooking Time(preheated oven) | |
| Beef | RareMediumWell done | 20 minutes per 450g (1lb), plus 20 minutes25 minutes per 450g (1lb), plus 25 minutes30 minutes per 450g (1lb), plus 30 minutes |
| Lamb | MediumWell Done | 25 minutes per 450g (1lb), plus 25 minutes30 minutes per 450g (1lb), plus 30 minutes |
| Pork | 35 minutes per 450g (1lb), plus 35 minutes | |
| Poultry | 20 minutes per 450g (1lb), plus 20 minutes | |
With the Stoves PROFLEX™ splitter you can convert the tall oven into two separate fan ovens which can be controlled independently to maximise your cooking options.
Left hand control
Right hand control


To activate the Tall Oven (without splitter)
![graph TD A["Block 1"] --> B["Block 2"] C["Block 3"] --> D["Block 4"]](/content/2026/05/968042/images/640ad21bd5151bf033abde762d37e9e6019a5273f80602de79c6aacca4cb5b30.jpg)

To use the tall oven without the splitter, turn the right hand control knob to the desired function or temperature.
To activate the splitter function
Upper Oven (with splitter)![graph LR A["Process Step 1"] --> B["Process Step 2"] B --> C["Output Arrow"]](/content/2026/05/968042/images/cc397dfc86081ab56d60fb2243164af17b48dc321ae085ccb2bc05e96f4a0435.jpg)

To use the upper oven separately, first insert the splitter, then turn the left-hand control knob to select the function or temperature. This will activate the top half of the oven.
Do not use the splitter as a shelf; only position it in the dedicated guides in the tall cavity.
Lower Oven (with splitter)![graph LR A["Step 1: Black/White Square with triangular top-left"] --> B["Step 2: Black/White Square with triangular top-right"] B --> C["Step 3: Black/White Square with solid black rectangle"]](/content/2026/05/968042/images/d481431039404b72edc684ce8ace77039e3d6ed1235222511c6a80b6edaf76e6.jpg)


With the upper oven activated, by turning the right-hand control knob to a function or temperature, the lower oven can operate. The lower oven cannot be used separately.
Warning: Allow the splitter to cool before removing.
Using the upper and lower ovens
When using the upper and lower ovens at different temperatures, use the upper oven at the higher temperature and the lower oven at the lower temperature. The table below shows the minimum temperature that can be achieved in the lower oven when the upper oven is in use. For example, with the upper oven at 200°C, the minimum temperature that can be used in the lower oven is 120°C.
| Upper Oven temperature (°C) | Lower Oven Minimum temperature (°C) |
| 100 (Slow Cook) S | 70 (Keep Warm) |
| 120 80 | |
| 140 90 | |
| 160 | 100 (Slow Cook) S |
| 180 110 | |
| 200 120 | |
| 220 130 |
Grilling
THE DOOR MUST BE OPEN WHEN THE GRILL IS USED FOR CONVENTIONAL GRILLING.
To operate the grill, turn the left-hand control to the grill function symbol.
Grill pan and trivet
The grill trivet (inside the grill pan) can be inverted to give a high or low position, or it may be removed. The speed of grilling can be controlled by selecting a higher or lower shelf position, or adjusting the grill setting (the tall oven is a fixed-rate grill).
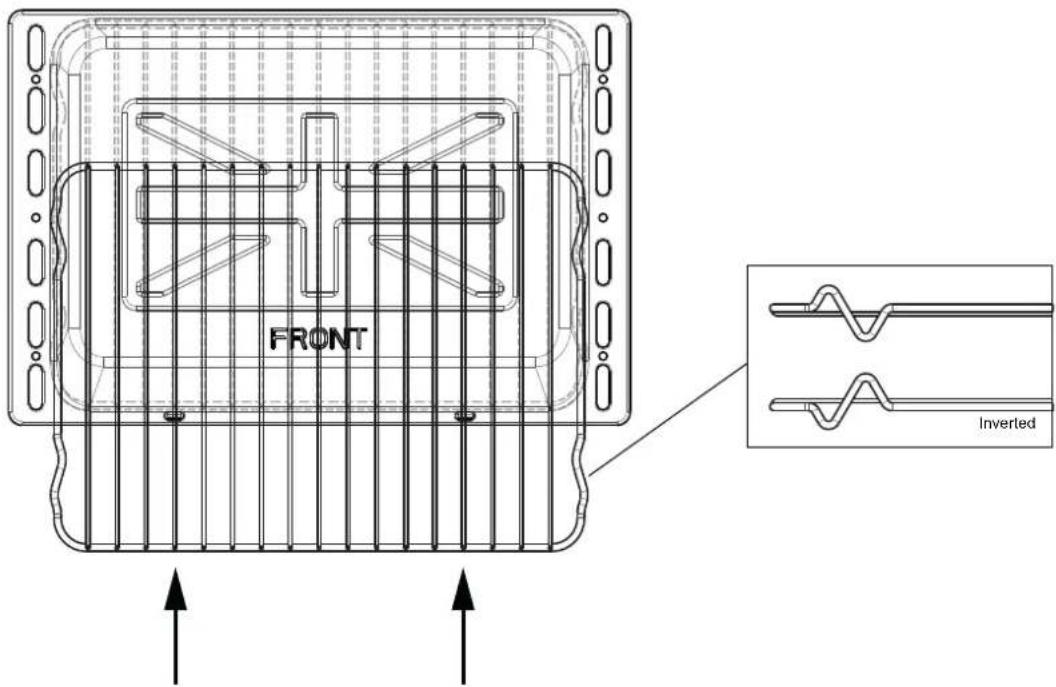
How to position the Splitter

Please be aware that only the bottom left-hand oven is controlled by the programmer.
Note: Your clock / programmer may not have all these functions

| Minute minder | Man | Manual mode | |
| Cooking time / Duration | L 1,L2,L3 | Volume level | |
| Time of day | 23:59 | 7-segment display | |
| Keylock | 99:00 | Max. adjustable minute minder | |
| Auto cooking | 2:59 | Max. adjustable cooking time | |
| Auto | Automatic mode | h:min | Display hours:minutes |
| Bluetooth Connectivity (Deluxe model only) | min:sec | Display minutes:seconds |
Using the touch controls
Menu - Scroll through to select a function
Plus - Increase time or volume
Minus - Decrease time or volume
When a function is selected and the time or volume is set, the chosen function will automatically start seven seconds after setting.
Manual Mode
If the programmer is not in semi-automatic mode you can use oven functions manually. The manual icon is also on the display.
Setting the time of day
By pressing menu, scroll through the functions until you reach 'time of day'.
1 Press the function button until the 'time of day' symbol appears
2 Press the plus or minus buttons to set a time


Setting the minute minder
The maximum cooking time that can be set is 99 minutes.
1 Press the function button until the 'minute minder' symbol appears
2 Press the plus or minus buttons to set a time


Once set, the minute minder will start to countdown in steps of seconds. The display will show the minute minder symbol and the remaining time. The countdown will continue in the background, if other functions are being set.
When the set time for the minute minder has completed, an alarm is heard and the minute minder symbol will flash on the display. Press any button to stop the alarm and the time of day is displayed.
To modify or cancel the minute minder
Return to the minute minder function and use either the plus or minus buttons to adjust the time. By setting the time to '0.00', this will cancel the countdown.
Setting the cooking time (the duration of time the oven will operate for) Semi Automatic cooking
Note: Only the bottom left hand oven can use the Semi Automatic cooking function.
The maximum cooking time that can be set is 2 hours and 59 minutes.
1 Press the function button until the 'cooking time' symbol appears
2 Press the plus or minus buttons to set a time


Once set, the automatic mode, auto cooking symbol and the time of day is displayed.
When cooking is completed, an alarm is heard and the manual mode symbol flashes on the display. Press the Menu button to stop the alarm and then the 'time of day' will then be displayed. Pressing the Menu button again will return to manual mode.
To modify or cancel the cooking time
Return to the ‘cooking time’ function and use either the plus or minus buttons to set the time. By setting the time to ‘0.00’, this will cancel the countdown.
Setting the volume
Press the menu button until "LX" (X = 1, 2 or 3) flashes on the display. Use the plus or minus buttons to select a tone.

Note: Default tone is L3
Activating / deactivating Key lock
1 Press and hold the plus button for 3-5 seconds
![12:20 h:min Man - [ ] [ ] = =](/content/2026/05/968042/images/90de86d88b78dc65d55acff9283dbf60341e097775b21231854c43231a5f85de.jpg)
2
Once the Key lock is active, the buttons will be inactive. A two beep signal will be heard if the buttons are pressed.
To deactivate the Key lock
Press and hold the plus button for 3-5 seconds. The Key lock symbol will disappear and the appliance can continue to be used.
Note: In case of main power loss for a short time (about 1.5 minutes), timer maintains its status. Key lock status and buzzer tone are memorized independent of the power loss duration.
State of Connectivity Symbol
- When the connectivity symbol is not present, the appliance cannot be connected to.
- When the connectivity symbol is blinking, the appliance is ready to be paired with a smart device using the Zeus appliance control app.
- When the connectivity symbol is solid, the appliance is connected to a smart device and can be set using the app.
Activating / deactivating the bluetooth connectivity
1 Press and hold the menu button for 2 seconds until a beep is heard
2 The connectivity symbol will start flashing. The timer is now ready to be connected to a smart device


3 Press and hold the menu button for 2 seconds. The connectivity symbol will disappear

Clear Memory
1 Press the menu and plus button at the same time until a beep is heard.

Once the beep is heard, any paired data will be cleared.
Delete pairing information in the Bluetooth Settings of your smartphone or tablet.
How to read the 6-digit pairing code
- When the smart device connects to the appliance through the app, the app will ask for a unique pairing code that will be displayed on the timer.
Note: Every time a new smart device connects though the app to the appliance, a different pairing code is displayed.
- When prompted to enter the 6-digit code, the code will appear on the timer. The 6-digit code will scroll across the timer display from the right to the left.
Note: Be aware that the display can only show four digits at a time.
Note: Your clock / programmer may not have all these functions


Auto cooking

7-segment display

Minute minder

Max. adjustable minute minder

Automatic mode

Max. adjustable cooking time

Bluetooth Connectivity
(Deluxe models only)
Setting the time of day
1 Press and hold the minus and plus buttons until the dot begins to flash

2 Press the minus or plus buttons to set the time of day

Setting the minute minder
1 Press the function button until the bell symbol begins to flash

2 Press the minus or plus buttons to set a time

Note: The minute minder duration time is in hours and minutes.
When the set time for the minute minder has completed, an alarm is heard. Press any button to stop the alarm and the time of day is displayed.
To modify or cancel the minute minder
Return to the 'minute minder' function and press the plus or minus buttons to change the time. To cancel, press the plus and minus buttons together. The display will then show '0.00'.
Setting the cooking time (the duration of time the oven will operate for) Semi Automatic cooking
1 Press the function button until 'dur' appears on the display

2 Press the minus or plus buttons to set a time

Once set, the time of day, the automatic cooking symbol and automatic mode symbol will appear on the display.
To see the remaining cooking time, press the function button twice.
When the set time has completed, an alarm is heard. Press any button to stop the alarm. The time of day is then displayed.
To modify or cancel the cooking time
To modify, press the function button until 'dur' appears on the display then press either the minus or plus button to set the time. To cancel, press the function button until 'dur' appears on the display then press the plus and minus buttons until 0.00 appears.
Setting the alarm tone
Press the minus button to listen to the first tone, then release the minus button and press it again to listen to the second tone, then the third tone.
Releasing the minus button after a tone has sounded, will automatically select that tone.

State of Connectivity Symbol
- When the connectivity symbol is not present, the appliance cannot be connected to.
- When the connectivity symbol is blinking, the appliance is ready to be paired with a smart device using the Zeus appliance control app.
- When the connectivity symbol is solid, the appliance is connected to a smart device and can be set using the app.
Activating / deactivating the Bluetooth connectivity
1 Press and hold the functions button for 3-5 seconds until a beep is heard

2 The connectivity symbol will start flashing. The timer is now ready to be connected to a smart device

3 Press and hold the function button for 3-5 seconds. The connectivity symbol will disappear

Clear Memory
1 Press the function and plus button at the same time until a beep is heard.

Once the beep is heard, any paired data will be cleared.
Delete pairing information in the Bluetooth Settings of your smartphone or tablet.
How to read the 6-digit pairing code
- When the smart device connects to the appliance through the app, the app will ask for a unique pairing code that will be displayed on the timer.
Note: Every time a new smart device connects though the app to the appliance, a different pairing code is displayed.
- When prompted to enter the 6-digit code, the code will appear on the timer. The 6-digit code will scroll across the timer display from the right to the left.
Note: Be aware that the display can only show four digits at a time.
THE GRIDDLE
Only use the griddle which has been approved for use on this appliance. Do not use any other griddle, as this may be hazardous. Please read these instructions thoroughly before using the griddle for the first time.
- The griddle is made of quality cast iron, and has a non-stick cooking surface. Regular seasoning will prolong its life and prevent rusting. If the griddle shows signs of rust, wash and re-season.
Before using the griddle for the first time
- Wash the griddle thoroughly in hot soapy water.
- Apply a small coat of unsalted vegetable oil, on a dry cloth or paper towel on to the griddle surface.
- Heat the griddle on full rate for 3 minutes. The griddle plate is now ready for use.
Using the griddle
- The griddle should only be positioned front-to-back over the burners.
- The griddle must not be used over the wok.
- Place the griddle carefully on the pan support over the burners, using the locating feet on the underside of the griddle. Take care to avoid damage to the surface of the pan supports.
- Before cooking, preheat the griddle for 3 minutes on full rate, which is indicated on the control knobs by a large flame symbol. • After preheating, turn the control knobs to the small flame symbol. • The griddle is now ready for cooking.
- Do not use metal implements, as they may damage the non-stick surface. • Always allow the griddle to cool completely before moving or cleaning.

Note: Always ensure the griddle is firmly located on the 2 burner pan supports.
Removing Shelf Runners

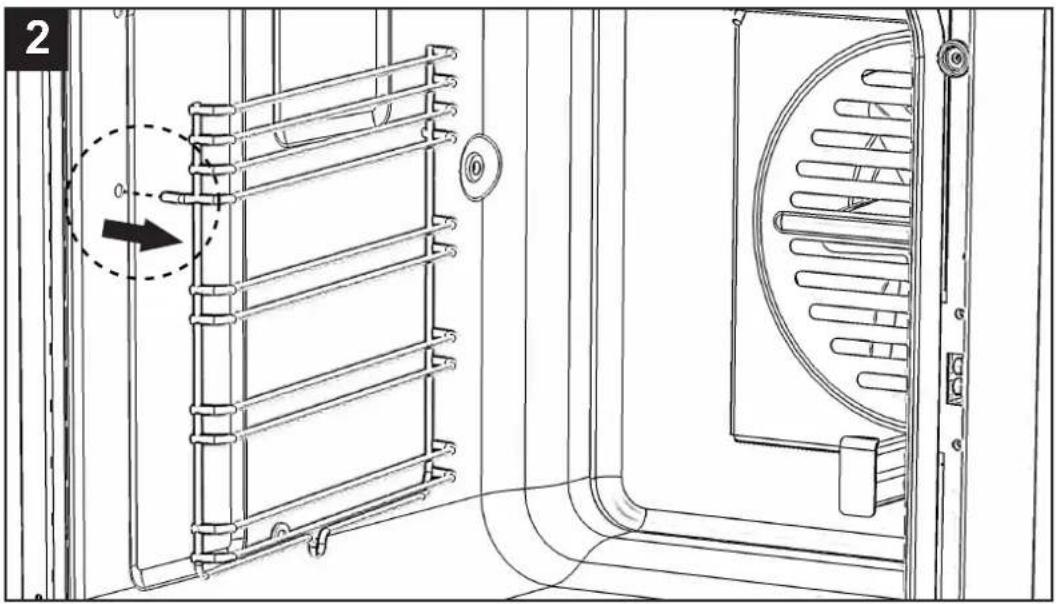
Standard shelves

Your product will be supplied with either one of the fitted Telescopic guides as shown. Please refer to the instructions below.
Option 1 Squared

Option 1 Rounded
Option 1: Removing Telescopic guides


Note: The Telescopic guides can only be attached to the top part of the top, middle and bottom sections of the shelves as shown below.


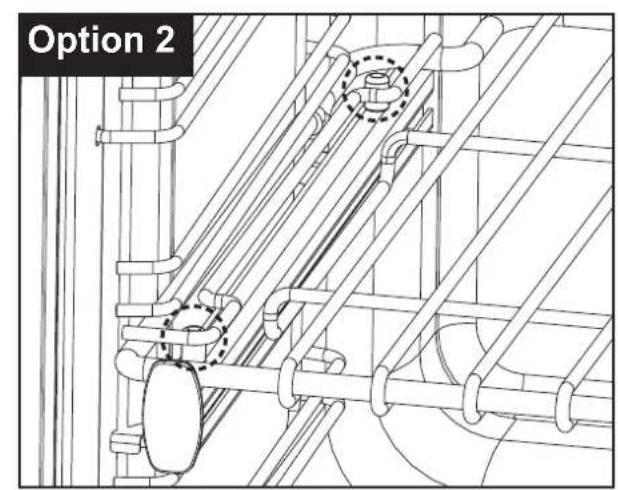
Option 2: Removing Telescopic guides
Push the front of the guide upwards firmly, ensuring the front clip is released from the shelf runner.

Pull the guide away from the shelf runner.

Pull the back clip away from in between the shelf runner.
Option 2: To reinstall the Telescopic guides
Secure the back clip in between the shelf runner. Ensure the guide is fully pushed back towards the back of shelf runner.

Locate the front clip onto the shelf runner and firmly push the front of the guide down until the front clip is secured into place.
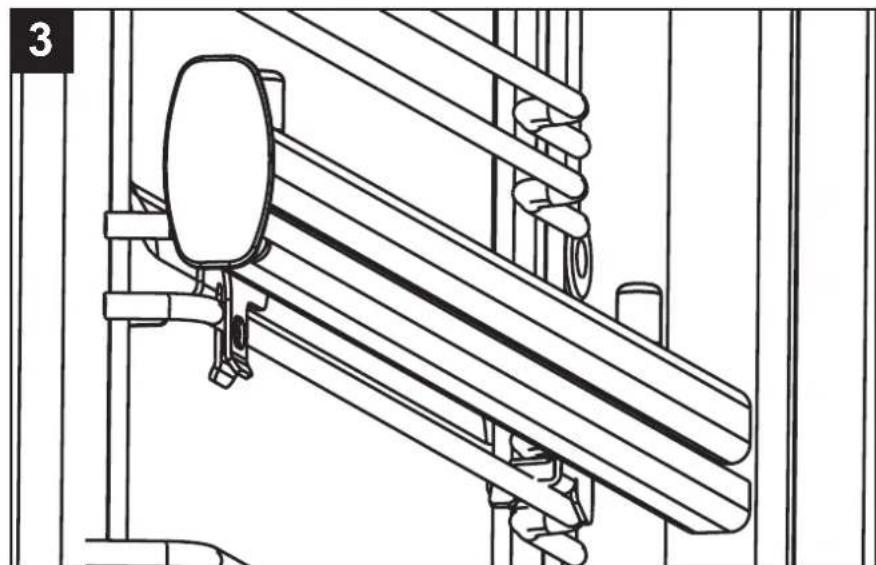
The Telescopic guide should now be fitted correctly and secure to the shelf runner.
Full width oven pan with Telescopic sliders

Note: Please ensure the wires / oven pan locate around the small tabs on the telescopic runner.
Telescopic sliders
Changing the light bulb

Not all appliances have the same number and type of bulbs. Before you replace your bulb, check to see what type you have. Please remember that bulbs are not covered by your warranty.
Additional features
Plate rack (if supplied)
- Pull the shelf out of the cavity.
- Tilt the plate warmer towards you and make sure that it hooks underneath the shelf bars at the front.
- Drop the plate warmer carefully into position.
The plate warmer is now secure and you can place your plates into it.
Always make sure that you use oven gloves if you are putting the plate warmer into a hot, or recently used oven to prevent burns.
Always make sure that your plates are suitable for warming - some plates may shatter or crack when exposed to heat.
We recommend that you heat the oven to 70°C, or below, if you are warming plates.

Wok Cradle (Deluxe only)

Please ensure the wok cradle sits securely on the 4 pan support fingers.
Also included are a set of skewers which are ideal for making kebabs and can be suspended over the specially designed rack.
Note: Skewers are not to be used in tall ovens in 90cm products and should always be orientated across the oven so not to come into contact with the oven fan blades.

Note: If the Steam and Infuse is not supplied as standard, it can be purchased through our Customer Care team.
Dos
Note: Always switch off your appliance and allow it to cool down before you clean any part of it.
Note: Please take extra care when cleaning over the symbols on the control panel, as this can lead to them fading.

- Warm, soapy water • Wipe with a damp cloth wrung out cloth

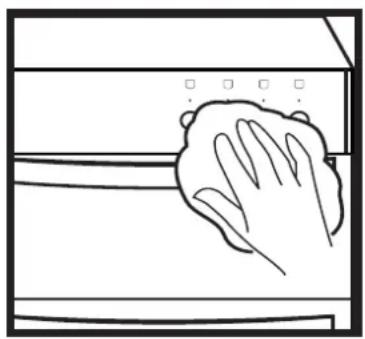
- Dry with a soft cloth
Tips: Some foods can mark or damage the metal or paint work e.g.; Vinegar, fruit juices and salt. Always clean food spillages as soon as possible.
Note: When cleaning the grill, take care of the fixing brackets and fixings.
Don'ts

- Undiluted bleaches
- Chloride products

- Wire Wool
- Abrasive cleaners
- Nylon pads
- Steam cleaners

Do not place in the dishwasher: - Cast iron griddle - Pan supports
IT IS IMPORTANT TO CLEAN YOUR APPLIANCE REGULARLY AS A BUILD UP OF FAT CAN AFFECT ITS PERFORMANCE OR DAMAGE IT AND MAY INVALIDATE YOUR GUARANTEE.
IN ADDITION TO THE ABOVE, DO NOT USE METAL SCRAPERS TO CLEAN THE OVEN DOOR GLASS.
INSTALLATION INSTRUCTIONS
Before you start please read the instructions. Planning your installation will save you time and effort.
FAILURE TO INSTALL APPLIANCES CORRECTLY IS DANGEROUS AND COULD LEAD TO PROSECUTION.
Installation should only be carried out by a qualified installer or engineer. We recommend that the appliance is connected by a competent person who is a member of a “Competent Person Scheme” who will comply with the required local regulations.
Our policy is one of constant development and improvement, therefore we cannot guarantee the strict accuracy of all of our illustrations and specifications. Changes may have been made subsequent to publishing.
Please keep to the following points most carefully;
Although every care has been taken to ensure this appliance has no sharp edges, we recommend that you wear protective gloves when installing and moving this appliance. This will prevent injury.
Ensure that you route all mains cables well clear of any adjacent heat source.
The space for air circulation, located underneath and at the back of the hob improves its reliability by ensuring that it will cool down, efficiently.
Installations should be carried out in line with the National Regulations applicable for this product type.
Prior to installation, ensure that the local distribution conditions (nature of the gas and gas pressure) and the adjustment of the appliance are compatible. The adjustment conditions are stated on the data badge.
This appliance is not connected to a combustion evacuation device. It shall be installed and connected in accordance with current installation regulation. Particular attention shall be given to the relevant requirements regarding ventilation.
In your own interest and that of safety, it is the law that all gas appliances be installed and serviced by competent persons. GAS SAFE registered installers undertake to work to satisfactory standards. Where regulations or standards have been revised since this handbook was printed, always use the latest edition.
In the UK the regulations and standards are as follows:
- Gas Safety Regulations 1996 (Installation and Use).
- Building Regulations - Issued by the Department of the Environment.
- Building Standards (Scotland) (Consolidated) - Issued by the Scottish Development Department.
- The current I.E.E. Wiring Regulations.
- Electricity at Work Regulations 1989.
- BS 6172 Installation of Domestic Gas cooking Appliances.
- Installation & Servicing Instructions for this appliance.
For installation in countries other than the UK, the appliance must be connected in accordance with all local gas and electrical regulations. In the Republic of Ireland, Installers should refer to IS813 Domestic Gas Appliances.
Ventilation requirements
The use of a gas cooking appliance results in the production of heat and moisture in the room in which it is installed. Ensure that the kitchen is well ventilated: keep natural ventilation holes open or install a mechanical ventilation device (mechanical extractor hood). Prolonged intensive use of the appliance may call for additional ventilation, for example, opening of a window, or more effective ventilation, for example increasing the level of mechanical ventilation where present.
The room containing the appliance should have an air supply in accordance with BS 5440: Part 2:1989:
All rooms require an openable window, or equivalent, and some rooms will require a permanent vent as well.
For room volumes up to 5m³ an air vent of 100cm² is required.
If the room has a door that opens directly to the outside, or the room exceeds 10 m³, NO AIR VENT is required.
For room volumes between 5 m³ and 10 m³, an air vent of 50 cm² is required.
If there are other fuel-burning appliances in the same room, BS 5440: Part 2: 1989 should be consulted to determine the air vent requirements.
This appliance must not be installed in a bed-sitting room of less than 20 m³ or in a bathroom or shower room.
Windows and permanent vents should therefore not be blocked or removed without first consulting a GAS SAFE gas installer.
In the Republic of Ireland, refer to relevant Irish Standards for correct ventilation requirements.
Levelling Your Cooker
Place a spirit level on a baking sheet onto an oven shelf.
The cooker is fitted with levelling feet (1). Level your cooker to your desired height using the levelling feet at the front and rear of the cooker.

Rear wheels (if fitted)
Adjustment of the wheel height can be made with a screwdriver, through the hexagonal hole in the front plinth.
Fitting the plinth
- Make sure the appliance is raised to a height of 915 mm or above before beginning. If the appliance is below 915 mm - you can only fit the plinth cover labelled X. You can adjust the height using the feet (1) of the appliance. If your appliance has a storage drawer at the bottom, you access the required holes through the base of the drawer after lifting the mat.
- Open the appliance doors, and loosen screw A located on bracket (2). Do not remove this screw entirely.
- Insert screw B, through slot (3) and screw into the small hole at the bottom of bracket (2). Make sure that the plinth cover is flush to the appliance, but not over tightened.

Fitting the towel rail (if applicable)
- On the towel rail there are two holes, top (A) and bottom (B), these holes have corresponding holes on the fascia at each end.
- The 2x longer screws are designed for the top hole (A) whereas the remaining screw just goes through the bottom hole (B). Both screws are M6 screws. Using the Allen key provided, tighten the screws making sure that the towel rail is flush to the fascia, but not over tightened.

Cupboard / hood clearances
View from front

View from above, with the appliance located in a corner
- If your appliance has a side opening door, we recommend a side clearance of 60mm to allow the oven door to fully open, if placed up to a wall or cabinetry.
- The cooker must have a side clearance above hob level of 90mm up to a height of 400mm.
Stability Bracket
If the cooker is fitted with a flexible connection, a stability bracket should be fitted to engage in the back of the cooker. A stability bracket can be bought from your local supplier.
A stability bracket can be fitted as follows:
- Place the cooker in the position and draw a PENCIL LINE level with the front edge.
- Mark the centre of the cooker to give the CENTRE LINE for the bracket.
- Remove the cooker and mark off 450mm from the PENCIL LINE to locate the front edge of the lower bracket.
- Fix the bracket to the floor. Measure from floor level to engagement edge in the back of cooker and add 3mm.
- Assemble the underside of the top part of the bracket to this height.

WARNING: This appliance must be earthed.
Connection to the electricity supply
(mains ignition models only)
The flexible mains lead is supplied connected to a BS 1363 fused plug, and the plug is fitted with the correct fuse.
Replace only with a fuse of the same rating, which is 13 amps.

The wires in the mains lead are colored in accordance with the following code:
Green and Yellow = Earth
Blue = Neutral, Brown = Live
As the colors of the wires in the mains lead for the appliance may not correspond with the colored markings identifying the terminals in your plug, proceed as follows:
- The wire which is colored green and yellow must be connected to the terminal marked E (Earth) or colored green.
- The wire which is colored blue must be connected to the terminal marked N (Neutral) or colored black.
- The wire which is colored brown must be connected to the terminal marked L (Live) or colored red.
The plug and socket must be accessible after installation. Should the mains lead of the appliance ever require replacement, this must be carried out by a qualified electrician who will replace it with a lead of the same size and temperature rating.
Under no circumstances should the mains electric cable be allowed to come into contact with the vertical oven flue tubes on the rear of the appliance.
Connect to the gas supply
The inlet to the cooker is 1/2" BSP internal situated at the rear right corner. Fit the bayonet connection. This should be located so as to ensure that the flexible connector hose does not kink.
Under no circumstances should the flexible connector be allowed to come into contact with the vertical oven flue tubes on the rear of the appliance.
Use a 900mm - 1125mm length of flexible connector.
Ensure that all pipework is of the correct rating for both size and temperature.
Flexible connections should comply with BS 669. Parts of the appliance likely to come into contact with a flexible connector have a temperature rise of less than 70°C.
After installation, make sure all connections are gas sound.
Burner aeration
All burners have fixed aeration and no adjustment is possible.
Pressure setting
Pressure test point: Use the oven injector.
Grill
Open the top oven / grill door. Push in and turn the top oven / grill control knob clockwise to the 'FULL ON' position. Hold the control knob in, and press the ignition switch (if fitted) or hold a lighted match or taper to the burner. Hold the control knob in for 15 seconds. Do not hold the control knob in for longer than 15 seconds if the gas has not lit. If the burner fails to light within this time, release the control knob and wait one minute before attempting further ignition.
Hob burner
Turn the control knob to the 'FULL ON' position, wait a second before pressing the ignition switch (if fitted) or holding a lighted match or taper to the burner. Hold the control knob in for 15 seconds. Do not hold the control knob in for longer than 15 seconds if the gas has not lit. If the burner fails to light within this time, release the control knob and wait one minute before attempting further ignition.
Ovens
Open the oven door. Turn the control to gas mark 9 and press the ignition switch (if fitted), or hold a lighted match or taper to the burner. Hold the control knob in for 15 seconds. Do not hold the control knob in for longer than 15 seconds if the gas has not lit. If the burner fails to light within this time, release the control knob and wait one minute before attempting further ignition.
Check the operation of electrical components
Clock Programmer/Minute Minder
Check functions as described in the User Guide.
Oven light & Convection fan
Open the main oven door. Turn the main oven control knob to the defrost setting. Check the oven light and convection fan both come on (tall oven on 90cm models only). Turn control knob back to 'OFF' position.
Cooling Fan
Open the grill door. Turn the grill control knob to the full power setting (gas grill on 90cm models). Check that the cooling fan operates. Turn control knob back to 'OFF' position and check cooling fan switches off immediately.
Lid Safety system (if fitted)
Ignite all hotplate burners including wok. Attempt to close the lid and make sure all flames are extinguished by the safety system.
If you are satisfied that the cooker is operating correctly, turn it off and show the customer how to use it. Make sure you ask the customer to operate the clock (if fitted) and controls.
Explain to the user that the lid safety system must not be used as a means of turning off the hotplate burners. Control knobs must always be turned to the 'OFF' position after use.
Note: If the cooker does not perform correctly, inform the customer of the problem and put a warning notice on the cooker. If the problem is dangerous, then disconnect the cooker. If there is a fault, then the customer should be advised to contact the manufacturer's local service organisation or the retailer.
Before leaving the installation hand over the User Guide to the customer
Gas - range
| Databadge Lower part of the front frame | |
| Appliance class Class 1 | - freestanding cooker |
| Type of gas See the dat | abadge for specific gas type |
| Gas category | Natural Gas I2H & LP Gas I3+ |
| Gas pressure settings | G20 Natural gas @ 20 mbarG30 Butane @ 28-30mbarG31 Propane @ 37mbar |
| Pressure test point Use | the oven injector |
| Burner Aeration Fixed | |
WARNING - This cooker must be earthed
| Burner / Element Nat | Gas LPG Butane Propane | |||||
| (kW) Injector (kW) | Injector g/h g/h | |||||
| 5 burner | ||||||
| Hob - small | 1.00 | 77 | 1.00 | 50 | 73 | 72 |
| Hob - medium x 2 | 2.00 | 104 | 2.00 | 70 | 145 | 143 |
| Hob - large | 3.00 | 129 | 3.00 | 87 | 218 | 215 |
| Hob - wok | 4.00 | 152 | 4.00 | 100 | 291 | 286 |
| Grill | 2.40 | 115 | 2.4 | 76 | 176 | 172 |
| Main Oven | 2.50 | 180 amal | 2.4 | 70 amal | 182 | 179 |
| 7 burner | ||||||
| Hob - small x 2 | 1.00 | 77 | 1.00 | 50 | 73 | 72 |
| Hob - medium x 3 | 2.00 | 104 | 2.00 | 70 | 145 | 143 |
| Hob - large | 3.00 | 129 | 3.00 | 87 | 218 | 215 |
| Hob - wok | 4.00 | 152 | 4.00 | 100 | 291 | 286 |
| Grill | 2.50 | 115 | 2.40 | 76 | 176 | 172 |
| Main oven | 2.50 | 180 amal | 2.40 | 70 amal | 182 | 179 |
| Oven Lamps / Fans @ 240V | |
| Lamps | 40W each |
| Lamps (90cm Tall oven) 25W each | |
| Cooling fans | 10W each |
| Electric oven (if fitted) 1.7 / 3.0 kW | |
| Electric grill (if fitted) | 1.7 / 2.7 kW |
| Electrical supply/load | ||
| Appliance size (cm) | Electrical supply | Max load (W) |
| 90 | 220 - 240V | 2630 - 3130 |
| 100/110 | 2500 - 2975 | |
| Bluetooth Timer Specification | V4.1 |
| Frequency range | 2402 – 2480 MHz |
| Output Power | 1.0mW |
GlenDimplex HOME APPLIANCES
EU Declaration of Conformity
We Glen Dimplex Home Appliances
Of Stoney Lane, Prescot, Merseyside, L35 2XW, UK
In accordance with the following Directive(s):
2014/53/EU Radio Equipment Regulations
Hereby declare that: Range Cookers listed on page 3
Are in conformity with the applicable requirements of the relevant Union harmonisation legislation:
| Ref No. | Title | Edition/date |
| EN 301 489-1 | ElectroMagnetic Compatibility (EMC) standard for radio equipment and services;Part 1: Common technical requirements; Harmonised Standard covering the essential requirements of article 3.1(b) of Directive 2014/53/EU and the essential requirements of article 6 of Directive 2014/30/EU | V2.1.1 |
| EN 301 489-17 | ElectroMagnetic Compatibility (EMC) standard for radio equipment and services;Part 17: Specific conditions for Broadband Data Transmission Systems;Harmonised Standard covering the essential requirements of article 3.1(b) of Directive 2014/53/EU | V3.1.1 |
| EN 300 328 | Wideband transmission systems; Data transmission equipment operating in the 2,4 GHz ISM band and using wide band modulation techniques;Harmonised Standard covering the essential requirements of article 3.2 of Directive 2014/53/EU | V2.1.1 |
| EN 62479 | Assessment of the compliance of low power electronic and electrical equipment with the basic restrictions related to human exposure to electromagnetic fields (10 MHz to 300 GHz) | 2010 |
This declaration of conformity is issued under the sole responsibility of the manufacturer. I hereby declare that the equipment named above has been designed to comply with the relevant sections of the above referenced specifications. These appliances comply with all applicable Essential Requirements of the Directives.
Paul Malen
Signed:
Name: Paul Mulvenna
Position: Product Approval Manager
Location: Glen Dimplex Home Appliances, Prescot
On: 4th October 2018 Issue 2
CE
Document Reference No. Range Cookers Dual Fuel and Gas - RED


Glen Dimplex Home Appliances
The appliances listed on Page 3 are also in accordance with the following Directive(s):
2014/53/EU Radio Equipment Regulations
2016/426 The Gas Appliance Regulations
2014/35/EU The Low Voltage Directive
2014/30/EU The Electromagnetic Compatibility Directive
2011/65/EU Restriction of the use of certain Hazardous Substances in electrical and electronic equipment
And are in conformity with the applicable requirements of the relevant Union harmonisation legislation:
| Ref No. | Title | Edition/date |
| EN 30-1-1 | Domestic cooking appliances burning gas. Safety - General | 2008 +A3:2013 |
| EN 30-2-1 | Domestic cooking appliances burning gas – Rational use of energy – General | 2015 |
| EN 60335-1 | Household and similar electrical appliances. Safety. General requirements | 2012 |
| EN 60335-2-6 | Household and similar electrical appliances. Particular requirements. Particular requirements for stationary cooking ranges, hobs, ovens and similar appliances | 2003 + A13:2013 |
| EN 60335-2-102 | Household and similar electrical appliances. Safety. Particular requirements for gas, oil and solid-fuel burning appliances having electrical connections | 2006 +A1:2010 |
| EN 62233 | Measurement methods for electromagnetic fields of household appliances and similar apparatus with regard to human exposure. | 2008 |
| EN 61000-6-1 | Electromagnetic compatibility (EMC). Generic standards. Immunity for residential, commercial and light-industrial environments. | 2007 |
| EN 61000-6-3 | Electromagnetic compatibility (EMC). Generic standards. Emission standard for residential, commercial and light-industrial environments. | 2007 |
| EN 50581 | Technical documentation for the assessment of electrical and electronic products with respect to the restriction of hazardous substances | 2012 |
Glen Dimplex Home Appliances
90cm Ranges
| Stoves Richmond DX RangesST RICH DX S900DFST RICH DX S900G | Stoves Sterling DX RangesST STER DX S900DFST STER DX S900G |
The above models may be suffixed with "EU" to identify a region.
The notified body BSI, Holywell Park, Ashby Road, Loughborough, LE11 3AQ, United Kingdom, CE0086 performed type test assessment to the BS EN 30-1-1 and BS EN 30-2-1 referenced in this report and issued the certificate: CE685905, expiry date 2028-05-11.
100cm & 110cm Ranges
| Stoves Richmond DX RangesST RICH DX S1000DFST RICH DX S1000GST RICH DX S1100DFST RICH DX S1100G | Stoves Sterling DX RangesST STER DX S1000DFST STER DX S1000GST STER DX S1100DFST STER DX S1100G |
The above models may be suffixed with "EU" to identify a region.
The notified body BSI, Holywell Park, Ashby Road, Loughborough, LE11 3AQ, United Kingdom, CE0086 performed type test assessment to the BS EN 30-1-1 and BS EN 30-2-1 referenced in this report and issued the certificate: CE685906, expiry date 2028-05-11.
Ranges: Gas Through Glass Variants
| 90cm variantsST RICH DX S900DF GTGST STER DX S900DF GTG | 100cm variantsST RICH DX S1000DF GTGST STER DX S1000DF GTG | 110cm variantsST RICH DX S1100DF GTGST STER DX S1100DF GTG |
The above models may be suffixed with "EU" to identify a region.
With respect to the appliances listed on this page, the notified body Kiwa Gastec, Kiwa House, Malvern View Business Park, Stella Way, Bishops Cleeve, Cheltenham, GL52 7DQ, United Kingdom, CE0558 performed type test assessment to the BS EN 30-1-1 and BS EN 30-2-1 referenced in this report and issued the certificate: CE/GAR/0558/018/062, expiry date 2019-04-27.

Glen Dimplex Home Appliances Limited. Registered Office: Stoney Lane, Prescot, Merseyside L35 2XW Tel: 0870 444 9919 Fax: 0870 458 9674 Registered in England No. 2692306. A member of the Glen Dimplex Group of companies.
Glen Dimplex HOME APPLIANCES
EU Declaration of Conformity
| We | GLEN DIMPLEX HOME APPLIANCES LIMITED |
| Of | Stoney Lane, Prescot, Merseyside, L35 2XW, UK |
In accordance with the following Directive(s):
(EU) 2016/426 The Gas Appliance Regulations
2014/53/EU Radio Equipment Directive
2011/65/EU Restriction of the use of certain Hazardous Substances in electrical and electronic equipment and
2015/863/EU amendment to RoHS 2011/65/EU
2009/125/EC Ecodesign and Energy Labelling
Hereby declare that the following Microwave appliance:
Range style cooker models listed on page 2
Are in conformity with the applicable requirements of the following documents
| Standard | Edition | Title |
| EN 30-1-1 | 2008+A1:2010+A2:2010+A3:2013 | Domestic cooking appliances burning gas. Safety - General |
| EN30-2-1 | 2015 | Domestic cooking appliances burning gas – Rational use of energy - General |
| EN 60335-1 | 2012+A13:2017 | Household and similar electrical appliances - Safety part 1: General requirements |
| EN 60335-2-6 | 2015 | Household and similar electrical appliances - Safety part 2-6: Particular requirements for stationary cooking ranges, hobs, ovens and similar appliances |
| EN 60335-2-102 | 2006+A2:2016 | Household and similar electrical appliances. Safety. Particular requirements for gas, oil and solid fuel burning appliances having electrical connections |
| EN 62233 | 2008 | Measurement methods for electromagnetic fields of household appliances and similar apparatus with regard to human exposure |
| EN 55014-1 | 2017 | Electromagnetic compatibility. Requirements for household appliances, electric tools and similar apparatus. Emission |
| EN 55014-2 | 2015 | Electromagnetic compatibility. Requirements for household appliances, electric tools and similar apparatus. Immunity. Product family standard. |
| EN 61000-3-2 | 2014 | Electromagnetic compatibility (EMC). Limits. Limits for harmonic current emissions |
| EN 61000-3-3: | 2013 | Electromagnetic compatibility (EMC). Limits. Limitation of voltage changes, voltage fluctuations and flicker in public low-voltage supply systems, for equipment with rated current ≤ 16 A per phase |
| EN 15181 | 2017 | Measuring method of the energy consumption of gas fired ovens |
| BS EN 50564 | 2011 | Electrical and electronic household and office equipment. Measurement of low power consumption |
GlenDimplex HOME APPLIANCES
| BS EN 50581 | 2017 | Technical documentation for the assessment of electrical and electronic products with respect to the restriction of hazardous substances |
| EN 301 489-1 | V2.1.1 | Electro Magnetic Compatibility (EMC) standard for radio equipment and services; Part 1: Common technical requirements; Harmonised Standard covering the essential requirements of article 3.1(b) of Directive 2014/53/EU and the essential requirements of article 6 of Directive 2014/30/EU |
| EN 301 489-17 | V3.1.1 | Electro Magnetic Compatibility (EMC) standard for radio equipment and services; Part 17: Specific conditions for Broadband Data Transmission Systems; Harmonised Standard covering the essential requirements of article 3.1(b) of Directive 2014/53/EU |
| EN 300 328 | V2.1.1 | Wideband transmission systems; Data transmission equipment operating in the 2,4 GHz ISM band and using wide band modulation techniques; Harmonised Standard covering the essential requirements of article 3.2 of Directive 2014/53/EU |
| 900cm models | 1000cm models | 1100cm models |
| ST PREC DX S900DF | ST PREC DX S1000DF | ST PREC DX S1100DF |
| ST PREC DX S900DF GTG | ST PREC DX S1000DF GTG | ST PREC DX S1100DF GTG |
| ST PREC DX S900G | ST PREC DX S1000G | ST PREC DX S1100G |
I hereby declare that the equipment named above has been designed to comply with the relevant sections of the above referenced specifications. The unit complies with all applicable Essential Requirements of the Directives.
The notified body BSI, Holywell Park, Ashby Road, Loughborough, LE11 3AQ, United Kingdom, CE0086 performed type test assessment to the BS EN 30-1-1 and BS EN 30-2-1 referenced in this declaration and issued the certificate:2531CS, expiry date 21/04/2028.
Signed:

Name: Mark Stone
Position: Product Engineering Director
Location: Glen Dimplex Home Appliances, Prescot
On: 2nd July 2019 Issue 1

Document Reference No. PRECISION RANGES DF G
- COUNTRIES OF DESTINATION
- CUSTOMER CARE HELPLINE
- WARRANTY REGISTRATION
- THANK YOU FOR BUYING THIS BRITISH-BUILT APPLIANCE FROM US
- EUROPEAN DIRECTIVES
- DISPOSAL OF PACKAGING MATERIAL
- WARNING
- CAUTION
- FIRE SAFETY ADVICE
- IF YOU HAVE AN ELECTRICAL FIRE IN THE KITCHEN AND YOU CONSIDER IT SAFE TO DO SO
- OTHER SAFETY ADVICE
- GETTING TO KNOW YOUR PRODUCT
- APPLIANCE FUNCTIONS
- OVENS AND GAS GRILL
- TOP OVEN - GRILL
- MAIN OVEN - GRILL - TALL OVEN GRILL (90CM ONLY)
- GRILL PAN AND TRIVET
- HOB
- FITTING BURNER CAPS AND HEADS
- PAN PLACEMENT
- PAN SIZES REQUIRED
- CAUTION: ACCESSIBLE PARTS MAY BE HOT WHEN THE GRILL IS USED - YOUNG CHILDREN SHOULD BE KEPT AWAY
- USING THE GRILL
- USING ALUMINIUM FOIL
- THE COOLING FAN
- ALUMINIUM FOIL
- USING THE TOP OVEN
- PREHEATING
- ZONES OF HEAT
- SLOW COOKING
- TOP OVEN BAKING GUIDE
- BAKING GUIDE HINTS
- ROAST TURKEY
- ROASTING GUIDE
- NOTES
- USING THE MAIN OVEN
- IGNITION
- OVEN FURNITURE
- BAKING TRAY AND ROASTING TINS
- OVEN SHELVES
- TRADITIONAL FRUIT CAKES
- INTRODUCTION
- COOKING TIMES
- COOKWARE
- KEEPING FOOD WARM
- THE ADVANTAGES OF SLOW COOKING ARE AS FOLLOWS
- USING THE SLOW COOK OVEN
- ACCESSIBLE PARTS MAY BE HOT WHEN THE OVEN IS USED. YOUNG CHILDREN SHOULD BE KEPT AWAY
- TO SWITCH ON THE OVEN
- WHEN USING THE OVEN
- FANNED OVEN
- SLOW COOKING (S SETTING OR 100°C)
- COOKING WITH A FANNED OVEN
- AS THIS IS A HIGH EFFICIENCY OVEN, YOU MAY NOTICE THE EMISSION OF STEAM FROM THE OVEN WHEN THE DOOR IS OPENED. PLEASE TAKE CARE WHEN OPENING THE DOOR
- TO HELP THE AIR CIRCULATE FREELY
- DEFROSTING AND COOLING IN THE TALL OVEN
- DEFROSTING TIMES
- BE SAFE
- TO ACTIVATE THE TALL OVEN (WITHOUT SPLITTER)
- TO ACTIVATE THE SPLITTER FUNCTION
- USING THE UPPER AND LOWER OVENS
- GRILLING
- HOW TO POSITION THE SPLITTER
- USING THE TOUCH CONTROLS
- MANUAL MODE
- SETTING THE TIME OF DAY
- SETTING THE MINUTE MINDER
- TO MODIFY OR CANCEL THE MINUTE MINDER
- SETTING THE COOKING TIME (THE DURATION OF TIME THE OVEN WILL OPERATE FOR) SEMI AUTOMATIC COOKING
- TO MODIFY OR CANCEL THE COOKING TIME
- SETTING THE VOLUME
- ACTIVATING / DEACTIVATING KEY LOCK
- TO DEACTIVATE THE KEY LOCK
- STATE OF CONNECTIVITY SYMBOL
- ACTIVATING / DEACTIVATING THE BLUETOOTH CONNECTIVITY
- CLEAR MEMORY
- HOW TO READ THE 6-DIGIT PAIRING CODE
- SETTING THE ALARM TONE
- THE GRIDDLE
- BEFORE USING THE GRIDDLE FOR THE FIRST TIME
- USING THE GRIDDLE
- REMOVING SHELF RUNNERS
- STANDARD SHELVES
- CHANGING THE LIGHT BULB
- ADDITIONAL FEATURES
- PLATE RACK (IF SUPPLIED)
- WOK CRADLE (DELUXE ONLY)
- DOS
- DON'TS
- INSTALLATION INSTRUCTIONS
- FAILURE TO INSTALL APPLIANCES CORRECTLY IS DANGEROUS AND COULD LEAD TO PROSECUTION
- PLEASE KEEP TO THE FOLLOWING POINTS MOST CAREFULLY
- IN THE UK THE REGULATIONS AND STANDARDS ARE AS FOLLOWS
- VENTILATION REQUIREMENTS
- LEVELLING YOUR COOKER
- REAR WHEELS (IF FITTED)
- FITTING THE PLINTH
- FITTING THE TOWEL RAIL (IF APPLICABLE)
- STABILITY BRACKET
- WARNING: THIS APPLIANCE MUST BE EARTHED
- CONNECTION TO THE ELECTRICITY SUPPLY
- CONNECT TO THE GAS SUPPLY
- BURNER AERATION
- PRESSURE SETTING
- GRILL
- HOB BURNER
- OVENS
- CHECK THE OPERATION OF ELECTRICAL COMPONENTS
- CLOCK PROGRAMMER/MINUTE MINDER
- OVEN LIGHT & CONVECTION FAN
- COOLING FAN
- LID SAFETY SYSTEM (IF FITTED)
- GLENDIMPLEX HOME APPLIANCES
- EU DECLARATION OF CONFORMITY
- HEREBY DECLARE THAT: RANGE COOKERS LISTED ON PAGE
- GLEN DIMPLEX HOME APPLIANCES
- IN ACCORDANCE WITH THE FOLLOWING DIRECTIVE(S)
- HEREBY DECLARE THAT THE FOLLOWING MICROWAVE APPLIANCE
Brand : STOVES
Model : Sterling Deluxe S1000G
Category : Cooker