
ST SEB602TCC - Oven STOVES - Free user manual and instructions
Find the device manual for free ST SEB602TCC STOVES in PDF.


| Brand | Stoves |
| Model | ST SEB602TCC |
| Product Type | Electric Built-in Oven |
| Dimensions (H x W x D) | 595 x 595 x 575 mm |
| Weight | 30 kg |
| Power Supply | 230 V, 50-60 Hz |
| Maximum Power | 2.5 kW |
| Oven Capacity | 65 liters |
| Cooking Functions | Conventional, Fan Assisted, Grill, Defrost, Fan Grill |
| Temperature Range | 50°C - 250°C |
| Cleaning Type | Standard (manual cleaning) |
| Control Type | Electronic touch with display |
| Timer Function | Yes, with delay start |
| Safety Features | Cool touch door, child lock, auto shut-off |
| Energy Efficiency Class | A+ |
| Door Type | Double glazed, removable |
| Interior Light | Yes, halogen |
| Number of Shelves | 2 (with multiple shelf positions) |
| Accessories Included | 1 baking tray, 1 wire shelf, 1 grill pan |
| Spare Parts Availability | Yes, from Stoves or authorized dealers |
| Warranty | 2 years (depending on region) |
Frequently Asked Questions - ST SEB602TCC STOVES
User questions about ST SEB602TCC STOVES
0 question about this device. Answer the ones you know or ask your own.
Ask a new question about this device
Download the instructions for your Oven in PDF format for free! Find your manual ST SEB602TCC - STOVES and take your electronic device back in hand. On this page are published all the documents necessary for the use of your device. ST SEB602TCC by STOVES.
USER MANUAL ST SEB602TCC STOVES
Countries of destination:
GB - Great Britain
IE - Ireland
DE - Germany
ES - Spain
FR - France
IT - Italy
PL - Poland
NL - Netherlands
SE - Sweden
CN - China
NZ - New Zealand
AU - Australia
To contact Stoves about your appliance, please call:

Customer Care Helpline 0344 815 3740
In case of difficulty within the UK

Warranty Registration 0800 952 1065
*Please call our Customer Care team for extended warranty

Spares Store 0344 815 3745

To register your appliance online:
www.stoves.co.uk

To contact us by email: gdhainfo@gdha.com

To register your appliance by mail: Please complete the warranty card and return to the address supplied

Alternatively general, spares and service information is available from our website at: www.stoves.co.uk
Calls are charged at the basic rate, please check with your telephone service provider for exact charges
Your new appliance comes with our 12-month guarantee, protecting you against electrical and mechanical breakdown. To register, please complete the registration form included, register online or by phone. For full terms & conditions of the manufacturer's guarantee, please refer to the website above. In addition, you may wish to purchase an extended warranty. A leaflet explaining how to do this is included with your appliance.
Our policy is one of constant development and improvement, therefore we cannot guarantee the strict accuracy of all of our illustrations and specifications. Changes may have been made subsequent to publishing.
ACKNOWLEDGMENT
Thank you for purchasing our product. We hope you enjoy using the many features and benefits it provides.
This user guide book is designed to help you through each step of owning your new product.
Please read it carefully before you start using your appliance, as we have endeavored to answer as many questions as possible, and provide you with as much support as we can.
General information, spares and service information is available from our website.
Ensure that other people using the product are familiar with these instructions as well.
If you should find something missing from your product or have any questions that are not covered in this user guide, please contact us (see contact information inside the front cover).
European Directives

This appliance is marked according to the European directive 2012/19/EU on Waste Electrical and Electronic Equipment (WEEE).
By ensuring this product is disposed correctly, you will help prevent potential negative consequences for the environment and human health, which could otherwise be caused by inappropriate waste handling of this product. The symbol on the product indicates that this product
may not be treated as household waste. Instead it shall be handed over to the applicable collection point for the recycling of electrical and electronic equipment. Disposal must be carried out in accordance with local environmental regulations for waste disposal. For more detailed information about treatment, recovery and recycling of this product, please contact your local city office, your household waste disposal service or the shop where you purchased the product
This appliance conforms to European Directive regarding Eco design requirements for energy-related products.
DECLARATION OF COMPLIANCE
When you have unpacked the oven, make sure that it has not been damaged in any way. If you have any doubts at all, do not use it: contact a professionally qualified person. Keep packing materials such as plastic bags, polystyrene, or nails out of the reach of children because these are dangerous to children.

WARNING
- During use the appliance becomes hot. Care should be taken to avoid touching heating elements.
- Children less than 8 years of age shall be kept away unless continuously supervised. This appliance can be used by children aged from 8 years and above and persons with reduced physical sensory or mental capabilities or lack of experience and knowledge if they have been given supervision or instruction concerning the use of the appliance in a safe way and understand the hazards involved. Children shall not play with the appliance. Cleaning and user maintenance shall not be made by children without supervision.
- Do not use harsh abrasive cleaners or sharp metal scrapers to clean the oven door glass since they can scratch the surface, which may result in shattering of the glass.
- Do not use a steam cleaner on any range cooker, hobs, and oven appliances.
- Ensure that the appliance is switched off before replacing the lamp to avoid electric shock.
- Never put items directly on the base of the oven or cover the oven base with foil, as this can cause the base element to overheat.
- When the oven is first switched on, it may give off an unpleasant smell. Please use the conventional or fanned cooking function at 250°C for 90 minutes to clean oil impurities inside the cavity. Ensure that the room is well ventilated during this process.
- Do not allow children to go near the oven when it is operating, especially when the grill is on.
- The means for disconnection must be incorporated in the fixed wiring in accordance with the wiring specifications.
- An all-pole disconnection means must be incorporated in the fixed wiring in accordance with the wiring rules in force.
- If the supply cord is damaged, it must be replaced by the manufacturer, its service agent, or similarly qualified persons in order to avoid a hazard.
- This appliance must be fitted to a switch providing all-pole
disconnection with a minimum contact separation of 3mm.
- Connection should be made with a suitable flexible cable with a minimum temperature rating of 70°C.
- Although every care has been taken to ensure this appliance has no sharp edges, we recommend that you wear protective gloves when installing and moving this appliance. This will prevent injury.
- Always switch off your appliance and allow it to cool down before you clean any part of it.
CAUTION
- This appliance must not be installed behind a decorative door in order to avoid overheating.
- The cooking process has to be supervised. A short term cooking process has to be supervised continuously.
- Ensure shelving is correctly installed, see the sections on shelf runners and shelf location within this book
- Fire Safety Advice
If you do have a fire in the kitchen, don't take any risks - get everyone out of your home and call the Fire Brigade.
If you have an electrical fire in the kitchen:
- Pull the plug out, or switch off the power at the fuse box - this may be enough to stop the fire immediately
- Smother the fire with a fire blanket, or use a dry powder or carbon dioxide extinguisher
- Remember: never use water on an electrical or cooking oil fire.
• Other Safety Advice
- Servicing should be carried out only by authorised personnel.
- Do not operate the appliance without the glass panels correctly fitted.
- There is a risk of electric shock, so always make sure you have turned off and unplugged your appliance before starting any cleaning or maintenance. Always allow the product to cool down before you change a bulb.
- Do not modify the outer panels of this appliance in any way.
• This appliance must be earthed.
- The appliance must never be disconnected from the mains supply during use, as this will seriously affect the safety and performance, particularly in relation to surface temperatures becoming hot and gas operated parts not working efficiently. The cooling fan (if fitted) is designed to run on after the control knob has been switched off.
- GAS WARNING! - If you smell gas: Do not try to light any appliance, Do not touch any electrical switch. Contact your local gas supplier immediately.
Getting to know your product
Note: Your appliance layout may differ depending on the model.
Control Panel
Oven / Grill functions
Note: Your oven may not have all of the functions shown here. We recommend for best cooking results, please preheat for 15 minutes.
| Symbol Function Description | |
 | Oven Lamp:- Can be operated on its own and will also come on when any oven function is selected except ECO function. |
 | Defrost:- Can be used to gently defrost frozen foods, This setting can also be used to help dough to rise faster than at room temperature. |
 | Base Heat:- Ideal for when additional base heat is required in the cooking process, e.g. the base heat can be used to provide additional browning for dishes such as pizza, pies and quiche. The temperature can be set within the ranges of 60-120°C. The default temperature is 60°C |
 | Conventional Cooking:-The top and bottom elements work together to provide traditional cooking and is ideal for roasting. The temperature can be set within the range of 50-250°C. The default temperature is 220°C. |
 | Fan Assist:- Combination of the fan and both top and bottom heating elements provide even heat distribution around the food. Dishes are lightly browned on the outside and still moist on the inside. Note: This function is suitable for grilling or roasting big pieces of meat at a higher temperature. The temperature can be set within the range of 50-250°C. The default temperature is 220°C. |
 | Top Heat:- is ideal for browning off the tops of food as it is not as intense as the grilling function, Provides additional browning for dishes like lasagna or cauliflower cheese, Use this function towards the end of the cooking cycle. The temperature can be set within the range of 150-200°C. The default temperature is 180°C |
 | Fanned Grill:- The fan forces air around the food and is ideal for thinner foods such as bacon, fish and gammon steaks. Foods require less turning. Use this function with the oven door closed. The temperature can be set within the range of 150-240°C. The default temperature is 210°C. |
 | Fanned Oven:- The even temperature in the oven makes this function suitable for batch baking, or batch cooking foods. The temperature can be set within the range of 50-240°C. The default temperature is 180°C. |
 | Radiant Grill:- The centre area under the grill becomes hot and is ideal for toasting, and grilling meats such as sausages, chops and steaks The temperature can be set within the range of 150-240°C. The default temperature is 210°C. |
 | Combination of the top and bottom heating elements with intermittent fan operation to provide even heat distribution around the food. The temperature can be set within the range of 50°C to 250°C. The default temperature is 160°C. |
Cooling Fan
When cooking is finished, paused, or if the center oven temperature is over 75°C, the cooling fan will continue working for 15 minutes. When the center oven temperature drops below 75°C, the cooling fan will stop.
To use your appliance
1. Clock Setting
After connecting the unit to the power, the symbols "0:00" will be visible on the display.
- Press "☐", the hour figures will flash.
- Press " < > " to adjust the hour figures, (time should be within 0--23).
- Press "☐", the minutes will flash.
- Press "◀> " to adjust the minutes setting, (time should be within 0--59).
- Press " 🔊" to finish the clock settings. " : " will flash, and the time will be illuminated. Note: The clock is 24 hours. After power on, if not set, the clock will show "0:00".
2. Function Setting
- Press "F" to choose the cooking function you require. The related indicator will illuminate.
- Press "◀▶" to adjust the cooking time and adjust the temperature before pressing "◀" to switch.
- Press "▶" to confirm the start of cooking.
- If step 2 is ignored, press "☐" to confirm the start of cooking and the default time is 9 hours, the default temperature will display on the LCD.
NOTE:
- The step quantities for the adjustment time of the coding switch are as follows: 0--0:30min: step 1 minute; 0:30--9:00hour: step 5 minutes.
- The step quantities for the adjustment of temperature is 5°C, and "☐" "☐" cannot adjust the temperature.
- Press "◀▶" to adjust the cooking time when cooking begins. Then press "▶" to confirm. If "▶" is not pressed within 5 seconds, the oven will revert back to the previous time to continue cooking.
- Press "◀", the "◀" will show, then press "◀◀" to adjust the temperature when cooking begins. Then press "◀" to start cooking. If "◀" is not pressed in 5 seconds, the oven will revert back to the previous temperature to continue cooking.
- If the temperature in the oven cavity does not reach the set temperature, the set temperature flashes; if the temperature in the oven cavity reaches the set temperature, a beep prompt will beep and the set temperature will be displayed continuously.
3. Lamp Setting
- Press "F" to select the relevant function, then the corresponding icon will be on.
- Press " ▶" button to start, " 0:00 " and lamp icon " 🔍" will light up, " : " will flash.
4. Inquiring Function
In the following states, you can use the inquiring function, and after 3 seconds it will return to the current state.
- During working state, if the clock was set, press the "☐" button to see the current time; if the reminder function was set, press the "☒" button to see the time of the reminder.
- In reminding state, if the clock was set, press the "☐" button to see the current time.
- In clock display state, if the reservation function was set, press the "☒" button to see the time of the reservation.
1) The clock cannot be queried in the following cases: cooking setting status, reservation function setting process, reservation function setting status, or when the child lock function has been set. 2) The clock cannot be queried without setting the clock.
5. Child Lock Function
To lock: press "▶" and "||" simultaneously for 3 seconds; there will be a long "beeping" sound and the "🔍" will be illuminated.
To unlock: press "▶" and "□" simultaneously for 3 seconds; there will be a long "beeping" sound indicating the child lock is released.
Note: During working mode, if you want to stop cooking, press the stop button quickly. Do not long press the stop button; it is invalid.
6. Reminder Function
The oven has a 9-hour reminder function. This function helps to remind you to start cooking at a certain time, from 1 minute to 9 hours. The reminder can only be set when the oven is in standby mode. Follow the steps below to set the reminder:
- Press the reminder setting button "☒" and the display shows "☐" and "AL";
- Press "◀▶" to set the time of the reminder.
- Press "▶" to confirm the setting. " : " will flash and the indicator for reminder "🔒" will light. The time will count down.
Note: The oven buzzer will sound 10 times after the time returns to zero hour. The "🔒" symbol disappears on the screen to remind you to start cooking. You can cancel the reminder during setting by pressing the stop button; after the reminder has been set, you can cancel it by pressing the stop button twice.
7. Reservation Function
Only when the clock has been set can the delay function be used.
In standby mode,
- Press "8" 2 times, the display shows "8" and "End".
- Press "◀▶" to set the hour of the cooking ending time of reservation.
- Press "☐" button again;
- Press "◀▶" to set the minute of the cooking ending time of reservation.
- Press "F" to choose the cooking function you require.
- After setting the cooking time and temperature, press "▶" to start.
Note:
Subtract the cooking time from the cooking ending time to get the time the oven starts to cook.
Oven lights and defrost functions do not allow the Reservation function to be set.
8. Start/Pause/Cancel Function
- If the cooking time has been set, press "▶" to start cooking. If the cooking is paused, press "▶" to resume cooking.
- During cooking process, press "☐" once to pause the cooking. Press "☐" twice to cancel the cooking.
9. Energy-Saving Function
- In waiting state and reminding state, press "☐" for three seconds, the LCD display will go off and set to energy-saving mode.
- If no operation in 10 minutes under waiting state, the LCD display will go off and go into energy-saving mode.
- Under the energy-saving mode, press any key can quit the energy-saving mode.
10. Note
- The oven lamp will be on for all functions. (except ECO function)
- Once the cooking programme has been set and the "☐" button is not pressed within 5 minutes, the current time will be displayed or turn back to waiting state. The setting program will be invalid.
- The buzzer will sound once when effectively pressed, if not effectively pressed there will be no response.
- The buzzer will sound five times to remind you when cooking has finished.
11. Door Open Detection
When the oven door is opened, the lamp lights up. When the oven door is closed, the lamp goes out.
When the oven door is opened during cooking, the oven will enter a pause state (except for the lamp function).
When the oven door is opened, press the Start/Confirmation button, and the screen displays "door". At this time, the oven cannot be started.
When the reservation function is running, open the oven door, and when the reservation time is up, the oven will enter a pause state and cannot start cooking.
Opening the oven door does not affect the operation of the alarm clock function.
Soft Closing Door (If fitted)
The door can be paused at any angle greater than 30°.
The door will close slowly under the action of the damper, if it is less than or equal to an angle of 30°.
Please do not close the door vigorously.

Catalytic Oven liners (If fitted)
Some oven specifications have catalytic oven liners fitted to the sides of the oven, you can easily tell if they are fitted because the panel is a light grey soft touch enamel. This enamel is special and partly cleans itself. This does not stop all marks on the lining, but helps to reduce the amount of manual cleaning needed.
These panels work best when the oven is heated above 200°C. If you do most of your cooking below this temperature, occasionally wipe the panels with a lint free cloth and hot soapy water. The panels should then be allowed to dry naturally and the oven heated at 200°C for about one hour. This will make sure that the panels are working effectively.
Do not use harsh abrasives or chemicals on this soft enamel.
Removing the door from oven (optional)
- To remove the door, open the door to the maximum angle. Then pull the catch at the door hinge backward.
- Close the door to an angle of approximately 30°. Hold the door with one hand on each side. Lift up and slowly pull the door out from the oven.
- Open the door rotation bracket assembly, refer to the action in the following picture.
- Lift up the door outer glass and pull it out, then take the door middle glass out in the same way.


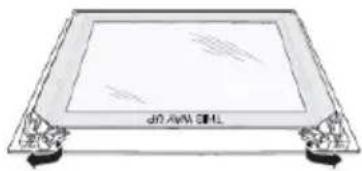


To reassemble, follow the instructions in reverse, ensuring the glass is re-installed the right way up.
WARNING: Do not forcibly pull on the oven door as this could result in the glass shattering during the dismantling process.
WARNING: The hinge springs could loosen, causing personal injury.
WARNING: Do not lift or carry the oven door by the door handle.

Accessories
Wire shelf: For grill, dishes, cake pan with items for roasting and grilling.

Slider bracket: For cooking larger size food, these shelf support rails on the right and left sides of the oven can be removed.

Grill pan: For cooking large quantities of food such as moist cakes, pastries, frozen food etc, or for collecting fat/spillage and meat juices.

Telescopic runner (if fitted): Some models might come with telescopic runners to facilitate the use of oven. These telescopic runners and slider brackets could be disassembled by unscrewing the screws used to fix it.

Shelf placement warning:
To ensure the oven shelves operate safely, correct placement of the shelves between the side rails is imperative. Shelves and the grill pan can only be used between the first and fifth layers.
The shelves should only be used in the right direction, as this ensures that trays and hot food items do not slide if the shelves are moved.
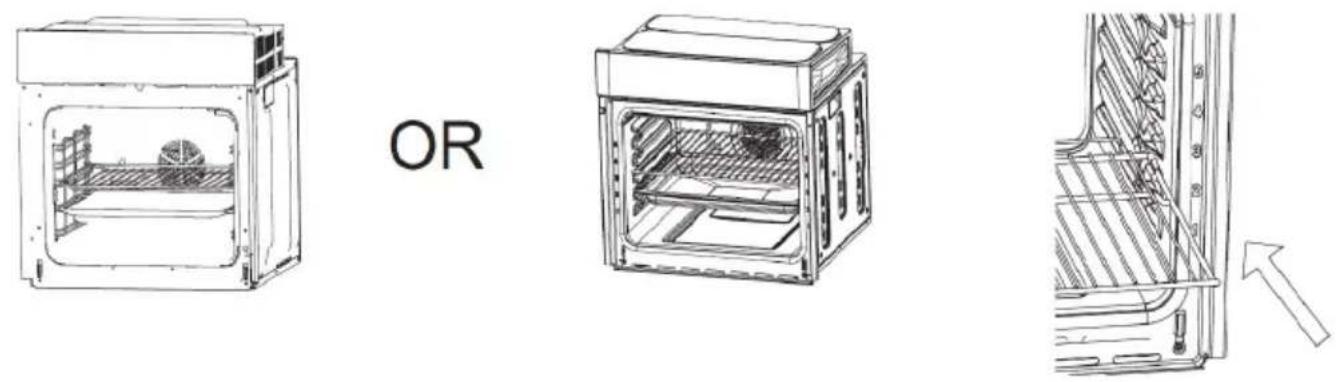
Removing Shelf Runners 12

Standard shelves
The oven shelves can also be hooked onto the shelf runners.

Before removing the shelves completely, please make sure that the shelf is unclipped from the retaining tabs.
BULB REPLACEMENT
Risk of electric shock!
Glass cover
You must replace a damaged glass cover. Suitable glass covers may be obtained from the after-sales service.
For replacement, proceed as follows:
- Disconnect power from the mains outlet or switch off the circuit breaker of the unit's mains outlet.
- Unscrew the glass lamp cover by turning it counter-clockwise (note, it may be stiff) and replace the bulb with a new one of the same type.
- Screw the glass lamp cover back in place.
Note: Only use 25-40W/220V-240V, T300°C halogen lamps

Do's
Note: Always switch off your appliance and allow it to cool down before you clean any part of it.
Note: Please take extra care when cleaning over the symbols on the control panel, as this can lead to them fading.

- Warm, soapy water • Wipe with a damp cloth, wring out cloth


- Dry with a soft cloth
Tips: Some foods can mark or damage the metal or paint work e.g.; Vinegar, fruit juices and salt. Always clean food spillages as soon as possible.
Don'ts

- Undiluted bleaches
- Chloride products

- Wire Wool
- Abrasive cleaners
- Nylon pads
- Steam cleaners

Do not place in the dishwasher: - Cast iron griddle - Pan supports
IT IS IMPORTANT TO CLEAN YOUR APPLIANCE REGULARLY AS A BUILD UP OF FAT CAN AFFECT ITS PERFORMANCE OR DAMAGE IT AND MAY INVALIDATE YOUR GUARANTEE.
IN ADDITION TO THE ABOVE, DO NOT USE METAL SCRAPERS TO CLEAN THE OVEN DOOR GLASS.
We offer a great range of cleaning products and accessories for your appliance. To shop, please visit our website located at the front of this User Guide.
Electric Built In
| Electrical supply / Load | ||
| Appliance Size (cm) Electrical $upply Load (kW) | ||
| 60 Multi Function Oven 220 - 240V ~ 50Hz-60Hz 2.1 | ||
For the specific power rating of your model, refer to the data badge on the front frame of your appliance.
WARNING: This appliance must be earthed.
| ST SEB602TCC Blk ST SEB602TCC Sta | |
| No of Cavities | 1 |
| Heat Source | Electricity |
| Usable Volume | 70L |
| ECelectric, cavity (Conventional) | 0.99 kWh/cycle |
| ECelectric, cavity (Forced Air) | 0.79 kWh/cycle |
| EEICavity | 94 |
| Energy Efficiency Class (A+++ to D) | A |
| - | Symbol | Value | Unit |
| Model identification | - | ST SEB602TCC BlkST SEB602TCC Sta | - |
| Type of oven | - | Built-in electric oven | - |
| Mass of the appliance | - | 34.4 | kg |
| Number of cavities | - | 1 | - |
| Heat source per cavity (electricity or gas) | Electricity | - | - |
| Volume per cavity | V | 70 | L |
| Energy consumption (electricity) required to heat a standardised load in a cavity of an electric heated oven during a cycle in conventional Mode per cavity (electric final energy) | EC electric cavity | 0.99 | kWh/cycle |
| Energy consumption required to heat a standardised load in a cavity of an electric heated oven during a cycle in fan-forced mode per cavity (electric final energy) | EC electric cavity | 0.79 | kWh/cycle |
| Energy Efficiency Index per Cavity | EEI cavity | 94 | - |
| Energy efficiency class | - | A | - |
| 1kWh/cycle= 3.6MJ/cycle | |||
The measurement and calculation method of the above table was done in accordance with commission regulation (EU) No 65/2014 & 66/2014.
Oven energy saving tips:
Cook meals together, if possible.
Keep the pre-heating time short.
Do not lengthen cooking time.
Do not open the oven door during the cooking period.
Do not forget to turn the appliance off at the end of cooking.


- COUNTRIES OF DESTINATION
- CUSTOMER CARE HELPLINE
- WARRANTY REGISTRATION
- ACKNOWLEDGMENT
- EUROPEAN DIRECTIVES
- DECLARATION OF COMPLIANCE
- WARNING
- CAUTION
- IF YOU HAVE AN ELECTRICAL FIRE IN THE KITCHEN
- GETTING TO KNOW YOUR PRODUCT
- OVEN / GRILL FUNCTIONS
- COOLING FAN
- TO USE YOUR APPLIANCE
- CLOCK SETTING
- FUNCTION SETTING
- NOTE
- LAMP SETTING
- INQUIRING FUNCTION
- CHILD LOCK FUNCTION
- REMINDER FUNCTION
- RESERVATION FUNCTION
- START/PAUSE/CANCEL FUNCTION
- ENERGY-SAVING FUNCTION
- DOOR OPEN DETECTION
- SOFT CLOSING DOOR (IF FITTED)
- CATALYTIC OVEN LINERS (IF FITTED)
- REMOVING THE DOOR FROM OVEN (OPTIONAL)
- ACCESSORIES
- SHELF PLACEMENT WARNING
- BULB REPLACEMENT
- GLASS COVER
- DO'S
- DON'TS
- ELECTRIC BUILT IN
Brand : STOVES
Model : ST SEB602TCC
Category : Oven