WBS-512AC - Router Planet - Free user manual and instructions
Find the device manual for free WBS-512AC Planet in PDF.


| Product Type | Outdoor Wireless CPE |
| Model | WBS-512AC |
| Wireless Standard | IEEE 802.11a/n/ac Wave 2 MU-MIMO |
| Data Rate | Up to 900 Mbps |
| Frequency Band | 5 GHz |
| Antenna | Built-in 14 dBi dual-polarization directional |
| Ports | 1 x 10/100/1000 PoE In, 1 x 10/100/1000 LAN |
| Power Supply | 48V DC 0.5A PoE+ or 12V DC 1A via DC jack |
| Power Consumption | < 10W |
| Dimensions (W x D x H) | 87 x 38 x 260 mm |
| Weight | 405 g |
| Operating Temperature | -20 to 70 °C |
| Ingress Protection | IP55 |
| Operation Modes | AP, Gateway, Repeater, Super WDS, WISP |
| Wireless Security | WPA/WPA2, 802.1X, MAC/IP/URL filtering, VLAN |
| Management | Web GUI, Planet Smart Discovery, NMS |
| Package Contents | CPE, Quick Guide, Ethernet Cable, Mounting Strap |
| Regulatory Approvals | FCC, CE, RoHS |
| Maintenance | Keep dry; clean with soft cloth; avoid harsh chemicals |
| Spare Parts | Not available separately |
Frequently Asked Questions - WBS-512AC Planet
User questions about WBS-512AC Planet
0 question about this device. Answer the ones you know or ask your own.
Ask a new question about this device
Download the instructions for your Router in PDF format for free! Find your manual WBS-512AC - Planet and take your electronic device back in hand. On this page are published all the documents necessary for the use of your device. WBS-512AC by Planet.
USER MANUAL WBS-512AC Planet
Outdoor Wireless CPE
WBS-512AC

natural_image
Woman in business attire using a laptop on stairs (no visible text or symbols)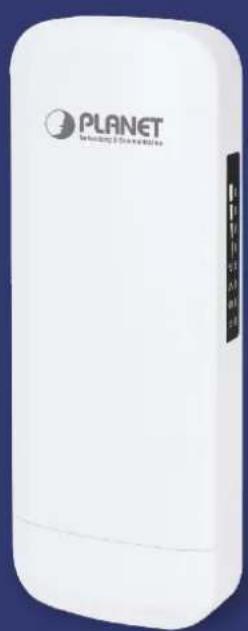
natural_image
White Planet Wireless device with 'PLANET' branding and ports (no readable text beyond branding)Copyright
Copyright © 2020 by PLANET Technology Corp. All rights reserved. No part of this publication may be reproduced, transmitted, transcribed, stored in a retrieval system, or translated into any language or computer language, in any form or by any means, electronic, mechanical, magnetic, optical, chemical, manual or otherwise, without the prior written permission of PLANET.
PLANET makes no representations or warranties, either expressed or implied, with respect to the contents hereof and specifically disclaims any warranties, merchantability or fitness for any particular purpose. Any software described in this manual is sold or licensed "as is". Should the programs prove defective following their purchase, the buyer (and not PLANET, its distributor, or its dealer) assumes the entire cost of all necessary servicing, repair, and any incidental or consequential damages resulting from any defect in the software. Further, PLANET reserves the right to revise this publication and to make changes from time to time in the contents hereof without obligation to notify any person of such revision or changes.
All brand and product names mentioned in this manual are trademarks and/or registered trademarks of their respective holders.
Federal Communication Commission Interference Statement
This equipment has been tested and found to comply with the limits for a Class B digital device, pursuant to Part 15 of FCC Rules. These limits are designed to provide reasonable protection against harmful interference in a residential installation. This equipment generates, uses, and can radiate radio frequency energy and, if not installed and used in accordance with the instructions, may cause harmful interference to radio communications. However, there is no guarantee that interference will not occur in a particular installation. If this equipment does cause harmful interference to radio or television reception, which can be determined by turning the equipment off and on, the user is encouraged to try to correct the interference by one or more of the following measures:
- Reorient or relocate the receiving antenna.
- Increase the separation between the equipment and receiver.
- Connect the equipment into an outlet on a circuit different from that to which the receiver is connected.
- Consult the dealer or an experienced radio technician for help.
FCC Caution
To assure continued compliance, use only shielded interface cables when connecting to computer or peripheral devices. Any changes or modifications not expressly approved by the party responsible for compliance could void the user's authority to operate the equipment.
This device complies with Part 15 of the FCC Rules. Operation is subject to the following two conditions:
(1) This device may not cause harmful interference
(2) This device must accept any interference received, including interference that may cause undesired operation.
FCC Radiation Exposure Statement
This equipment complies with FCC radiation exposure limits set forth for an uncontrolled environment. This equipment should be installed and operated with minimum distance 26cm between the radiator & your body.
CE Compliance Statement
This device meets the RED 2014/53/EU requirements on the limitation of exposure of the general public to electromagnetic fields by way of health protection. The device complies with RF specifications when it is used at a safe distance of 20 cm from your body.
Safety
This equipment is designed with the utmost care for the safety of those who install and use it. However, special attention must be paid to the dangers of electric shock and static electricity when working with electrical equipment. All guidelines of this and of the computer manufacture must therefore be allowed at all times to ensure the safe use of the equipment.
National Restrictions
This device is intended for home and office use in all EU countries (and other countries following the EU directive 1999/5/EC) without any limitation except for the countries mentioned below:
| Country | Restriction | Reasons/remarks |
| Bulgaria None | General authorization required for outdoor use and public service | |
| France | Outdoor use; limited to 10 mW e.i.r.p. within the band 2454-2483.5 MHz | Military Radiolocation use. Refarming of the 2.4 GHz band has been ongoing in recent years to allow current relaxed regulation. Full implementation planned 2012 |
| Italy None | If used outside of own premises, general authorization is required | |
| Luxembourg None | General authorization required for network and service supply(not for spectrum) | |
| Norway Implemented | This subsection does not apply for the geographical area within a radius of 20 km from the centre of Ny-Ålesund | |
| Russian Federation | None Only for indoor applications |
Note: Please don't use the product outdoors in France.
WEEE regulation

To avoid the potential effects on the environment and human health as a result of the presence of hazardous substances in electrical and electronic equipment, end users of electrical and electronic equipment should understand the meaning of the crossed-out wheeled bin symbol. Do not dispose of WEEE as unsorted municipal waste and have to collect such WEEE separately.
Revision
User Manual of PLANET 802.11ac 900Mbps Outdoor Wireless CPE
Model: WBS-512AC
Part No. EM-WBS-512AC_v1.1
CONTENTS
Chapter 1.Product Introduction....1
1.1 Package Contents....1
1.2 Product Description....2
1.3 Product Features....5
1.4 Product Specifications 6
Chapter 2. Hardware Installation ...... 9
2.1 Product Outlook....9
2.1.1 Port and Button....11
2.1.2 Hardware Description 11
Chapter 3. Connecting to the CPE ....12
3.1 System Requirements .... 12
3.2 Installing the CPE....12
Chapter 4. Quick Installation Guide ...... 14
4.1 Manual Network Setup -- TCP/IP Configuration....14
4.1.1 Configuring the IP Address Manually ....14
4.2 Starting Setup in the Web UI....18
Chapter 5.Configuring the CPE....19
5.1 Wizard....20
5.2 Gateway Mode 20
5.2.1 WAN Settings....21
5.2.2 Wireless....23
5.3 Super WDS Mode 24
5.4 WISP Mode....28
5.5 AP Mode....30
5.6 Repeater Mode 32
5.7 Wi-Fi....35
5.7.1 5G Wi-Fi....35
5.7.1.1. Basic 35
5.7.1.2. VAP 36
5.7.2 MAC ACL 37
5.7.2.1. MAC ACL 37
5.7.3 Wi-Fi Timer Off....38
5.7.3.1. Wi-Fi Timer Off....38
5.7.4 Advanced....39
5.7.4.1. Advanced....39
5.7.5 Network....41
5.7.5.1. LAN Settings 41
5.7.5.2. SNMP Config 42
5.7.5.3. VLAN Settings....42
5.7.5.4. WAN Settings.... 43
5.7.5.5. WAN advanced settings....46
5.7.6 Security....47
5.7.6.1. URL Filtering 47
5.7.6.2. IP/Port Filtering 49
5.7.6.3. MAC Filtering 50
5.7.6.4. Security (Port Mapping/Port Forwarding) 52
5.7.6.5. DMZ....53
Chapter 6. Quick Connection to a Wireless Network....54
6.1 Windows XP (Wireless Zero Configuration)....54
6.2 Windows 7 (WLAN AutoConfig)....56
6.3 Mac OS X 10.x....59
6.4 iPhone/iPod Touch/iPad 63
Appendix A: Planet Smart Discovery Utility....66
Appendix B: FAQs....67
Q1: How to set up the AP Client Connection....67
Q2: How to set up the WDS Connection....72
Appendix C: Troubleshooting....78
Appendix D: Glossary 80
FIGURE
FIGURE 2-1 WBS-512AC FRONT SIDE....9
FIGURE 2-2 WBS-512AC REAR SIDE....9
FIGURE 3-1 CONNECT THE ANTENNA ...... 12
FIGURE 3-2 CONNECT THE ETHERNET CABLE....13
FIGURE 3-3 CONNECT THE POE INJECTOR ....13
FIGURE 4-1 TCP/IP SETTING....15
FIGURE 4-2 WINDOWS START MENU .... 16
FIGURE 4-3 SUCCESSFUL RESULT OF PING COMMAND ....16
FIGURE 4-4 FAILED RESULT OF PING COMMAND .... 17
FIGURE 4-5 LOGIN BY DEFAULT IP ADDRESS....18
FIGURE 4-6 LOGIN WINDOW ....18
FIGURE 5-1 MAIN MENU .... 19
FIGURE 5-3 GATEWAY MODE....20
FIGURE 5-4 GATEWAY -- STATIC IP ....21
FIGURE 5-5 GATEWAY - PPPOE (ADSL) 22
FIGURE 5-6 GATEWAY - DHCP....22
FIGURE 5-7 GATEWAY - WIRELESS 23
FIGURE 5-14 AP MODE....30
FIGURE 5-21 MAC ACL....37
FIGURE 5-30 SNMP CONFIG ....42
FIGURE 5-31 VLAN SETTINGS....42
FIGURE 5-32 STATIC IP 43
FIGURE 5-33 PPPoE (ADSL) 44
FIGURE 5-34 DHCP....45
FIGURE 5-35 WAN ADVANCED SETTINGS ....46
FIGURE 6-1 SYSTEM TRAY – WIRELESS NETWORK ICON....54
FIGURE 6-2 CHOOSING A WIRELESS NETWORK ....54
FIGURE 6-3 ENTERING THE NETWORK KEY ....55
FIGURE 6-4 CHOOSING A WIRELESS NETWORK -- CONNECTED ....55
FIGURE 6-5 NETWORK ICON....56
FIGURE 6-6 WLAN AUTOCONFIG....56
FIGURE 6-7 TYPING THE NETWORK KEY ....57
FIGURE 6-8 CONNECTING TO A NETWORK ....57
FIGURE 6-9 CONNECTED TO A NETWORK....58
FIGURE 6-10 MAC OS – NETWORK ICON....59
FIGURE 6-11 HIGHLIGHTING AND SELECTING THE WIRELESS NETWORK....59
FIGURE 6-12 ENTER THE PASSWORD ....60
FIGURE 6-13 CONNECTED TO THE NETWORK ...... 60
FIGURE 6-14 SYSTEM PREFERENCES ...... 61
FIGURE 6-15 SYSTEM PREFERENCES -- NETWORK....61
FIGURE 6-16 SELECTING THE WIRELESS NETWORK ...... 62
FIGURE 6-17 IPHONE - SETTINGS ICON....63
FIGURE 6-18 WI-FI SETTING ...... 63
FIGURE 6-19 WI-FI SETTING - NOT CONNECTED ...... 64
FIGURE 6-20 TURNING ON WI-FI....64
FIGURE 6-21 IPHONE -- ENTERING THE PASSWORD....65
FIGURE 6-22 IPHONE -- CONNECTED TO THE NETWORK ....65
Chapter 1. Product Introduction
Package Contents 1.1
Thank you for choosing PLANET WBS-512AC Wireless AP. Please verify the contents inside the package box.
Package Contents of WBS-512AC/WBS-512AC
WBS-512AC

Quick Guide
Ethernet Cable

Mounting Strap


Note
If there is any item missing or damaged, please contact the seller immediately.
Product Description 1.2
Flexible and Reliable Outdoor Wireless Solution with Superior Performance
PLANET WBS-512AC 802.11ac WAVE 2 900Mbps Outdoor Wireless CPE offers a better range and excellent throughput than those of the traditional wireless device. With the standard IEEE 802.3at Power over Ethernet (PoE) design, the WBS-512AC can be easily installed in the areas where power outlets are not available. The WBS-512AC is definitely suitable for wireless IP surveillance, and bridge link of building to building and backbone of public service. Additionally, the self-healing capability keeps connection alive all the time. With the IP55-rated outdoor enclosure, the WBS-512AC can perform normally under rigorous weather conditions, meaning it can be installed in any harsh, outdoor environments.
Benefits of MU-MIMO under 802.11ac Wave 2
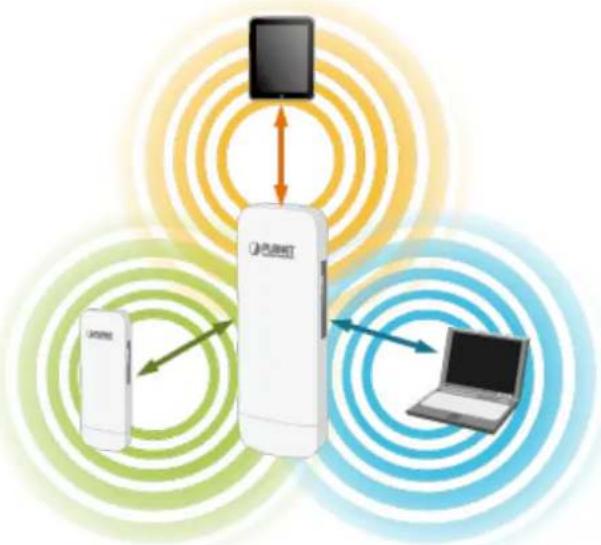
With the MU-MIMO Wave 2 technology, the WBS-512AC, installed in public areas such as hotspots, airports and conferences, reduces the frustration that Wi-Fi users often experience in downloading web pages, e-mail file attachments and media contents. For cellular operators, the WBS-512AC provides a better Wi-Fi user experience, reducing the likelihood of users turning off Wi-Fi and putting more load on the cellular network. For enterprises, this technology also can solve Wi-Fi congestion issues in open work spaces and conference rooms. Outdoor wireless CPE is specially designed for long-distance outdoor surveillance and wireless backhaul solutions that are capable of establishing stable bridge connection through the embedded antenna. To provide maximum performance, the outdoor wireless CPE can implement up to 8 operation modes where a multitude of applications in communities, warehouses, campuses, harbors, etc. can be made.
WAVE 1
SU-MIMO
Serving one user at a time

natural_image
Illustration of a QFIRET airship with three connected devices and a central touchscreen display (no text or symbols)WAVE 2
MU-MIMO
Serving multiple users simultaneously
flowchart
graph TD
    A["Q-POWER Device"] -->|Signal| B["Laptop"]
    C["Smartphone"] -->|Signal| A
    style A fill:#f9f,stroke:#333
    style B fill:#ccf,stroke:#333
    style C fill:#cfc,stroke:#333
Multiple SSIDs with VLAN Tagging
The WBS-512AC supports WPA/WPA2, and the 802.1X RADIUS authentication to secure the wireless connection. Besides, the supported IEEE 802.1Q VLAN allows multiple VLAN tags to be mapped to multiple SSIDs to distinguish the wireless access. This makes it possible for the WBS-512ACN to work with managed Ethernet switches to have VLANs assigned to a different access level and authority.

Multi-SSIDs + VLANs
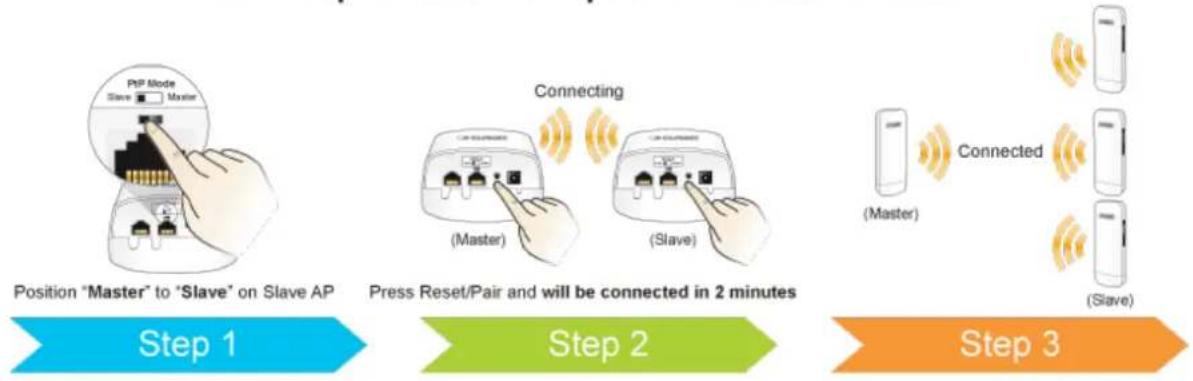
3 Simple Steps to Set Up PtP Connection
Without needing to enter the Web interface for configuration, the WBS-512AC has the DIP switch for setting to master (AP mode) and to slave (repeater mode). User only needs three simple steps to establish the PtP connection without any difficulty. By just switching the button to "Master" on the master AP, and pressing the reset button, the PtP connection can be established in 2 minutes as the connection steps are shown below.
3 Steps to Set Up PtP Connection
flowchart
graph LR
    A["Position "Master" to "Slave" on Slave AP"] --> B["Press Reset/Pair and will be connected in 2 minutes"]
    B --> C["Connected (Master)"]
    B --> D["Connected (Slave)"]
    C --> E["Step 3"]
    D --> E
Optimized Efficiency in AP Management
The brand-new GUI configuration wizard helps the system administrator easily set up the WBS-512AC step by step. Besides, the built-in Wi-Fi analyzer provides real-time channel utilization to prevent channel overlapping to assure greater performance. With the automatic transmission power mechanism, distance control and scheduling reboot setting, the WBS-512AC is easy for the administrator to deploy and manage without on-site maintenance. Moreover, you can use PLANET NMS-500 or NMS-1000V AP control function to deliver wireless profiles to multiple APs simultaneously, thus making the central management simple.
Setup Wizard Multiple Modes

Wi-Fi Channel Analyzer
Product Features 1.3
Industrial Compliant Wireless LAN and LAN
■ Compliant with the IEEE 802.11a/n/ac WAVE2 MU-MIMO wireless technology
■ 2T2R architecture with data rate of up to 900Mbps
■ Equipped with two 10/100/1000Mbps RJ45 ports with auto MDI/MDI-X supported
Fixed Network Broadband Router
■ Supported WAN connection types: DHCP, Static IP, PPPoE
■ Supports Port Forwarding and DMZ for various networking applications
■ Supports DHCP server in Gateway/WISP mode
RF Interface Characteristics
■ Built-in 14dBi dual-polarization antenna
■ High output power with multiply-adjustable transmit power control
Outdoor Environmental Characteristics
■ IP55 rating
■ IEEE 802.3 at Power over Ethernet design
■ Operating temperature: -20\~70 degrees C
Multiple Operation Modes and Wireless Features
■ Multiple operation modes: AP, Gateway, Repeater, Super WDS, WISP
■ WMM (Wi-Fi multimedia) provides higher priority to multimedia transmitting over wireless
■ Coverage threshold to limit the weak signal of clients occupying session
■ Real-time Wi-Fi channel analysis chart and client limit control for better performance
■ Support Terminal Fast Roaming with 802.11k, 802.11v, and 802.11r
Secure Network Connection
■ Full encryption supported: WPA/WPA2, WPA-PSK/WPA2-PSK and 802.1X RADIUS authentication
■ Supports 802.1Q VLAN and SSID-to-VLAN mapping
■ Supports IP/Port/MAC address/URL filtering, DoS, SPI Firewall
■ Supports DMZ and Port Forwarding
■ Bandwidth control per IP address to increase network stability
Easy Installation and Management
■ 3 simple steps to establish PtP (AP + Repeater) connection easily
■ Supports PLANET NMS Controllers in AP mode
■ Easy discovery by PLANET Smart Discovery
■ Self-healing mechanism through system auto reboot setting
■ System status monitoring through remote Syslog Server
■ Supports PLANET DDNS/Easy DDNS
Product Specifications 1.4
| Product | WBS-512AC | ||
| 900Mbps Outdoor Wireless CPE Wave 2.0, MU-MIMO | |||
| Hardware | |||
| Standard Support | IEEE 802.11a/n/acIEEE 802.11iIEEE 802.3 10BASE-TIEEE 802.3u 100BASE-TXIEEE 802.3x flow controlIEEE 802.11k, 802.11v, and 802.11r | ||
| Dimensions (W x D x H) | 87 x 38 x 260mm | ||
| Weight | 405g | ||
| Power Requirements | 48V DC IN, 0.5A, IEEE 802.3 at PoE+ or12V DC IN, 1.0A from DC Jack | ||
| Power Consumption (max.) | < 10W | ||
| Interface | Wireless IEEE 802.11a/n/ac, 2T2RPoE: 1 x 10/100/1000BASE-TX, auto-MDI/MDIX, 802.3 at PoE InLAN: 1x 10/100/1000BASE-TX, auto-MDI/MDIX | ||
| Button | Reset/Pair button, PtP Switch | ||
| Antenna | Built-in 14dBi directional antenna with dual polarization | ||
| Half-power beam width | Vertical H: 70 V: 15 | ||
| Horizontal H: 50 V: 15 | |||
| Data Rate | IEEE 802.11a: up to 54MbpsIEEE 802.11n (20MHz): up to 150MbpsIEEE 802.11n (40MHz): up to 300MbpsIEEE 802.11ac (80MHz): up to 867Mbps | ||
| Media Access Control | CSMA/CA | ||
| Modulation | 802.11 a/n/ac: OFDM (BPSK / QPSK / 16QAM / 64QAM / 256QAM) | ||
| Frequency Band | FCC: 5.180~5.240GHz, 5.745~5.825GHzETSI: 5.180~5.700GHz | ||
| Operating Channels | FCC: 36, 40, 44, 48, 149, 153, 157, 161, 165 (9 channels)ETSI: 36, 40, 44, 48, 100, 104, 108, 112, 116, 132, 136, 140 (12 channels)5GHz channel list will vary in different countries according to their regulations. | ||
| Max. Transmit Power (dBm) | FCC: up to 25 ± 1dBmETSI: < 20dBm (EIRP) | ||
| Receiver Sensitivity (dBm) | Network Mode | Data Rate | Receive Sensitivity (dBm) |
| 802.11a | 6Mbps -92 | ||
| 54Mbps -75 | |||
| 802.11n HT20 | MCS0/MCS8 -91 | ||
| MCS7/MCS15 | -72 | ||
| 802.11n HT40 | MCS0/MCS8 -88 | ||
| MCS7/MCS15 -70 | |||
| 802.11ac VHT20 | MCS0 -92 | ||
| MCS8 -70 | |||
| 802.11ac VHT40 | MCS0 -89 | ||
| MCS9 -65 | |||
| 802.11ac VHT80 | MCS0 -87 | ||
| MCS9 -61 | |||
| Environment & Certification | |||
| Operating Temperature | -20 ~ 70 degrees C | ||
| Operating Humidity | 5 ~ 90% (non-condensing) | ||
| IP Level | IP55 | ||
| ESD Protection | ± 8kV air-gap discharge± 4kV contact discharge | ||
| Surge Protection | ± 4kV | ||
| Regulatory | CE, RoHS | ||
| Software | |||
| LAN | Static IP/DHCP | ||
| Supports IP-MAC binding | |||
| WAN Type (GW/ WISP mode) | ■ Static IP■ Dynamic IP■ PPPoE | ||
| Wireless Modes | ■ Access Point■ Gateway■ Repeater■ Super WDS■ WISP | ||
| Channel Width | 20MHz, 40MHz, 80MHz | ||
| Encryption Type | 64-/128-bit WEP, WPA, WPA-PSK, WPA2, WPA2-PSK, 802.1X | ||
| Wireless Security | Enable/Disable SSID Broadcast | ||
| Wireless Max. 32 MAC address filtering | |||
| User Isolation | |||
| Max. SSIDs | 4 | ||
| Max. Wireless Clients | 64 per radio (50 is suggested, depending on usage) | ||
| Max. WDS Peers | 4 (Up to 3 peers by using “One-click WDS”) | ||
| Wireless QoS | Supports Wi-Fi Multimedia (WMM) | ||
| Wireless Advanced | Auto Channel Selection | ||
| 5-level Transmit Power Control (Max. (100%), Efficient (75%), Enhanced (50%), Standard (25%), Min. (12.5%)) | |||
| Client Limit Control, Coverage Threshold | |||
| Wi-Fi channel analysis chart | |||
| Fast Roaming(IEEE 802.11k, 802.11r, 802.11v) | |||
| Status Monitoring | Device status, wireless client List | ||
| PLANET Smart Discovery | |||
| DHCP client table | |||
| System Log supports remote syslog server | |||
| VLAN | IEEE 802.1Q VLAN (VID: 3~4094) | ||
| SSID-to-VLAN mapping up to 4 SSIDs | |||
| Self-healing | Supports auto reboot settings per day/hour | ||
| Management | Remote management through PLANET DDNS/Easy DDNS | ||
| Configuration backup and restore | |||
| Supports UPnP | |||
| Supports IGMP Proxy | |||
| Supports PPTP/L2TP/IPSec VPN Pass-through | |||
| SNMP v1/v2c/v3 support, MIB I/II, Private MIB | |||
| Central Management | Applicable controllers: WAPC-500, WAPC-1000, NMS-500, NMS-1000V | ||
Chapter 2. Hardware Installation
Product Outlook 2.1
WBS-512AC
■ Dimensions: 87 x 38 x 260mm
Front Side:

Figure 2-1 WBS-512AC Front Side
Rear Side

natural_image
White plastic object with vertical grooves and a central cross-shaped feature (no text or symbols)Figure 2-2 WBS-512AC Rear Side
Right Side

flowchart
graph LR
    A["Signal Strength LED"] --> B["PtP Master (AP mode): Slow flash"]
    C["LAN Port LED"] --> B
    D["WAN Port LED"] --> B
    E["Wireless LED"] --> B
    F["Power LED"] --> B
    B --> G["PtP Slave (Repeater mode): Steady"]
Figure 2-3 WBS-512AC Right Side
LED Definitions
| LED State Meaning | ||
| Power | On | PtP Master (AP mode): Slow flashThe device is powered on. |
| PtP Slave (Repeater mode) : Steady | ||
| Off | The device is powered off. | |
| WAN Port | On Port linked. | |
| Blinking | Data is transmitting or receiving data. | |
| Off No link | ||
| LAN Port | On Port linked. | |
| Blinking | Data is transmitting or receiving data. | |
| Off No link | ||
| WLAN | On The wireless radio is on. | |
| Blinking | Data is transmitting or receiving over wireless. | |
| Off | The wireless radio is off | |
2.1.1 Port and Button
It provides a simple interface monitoring the AP. Figure 2-4 shows the hardware-based interface of the WBS-512AC.
WBS-512AC Hardware-based Interface:
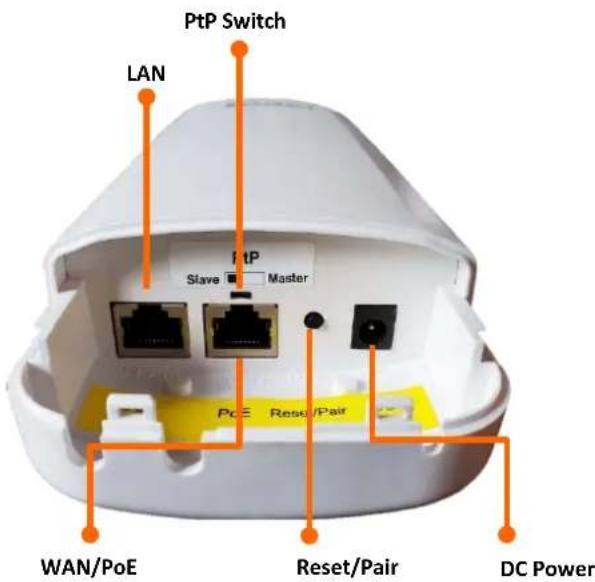
Figure 2-4 WBS-512AC Interface
2.1.2 Hardware Description
Hardware Interface Definition
| Object Description | |
| PoE LAN Port | 10/100/1000Mbps RJ45 port, auto MDI/MDI-X |
| LAN Port | 10/100/1000Mbps RJ45 port, auto MDI/MDI-X |
| PtP Switch | Position "Master" to "Slave" on the AP. |
| Reset/Pair Button | Press and hold the Reset button on the device for over 15 seconds to return to the factory default setting.Press the "Reset/Pair" button on both APs to be connected in 2 minutes. The connection has been successfully established. |
Chapter 3. Connecting to the CPE
System Requirements 3.1
■ Broadband Internet Access Service (Cable/xDSL/Ethernet connection)
■ One IEEE 802.3at PoE switch (supply power to the WBS-512AC)
■ PCs with a working Ethernet adapter and an Ethernet cable with RJ45 connectors
■ PCs running Windows 98/ME, NT4.0, 2000/XP, Windows Vista / Win 7, MAC OS 9 or later, Linux, UNIX or other platforms compatible with TCP/IP protocols

- The CPE in the following instructions refers to PLANET WBS-512AC.
- It is recommended to use Internet Explorer 11, Firefox or Chrome to access the CPE.
Installing the CPE 3.2
Before installing the CPE, make sure your PoE switch is connected to the Internet through the broadband service successfully at this moment. If there is any problem, please contact your local ISP. After that, please install the AP according to the following steps. Don't forget to pull out the power plug and keep your hands dry.
Please install the AP according to the following steps. Don't forget to pull out the power plug and keep your hands dry.
Step 1. Push the latch on the bottom of the Outdoor Wireless CPE to remove the sliding cover.
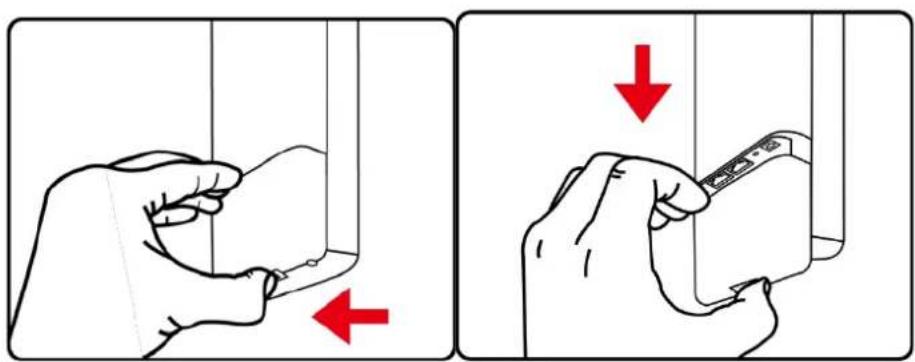
Figure 3-1 Connect the Antenna
Step 2. Plug the RJ45 Ethernet cable into the PoE Port of the Outdoor Wireless CPE. Then, slide back the cover to finish the installation.
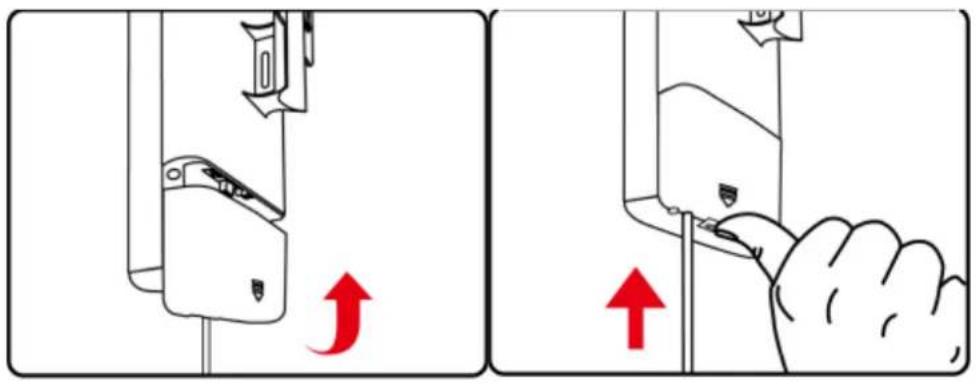
Figure 3-2 Connect the Ethernet cable
Step 3. Place the mounting strap through the slot on the back of the Outdoor Wireless CPE and then around the pole. Tighten the mounting strap to secure the Outdoor Wireless CPE.
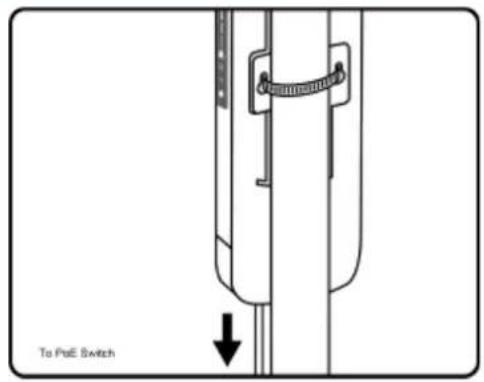
Figure 3-3 Connect the PoE injector
Chapter 4. Quick Installation Guide
This chapter will show you how to configure the basic functions of your CPE within minutes.

A computer with wired Ethernet connection to the Wireless CPE is required for the first-time configuration.
4.1 Manual Network Setup -- TCP/IP Configuration
The default IP address of the WBS-512AC is 192.168.1.253. And the default Subnet Mask is 255.255.255.0. These values can be changed as you want. In this guide, we use all the default values for description.
Connect the WBS-512AC with your PC by an Ethernet cable plugging in LAN port on one side and in LAN port of PC on the other side. Please power on the WBS-512AC by PoE switch through the PoE port.
In the following sections, we'll introduce how to install and configure the TCP/IP correctly in Windows 10. And the procedures in other operating systems are similar. First, make sure your Ethernet Adapter is working, and refer to the Ethernet adapter manual if needed.
4.1.1 Configuring the IP Address Manually
Summary:
■ Set up the TCP/IP Protocol for your PC.
Configure the network parameters. The IP address is 192.168.1.xxx (If the default IP address of the WBS-512AC is 192.168.1.253, and the DSL router is 192.168.1.254, the "xxx" can be configured to any number from 1 to 252.) and subnet mask is 255.255.255.0.
1 Select Use the following IP address, and then configure the IP address of the PC.
2 For example, as the default IP address of the WBS-512AC is 192.168.1.253 and the DSL router is 192.168.1.254, you may choose from 192.168.1.1 to 192.168.1.252.

Figure 4-1 TCP/IP Setting
Now click OK to save your settings.
Now, you can run the ping command in the command prompt to verify the network connection between your PC and the AP. The following example is in Windows 10 OS. Please follow the steps below:
-
Click on Start > Run.
-
Type "cmd" in the Search box.
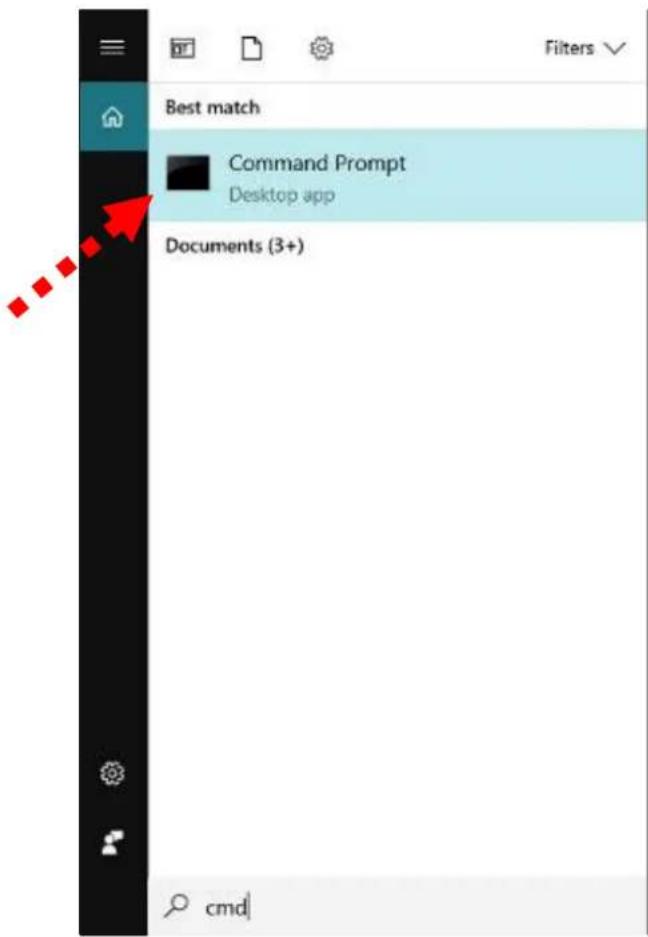
Figure 4-2 Windows Start Menu
- Open a command prompt, type ping 192.168.1.253 and then press Enter.
If the result displayed is similar to Figure 4-3, it means the connection between your PC and the AP has been established well.
![C:\Administrator: C:\Windows\system32\cmd.exe Microsoft Windows [Version 6.1.7601] Copyright (c) 2009 Microsoft Corporation. All rights reserved. C:\>ping 192.168.1.253 Pinging 192.168.1.253 with 32 bytes of data: Reply from 192.168.1.253: bytes=32 time=17ms TTL=64 Reply from 192.168.1.253: bytes=32 time=18ms TTL=64 Reply from 192.168.1.253: bytes=32 time=18ms TTL=64 Reply from 192.168.1.253: bytes=32 time=18ms TTL=64 Ping statistics for 192.168.1.253: Packets: Sent = 4, Received = 4, Lost = 0 (0% loss), Approximate round trip times in milli-seconds: Minimum = 17ms, Maximum = 18ms, Average = 17ms C:\>](/content/2026/05/967876/images/54263d954957ec19812666cd9af826ea91cd291c1beaff548143c4d91dac1e8a.jpg)
Figure 4-3 Successful Result of Ping Command
If the result displayed is similar to Figure 4-4, it means the connection between your PC and the AP has failed.
![Microsoft Windows [Version 6.1.7601] Copyright 2009 Microsoft Corporation. All rights reserved. C:\Documents and Settings\user>ping 192.168.1.253 Pinging 192.168.1.253 with 32 bytes of data: Destination host unreachable. Destination host unreachable. Destination host unreachable. Destination host unreachable. Ping statistics for 192.168.1.253: Packets: Sent = 4, Received = 0, Lost = 4 (100% loss), C:\Documents and Settings\user>](/content/2026/05/967876/images/be157188d291897bfcf29d98bf34e9ca3a2beb68ad2398687f14114dd00ce55c.jpg)
Figure 4-4 Failed Result of Ping Command
If the address is 0.0.0.0, check your adapter installation, security settings, and the settings on your AP. Some firewall software programs may block a DHCP request on newly installed adapters.
4.2 Starting Setup in the Web UI
It is easy to configure and manage the CPE with the web browser.
Step 1. To access the configuration utility, open a web-browser and enter the default IP address http://192.168.1.253 in the web address field of the browser.

Figure 4-5 Login by Default IP Address
After a moment, a login window will appear. Enter admin for the password in lower case letters. Then click LOGIN or press the Enter key.

Figure 4-6 Login Window
Default IP Address: 192.168.1.253
Default Password: admin

If the above screen does not pop up, it may mean that your web-browser has been set to a proxy. Go to Tools menu> Internet Options> Connections> LAN Settings on the screen that appears, uncheck Using Proxy and click OK to finish it.
Chapter 5. Configuring the CPE
This chapter delivers a detailed presentation of CPE's functionalities and features 3 main items below, allowing you to manage the CPE with ease.

Figure 5-1 Main Menu
The page includes the following fields:
| Object Description | |
| Operation Mode | It shows the current mode status. |
| Device Information | It shows the CPU/memory usage. |
| Device Description | You can enter the device description. |
| Flow (5G Wi-Fi) bps | It shows the Upstream/Downstream graph. |
| LAN Information | It shows the device IP mode, LAN IP, subnet, gateway and MAC address. |
| Wi-Fi Information | It shows the Wi-Fi status, SSID, channel, Encryption, MAC address and client list. |
| Version | It shows the firmware version (Double-click to show more detailed info.). |
Wizard 5.1
The Wizard guides you to configuring the WBS-512AC in a different mode, including Gateway, Super WDS, WISP, and AP (repeater) mode.
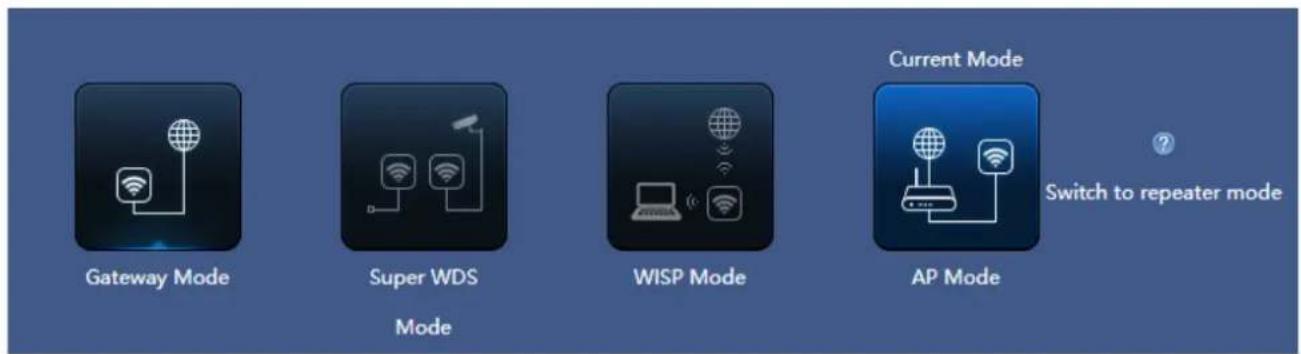
flowchart
graph LR
    A["Gateway Mode"] --> B["Super WDS"]
    B --> C["WISP Mode"]
    C --> D["AP Mode"]
    D --> E["Switch to repeater mode"]
Figure 5-2 Operation Mode

The default operation mode is AP mode.
Change the PtP switch to optional AP/repeater mode.
Gateway Mode 5.2
Click "Wizard" → "Gateway Mode" and the following page will be displayed. This section allows you to configure the Gateway mode.
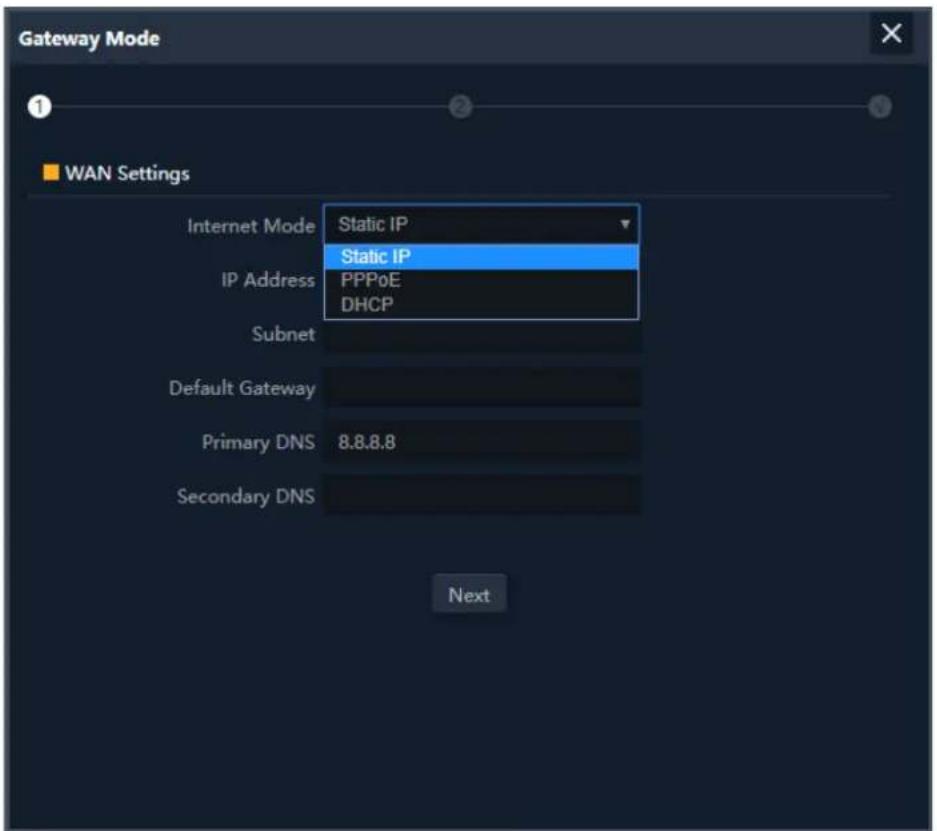
Figure 5-3 Gateway Mode
5.2.1 WAN Settings
■ Static IP
If your ISP offers you static IP Internet connection type, select "Static IP" and then enter IP address, subnet mask, default gateway and primary DNS information provided by your ISP in the corresponding fields.
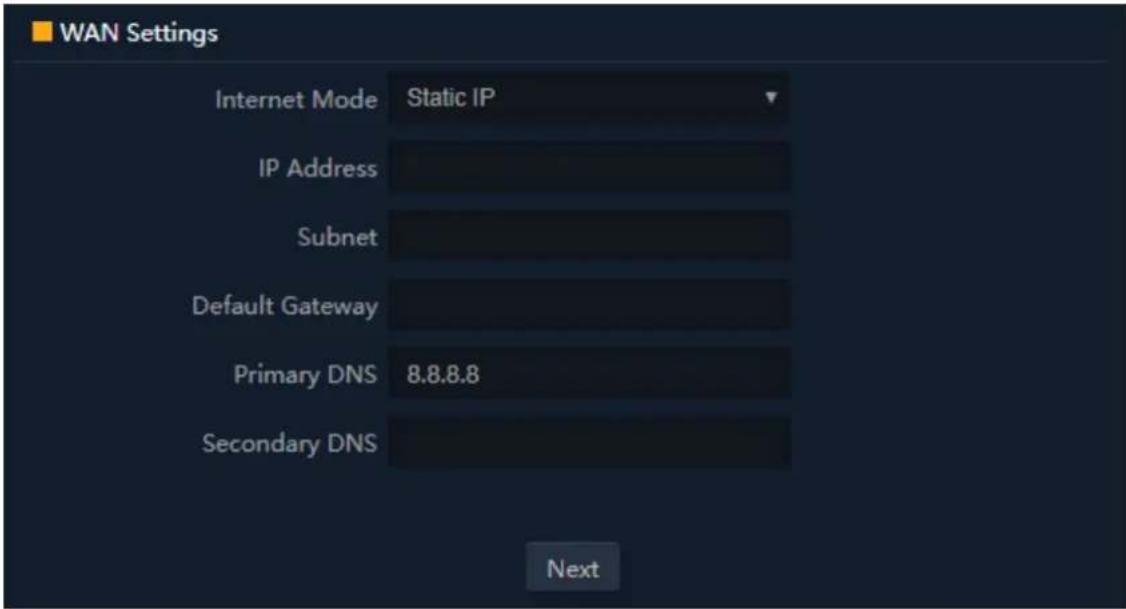
Figure 5-4 Gateway -- Static IP
The page includes the following fields:
| Object Description | |
| IP Address | Enter the WAN IP address provided by your ISP. Enquire your ISP if you are not clear |
| Subnet Mask | Enter WAN Subnet Mask provided by your ISP |
| Default Gateway | Enter the WAN Gateway address provided by your ISP |
| Primary DNS | Enter the necessary DNS address provided by your ISP |
| Second DNS | Enter the second DNS address provided by your ISP |
- PPPoE (ADSL)
Select PPPOE if your ISP is using a PPPoE connection and provide you with PPPoE user name and password info.

Figure 5-5 Gateway – PPPoE (ADSL)
The page includes the following fields:
| Object Description | |
| Username | Enter the PPPoE User Name provided by your ISP |
| Password | Enter the PPPoE password provided by your ISP |
| Server Name | Enter the server name by your ISP, or not |
| Service Name | Enter the service name by your ISP, or not |
DHCP
Choose "DHCP" and the router will automatically obtain IP addresses, subnet masks and gateway addresses from your ISP.
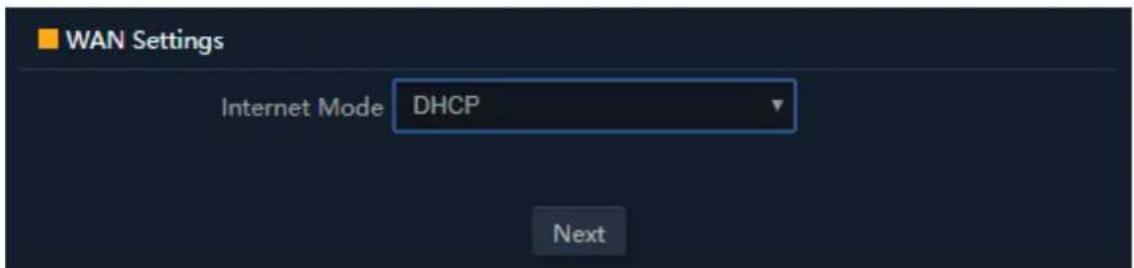
Figure 5-6 Gateway – DHCP
5.2.2 Wireless
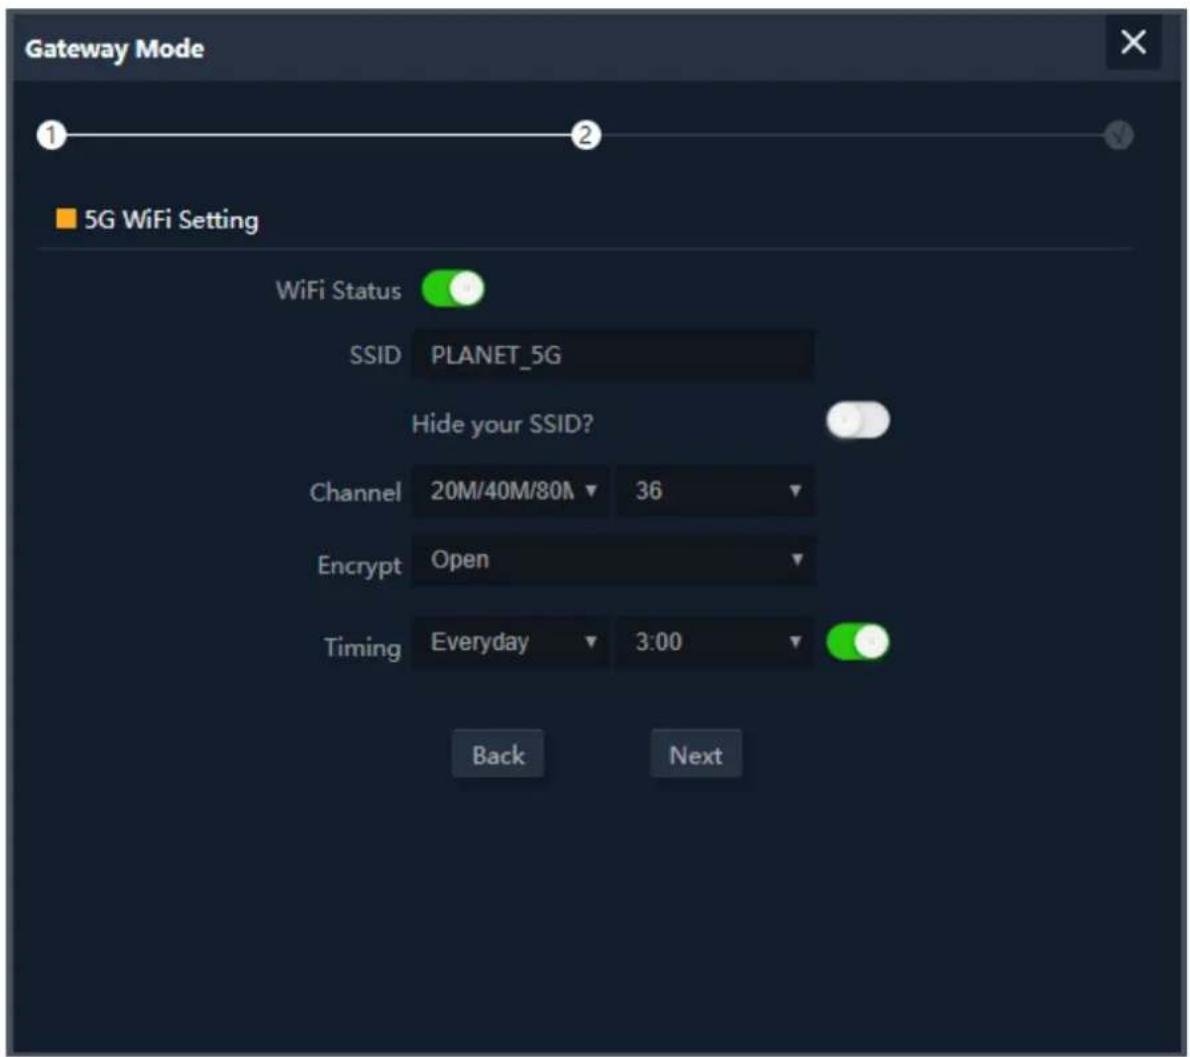
Figure 5-7 Gateway – Wireless
The page includes the following fields:
| Object Description | |
| Wi-Fi Status | Select ON (Green) or OFF (Gray) to enable or disable wireless LAN |
| SSID | It is the wireless network name. The default SSID is PLANET_5G |
| Hide your SSID ? | Select ON (Green) or OFF (Gray) to hide wireless LAN or not |
| Channel | Select the operating channel you would like to use. The channel range will be changed by selecting a different domain. |
| Encryption | Select the wireless encryption. The default is None |
| Timing | Set time to restart for clock |
Super WDS Mode 5.3

Figure 5-8 Super WDS Mode
The page includes the following fields:
| Object Description | |
| WDS SSID | It is the WDS wireless network name. The default SSID is “Wireless5.8G_WDS” |
| AP BSSID/Mark | Press the “Scan” button to find the WDS BSSID to connect |
| Encryption | Select open or WEP for the wireless encryption. The default is None Key in the correct password for BSSID of WEP |

Figure 5-9 Super WDS Mode
The page includes the following fields:
| Object Description | |
| Wi-Fi Status | Select ON (Green) or OFF (Gray) to enable or disable wireless LAN |
| SSID | It is the wireless network name. The default SSID is “PLANET_5G” |
| Hide your SSID ? | Select ON (Green) or OFF (Gray) to hide wireless LAN or not |
| Bandwidth | Select the operating channel width, “20MHz” or “40MHz” or “80MHz” |
| Channel | Select the operating channel you would like to use. The channel range will be changed by selecting a different domain. |
| Encryption | Select the wireless encryption. The default is “None” |
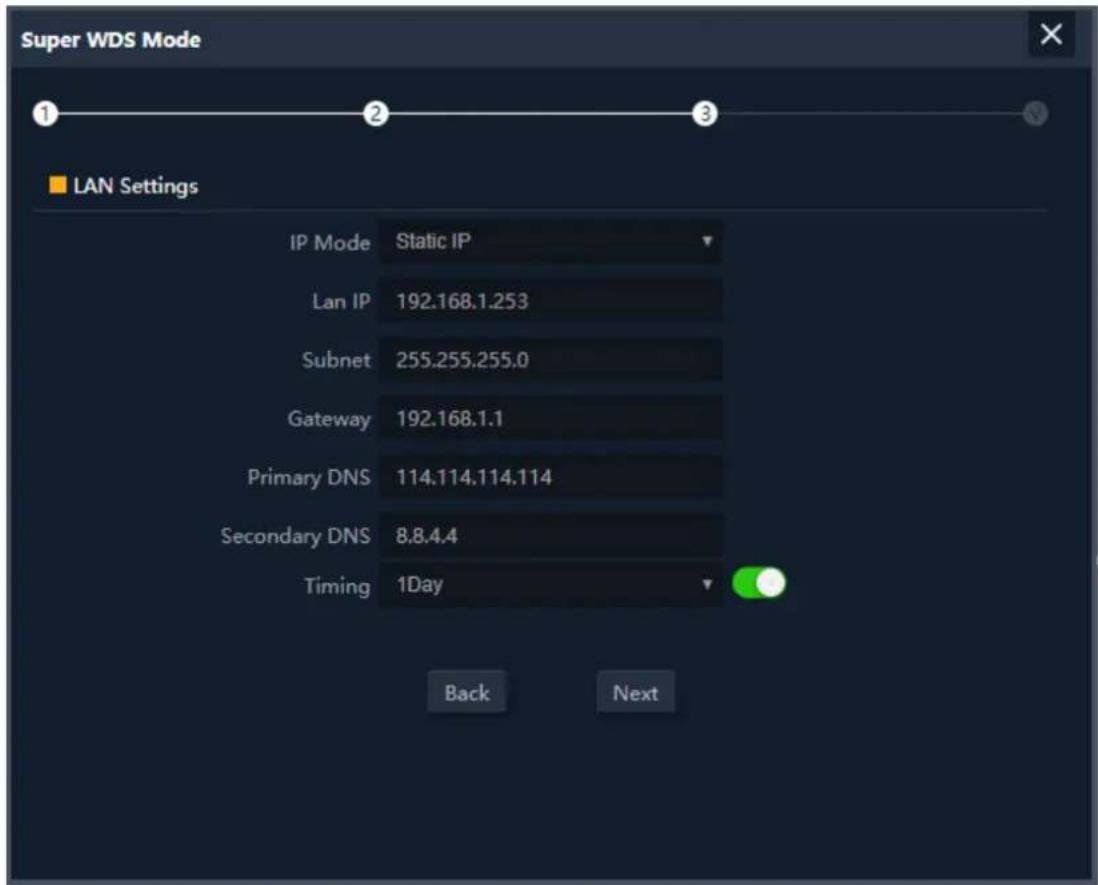
Figure 5-10 Super WDS Mode
The page includes the following fields:
| Object Description | |
| IP Mode | Select “Static IP” or “DHCP Client” for setting up device IP |
| Timing | Set time to restart |
AP1 – Enter the WDS SSID and encrypt password.
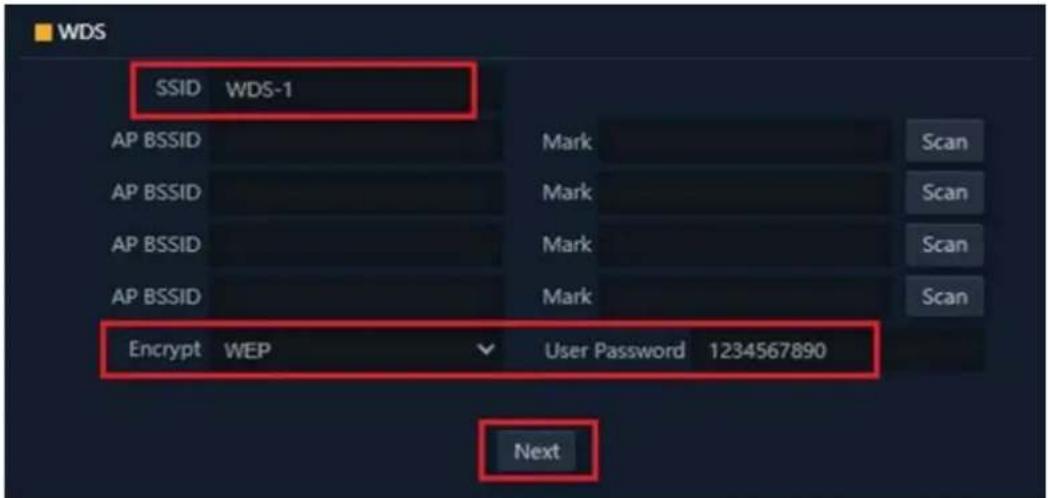
Figure 5-11 Super WDS Mode - AP1
AP2 -- Press the "Scan" button to find AP1 BSSID and choose it to connect. Enter the encrypt password.

Figure 5-12 Super WDS Mode – AP2
WISP Mode 5.4
Click "Wizard" → "WISP Mode" and the following page will be displayed. This section allows you to configure the WISP mode.

Figure 5-13 WISP Mode
The page includes the following fields:
| Object Description | |
| Repeater SSID | Enter the root AP's SSID or press “Scan” to select |
| Lock BSSID | Check to lock the root AP' MAC address |
| Encryption | Select the wireless encryption of root AP. The default is “WPA/WPA2PSK_TKIPAES” |
| Password | Enter the password of root AP |
| Bandwidth | Select the operating channel width, “20MHz” or “40MHz” or “80MHz” |

Figure 5-14 WISP Mode – Select Internet Mode (Set up WAN type)
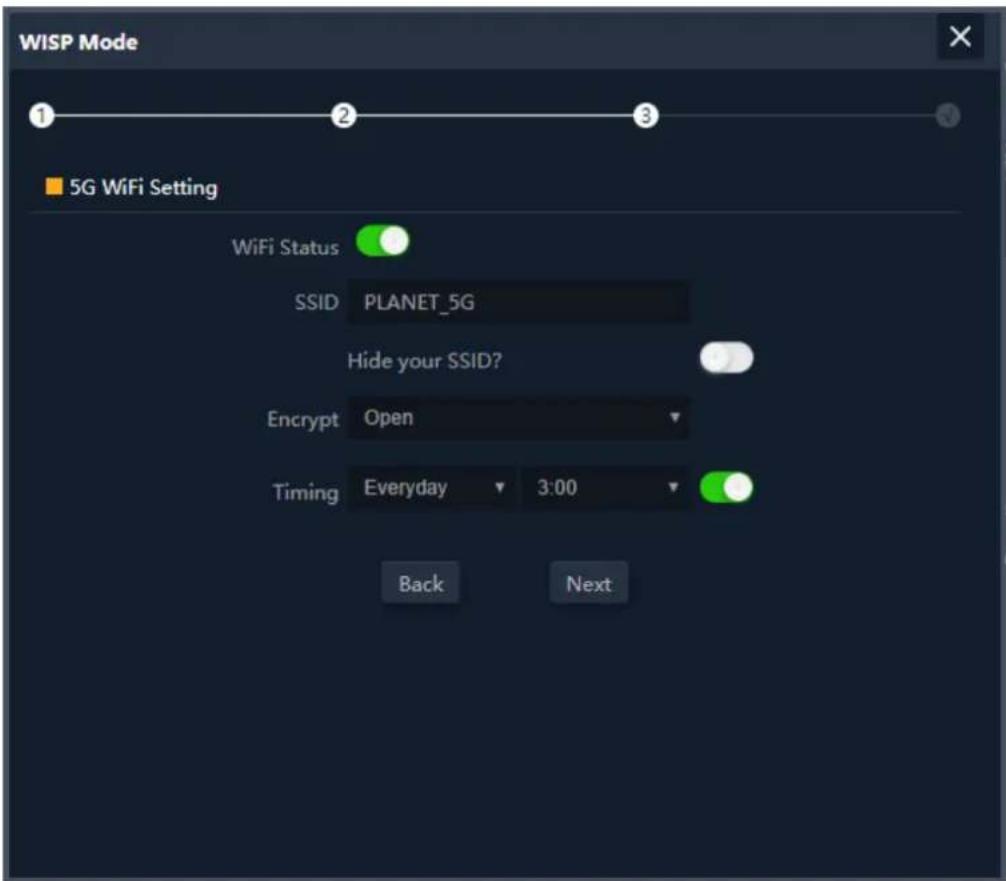
Figure 5-14 WISP Mode – Setting up Wi-Fi
AP Mode 5.5
Click "Wizard" → "AP Mode" and the following page will be displayed. This section allows you to configure the AP mode.

Figure 5-8 AP Mode
The page includes the following fields:
| Object Description | |
| IP Mode | Select “Static IP” or “DHCP Client” for setting up device IP |
| LAN IP | Enter the AP static IP address |
| Subnet | Enter the network mask |
| Gateway | Enter the default gateway IP address |
| Primary DNS | Enter the primary DNS IP address, or not |
| Secondary DNS | Enter the secondary DNS IP address, or not |
Enter the LAN IP address.

Figure 5-15 AP Mode – Set up Wi-Fi
The page includes the following fields:
| Object Description | |
| Wi-Fi Status | Select ON (Green) or OFF (Gray) to enable or disable wireless LAN |
| SSID | It is the wireless network name. The default SSID is “PLANET_5G” |
| Hide your SSID ? | Select ON (Green) or OFF (Gray) to hide wireless LAN or not |
| Bandwidth | Select the operating channel width, “20MHz” or “40MHz” or “80MHz” |
| Channel | Select the operating channel you would like to use. The channel range will be changed by selecting a different domain. |
| Encryption | Select the wireless encryption. The default is “None” |
| Timing | Set time to restart |
Repeater Mode 5.6
Click "Wizard" → "Repeater Mode" and the following page will be displayed. This section allows you to configure the Repeater mode.
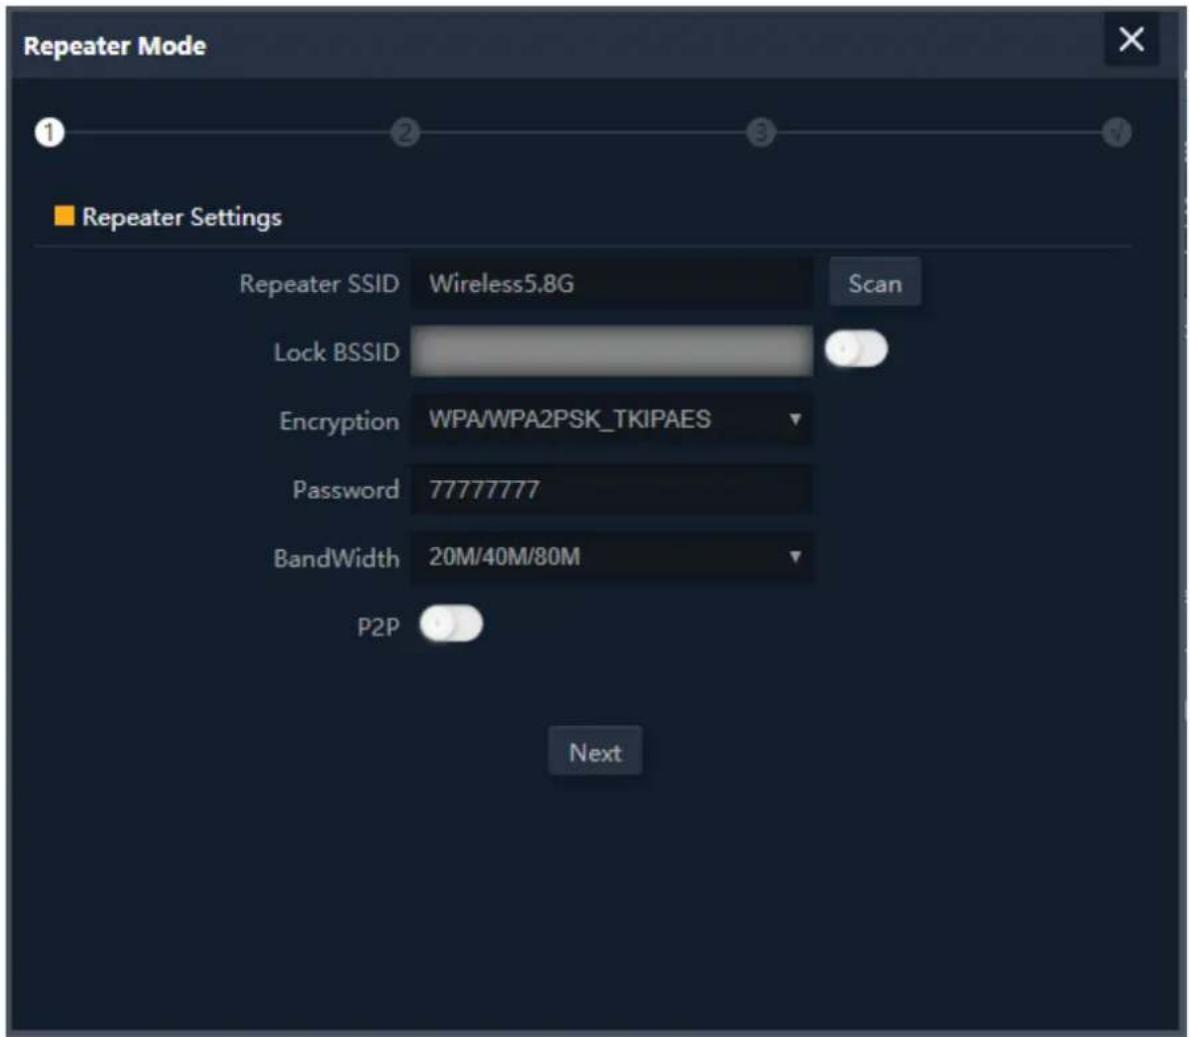
Figure 5-16 Repeater Mode
The page includes the following fields:
| Object Description | |
| Repeater SSID | Enter the root AP's SSID or press “Scan” to select |
| Lock BSSID | Check to lock the root AP' MAC address |
| Encryption | Select the wireless encryption of root AP. The default is “WPA/WPA2PSK_TKIPAES” |
| Password | Enter the password of root AP |
| Bandwidth | Select the operating channel width, “20MHz” or “40MHz” or “80MHz” |
| P2P | Enable switch for Point to Point function |
Press the "Scan" button to find the root AP that you need to repeat and press Choice to select the AP.
![Repeater Mode Wireless List VAP_5G Channel[ 100 ] MAC[ A8:F7:E0:55:65:41 ] Signal[ -62dBm ] WPA/WPA2PSK_TKIPAES PLANET_5G Channel[ 36 ] MAC[ A8:F7:E0:55:65:D9 ] Signal[ -66dBm ] Open C7200E-5-1 Channel[ 100 ] MAC[ A8:F7:E0:55:41:7C ] Signal[ -73dBm ] WPA/WPA2PSK_AES WDS-3 Channel[ 100 ] MAC[ C2:F7:E0:55:41:7C ] Signal[ -74dBm ] WEP WLAN_5.8G_EF22 Channel[ 44 ] MAC[ A8:F7:E0:55:65:55 ] Signal[ -87dBm ] WPA/WPA2PSK_TKIPAES](/content/2026/05/967876/images/b92b6a0c06564191e8987064f5e0aedf17fc2a5fadc911ca71c7ce3e1a105cf1.jpg)
Figure 5-17 Repeater Mode -- Scan AP
Set up the repeater wireless network

Figure 5-18 Repeater Mode – Setting up Wi-Fi
The page includes the following fields:
| Object Description | |
| Wi-Fi Status | Select ON (Green) or OFF (Gray) to enable or disable wireless LAN |
| SSID | It is the wireless network name. The default SSID is “PLANET_5G” |
| Hide your SSID ? | Select ON (Green) or OFF (Gray) to hide wireless LAN or not |
| Encryption | Select the wireless encryption. The default is “None” |
| Timing | Set time to restart |
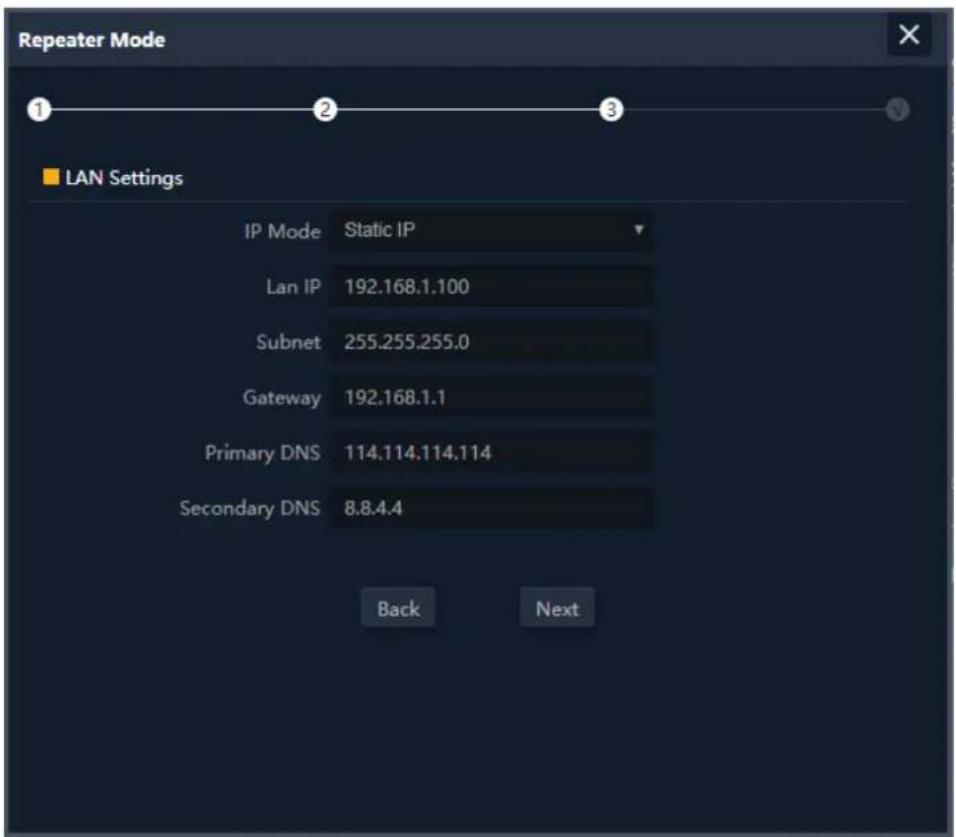
Figure 5-19 Repeater Mode – Setting up Wi-Fi
The page includes the following fields:
| Object Description | |
| IP Mode | Select “Static IP” or “DHCP Client” for setting up device IP |
| LAN IP | Enter the AP static IP address |
| Subnet | Enter the network mask |
| Gateway | Enter the default gateway IP address |
| Primary DNS | Enter the primary DNS IP address, or not |
| Secondary DNS | Enter the secondary DNS IP address, or not |
Enter the LAN IP address.
Wi-Fi 5.7
5.7.1 5G Wi-Fi
5.7.1.1. Basic
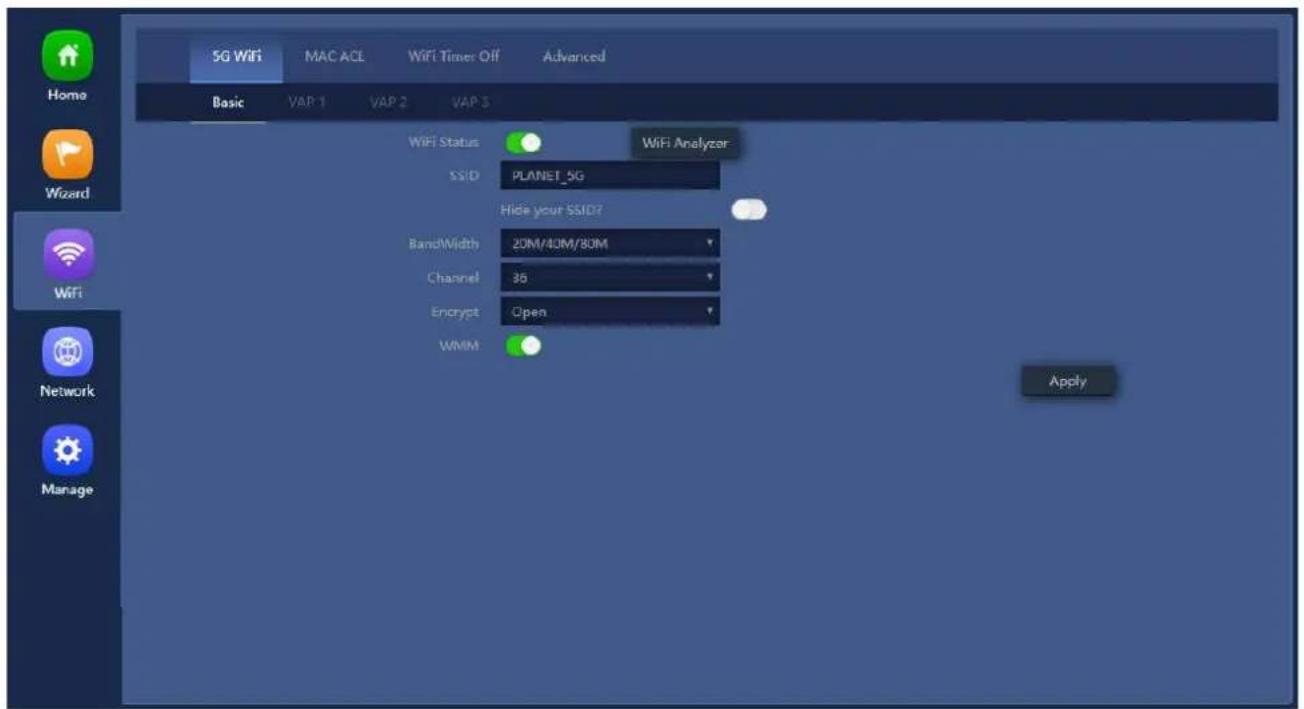
Figure 5-20 Basic
The page includes the following fields:
| Object Description | |
| Wi-Fi Status | Select ON (Green) or OFF (Gray) to enable or disable wireless LAN |
| SSID | It is the wireless network name. The default SSID is “PLANET_5G” |
| Hide your SSID ? | Select ON (Green) or OFF (Gray) to hide wireless LAN or not |
| Channel | It shows the channel of the CPE. Default 5GHz is channel 36. |
| Encryption | Select the wireless encryption. The default is “None” |
| WMM | Enable/Disable WMM ( Wi-Fi Multimedia ) function |
| Wi-Fi Analyzer | Press this button to analyze local area wireless signal |
5.7.1.2. VAP
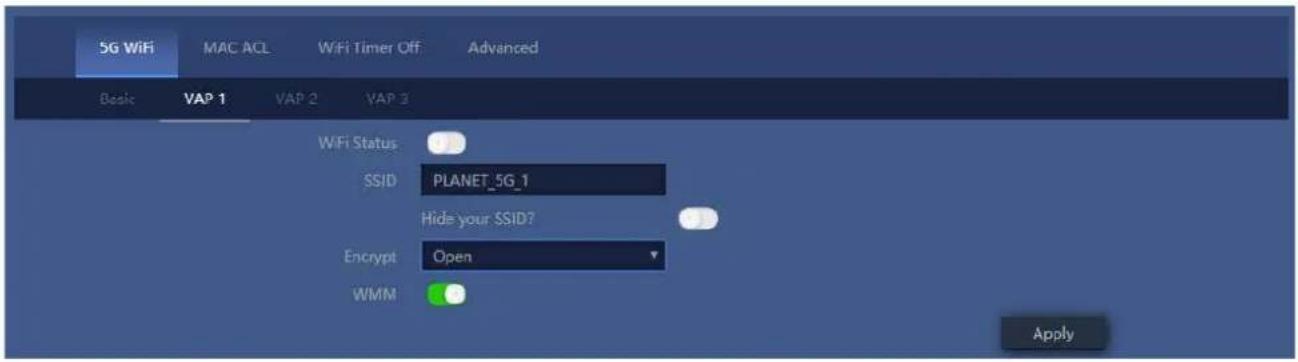
Figure 5-21 VAP
Select VAP1\~VAP3 to enable virtual AP
The page includes the following fields:
| Object Description | |
| Wi-Fi Status | Select ON (Green) or OFF (Gray) to enable or disable virtual wireless LAN |
| SSID | It is the wireless network name. The default SSID is “PLANET_5G_1” to “PLANET_5G_3” |
| Hide your SSID ? | Select ON (Green) or OFF (Gray) to hide wireless LAN or not |
| Channel | It shows the channel of the CPE. Default 5GHz is channel 36. |
| Encryption | Select the wireless encryption. The default is “None” |
| WMM | Enable/Disable WMM (Wi-Fi Multimedia ) function |
5.7.2 MAC ACL
5.7.2.1. MAC ACL
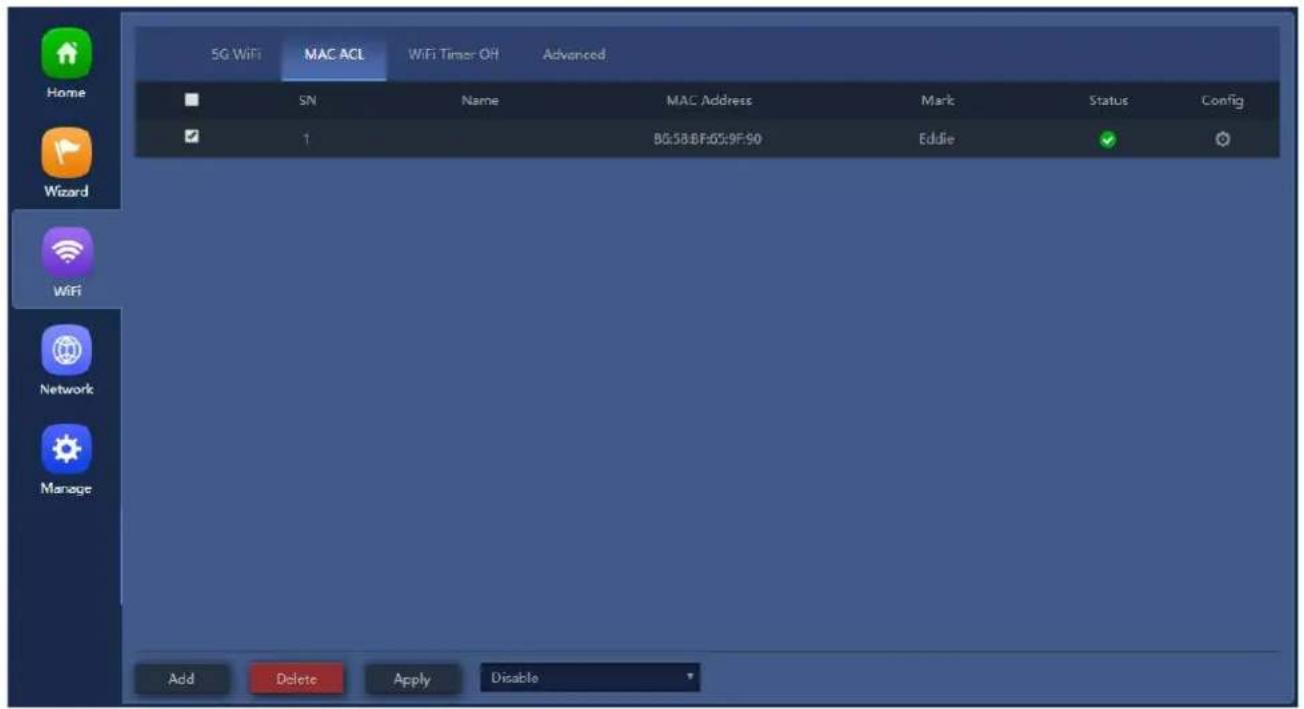
Figure 5-9 MAC ACL
The page includes the following fields:
| Object Description | |
| Add | Press the “Add” button to add end-device that is scanned from wireless network and mark them |
| Delete | Press the “Delete” button to delete device from list |
| Apply | Press the “Apply” button to enable/disable the rule |
| ACL Status | Select the rule of ACL, default is Disable.Whitelist: Allows the devices to pass in the ruleBlacklist: Prohibited rules within the device through |

Figure 5-22 ACL status
5.7.3 Wi-Fi Timer Off
5.7.3.1. Wi-Fi Timer Off
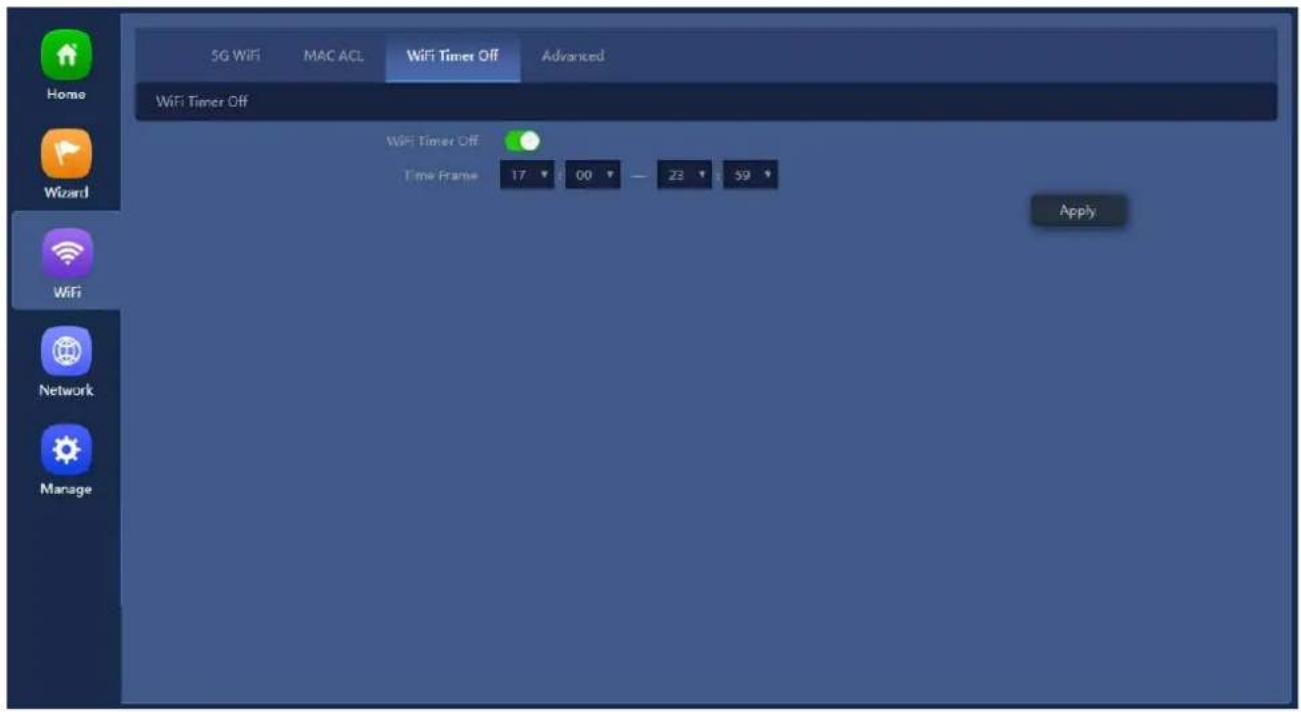
Figure 5-23 Wi-Fi Timer Off
The page includes the following fields:
| Object Description | |
| Wi-Fi Timer Off | Select ON (Green) or OFF (Gray) to enable or disable timer |
| Time Frame | Choose the time frame of Wi-Fi |
5.7.4 Advanced
5.7.4.1. Advanced
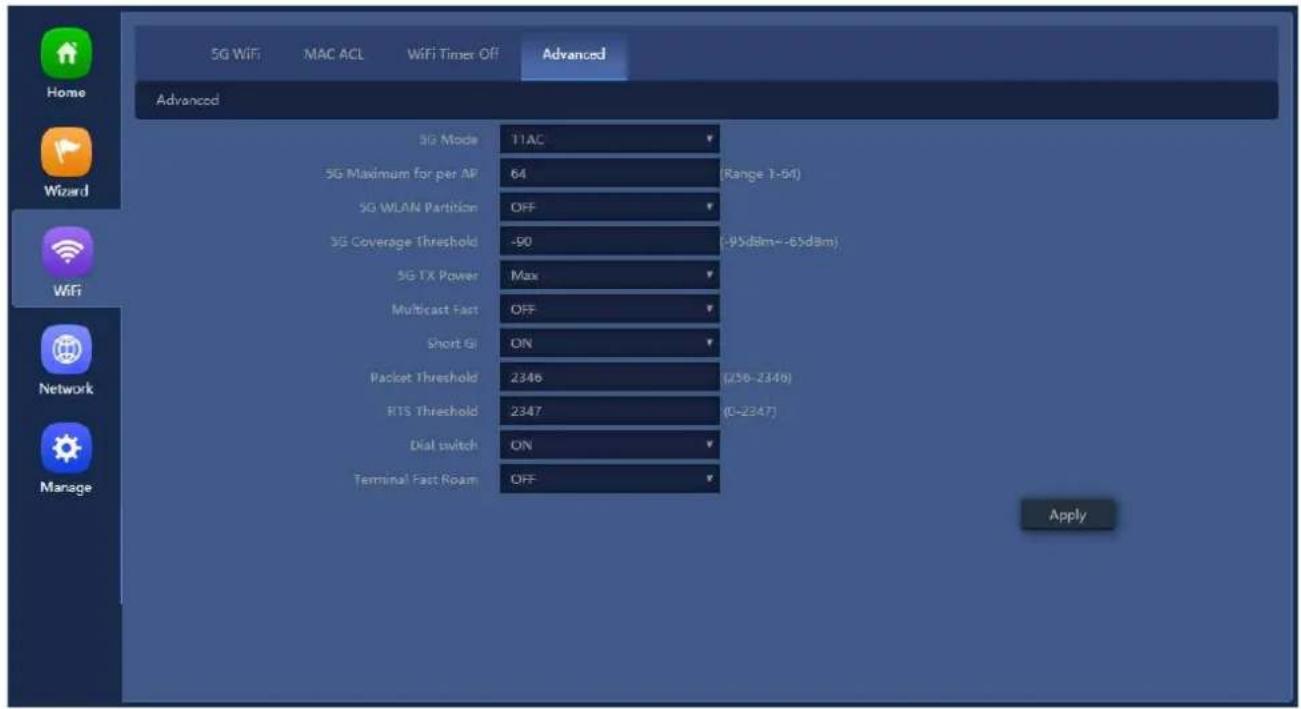
Figure 5-24 Advanced
The page includes the following fields:
| Object Description | |
| 5G Mode | Select 802.11A or 802.11AN or 802.11AC in CPE |
| Maximum 5G per AP | The maximum users are 64 |
| 5G WLAN Partition | Enable it to isolate each connected wireless client so that they cannot access mutually. |
| 5G Coverage Threshold | The coverage threshold is to limit the weak signal of clients occupying session. The default is -90dBm |
| 5G TX Power | The range of transmit power is Max (100%), Efficient (75%), Enhanced (50%), Standard (25%) or Min (12.5%). In case of shortening the distance and the coverage of the wireless network, input a smaller value to reduce the radio transmission power |
| Multicast Fast | A part of the 802.11n standard that allows sending multiple frames per single access to the medium by combining frames together into one larger frame. It creates the larger frame by combining smaller frames with the same physical source, destination end points, and traffic class (QoS) into one large frame with a common MAC header |
| Short GI | Guard intervals are used to ensure that distinct transmissions do not interfere with one another. |
| Packet Threshold | When the length of a data packet exceeds this value, the router willsend an RTS frame to the destination wireless node, and the latter will reply with a CTS frame, and thus they are ready to communicate. The default value is 2346 |
| RTS Threshold | Enable or Disable RTS/CTS protocol. It can be used in the following scenarios and used by Stations or Wireless AP.1) When medium is too noisy or lots of interferences are present. If the AP/Station cannot get a chance to send a packet, the RTS/CTS mechanism can be initiated to get the packet sent.2) In mixed mode, the hidden node problem can be avoided.The default value is 2347 |
| Dial Switch | Enable or Disable PtP switch |
| Terminal Fast Roam | Enable or Disable 802.11k, 802.11v and 802.11r |
5.7.5 Network
5.7.5.1. LAN Settings
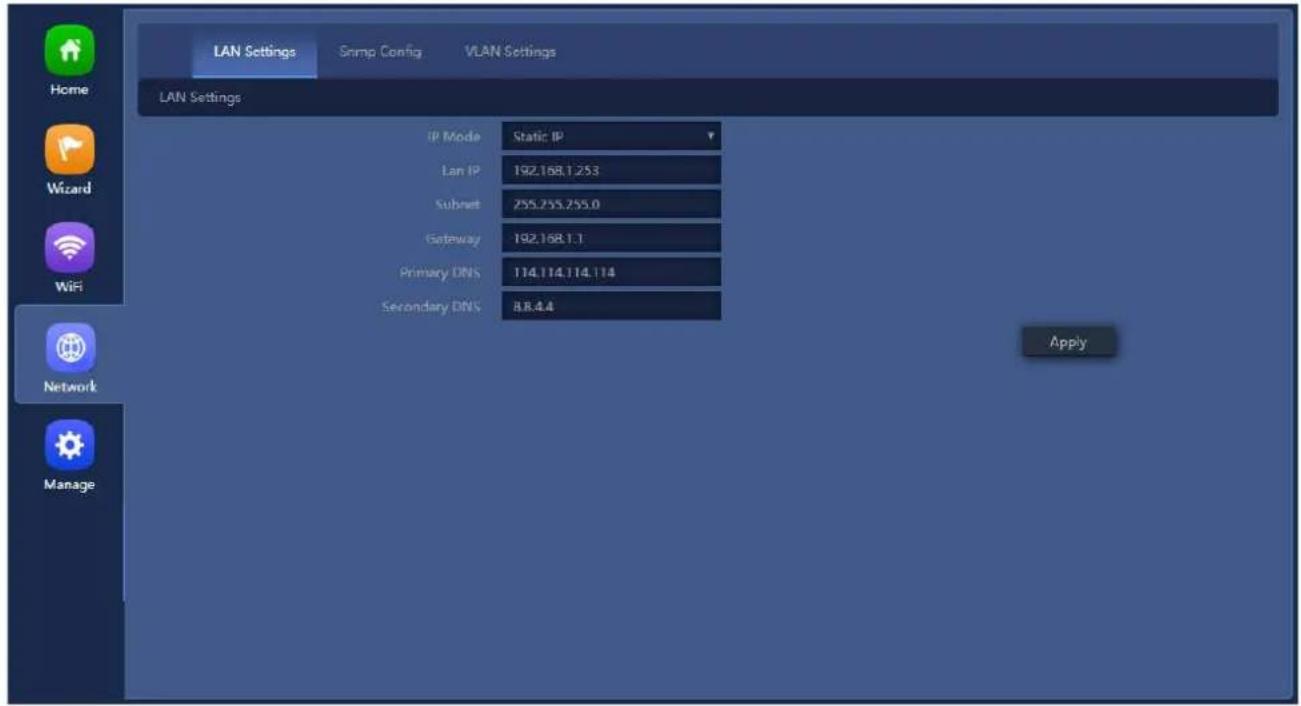
Figure 5-25 LAN Settings
The page includes the following fields:
| Object Description | |
| IP Mode | Select “Static IP” or “DHCP Client” for setting up device IP |
| LAN IP | Enter the AP static IP address |
| Subnet | Enter the network mask |
| Gateway | Enter the default gateway IP address |
| Primary DNS | Enter the primary DNS IP address, or not |
| Secondary DNS | Enter the secondary DNS IP address, or not |
5.7.5.2. SNMP Config
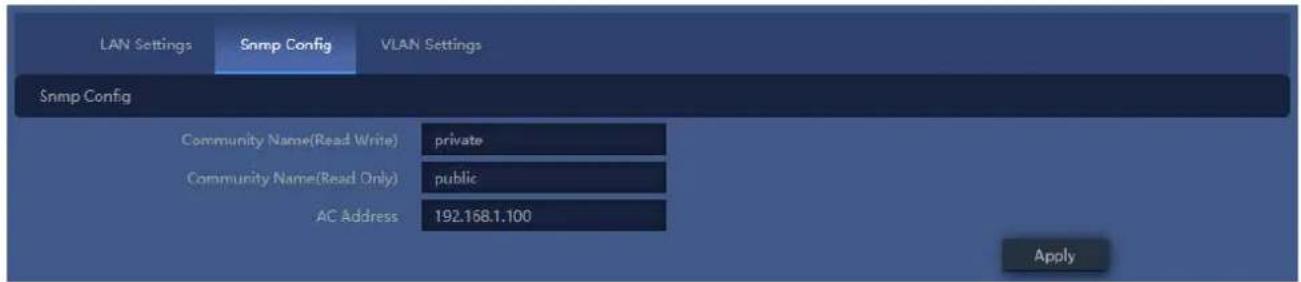
Figure 5-10 SNMP Config
The page includes the following fields:
| Object Description | |
| Read Community | Enter the read community, default is public |
| Write Community | Enter the write community, default is private |
| Trap Destination Address | Enter the SNMP trap IP address, default is 192.168.1.100 |
5.7.5.3. VLAN Settings

Figure 5-11 VLAN Settings
The page includes the following fields:
| Object Description | |
| AP | Select AP or VAP included in the VLAN |
| VLAN ID | Enter the VLAN ID from 3 to 4094 |
5.7.5.4. WAN Settings
■ Static IP
If your ISP offers you static IP Internet connection type, select "Static IP" and then enter IP address, subnet mask, default gateway and primary DNS information provided by your ISP in the corresponding fields.
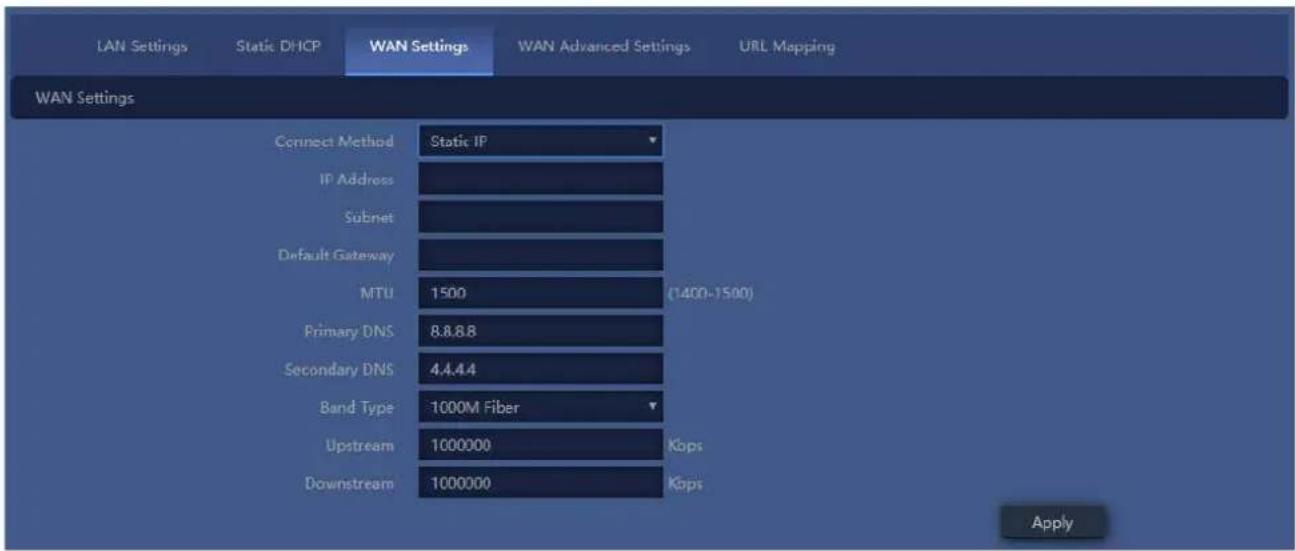
Figure 5-12 Static IP
The page includes the following fields:
| Object Description | |
| IP Address | Enter the WAN IP address provided by your ISP. Enquire your ISP if you are not clear |
| Subnet | Enter WAN Subnet Mask provided by your ISP |
| Default Gateway | Enter the WAN Gateway address provided by your ISP |
| MTU | Maximum Transmission Unit. Default is 1500 |
| Primary DNS | Enter the necessary DNS address provided by your ISP |
| Secondary DNS | Enter the secondary DNS address provided by your ISP |
| Upstream | Enter limited upstream throughput, default is 1000000 Kbps |
| Downstream | Enter limited downstream throughput, default is 1000000 Kbps |
- PPPoE (ADSL)
Select PPPOE if your ISP is using a PPPoE connection and provide you with PPPoE user name and password info.
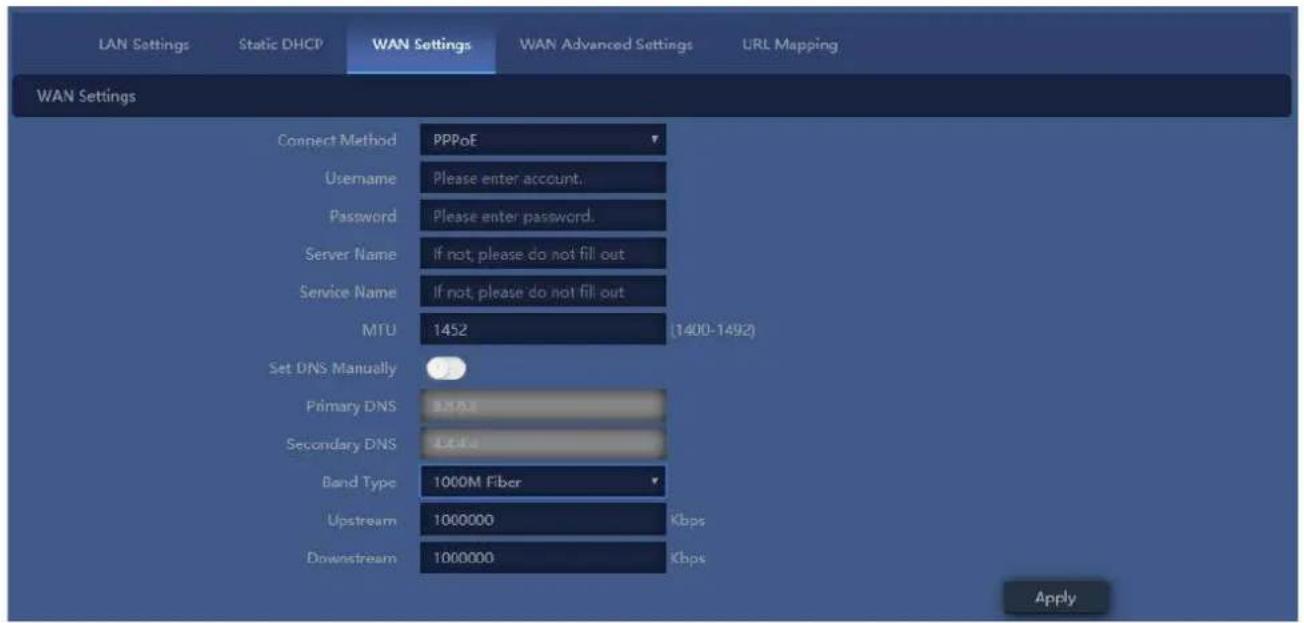
Figure 5-13 PPPoE (ADSL)
The page includes the following fields:
| Object Description | |
| Username | Enter the PPPoE User Name provided by your ISP |
| Password | Enter the PPPoE password provided by your ISP |
| Set DNS Manually | Enable/Disable DNS Manually |
| Primary DNS | Enter the necessary DNS address provided by your ISP |
| Secondary DNS | Enter the secondary DNS address provided by your ISP |
| MTU | Maximum Transmission Unit. Default is 1452 |
| Band Type | Select the band type provided by your ISP |
| Upstream | Enter limited upstream throughput, default is 1000000 Kbps |
| Downstream | Enter limited downstream throughput, default is 1000000 Kbps |
DHCP
Choose "DHCP" and the router will automatically obtain IP addresses, subnet masks and gateway addresses from your ISP.
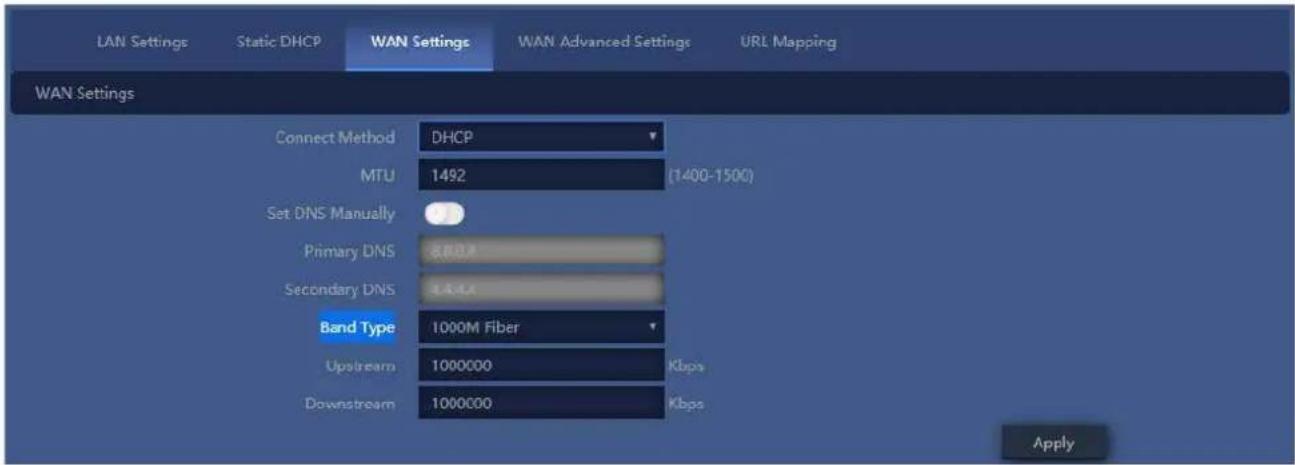
Figure 5-14 DHCP
The page includes the following fields:
| Object Description | |
| MTU | Maximum Transmission Unit. Default is 1452 |
| Set DNS Manually | Enable/Disable DNS Manually |
| Primary DNS | Enter the necessary DNS address provided by your ISP |
| Secondary DNS | Enter the secondary DNS address provided by your ISP |
| Band Type | Select the band type provided by your ISP |
| Upstream | Enter limited upstream throughput, default is 1000000 Kbps |
| Downstream | Enter limited downstream throughput, default is 1000000 Kbps |
5.7.5.5. WAN advanced settings
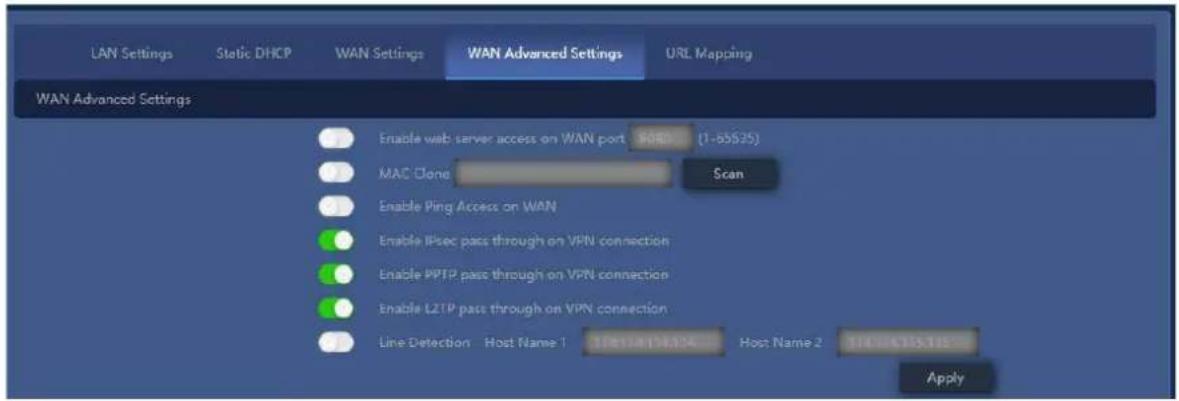
Figure 5-15 WAN advanced settings
The page includes the following fields:
| Object Description | |
| Enable web server access on WAN port | Enable to access from WAN, default port is 8080 |
| MAC clone | Enable and scan to clone the MAC address |
| Enable Ping Access on WAN | Enable or Disable this function |
| Enable IPsec passthrough on VPN connection | Enable or disable IPSec to pass through IPSec communication data. |
| Enable PPTP passthrough on VPN connection | Enable or disable PPTP to pass through PPTP communication data. |
| Enable L2TP passthrough on VPN connection | Enable or disable L2TP to pass through L2TP communication data. |
| Line Detection | Enable to ping Host 1 and Host 2 IP. If ping fails, the WAN will be disconnected. |
5.7.6 Security
5.7.6.1. URL Filtering
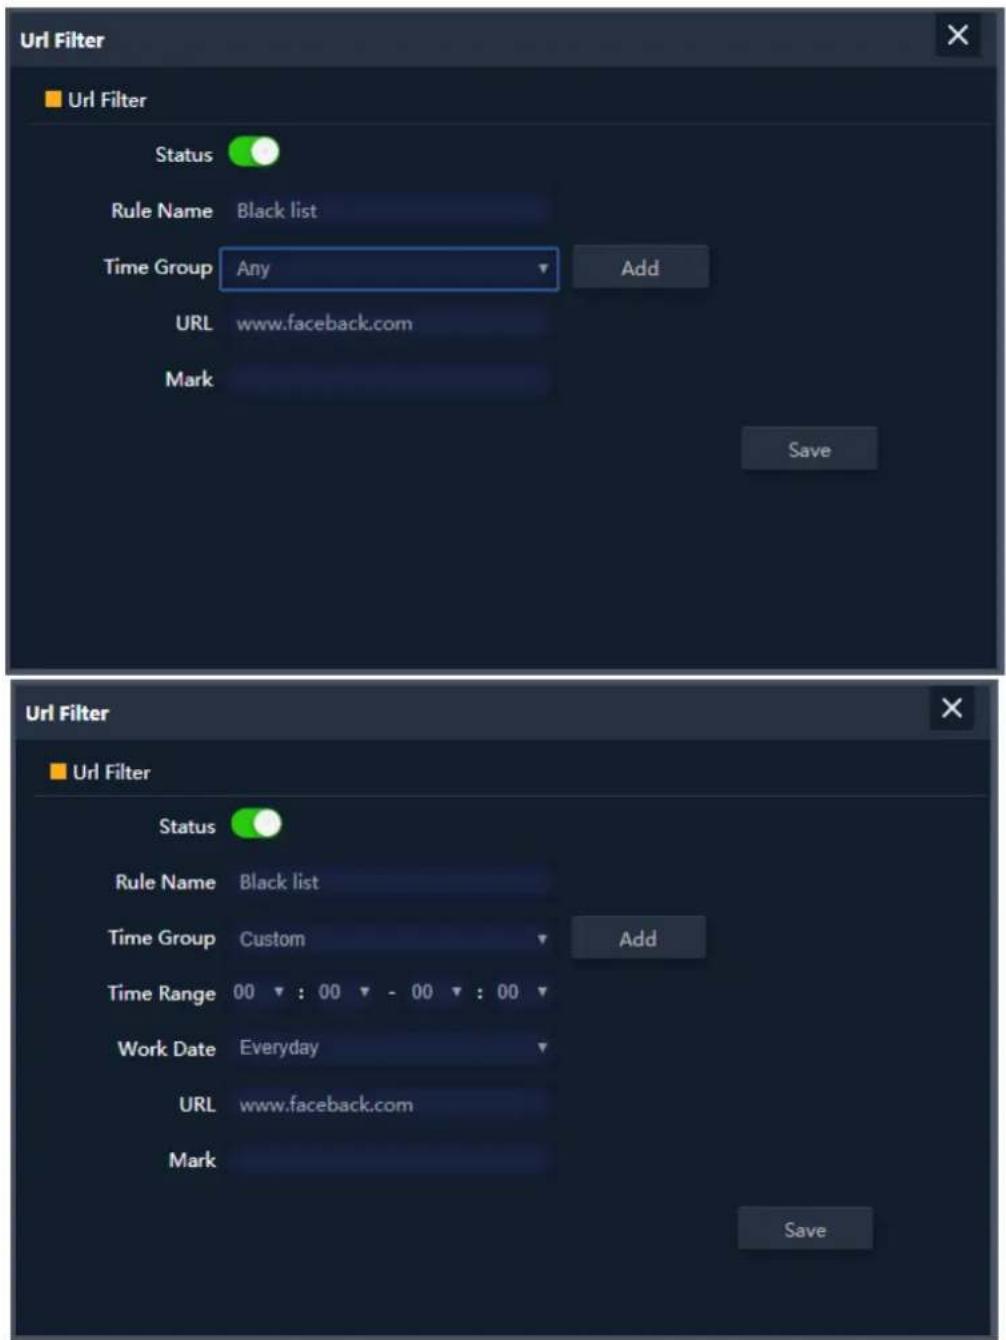
Figure 5-36 URL Filtering
The page includes the following fields:
| Object Description | |
| Add | Press the “Add” button to add the rule |
| Delete | Press the “Delete” button to delete the rule |
| Apply | Press the “Apply” button to enable/disable the rule |
| Status | Select ON (Green) or OFF (Gray) to enable or disable |
| Rule Name | Enter the rule name, e.g. Black list |
| Time Group | Select Any or Customer to set up time range and work data. |
| URL | Enter the URL that you need to put in black list |
| Mark | Enter the mark string, or not |
Enable/disable URL filter function

Figure 5-37 URL Filtering
5.7.6.2. IP/Port Filtering
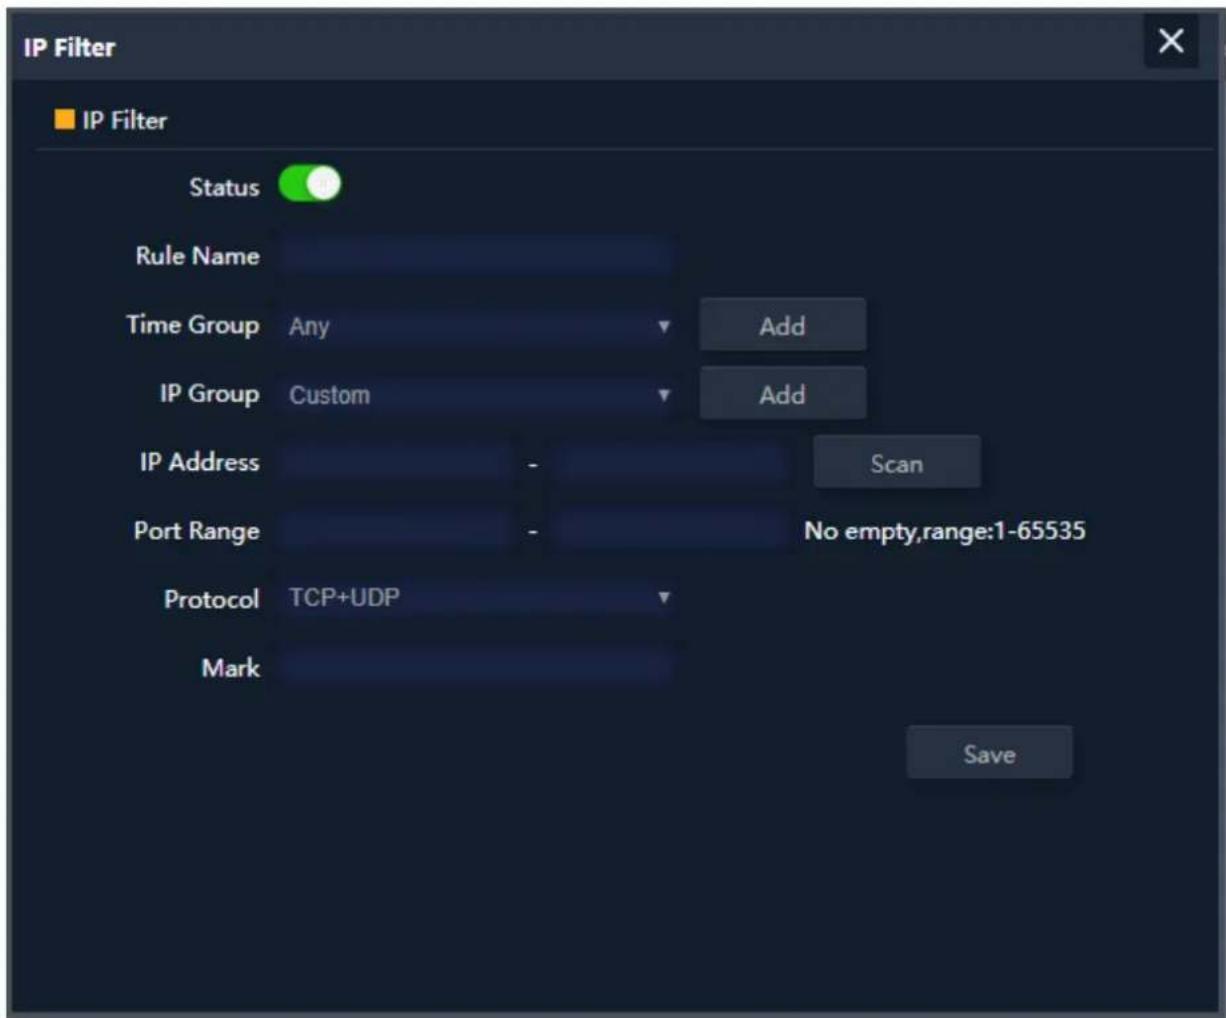
Figure 5-38 IP/Port Filtering
The page includes the following fields:
| Object Description | |
| Add | Press the “Add” button to add the rule in the black or white list |
| Delete | Press the “Delete” button to delete the rule |
| Apply | Press the “Apply” button to enable/disable the rule |
| Status | Select ON (Green) or OFF (Gray) to enable or disable |
| Rule Name | Enter the rule name, e.g. Black list |
| Time Group | Select Any or Customer to set up time range and work data. |
| IP Group | Select IP Group for adding IP by entering IP range or by scanning devices |
| IP Address | Enter the IP that you need to put in black or white list |
| Port Range | Enter the web port to access |
| Protocol | Select TCP, UDP or TCP+UDP |
| Mark | Enter the mark string, or not |
| IP/Port Filtering Status | Select the rule of IP/Port Filtering, default is Disable.Whitelist: Allow the devices to pass in the ruleBlacklist: Prohibited rules within the device through |

Figure 5-39 IP/Port Filtering
5.7.6.3. MAC Filtering


Figure 5-40 MAC Filtering
The page includes the following fields:
| Object Description | |
| Add | Press the “Add” button to add the rule in the black or white list |
| Delete | Press the “Delete” button to delete the rule |
| Apply | Press the “Apply” button to enable/disable the rule |
| Status | Select ON (Green) or OFF (Gray) to enable or disable |
| Rule Name | Enter the rule name, e.g. Black list |
| Time Group | Select Any or Customer to set up time range and work data. |
| MAC Address | Enter the MAC address that you need to put in black or white list |
| Mark | Enter the mark string, or not |
| MAC Filtering Status | Select the rule of MAC Filtering, default is Disable.Whitelist: Allow the devices to pass in the ruleBlacklist: Prohibited rules within the device through |

Figure 5-41 IP/Port Filtering
5.7.6.4. Security (Port Mapping/Port Forwarding)
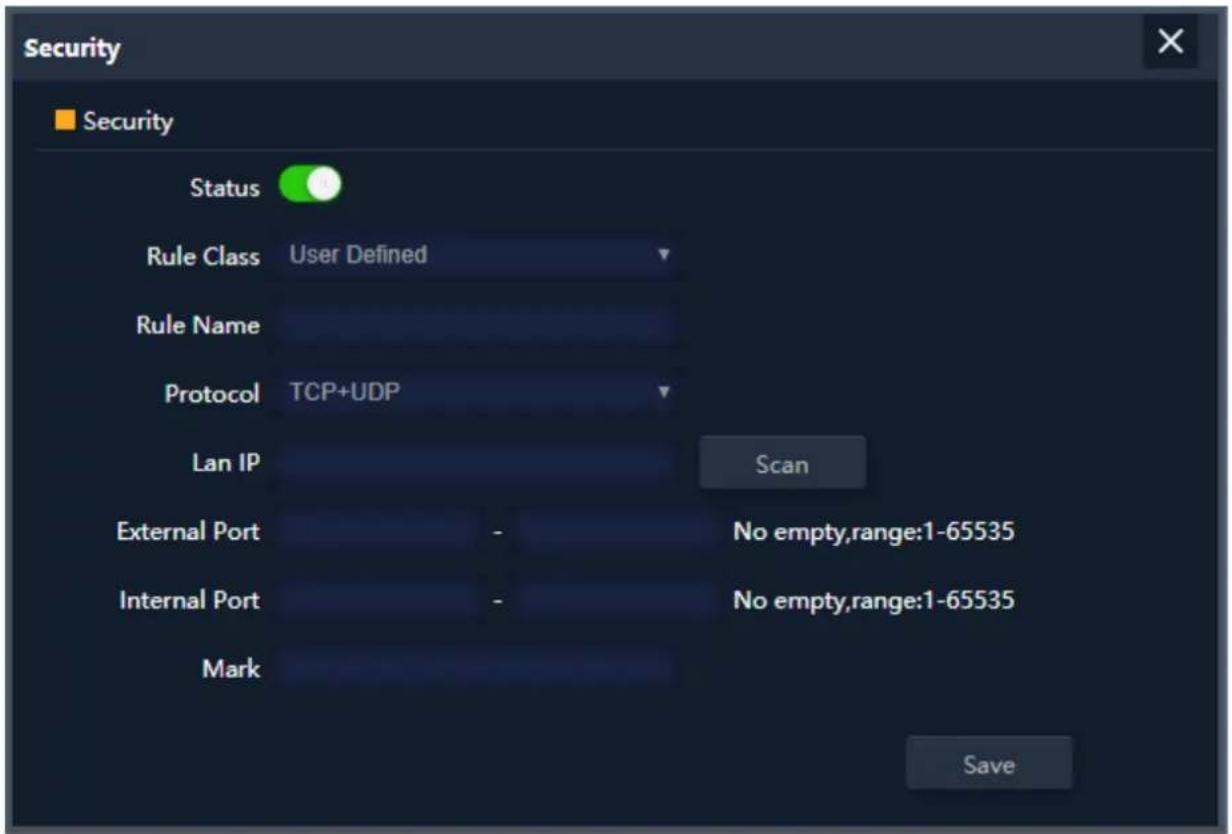
Figure 5-42 Port Mapping
The page includes the following fields:
| Object Description | |
| Add | Press the “Add” button to add the rule in the black or white list |
| Delete | Press the “Delete” button to delete the rule |
| Apply | Press the “Apply” button to enable/disable the rule |
| Status | Select ON (Green) or OFF (Gray) to enable or disable |
| Rule Name | Enter the rule name, e.g. Black list |
| Protocol | Select TCP, UDP or TCP+UDP |
| LAN IP | Enter the IP address that you need for port forwarding |
| External Port | Enter the external port range |
| Internal Port | Enter the internal port range |
| Mark | Enter the mark string, or not |
Enable/disable Port Mapping function

Figure 5-43 Port Mapping
5.7.6.5. DMZ

Figure 5-44 DMZ
The page includes the following fields:
| Object Description | |
| Enable DMZ | Select Enable DMZ Host or Disable |
| DMZ Host IP | Enter the DMZ LAN IP |
Chapter 6. Quick Connection to a Wireless Network
In the following sections, the default SSID of the WBS-512AC is configured to "default".
Windows XP (Wireless Zero Configuration) 6.1
Step 1: Right-click on the wireless network icon displayed in the system tray

Figure 6-1 System Tray – Wireless Network Icon
Step 2: Select [View Available Wireless Networks]
Step 3: Highlight and select the wireless network (SSID) to connect
(1) Select SSID [default]
(2) Click the [Connect] button

Figure 6-2 Choosing a Wireless Network
Step 4: Enter the encryption key of the wireless AP
(1) The Wireless Network Connection box will appear
(2) Enter the encryption key that is configured in section 5.7.1.1
(3) Click the [Connect] button
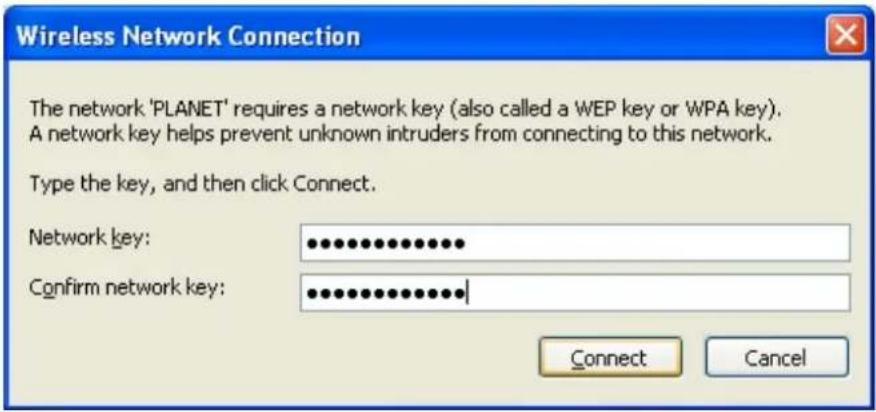
Figure 6-3 Entering the Network Key
Step 5: Check if "Connected" is displayed

Figure 6-4 Choosing a Wireless Network -- Connected

Some laptops are equipped with a "Wireless ON/OFF" switch for the internal wireless LAN. Make sure the hardware-based wireless switch is switched to "ON" position.
Windows 7 (WLAN AutoConfig) 6.2
WLAN AutoConfig service is built-in in Windows 7 that can be used to detect and connect to wireless network. This built-in wireless network connection tool is similar to wireless zero configuration tool in Windows XP.
Step 1: Right-click on the network icon displayed in the system tray

Figure 6-5 Network Icon
Step 2: Highlight and select the wireless network (SSID) to connect
(1) Select SSID [default]
(2) Click the [Connect] button

Figure 6-6 WLAN AutoConfig

If you will be connecting to this Wireless AP in the future, check [Connect automatically].
Step 4: Enter the encryption key of the wireless AP
(1) The Connect to a Network box will appear
(2) Enter the encryption key that is configured in section 5.7.1.1
(3) Click the [OK] button

Figure 6-7 Typing the Network Key
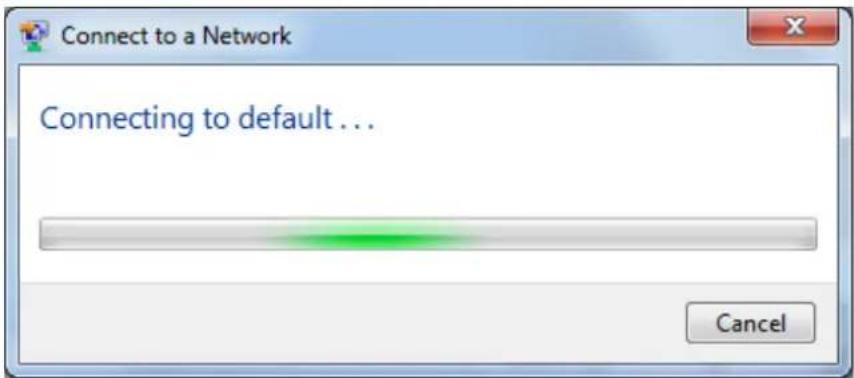
Figure 6-8 Connecting to a Network
Step 5: Check if "Connected" is displayed
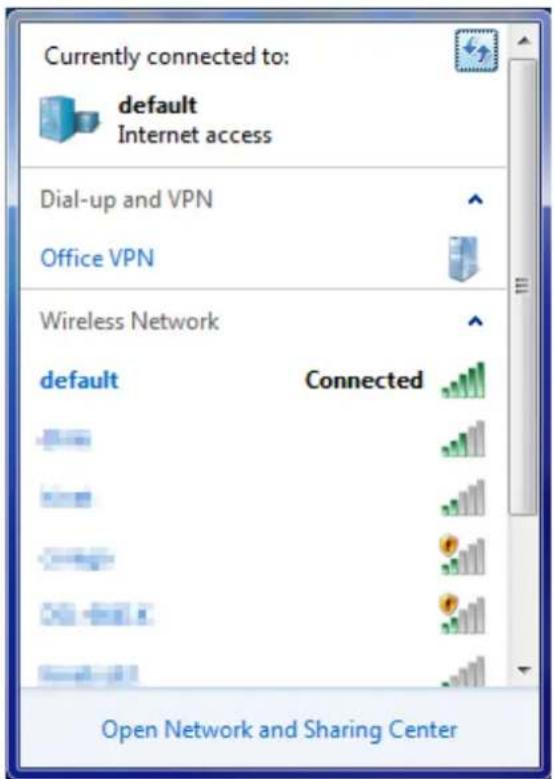
Figure 6-9 Connected to a Network
Mac OS X 10.x 6.3
In the following sections, the default SSID of the WBS-512AC is configured to "default".
Step 1: Right-click on the network icon displayed in the system tray
The AirPort Network Connection menu will appear

Figure 6-10 Mac OS – Network Icon
Step 2: Highlight and select the wireless network (SSID) to connect
(1) Select and SSID [default]
(2) Double-click on the selected SSID
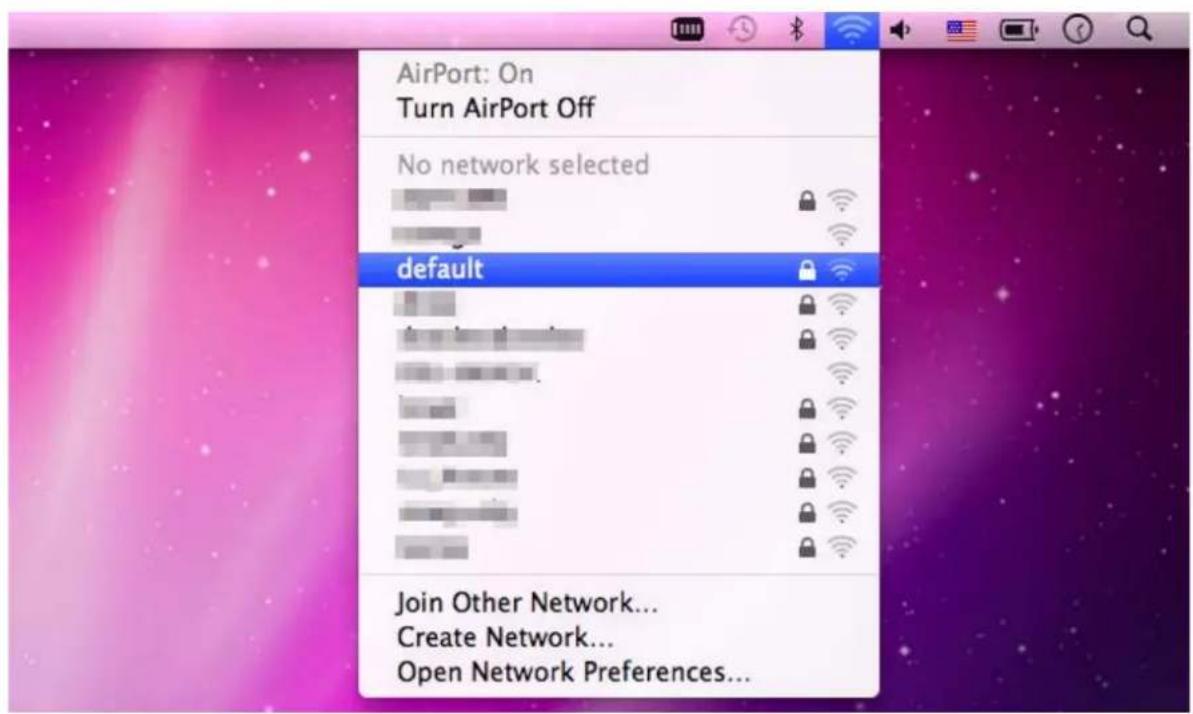
Figure 6-11 Highlighting and Selecting the Wireless Network
Step 4: Enter the encryption key of the wireless AP
(1) Enter the encryption key that is configured in section 5.7.1.1
(2) Click the [OK] button

Figure 6-12 Enter the Password

If you will be connecting to this Wireless AP in the future, check [Remember this network].
Step 5: Check if the AirPort is connected to the selected wireless network.
If "Yes", then there will be a "check" symbol in front of the SSID.

Figure 6-13 Connected to the Network
There is another way to configure the MAC OS X wireless settings:
Step 1: Click and open the [System Preferences] by going to Apple > System Preference or Applications
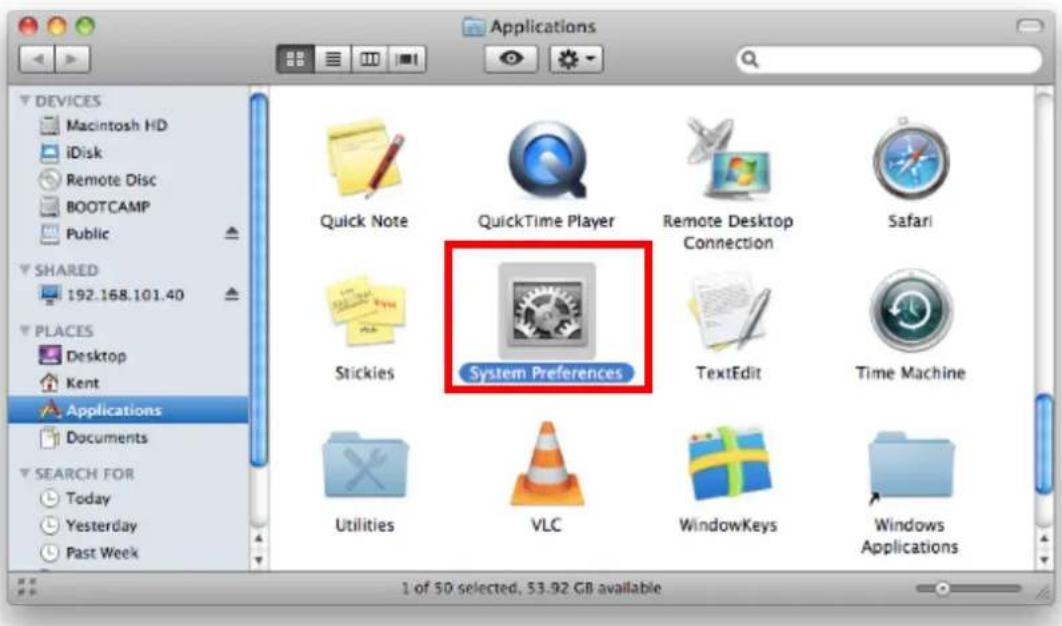
Figure 6-14 System Preferences
Step 2: Open Network Preference by clicking on the [Network] icon

Figure 6-15 System Preferences -- Network
Step 3: Check Wi-Fi setting and select the available wireless network
(1) Choose the AirPort on the left-menu (make sure it is ON)
(2) Select Network Name [default] here
If this is the first time to connect to the Wireless AP, it should show "No network selected".

Figure 6-16 Selecting the Wireless Network
iPhone/iPod Touch/iPad 6.4
In the following sections, the default SSID of the WBS-512AC is configured to "default".
Step 1: Tap the [Settings] icon displayed in the home screen

Figure 6-17 iPhone – Settings icon
Step 2: Check Wi-Fi setting and select the available wireless network
(1) Tap [General] \ [Network]
(2) Tap [Wi-Fi]
If this is the first time to connect to the Wireless AP, it should show "Not Connected".

Figure 6-18 Wi-Fi Setting

Figure 6-19 Wi-Fi Setting – Not Connected
Step 3: Tap the target wireless network (SSID) in "Choose a Network..."
(1) Turn on Wi-Fi by tapping "Wi-Fi"
(2) Select SSID [default]

Figure 6-20 Turning on Wi-Fi
Step 4: Enter the encryption key of the Wireless AP
(1) The password input screen will be displayed
(2) Enter the encryption key that is configured in section 5.7.1.1
(3) Tap the [Join] button
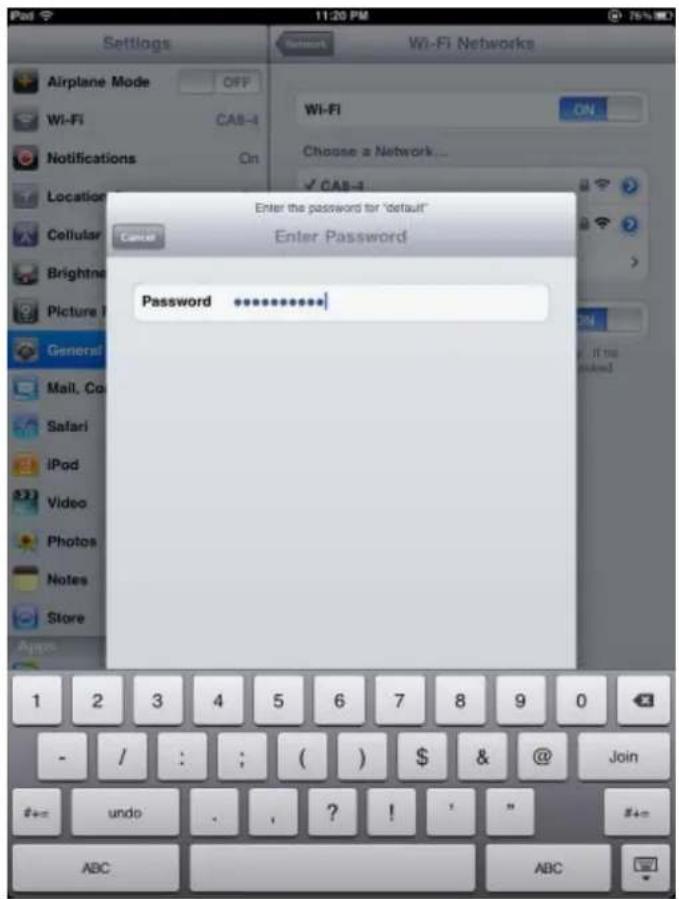
Figure 6-21 iPhone -- Entering the Password
Step 5: Check if the device is connected to the selected wireless network.
If "Yes", then there will be a "check" symbol in front of the SSID.
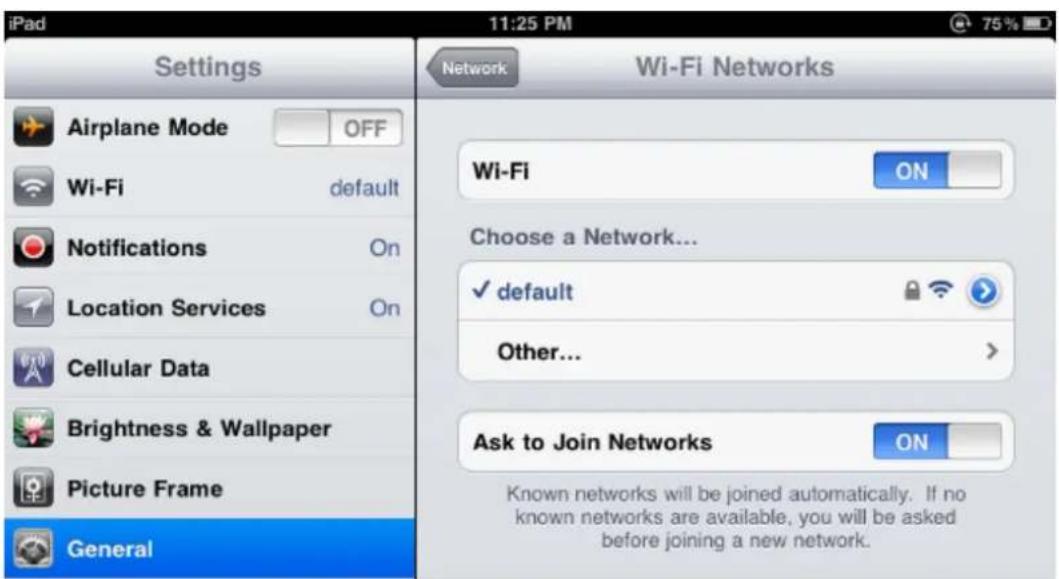
Figure 6-22 iPhone -- Connected to the Network
Appendix A: Planet Smart Discovery Utility
To easily list the WBS-512A in your Ethernet environment, the Planet Smart Discovery Utility is an ideal solution.
The following installation instructions guide you to running the Planet Smart Discovery Utility.
Step 1: Download the Planet Smart Discovery Utility from the administrator PC.
Step 2: Run this utility and the following screen appears.

Planet_Utility.exe PLANET Corp.
Step 3: Press "Refresh" for the current connected devices in the discovery list as shown in the following screen:

PLANET Smart Discovery Lite
File
Option Help
Refresh
Exit


PLANET
Networking & Communication
| MAC Address | Device Name | Version | DeviceIP | NewPassword | IP Address | NetMask | Gateway | Description | |
| 1 | A8-F7-E0-55-65-D4 | WBS-512AC | AP-ETSI-V3.0 | 192.168.1.253 | 192.168.1.253 | 255.255.255.0 | 0.0.0.0 | ||
Select Adapter :
192.168.1.20 (00:30:4F:9E:B7:DF)

Control Packet Force Broadcast
Update Device
Update Multi
Update All
Connect to Device
Device: WBS-512AC (A8-F7-E0-55-65-D4)
Get Device Information done.
Step 3: Press "Connect to Device" and then the Web login screen appears.

Note
The fields in white background can be modified directly and then you can apply the new setting by clicking "Update Device".
Appendix B: FAQs
Q1: How to set up the AP Client Connection
Topology:
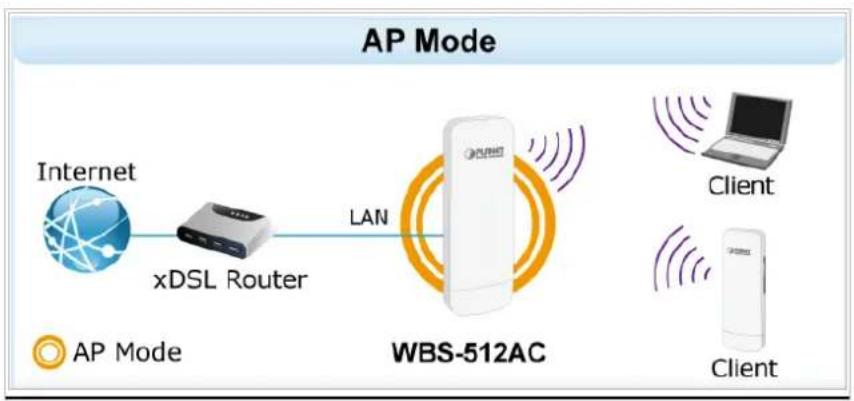
flowchart
graph LR
    A["Internet"] --> B["xDSL Router"]
    B --> C["WBS-512AC"]
    C --> D["Client"]
    C --> E["Client"]
    style A fill:#fff,stroke:#000
    style B fill:#fff,stroke:#000
    style C fill:#fff,stroke:#000
    style D fill:#fff,stroke:#000
    style E fill:#fff,stroke:#000
Step1. Use static IP in the PCs that are connected with AP-1 (Site-1) and AP-2 (Site-2). In this case, Site-1 is "192.168.1.100", and Site-2 is "192.168.1.200".

Step2. In AP-2, change the PtP switch to slave, the default IP is 192.168.1.100.

Step 3. In AP-1, go to "Wizard" to configure it to AP Mode. In AP-2, configure it to Repeater Mode.
AP-1

flowchart
graph LR
    A["Gateway Mode"] --> B["Super WDS"]
    B --> C["WISP Mode"]
    C --> D["Current Mode"]
    D --> E["AP Mode"]
    style A fill:#f9f,stroke:#333
    style B fill:#f9f,stroke:#333
    style C fill:#f9f,stroke:#333
    style D fill:#bbf,stroke:#333
    note right of D: Switch to repeater mode
AP-2
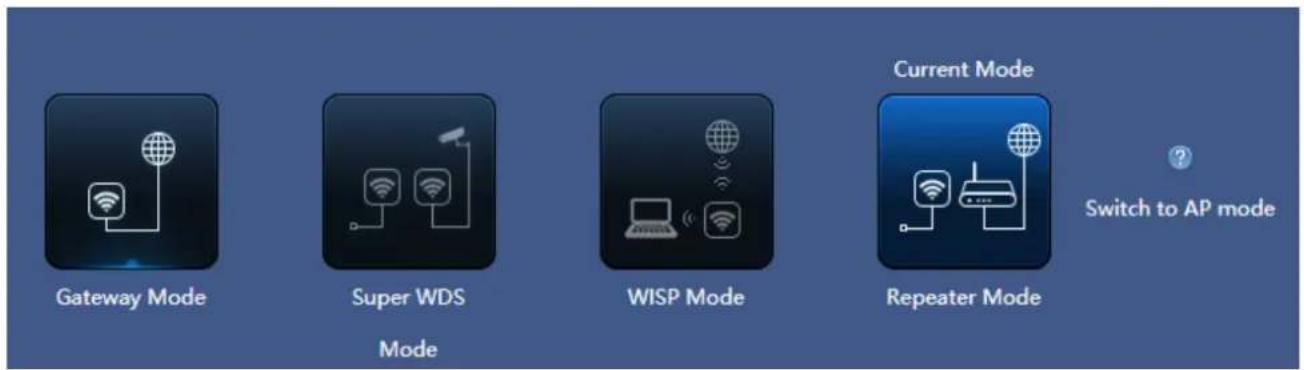
flowchart
graph LR
    A["Gateway Mode"] --> B["Super WDS"]
    B --> C["WISP Mode"]
    C --> D["Current Mode"]
    D --> E["Switch to AP mode"]
Step 4. In AP-2, press Scan AP to search the AP-1. You can also enter the MAC address, SSID, encryption and bandwidth if you know what they are.
![Wireless List WDS-3 Channel[ 100 ] MAC[ C2:F7:E0:55:41:7C ] Signal[ -69dBm ] WEP PLANET_5G_512AC Channel[ 36 ] MAC[ A8:F7:E0:55:65:D9 ] Signal[ -70dBm ] WPA/WPA2PSK_AES](/content/2026/05/967876/images/6370e9e2097be795a6c323ec226cb8f556b7ea4d87050f47d7db4d1e3ba217da.jpg)

Step 5. Click "Next" to finish the setting.
Step 6. Go to "Repeater Information" to check connection status.
![Operation Mode Repeater Mode Device Description Uptime 00:51:13 Home Wizard WiFi Network Manage Device Information CPU Usage 11% Memory Usage 32% LAN Information Tan IP 192.168.1.253 Subnet 255.255.255.0 MAC Address ARF7:EO-55#65D4 Gateway 192.168.1.1 DHCP Server OFF Flow(hps) Repeat Down Stream Repeat Up Stream Repeat Information Repeater SSID PLANET_5G_512AC Channel 36 BSSID ARF7:EO-55#65D9 Encrypt WPA/WPA2PSK_AES Signal [-70dBm] WiFi Information Status ON 0 SSID PLANET_5G_512AC Channel 36 Encrypt WPA/WPA2PSK_AES MAC Address ARF7:EO-55#65D6 Version:WBS-512AC-AP-ETSI-V3.0](/content/2026/05/967876/images/d93507a28a6fb07fab974ad40b22f4c94087f1e1b256a443eb36e54fab1d32f4.jpg)
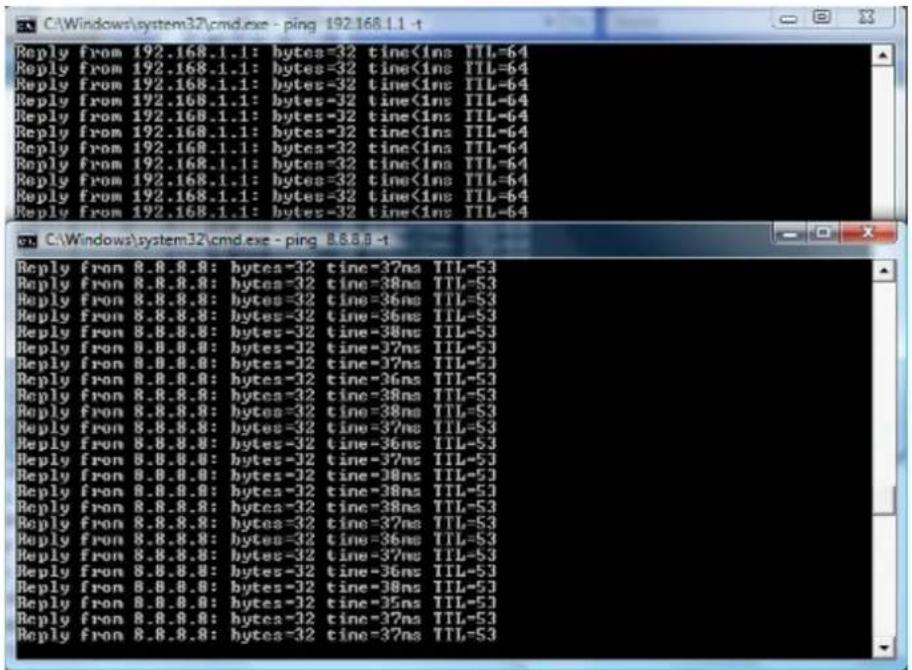
Step 7. Use command line tool to ping each other to ensure the link is successfully established.
From Site-1, ping 192.168.1.200; and in Site-2, ping 192.168.1.100.

Step 8. Configure the TCP/IP settings of Site-2 to "Obtain an IP address automatically".

Step 9. Use command line tool to ping the DNS (e.g., Google) to ensure Site-2 can access internet through the wireless connection.
flowchart
graph TD
    A["LAN"] --> B["Server"]
    B --> C["Server"]
    C --> D["Security Camera"]
    style A fill:#f9f,stroke:#333
    style D fill:#bbf,stroke:#333
    note right of A
        Device Description
    end
    note bottom of D
        Uptime 00:06:36
Appendix C: Troubleshooting
If you find the AP is working improperly or stops responding to you, please read this troubleshooting first before contacting the dealer for help. Some problems can be solved by yourself within a very short time.| Scenario Solution | |
| The AP is not responding to me when I want to access it by Web browser. | a. Please check the connection of the power cord and the Ethernet cable of this AP. All cords and cables should be correctly and firmly inserted into the AP.b. If all LEDs on this AP are off, please check the status of power adapter, and make sure it is correctly powered.c. You must use the same IP address section where AP uses.d. Are you using MAC or IP address filter? Try to connect the AP with another computer and see if it works; if not, please reset the AP to the factory default settings by pressing the ‘reset’ button for over 7 seconds.e. Use the Smart Discovery Tool to see if you can find the AP or not.f. If you did a firmware upgrade and this happens, contact your dealer for help.g. If all the solutions above don’t work, contact the dealer for help. |
| I can’t get connected to the Internet. | a. Go to ‘Status’ -> ‘Internet Connection’ menu on the router connected to the AP, and check Internet connection status.b. Please be patient, sometimes Internet is just that slow.c. If you’ve connected a computer to Internet directly before, try to do that again, and check if you can get connected to Internet with your computer directly attached to the device provided by your Internet service provider.d. Check PPPoE / L2TP / PPTP user ID and password entered in the router’s settings again.e. Call your Internet service provider and check if there’s something wrong with their service.f. If you just can’t connect to one or more website, but you can still use other internet services, please check URL/Keyword filter.g. Try to reset the AP and try again later.h. Reset the device provided by your Internet service provider too.i. Try to use IP address instead of host name. If you can use IP address to communicate with a remote server, but can't use host name, please check DNS setting. |
| I can't locate my AP by my wireless device. | a. ‘Broadcast ESSID’ set to off?b. Both two antennas are properly secured.c. Are you too far from your AP? Try to get closer.d. Please remember that you have to input ESSID on your wireless client manually, if ESSID broadcast is disabled. |
| File downloading is very slow or breaks frequently. | a. Are you using QoS function? Try to disable it and try again.b. Internet is slow sometimes. Please be patient.c. Try to reset the AP and see if it's better after that.d. Try to know what computers do on your local network. If someone's transferring big files, other people will think Internet is really slow.e. If this never happens before, call you Internet service provider to know if there is something wrong with their network. |
| I can't log into the web management interface; the password is wrong. | a. Make sure you're connecting to the correct IP address of the AP!b. Password is case-sensitive. Make sure the ‘Caps Lock’ light is not illuminated.c. If you really forget the password, do a hard reset. |
| The AP becomes hot | a. This is not a malfunction, if you can keep your hand on the AP's case.b. If you smell something wrong or see the smoke coming out from AP or A/C power adapter, please disconnect the AP and power source from utility power (make sure it's safe before you're doing this!), and call your dealer for help. |
Appendix D: Glossary
802.11ac - 802.11ac is a wireless networking standard in the 802.11 family (which is marketed under the brand name Wi-Fi), developed in the IEEE Standards Association process, providing high-throughput wireless local area networks (WLANs) on the 5 GHz band. 802.11n - 802.11n builds upon previous 802.11 standards by adding MIMO (multiple-input multiple-output). MIMO uses multiple transmitter and receiver antennas to allow for increased data throughput via spatial multiplexing and increased range by exploiting the spatial diversity, perhaps through coding schemes like Alamouti coding. The Enhanced Wireless Consortium (EWC) [3] was formed to help accelerate the IEEE 802.11n development process and promote a technology specification for interoperability of next-generation wireless local area networking (WLAN) products. 802.11a - 802.11a was an amendment to the IEEE 802.11 wireless local network specifications that defined requirements for an orthogonal frequency division multiplexing (OFDM) communication system. It was originally designed to support wireless communication in the unlicensed national information infrastructure (U-NII) bands (in the 5–6 GHz frequency range) as regulated in the United States by the Code of Federal Regulations, Title 47, Section 15.407. 802.11b - The 802.11b standard specifies a wireless networking at 11 Mbps using direct-sequence spread-spectrum (DSSS) technology and operating in the unlicensed radio spectrum at 2.4GHz, and WEP encryption for security. 802.11b networks are also referred to as Wi-Fi networks. 802.11g - specification for wireless networking at 54 Mbps using direct-sequence spread-spectrum (DSSS) technology, using OFDM modulation and operating in the unlicensed radio spectrum at 2.4GHz, and backward compatibility with IEEE 802.11b devices, and WEP encryption for security. DDNS (Dynamic Domain Name System) - The capability of assigning a fixed host and domain name to a dynamic Internet IP Address. DHCP (Dynamic Host Configuration Protocol) - A protocol that automatically configure the TCP/IP parameters for the all the PC(s) that are connected to a DHCP server. DMZ (Demilitarized Zone) - A Demilitarized Zone allows one local host to be exposed to the Internet for a special-purpose service such as Internet gaming or videoconferencing. DNS (Domain Name System) - An Internet Service that translates the names of websites into IP addresses. Domain Name - A descriptive name for an address or group of addresses on the Internet. DSL (Digital Subscriber Line) - A technology that allows data to be sent or received over existing traditional phone lines. ISP (Internet Service Provider) - A company that provides access to the Internet. MTU (Maximum Transmission Unit) - The size in bytes of the largest packet that can be transmitted. NAT (Network Address Translation) - NAT technology translates IP addresses of a local area network to a different IP address for the Internet. - PPPoE (Point to Point Protocol over Ethernet) - PPPoE is a protocol for connecting remote hosts to the Internet over an always-on connection by simulating a dial-up connection. SSID - A Service Set Identification is a thirty-two character (maximum) alphanumeric key identifying a wireless local area network. For the wireless devices in a network to communicate with each other, all devices must be configured with the same SSID. This is typically the configuration parameter for a wireless PC card. It corresponds to the ESSID in the wireless Access Point and to the wireless network name. WEP (Wired Equivalent Privacy) - A data privacy mechanism based on a 64-bit or 128-bit or 152-bit shared key algorithm, as described in the IEEE 802.11 standard. Wi-Fi - A trade name for the 802.11b wireless networking standard, given by the Wireless Ethernet Compatibility Alliance (WECA, see http://www.wi-fi.net), an industry standards group promoting interoperability among 802.11b devices. WLAN (Wireless Local Area Network) - A group of computers and associated devices communicate with each other wirelessly, which network serving users are limited in a local area. EC Declaration of Conformity| English | Hereby, PLANET Technology Corporation, declares that this 900Mbps 802.11ac Wireless Outdoor CPE is in compliance with the essential requirements and other relevant provisions of Directive 2014/53/EU. | Lietuviškai | Šiuo PLANET Technology Corporation,, skelbia, kad 900Mbps 802.11ac Wireless Outdoor CPE tenkina visus svarbiausius 2014/53/EU direktyvos reikalavimus ir kitas svarbias nuostatas. |
| Česky | Společnost PLANET Technology Corporation, tímto prohlašuje, že tato 900Mbps 802.11ac Wireless Outdoor CPE splňuje základní požadavky a další příslušná ustanovení směrnice 2014/53/EU. | Magyar | A gyártó PLANET Technology Corporation, kijelenti, hogy ez a 900Mbps 802.11ac Wireless Outdoor CPE megfelel az 2014/53/EK irányelv alapkövetelményeinek és a kapcsolódó rendelkezéseknek. |
| Dansk | PLANET Technology Corporation, erklærer herved, at følgende udstyr 900Mbps 802.11ac Wireless Outdoor CPE overholder de væsentlige krav og øvrige relevante krav i direktiv 2014/53/EU | Malti | Hawnhekk, PLANET Technology Corporation, jiddikjara li dan 900Mbps 802.11ac Wireless Outdoor CPE jikkonforma mal-ħtiġijiet essenzjali u ma provvedimenti oħrajn relevanti li hemm fid-Dirrettiva 2014/53/EU |
| Deutsch | Hiermit erklärt PLANET Technology Corporation, dass sich dieses Gerät 900Mbps 802.11ac Wireless Outdoor CPE in Übereinstimmung mit den grundlegenden Anforderungen und den anderen relevanten Vorschriften der Richtlinie 2014/53/EU befindet". (BMWi) | Nederlands | Hierbij verklaart , PLANET Technology orporation, dat 900Mbps 802.11ac Wireless Outdoor CPE in overeenstemming is met de essentiële eisen en de andere relevante bepalingen van richtlijn 2014/53/EU |
| Eestikeeles | Käesolevaga kinnitab PLANET Technology Corporation, et see 900Mbps 802.11ac Wireless Outdoor CPE vastab Euroopa Nõukogu direktiivi 2014/53/EU põhinõuetele ja muudele olulistele tingimustele. | Polski | Niniejszym firma PLANET Technology Corporation, oświadcza, že 900Mbps 802.11ac Wireless Outdoor CPE spełnia wszystkie istotne wymogi i klauzule zawarte w dokumencie „Directive 2014/53/EU”. |
| Ελληνικά | ME THN ΠΑΡΟΥΣΑ , PLANET Technology Corporation, ΔΗΛΩΝΕΙ ΟΤΙ ΑΥΤΟ 900Mbps 802.11ac Wireless Outdoor CPEΣΥΜΜΟΡΦΩΝΕΤΑΙ ΠΡΟΣ ΤΙΣ ΟΥΣΙΩΔΕΙΣ ΑΠΑΙΤΗΣΕΙΣ ΚΑΙ ΤΙΣ ΛΟΙΠΕΣ ΣΧΕΤΙΚΕΣ ΔΙΑΤΑΞΕΙΣ ΤΗΣ ΟΔΗΓΙΑΣ 2014/53/EU | Português | PLANET Technology Corporation, declara que este 900Mbps 802.11ac Wireless Outdoor CPE está conforme com os requisitos essenciais e outras disposições da Directiva 2014/53/EU. |
| Español | Por medio de la presente, PLANET Technology Corporation, declara que 900Mbps 802.11ac Wireless Outdoor CPE cumple con los requisitos esenciales y cualesquiera otras disposiciones aplicables o exigibles de la Directiva 2014/53/EU | Slovensky | Výrobca PLANET Technology Corporation, týmto deklaruje, že táto 900Mbps 802.11ac Wireless Outdoor CPE je v súlade so základnými požiadavkami a d'alšími relevantnými predpismi smernice 2014/53/EU. |
| Français | Par la présente, PLANET Technology Corporation, déclare que les appareils du 900Mbps 802.11ac Wireless Outdoor CPE sont conformes aux exigences essentielles et aux autres dispositions pertinentes de la directive 2014/53/EU | Slovensko | PLANET Technology Corporation, s tem potrjuje, da je ta 900Mbps 802.11ac Wireless Outdoor CPE skladen/a z osnovnimi zahtevami in ustreznimi določili Direktive 2014/53/EU. |
| Italiano | Con la presente, PLANET Technology Corporation, dichiara che questo 900Mbps 802.11ac Wireless Outdoor CPE è conforme ai requisiti essenziali ed alle altre disposizioni pertinenti stabilite dalla direttiva 2014/53/EU. | Suomi | PLANET Technology Corporation, vakuuttaa täten että 900Mbps 802.11ac Wireless Outdoor CPE typpinen laite on direktiivin 2014/53/EU oleellisten vaatimusten ja sită koskevien direktiivin muiden ehtojen mukainen. |
| Latviski | Ar šo PLANET Technology Corporation, apliecina, ka šī 900Mbps 802.11ac Wireless Outdoor CPE atbilst Direktivas 2014/53/EU pamatprasībām un citiem atbilstošiem noteikumiem. | Svenska | Härmed intygar, PLANET Technology Corporation, att denna 900Mbps 802.11ac Wireless Outdoor CPE står i överensstämmelse med de väsentliga egenskapskrav och övriga relevanta bestämmelser som framgår av direktiv 2014/53/EU. |
- Copyright
- Federal Communication Commission Interference Statement
- FCC Caution
- FCC Radiation Exposure Statement
- CE Compliance Statement
- Safety
- National Restrictions
- WEEE regulation
- Revision
- CONTENTS
- Chapter 1.Product Introduction....1
- Chapter 2. Hardware Installation ...... 9
- Product Outlook....9
- Chapter 3. Connecting to the CPE ....12
- Chapter 4. Quick Installation Guide ...... 14
- Chapter 5.Configuring the CPE....19
- Network....41
- Security....47
- Chapter 6. Quick Connection to a Wireless Network....54
- Appendix A: Planet Smart Discovery Utility....66
- Appendix B: FAQs....67
- Appendix C: Troubleshooting....78
- Appendix D: Glossary 80
- FIGURE
- Chapter 1. Product Introduction
- Package Contents 1.1
- Product Description 1.2
- Flexible and Reliable Outdoor Wireless Solution with Superior Performance
- Benefits of MU-MIMO under 802.11ac Wave 2
- Multiple SSIDs with VLAN Tagging
- Simple Steps to Set Up PtP Connection
- Optimized Efficiency in AP Management
- Product Features 1.3
- Industrial Compliant Wireless LAN and LAN
- Fixed Network Broadband Router
- RF Interface Characteristics
- Outdoor Environmental Characteristics
- Multiple Operation Modes and Wireless Features
- Secure Network Connection
- Easy Installation and Management
- Chapter 2. Hardware Installation
- Product Outlook 2.1
- WBS-512AC
- Rear Side
- Port and Button
- WBS-512AC Hardware-based Interface:
- Hardware Description
- Chapter 3. Connecting to the CPE
- System Requirements 3.1
- Installing the CPE 3.2
- Chapter 4. Quick Installation Guide
- Manual Network Setup -- TCP/IP Configuration
- Configuring the IP Address Manually
- Summary:
- Starting Setup in the Web UI
- Chapter 5. Configuring the CPE
- Device Information
- Wizard 5.1
- Gateway Mode 5.2
- WAN Settings
- ■ Static IP
- - PPPoE (ADSL)
- DHCP
- Wireless
- WISP Mode 5.4
- AP Mode 5.5
- Repeater Mode 5.6
- Wi-Fi 5.7
- 5G Wi-Fi
- Basic
- VAP
- MAC ACL
- MAC ACL
- Wi-Fi Timer Off
- Wi-Fi Timer Off
- Advanced
- Advanced
- Network
- LAN Settings
- SNMP Config
- VLAN Settings
- WAN Settings
- WAN advanced settings
- Security
- URL Filtering
- IP/Port Filtering
- MAC Filtering
- Security (Port Mapping/Port Forwarding)
- DMZ
- Chapter 6. Quick Connection to a Wireless Network
- Windows XP (Wireless Zero Configuration) 6.1
- Step 2: Select [View Available Wireless Networks]
- Step 4: Enter the encryption key of the wireless AP
- Step 5: Check if "Connected" is displayed
- Windows 7 (WLAN AutoConfig) 6.2
- Step 2: Highlight and select the wireless network (SSID) to connect
- Mac OS X 10.x 6.3
- Step 5: Check if the AirPort is connected to the selected wireless network.
- Step 3: Check Wi-Fi setting and select the available wireless network
- iPhone/iPod Touch/iPad 6.4
- Step 5: Check if the device is connected to the selected wireless network.
- Appendix A: Planet Smart Discovery Utility
- Appendix B: FAQs
- Q1: How to set up the AP Client Connection
- Q2: How to set up the WDS Connection
- Topology:
- Appendix C: Troubleshooting
- Appendix D: Glossary
Brand : Planet
Model : WBS-512AC
Category : Router