
INT70FF - Refrigerator STOVES - Free user manual and instructions
Find the device manual for free INT70FF STOVES in PDF.


| Product Type | Refrigerator |
| Brand | Stoves |
| Model | INT70FF |
| Dimensions (HxWxD) | Approx 850 x 700 x 600 mm |
| Net Weight | Approx 35 kg |
| Power Supply | 220-240V, 50Hz |
| Energy Class | A+ |
| Total Gross Capacity | Approx 200 L |
| Temperature Range | 0°C to 8°C |
| Climate Class | N-ST |
| Defrost Type | Automatic (frost-free) |
| Number of Shelves | 4 tempered glass shelves |
| Door Type | Solid, reversible hinge |
| Door Alarm | Yes |
| Interior Light | LED |
| Adjustable Feet | Yes, front leveling feet |
| Maintenance | Clean condenser coils annually; clean interior with mild soap |
| Safety Features | Overheating protection; keep ventilation slots clear |
| Spare Parts Available | Shelves, thermostat, interior bulb, door gasket |
Frequently Asked Questions - INT70FF STOVES
User questions about INT70FF STOVES
0 question about this device. Answer the ones you know or ask your own.
Ask a new question about this device
Download the instructions for your Refrigerator in PDF format for free! Find your manual INT70FF - STOVES and take your electronic device back in hand. On this page are published all the documents necessary for the use of your device. INT70FF by STOVES.
USER MANUAL INT70FF STOVES
ST INT70FF
444444333
Contents
BEFORE USING THE APPLIANCE 4
General warnings ....4
Old and out-of-order fridges ....6
Safety warnings....6
Installing and operating your fridge freezer 7
Before Using your fridge freezer....8
HOW TO OPERATE THE APPLIANCE......8
Information on the Frost Free technology....8
Thermostat setting....9
Warnings for Temperature Settings....9
Accessories 10
Ice tray 10
Bottle holder....10
Fresh dial 10
FOOD STORAGE IN THE APPLIANCE.... 11
Refrigerator Compartment.... 11
Freezer Compartment 11
CLEANING AND MAINTENANCE 15
Defrosting 15
TRANSPORTATION AND CHANGING OF INSTALLATION POSITION 16
BEFORE CALLING YOUR AFTER SALES SERVICE....16
Tips for saving energy 17
PARTS OF THE APPLIANCE AND THE COMPARTMENTS ...... 18
Installation 19
Door reversing....22
The operating instructions apply to several models. Differences may therefore occur.
PART - 1. BEFORE USING THE APPLIANCE
General warnings
WARNING: Keep ventilation openings, in the appliance enclosure or in the built-in structure, clear of obstruction.
WARNING: Do not use mechanical devices or other means to accelerate the defrosting process, other than those recommended by the manufacturer.
WARNING: Do not use electrical appliances inside the food storage compartments of the appliance, unless they are of the type recommended by the manufacturer.
WARNING: Do not damage the refrigerant circuit.
WARNING: To avoid a hazard due to the instability of the appliance, it must be fixed in accordance with the instructions.
- If your appliance uses R600a as a refrigerant (this information will be provided on the label of the cooler) you should take care during transportation and installation to prevent the cooler elements from being damaged. R600a is an environmentally friendly and natural gas, but it is explosive. In the event of a leak due to damage of the cooler elements, move your fridge away from open flames or heat sources and ventilate the room where the appliance is located for a few minutes.
- While carrying and positioning the fridge, do not damage the cooler gas circuit.
- Do not store explosive substances such as aerosol cans with a flammable propellant in this appliance.
- This appliance is intended to be used in household and domestic applications such as:
- staff kitchen areas in shops, offices and other working environments.
- farm houses and by clients in hotels, motels and other residential type environments.
- bed and breakfast type environments;
- catering and similar non-retail applications.
- If the socket does not match the refrigerator plug, it must be replaced by the manufacturer, a service agent or similarly qualified persons in order to avoid a hazard.
- A specially grounded plug has been connected to the power cable of your refrigerator. This plug should be used with a specially grounded socket of 16 amperes. If there is no such socket in your house, please have one installed by an authorised electrician.
- This appliance can be used by children aged from 8 years and above and persons with reduced physical, sensory or mental capabilities or lack of experience and knowledge if they have been given supervision or instruction concerning use of the appliance in a safe way and understand the hazards involved. Children shall not play with the appliance. Cleaning and user maintenance shall not be made by children without supervision.
- If the supply cord is damaged, it must be replaced by the manufacturer, an authorised service agent or similar qualified persons, in order to avoid a hazard.
- This appliance is not intended for use at altitudes exceeding 2000 m.
Old and out-of-order fridges
- If your old fridge has a lock, break or remove the lock before discarding it, because children may get trapped inside it and may cause an accident.

- Old fridges and freezers may contain isolation material and refrigerant with CFC or HFC. Therefore, take care not to harm environment when you are discarding your old fridges.
- Please ask your municipal authority about the disposal of the WEEE reuse, recycle and recovery purposes.
Notes:
- Please read the instruction manual carefully before installing and using your appliance. We are not responsible for the damage occurred due to misuse.
- Follow all instructions on your appliance and instruction manual, and keep this manual in a safe place to resolve the problems that may occur in the future.
This appliance is produced to be used in homes and it can only be used in domestic environments and for the specified purposes. It is not suitable for commercial or common use. Such use will cause the guarantee of the appliance to be cancelled and our company will not be responsible for losses incurred.
This appliance is produced to be used in houses and it is only suitable for cooling / storing food. It is not suitable for commercial or common use and/or for storing substances except for food. Our company is not responsible for losses to be incurred in the contrary case.
Safety warnings
- Do not connect your fridge freezer to the mains electricity supply using an extension lead.
- Do not plug in damaged, torn or old plugs.
- Do not pull, bend or damage the cord.

- This appliance is designed for use by adults, do not allow children to play with the appliance or let them hang off the door.
- Never touch the power cord/plug with wet hands as this could cause a short circuit or electric shock.
- Do not place glass bottles or beverage cans in the ice-making compartment as they can burst as the contents freeze.
- Do not place explosive or flammable material in your fridge freezer. Place drinks with high alcohol content vertically in the fridge compartment and make sure that their tops are tightly closed.
- When removing ice from the ice-making compartment, do not touch it. Ice may cause frost burns and/or cuts.
- Do not touch frozen goods with wet hands! Do not eat ice-cream
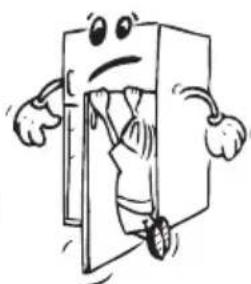


and ice cubes immediately after you have taken them out of the freezer compartment!

- Do not touch frozen goods with wet hands. Do not eat ice-cream or ice cubes immediately after you have taken them out of the ice-making compartment.
- Do not cover the body or top of fridge with lace. This affects the performance of your fridge freezer.
- Secure any accessories in the fridge freezer during transportation to prevent damage to the accessories.
Installing and operating your fridge freezer
Before starting to use your fridge freezer, you should pay attention to the following points:
- The operating voltage for your fridge freezer is 220-240 V at 50Hz.
- The plug must be accessible after installation.
- Your fridge may have a smell when it is operated for the first time. This is normal and the smell will fade away when your fridge freezer starts to cool.
- Before connecting your fridge freezer, ensure that the information on the data plate (voltage and connected load) matches that of the mains electricity supply. If in doubt, consult a qualified electrician.
- Insert the plug into a socket with an efficient ground connection. If the socket has no ground contact or the plug does not match, we recommend that you consult a qualified electrician for assistance.
- The appliance must be connected with a properly installed fused socket. Power supply (AC) and voltage at the operating point must match with the details on the name plate of the appliance (name plate is located on the inside left of the appliance).
- We do not accept responsibility for any damages that occur due to ungrounded usage.
- Place your fridge freezer where it will not be exposed to direct sunlight.
- Your fridge freezer should never be used outdoors or exposed to rain.
- Your appliance should be at least 50 cm away from stoves, gas ovens and heater cores, and at least 5 cm away from electrical ovens.
- When your fridge freezer is placed next to a deep freezer, there should be at least 2 cm between them to prevent humidity forming on the outer surface.
- Do not place heavy items on the appliance.
- Clean the appliance thoroughly, especially the interior, before use (see Cleaning and Maintenance).
- The installation procedure into the kitchen unit is given in the installation manual. This product is intended to be used in proper kitchen units only.
- Before using your fridge freezer, wipe all parts with a solution of warm water and a teaspoon of sodium bicarbonate, then rinse with clean water and dry. Place all parts in the fridge freezer after cleaning.
- Install the plastic distance guide (the part with black vanes at the rear) by turning it 90 degrees (as shown in the figure) to prevent the condenser from touching the wall.
- The fridge freezer should be placed against a wall with a free space not exceeding 75 mm.


Before Using Your Fridge Freezer
- When using your fridge freezer for the first time, or after transportation, keep it in an upright position for at least 3 hours before plugging into the mains. This allows efficient operation and prevents damage to the compressor.
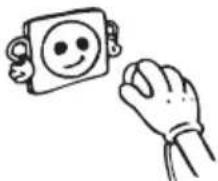
- Your fridge freezer may have a smell when it is operated for the first time. This is normal and the smell will fade away when your fridge freezer starts to cool.
HOW TO OPERATE THE APPLIANCE
Information on the Frost Free Technology
The Frost Free refrigerators are different from the other static refrigerators in terms of their operational system.
In normal fridge freezers, the humidity entering the fridge freezer due to opening the door and the humidity inherent in the food causes freezing in the freezer compartment. To defrost the frost and ice in the freezer compartment, you are periodically required to turn off the fridge, place the food that needs to be kept frozen in a separately cooled container and remove the ice gathered in the freezer compartment.
The situation is completely different in no-frost refrigerators. Dry and cold air is blown into the fridge and freezer compartments homogeneously and evenly from several points via a blower fan. Cold air dispersed homogeneously and evenly between the shelves cools all of your food equally and uniformly, thus preventing humidity and freezing.
Therefore your no-frost fridge freezer allows you ease of use, in addition to its huge capacity and stylish appearance.
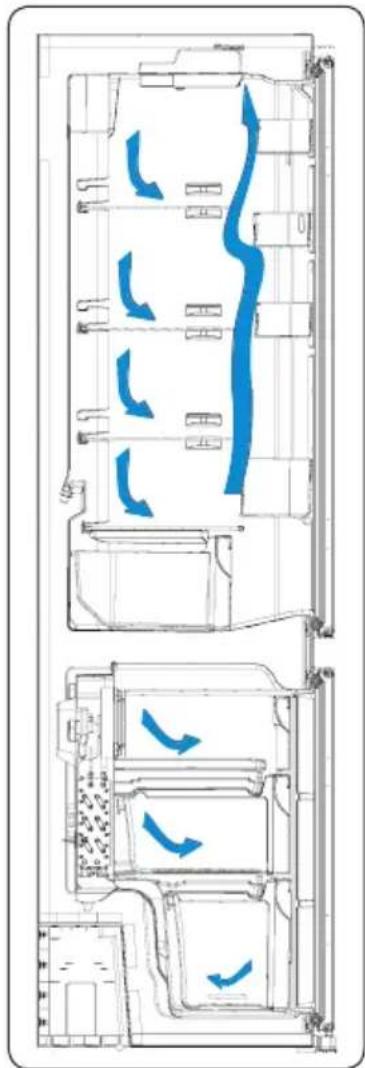
Thermostat Setting
Cooling compartment
It ensures that the temperature settings in the cooling and freezing compartments of your refrigerator are performed automatically. It may be set to any value ranging from 1 to 5. As you turn the thermostat setting knob from 1 to 5, the temperature decreases. To save energy in winter months, operate your refrigerator in a lower position.
Fridge compartment thermostat knob;
4 - 5 : For further cooling.
2 - 3 : For normal use.
1: For less cooling.

Warnings for Temperature Settings
- The ambient temperature, temperature of the freshly stored food and how often the door is opened affects the temperature in the refrigerator compartment. If required, change the temperature setting.
- It is not recommended that you operate your fridge in environments colder than 10°C in terms of its efficiency.
- The thermostat should be set by taking into consideration how often the fresh food and freezer doors are opened and closed, how much food is stored in the refrigerator, and the environment in which the refrigerator is located.
- When you first switch on the appliance, you should ideally try to run it without any food in for 24 hours and not open the door. If you need to use it straight away, try not to put a large quantity of food inside.
- A 5 minute delay function is included to prevent damage to the compressor of your fridge, when you unplug it and then plug it in again to operate it, or when an energy breakdown occurs. Your fridge will start to operate normally after 5 minutes.
- Your fridge is designed to operate in the ambient temperature intervals stated in the standards, according to the climate class stated in the information label. It is not recommended that your fridge is operated in the environments which are out of the
stated temperature intervals. This will reduce the cooling efficiency of the fridge.
- This appliance is designed for use at an ambient temperature within the 10°C - 43°C range.
| Climate class | Ambient Temperature (°C) |
| T Between 16 and 43 | °C |
| ST Between 16 and 38 | °C |
| N Between 16 and 32 | °C |
| SN Between 10 and 32 | °C |
Accessories
Ice tray (In some models)
- Fill the ice tray with water and place it in the freezer compartment. After the water has completely turned into ice, you can twist the tray as shown below to remove the ice cubes.
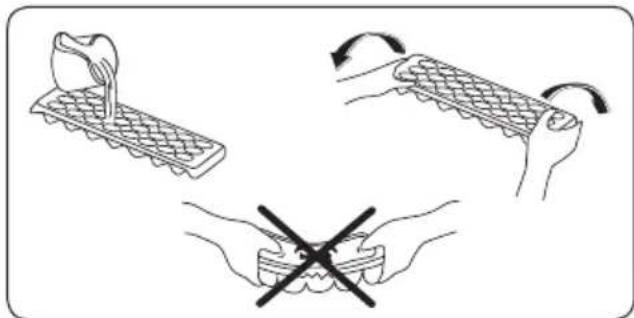
Bottle holder (In some models)
To prevent bottles from slipping or falling over, you can use the bottle holder. This also helps to reduce noise from bottles when opening or closing the door.

Fresh dial
When the humidity controller is in the closed position, it allows fresh fruit and vegetables to be stored longer.
If the crisper is completely full, the fresh dial, located in front of the crisper, should be opened. This will control the air and humidity level in the crisper, increasing the shelf life of the produce.

If you see condensation on the glass shelf, the humidity control should be set to the open position.
All written and visual descriptions in the accessories may vary depending on the appliance model.
FOOD STORAGE IN THE APPLIANCE
Refrigerator Compartment
Always make sure food is wrapped or stored in closed containers. Hot food and drinks should be cooled to room temperature before being placed in the refrigerator. Do not store packaged food and cups against the lamp and cover of the cooling compartment. Store fruit and vegetable items loose in the crisper containers. Some recommendations have been specified below for the placement and storage of your food in the cooling compartment.
Some recommendations have been specified below for the placement and storage of your food in the cooling compartment.
| Food Maximum | Storing time | Where to place in the fridge department |
| Vegetables and fruits 1 | week Vegetable bin | |
| Meat and fish 2 - 3 Days | Wrapped in plastic foil or bags or in a meat container(on the glass shelf) | |
| Fresh cheese 3 - 4 Days | In special door shelf | |
| Butter and margarine 1 | week In special door shelf | |
| Bottled products milk and yoghurt | Until the expiry date recommended by the producer | In special door shelf |
| Eggs 1 month In the egg | shelf | |
| Cooked food All shelves |
Freezer Compartment
- Please use the deep freeze compartment of your refrigerator for storing frozen food for a long time and producing ice.
- Please place the food you would like to freeze initially in the upper basket of the deep freeze in such a way that it does not exceed the declared freezing capacity of your refrigerator. Please do not place the food to be frozen near the already frozen food. You may place your food next to the other frozen food after it has frozen (for at least 24 hours).
- You should freeze food (meat, minced meat, fish, etc.) by dividing it into portions in such a way that they can be consumed in one sitting.
- Please do not refreeze frozen food once it has thawed. It may pose a danger for your health since it might cause food poisoning.
- Do not place hot meals in the deep freeze before they have cooled. You may cause the other food frozen food in the deep freeze to become putrefied.
- When you buy frozen food, make sure they were frozen under appropriate conditions and that the package is not torn.
- When storing frozen food, the storage conditions on the package should be observed. If there are no instructions, the food has to be consumed in the shortest possible period of time.
- Frozen food has to be transported before it perishes and should be placed in the fast freezing shelf as soon as possible. Please do not use the door shelves for freezing purposes.
- If a frozen food package has been humidified and has a foul smell, the food might have previously been stored under suitable conditions and gone rotten. Please do not buy such food!
- The storage duration of frozen food changes depending on the environmental temperature, the frequent opening and closing of the doors, thermostat settings, food type and the length of time that has elapsed from the time the food was bought to the time it entered the freezer. Always abide by the instructions on the packaging and never exceed the storage duration.
Some recommendations have been specified below for the placement and storage of your food in the cooling compartment.
| Dairy Products Preparation | Maximum Storing time (months) | Storing Conditions | |
| Packet (Homogenize) Milk | In its own packet 2 - 3 | Pure Milk – In its own packet | |
| Cheese-excluding white cheese | In slices 6 - 8 | Original package may be used for short storing period. It should be wrapped in foil for longer periods. | |
| Butter, margarine In | its package 6 | ||
| Maximum Storing time (months) | Thawing time in room temperature (hours) | Thawing time in oven (minutes) | |
| Bread 4 - 6 2 - 3 | 4-5 (220-225 °C) | ||
| Biscuits 3 - 6 1 | 1,5 5-8 (190-200 °C) | ||
| Pastry 1 - 3 2 - | 3 5-10 (200-225 °C) | ||
| Pie 1 - 1,5 3 - 4 | 5-8 (190-200 °C) | ||
| Phyllo dough | 2 - 3 1 - 1,5 | 5-8 (190-200 °C) | |
| Pizza | 2 - 3 2 - 4 15 | 20 (200 °C) |
| Meat and fish Preparation | Maximum Storing time (month) |
| Steak Wrapping in a foil 6 - 8 | |
| Lamb meat Wrapping in a foil 6 - 8 | |
| Veal roast Wrapping in a foil 6 - 8 | |
| Veal cubes In small pieces 6 - 8 | |
| Lamb cubes In pieces 4 - 8 | |
| Minced meat In packages without using spices 1 - 3 | |
| Giblets (pieces) In pieces 1 - 3 | |
| Bologna sausage/salami | Should be packaged even if it has membrane |
| Chicken and turkey Wrapping in a foil 4 - 6 | |
| Goose and Duck Wrapping in a foil 4 - 6 | |
| Deer, Rabbit, Wild Boar | In 2.5 kg portions and as fillets |
| Fresshwater fishes (Salmon, Carp, Crane, Siluroidea) | After cleaning the bowels and scales of the fish, wash and dry it; and if necessary, cut off the tail and head. |
| Lean fish; bass, turbot, flounder | |
| Fatty fishes (Tunny, Mackarel, bluefish, anchovy) | |
| Shellfish | Cleaned and in bags |
| Caviar | In its package, aluminium or plastic container |
| Snails | In salty water, aluminum or plastic container |
Note: Frozen meat should be cooked as fresh meat after being thawed. If the meat is not cooked after being thawed, it must not be re-frozen.
| Vegetables and Fruits Preparation | Maximum Storing time (months) | |
| String beans and beans | Wash and cut into small pieces and boil in water | 10 - 13 |
| Beans Hull and wash and | boil in water 12 | |
| Cabbage Cleaned and boil | in water 6 - 8 | |
| Carrot Clean and cut to slices and boil in water 12 | ||
| Pepper | Cut the stem, cut into two pieces, remove the core and boil in water | 8 - 10 |
| Spinach Washed and boil | in water 6 - 9 | |
| Cauliflower | Take the leaves apart, cut the heart into pieces, and leave it in water with a little lemon juice for a while | 10 - 12 |
| Eggplant Cut to pieces of | 2cm after washing 10 - 12 | |
| Corn | Clean and pack with its stem or as sweet corn | 12 |
| Apple and pear Peel and slice 8 - 10 | ||
| Apricot and Peach Cut into two pieces and remove the stone | 4 - 6 | |
| Strawberry and Blackberry | Wash and hull 8 - 12 | |
| Cooked fruits | Adding 10 % of sugar in the container | 12 |
| Plum, cherry, sourberry | Wash and hull the stems | 8 - 12 |
PART 4. CLEANING AND MAINTENANCE
- Disconnect the unit from the power supply before cleaning.
- Do not clean the appliance by pouring water.
• Make sure that no water enters the lamp housing and other electrical components.
- The refrigerator should be cleaned periodically using a solution of bicarbonate of soda and lukewarm water.


- Clean the accessories separately with soap and water. Do not clean them in the dishwasher.

- Do not use abrasive products, detergents or soaps. After washing, rinse with clean water and dry carefully. When you have finished cleaning, reconnect the plug to the mains supply with dry hands.

- Clean the condenser with a broom at least twice a year. This will help you to save on energy costs and increase productivity.

THE POWER SUPPLY MUST BE DISCONNECTED.
Defrosting
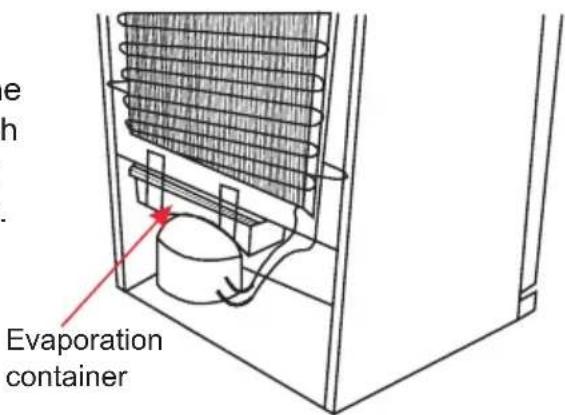
Your refrigerator has fully automatic defrosting. The water formed as a result of defrosting passes through the water collection spout, flows into the vaporisation container below the condenser and evaporates there.
Replacing LED lighting
If your refrigerator has LED lighting, contact the help desk as this should be changed by authorized personnel only.
PART - 5. TRANSPORTATION AND CHANGING OF INSTALLATION POSITION
Transportation and changing of installation position
- The original packages and foamed polystyrene (PS) can be retained if required.
- During transportation, the appliance should be secured with a wide string or a strong rope. The instructions written on the corrugated box must be followed while transporting.
- Before transporting or changing the installation position, all the moving objects (i.e., shelves, crisper, etc.) should be taken out or fixed with bands in order to prevent them from getting damaged.
- Carry your fridge freezer in the upright position.

BEFORE CALLING YOUR AFTER SALES SERVICE
If your refrigerator is not working properly, it may be a minor problem. To save time and money, check the following before calling an electrician.
What to do if your appliance does not operate:
Check that:
- There is no power.
- The general switch in your home is disconnected.
- The socket is not faulty. To check this, plug in another appliance that you know is working into the same socket.
What to do if your appliance performs poorly:
Check that:
- You have overloaded the appliance.
- The thermostat setting is in position "1" (if so, set the thermostat dial to a suitable value). The doors are closed properly.
- There is no dust on the condenser.
- There is enough space at the rear and side walls.
If there is noise:
The cooling gas that circulates in the refrigerator circuit may make a slight noise (bubbling sound) even when the compressor is not running. Do not worry, this is quite normal. If you hear any other noises, check that:
• The appliance is level - Nothing is touching the rear of the appliance. - The objects on the appliance are vibrating.
If there is water in the lower part of the refrigerator,
Check that:
The drain hole for the water is not clogged (use the defrost drain plug to clean the drain hole)
Recommendations
- The compressor protection thermal fuse will cut out after sudden power breakdowns or after unplugging the appliance, because the gas in the cooling system is not stabilized. This is quite normal and the fridge will restart after 4 or 5 minutes.
- The cooling unit of your refrigerator is hidden in the rear of the appliance. Therefore, water droplets or icing may occur on the rear surface of your fridge due to the operation of the compressor at specified intervals. This is normal. There is no need to perform a defrosting operation unless the icing is excessive.
- To stop the appliance completely, unplug it from the main socket (for cleaning and when the doors are left open).
- If a problem persists after you have followed all the instructions above, please consult the nearest Authorized Service Centre.
- The appliance you have purchased is designed for domestic use and can only be used at home and for the stated purposes. It is not suitable for commercial or common use. If the consumer uses the appliance in a way that does not comply with this, we emphasize that the manufacturer and the dealer will not be responsible for any repair and failure within the guarantee period.
- The lifetime of your appliance is stated and declared by the Department of Industry. The period for retaining parts required for the operation of the appliance is 10 years.
Tips for saving energy
- Install the appliance in a cool, well-ventilated room, but not in direct sunlight and not near a heat source (radiator, cooker, etc.). Otherwise, use an insulating plate.
- Allow warm food and drinks to cool down outside the appliance.
- When thawing frozen food, place it in the refrigerator compartment. The low temperature of the frozen food will help to cool the refrigerator compartment when it is thawing. This will help to save energy. If the frozen food is put out, it results in a waste of energy.
- Cover drinks or other liquids when placing them in the appliance. Otherwise, humidity increases in the appliance. Therefore, the working time gets longer. Also, covering drinks and other liquids helps to preserve smell and taste.
- Try to avoid keeping the doors open for long periods or opening the doors too frequently, as warm air will enter the cabinet and cause the compressor to switch on unnecessarily often.
- Keep the covers of the different temperature compartments (crisper, chiller, etc.) closed.
- Door gaskets must be clean and pliable. Replace gaskets if worn.
PART - 7. PARTS OF THE APPLIANCE AND THE COMPARTMENTS

This presentation is for information purposes only about the parts of the appliance. Parts may vary depending on the model.
A) Refrigerator compartment B) Freezer compartment
1) Turbo Fan 2) Refrigerator shelves 3) Crisper cover 4) Crisper 5) Freezer room cover 6) Freezer drawers
7) Ice tray * 8) Freezer glass shelves * 9) Bottle shelf 10) Door shelves 11) Egg holder* 12) Thermostat knob and Refrigerator lamp & cover
* In some models
Installation
! Before installation, read the instructions carefully.
! Fit the refrigerator/freezer in stable kitchen units only.
! If necessary, reverse the door according to instructions.
! Check the installation dimensions according to fig.C. The position of the joint between the unit doors must be level with the position of the joint between the appliance doors.
- See fig.A for the necessary attachment components.
- Insert trim flap 1 into slot and screw by screws 6 . (fig.D)
- Pass the power cord through ventilation shaft and position it so that the appliance could be easily plugged in once it has been installed. (fig.B - fig.C)
- Take out the trim gasket located on the side panel of the appliance and stick it on reverse side of the door hinges of the appliance. (fig.D - fig.E)
- Raise appliance and slide into kitchen unit. Push appliance to the reverse side of door hinges providing that trim gasket 2 covers space between appliance and the kitchen unit.
- Align front feet with the front surface of the kitchen unit. (fig. F)
- Screw the front feet using screws 5. (fig. F)
- Screw trim flap 1 to the kitchen unit using screws 5. (fig. G)
- Screw fixing bracket 11, as leaned to the kitchen unit, using screws 5. Repeat this for the opposite side. (fig. H)
- Screw guides 3 to the appliance doors with screws 6. Lean the appliance doors to the unit door as it is opened at a right angle. Slide rails 4 into guides 3, aligning the groove. Screw the rails 4 to the unit doors with screws 5. (fig. J)
- Set a 1-2 mm gap on the handle side between the unit itself and the unit doors by adjusting guides 3. That is vital for appliance performance. (fig. J)

Figure A

| Model | A | B | C | D | E | ||||
| 2750 | 1770 | 840 | 0,5 | 802 | 817 | 1770 | - | 1790 | |
| 2751 | 1770 | 840 | 0,5 | 802 | 817 | 1770 | - | 1790 | |
| 2760 | 1770 | 660 | 0,3 | 623 | 5 | 995,5 | 1770 | - | 1790 |
| 2761 | 1770 | 660 | 0,3 | 623 | 5 | 995,5 | 1770 | - | 1790 |
Figure C
Figure B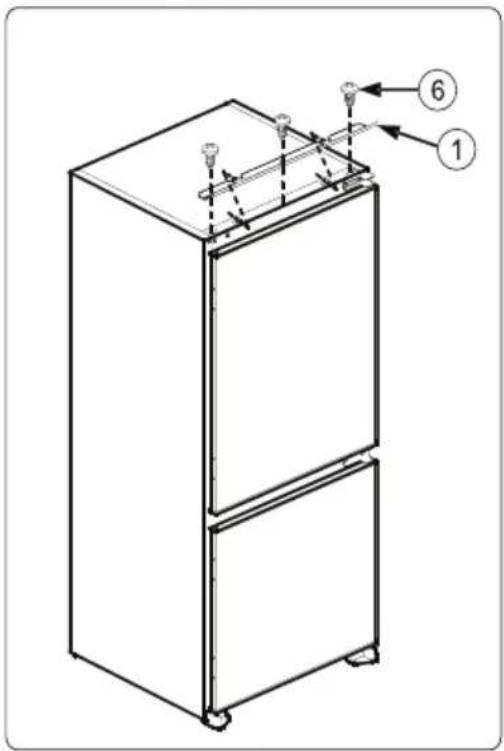
Figure D

Figure E

Figure F, Figure G, Figure H


Door reversing
- Unscrew the upper door hinge 15 and take the upper door 14 to a safe place.
- Unscrew the door hinge pin 16 and screw it to the opposite side firmly, then take it to a safe place.
- Unscrew middle door hinge 12 and take lower door 10 to a safe place. Screw back fixing bracket 11 to its original position without middle door hinge 12.
- Take door lower pin 8 to the opposite side.
- Take hole plugs 4 to the empty holes on the opposite side.
- Place lower door 10 over door lower pin 18 and close onto the cabinet.
- Unscrew fixing bracket 13. Position middle door hinge 12 onto lower door 10. Place fixing bracket 11 onto middle door hinge 12 and screw together firmly onto the cabinet.
- Place upper door 14 over middle door hinge 12 and position upper door hinge 15 over upper door 14, then screw upper door hinge 15 firmly onto the opposite side of the original position.
ELECTRICAL CONNECTION (FOR UK TYPE PLUG)
For your safety, please read the following information.
Warning: This appliance must be earthed.
This appliance operates from 220-240 volts and should be protected by a 13 amp fuse in the plug.
The appliance is supplied with a standard 13 amp 3-pin mains plug fitted with a 13-amp fuse. Should the fuse require replacement, it must be replaced with a fuse rated at 13 amp and approved to BS1362.
If the mains plug which is fitted is unsuitable for the socket outlet in your home or is removed for any other reason, please follow the instructions below on how to wire a 13 amp 3 pin plug.
How to wire a 13 amp plug.
Important
The wires in the mains lead on this appliance are coloured in accordance with the following code:
Green and Yellow - Earth
Blue – Neutral
Brown – Live

As the colours may not correspond with the markings identifying the terminals in your plug, proceed as follows.
The green and yellow wire must be connected to the terminal in the plug which is marked with the letter E or with the earth symbol or coloured green and yellow.
The blue wire must be connected to the terminal marked N.
The brown wire must be connected to the terminal marked L.
You must make sure the lead is firmly secured under the cord clamp.
| EN | PRODUCT FICHE | |
| 1 | Brand | STOVES |
| 2 | Model | Stoves 7030FF |
| 3 | Product category | 7 (Freezer - Fridge) |
| 4 | Energy class | A+ |
| 5 | Annual energy consumption* | 274 kWh |
| 6 | Total gross volume | 256 l |
| 7 | Total net volume | 243 l |
| 8 | Refrigerator gross volume | 181 l |
| 9 | Refrigerator net volume | 180 l |
| 10 | Chiller compartment net volume | - |
| 11 | Freezer gross volume | 75 l |
| 12 | Freezer net volume | 63 l |
| 13 | Star rating | **** |
| 14 | Refrigeration system | Freezer: NO FROSTFridge: STATIC |
| 15 | Temperature rise time (-18°C/-9°C) | 12 Hours |
| 16 | Freezing capacity | 3 kg / 24 h |
| 17 | Climate class ** | ST/N (16°C - 38°C) |
| 18 | Noise emission | 41 dB(A) |
| * | Energy consumption of 274 kWh per year, calculated on the basis of results obtained in 24 hours under normalised test conditions. Real energy consumption depends on the conditions in which the equipment is used as well as where it is placed. | |
| ** | This appliance is designed for use at an ambient temperature within the 16°C - 38°C range. | |
Customer Care
Please keep this handbook in a safe place as the information inside may be of use should you sell or pass on the appliance. Please fill in the model number and serial number in the spaces provided below as they will assist us should you need to call.
03448 153740
When you dial this number, you will hear a recorded message and be given several options. This indicates that your call has been accepted and is being held in a queue. Calls are answered in strict rotation as our Customer Care
Model No
| 4 | 4 | 4 |
Serial No
Representatives become available.
Enter appliance numbers here for future reference:
These numbers can be found on your appliance's data badge. Outside the UK and Northern Ireland, refer to your local supplier.

Stoney Lane, Prescot, Merseyside, L35 2XW.
CE

- CONTENTS
- BEFORE USING THE APPLIANCE
- HOW TO OPERATE THE APPLIANCE
- FOOD STORAGE IN THE APPLIANCE
- CLEANING AND MAINTENANCE
- TRANSPORTATION AND CHANGING OF INSTALLATION POSITION
- BEFORE CALLING YOUR AFTER SALES SERVICE
- PARTS OF THE APPLIANCE AND THE COMPARTMENTS
- PART - 1. BEFORE USING THE APPLIANCE
- GENERAL WARNINGS
- OLD AND OUT-OF-ORDER FRIDGES
- NOTES
- SAFETY WARNINGS
- INSTALLING AND OPERATING YOUR FRIDGE FREEZER
- BEFORE USING YOUR FRIDGE FREEZER
- INFORMATION ON THE FROST FREE TECHNOLOGY
- THERMOSTAT SETTING
- COOLING COMPARTMENT
- FRIDGE COMPARTMENT THERMOSTAT KNOB
- WARNINGS FOR TEMPERATURE SETTINGS
- ACCESSORIES
- BOTTLE HOLDER (IN SOME MODELS)
- FRESH DIAL
- REFRIGERATOR COMPARTMENT
- FREEZER COMPARTMENT
- PART 4. CLEANING AND MAINTENANCE
- THE POWER SUPPLY MUST BE DISCONNECTED
- DEFROSTING
- REPLACING LED LIGHTING
- PART - 5. TRANSPORTATION AND CHANGING OF INSTALLATION POSITION
- WHAT TO DO IF YOUR APPLIANCE DOES NOT OPERATE
- CHECK THAT
- WHAT TO DO IF YOUR APPLIANCE PERFORMS POORLY
- IF THERE IS NOISE
- IF THERE IS WATER IN THE LOWER PART OF THE REFRIGERATOR
- RECOMMENDATIONS
- TIPS FOR SAVING ENERGY
- PART - 7. PARTS OF THE APPLIANCE AND THE COMPARTMENTS
- INSTALLATION
- DOOR REVERSING
- ELECTRICAL CONNECTION (FOR UK TYPE PLUG)
- WARNING: THIS APPLIANCE MUST BE EARTHED
- HOW TO WIRE A 13 AMP PLUG
- CUSTOMER CARE
Brand : STOVES
Model : INT70FF
Category : Refrigerator